What the demo provides
The fauna-gatsby-comments repo is a comment system for a Gatsby blog: a form for readers, an admin area for approving or deleting comments, Netlify Identity for authentication, and Netlify serverless functions in front of an Apollo/GraphQL API that writes to a FaunaDB collection. The working app is deployed for inspection, and the code lives at github.com/PaulieScanlon/fauna-gatsby-comments.
No matter which stack you use, or where you're deploying your app, FaunaDB gives you effortless, low-latency and reliable access to your data via APIs familiar to you
Setting up the project
Clone the repo, then install dependencies at the root:
npm installThe Netlify function is a separate package with its own dependencies, so cd into functions/apollo-graphql and install there as well. You will also need the Netlify CLI.
Three environment files belong at the project root, added by hand: .env, .env.development and .env.production. Their contents follow the same pattern:
GATSBY_FAUNA_DB =
GATSBY_FAUNA_COLLECTION =
GATSBY_FAUNA_DB =
GATSBY_FAUNA_COLLECTION =
GATSBY_SHOW_SIGN_UP = true
GATSBY_ADMIN_ID =GATSBY_FAUNA_DB =
GATSBY_FAUNA_COLLECTION =
GATSBY_SHOW_SIGN_UP = false
GATSBY_ADMIN_ID =GATSBY_FAUNA_DB— the FaunaDB secret key for your databaseGATSBY_FAUNA_COLLECTION— the FaunaDB collection nameGATSBY_SHOW_SIGN_UP— hides the Sign up button in productionGATSBY_ADMIN_ID— a user id generated by Netlify Identity
You can preview the app with gatsby develop or yarn develop at http://localhost:8000, and fill in these values as you go.
FaunaDB setup
Database, collection and server key
Sign up at fauna.com, then create a database (NEW DATABASE); the demo uses fauna-gatsby-comments. Create a collection (NEW COLLECTION); the demo uses demo-blog-comments.

Under SECURITY, create a server key with the database selected as its scope, the Role set to Admin, and a name (the demo uses demo-blog-server-key).

Copy the key into GATSBY_FAUNA_DB and the collection name into GATSBY_FAUNA_COLLECTION, in all three env files. The .env values cover local testing of the operations below.
Comment operations
Creating a comment
The first operation lives in boop.js:
// boop.js
...
// CREATE COMMENT
createComment: async () => {
  const slug = "/posts/some-post"
  const name = "some name"
  const comment = "some comment"
  const results = await client.query(
    q.Create(q.Collection(COLLECTION_NAME), {
      data: {
        isApproved: false,
        slug: slug,
        date: new Date().toString(),
        name: name,
        comment: comment,
      },
    })
  )
  console.log(JSON.stringify(results, null, 2))
  return {
    commentId: results.ref.id,
  }
},
...
Here q is the instance of faunadb.query, Create adds an entry to a collection, and Collection names the collection on its first argument while taking the data object as its second.
That data object is the shape driving the whole comment system. In this scratch version slug, name and comment are hard-coded; in the finished app they arrive through args from the input form on each post. The fields break down as follows:
isApproved— status of the comment,falseby default until approved in Adminslug— path of the post the comment belongs todate— timestamp of the commentname— the name entered in the formcomment— the text entered in the form
The return value matters little, since the reader only ever sees a success or failure state; if you wanted more, you could surface it in the UI by returning something from createComment.
With the values hard-coded, run the script from the CLI:
node boop createCommentA successful run logs the new comment to the terminal, and the entry shows up under COLLECTIONS in FaunaDB.
{
   "ref": {
     "@ref": {
       "id": "263413122555970050",
       "collection": {
         "@ref": {
           "id": "demo-blog-comments",
           "collection": {
             "@ref": {
               "id": "collections"
             }
           }
         }
       }
     }
   },
   "ts": 1587469179600000,
   "data": {
     "isApproved": false,
     "slug": "/posts/some-post",
     "date": "Tue Apr 21 2020 12:39:39 GMT+0100 (British Summer Time)",
     "name": "some name",
     "comment": "some comment"
   }
 }
 { commentId: '263413122555970050' }
Change the hard-coded name and comment, run the command again, and repeat until at least three comments sit in the database; the next steps use them:
node boop createCommentDeleting by id
Deletion takes the commentId of an existing comment — the id inside the ref.@ref object. As with creation, the return value is unimportant unless you want to feed something back to the UI from deleteCommentById.
In this function, client is the FaunaDB client instance, query retrieves data from FaunaDB, q is the faunadb.query instance, Delete removes entries from a collection, Ref is the unique reference identifying an entry, and Collection is where the data lives:
// boop.js
...
// DELETE COMMENT
deleteCommentById: async () => {
  const commentId = "263413122555970050";
  const results = await client.query(
    q.Delete(q.Ref(q.Collection(COLLECTION_NAME), commentId))
  );
  console.log(JSON.stringify(results, null, 2));
  return {
    commentId: results.ref.id,
  };
},
...
Run it with a hard-coded commentId:
node boop deleteCommentByIdBack under COLLECTIONS, that entry should be gone.
Indexes and queries
An INDEX lets you query with a specific term and return a defined data shape. Used with GraphQL or TypeScript, this means responses carry only the data you need in a predictable shape, which makes typing them straightforward — a contrast with APIs that return one oversized object of mostly irrelevant values.
get-all-comments
Under INDEXES, click NEW INDEX, name it get-all-comments, and set the source collection to the one from earlier.

Add the values in exactly this order and spelling — ref, data.isApproved, data.slug, data.date, data.name, data.comment — then click SAVE. On the free tier these values cannot be amended after creation; a mistake means deleting the index and starting over.
// boop.js
...
// GET ALL COMMENTS
getAllComments: async () => {
   const results = await client.query(
     q.Paginate(q.Match(q.Index("get-all-comments")))
   );
   console.log(JSON.stringify(results, null, 2));
   return results.data.map(([ref, isApproved, slug, date, name, comment]) => ({
     commentId: ref.id,
     isApproved,
     slug,
     date,
     name,
     comment,
   }));
 },
...
In the query, client is the FaunaDB client instance, query fetches data, q is the faunadb.query instance, Paginate paginates responses, Match returns matched results, and Index names the index just created. Results come back as an array in the shape defined by the index values:
node boop getAllCommentsget-comments-by-slug
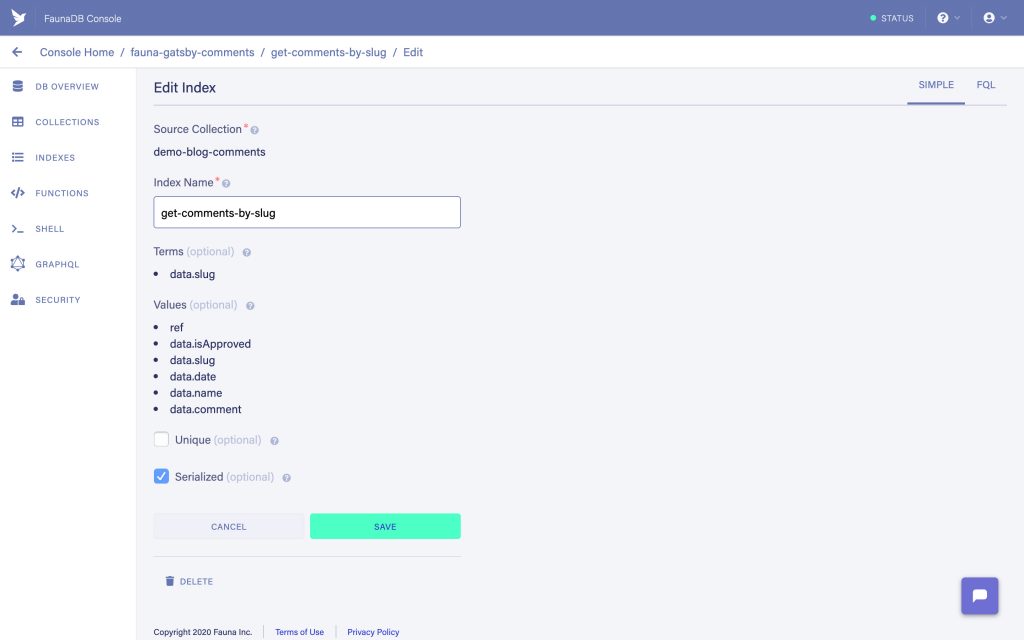
A second index restricts the query to one post. Create it the same way, name it get-comments-by-slug, point it at the same source collection, and add data.slug to the Terms field. The values are identical to the list above, and again you save afterwards.
// boop.js
...
// GET COMMENT BY SLUG
getCommentsBySlug: async () => {
  const slug = "/posts/some-post";
  const results = await client.query(
    q.Paginate(q.Match(q.Index("get-comments-by-slug"), slug))
  );
  console.log(JSON.stringify(results, null, 2));
  return results.data.map(([ref, isApproved, slug, date, name, comment]) => ({
    commentId: ref.id,
    isApproved,
    slug,
    date,
    name,
    comment,
  }));
},
...
The function's parts match the previous query — client, query, q, Paginate, Match, Index — and it returns an array shaped by the index values, this time narrowed by the term:
node boop getCommentsBySlugApproving by id
Because isApproved is written as false, new comments stay out of the app until approved. Approval takes a hard-coded commentId from one of the earlier comments. In this function, Update is FaunaDB's method for updating an entry, alongside client, query, q, Ref and Collection as before:
// boop.js
...
// APPROVE COMMENT BY ID
approveCommentById: async () => {
  const commentId = '263413122555970050'
  const results = await client.query(
    q.Update(q.Ref(q.Collection(COLLECTION_NAME), commentId), {
      data: {
        isApproved: true,
      },
    })
  );
  console.log(JSON.stringify(results, null, 2));
  return {
    isApproved: results.isApproved,
  };
},
...
Run it from the CLI with that id:
node boop approveCommentByIdRe-running getCommentsBySlug should now show the isApproved status flipped to true for that entry:
node boop getCommentsBySlugThese are all the operations the app needs to manage its data. In the repo, functions/apollo-graphql/apollo-graphql.js holds each of them, with the hard-coded values replaced by the args passed in from the app's various parts.
Deploying to Netlify
Push the repo to GitHub — initialise git locally, add a remote, push upstream — then link it to Netlify's Continuous Deployment by clicking "New site from Git" on the Netlify dashboard, authorising GitHub access and selecting the gatsby-fauna-comments repo. One deploy is needed to get a public URL, something like https://ecstatic-lewin-b1bd17.netlify.app; rename it if you like, but note it down for the Identity step.

In Netlify, go to Settings → Build and deploy → Environment, or scroll to Environment variables, and click Edit variables. Add:
GATSBY_SHOW_SIGN_UP = false
GATSBY_FAUNA_DB = you FaunaDB secret key
GATSBY_FAUNA_COLLECTION = you FaunaDB collection name
Also change the Sensitive variable policy to Deploy without restrictions.
Identity and admin access
Becoming the admin means creating an identity through the Netlify Identity Widget. After the Continuous Deployment step, open the Identity page in Netlify and click Enable Identity.

From here on, run the app with netlify dev rather than gatsby develop or yarn develop: the app relies on "special" Netlify methods that require netlify dev to spin up the necessary processes.
- Start the app with
netlify dev - Go to
http://localhost:8888/admin/ - Click Sign Up in the header
Point the Identity widget at the deployed app URL from earlier; a prompt in the pop-up window offers Set site's URL. Complete the sign-up steps, confirm your identity via the email that follows, and refresh the Netlify Identity page — you should appear as a user.
To log in, find Identity.js in src/components and temporarily un-comment the console.log() on line 14, which logs the Netlify Identity user object to the console. Restart the local server, start the app with netlify dev, and click Login in the header. The console should print netlifyIdentity.currentUser:; copy the value of its id key and set it as GATSBY_ADMIN_ID = in both .env.production and .env.development. Then remove or re-comment the console.log() on line 14 of Identity.js.
GATSBY_ADMIN_ID = your Netlify Identity user idRestart the local server and run netlify dev once more; logging in at http://localhost:8888/admin/ should now work as Admin. Note that development now uses localhost:8888, not the usual Gatsby localhost:8000.
For the deployed environment, add the Identity user id to Netlify's Environment variables (Settings → Build and deploy → Environment → Edit variables):
GATSBY_ADMIN_ID = your Netlify Identity user idWorking with comments
Post a few comments on each post, then return to the Admin page and either approve or delete them. Only approved comments appear on a post, and deleted ones are gone permanently.