
Why Documentation Quality Matters — and Why It Gets Neglected
Teams often struggle to keep documentation accurate and clear. When a team member tries to build on an existing feature but can't understand how it works from the docs, productive hours are lost. Poor documentation also damages the customer experience. For API products specifically, documentation serves as the primary advertisement for technical stakeholders. In an IBM study, 90% of respondents said the quality of a product's documentation influenced their purchasing decisions.
Yet engineering teams frequently deprioritize documentation work. The main culprit: documentation typically lives outside the main codebase, making it cumbersome to find and update. It's not uncommon to see docs stored in spreadsheets or proprietary content management systems. This separation breaks developer flow and adds friction to what should be a straightforward process.
Automating documentation solves this by applying standard software development practices. That means writing docs in Markdown, using a CI/CD pipeline (here, GitHub Actions) to run tasks like error correction and deployment, and employing linters like Vale to enforce a style guide and catch grammatical issues automatically.
Style Guides: The Foundation
A style guide keeps documentation cohesive, even when multiple teams contribute. It defines your company's voice and tone — covering concepts, vocabulary, verbosity, grammar, and punctuation — against core brand values. For example, the transit app TAPP uses a style guide organized as a table: the header announces company values like efficiency, trustworthiness, and accessibility, while the left column lists the components of written material.
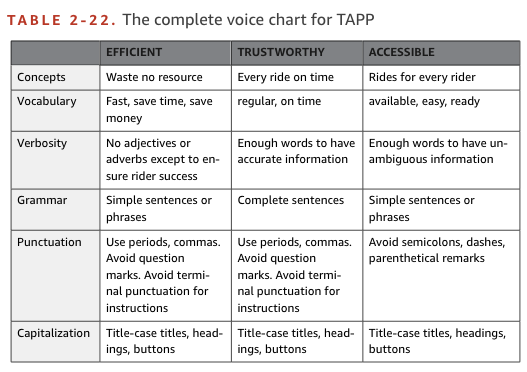
This table format makes it clear for engineers and copywriters alike what capitalization and punctuation to use. Larger organizations take a different approach. Microsoft's style guide is an entire website covering everything from acronyms to bias-free communication. Google also maintains its own comprehensive style guide.
The problem with style guides is friction. Writers don't stop mid-thought to consult a reference every time a question arises. The Microsoft Style Guide, for instance, spans over a thousand pages — hardly a quick reference.
Bringing Linters and CI/CD to Documentation
Programmers know linters as tools that enforce coding standards on a team. The same concept applies to documentation. Setting up a linter establishes a quality benchmark for your writing. Here, that linter is Vale.
Linting pairs naturally with continuous integration and continuous deployment (CI/CD). CI automates the building and testing of documentation; CD automates its release. While many tools can implement a CI/CD workflow, GitHub Actions is particularly convenient because it runs CI directly inside a GitHub repository — no third-party service like CircleCI or Travis required.
GitHub Actions are event-driven: they fire when something occurs, like a pull request or issue. In the setup we'll walk through, the action triggers when changes are pushed to the main branch.
Creating the GitHub Workflow
Start by creating a GitHub repository. Locally, create a folder and cd into it:
mkdir automated-docs
cd automated-docs
Initialize the directory for Git:
git initThen create a workflows directory in your project folder:
mkdir .github/ && cd .github/ && mkdir workflows/ && cd workflows/Workflows store all GitHub actions. Inside the workflows folder, create a new workflow file. Name it vale.yml:
touch vale.ymlVale.yml is a YAML file that will hold actions and jobs. Open it in a text editor:
nano vale.ymlCopy this base workflow into vale.yml:
# This is a basic workflow to help you get started with Actions

name: CI

# Controls when the workflow will run
on:
  # Triggers the workflow on push or pull request events but only for the main branch
  push:
    branches: [ main ]
  pull_request:
    branches: [ main ]

  # Allows you to run this workflow manually from the Actions tab
  workflow_dispatch:

# A workflow run is made up of one or more jobs that can run sequentially or in parallel
jobs:
  # This workflow contains a single job called "build"
  build:
    # The type of runner that the job will run on
    runs-on: ubuntu-latest

    # Steps represent a sequence of tasks that will be executed as part of the job
    steps:
      # Checks-out your repository under $GITHUB_WORKSPACE, so your job can access it
      - uses: actions/checkout@v2

      # Runs a single command using the runners shell
      - name: Run a one-line script
        run: echo Hello, world!

      # Runs a set of commands using the runners shell
      - name: Run a multi-line script
        run: |
          echo Add other actions to build,
          echo test, and deploy your project.
        env:
          GITHUB_TOKEN: ${{secrets.GITHUB_TOKEN}}
The key syntax elements are:
name: the workflow's name, a string.on: controls the workflow and its triggers.jobs: sets up and controls actions. Select the environment (Ubuntu is usually a safe choice) and define actions here.
GitHub maintains a full guide on workflow syntax and variables.
Configuring the Vale Action
Next, customize the workflow to run Vale. Change the YAML file's name to Docs-Linting:
# This is a basic workflow to help you get started with Actions.

name: Docs-Linting
The action should run once changes are pushed to the main branch — not on pull requests, so remove that trigger from the YAML:
on:
  # Triggers the workflow on push or pull request events but only for the main branch
  push:
    branches: [ main ]
The jobs section is the heart of the file, responsible for running the actions:
jobs:
  build:
    runs-on: ubuntu-latest
    steps:
    - name: Checkout
      uses: actions/checkout@master
The actions run on the latest Ubuntu version. The Checkout action pulls the repository so the workflow can access it. Then add the Vale action:
  - name: Vale
      uses: errata-ai/[email protected]
      with:
        debug: true
        styles: |
          https://github.com/errata-ai/write-good/releases/latest/download/write-good.zip
          https://github.com/errata-ai/Microsoft/releases/latest/download/Microsoft.zip

      env:
        GITHUB_TOKEN: ${{secrets.GITHUB_TOKEN}}
The action is named Vale. The uses variable specifies the Vale version (ideally the most recent). Within with, debug is set to true.
The styles section attaches a style guide. Here, we apply write-good and Microsoft's official style guide, though other style guides are also available. The env section requires a secret token for authentication.
The finished action should look like this:
# This is a basic workflow to help you get started with Actions.

name: Docs-Linting

# Controls when the action will run.
on:
  # Triggers the workflow on push or pull request events but only for the main branch
  push:
    branches: [ main ]

  # Allows you to run this workflow manually from the Actions tab
  workflow_dispatch:

jobs:
  prose:
    runs-on: ubuntu-latest
    steps:
    - name: Checkout
      uses: actions/checkout@master

    - name: Vale
      uses: errata-ai/[email protected]
      with:
        debug: true
        styles: |
          https://github.com/errata-ai/write-good/releases/latest/download/write-good.zip
          https://github.com/errata-ai/Microsoft/releases/latest/download/Microsoft.zip

      env:
        GITHUB_TOKEN: ${{secrets.GITHUB_TOKEN}}
Save, commit, and push to GitHub:
git add .github/workflows/vale.yml
git commit -m "Added github repo to project"
git push -u origin main
The Vale Configuration File
Navigate to the project's root directory and create the config file with touch .vale.ini. Open it in a text editor and add:
StylesPath = .github/styles
MinAlertLevel = warning

[formats]
Markdown = markdown

[*.md]
BasedOnStyles = write-good, Microsoft
Each line serves a specific purpose:
StylesPath = .github/styles: points to where Vale styles are stored.MinAlertLevel = warning: sets the minimum severity for alerts. Options aresuggestion,warning, anderror.[formats]withMarkdown = markdown: specifies the file format.[*.md]withBasedOnStyles = write-good, Microsoft: runs both style guides on all Markdown files ending in.md.
This configuration is the bare minimum. Save the file, commit, and push:
git add .vale.ini
git commit -m "Added Vale config file"
git push -u origin main
Putting the Pipeline to Work
With the Vale configuration and GitHub Actions workflow in place, the next step is to see the whole setup in action. Create a new Markdown file at the root of your project with touch getting-started.md, then fill it with placeholder text generated from DeLorean Ipsum. Paste the generated text into the file in your editor.
# Getting Started Guide

I can’t play. It’s my dad. They’re late. My experiment worked. They’re all exactly twenty-five minutes slow. Marty, this may seem a little foreward, but I was wondering if you would ask me to the Enchantment Under The Sea Dance on Saturday. Well, they’re your parents, you must know them. What are their common interests, what do they like to do together?

Okay. Are you okay? Whoa, wait, Doc. What, well you mean like a date? I don’t wanna see you in here again.

No, Biff, you leave her alone. Jesus, George, it’s a wonder I was ever born. Hey, hey, keep rolling, keep rolling there. No, no, no, no, this sucker’s electrical. But I need a nuclear reaction to generate the one point twenty-one gigawatts of electricity that I need. I swiped it from the old lady’s liquor cabinet. You know Marty, you look so familiar, do I know your mother?
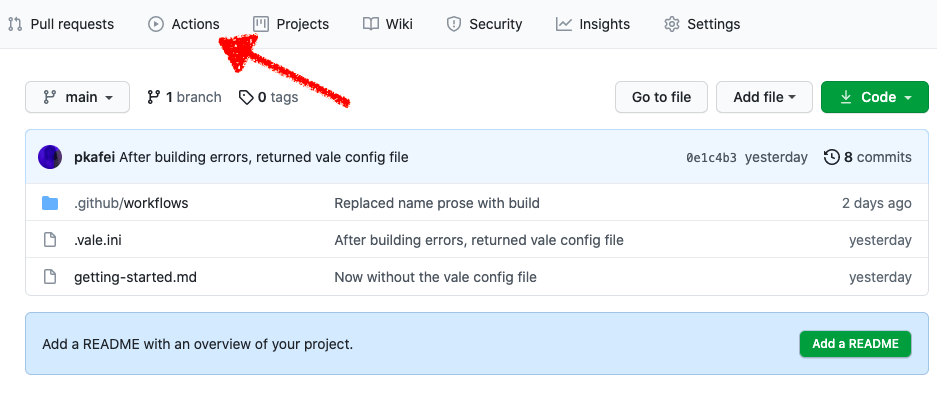
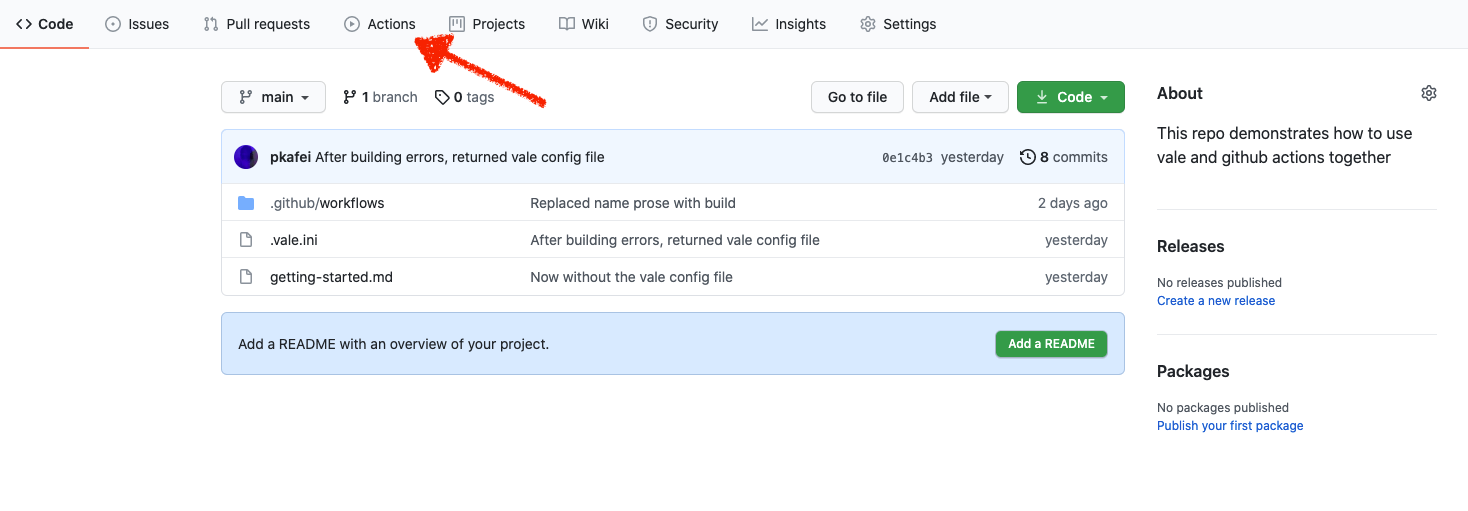
Save the file, commit it locally, and push it to GitHub. From your repository page, open the Actions tab. The left sidebar lists all workflows associated with the repository—in this case, just the single one named Docs-Linting, which matches the name given in the vale.yml file.
Pushing the documentation file triggers the workflow automatically. When the run completes successfully, a green checkmark appears next to it.

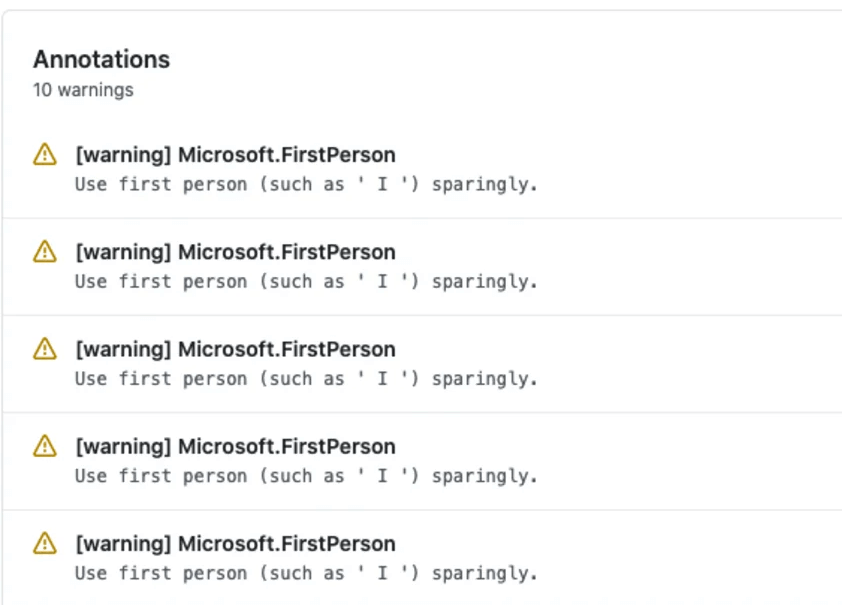
Click on “Added docs” to open the detailed report. The output shows a total of 11 warnings from Vale. The one flagged as a “weasel word” is a good demonstration of how to fix a style issue. Return to getting-started.md in your editor and delete the word “exactly” that triggers the warning.
# Getting Started Guide

I can’t play. It’s my dad. They’re late. My experiment worked. They’re all twenty-five minutes slow. Marty, this may seem a little foreward, but I was wondering if you would ask me to the Enchantment Under The Sea Dance on Saturday. Well, they’re your parents, you must know them. What are their common interests, what do they like to do together?

Okay. Are you okay? Whoa, wait, Doc. What, well you mean like a date? I don’t wanna see you in here again.

No, Biff, you leave her alone. Jesus, George, it’s a wonder I was ever born. Hey, hey, keep rolling, keep rolling there. No, no, no, no, this sucker’s electrical. But I need a nuclear reaction to generate the one point twenty-one gigawatts of electricity that I need. I swiped it from the old lady’s liquor cabinet. You know Marty, you look so familiar, do I know your mother?
Commit and push the revision. This again fires the GitHub action. Opening the new run, labeled “Deleted the weasel word,” shows the warning count has dropped to 10, with the weasel word warning gone from the list.
At this point, the workflow is fully functional:
- Documentation was added to the repository,
- The Vale GitHub action was triggered automatically on push,
- A style violation was corrected and the fix was pushed back to GitHub.
Treating Docs Like Code
With distributed teams becoming the norm, investing in solid documentation practices matters more than ever. The first requirement is defining what “good” looks like—that means establishing a style guide that encodes your rules. Once those guidelines are specified, automation takes over the enforcement.
Documentation should be treated with the same discipline as a codebase: a living artifact that gets regular updates and improves with each revision.