

Why face cams matter
Recording yourself on video is rarely the actual job — the job is making a point, explaining a concept, or telling a story. But the recording process itself can quietly become the bottleneck. If you're doing everything solo, every minute spent fighting gear is a minute stolen from research, writing, and editing. The goal isn't to build a broadcast studio; it's to reduce the number of ways a shoot can go wrong.
Some classes of failure are obvious: dead batteries, full SD cards, forgotten power switches. But the subtle ones are worse — a mic that's recording but clipping, a subject slightly out of frame, a background noise that only shows up in post. A camera screen that flips around helps you see *some* of these problems, but only if you remember to look, and only for the problems it can show you.
Over years of shooting, common failure modes have accumulated: the camera isn't recording, the external mic isn't powered, the SD card runs out mid-take, the room has a hum you didn't notice until playback. The fix isn't to buy more gear. It's to eliminate entire categories of failure by design. If you can't forget to turn something on, you won't.
Dummy batteries address one such category. They're battery-shaped blocks with a cable running to a power supply, so an "empty battery" is no longer a reason to stop. The only remaining task is to actually turn the camera off at the end of the day.
Spending money on this is only partly about quality. AV gear is an expensive hobby, and price sensitivities change as you realize that the cheapest option often costs more in reshoots and frustration than a slightly better one would have upfront.
Buying gear without losing time
The purchase itself is its own failure mode. There are no affiliate links in this article; everything points to manufacturers' sites, Wikipedia, or specialized resellers like Thomann for audio and Miss Numérique in France. The reseller list on any manufacturer's website is your friend — buying from a smaller outlet can get you better service and advice, not just a better conscience.
Marketplaces have their place. Amazon's return policy is genuinely strong, and the odd eBay purchase can surprise you, for better or worse. Chinese marketplaces like AliExpress do carry legitimate bargains, but you have to know exactly what you're looking for. Cheap 2160p@30 HDMI capture sticks in the €20 range, for instance, work fine as USB video class devices without drivers — but they look identical to endless broken variants.
Cameras want to fail
A DSLR or mirrorless camera feels like the obvious choice, and it can work. SD cards are cheap and capacious — 512 GB for around €100–150 — and with a decent tripod (never cheap out on kit that could drop expensive kit) you're theoretically done.
In practice, the camera becomes the problem. In some countries, tax rules shut cameras off after 30 minutes, on the assumption that a camera that records video is priced differently.
The mic is the first casualty: the image will hold whatever quality the lens offers, but the audio from a built-in mic is only good enough to prove the encoder is doing something. A shoe-mounted RODE VideoMic (around €280) solves that, but now the mic needs power, which means one more thing to switch on and off correctly.
Frame checking is the next gap. Unless you add a separate monitor, you can't verify that you're framed correctly while you speak. Slight off-center framing is barely noticeable, but being visibly out of frame means the take is over. If you also shoot against green screen, any drift from the correct position means extra keying work in post.
None of these problems are fatal on their own. Together, they compound into a long list of reasons to reshoot: gear that isn't on, batteries that die mid-sentence, audio that clips at the loudest word, a street construction crew that starts up exactly when you hit record.
Capturing clean audio for a face cam
If a face cam is your primary output, the microphone you pick is less about the price tag and more about matching the hardware to the room you're in. Shotgun mics like the RODE NTG4+ (~250 EUR) shine in outdoor or large spaces where you can aim at a specific source. Lavalier systems like the RODE Wireless GO II are excellent for noisy environments where proximity to the chest isolates the voice from ambient sound; the backup recording on the transmitter is a lifesaver if the connection drops. But for a quiet home office or garage, neither is ideal. A small room creates reflections that make shotgun mics and large-diaphragm condensers sound boxy and harsh unless you treat the surfaces, which quickly becomes a budget-heavy project.
I learned this the hard way. My early videos used a RODE NT1-A (~200 EUR) in a room full of bare walls and desks. It captured every reflection, and while de-reverb plug-ins like those in iZotope RX10 exist, they damage the recording in the process. Garbage in, garbage out — it's far easier to not record bad audio in the first place than to fix it later. I then moved to a RODE PodMic (~100 EUR) with XLR into a USB interface. Its tight cardioid pattern rejects room noise much more effectively, meaning you can get away with those reflective surfaces. Still, throw a couch in the room if you can.
Not fully satisfied, I eventually invested in the Shure SM7B (~400 EUR) plus a FetHead for clean gain, used with a quality USB interface I already owned.

It sounds perfect out of the box. At four times the PodMic's price, excluding the extra signal chain, it's pricey, but it eliminates the need for post-EQ chasing. It's not just a YouTuber fad — it's a genuinely solid, industry-standard mic. For mounting, after a cheap arm broke while I was away, I switched to the Rode PSA1 (~90 EUR). It clamps to the desk, moves easily to stay out of frame, though the metal tightening handle is a bit rough on the fingers.

Audio interfaces & 32-bit float recording
Forget 3.5mm jacks and Bluetooth for this work. You're dealing with USB or XLR. A built-in USB interface can signal a cheap mic (think Blue Yeti), but modern all-in-one packages like the Rode NT1-5 offer both XLR and USB, with a world-first 32-bit float digital output.
That means clipping is no longer a concern. With fixed-point integer audio (16-bit, 24-bit), setting gain too low uses only a fraction of the available precision — 10% amplitude on a 16-bit system yields ~6,000 values instead of 65,000. Setting gain too high causes clipping: a plosive or loud peak exceeds the representable range, clamping the wave flat and ruining the take irrecoverably.

This is why professionals use redundant setups — two lavs, or a second channel with -8/-12/-20dB gain as found on the RODE Wireless GO II, to salvage a clipped section in post. 32-bit floating-point recording, new on USB devices, sidesteps gain-setting entirely. An IEEE-754 float has a 23-bit significand, nearly as precise as 24-bit integer, and the exponent handles headroom so you can't mess up the record level. It takes more storage, but that's trivial next to video files.
My first dedicated video audio interface was the Focusrite Scarlett 2i2 4th Gen — small, well-built, and famously good.

These choices are often vibes-based trial and error, but they stick when they work. I recently upgraded to a Zoom UAC-232 specifically for its 32-bit float support on any XLR mic. The internal design uses two analog-digital converters at different gains, switching dynamically to avoid both noise floor and clipping. The manual details the scheme. Just remember that software configuration still matters — you're not automatically safe from clipping on the computer side.
For portability, I own a Zoom H4N Pro Black, which has decent built-in XY mics and XLR inputs. In practice, I rarely use it for studio face cams. It's slow to boot and adds another SD card and batteries to manage. As a USB interface it works, but you're tethered anyway, so a desktop unit is simpler. The rechargeable AAs are a hassle, though using the XY mics with studio headphones in the field is a genuinely different way to hear the world.
For post-processing, iZotope RX 10 Standard (currently 439 EUR, often on sale) is worth it for two plug-ins: "De-plosive" and especially "Mouth de-click." The latter addresses dry-mouth clicks that no amount of apple juice fixes — a problem I've battled through orthodontics — and justifies the entire bundle.
Monitoring with studio headphones
My daily drivers are the 250-ohm beyerdynamic DT 770 PRO. They're neutral enough for mixing, comfortable for long sessions, and recommended by friends who mix better than I do. Previously I used the Sennheiser HD-25 1-II — a classic with fully replaceable parts — but I wouldn't buy them at full price today unless budget were tight.
Avoid the trap of mixing on consumer speakers or Bluetooth headphones. Logitech computer speakers are extremely biased — what sounds good on them won't translate elsewhere. Wireless Sony WH-1000XM3 headphones introduce ~200-400ms latency that editing software only sometimes compensates for. I once published a video and noticed the audio-video sync issue only during the premiere on another device. Even wired, that Sony family is too colored for mixing; they excel at noise-cancelling commutes, not studio work.
Choosing a camera that isn't a webcam
The first instinct for many streamers is to reach for a purpose-built webcam, especially after dealing with the consistently poor quality of laptop-integrated cameras. Even paying a premium for a model like the Logitech BRIO—which advertises 4K and HDR—doesn't solve the fundamental issue.
The real constraint isn't the lens or sensor size (though those do limit depth of field), it's the connection. A quick calculation shows why: USB 2.0 has an effective throughput of around 35 MB/s. A single 3840x2160 frame in RGBX8888 format consumes roughly 32 MB, so transferring 30 of those per second is physically impossible, and these cameras don't unlock different formats on a USB 3.0 port.
Manufacturers get around this by compressing the signal, but not in a way that helps quality. While Logitech once partnered with Skype to use H.264 encoding for lower-bandwidth calls, modern models like the BRIO output MJPEG by default. The resulting JPEG artifacts are noticeable in any detailed scene, even if they go unnoticed on a typical video call. For production work, this is a dead end.
This leads to a different approach: use a real camera purely as a sensor, bypassing its storage and onboard recording entirely. The key requirements then become clean HDMI output and support for higher resolutions and frame rates than any webcam offers. Some cameras offer a USB "webcam mode," but that path reintroduces the same resolution and frame rate limitations found in dedicated webcams.
The Capture Chain: HDMI Cards, Recorders, and the Color Rabbit Hole
My journey into 4K60 capture began with the Elgato 4K60 Pro MK.2 (~250EUR), a PCI-e card that lured me in with its sleek design and solid performance—when it decided to cooperate. It gobbles up a PCI-e 4x lane, leaving me with no room for a second card after my GPU. It offers one HDMI in and one HDMI out (the latter I've never touched).

The card suffered from occasional "no signal" hiccups; a power cycle or a coffee break usually resolved them. Once it was running, though, it stayed running. The real headache emerged in OBS: full-resolution recording resulted in persistent dropped frames. I revisited it recently, assuming I'd misconfigured something, but user comments on their own guides confirm this is still an issue. So, for years, I've relied on the Elgato 4K Capture Utility instead.


The quality was acceptable once I pushed the bit rate to its 140 Mbps maximum. That extreme setting is crucial for green screen work. Without proper lighting, the green tones become unevenly lit and fall into darker ranges susceptible to bit-crushing during H.264 encoding. Codecs economize by compressing shadow detail, which causes visible banding—particularly noticeable in post-production.

Capturing at higher fidelity than the final render target is wise, much like audio. I experimented with 10-bit recording for extra flexibility, but no bit depth could compensate for my lack of proper lighting. Plus, 10-bit ushers in a labyrinth of color science complexities. It's often conflated with HDR, which isn't just about more shades—it involves different colorspaces (Rec.2020 vs. Rec.709), varied brightness standards (calibrated HDR400 hits 400 nits; superior displays reach 1000 nits), and formats like chroma subsampling where 4:4:4 is the only non-subsampled option, yet virtually nobody uses it. YouTube transcodes everything to YUV420P (4:2:0), giving one color sample per four pixels.
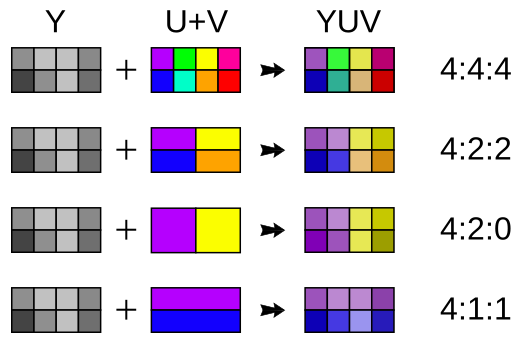
HDR mastering demands an obscenely expensive display; my editing software references values up to 4000 nits for Dolby Vision masters. Ideally, you'd produce separate SDR and HDR masters since most viewers lack proper HDR displays, but YouTube doesn't accommodate that. I abandoned HDR quickly and now target SDR for the foreseeable future, though I might revisit 10-bit strictly as an intermediate capture format. Ironically, my Elgato card refuses to work when my camera outputs 10-bit.
Cool Bear's hot tip: HD = high definition, SD = standard definition, HDR = high dynamic range, SDR = standard dynamic range.
The Atomos Ninja V Experiment
My portability ambitions led me to the Atomos Ninja V (~600EUR)—half the camera's price, yet undeniably impressive. The 1000-nit HDR display is gorgeous, packed with features like overexposure indicators, multi-input audio monitors, and expandable Wi-Fi casting. It records to codecs including ProRes, DNxHR, H.264, and H.265 (some requiring a paid unlock).


Its standout feature: it bypasses SD cards entirely, writing directly to SATA 2.5" SSDs housed in plastic caddies that slide in and out of the monitor. That's genuinely fun. But practicality soured the romance: the unit runs catastrophically hot, the fan noise is unusable in quiet environments, and its 4-second button hold to power down physically hurt after a session on a boiling-hot device. There's a strict list of compatible SSDs—mine required a month's wait. The hefty display mounts via a cold shoe (physical support without electronic connections), which is great for checking shots, but impossible to pair with my teleprompter that wraps around the camera. The Ninja V now collects dust, awaiting my resolve to sell it.


Software Workflow Woes and a Blackmagic Pivot
My Elgato software workflow grew tedious. The utility treated my external microphone as a separate file, producing three MP4s per recording:
- Camera mic audio only
- External mic audio only
- Video with both audio channels mixed together (not left/right)
Files named "Game" and "Live Commentary"—sensible for gameplay capture, less so for my purposes. Every take required manual realignment: unlinking video and audio in the editor, deleting the useless mixed-down track (with its 300ms delay offset between mics), aligning the external audio file, then zooming in to adjust timing by ~0.4 seconds if I hadn't done a clap sync. Repeat for every single take—I'd record entire hour-long videos in one take just to avoid the chore.

DaVinci Resolve's Capture panel hinted at native control via Blackmagic capture hardware. I purchased the cheapest viable option, the BlackMagicDeckLink Mini Recorder 4K (~215EUR), featuring one HDMI input and one 6G SDI input—my first encounter with SDI. Setup required drivers, and it couldn't coexist with the Elgato card, both demanding 4-lane slots.


My hopes were dashed: DaVinci Resolve cannot record live sources. It only acquires from a Cintel Film Scanner (I don't shoot 35mm) or a video tape recorder (VTR), which isn't the modern replacement I sought. However, the disappointment faded when I discovered the DeckLink performs flawlessly in OBS, even at 2160p25—my new target. More on that later.
Lighting: It’s All About the Flicker
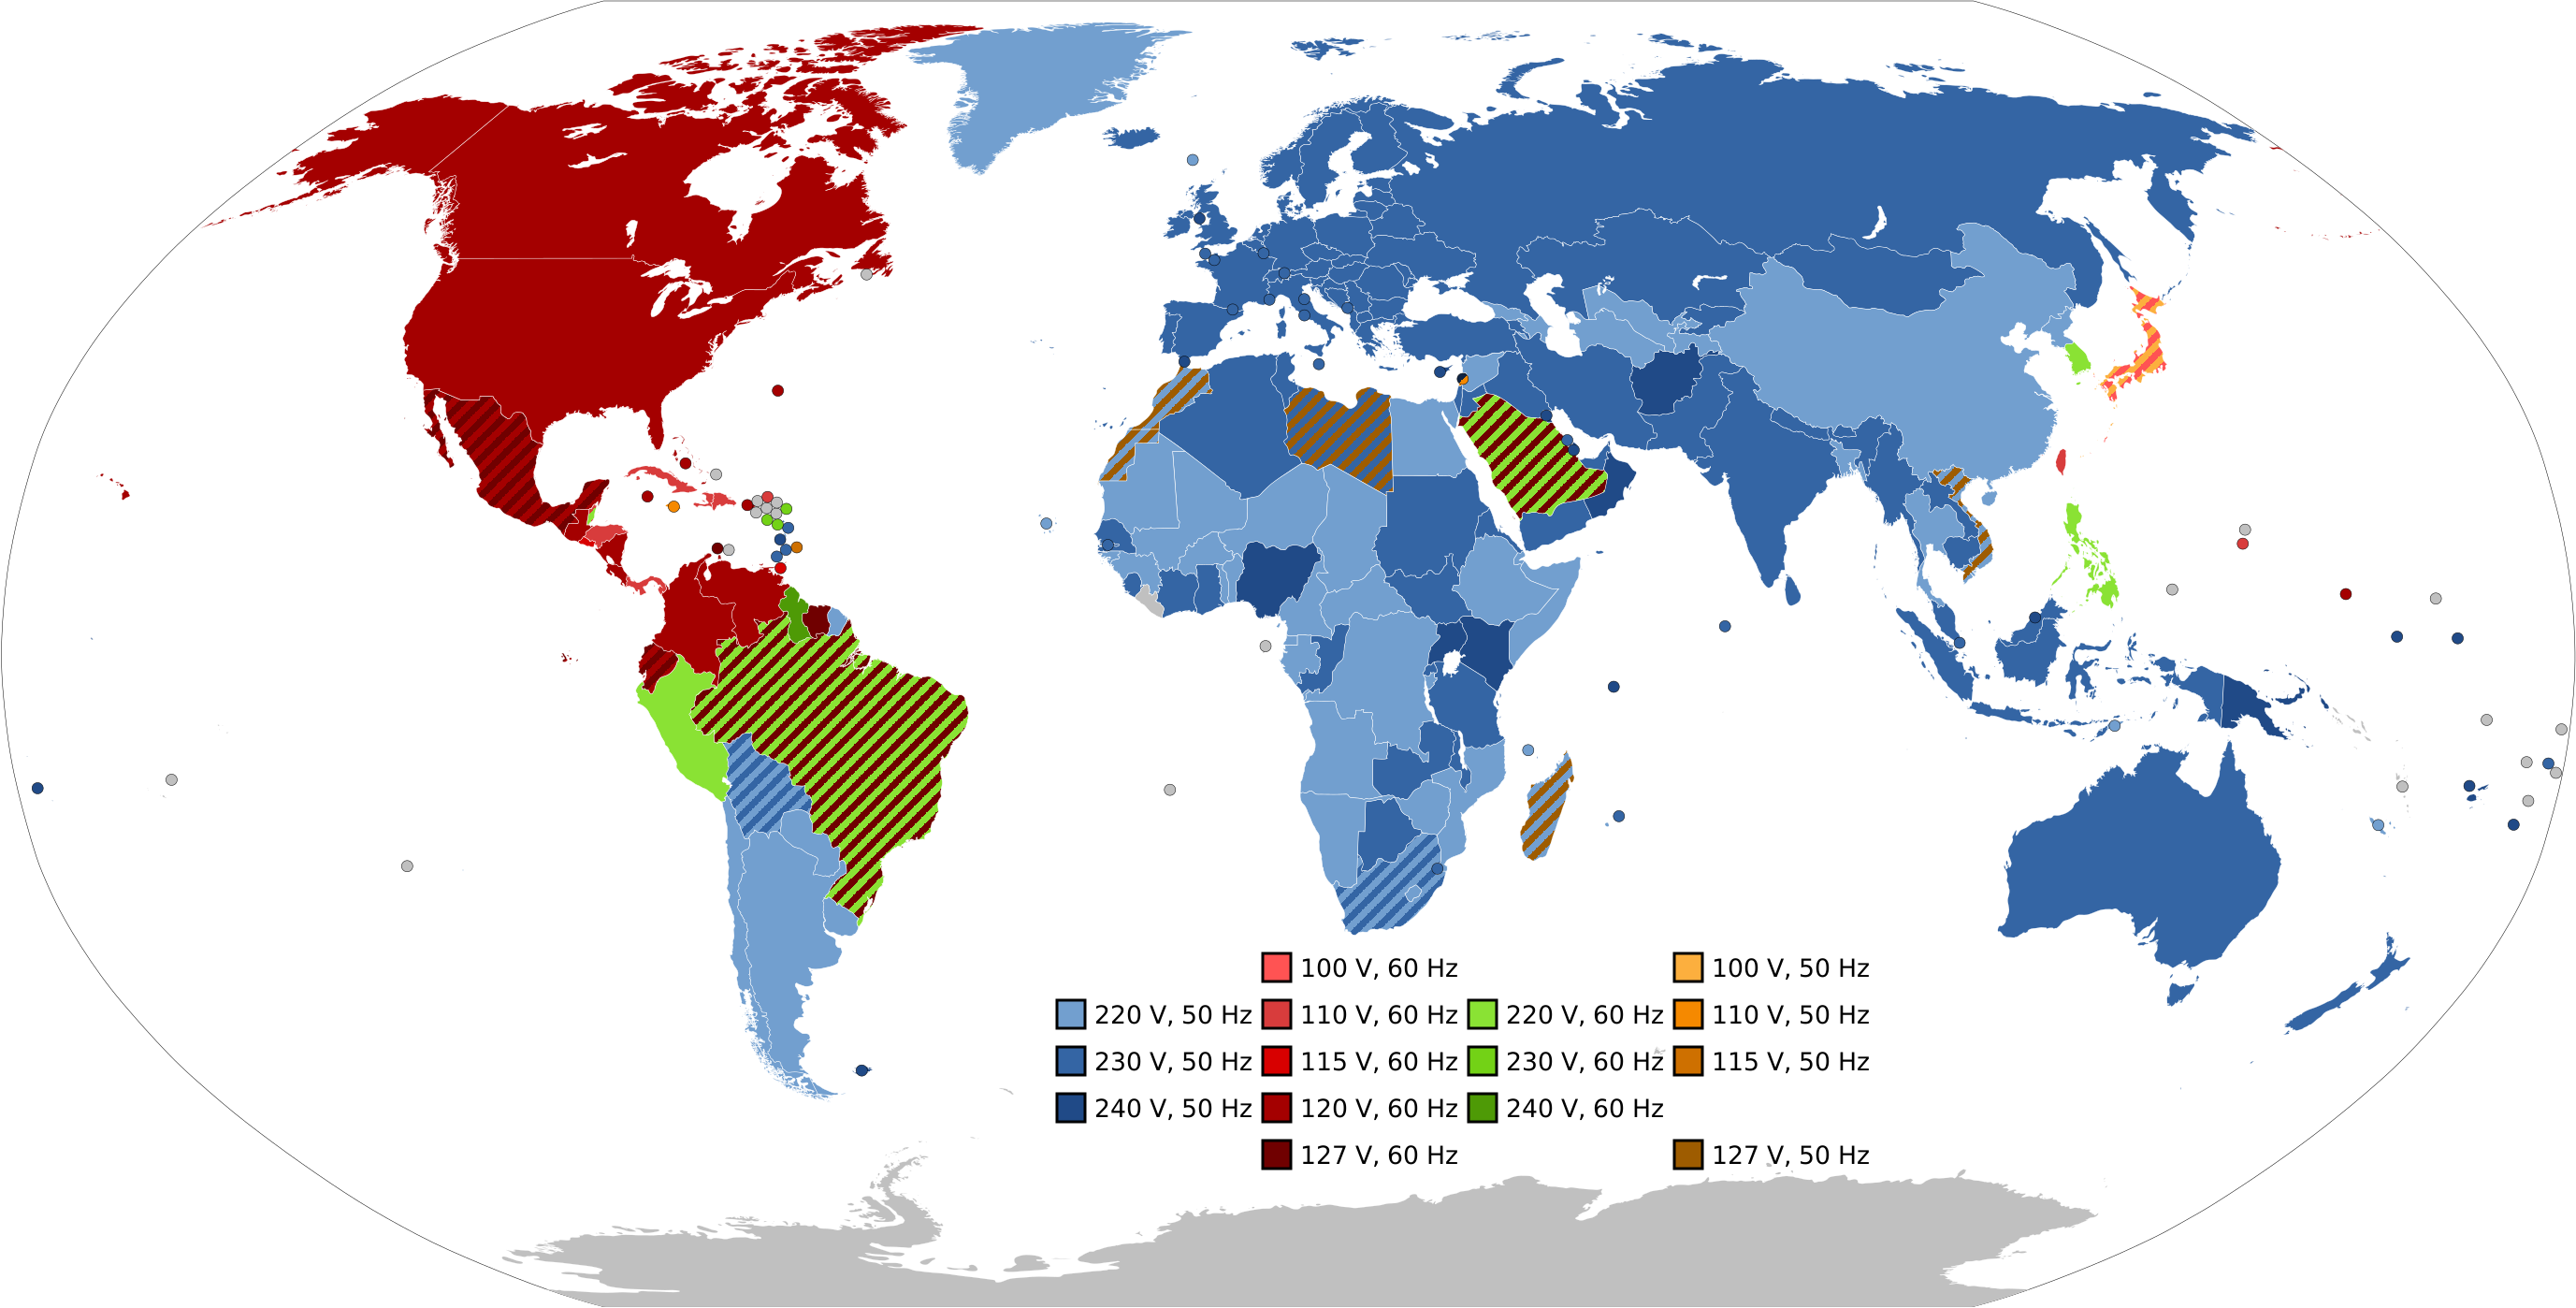
The frequency of alternating current depends on where you live: 50Hz in France and most of the world, 60Hz in the US and Japan. This determines legacy video standards like PAL (50Hz) and NTSC (60Hz). While modern cameras can switch their system frequency between 50Hz and 60Hz freely, lights are another story.
Your ceiling light is likely inadequate and flickers at the AC frequency—both LED and traditional bulbs do this. For a face cam, especially with green screen, you want soft, diffuse light. Soft boxes are made for this purpose. I started with an affordable set of two LED soft boxes, a huge step up despite my lack of attention to CRI (Color rendering index). However, they ran hot, generating an irritating high-pitched hiss from a small fan that was nearly impossible to remove in post.
I then switched to fluorescent soft boxes: five bulbs per box, arranged in three groups (2-1-2) with separate switches. They were fanless, providing good light without background noise, but they also ran hot and were enormous. Set-up and tear-down added 20 and 10 minutes respectively to every session, killing any spontaneity.
Sunnier alternatives were needed. The Elgato Key Light MK.2 (~180EUR) eventually proved ideal. The build quality and absence of noise were immediately apparent. The lights clamp to the desk, with good height adjustability and full directional control. They’re remotely controllable from my phone and computers to adjust brightness and temperature (2900K to 5000K). I connected them to Apple HomeKit via HomeBridge on a Raspberry Pi Zero 2 W, using them as desk lights facing the wall when not shooting.
I now own three, using two to light the green screen and one slightly off-center for highlights on my face. While heavy (I suffered a nail injury adjusting one), the keying is now easy without artifacts.
Flicker prevention is straightforward: in a 60Hz country, shoot at 60FPS or 30FPS; in a 50Hz country, shoot at 50FPS or 25FPS. I target 25FPS since high framerates aren’t necessary for face cams. The 4K Capture Utility only supported 60/30FPS, causing stuttering, but the DeckLink Mini Recorder 4K handles 25FPS input without issues.
Recording Software & Audio Sync
I’ve returned to OBS for recording after issues with the Elgato 4K Capture Utility. It was silently dropping video frames (visible as duplicates when scrubbing) and dropping audio frames entirely, leaving gaps in the waveform—both unacceptable for production.
OBS solved these problems, and after matching the delay between the video capture path and audio capture path—276 milliseconds, to be exact—the captured file is perfectly synchronized every time. This involves making other audio 276ms late to match the video input delay.
While OBS can use hardware encoding via NVENC with H.264, H.265, and AV1 on newer cards, the Elgato software insisted on H.264. Scrubbing issues in DaVinci Resolve were resolved by lowering the keyframe interval to 1 second, even with H.265.
For those with 32-bit float audio interfaces like the ZOOM UAC-232, OBS supports “FFmpeg PCM (32-bit float)” in MOV containers. However, this doesn’t deliver true 32-bit float performance via WASAPI on Windows. The path to this quality is through ASIO, Steinberg’s protocol that provides direct, low-latency access to external sound interfaces. Ableton Live achieves this with buffer sizes as low as 16, giving 1.67 ms input latency and 4.52 ms output latency—a massive improvement over the 171 ms input latency with MME/DirectX.
OBS lacks built-in ASIO support, but the Andersama/obs-asio plug-in provides an “ASIO Input Capture” input type that works flawlessly. ASIO does require exclusive control of a device, though the UAC-232’s separate input and output sides allow me to have OBS own the input while DaVinci Resolve owns the output.
Picking an editor: the trade-offs are real
Complaints about GIMP not being a Photoshop replacement are mild compared to the state of free video editing. I’ve tried every open-source “solution” out there, and at least back then, none of it was dependable. The tools people actually use for real work sit in a different class.
DaVinci Resolve was the first editor I used that didn’t feel held together by tape. It has a free edition. macOS support is best, Windows works if you insist, and Linux technically has binaries but is missing key codecs.

The other “real” editor I tried was Adobe Premiere Pro. Frustration with Resolve’s motion design capabilities pushed me there, along with curiosity about its text-based editing and After Effects integration. I never went as far as After Effects. As a Resolve user, Premiere’s color grading felt weak, and its keying (turning green screen transparent) was oddly limiting. I briefly considered using Resolve for keying and Premiere for editing, but that’s not a streamlined workflow.
Premiere’s text-based editing is the standout: once clips are transcribed, the transcript follows you into the timeline regardless of nesting depth. You can edit from the “Text” panel or the regular timeline, and the transcript updates. Subtitles can be generated from it. Since I insist on high-quality captions—if not hand-written, at least hand-fixed—having them in the editor sounded ideal.
But choosing between Premiere and Resolve means picking your poison.
Premiere is an original non-linear editor with functionality layered on. The memes about Adobe instability apply here too. The native part can crash and kill everything; the newer “HTML5” parts—like text-based editing—can crash and show a minified JavaScript stack trace in a panel that already looked out of place with its larger, lighter fonts. I edited a few shorts with it, but didn’t need a thousandth paper cut to cancel the 35 EUR/month subscription and move back to Resolve.

Meanwhile, Blackmagic had shipped their own transcription and text-based editing in Resolve 18.5, with far fewer stability problems. Both tools gaining this around the same time is no coincidence—it followed the arrival of solid speech-to-text models like OpenAI Whisper.
Why Resolve feels different
Resolve has no HTML5 layer—it’s all QT5—so the interface stays consistent. There are severe interface bugs, and the small group of us doing motion design in the Fusion tab with dual screens and character-level keyframing have hit that crash. But what professionals use day-to-day is solid.
Blackmagic’s core business is professional hardware: $6K 12K cameras, $7K hardware chroma keyers, a $20K audio console, a $32K film scanner.

Their software is “just a side gig”—a very successful one.
Getting comfortable took time. I started heavily using the timeline with clips and effects stacked. Over time, I moved toward fusion compositions. Blackmagic Fusion also ships standalone, but inside Resolve it’s the most flexible way to do nearly anything, despite integration bugs.
I hit the Color tab early for chroma keying. After trying various keyers (UltraKeyer worked best), I found a simpler route: add a 3D qualifier, paint over the green, invert it, crank despill to max, add an alpha channel output, connect the node. Done.

Despilling removes green that “spilled” onto parts you want to keep—hair, face, reflections in glasses.
Here’s the same image without despill (look at the hair):

Since the Color tab works on clips rather than source assets, I struggled to find a workflow. Often I keyed a one-hour take, chopped it up, then noticed a segment wasn’t keyed right—either I moved or lighting shifted. Fixing it meant the keying became inconsistent across cuts.
I tried “shared nodes” so updating one clip updated others after cutting, but that required a single source clip. Nested timelines—putting takes in their own timeline, dragging that onto another, coloring there, then slicing—worked but bogged down Resolve and turned me into a QA engineer hitting code paths nobody touches. Compound clips are similarly finicky.
The Color tab’s “Clips” panel allowed Ctrl+click to select multiple clips and middle-click a “template” clip to apply the same grade. Two issues remained: no way to select only face clips, and no way to copy grading across timelines (a few videos ago I started putting each video part in its own timeline).
The first problem I solved with “People” analysis:

Resolve asks who the person is, like phone photo apps do.

From the Clips dropdown, selecting the name shows only the face clips.

Manual metadata works too: in the Media tab, expand Metadata and pick “All groups” or “Shot & scene” to add keywords. Filtering by colors is also possible. Tagging feels like a waste until you’re 2.5 weeks into editing and wish you’d done it from the start.
Cross-timeline grading I solved by clicking around: the “Color” menu has “Memories.” Save memory A on one clip, load it on any clip in any timeline. With clips selected, a memory applies to all of them.

Now I can keep consistent keying and color for all takes, even if I tune mid-edit—which happens often since sponsored segments sit on white backgrounds where bad keying is obvious.
Power windows became necessary too: when removing green, you need a power window around yourself; otherwise everything outside the frame gets alpha of 1 instead of 0, and shrinking yourself to a corner leaves the rest black.

The power window interface is frustrating—dragging handles is useless, direct numeric entry works better. Like other Color tab settings, it can be copied via memories.
Fusion: the flexible way out
My videos have many screenshots with backgrounds removed so they blend with the “dark paper” backdrop (see C++ vs Rust: which is faster?).
At first I keyed them in the Color tab, but you can “open in fusion page” anything—stills (as Resolve calls images), Text+ nodes, whatever.

From there: slap on a 3D keyer, merge onto a background, scale, add masks for partial removal or progressive reveals with keyframes. Endless possibilities. Fusion was hard to learn, but tutorials and the thorough reference manual have paid off repeatedly.
Fusion was awkward mainly because I wanted animations synced to my voice, which lives on the Edit timeline across multiple clips. A Fusion composition is mostly interactive only from the Fusion tab. Text+ nodes are also Fusion compositions, but workable from the inspector. (As I write, I just learned about macro tools, which sound great.)
Opening a clip in Fusion plays its audio in sync, enabling animation “to the audio.” But opening a standalone composition, still, or Text+ node won’t—no media input exists. Adding a media input node may produce sound, but often out of sync or corrupted. I found a fix involving:
- Adding a media input (focus the node panel, Shift-Space, type “MI”, Enter)
- Making sure the composition starts at zero
- Clearing the audio cache liberally
The second point is tricky when Text+ has a default duration—it starts at zero but dragging its left handle changes that.

Fixing a non-zero start: in the Fusion tab, go to frame 0 (if the composition starts positive, extend the left handle in the Edit tab first), then in the Edit tab resize the clip to start there.

With start frame at zero and a media input, sound may still be wrong. Select the MediaIn node, open “Audio” in the inspector, expand “AudioCache” if needed, and click “Purge Audio Cache.”

That solves everything. The button is an admission of defeat, but I wish I’d known it sooner.
Production speed-ups inside Resolve
Use keyboard shortcuts to jump around:
- Alt-1: Project manager
- Alt-2: Media tab
- Alt-3: Cut tab
- Alt-4: Edit tab
- Alt-5: Fusion tab
- Alt-6: Color tab
- Alt-7: Fairlight/Audio tab
- Alt-8: Deliver tab
- Alt-9: Project settings
Disable “Show page navigation” under “Workspace” to regain vertical space. Also: enable “Full screen window.” And dual-screen users can find “Full screen timeline” in the Edit tab only when dual-screen is on.
In “Keyboard Customization” (under the DaVinci Resolve menu), map:
- Ctrl+Shift+F to “Edit timeline → Open in Fusion Page”
- Ctrl+Shift+E to “Edit timeline → Open in Timeline” (useful for compound clips)

Enable stacked timelines via the “Timeline view options” button in the Edit tab toolbar. Multiple timelines behave like browser tabs.

Learn the Edit tab shortcuts:
- Dual-screen with full-screen player (Ctrl+F) blocks most shortcuts—be aware.
- Left/Right: move frame by frame
- J/K/L: play backward/pause/forward; press J/L repeatedly for 2x speed
- Ctrl+Alt+L: unlink/relink clips (audio/video)
- Ctrl+B: cut all clips at playhead—faster than switching to blade (B) and back
- Backspace: delete selected clips without shifting others
- Shift+Backspace: ripple delete—moves trailing content; lock tracks to protect background music
- Delete empty space between clips with Backspace
- N: toggle snapping; press while dragging for temporary fine control
- Drag a clip’s left handle right while holding T for “Trim Edit Mode” to shift trailing clips
- Alt-drag: duplicate clips
- With the playhead scrubbing, I/O set in/out points; Alt-X clears them
- Set in/out: Ctrl+X ripples, Delete or Shift+Backspace does ripple without touching clipboard; Backspace leaves empty space
Fusion-specific speed-ups: keyframe spline editor beat the Edit tab’s inline options. Pan/zoom is annoying but there’s a zoom-all button.

Select points and press S to smooth transitions. Drag keyframes around—when they select. Node trees are text: select nodes, Ctrl+C, paste into a text editor—you’ll see the structure—and paste into another composition easily.
{
	Tools = ordered() {
		MediaIn1 = MediaIn {
			ExtentSet = true,
			CustomData = {
				MediaProps = {
					MEDIA_AUDIO_TRACKS_DESC = {
						{
							MEDIA_AUDIO_BIT_DEPTH = 32,
							MEDIA_AUDIO_FRAME_RATE = 25,
							MEDIA_AUDIO_NUM_CHANNELS = 2,
							MEDIA_AUDIO_SAMPLE_RATE = 48000,
							MEDIA_AUDIO_START_TIME = 0,
							MEDIA_AUDIO_TRACK_ID = "Timeline Audio",
							MEDIA_AUDIO_TRACK_NAME = "Timeline Audio [Timeline 1]"
						}
					},
					MEDIA_AUDIO_TRACKS_NUM = 1,
					MEDIA_HAS_AUDIO = true,
					MEDIA_HEIGHT = 2160,
					MEDIA_IS_SOURCE_RES = false,
					MEDIA_MARK_IN = 0,
					MEDIA_MARK_OUT = 124,
					MEDIA_NAME = "Fusion Title",
					MEDIA_NUM_FRAMES = 125,
					MEDIA_PAR = 1,
					MEDIA_SRC_FRAME_RATE = 25,
					MEDIA_START_FRAME = 0,
					MEDIA_WIDTH = 3840
				},
			},
			Inputs = {
				GlobalOut = Input { Value = 124, },
				AudioTrack = Input { Value = FuID { "Timeline Audio" }, },
				Layer = Input { Value = "0", },
				ClipTimeEnd = Input { Value = 124, },
				["Gamut.SLogVersion"] = Input { Value = FuID { "SLog2" }, },
				LeftAudio = Input {
					SourceOp = "Left",
					Source = "Data",
				},
				RightAudio = Input {
					SourceOp = "Right",
					Source = "Data",
				},
			},
			ViewInfo = OperatorInfo { Pos = { 76.7662, 48.996 } },
		},
		Left = AudioDisplay {
		},
		Right = AudioDisplay {
			CtrlWZoom = false,
		},
		Template = TextPlus {
			Inputs = {
				GlobalIn = Input { Value = -48, },
				GlobalOut = Input { Value = 134, },
				Width = Input { Value = 3840, },
				Height = Input { Value = 2160, },
				UseFrameFormatSettings = Input { Value = 1, },
				StyledText = Input { Value = "Custom Title", },
				Font = Input { Value = "Open Sans", },
				Style = Input { Value = "Semibold", },
				Size = Input { Value = 0.09, },
				VerticalJustificationNew = Input { Value = 3, },
				HorizontalJustificationNew = Input { Value = 3, },
			},
			ViewInfo = OperatorInfo { Pos = { 220, 49.5 } },
		},
		MediaOut1 = MediaOut {
			CtrlWZoom = false,
			Inputs = {
				Index = Input { Value = "0", },
				Input = Input {
					SourceOp = "Template",
					Source = "Output",
				},
			},
			ViewInfo = OperatorInfo { Pos = { 439.057, 78.6414 } },
		}
	}
}
Shift-Space opens the tool picker, search pre-focused. Learn abbreviations—they’re in parentheses:
- mi: media input
- bg: background
- rsz: resize
- xf: transform
- pnm: mask paint
- aml: alpha multiply
- rct: rectangle
- 3dk: 3D keyer

Dragging one node output and merging creates a merge. Ctrl+T swaps merge inputs, changing stacking. If you have a node selected and add a tool, combining usually happens correctly—e.g., Text+ selected, add background: it merges above. One Ctrl+T later, the background sits behind. Selecting the background and adding a rectangle masks it. Masks are versatile; learn them.
You likely only need the resize node to control scaling algorithms (linear, nearest neighbor, bicubic). Background-derived nodes have a “frame size” shown in the status bar; change it in the Inspector under “Image” → uncheck “Auto Resolution” and adjust dimensions.

For attribution on clips from other channels, I use Fusion with a single Edit-tab clip. Since source resolutions differ, but Text+ coordinates are normalized floats with sizes relative to composition dimensions, identical values across different frame sizes produce different results. Low-res projects make text pixelated. I now ensure all Fusion compositions match my output frame size (2160p).
Media management matters: I used to drag clips straight from the file explorer, but that can overwrite existing timeline content if the clip is long. First drag into the Media Pool pane, rename or add metadata, then double-click the clip icon (not the name—that starts renaming) to open the source viewer. Set an in/out, then drag only that segment into the timeline.

If the clip has both video and audio, hover the source player and drag only the video or audio pictogram. Or use F9/F10/F11: insert, overwrite, and replace, anchored by clip in/out and timeline in/out points. Neat workflow: for music over a 3-second segment, set in/out on the timeline, bring the music into the source viewer, set its in point, select the right track (the one with red outline), F11 inserts an editable clip exactly for that span.
Ctrl+M adds markers for to-dos—playhead snaps to them. Alt-Y selects everything touching and right of the playhead. Browse Edit, Trim, Timeline, Clip, and Mark menus for other shortcuts.
Effect playback bugs—using default settings instead—can be fixed by switching to the Fairlight tab (Shift+7). Track-based effects avoid the issue.
I split videos across timelines by part, finally assembling a master. Timelines are named with numeric prefixes (000 is the master, 005 the sponsored disclaimer, 100/200 parts), tolerating gaps and mid-sequence additions.

Colored flags track completion state: derushing, rough cut, visuals, voice-overs, sound, final review. The “Timelines” smart bin (Settings → User → Editing → Automatic Smart Bins) groups them. Load the “Timeline TODO” column preset to see “Clip Name,” “Duration,” and “Flags.”

Working with captions
DaVinci Resolve (Studio) can generate subtitles from an audio track via "Timeline → Create subtitles from Audio…", but this only works on the current timeline. You can't auto-generate captions for sub-timelines and then combine them into a single subtitle file at export.
When I need finer control, I fall back on SubtitleEdit (Windows-only). After it fetches its own copies of libmpv and ffmpeg, you can drag any video file into the waveform area for analysis. The killer feature is Whisper-based transcription under "Video → Audio to text (Whisper)…", with model selection — I stick to small.en or medium.en. It also bundles Purfview's Faster-Whisper, which is genuinely quicker.

My main speed trick in SubtitleEdit is binding "S" to "set subtitle start" and "F" to "set subtitle end and move to the next entry", letting me pace caption timing almost in real time.
Formatting is a dead end, though. SubtitleEdit supports colors, positioning, and dozens of formats, but YouTube barely honors any of them in a compatible way. EBU STL technically carries formatting but renders strangely on YouTube. These days I export plain .srt and skip styling beyond occasional music notes and parentheses. WebVTT supports formatting in theory, but nobody agrees on how colors or voices should be encoded, so it's not worth the trouble.
Captions matter. It usually takes me 1.5–3x the video runtime to finish them, but they broaden accessibility and give YouTube's auto-translation feature a solid base.
Input devices and misc. hardware
I used Logitech K120 keyboards exclusively for years. Mechanical keyboards were too loud, and I spent my switch-testing budget on AV gear instead.
Now that I alternate between a MacBook Pro and a Windows workstation, I bought an Apple Magic Keyboard with Touch ID and Numeric Keypad. The keyboard itself is great, though Touch ID is useless on Windows, even with third-party tools like Magic Utilities.

I also tried the Apple Magic Mouse for gestures but struggled with it and regret the purchase. The Apple Magic Trackpad, however, works brilliantly on both macOS and Windows with Magic Utilities. Once I configured it properly, the four-finger swipe up to open the task switcher (Win+Tab) became indispensable.

For window management, I use AltSnap on Windows (a maintained AltDrag fork) and Easy Move+Resize on macOS.
Blackmagic sells hardware meant to accelerate editing — the DaVinci Resolve Speed Editor ($395) and the DaVinci Resolve Editor Keyboard ($595). I haven't tried either, though the Speed Editor bundles a Resolve Studio license ($295 standalone), so in hindsight it would have been the cheaper route — assuming it didn't slow me down when editing on the go.
Before the Apple trackpad, I used Logitech MX Master 2S mice, and they remain my favorite conventional option.

For hand-drawn work, I have a small Wacom One (~€60). It's a basic pointing tablet without a display, but it does the job for its price.

Secondary cameras and audio adapters
For quick shots of real-life subjects, I use an iPhone — I had the 12, then "upgraded" to the 14 just before the 15 launched. It records in Dolby Vision HDR, which is a pain in post; most colorspace conversion tutorials for iPhone footage are contradictory, so I'll just wish you luck.
That said, the Shoot on iPhone → AirDrop → drag into the timeline pipeline is quite pleasant. For lavalier mics and other 3.5mm sources, you need a TRS-to-TRRS adapter like RODE's SC4, because phones don't expose a separate mic input — they use an input channel on the same jack as the headphone output. iPhones 14 and earlier also require a Lightning-to-TRRS adapter; for iPhone 15 and later, USB-C equivalents should exist.

I occasionally use a GoPro as a secondary wide-angle camera, though less than I'd like.
Storage and archiving
Between the crypto-driven SSD price swings and chip shortages, large portable SSDs became surprisingly affordable. Sandisk Extreme Pro Portable SSDs are a reasonably safe choice up to 2TB, or so I've heard.

After exporting a project, I ship the entire archive to Backblaze B2, an S3-compatible service at roughly one-fifth the cost of AWS S3. For fast, reliable large-file uploads, s5cmd is the only tool I trust — GUI clients like Cyberduck have been too flaky for me. I've skipped building a home NAS, but at least I have off-site backups.
Script writing
For real-time collaboration, CRDT-based tools like Google Docs or Etherpad work well, especially if you share a script editor. I tried Scrivener for screenplay-style scripts with stage directions, but I grew tired of it. Its corkboard and writing aids are nice, yet I spent more time fighting the tool and struggling to export for my teleprompter than writing. Dropbox is the only sync option, which brings its own issues.

I now write scripts in VS Code, as if they were blog posts. They live as drafts in my custom Rust CMS, accessible from any device when I log in with Patreon or GitHub — visible to me, not the public.

Teleprompter
I built a presenter mode into my website that only shows when I'm logged in. A 'Present' button enlarges the text, centers it, and flips it horizontally so it reads correctly through a beam-splitter mirror.
My rig is a Glide Gear TMP100 (~€190). It's larger than strictly necessary, but it works well. I pair it with a cheap Android tablet that loads my website as the display.

A dedicated teleprompter remote I tried (for the "Teleprompter PAD" app) was disappointing. It registers on Android as a Bluetooth keyboard, emitting odd key codes that only work within that specific app — I couldn't distinguish its keys in Chrome on the tablet. So I wrote a small Kotlin Android app that embeds a web view and exposes raw input events, injecting them into the loaded page. It works flawlessly and loads fasterthanli.me directly. Deploying content changes takes seconds despite multiple CDN nodes, and I'm always sure I'm seeing the latest revision — unlike cloud-sync apps that claim everything is current but open a file from two hours ago.
I now try a different approach before recording: do a quick "dirty" read of the script inside DaVinci Resolve's Fairlight tab to feel out the rhythm, and add Text+ notes for what visuals should accompany each line. Combined with more time spent on the script itself, this saves far more editing or re-shooting time than it costs.
Air quality monitoring
My Aranet4 Home (~€240) is an odd but useful companion — it tells me when CO₂ crosses 1000 ppm, at which point persisting just leads to a headache. Whether it's worth the price is debatable, but it's a beautifully made device.

Reference build, March 2024
Here is the complete equipment and software setup used in video production, current as of March 2024:
- Scripting: Visual Studio Code in vim mode for markdown; source hosted on a self-managed Forgejo instance with a push mirror to GitHub.
- CMS: Custom Rust-based website software, “told” (formerly “futile”).
- Camera: Panasonic Lumix DC-GH5M with a dummy battery, feeding a Blackmagic Design DeckLink Mini Recorder 4K capture card.
- Support gear: SIRUI AM-223 mini carbon fiber tripod, Glide Gear TMP100 teleprompter, RemotePad remote.
- Lighting: Three Elgato Key Lights and an Elgato green screen. The screen sits on a table with a height-adjustable IKEA desk so shooting can be done standing — otherwise the presenter is too tall for it.
- Audio: Shure SM7B microphone on a RODE PSA1 arm, Triton Audio Fethead preamp, and a Zoom UAC-232 interface. Note: both USB ports on the interface must be connected, or the USB controller will reset.
- Input devices: Apple Magic Keyboard, Apple Magic Trackpad, Wacom One graphic tablet.
- Post-production: DaVinci Resolve for color, editing and export; SubtitleEdit for occasional captioning; Ableton Live for musical outros.
- Storage: Professional-grade SSD with a SATA-to-USB-A adapter.
- Computers: Desktop with a Ryzen 5950X, 128 GB RAM and an RTX 3070 with 8 GB VRAM (more VRAM is often desired); second machine is an M2 MacBook Pro from 2022.


