Speech interfaces are common enough now that it's fair to ask what else they can drive. One answer: speak, have the browser transcribe it, and download the result as a PDF. The build here pairs Next.js on the client with Express.js on the server, and a handful of npm packages do the heavy lifting.
The stack and why each piece is there
Next.js extends React with static-site features — dynamic routing, image optimization, built-in domain and subdomain routing, fast refresh, file system routing and API routes. The piece this project relies on is API routes on the client side: a route that accepts a text file, turns it into PDF, writes it to the filesystem and answers the client. Express.js provides the separate Node.js API — routing, HTTP helpers, templating — that the app talks to.
The supporting dependencies:
react-speech-recognition— converts speech to text and exposes it to React components.regenerator-runtime— works around the "regeneratorRuntimeis not defined" error Next.js throws when usingreact-speech-recognition.html-pdf-node— converts an HTML page or a public URL into a PDF.axios— HTTP requests, in both browser and Node.js.cors— cross-origin resource sharing.
Scaffolding the two projects
Create a client folder and a server folder (audio-to-pdf-client and audio-to-pdf-server in the source). Bootstrap the client with create-next-app from inside the client folder:
npx create-next-app clientFor the server, cd into its folder, run npm init to produce a package.json, then install Express with npm install express. Create an index.js in the server folder with this starting code:
const express = require("express")
const app = express()

app.listen(4000, () => console.log("Server is running on port 4000"))
Start it as follows:
node index.jsIn the client project, add a components folder containing a SpeechToText.jsx file, and replace the default contents of pages/index.js with:
import Head from "next/head";
import SpeechToText from "../components/SpeechToText";

export default function Home() {
  return (
    <div className="home">
      <Head>
        <title>Audio To PDF</title>
        <meta
          name="description"
          content="An app that converts audio to pdf in the browser"
        />
        <link rel="icon" href="https://css-tricks.com/favicon.ico" />
      </Head>

      <h1>Convert your speech to pdf</h1>

      <main>
        <SpeechToText />
      </main>
    </div>
  );
}
The page imports SpeechToText, which will eventually be exported from components/SpeechToText.jsx. Install the remaining client and server packages:
npm install react-speech-recognition regenerator-runtime axiosnpm install html-pdf-node corsThe client folder should now hold:
/audio-to-pdf-web-client
├─ /components
|  └── SpeechToText.jsx
├─ /pages
|  ├─ _app.js
|  └── index.js
└── /styles
    ├─globals.css
    └── Home.module.css
And the server folder:
/audio-to-pdf-server
└── index.js
The interface
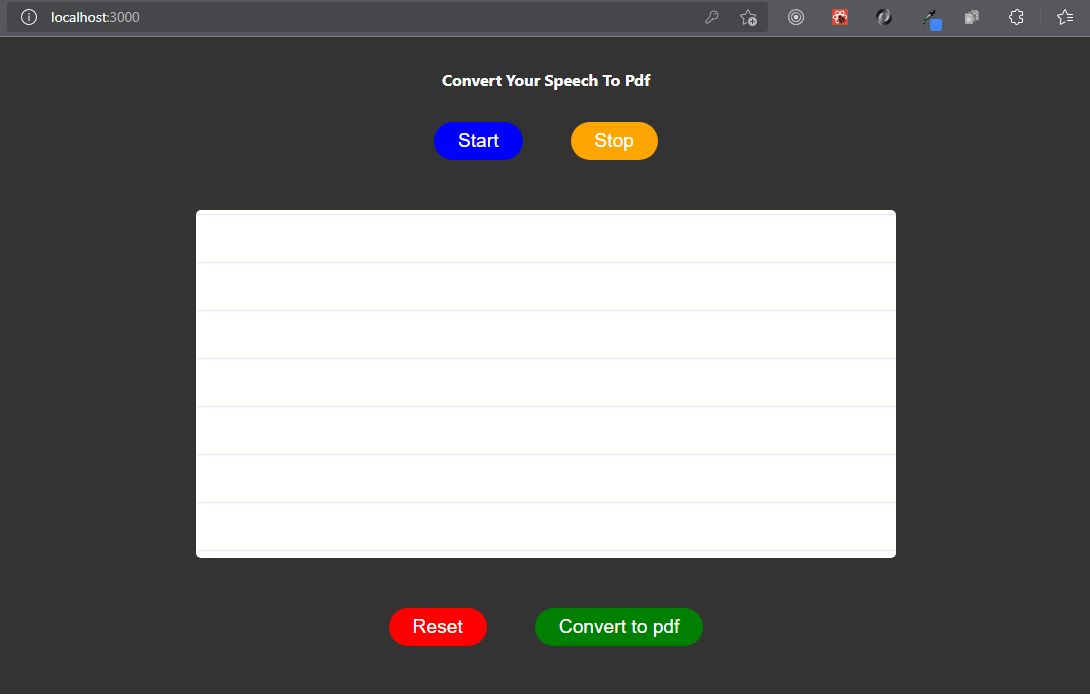
The <SpeechToText> component returns a React fragment wrapping an HTML <section> with three divs. The first .button-container holds start and stop buttons. The .words div carries contentEditable and suppressContentEditableWarning, making it editable while silencing React's warning. A second .button-container holds reset and convert-to-PDF buttons.
import React from "react";

const SpeechToText = () => {
  return (
    <>
      <section>
        <div className="button-container">
          <button type="button" style={{ "--bgColor": "blue" }}>
            Start
          </button>
          <button type="button" style={{ "--bgColor": "orange" }}>
            Stop
          </button>
        </div>
        <div
          className="words"
          contentEditable
          suppressContentEditableWarning={true}
        ></div>
        <div className="button-container">
          <button type="button" style={{ "--bgColor": "red" }}>
            Reset
          </button>
          <button type="button" style={{ "--bgColor": "green" }}>
            Convert to pdf
          </button>
        </div>
      </section>
    </>
  );
};

export default SpeechToText;
Styling is left open; the CSS variables used for button background colors can live in styles/global.css and serve as a starting point.
html,
body {
  padding: 0;
  margin: 0;
  font-family: -apple-system, BlinkMacSystemFont, Segoe UI, Roboto, Oxygen,
    Ubuntu, Cantarell, Fira Sans, Droid Sans, Helvetica Neue, sans-serif;
}

a {
  color: inherit;
  text-decoration: none;
}

* {
  box-sizing: border-box;
}

.home {
  background-color: #333;
  min-height: 100%;
  padding: 0 1rem;
  padding-bottom: 3rem;
}

h1 {
  width: 100%;
  max-width: 400px;
  margin: auto;
  padding: 2rem 0;
  text-align: center;
  text-transform: capitalize;
  color: white;
  font-size: 1rem;
}

.button-container {
  text-align: center;
  display: flex;
  justify-content: center;
  gap: 3rem;
}

button {
  color: white;
  background-color: var(--bgColor);
  font-size: 1.2rem;
  padding: 0.5rem 1.5rem;
  border: none;
  border-radius: 20px;
  cursor: pointer;
}

button:hover {
  opacity: 0.9;
}

button:active {
  transform: scale(0.99);
}

.words {
  max-width: 700px;
  margin: 50px auto;
  height: 50vh;
  border-radius: 5px;
  padding: 1rem 2rem 1rem 5rem;
  background-image: -webkit-gradient(
    linear,
    0 0,
    0 100%,
    from(#d9eaf3),
    color-stop(4%, #fff)
  ) 0 4px;
  background-size: 100% 3rem;
  background-attachment: scroll;
  position: relative;
  line-height: 3rem;
  overflow-y: auto;
}

.success,
.error {
  background-color: #fff;
  margin: 1rem auto;
  padding: 0.5rem 1rem;
  border-radius: 5px;
  width: max-content;
  text-align: center;
  display: block;
}

.success {
  color: green;
}

.error {
  color: red;
}
Run npm run dev and load http://localhost:3000.
Bringing in speech recognition
Import the required dependencies into <SpeechToText>:
import React, { useRef, useState } from "react";
import SpeechRecognition, {
  useSpeechRecognition,
} from "react-speech-recognition";
import axios from "axios";
Check whether the browser supports speech recognition and render a notice when it doesn't:
const speechRecognitionSupported =
  SpeechRecognition.browserSupportsSpeechRecognition();

if (!speechRecognitionSupported) {
  return <div>Your browser does not support speech recognition.</div>;
}
Pull transcript and resetTranscript out of the useSpeechRecognition() hook:
const { transcript, resetTranscript } = useSpeechRecognition();Add state for listening:
const [listening, setListening] = useState(false);Create a ref for the contentEditable div, attach it, and pass transcript as its children:
const textBodyRef = useRef(null);<div
className="words"
contentEditable
ref={textBodyRef}
suppressContentEditableWarning={true}
>
{transcript}
</div>Finally, write a function that kicks off recognition and wire it to a button's onClick. The button sets listening to true and runs recognition continuously; it stays disabled in that state so extra events can't fire.
const startListening = () => {
  setListening(true);
  SpeechRecognition.startListening({
    continuous: true,
  });
};
<button
type="button"
onClick={startListening}
style={{ "--bgColor": "blue" }}
disabled={listening}
>
Start
</button>Clicking the button starts transcription.
Stop, reset, convert
Three more functions complete the component: stopListening, resetText and handleConversion, each bound to the matching button's onClick.
const stopListening = () => {
  setListening(false);
  SpeechRecognition.stopListening();
};

const resetText = () => {
  stopListening();
  resetTranscript();
  textBodyRef.current.innerText = "";
};

const handleConversion = async () => {}
<button
type="button"
onClick={stopListening}
style={{ "--bgColor": "orange" }}
disabled={listening === false}
>
Stop
</button>
<div className="button-container">
<button
type="button"
onClick={resetText}
style={{ "--bgColor": "red" }}
>
Reset
</button>
<button
type="button"
style={{ "--bgColor": "green" }}
onClick={handleConversion}
>
Convert to pdf
</button>
</div>handleConversion is asynchronous because it will make an API request. The Stop button is disabled whenever listening is false. With the server restarted and the browser refreshed, start, stop and reset all work. The remaining step is to have the recognized speech converted to a PDF through the Express route.
The server-side PDF route
The route's job: take a text file, convert it to a PDF, write the PDF to the filesystem, send a response. In server/index.js, import html-pdf-node and fs, which handles writing and opening files:
const HTMLToPDF = require("html-pdf-node");
const fs = require("fs");
const cors = require("cors)
Set up the route:
app.use(cors())
app.use(express.json())

app.post("/", (req, res) => {
  // etc.
})
Then define the options html-pdf-node requires:
let options = { format: "A4" };
let file = {
  content: `<html><body><pre style='font-size: 1.2rem'>${req.body.text}</pre></body></html>`,
};
The options object carries the paper size and style; note that paper sizes follow a different system than the units used on the web, with A4 being the typical letter size. The file object takes either a public URL or HTML markup. To build the HTML page, the route uses the html, body and pre tags together with the text from req.body; any styling can be applied. A trycatch handles errors along the way:
try {

} catch(error){
  console.log(error);
  res.status(500).send(error);
}
generatePdf from html-pdf-node produces a pdfBuffer — the raw PDF — from the file, and a unique pdfName is created:
HTMLToPDF.generatePdf(file, options).then((pdfBuffer) => {
  // console.log("PDF Buffer:-", pdfBuffer);
  const pdfName = "./data/speech" + Date.now() + ".pdf";

  // Next code here
}
The filesystem module then writes, reads and sends the response to the client:
fs.writeFile(pdfName, pdfBuffer, function (writeError) {
  if (writeError) {
    return res
      .status(500)
      .json({ message: "Unable to write file. Try again." });
  }

  fs.readFile(pdfName, function (readError, readData) {
    if (!readError && readData) {
      // console.log({ readData });
      res.setHeader("Content-Type", "application/pdf");
      res.setHeader("Content-Disposition", "attachment");
      res.send(readData);
      return;
    }

    return res
      .status(500)
      .json({ message: "Unable to write file. Try again." });
  });
});
Details worth noting:
writeFiletakes a file name, the data and a callback that can return an error; a CDN with error endpoints could be substituted.readFiletakes a file name and a callback that can return a read error plus the read data. With no error and data present, the response is constructed and sent. A CDN's endpoints could replace this too.res.setHeader("Content-Type", "application/pdf");tells the browser a PDF is being sent.res.setHeader("Content-Disposition", "attachment");makes the received data downloadable.
With the route live at http://localhost:4000, the client side can finish handleConversion.
Calling the route from the client
First, state for API requests — loading, error, success and other messages — via React's useState hook:
const [response, setResponse] = useState({
  loading: false,
  message: "",
  error: false,
  success: false,
});
Inside handleConversion, check that the page has loaded and that the editable div isn't empty:
if (typeof window !== "undefined") {
const userText = textBodyRef.current.innerText;
  // console.log(textBodyRef.current.innerText);

  if (!userText) {
    alert("Please speak or write some text.");
    return;
  }
}
Wrap the request in a trycatch that handles errors and updates the response state:
try {

} catch(error){
  setResponse({
    ...response,
    loading: false,
    error: true,
    message:
      "An unexpected error occurred. Text not converted. Please try again",
    success: false,
  });
}
Set the response values, configure axios and post to the server:
setResponse({
  ...response,
  loading: true,
  message: "",
  error: false,
  success: false,
});
const config = {
  headers: {
    "Content-Type": "application/json",
  },
  responseType: "blob",
};

const res = await axios.post(
  "http://localhost:4000",
  {
    text: textBodyRef.current.innerText,
  },
  config
);
On a successful response, update the response state and tell the browser to download the PDF:
setResponse({
  ...response,
  loading: false,
  error: false,
  message:
    "Conversion was successful. Your download will start soon...",
  success: true,
});

// convert the received data to a file
const url = window.URL.createObjectURL(new Blob([res.data]));
// create an anchor element
const link = document.createElement("a");
// set the href of the created anchor element
link.href = url;
// add the download attribute, give the downloaded file a name
link.setAttribute("download", "yourfile.pdf");
// add the created anchor tag to the DOM
document.body.appendChild(link);
// force a click on the link to start a simulated download
link.click();
Messages can be displayed below the contentEditable div:
<div>
  {response.success && <i className="success">{response.message}</i>}
  {response.error && <i className="error">{response.message}</i>}
</div>
Both projects are on GitHub: server repo and client repo.