
Chat Assistants Built On Dialogflow
A 2019 Capgemini Research Institute report tied the adoption of chat assistants to a 76% jump in customer satisfaction. SaaS products such as Google’s Dialogflow, IBM’s Watson Assistant, Microsoft’s Azure Bot Service, and Amazon’s Lex let developers model a conversation flow in the cloud and drop the resulting assistant into their own services. This article focuses on Dialogflow and its console workflow, which lets you visually construct and train a natural-language assistant.
Developers comfortable with JavaScript can follow along fully; the custom webhook handling in the article’s example relies on it.
Core Dialogflow Concepts
Dialogflow is a platform for building NLP-based conversational assistants that accept text or voice input. The key pieces that make up an agent:
Agent
An agent is the assistant itself — the conversational interface end-users chat with. It comprises several components, each of which retrains the whole agent when changed. For teams that need a working bot immediately, Dialogflow offers prebuilt agents as starting templates with built-in intents and responses. Here, “end-user” refers to anyone interacting with the assistant, not its author.
Intent
An intent is the end-user’s goal in a given utterance. One agent hosts many intents, and they are chained together through contexts. For instance, a food-delivery agent would include intents for placing an order and for asking about menu recommendations.
Entity
Entities let Dialogflow pull specific data out of a sentence. A Car entity attached to an intent will extract vehicle names from any input. Each agent starts with predefined system entities; you can also define custom entities and enumerate their acceptable values.
Training Phrase
Training phrases teach the agent to detect an end-user’s intent. Dialogflow’s own documentation recommends entering at least 10-20 phrases per intent to improve accuracy. Annotating specific words inside a phrase marks them as placeholders for values that appear in real user input.
Context
Contexts — simple string names — control conversation flow. Each intent can carry one or more input contexts and output contexts. When an intent matches, its output contexts activate, and one of those becomes the gate for the next matching intent. A useful mental model: context is security door, intent is the building inside, and input/output contexts ferry the visitor between buildings.
Knowledge Base
A knowledge base is a pool of reference material — as a txt, pdf, csv or other supported format — the agent draws on when answering. In machine learning terms, this functions as the training dataset. A customer-support bot might link to a business’s FAQ document as its knowledge base.
Fulfillment
Fulfillment produces dynamic answers instead of static ones. Once a matched intent goes through its webhook, Dialogflow sends an API request to the service you’ve configured for the agent. This is how an intent can trigger a database lookup or a write operation.
With those definitions in place, the next step is to use the Dialogflow console to create and train an agent for a hypothetical food-delivery service.
Building the Agent in the Dialogflow Console
The Dialogflow console is where you create, train, and test an agent before connecting it to external services. It requires a Google account and a Cloud Platform project, but the console also exposes REST API endpoints for those who prefer not to use the graphical interface.
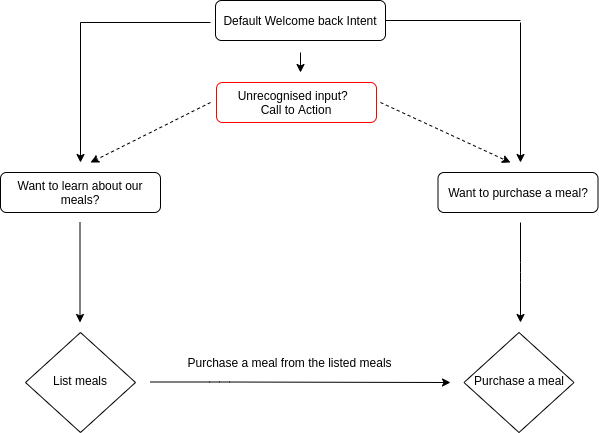
For this walkthrough, the agent will act as a customer-care bot for a food delivery service. It must be able to list available meals, accept a new order, and provide information about a requested meal.
Creating an Agent and Setting Default Intents
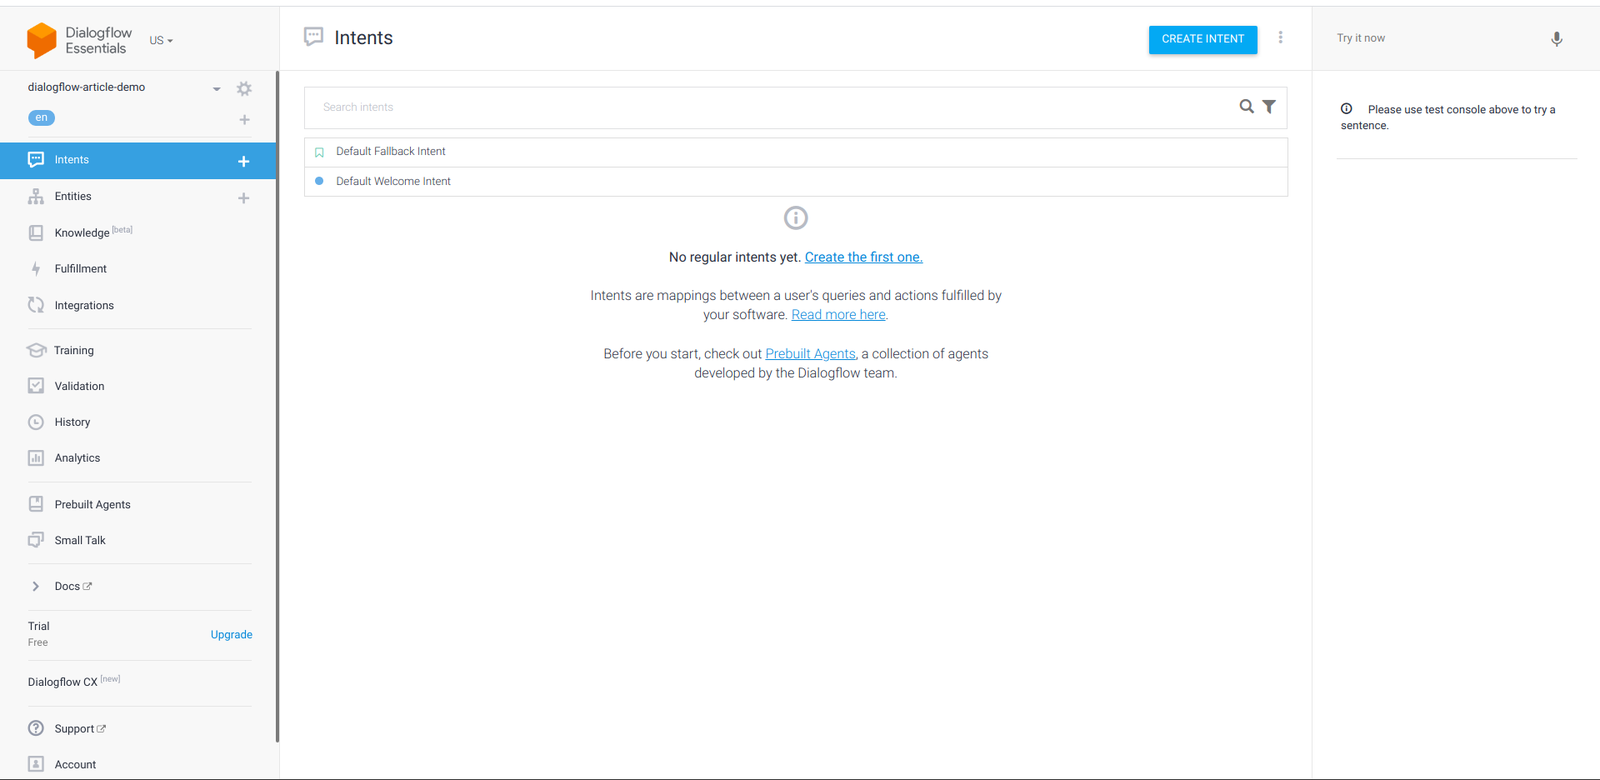
On first use, Dialogflow prompts you to create an agent. You supply a name, choose a language (English is the default), and associate it with a Google Cloud project. After creation, the intents tab shows two default intents: Default Welcome Intent and Default Fallback Intent.
The Default Fallback Intent contains no training phrases but lists responses like “Sorry, could you say that again?” or “What was that?” These are returned whenever the agent fails to recognize a user's input. It is worth replacing those generic sentences with responses that also remind the user of what the bot can do. The image below shows the updated fallback responses for the food-service bot.
I didn't get that. I am Zara and I can assist you in purchasing or learning more about the meals from Dialogflow-food-delivery service. What would you like me to do?

I missed what you said. I'm Zara here and I can assist you in purchasing or learning more about the meals from Dialogflow-food-delivery service. What would you like me to do?

Sorry, I didn't get that. Can you rephrase it?  I'm Zara by the way and I can assist you in purchasing or learning more about the meals from Dialogflow-food-delivery service.

Hey, I missed that I'm Zara and I can assist you in purchasing or learning more about the meals from Dialogflow-food-delivery service.  What would you like me to do?
The Default Welcome Intent begins with a blank Context section. Since the user should be able to either order a meal or request a list of meals, we add two output contexts: awaiting_order_request and awaiting_info_request. These become active whenever the welcome intent is matched and allow the agent to route the next user message to the correct intent.
Next, the Events section already contains the Welcome event, which ensures this intent fires when the agent first loads. The Training Phrases section ships with 16 default phrases that a user might type when starting a conversation.
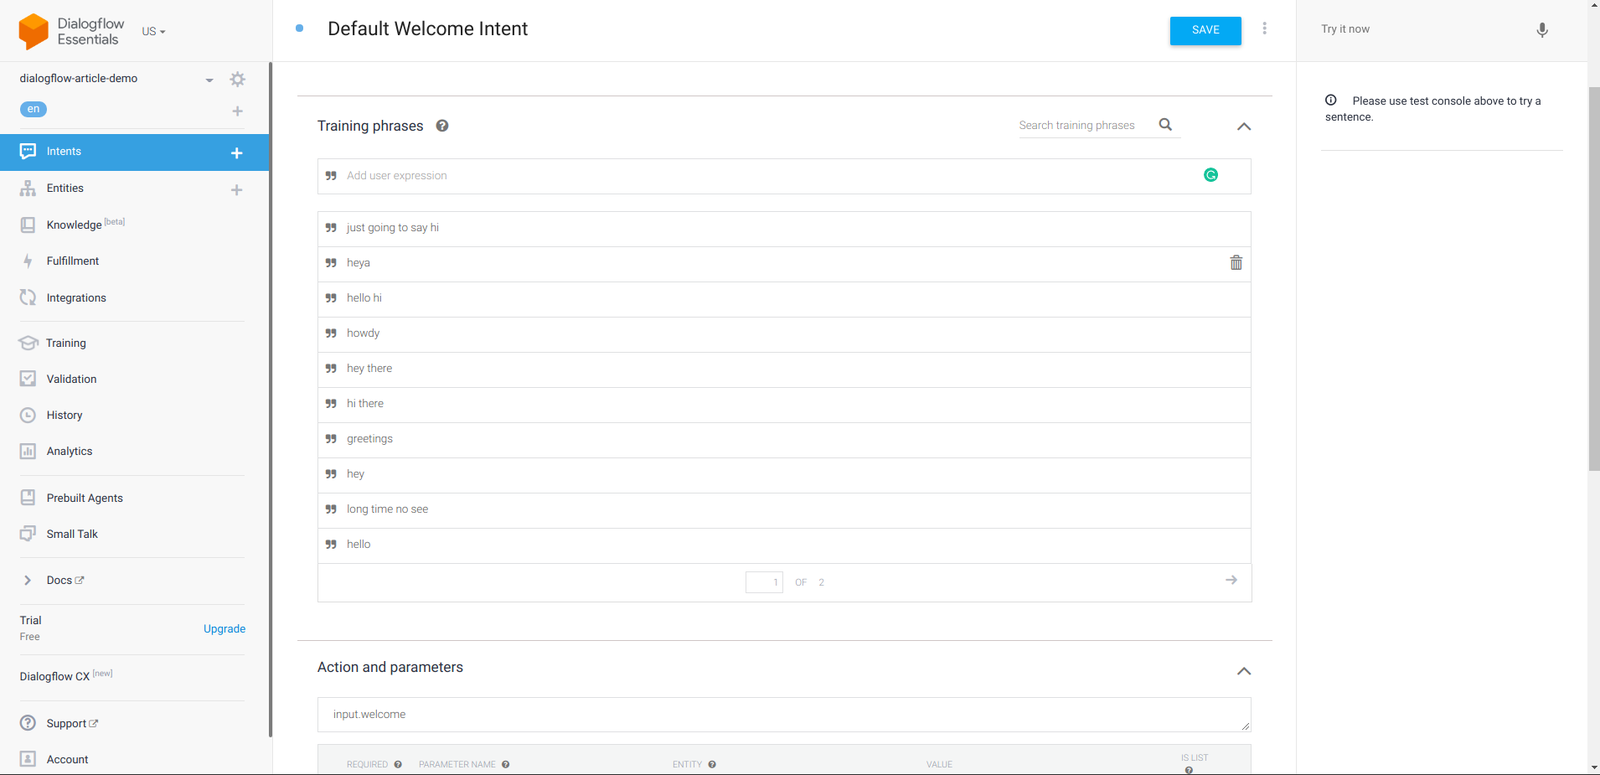
The Responses list contains automatically generated replies such as “Hello!” or “Hi there.” For this bot, we replace them with responses that identify the organization and list the bot's two capabilities.
1.  Hello there, I am Zara and I am here to assist you to purchase or learn about the meals from the Dialogflow-food-delivery service. What would you like me to do?

2. Hi, I am Zara and I can assist you in purchasing or learning more about the meals from the Dialogflow-food-delivery service. What would you like me to do?
Saving those responses retrains the agent immediately. The next step is adding two new intents that handle the actions mentioned in the welcome message: one for listing meals and one for ordering.
Creating the List-Meals Intent
Click the + icon in the left navigation and name the new intent list-available-meals. In the Context section, add an output context named awaiting-order-request. This links this intent to the follow-up order intent, since a user is expected to place an order after seeing the available meals.
Then, add training phrases that an end-user would type to ask about available meals.
Hey, I would like to know the meals available.
What items are on your menu?
Are there any available meals?
I would like to know more about the meals you offer.
In the Responses section, add a single fallback response indicating that the meal list is unavailable or an error has occurred. This response is only used when the fetch fails; the main response comes through fulfillment.
Hi there, the list of our meals is currently unavailable. Please check back in a few minutes as the items on the list are regularly updated.Finally, enable the Webhook call option in the Fulfillment section. This allows the agent to request data from an externally deployed API.
Configuring Fulfillment
The Fulfillment tab offers two options: a custom webhook pointing to any deployed API endpoint, or the inline code editor, which deploys a serverless cloud function on Google Cloud.
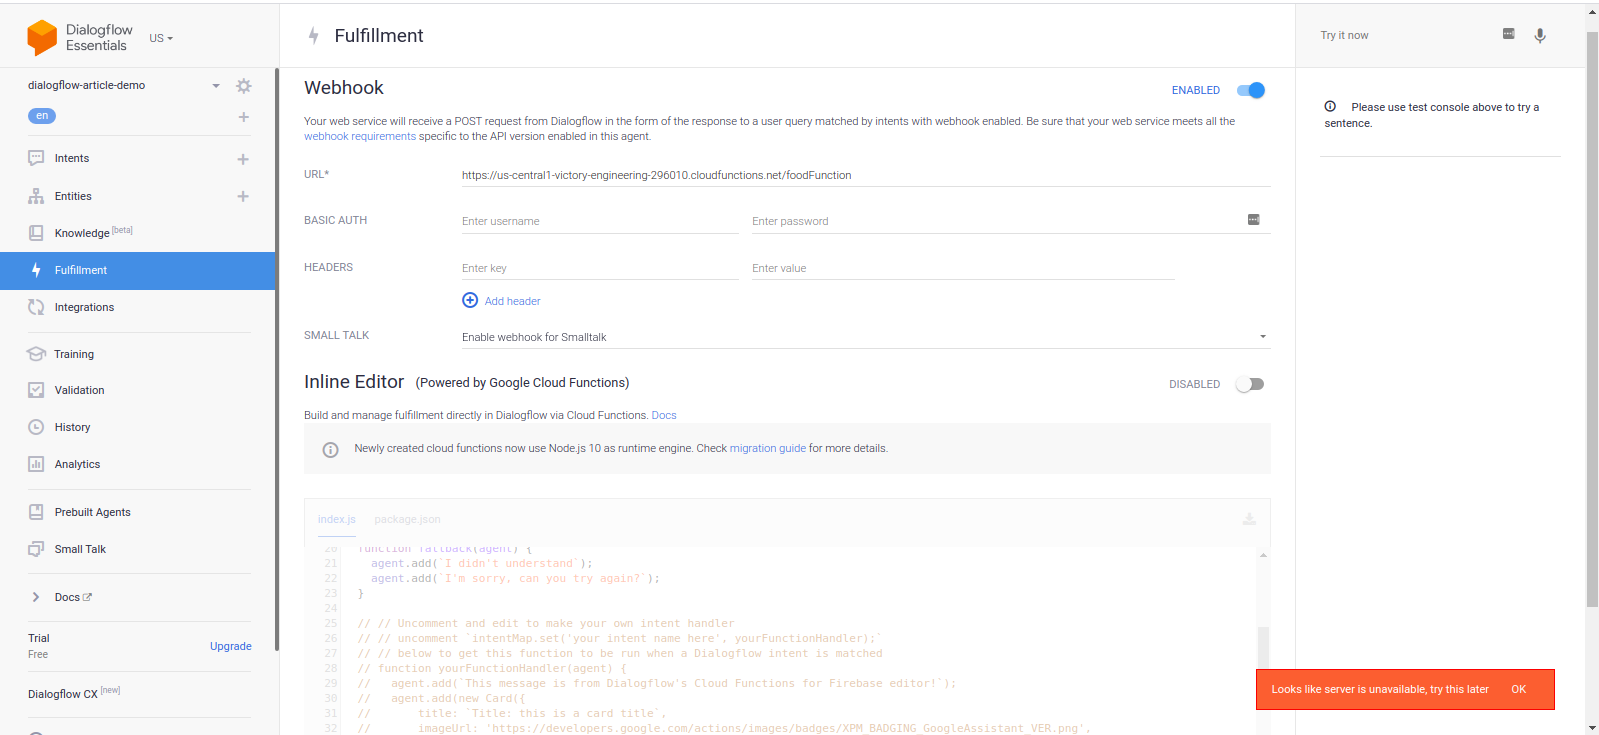
Whenever an intent is matched with webhook fulfillment enabled, Dialogflow sends a POST request to the endpoint. The request body includes several fields, but the queryResult object is the one that matters. It contains the parameters extracted from the user's text — in this case, the meal name a user is asking about or ordering.
{
  "queryResult": {
    "queryText": "End-user expression",
    "parameters": {
      "param-name": "param-value"
    },
  },
}
The overall architecture has the cloud function acting as a middleman: the Dialogflow agent sends extracted parameters to the cloud function, which queries the food-service database and returns the result to the agent for display.
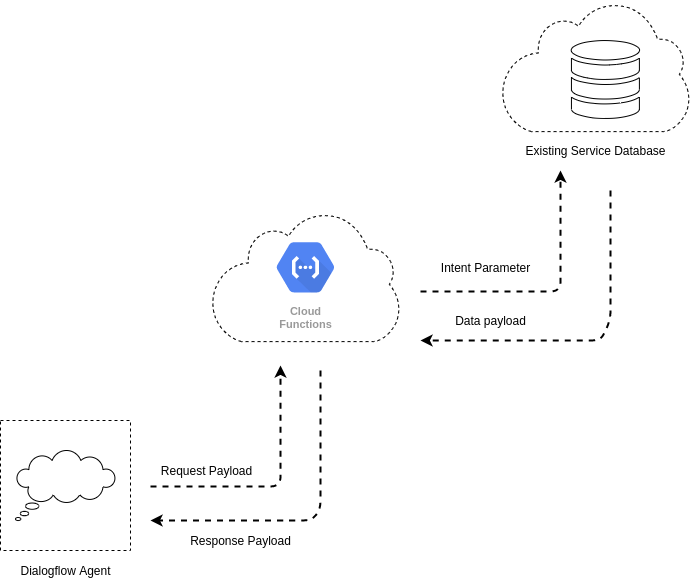
Start by creating the cloud function locally and connecting it to the agent via the custom webhook option. After testing, you can move it into the inline editor to deploy it as a managed function. Run the following commands to install the necessary packages.
# Create a new project and ( && ) move into it.
mkdir dialogflow-food-agent-server && cd dialogflow-food-agent-server

# Create A New Node Project
yarn init -y

# Install Needed Packages
yarn add mongodb @google-cloud/functions-framework dotenv
Then modify the generated package.json to include the scripts needed to run the function locally using the Functions Framework.
// package.json
{
  "main": "index.js",
  "scripts": {
    "start": "functions-framework --target=foodFunction --port=8000"
  },
}
The start script instructs the Functions Framework to run the foodFunction from index.js, listening on localhost port 8000. The following index.js code connects to a MongoDB cluster, queries the meal collection, and returns the matched documents to Dialogflow.
require("dotenv").config();

exports.foodFunction = async (req, res) => {
  const { MongoClient } = require("mongodb");
  const CONNECTION_URI = process.env.MONGODB_URI;

  // initate a connection to the deployed mongodb cluster
  const client = new MongoClient(CONNECTION_URI, {
    useNewUrlParser: true,
  });

  client.connect((err) => {
    if (err) {
      res
        .status(500)
        .send({ status: "MONGODB CONNECTION REFUSED", error: err });
    }
    const collection = client.db(process.env.DATABASE_NAME).collection("Meals");
    const result = [];
    const data = collection.find({});
    const meals = [
      {
        text: {
          text: [
            `We currently have the following 20 meals on our menu list. Which would you like to request for?`,
          ],
        },
      },
    ];
    result.push(
      data.forEach((item) => {
        const { name, description, price, image_uri } = item;
        const card = {
          card: {
            title: `${name} at $${price}`,
            subtitle: description,
            imageUri: image_uri,
          },
        };
        meals.push(card);
      })
    );

    Promise.all(result)
      .then((_) => {
        const response = {
          fulfillmentMessages: meals,
        };
        res.status(200).json(response);
      })
      .catch((e) => res.status(400).send({ error: e }));
    client.close();
  });
};
The function performs four steps:
- It opens a connection to a MongoDB Atlas cluster and selects the meal category collection.
- It runs a find query with the parameter from the user's message and iterates over the returned cursor.
- It converts each document into Dialogflow's Rich response message card format, including image, title, and description.
- It sends the complete response back to the agent as JSON and ends execution with a
200status code.
Note: Dialogflow waits up to 5 seconds for a webhook response. If the function takes longer, the agent falls back to a static response and returns a DEADLINE EXCEEDED error. Design webhook operations with this limit in mind. The API error retries section of the Dialogflow best practices shows how to set up retry handling.
The function relies on environment variables stored in a .env file in the project directory.
#.env
MONGODB_URI = "MONGODB CONNECTION STRING"
DATABASE_NAME = ""
Start the function with yarn start, but note that Dialogflow only accepts secure connections. Use Ngrok to expose the local port through a tunnel with an SSL certificate.
ngrok http -bind-tls=true 8000The extra -bind-tls=true argument ensures Ngrok creates a secured tunnel rather than the unsecured default. Copy the forwarding URL from the Ngrok output, paste it into the Webhook section's URL field in Dialogflow, and save.
To test the setup, type a message such as a request for the meal list in the console's Input field. The agent will wait for the cloud function to respond and display the returned meals as cards.
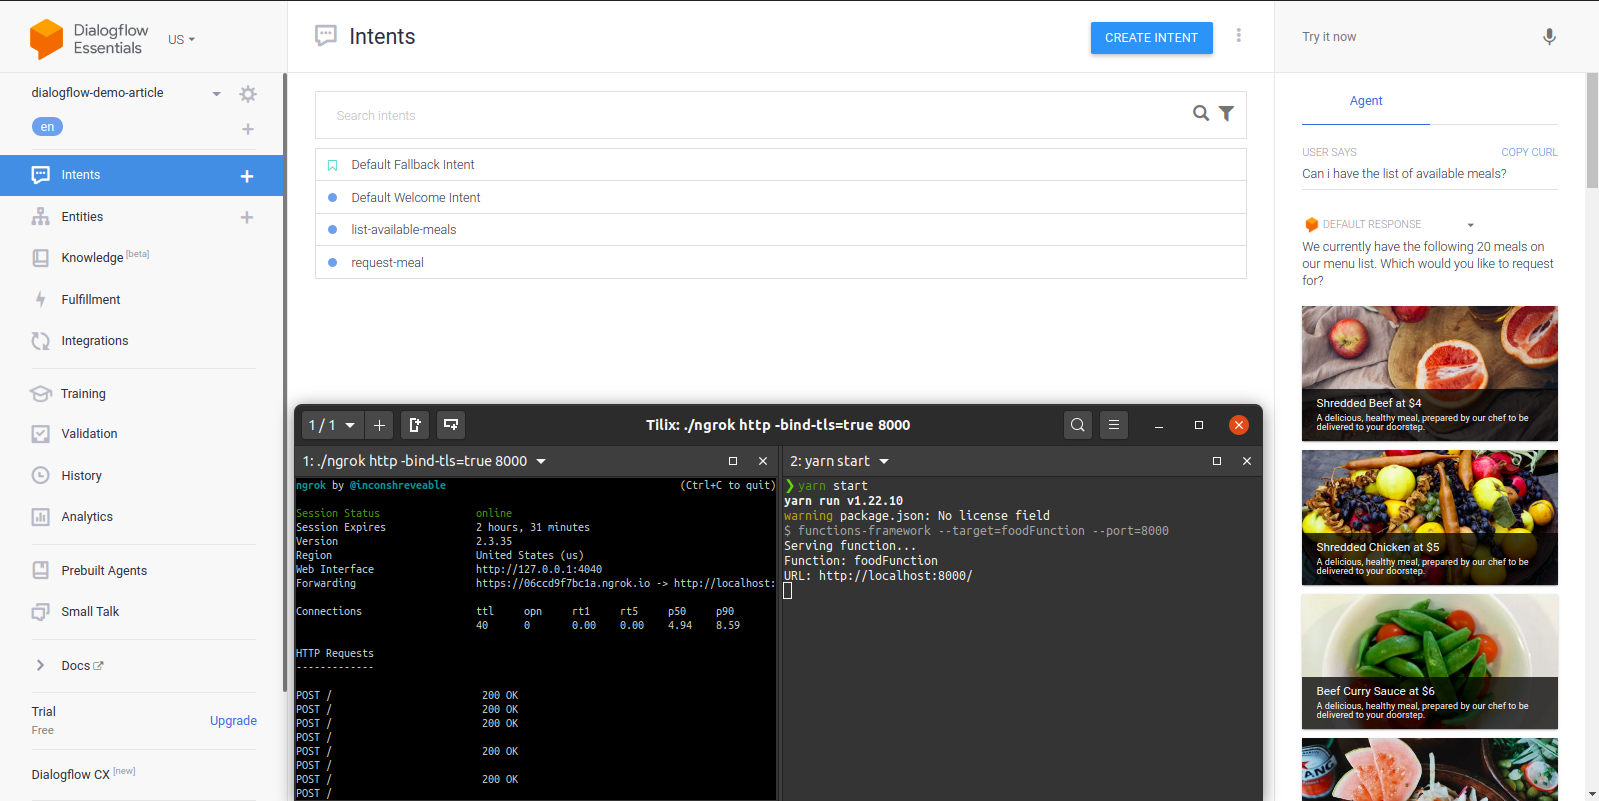
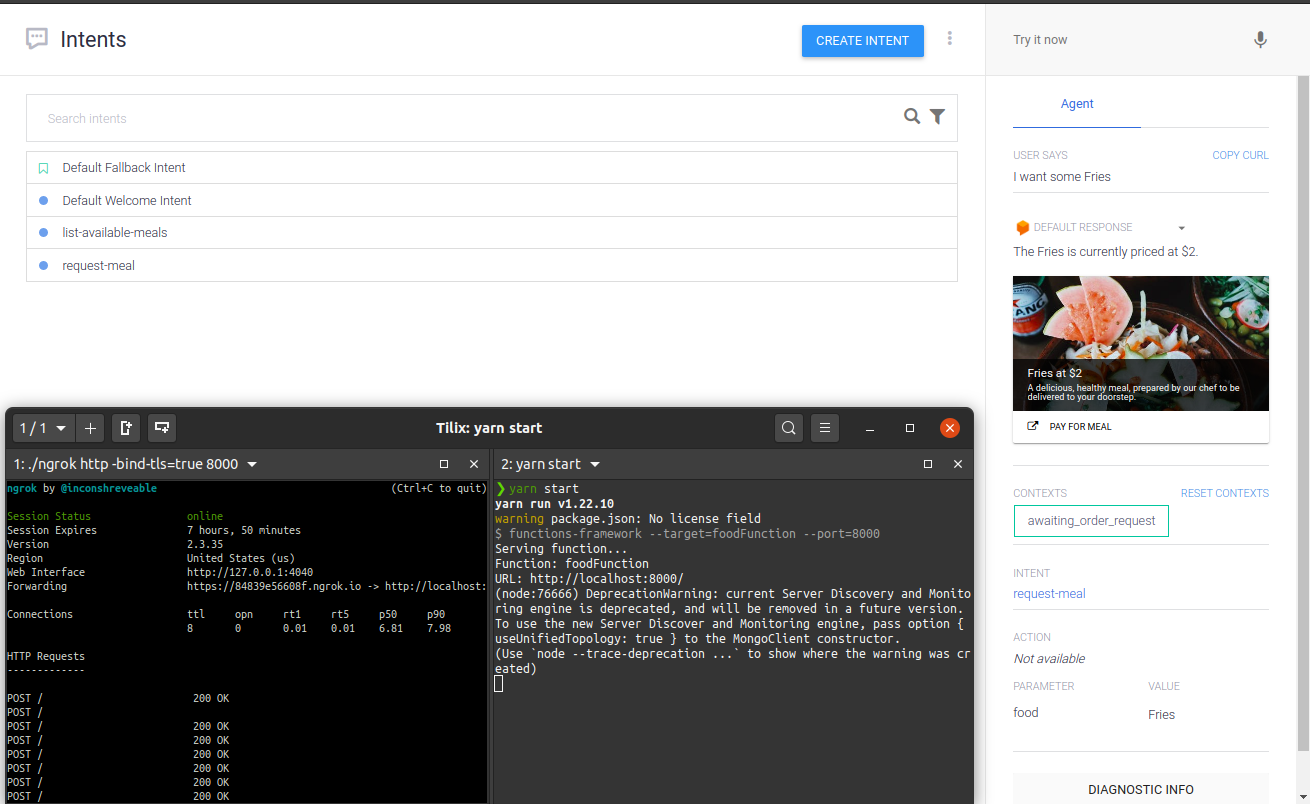
The center terminal in the screenshot shows the series of POST requests hitting the local function, while the right side shows the formatted card responses. If a webhook request fails, Dialogflow replies with a fallback response. Use the Diagnostic Info tool within each conversation to debug: the Raw API response, Fulfillment request, Fulfillment response, and Fulfillment status tabs all contain JSON-formatted details about the request and response.
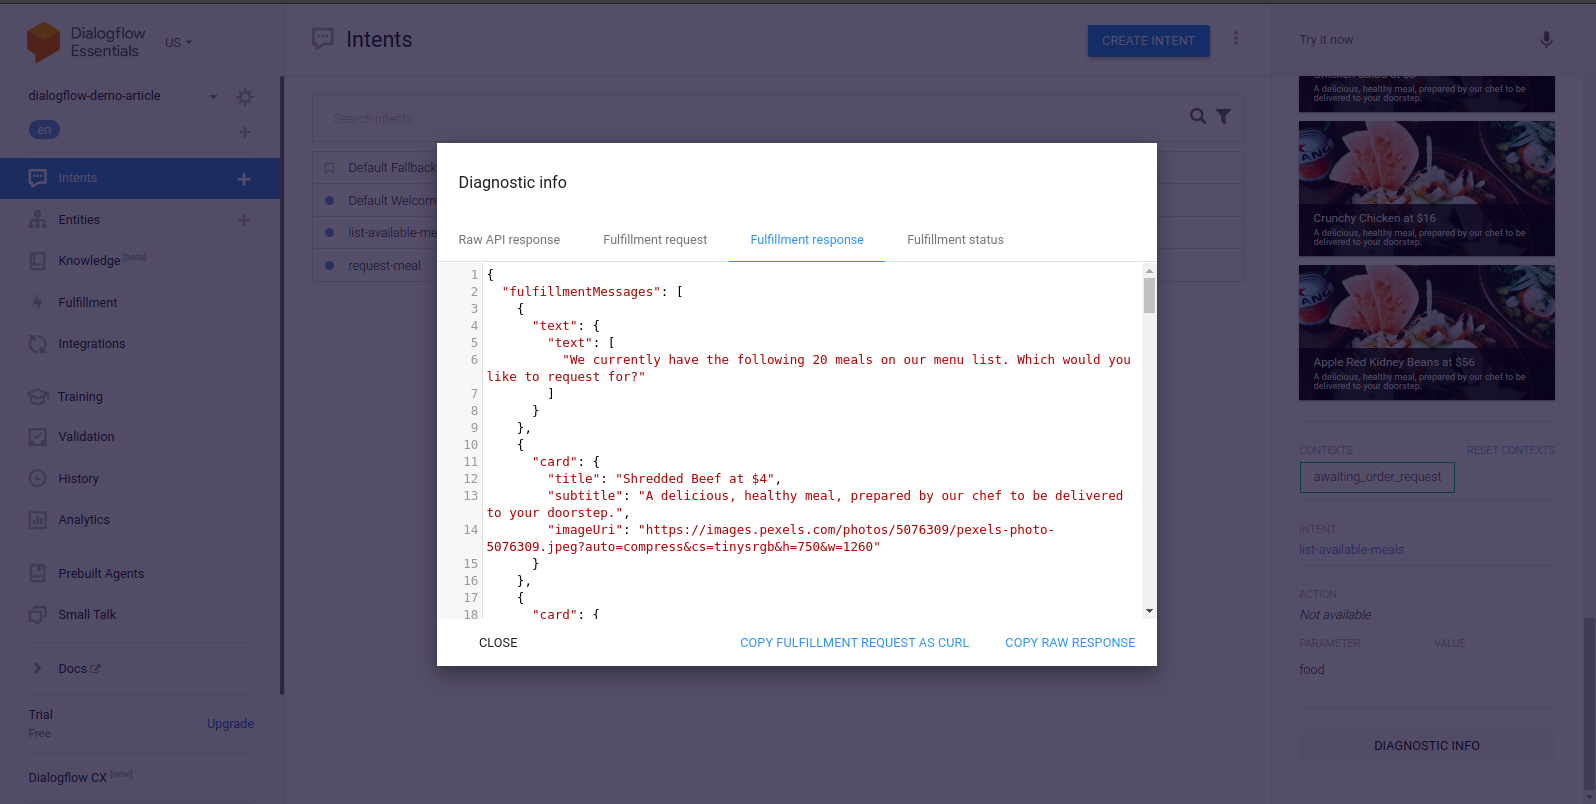
At this point, the user is expected to continue the conversation by ordering one of the listed meals. The final intent for this demo handles that order.
Adding a Meal Request Intent
To let users order a specific meal, create a new intent called request-meal with an input context of awaiting_order_request. This links the intent back to either the Default Welcome Intent or the list-available-meals intent.
The training phrases for this intent all share a common theme — they express a desire for food without naming a particular dish. This is deliberate: instead of enumerating every possible meal, using the generic term "food" keeps the phrase list manageable.
Hi there, I'm famished, can I get some food?

Yo, I want to place an order for some food.

I need to get some food now.

Dude, I would like to purchase $40 worth of food.

Hey, can I get 2 plates of food?
To make the values in these phrases dynamic — such as meal type, price, and quantity — Dialogflow uses entities. In these examples, Dialogflow automatically recognizes amounts like $40 as @sys.unit-currency and numbers like 2 as @number from its system entities. The word food, however, is not a system entity, so you need to create a custom entity for it.
Defining Custom Entities
Within the training phrase editor, double-clicking food opens the entity dropdown. At the bottom, selecting Create new entity navigates to the Entities tab of the Dialogflow console. Name the entity food. In the options dropdown next to the Save button, switch to raw edit mode, which allows bulk entry of values in JSON or CSV rather than one at a time.
// foods.json

[
    {
        "value": "Fries",
        "synonyms": [
            "Fries",
            "Fried",
            "Fried food"
        ]
    },
 {
        "value": "Shredded Beef",
        "synonyms": [
            "Shredded Beef",
            "Beef",
            "Shredded Meat"
        ]
    },
    {
        "value": "Shredded Chicken",
        "synonyms": [
            "Shredded Chicken",
            "Chicken",
            "Pieced Chicken"
        ]
    },

    {
        "value": "Sweet Sour Sauce",
        "synonyms": [
            "Sweet Sour Sauce",
            "Sweet Sour",
            "Sauce"
        ]
    },
    {
        "value": "Spring Onion",
        "synonyms": [
            "Spring Onion",
            "Onion",
            "Spring"
        ]
    },
    {
        "value": "Toast",
        "synonyms": [
            "Toast",
            "Toast Bread",
            "Toast Meal"
        ]
    },
    {
        "value": "Sandwich",
        "synonyms": [
            "Sandwich",
            "Sandwich Bread",
            "Sandwich Meal"
        ]
    },
    {
        "value": "Eggs Sausage Wrap",
        "synonyms": [
            "Eggs Sausage Wrap",
            "Eggs Sausage",
            "Sausage Wrap",
            "Eggs"
        ]
    },
    {
        "value": "Pancakes",
        "synonyms": [
            "Pancakes",
            "Eggs Pancakes",
            "Sausage Pancakes"
        ]
    },
    {
        "value": "Cashew Nuts",
        "synonyms": [
            "Cashew Nuts",
            "Nuts",
            "Sausage Cashew"
        ]
    },
    {
        "value": "Sweet Veggies",
        "synonyms": [
            "Sweet Veggies",
            "Veggies",
            "Sweet Vegetables"
        ]
    },
    {
        "value": "Chicken Salad",
        "synonyms": [
            "Chicken Salad",
            "Salad",
            "Sweet Chicken Salad"
        ]
    },
    {
        "value": "Crunchy Chicken",
        "synonyms": [
            "Crunchy Chicken",
            "Chicken",
            "Crunchy Chickens"
        ]
    },
    {
        "value": "Apple Red Kidney Beans",
        "synonyms": [
            "Apple Red Kidney Beans",
            "Sweet Apple Red Kidney Beans",
            "Apple Beans Combination"
        ]
    },
]
The JSON above defines 15 meal examples. Each object in the array contains a "value" key with the canonical meal name and a "synonyms" key containing alternative names for that meal. After pasting the data, be sure to enable Fuzzy Matching. This lets the agent recognize annotated entities even when typed incompletely or with minor spelling errors.
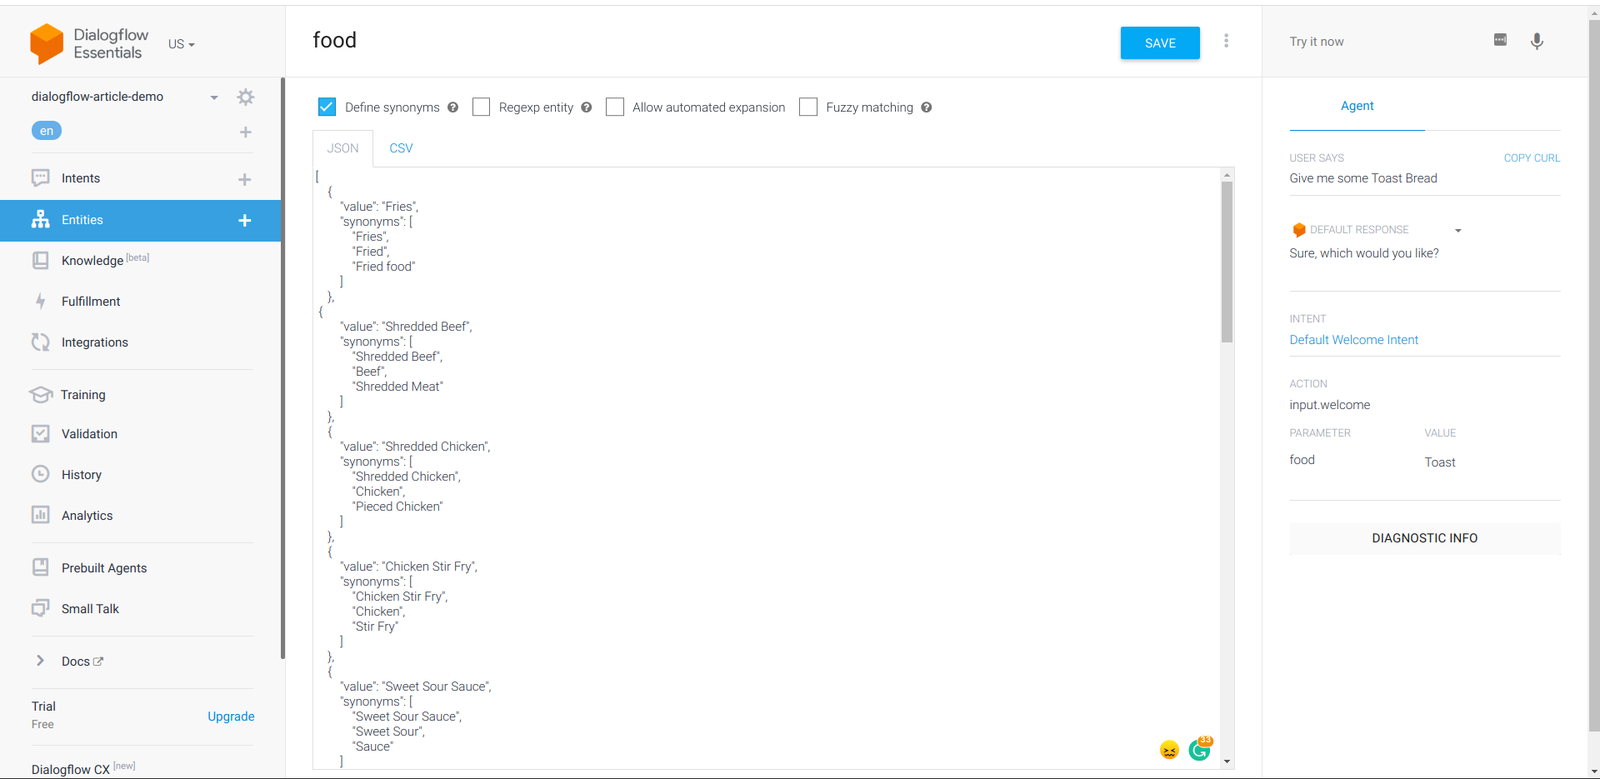
Once saved, the agent retrains immediately with the new entity. To respond even if the webhook fails, a fallback response is configured within the intent.
I currently can't find your requested meal. Would you like to place an order for another meal?The existing Cloud Function must also be updated to handle requests from two intents now. The modified code introduces several new behaviors:
- Multiple intent handling — The function now uses a
switchstatement keyed on the intent name. Dialogflow includes the intent name in each webhook request payload, so the function can route requests appropriately. - Single meal lookup — The Meals collection is queried using the parameter extracted from the user's input rather than fetching the whole list.
- Call-to-action button — A card now includes a button for paying for the requested meal. Clicking it opens a new browser tab. In a production assistant, this button's
postbackURL should point to a real checkout page, likely using a service like Stripe Checkout.
require("dotenv").config();

exports.foodFunction = async (req, res) => {
  const { MongoClient } = require("mongodb");
  const CONNECTION_URI = process.env.MONGODB_URI;

  const client = new MongoClient(CONNECTION_URI, {
    useNewUrlParser: true,
  });

  // initate a connection to the deployed mongodb cluster
  client.connect((err) => {
    if (err) {
      res
        .status(500)
        .send({ status: "MONGODB CONNECTION REFUSED", error: err });
    }

    const collection = client.db(process.env.DATABASE_NAME).collection("Meals");
    const { displayName } = req.body.queryResult.intent;
    const result = [];

    switch (displayName) {
      case "list-available-meals":
        const data = collection.find({});
        const meals = [
          {
            text: {
              text: [
                `We currently have the following 20 meals on our menu list. Which would you like to request for?`,
              ],
            },
          },
        ];
        result.push(
          data.forEach((item) => {
            const {
              name,
              description,
              price,
              availableUnits,
              image_uri,
            } = item;
            const card = {
              card: {
                title: `${name} at $${price}`,
                subtitle: description,
                imageUri: image_uri,
              },
            };
            meals.push(card);
          })
        );
        return Promise.all(result)
          .then((_) => {
            const response = {
              fulfillmentMessages: meals,
            };
            res.status(200).json(response);
          })
          .catch((e) => res.status(400).send({ error: e }));

      case "request-meal":
        const { food } = req.body.queryResult.parameters;

        collection.findOne({ name: food }, (err, data) => {
          if (err) {
            res.status(400).send({ error: err });
          }
          const { name, price, description, image_uri } = data;
          const singleCard = [
            {
              text: {
                text: [`The ${name} is currently priced at $${price}.`],
              },
            },
            {
              card: {
                title: `${name} at $${price}`,
                subtitle: description,
                imageUri: image_uri,
                buttons: [
                  {
                    text: "Pay For Meal",
                    postback: "htts://google.com",
                  },
                ],
              },
            },
          ];
          res.status(200).json(singleCard);

      default:
        break;
    }

    client.close();
  });
};
After making these changes, restart the function to apply them by running yarn start. There is no need to restart the running Ngrok tunnel; it will continue forwarding webhook requests to the updated function. Testing an order request from the Dialogflow console shows the request-meal case being executed and a single card returned as the response.
Deploying to Google Cloud Functions
With the local function verified, the next step is deployment to Google Cloud Functions using the command below.
gcloud functions deploy "foodFunction" --runtime nodejs10 --trigger-http --entry-point=foodFunction --set-env-vars=[MONGODB_URI="MONGODB_CONNECTION_URL", DATABASE_NAME="DATABASE_NAME"] --allow-unauthenticatedThat command deploys the function and logs a generated HTTPS endpoint to the terminal. Each flag serves a specific purpose:
NAME— The required name for the deployed function. Here it isfoodFunction.trigger-http— Sets HTTP as the trigger type, so the function is invoked via its secure URL endpoint.entry-point— Designates which exported module from the source file should be deployed.set-env-vars— Passes runtime environment variables. In this case, onlyMONGODB_URIandDATABASE_NAMEare needed. The MongoDB connection string comes from a cluster created on Atlas; MongoDB's Getting Started docs cover this setup.allow-authenticated— Permits unauthenticated invocation of the function from the internet via its endpoint.
Platform Integrations
Dialogflow agents can connect to numerous conversational platforms, including Facebook Messenger, Slack, and Telegram. The Dialogflow documentation catalogs all available integration types and their supported platforms beyond the ones used here.
Google Actions Integration
As a Google product, Dialogflow integrates naturally with Google Assistant. From the Integrations tab, Google Assistant appears as the primary option. Clicking it opens the Assistant modal, where selecting the test app launches the agent in test mode via the Actions console, allowing interaction through voice or text input.
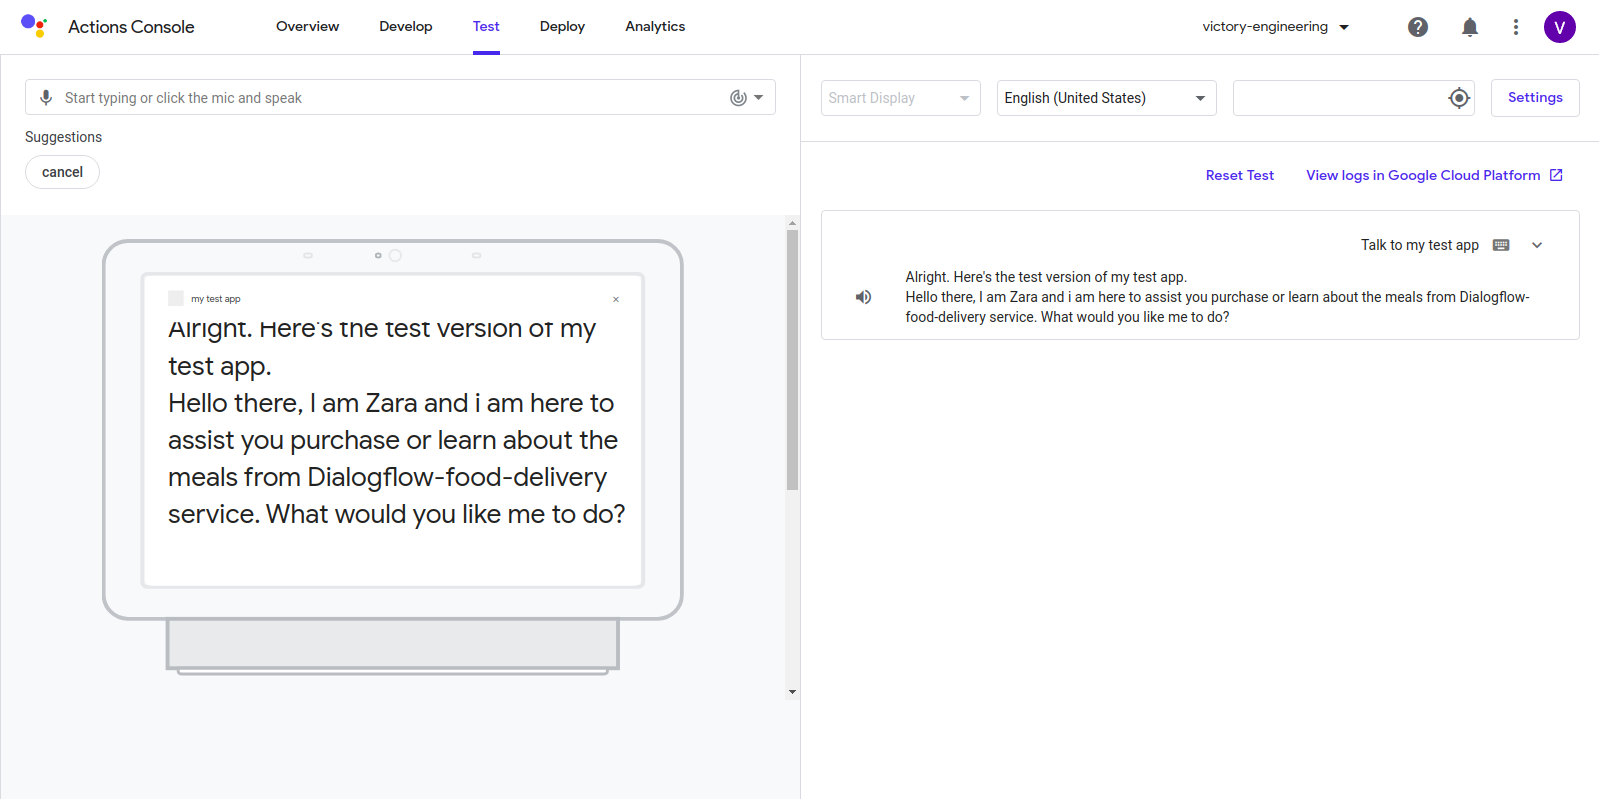
This integration exposes the agent to millions of Google users across devices like smartphones, watches, and laptops. To publish formally, the Actions console developer documentation explains the full deployment flow.
Web Demo Integration
The Web Demo option, found under text-based integrations, provides a quick way to embed the agent in a web application via an iframe. The generated URL opens a page with a chat window simulating a real chat app.
Note that the Web Demo supports only text responses. It cannot render rich messages, cards, or images — important to remember if your webhook returns rich response payloads.


