

Why Serverless for Front-End Work
Application development has been shifting away from manually provisioning, scaling, and updating infrastructure. Instead, teams increasingly rely on cloud providers to handle resource management so they can focus on shipping core product features. For front-end engineers, this often means moving business logic into small, event-driven functions rather than maintaining a dedicated back-end service.
Serverless applications — also called Functions as a Service (FaaS) — are broken into tiny, reusable functions that are hosted and managed by a third-party cloud provider. Despite the name, these functions do run on servers; the difference is that the developer does not provision or manage those servers. They are triggered by specific events and execute on demand, running only when needed and accessible over the public internet.
A typical use case is sending emails when users subscribe to a product launch list on a landing page. Rather than building and operating a full back-end just to handle that one task, you can write a single function that uses an email client, deploy it to a cloud provider, and connect it directly to your front end.
Key Benefits of FaaS
- Auto scaling: Serverless functions are horizontally scaled by the provider based on invocation volume. The developer does not need to manually add or remove resources under heavy load.
- Cost effectiveness: Because functions are event-driven and run only when invoked, billing is based purely on the number of executions.
- Flexibility: Functions are highly reusable and not tied to a single project. A functionality can be extracted, deployed once, and reused across multiple applications. They can also be written in the developer’s preferred language, though language support varies by provider.
Serverless on Google Cloud Platform
Among the many public cloud providers supporting serverless applications, this article focuses on Google Cloud Platform: how functions are created, managed, and deployed there, and how they integrate with other GCP products. To illustrate the process, we will add new functionality to an existing React application, working through:
- Storing and retrieving user data on the cloud;
- Creating and managing cron jobs on Google Cloud;
- Deploying Cloud Functions to Google Cloud.
Serverless applications are not limited to React — any front-end framework or library capable of making an HTTP request can consume a serverless function. Prior experience with React is helpful for this walkthrough, but no previous serverless experience is required.
Cloud Functions Primer
Serverless backends on Google Cloud are built around Cloud Functions: event-driven, short-lived pieces of code that listen for one of six trigger types and execute a single operation. Functions run with a default timeout of 60 seconds, expandable to nine minutes, and can be authored in JavaScript, Python, Go, or Java. Node.js functions use CommonJS modules, exporting a single primary function that receives request and response arguments similar to an HTTP route.
A minimal Cloud Function boilerplate looks like this:
// index.js

exports.firestoreFunction = function (req, res) {
  return res.status(200).send({ data: `Hello ${req.query.name}` });
}
One important behavioral note: a Cloud Function matches every HTTP protocol for incoming requests. Data arrives in the request body for POST calls and in the query string for GET calls.
Local Development and Deployment
For local testing, install the @google-cloud/functions-framework package—either per-project or globally via npm i -g @google-cloud/functions-framework. Then wire it into package.json scripts, pointing at the exported module name:
"scripts": {
     "start": "functions-framework --target=firestoreFunction --port=8000",
  }
With the local server running on port 8000, a quick curl request verifies the endpoint and returns a 200 status along with any query data:
curl https://localhost:8000?name="Smashing Magazine Author"To move into production, the Cloud SDK’s gcloud CLI handles deployment. After authentication, this command pushes a local function up as an HTTP-triggered Cloud Function:
gcloud functions deploy "demo-function" --runtime nodejs10 --trigger-http --entry-point=demo --timeout=60 --set-env-vars=[name="Developer"] --allow-unauthenticatedThe deploy command’s key flags:
- NAME: the required identifier for the deployed function.
region: deployment region, withus-central1as the default.trigger-http: sets HTTP as the trigger type.allow-unauthenticated: permits public internet invocation without authentication checks.source: local path to the file holding the function.entry-point: which exported module to deploy from that file.runtime: the language runtime from Google’s supported list.timeout: max execution time before termination (60 seconds default, 9 minutes maximum).
Security consideration: allowing unauthenticated requests opens your function to anyone with the endpoint. Mitigate this by keeping the URL in environment variables or requiring authorization headers on every request.
After deployment, the endpoint prints to the terminal; if you miss it, run gcloud function describe FUNCTION_NAME. To load-test, a global autocannon install works well: autocannon -d=5 -c=300 CLOUD_FUNCTION_URL drives 300 concurrent requests for 5 seconds.
The dashboard’s Metrics tab then visualizes the results—invocation counts, execution duration, memory footprint, and instance scaling:
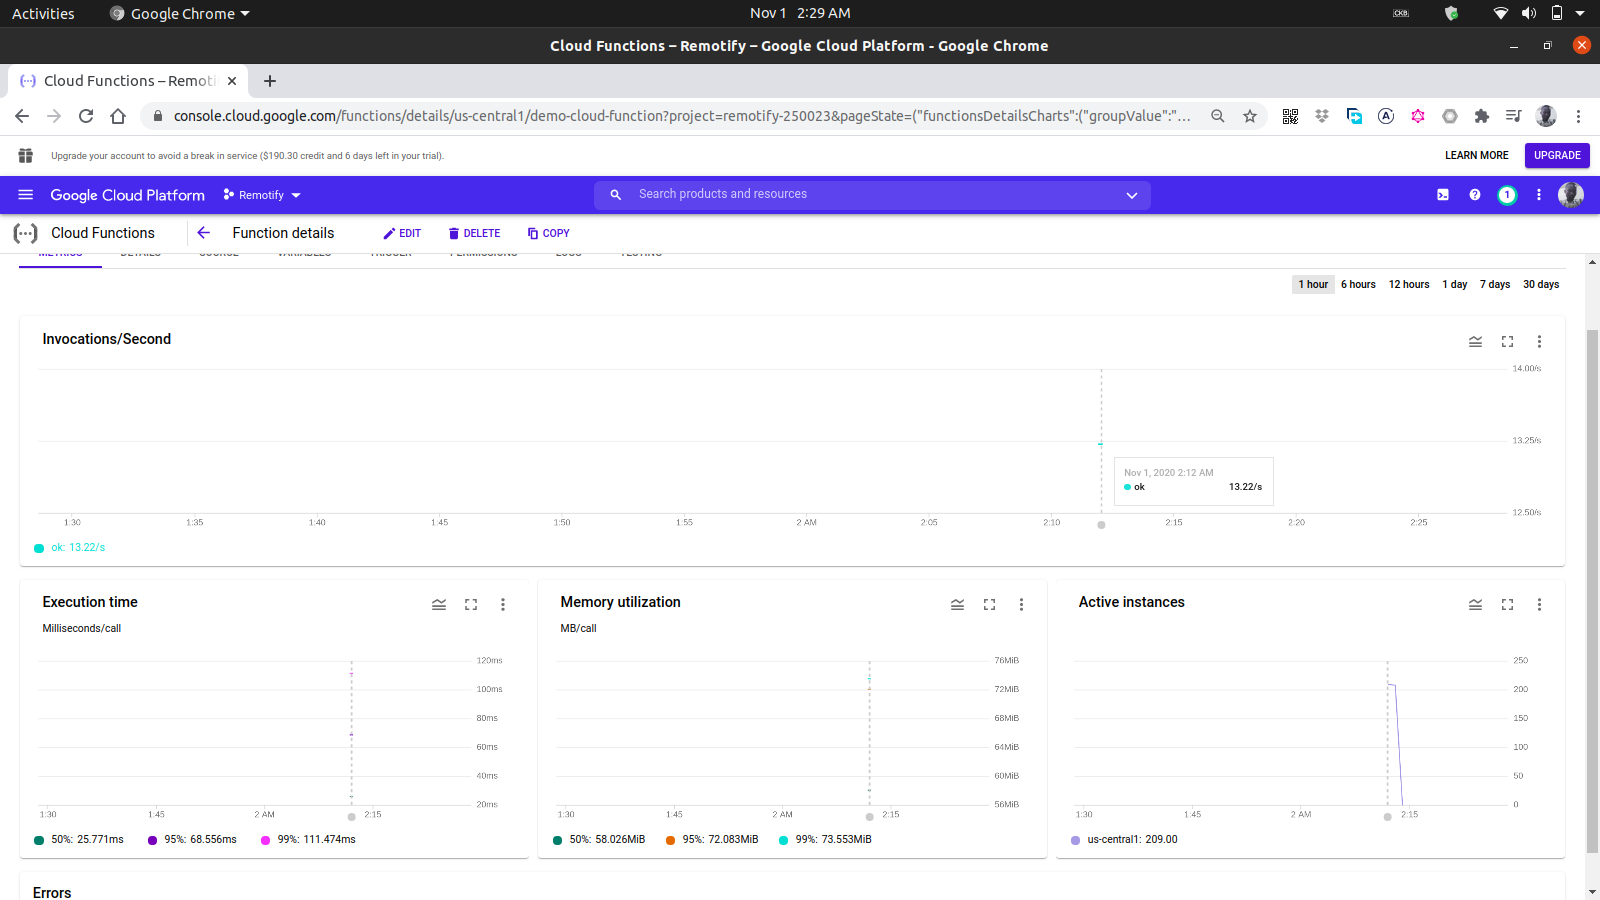
The Active Instances chart is particularly revealing about horizontal scaling: in our load test, 209 instances spun up within seconds to absorb the concurrent traffic.
Reading Function Logs
Every deployed function maintains its own log, appending a new entry per execution. The Log tab on the dashboard lists them chronologically:
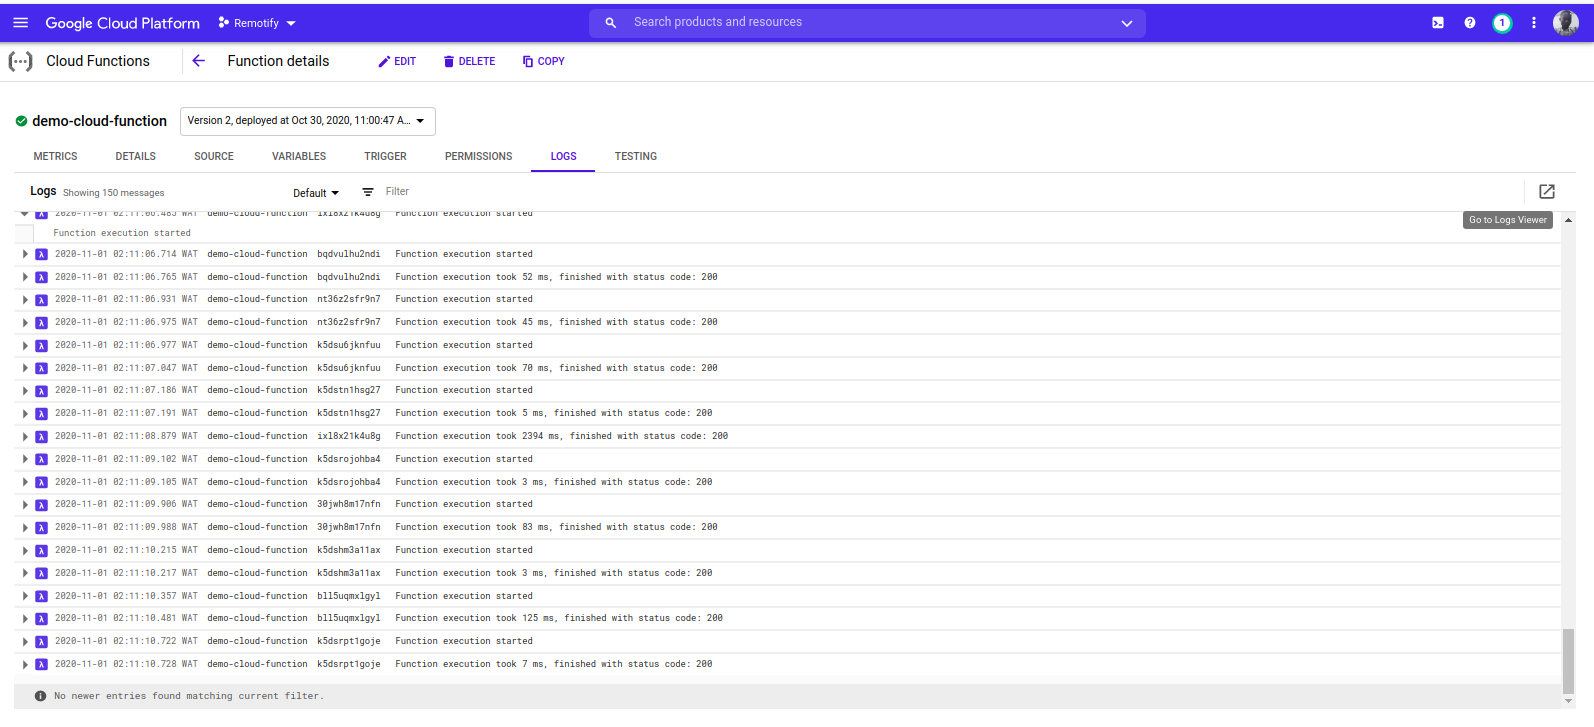
Each entry records execution time, duration, and resulting status code. Errors include the file and line where they occurred. For deeper investigation, the Logs Explorer in Google Cloud provides more granular filtering and detail.
Using Cloud Functions in a Front-End App
Cloud Functions give front-end engineers a path to backend logic without managing servers. Deploy a function, grab its endpoint, and call it with HTTP requests from any client application.
To demonstrate, we’ll extend a React app that already routes between authentication and home pages. We’ll introduce the React Context API for state management, since the function calls will live inside application reducers.
First, define the context and a user reducer:
// state/index.js
import { createContext } from "react";

export const UserReducer = (action, state) => {
  switch (action.type) {
    case "CREATE-USER":
      break;
    case "UPLOAD-USER-IMAGE":
      break;
    case "FETCH-DATA" :
      break
    case "LOGOUT" :
      break;
    default:
     console.log(`${action.type} is not recognized`)
  }
};

export const userState = {
  user: null,
  isLoggedIn : false
};

export const UserContext = createContext(userState);
The UserReducer function contains a switch statement with four action cases. They’re empty placeholders for now, to be filled in as we integrate the cloud functions. We also export a UserContext created via createContext, with a default value of userState—an object holding a user field (null until authenticated) and an isLoggedIn boolean.
Consuming this context requires wrapping the entire component tree with its Provider. At the root component, we pass the default userState through the value prop:
// index.js
import React from "react";
import ReactDOM from "react-dom";
import "./index.css";
import App from "./app";
import { UserContext, userState } from "./state/";

ReactDOM.render(
  <React.StrictMode>
    <UserContext.Provider value={userState}>
      <App />
    </UserContext.Provider>
  </React.StrictMode>,
  document.getElementById("root")
);

serviceWorker.unregister();
With application state in place, the next step is defining the user data model in Google Cloud Firestore, accessed through a Cloud Function.
Persisting User Data with Cloud Firestore
Each user record in this application consists of a unique ID, an email address, a password, and a URL pointing to a profile image. A cloud function handles storing this data with Cloud Firestore, a NoSQL database available on Google Cloud Platform.
Cloud Firestore, an evolution of the Firebase Realtime Database, organizes records into collections and documents (similar to MongoDB), with support for richer, faster queries and offline data. You can view and manage this data in the Google Cloud Console by navigating to the Database section and opening Firestore. From there, create a users collection for the application.
While Cloud Firestore has a JavaScript client library, it operates only in a Node.js environment and throws errors in a browser. Using @google-cloud/firestore within a cloud function is the workaround.
Connecting a Cloud Function to Firestore
Rename the initial demo-function to firestoreFunction, then use a switch statement on a type value from the request body to handle authentication operations. Omitting type triggers a 400 response explaining the missing data.
require("dotenv").config();
const { Firestore } = require("@google-cloud/firestore");
const { SecretManagerServiceClient } = require("@google-cloud/secret-manager");

const client = new SecretManagerServiceClient();

exports.firestoreFunction = function (req, res) {
    return {
        const { email, password, type } = req.body;
        const firestore = new Firestore();
        const document = firestore.collection("users");
        console.log(document) // prints details of the collection to the function logs
        if (!type) {
            res.status(422).send("An action type was not specified");
        }

        switch (type) {
            case "CREATE-USER":
                break
            case "LOGIN-USER":
                break;
            default:
                res.status(422).send(`${type} is not a valid function action`)
        }
};
Connection to Firestore relies on Application Default Credentials (ADC) inside the client library. You then reference the users collection via the collection method for subsequent document operations. If a service account key isn’t initialized in the constructor, ADC falls back to using IAM roles attached to the cloud function. Redeploy the function after local edits using the same gcloud command used for the initial deployment.
Within the CREATE-USER case, implement new user creation using data from the request body:
require("dotenv").config();
const { Firestore } = require("@google-cloud/firestore");
const path = require("path");
const { v4 : uuid } = require("uuid")
const cors = require("cors")({ origin: true });

const client = new SecretManagerServiceClient();

exports.firestoreFunction = function (req, res) {
    return cors(req, res, () => {
        const { email, password, type } = req.body;
        const firestore = new Firestore();
        const document = firestore.collection("users");
        if (!type) {
            res.status(422).send("An action type was not specified");
        }

        switch (type) {
            case "CREATE-USER":
              if (!email || !password) {
                res.status(422).send("email and password fields missing");
              }

            const id = uuid()
            return bcrypt.genSalt(10, (err, salt) => {
              bcrypt.hash(password, salt, (err, hash) => {
                document.doc(id)
                  .set({
                    id : id
                    email: email,
                    password: hash,
                    img_uri : null
                   })
                  .then((response) => res.status(200).send(response))
                  .catch((e) =>
                      res.status(501).send({ error : e })
                    );
                  });
                });

           case "LOGIN":
              break;
          default:
            res.status(400).send(`${type} is not a valid function action`)
        }
    });
};
A UUID generated by the uuid package serves both as the document ID and as the user ID. This value matters because it later enables targeted updates to a specific user document during image upload. The password is salted with bcryptjs before its hash is saved, rather than storing plain text.
The app dispatches a CREATE_USER action from the user reducer to call this function:
import { createContext } from "react";
import { navigate } from "@reach/router";
import Axios from "axios";

export const userState = {
  user : null,
  isLoggedIn: false,
};

export const UserReducer = (state, action) => {
  switch (action.type) {
    case "CREATE_USER":
      const FIRESTORE_FUNCTION = process.env.REACT_APP_FIRESTORE_FUNCTION;
      const { userEmail, userPassword } = action;

      const data = {
        type: "CREATE-USER",
        email: userEmail,
        password: userPassword,
      };

      Axios.post(`${FIRESTORE_FUNCTION}`, data)
        .then((res) => {
          navigate("/home");
          return { ...state, isLoggedIn: true };
        })
        .catch((e) => console.log(`couldnt create user. error : ${e}`));
      break;
    case "LOGIN-USER":
      break;
    case "UPLOAD-USER-IMAGE":
      break;
    case "FETCH-DATA" :
      break
    case "LOGOUT":
      navigate("/login");
      return { ...state, isLoggedIn: false };
    default:
      break;
  }
};

export const UserContext = createContext(userState);
This Axios request posts the entered email and password to the firestoreFunction endpoint. When resolved, the user state changes from null to the response data, and the routed page becomes the authenticated home view. Account creation and Firestore-backed data insertion now function together.
Managing Profile Images with Cloud Storage
File storage is a frequent need. In a standard Node.js backend, Multer handles multipart/form-data, but that middleware isn't available as a standalone front-end solution. Google Cloud Storage is an alternative for static assets, providing a scalable, object-based file repository in globally available buckets using either the Storage API endpoints or the Node client library. Since the node library won't run in the browser, a cloud function with the appropriate code is the practical route.
The following cloud function connects, uploads, and manages objects in a created bucket:
const cors = require("cors")({ origin: true });
const { Storage } = require("@google-cloud/storage");
const StorageClient = new Storage();

exports.Uploader = (req, res) => {
    const { file } = req.body;
    StorageClient.bucket("TEST_BUCKET")
      .file(file.name)
      .then((response) => {
         console.log(response);
        res.status(200).send(response)
       })
      .catch((e) => res.status(422).send({error : e}));
  });
};
The function's two core actions are:
- Initializing the
Storage constructor, which uses Application Default Credentials for GCP authentication. - Uploading the uploaded file to the
TEST_BUCKETvia the.filemethod and returning a200response after success.
Expanded to handle a user's profile image, this same function stores the file in the bucket and also updates the relevant img_uri record inside the Firestore users collection:
require("dotenv").config();
const { Firestore } = require("@google-cloud/firestore");
const cors = require("cors")({ origin: true });
const { Storage } = require("@google-cloud/storage");

const StorageClient = new Storage();
const BucketName = process.env.STORAGE_BUCKET

exports.Uploader = (req, res) => {
  return Cors(req, res, () => {
    const { file , userId } = req.body;
    const firestore = new Firestore();
    const document = firestore.collection("users");

    StorageClient.bucket(BucketName)
      .file(file.name)
      .on("finish", () => {
        StorageClient.bucket(BucketName)
          .file(file.name)
          .makePublic()
          .then(() => {
              const img_uri = `https://storage.googleapis.com/${Bucket}/${file.path}`;
                document
                 .doc(userId)
                 .update({
                      img_uri,
                  })
                  .then((updateResult) => res.status(200).send(updateResult))
                  .catch((e) => res.status(500).send(e));
                  })
          .catch((e) => console.log(e));
      });
  });
};
Extra operations now include:
- Making a fresh Firestore connection to access the
userscollection. Authentication follows Application Default Credentials as before. - Making the uploaded file public through
makePublic, so it becomes accessible via a public URL — a step required since Storage's default Access Control blocks internet access otherwise.
Opening up a file fully public means anyone who obtains the link has unrestricted access. Using a Signed URL that grants time-limited access avoids that exposure.
- Locating the user's document using a Firestore
WHEREquery to match theuserIdposted with the image, then assigning the uploaded file's URL to that document'simg_urifield.
Any app with registered users in Firestore can call this by making a POST request that carries a userId and the image as its payload.
In the application, the UPLOAD-FILE state case triggers that request:
# index.js

import Axios from 'axios'

const UPLOAD_FUNCTION = process.env.REACT_APP_UPLOAD_FUNCTION

export const UserReducer = (state, action) => {
switch (action.type) {
 case "CREATE-USER" :
   # .....CREATE-USER-LOGIC ....

 case "UPLOAD-FILE":
    const { file, id }  = action
    return Axios.post(UPLOAD_FUNCTION, { file, id }, {
     headers: {
         "Content-Type": "image/png",
      },
   })
  .then((response) => {})
  .catch((e) => console.log(e));

  default :
    return console.log(`${action.type} case not recognized`)
  }
}
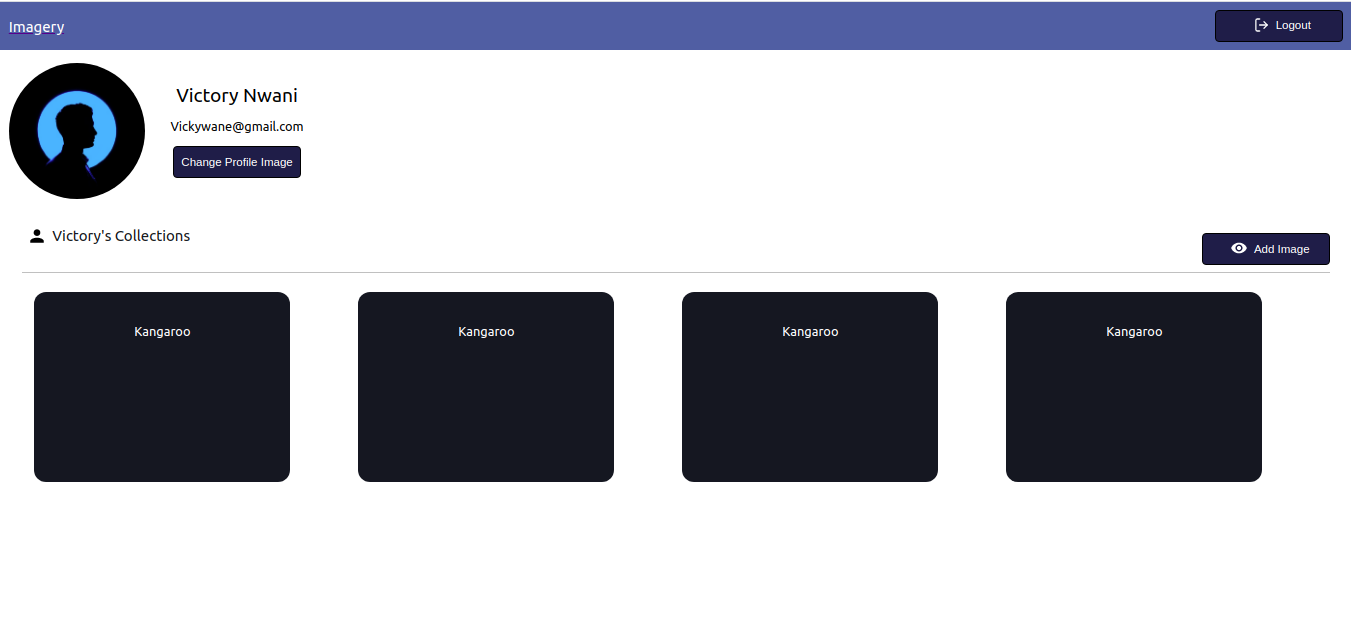
Here Axios handles the upload, sending the file's content with an image Content-Type in the header. The successful response carries the updated user document, now containing the permanent URL for the stored profile image, which the app state adopts to refresh the profile component's image src.
Scheduling Repetitive Tasks with Cloud Scheduler
Serverless applications still need to run automated, time-based operations — sending a digest email, cleaning up stale records, or hitting an internal endpoint on a schedule. In a traditional Node.js setup, you might reach for node-cron or node-schedule. On Google Cloud Platform, the equivalent service is Cloud Scheduler.
Cloud Scheduler mirrors the Unix cron utility in concept, but with an important distinction: it doesn't execute shell commands. Instead, each scheduled operation, called a job, triggers a specified target.
Jobs are managed from the Scheduler section of the Cloud Console. Each job definition contains these core fields:
- Frequency
The schedule itself, expressed in the standard unix-cron format — a five-value string representing minute, hour, day of month, month, and day of week. - Timezone
The timezone governing the schedule, which affects when the job actually fires. - Target
The operation to perform: anHTTPrequest to a URL, a Pub/Sub topic, or an App Engine application.
The Crontab generator can be helpful for assembling a valid frequency string without manual calculation.
Triggering Cloud Functions from a Job
Cloud Scheduler integrates cleanly with HTTP-triggered Cloud Functions. When creating a job with an HTTP target, you specify the function’s endpoint URL, the HTTP method (e.g., POST), and any request body data the function needs.
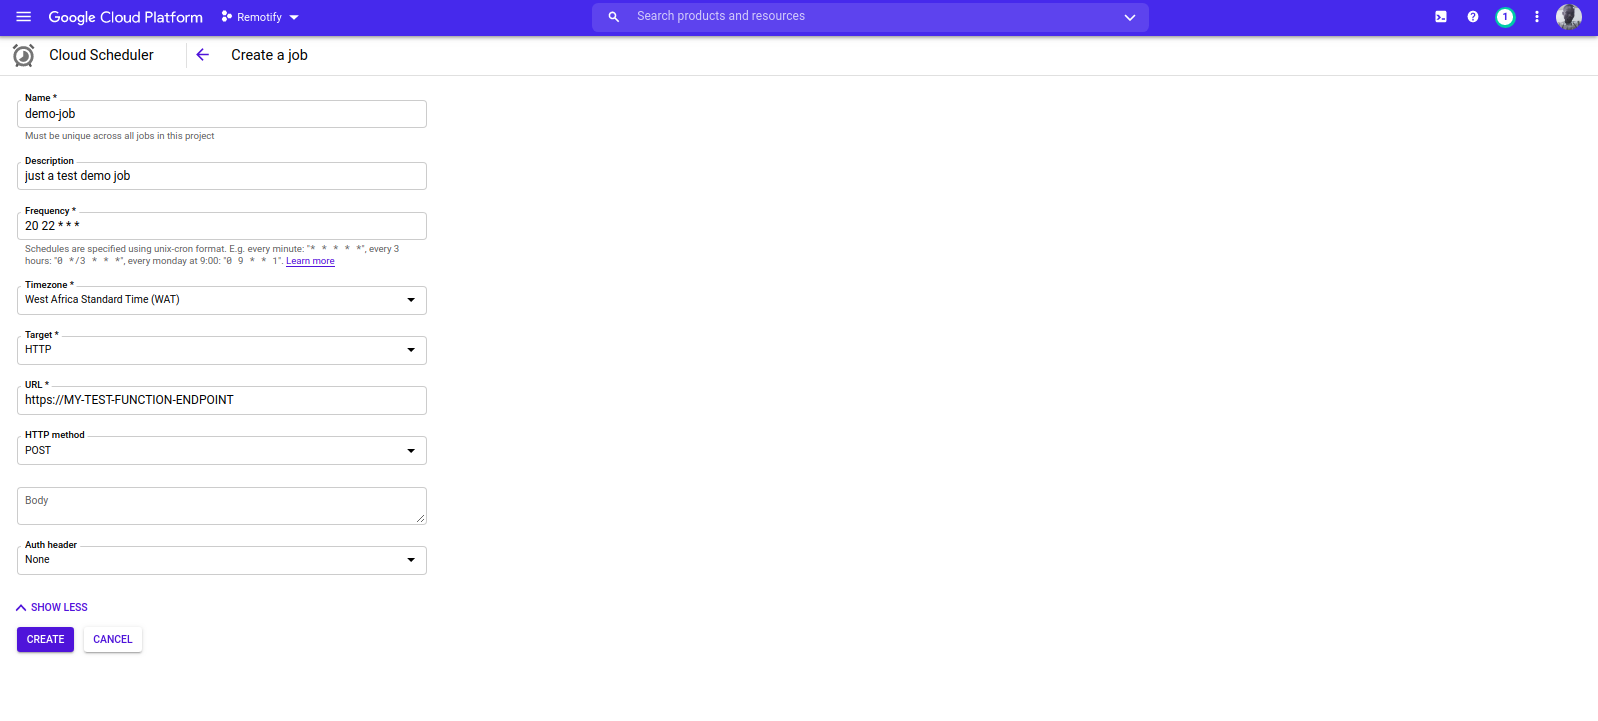
The example job above fires at 9 AM daily, sending a POST request to the function’s endpoint.
A Scheduled Email Use Case
A practical example is sending a scheduled HTML email. The following Cloud Function uses nodemailer to connect to a Mailgun SMTP server:
# index.js

require("dotenv").config();
const nodemailer = require("nodemailer");

exports.Emailer = (req, res) => {
  let sender = process.env.SENDER;
  const { reciever, type } = req.body

  var transport = nodemailer.createTransport({
    host: process.env.HOST,
    port: process.env.PORT,
    secure: false,
    auth: {
      user: process.env.SMTP_USERNAME,
      pass: process.env.SMTP_PASSWORD,
    },
  });

  if (!reciever) {
    res.status(400).send({ error: `Empty email address` });
  }

  transport.verify(function (error, success) {
    if (error) {
      res
        .status(401)
        .send({ error: `failed to connect with stmp. check credentials` });
    }
  });

  switch (type) {
    case "statistics":
      return transport.sendMail(
        {
          from: sender,
          to: reciever,
          subject: "Your usage satistics of demo app",
          html: { path: "./welcome.html" },
        },
        (error, info) => {
          if (error) {
            res.status(401).send({ error : error });
          }
          transport.close();
          res.status(200).send({data  : info});
        }
      );

    default:
      res.status(500).send({
        error: "An available email template type has not been matched.",
      });
  }
};
This function performs the following steps:
- It sets up an SMTP transport using the
host,user, andpasscredentials from the Mailgun dashboard. - It verifies the transport connection. If authentication fails, the function terminates with a
401 unauthenticatedstatus code. - It calls
sendMailto deliver the HTML email to the address in thetofield.
A switch statement on the type field in the request body makes the function reusable, letting it send different email templates to different recipients.
Creating Jobs Dynamically
Rather than setting up each email job manually, you can create cron jobs programmatically using the official Cloud Scheduler client library. This is especially useful when a new user signs up and an email needs to be scheduled for one day later.
The following example expands the CREATE-USER case in a Firestore-triggered function to create that job:
require("dotenv").config();cloc const { Firestore } = require("@google-cloud/firestore"); const scheduler = require("@google-cloud/scheduler") const cors = require("cors")({ origin: true }); const EMAILER = proccess.env.EMAILER_ENDPOINT const parent = ScheduleClient.locationPath( process.env.PROJECT_ID, process.env.LOCATION_ID ); exports.firestoreFunction = function (req, res) { return cors(req, res, () => { const { email, password, type } = req.body; const firestore = new Firestore(); const document = firestore.collection("users"); const client = new Scheduler.CloudSchedulerClient() if (!type) { res.status(422).send({ error : "An action type was not specified"}); } switch (type) { case "CREATE-USER":const job = { httpTarget: { uri: process.env.EMAIL_FUNCTION_ENDPOINT, httpMethod: "POST", body: { email: email, }, }, schedule: "*/30 */6 */5 10 4", timezone: "Africa/Lagos", }if (!email || !password) { res.status(422).send("email and password fields missing"); } return bcrypt.genSalt(10, (err, salt) => { bcrypt.hash(password, salt, (err, hash) => { document .add({ email: email, password: hash, }) .then((response) => {client.createJob({ parent : parent, job : job }).then(() => res.status(200).send(response)) .catch(e => console.log(`unable to create job : ${e}`) )}) .catch((e) => res.status(501).send(`error inserting data : ${e}`) ); }); }); default: res.status(422).send(`${type} is not a valid function action`) } }); };
Key points from this snippet:
- A Cloud Scheduler instance is instantiated using Application Default Credentials (ADC).
- The job configuration object contains:
uri— the email function’s endpoint.body— the payload with the recipient’s email address.schedule— the unix-cron string for the desired execution time.
- The job is created via
createJobonly after the user document has been successfully written to Firestore. - The function returns a
200status code once the job creation promise resolves.
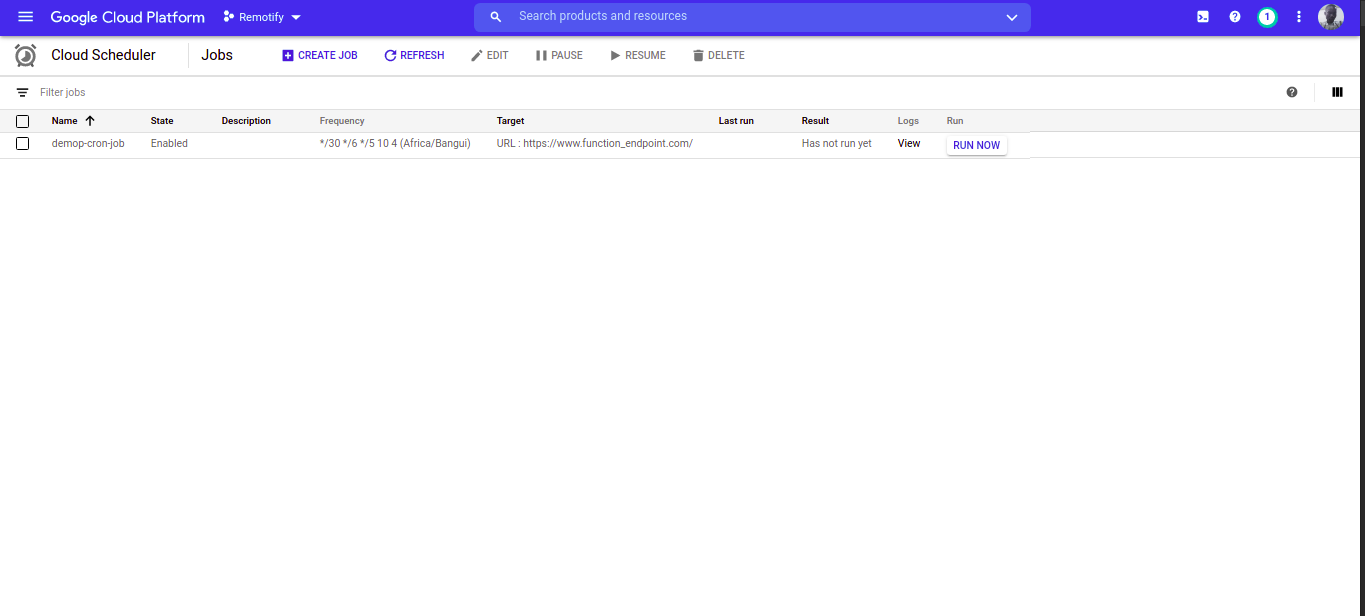
You can then see the scheduled job listed on the Cloud Scheduler page and either wait for it to trigger or run it manually for testing.
Conclusion and Next Steps for Scaling
This overview has covered the fundamentals of building serverless applications on Google Cloud — from Cloud Functions and data storage to handling automated scheduling with Cloud Scheduler, a component that maps neatly onto the cron patterns you already use.
As serverless architectures become the default for many teams, having a reliable way to run time-based logic without managing a dedicated server is essential. For production workloads, Google Cloud advocates recommend reviewing their guidance on 6 Strategies For Scaling Your Serverless Applications.
For reference, the source code for the cloud functions is in this GitHub repository, and the accompanying front-end application is available in a second repository. A live deployment of the front end is hosted on Netlify and can be tested here.


