

Stripe Objects You'll Use Most
Before we start wiring up billing endpoints, it helps to know the Stripe objects you will interact with. These five are the core of the flow we'll implement:
- Product: Represents an item or service sold through your app. You can create these from the Stripe dashboard and later retrieve them via the API.
- Price: Holds the monetary details (currency, amount, billing cycle) attached to a product. You can create these from the dashboard too.
- Subscription: Created to charge users on a set schedule. The billing period defined on the product's price object tells Stripe how often to renew the charge automatically.
- Payment method: Stores a customer's card or other payment details for use at checkout.
- Payment intent: Tracks the lifecycle of a single one-time payment. It has a
statusfield so you always know which stage the collected amount is in.
Setting Up Stripe for a New Business
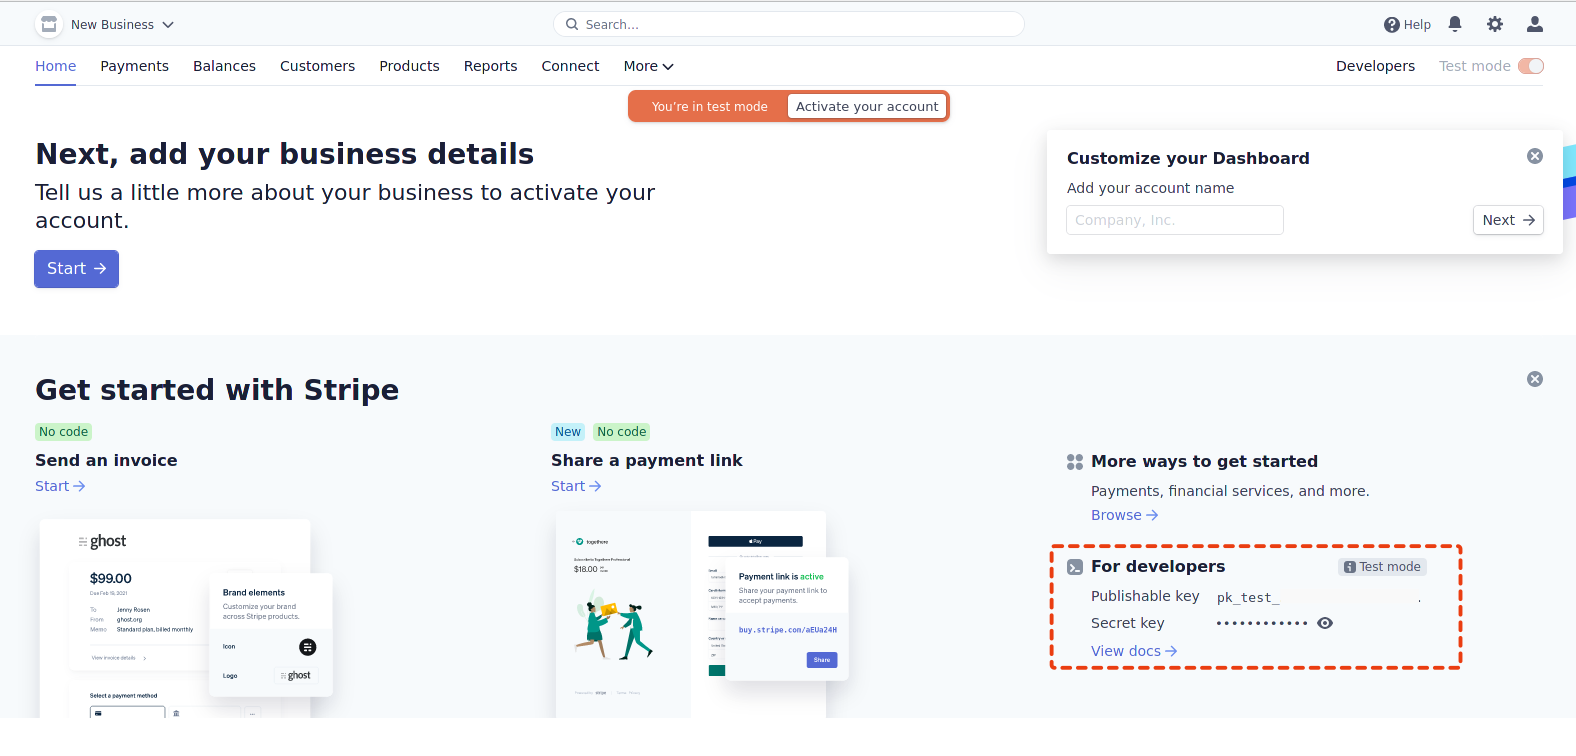
To get started with Stripe, head to their site to create a fresh account. New accounts automatically land in test mode, which acts like a local environment — you can safely create objects with Stripe's sample credit card numbers without moving real money. Test mode shows up in the dashboard as a toggle near the account settings.
Once your Stripe account page is ready, you'll see the API keys displayed there. The secret key is what our Node.js code will use when talking to Stripe's services from an Azure Function later; copy it somewhere private for now.
Creating Sample Products for the Demo
For this walkthrough, the business owner will manage all listed goods through Stripe's admin dashboard rather than through an API call. With that in mind, we manually populate two types of sample items there.
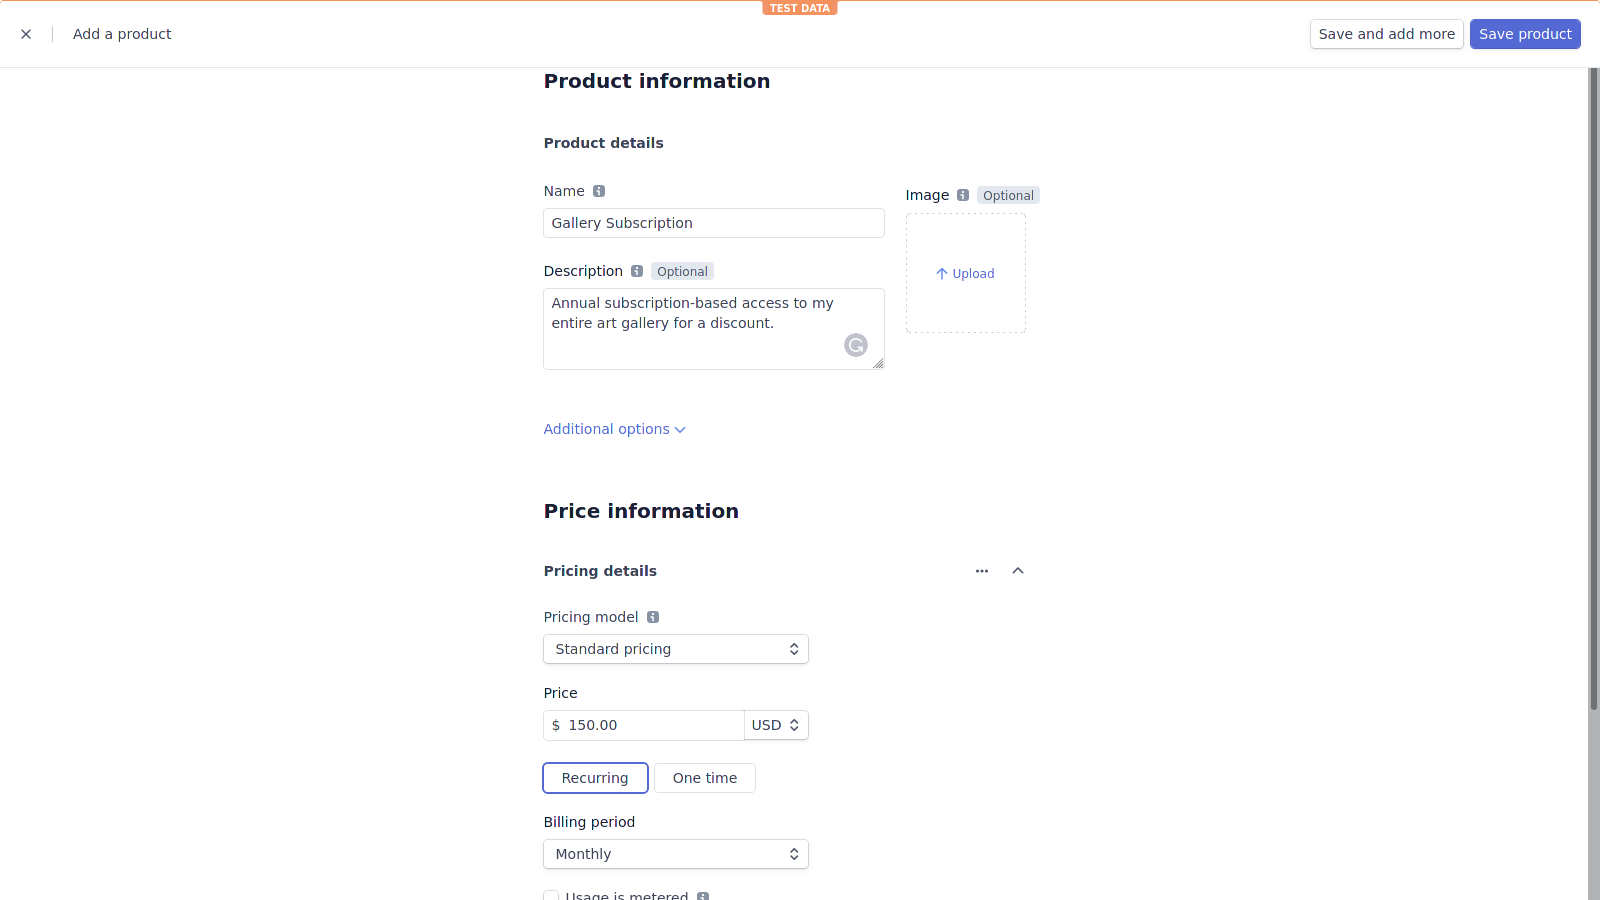
Start by navigating to the Products tab and hitting “Create Product”. Fill in the form with the item title, short description, and your chosen cost, then hold on before saving.
Select the pricing type that matches how you want to sell: a Recurring option lets you define a billing interval (monthly or yearly), producing an auto-renewing subscription on purchase. In contrast, selecting One time wipes out the billing-period field and creates a standard single-payment product.
For the demo, create one of each: name the first "Gallery Subscription" with a price of 150, applying the Recurring choice.
Now click “Save Product” to store it, go back to the Products list, and build your second item with the One time option selected. That way, your React frontend has both a subscription-type offering and a one-time purchase to show.
If you include an image through the product form, Stripe associates it with that listing automatically — the picture box accepts an upload sheet from your local device for that purpose.
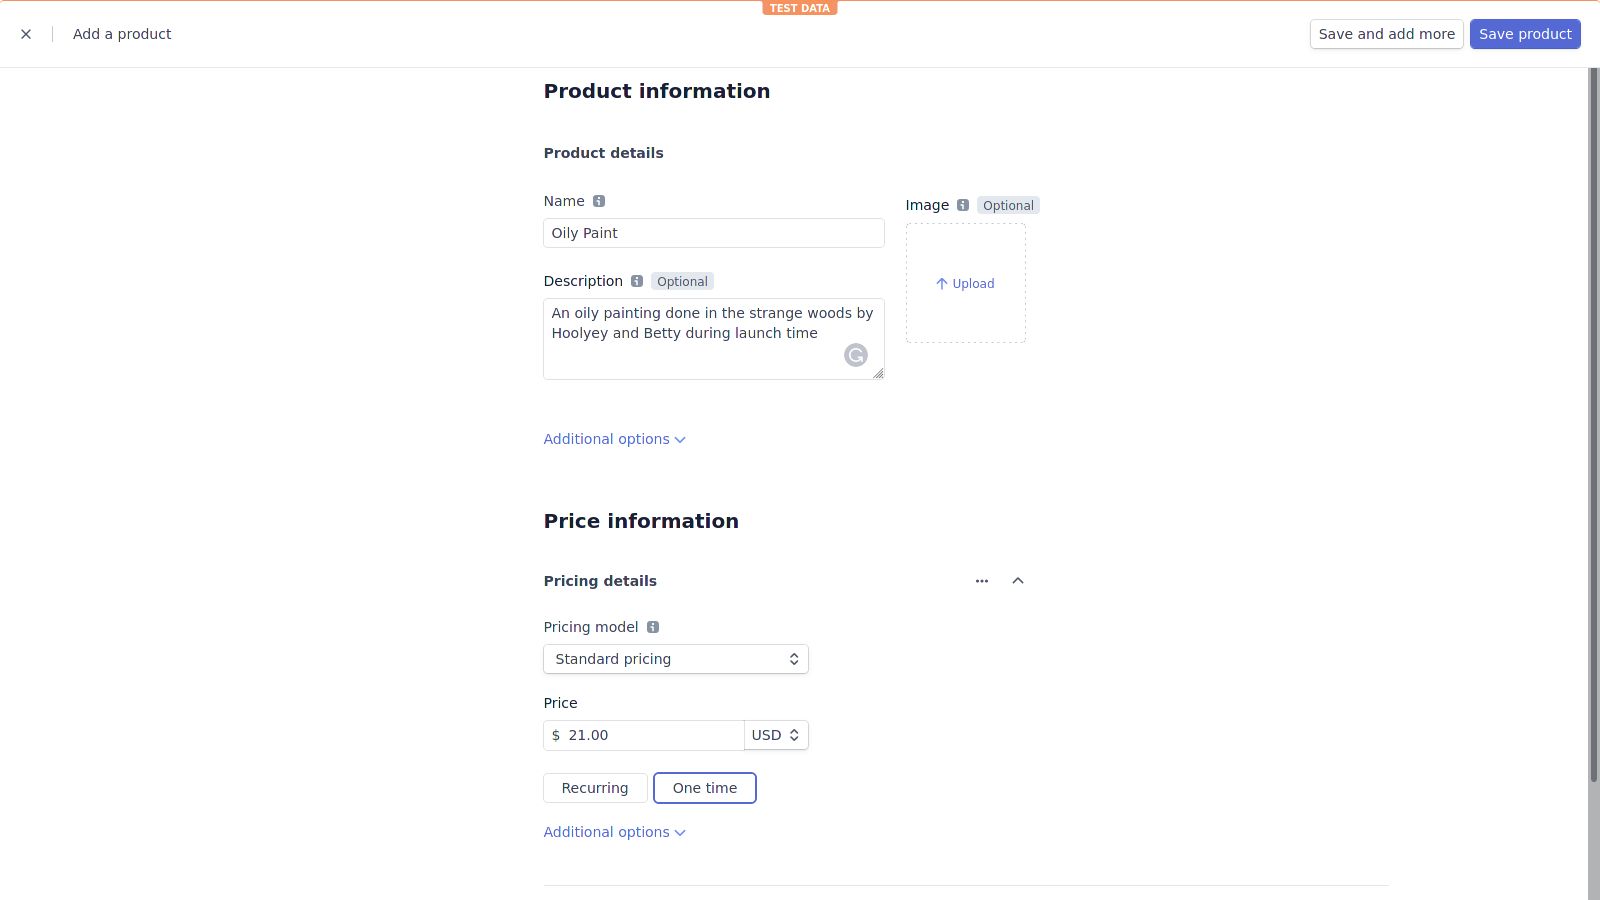
You can keep making more products if you want to see several entries on your storefront later; the dashboard accepts any name, detail, or photo at once via the same “Create Product" route, and those objects stay linked to your account for API consumption when building the backend functions.
Designing the API Layer with Azure Functions
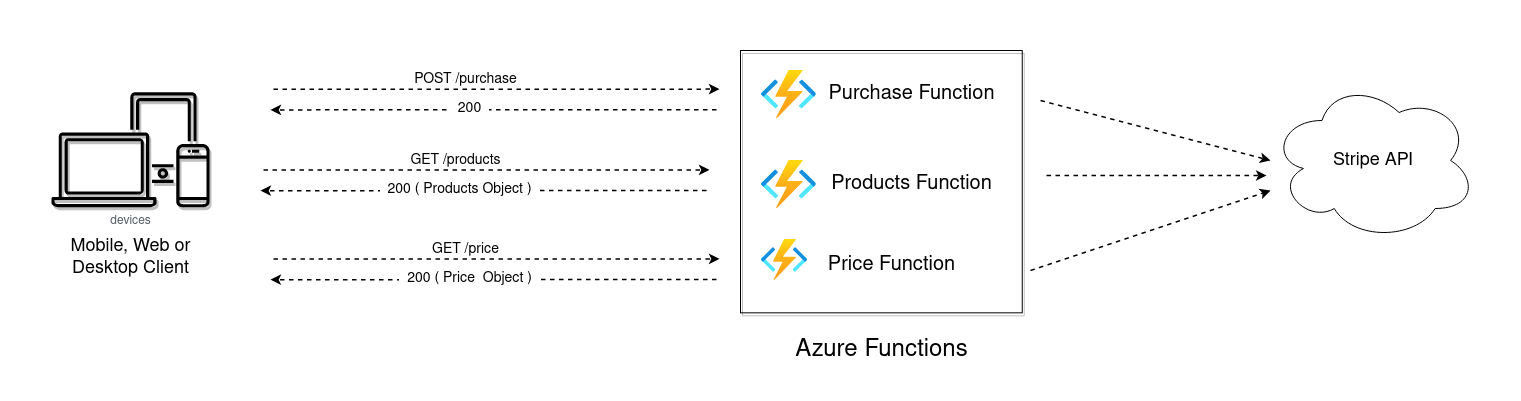
To handle the purchase flow programmatically, we'll build a small set of Azure Functions apps and expose each over HTTP. Using the Stripe Node.js package, these endpoints will receive requests from the web client, then talk to Stripe directly using the account keys mentioned above.
One project of Azure Functions can hold multiple functions, where each one works as an individual serverless service. The components we need expose correspond one-to-one to the flow: retrieving products, creating payment intents, and managing subscriptions. These same sections are reusable if you choose a different provider for the serverless side of things (e.g., AWS’s Lambda or Google’s Cloud Functions would work with the same logic), but we'll demonstrate them with Azure’s service here.
The way these pieces fit together for the storefront app is mirrored in the diagram below.
Required Tooling and Accounts
You need a few things installed and registered to get going:
- a free Stripe account (test mode will handle the API calls you make here, so no charges apply);
- an Auth0 account for securing the endpoint calls;
- a working understanding of JavaScript plus some familiarity with React for the frontend work we'll plug these endpoints into.
Building the Serverless Backend
Azure Functions provides a straightforward path for handling serverless, event-driven code invoked through HTTP triggers. All function apps in this project rely on the HTTP trigger model, allowing each function to execute when an HTTP request hits its endpoint. The Stripe npm library handles all programmatic Stripe operations in a Node.js environment, making this approach well-suited for JAMstack applications that need billing logic without maintaining a dedicated backend service.
While Azure Functions can be built in the Azure portal, developing locally with the Core Tools CLI is more efficient. After installing the Core Tools globally via npm, you bootstrap a new function project:
# Create a new directory
mkdir stripe-serverless-api

# Change into new directory
cd stripe-serverless-api

# Bootstrap Azure Functions project
func new --language='javascript' --worker-runtime='node' --template="HTTP trigger"
--name="products"
This creates a stripe-serverless-api directory containing an Azure Functions app scaffolded with an HTTP trigger template running Node.js and JavaScript. Starting the function listens for HTTP requests on localhost port 5050. Each function app is invoked by appending its name to the endpoint — for instance, a products function app responds at <FUNCTIONS_ENDPOINT>/products.
func start -p 5050Two dependencies are required before implementing the functions: the Stripe Node.js package for API interactions and dotenv for loading sensitive credentials. Store the Stripe secret key in a .env file, and ensure a .gitignore file excludes it from version control.
// .env

STRIPE_SECRET_KEY=<STRIPE_SECRET_KEY>
// .gitignore
.env
Products Function
The products function responds to a GET request by returning JSON with all products in the Stripe account. In the index.js file within the products directory, the exported function calls the Stripe list method to fetch products associated with the STRIPE_SECRET_KEY stored in the environment. Once the asynchronous call resolves, the data array is destructured and returned in the response body through the context object.
require("dotenv").config();

const stripe = require("stripe")(process.env.STRIPE_SECRET_KEY);
const headers = {
  "Access-Control-Allow-Methods": "*",
  "Access-Control-Allow-Origin": "*",
  "Access-Control-Allow-Headers": "Content-Type",
  "Content-Type": "application/json",
};

module.exports = async function (context, req) {
  try {
    const { data } = await stripe.products.list({});
    context.res = {
      headers,
      body: {
        data,
      },
    };
  } catch (e) {
    context.res = {
      headers,
      body: e,
    };
  }
};
Testing from a separate terminal with cURL confirms the function returns the product list as JSON:
curl http://localhost:4040/api/customer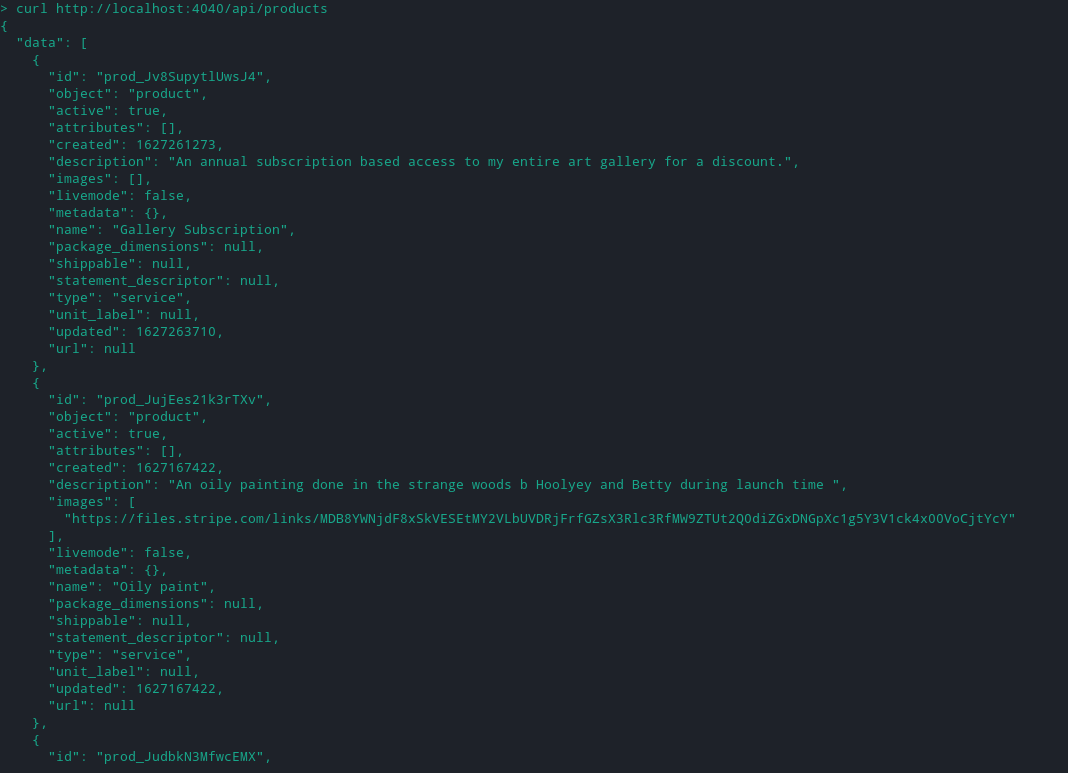
Price Function
Product objects returned by the products function do not include price information. Fetching a product's price requires a separate API call to the price endpoint. The price function handles this by accepting a GET request with a product ID in the query parameter, then passing that ID to the list method on the price object to retrieve only prices associated with the specified product.
To create this function app, duplicate the existing products folder, rename the copy to price, and replace its index.js contents:
require("dotenv").config();

const stripe = require("stripe")(process.env.STRIPE_SECRET_KEY);
const headers = {
  "Access-Control-Allow-Methods": "*",
  "Access-Control-Allow-Origin": "*",
  "Access-Control-Allow-Headers": "Content-Type",
  "Content-Type": "application/json",
};

module.exports = async function (context, req) {
  const { product } = req.query;

  try {
    const { data } = await stripe.prices.list({
      product,
    });
    context.res = {
      headers,
      body: {
        data : data[0],
      },
    };
  } catch (e) {
    context.res = {
      headers,
      body: e,
    };
  }
};
Only the first object from the resolved data array is returned in the response, since the application needs a single price entity per product, even though products may have multiple prices attached. Product IDs are visible in the Stripe dashboard under the Products page. Testing with a product ID in the request parameter returns the corresponding price object:
curl http://localhost:4040/api/price?product="prod_JudY3VFuma4zj7"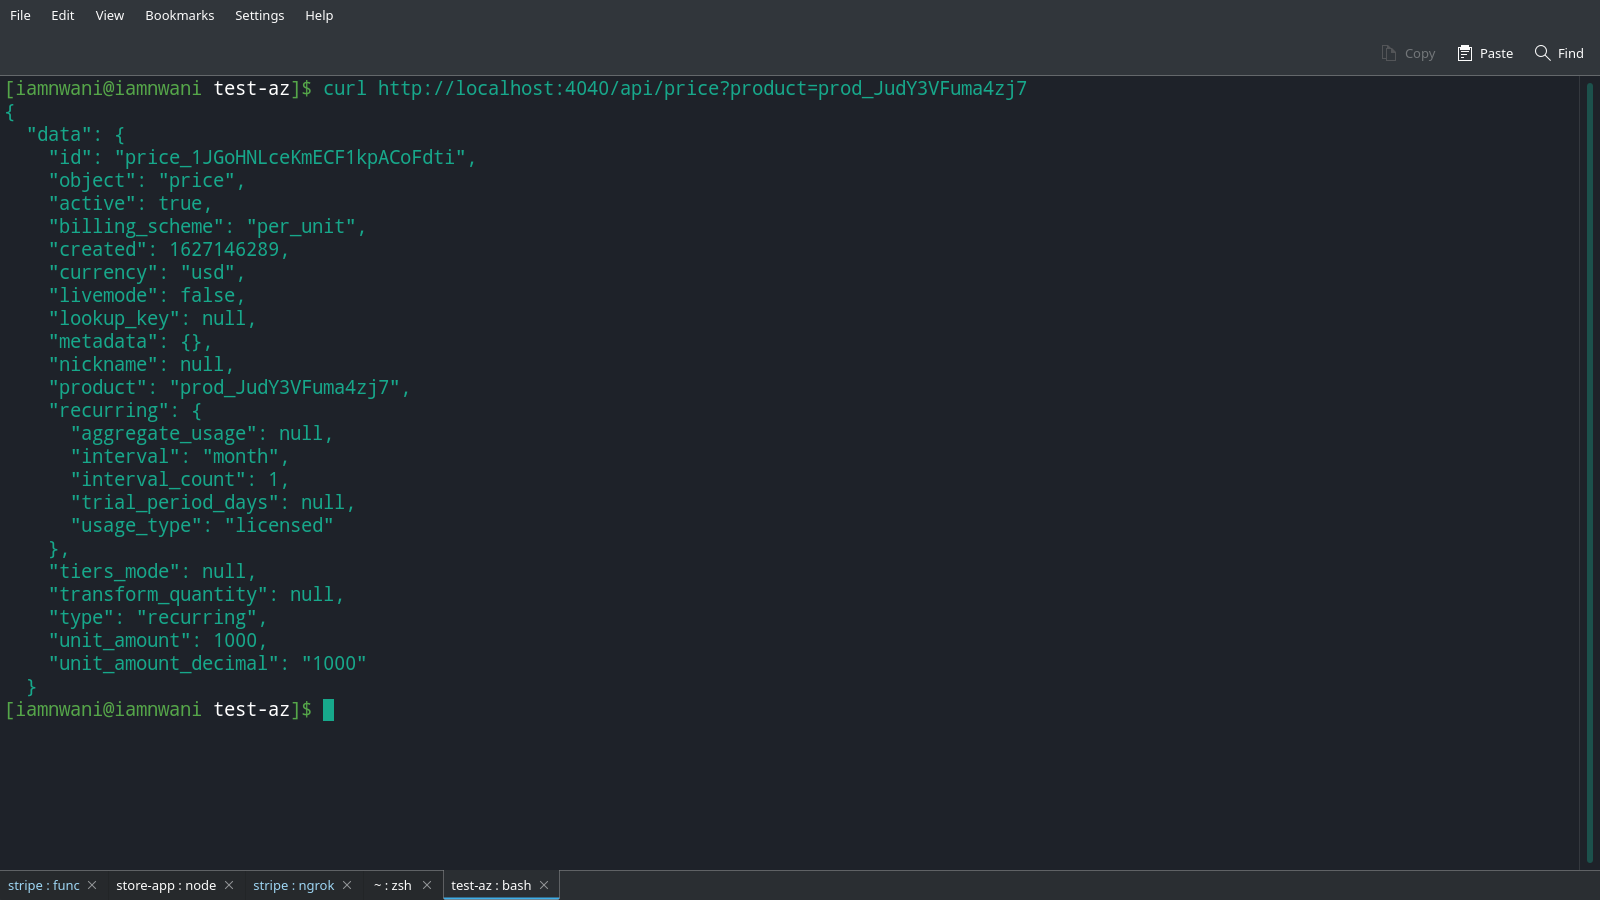
The returned price object includes currency, type, and recurring billing details.
Purchase Function
The purchase function handles both one-time product purchases and user subscriptions. Whichever operation executes, the user is charged via a credit card. Duplicate an existing function folder, rename it to purchase, and update its index.js to process POST requests:
// ./purchase/index.js
require("dotenv").config();

const stripe = require("stripe")(process.env.STRIPE_SECRET_KEY);
const headers = {
  "Access-Control-Allow-Methods": "*",
  "Access-Control-Allow-Origin": "*",
  "Access-Control-Allow-Headers": "Content-Type",
  "Content-Type": "application/json",
};

module.exports = async function (context, req) {
  const {
    number,
    purchaseCurrency,
    cvc,
    exp_month,
    exp_year,
    purchaseAmount,
    email,
    purchaseType,
    priceEntityId,
  } = req.body;

  try {
    // Create a payment method for user using the card details
    const { id: paymentID } = await stripe.paymentMethods.create({
      type: "card",
      card: {
        number,
        cvc,
        exp_year,
        exp_month,
      },
    });

    const { id: customerID } = await stripe.customers.create({
      email,
      description: "Artwork gallery customer",
      payment_method: paymentID,
    });

    await stripe.paymentMethods.attach(paymentID, { customer: customerID });
    if (purchaseType === "recurring") {
      const subscriptionData = await stripe.subscriptions.create({
        customer: customerID,
        default_payment_method: paymentID,
        items: [
          {
            price: priceEntityId,
          },
        ],
      });
      context.res = {
        headers,
        body: {
          message: "SUBSCRIPTION CREATED",
          userStripeId: customerID,
          userSubscriptionId: subscriptionData.id,
        },
      };
    } else {
      const { id: paymentIntentId } = await stripe.paymentIntents.create({
        amount: purchaseAmount,
        currency: purchaseCurrency || "usd",
        customer: customerID,
        payment_method: paymentID,
      });
      const { amount_received } = await stripe.paymentIntents.confirm(
        paymentIntentId,
        {
          payment_method: paymentID,
        }
      );
      context.res = {
        headers,
        body: {
          message: `PAYMENT OF ${amount_received} RECIEVED`,
        },
      };
    }
  } catch (e) {
    context.res = {
      status: 500,
      body: e,
    };
  }
};
The handler in that code makes three sequential Stripe operations:
- A
payment_methodentity is created from the credit card number, cardholder name, CVC, and expiry date destructured from the request body. - A customer is created with the email from the request, along with a description and the previously created payment method. The
customerobject is then attached to thepayment_methodvia theattachmethod, using both IDs. - An
ifcondition branches onpurchaseType. When the value isrecurring, asubscriptionis built from the customer ID, thepayment_methodID as the default payment method, and anitemsarray containing a single price entity ID.
Connecting the React Client
A React web application acts as the client that calls the Azure Functions directly. The interface already exists with data pulled from a mock JSON file; the work here involves swapping static data for live HTTP requests to the function endpoints.
Clone the application repository and install its dependencies:
git clone https://github.com/vickywane/stripe-art-app.git# change directory
cd stripe-art-app
# install dependencies
yarn installLaunching it with yarn start serves the home page at http://localhost:3000.
Two existing pieces of the app's structure matter here. First, user management — authentication and profile storage — is handled by Auth0 through the auth0-react SDK. The cloned app expects Auth0 single-page application credentials in the .env file:
# ./env

REACT_APP_AUTHO_DOMAIN=<AUTH0_DOMAIN>
REACT_APP_AUTHO_SECRET_KEY=<AUTH0_SECRET>
REACT_APP_FUNCTION_ENDPOINT="http://localhost:5050/api"
The REACT_APP_FUNCTION_ENDPOINT variable points to the running Azure Functions apps. During development this is a localhost URL, but it becomes a live URL once the functions are deployed to Azure.
Second, the art products shown on the home page currently come from a JSON file in the data directory.
Two updates are planned for this part of the project. On the home page, the static product display will be refactored to fetch products from Stripe using the products Azure function, and the mock.json file will be removed. A new checkout page will then be added so users can purchase an art print or a subscription with a credit card.
Displaying Products on the Home Page
The home page renders for both authenticated and unauthenticated users, showing all available artwork products through a child artworkCard component defined in artworkCard.js. To enable purchases, the button in this card needs to trigger a checkout flow. Modify the existing artworkCard.js file in the components directory as highlighted:
// ./src/components/artworkCard.js

import { navigate } from "@reach/router";
import React, { useState, useEffect } from "react";

const ArtworkCard = ({ name, description, img_uri, productId }) => {
  const [priceData, setPriceData] = useState({});

  useEffect(() => {
    (async () => await fetchPrice())();
  }, []);

  const fetchPrice = async () => {
    const res = await fetch(
      '${process.env.REACT_APP_FUNCTION_ENDPOINT}/price?product=${productId}'
    );
    const { data } = await res.json();
    setPriceData(data);
  };

  return (
    <div className="artwork-card">
      <div
        className="card-top"
        style={{
          backgroundImage: 'url(${img_uri})',
        }}
      ></div>
      <div className="artwork-details">
        <div className={"align-center"}>
          <h5> {name} </h5>
        </div>
        <hr />
        <div style={{ justifyContent: "space-between" }} className="flex">
          <div className="align-center">
          <p> {'$${priceData.unit_amount}'} </p>
          </div>
          <div>
            <button
              className="btn"
              onClick={() =>
                navigate('/checkout/${productId}', {
                  state: {
                    name,
                    productId,
                    priceEntityId: priceData.id,
                    price: priceData.unit_amount,
                    purchaseType: priceData.type,
                  },
                })
              }
            >
              Purchase
            </button>
            </div>
        </div>
        <br />
        <p> {description} </p>
      </div>
    </div>
  );
};

export default ArtworkCard;
The additions introduce a useEffect hook that fetches the price object for the displayed product from the price function app. Once the fetch promise resolves, the response stream is converted to JSON and stored in the component's local state. A Purchase button is also added, and clicking it navigates the user to the checkout page for entering bank card details.
Next, open Home.js in the pages directory and apply the highlighted changes to retrieve all products from Stripe through the products function app:
# ./src/pages/home.js

import React, { useState, useEffect } from "react";
import Header from "../components/header";
import "../App.css";
import Banner from "../components/banner";
import ArtworkCard from "../components/artworkCard";

const Home = () => {

  const [artworks, setArtworks] = useState([]);
  useEffect(() => {
    (async () => await fetchArtworks())();
  }, []);

  const fetchArtworks = async () => {
    const res = await fetch(`${process.env.REACT_APP_FUNCTION_ENDPOINT}/products`);
    const { data } = await res.json();
    setArtworks(data);
  };

  return (
    <div style={{ backgroundColor: "#F3F6FC", height: "100vh" }}>
      <Header />
      <Banner />
      <br />
      <br />
      <div className="page-padding">
        <div style={{}}>
          <div className="flex">
            <div className="align-center">
              <h4> My Rated Art Paints </h4>
            </div>
          </div>
          <p>
            Every artist dips his brush in his own soul, <br />
            and paints his own nature into his pictures.
          </p>
        </div>
        <br />
        <div>
          <ul className="artwork-list">
            {artworks.map(({ id, name, img_uri, images, description }) => (
              <li key={id}>
                <ArtworkCard
                  productId={id}
                  description={description}
                  img_uri={images[0]}
                  name={name}
                />
              </li>
            ))}
          </ul>
        </div>
      </div>
    </div>
  );
};

export default Home;
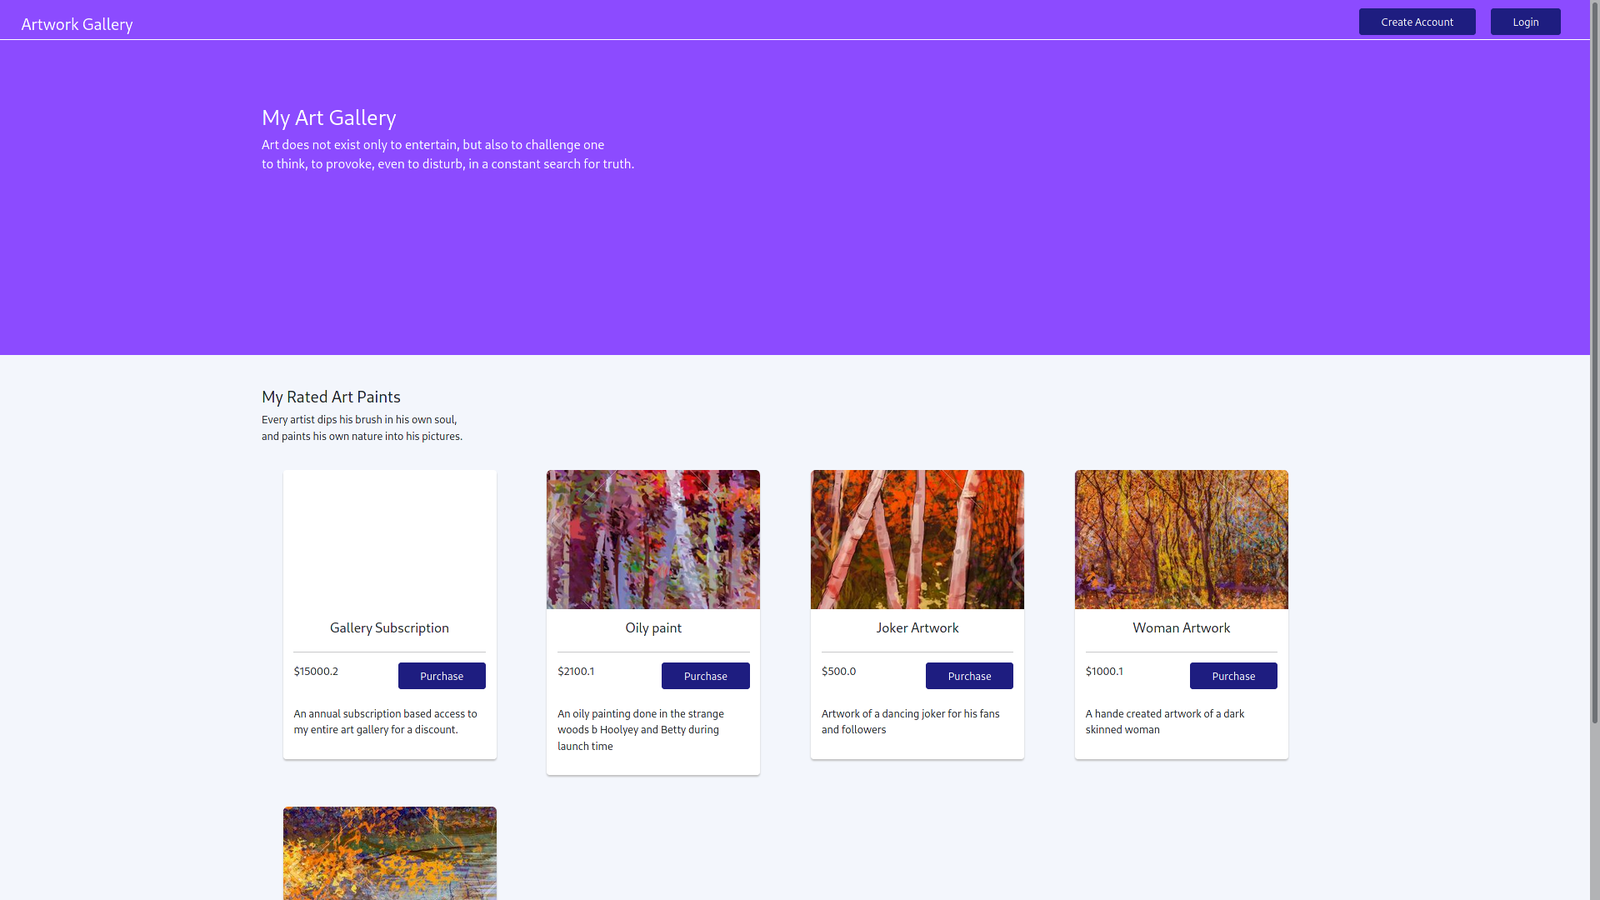
This code performs a GET request in a useEffect hook as soon as the component mounts, using the browser's fetch API. The response stream is converted to JSON and stored in local component state. The data.json file is no longer referenced. In the browser, the products created earlier in Stripe now appear in a grid layout, as the rendered markup demonstrates:
Checkout Page and Payment Submission
Create a checkout.js file in the pages directory. This component collects credit card details when users reach /checkout after clicking the "Purchase" button. Add the following contents:
# ./src/pages/checkout.js

import React, { useState } from "react";
import { useAuth0 } from "@auth0/auth0-react";
import Header from "../components/header";
import "../App.css";

const Checkout = (props) => {
  const { purchaseType, productId, priceEntityId, name, price } =
    props.location.state;

  const [cardNumber, setCardNumber] = useState("");
  const [cardName, setCardName] = useState("");
  const [cvc, setcvc] = useState("");
  const [cardExpiryMonth, setCardExpiryMonth] = useState("");
  const [cardExpiryYear, setCardExpiryYear] = useState("");
  const [loading, setLoading] = useState(false);
  const [paymentSuccess, setPaymentSuccess] = useState(false);
  const { user } = useAuth0();

  const makePayment = async () => {
    setLoading(true);
    try {
      const res = await fetch(
        `${process.env.REACT_APP_FUNCTION_ENDPOINT}/purchase`,
        {
          method: "POST",
          body: JSON.stringify({
            number: cardNumber,
            exp_month: cardExpiryMonth,
            exp_year: cardExpiryYear,
            purchaseAmount: price,
            purchaseType,
            priceEntityId,
            cvc,
            email: user.email,
          }),
        }
      );

      if (res.status === 200) {
        const { paymentId } = await res.json();
        await fetch(`${process.env.REACT_APP_FUNCTION_ENDPOINT}/billing-data`, {
          method: "POST",
          body: JSON.stringify({
            productId,
            userId: user.sub,
            paymentId,
          }),
        });
        setPaymentSuccess(true);
      }
    } catch (e) {
      console.log(e);
    } finally {
      setLoading(false);
    }
  };

  return (
    <div
      style={{
        height: "100vh",
        background: "#F3F6FC",
      }}
    >
      <Header />
      <div
        className="product-page-padding"
        style={{
          height: window.innerHeight,
          display: "flex",
          justifyContent: "center",
          alignItems: "center",
        }}
      >
        <div className="align-center">
          <div className="payment-card">
            <h5 className="align-center">
              <b>{name} Checkout </b>
            </h5>
            <p>
              <b>Total Price:</b> {`$${price}`}
            </p>
            <p>
              <b> Payment Type: </b> {purchaseType.toUpperCase()}
            </p>
            <hr />
            {!paymentSuccess ? (
              <form
                onSubmit={(e) => {
                  e.preventDefault();
                  makePayment();
                }}
              >
                <h5> Payment Details </h5>
                <br />
                <div className="input-container">
                  <label id="name"> Cardholder Name </label>
                  <input
                    value={cardName}
                    onChange={(e) => setCardName(e.target.value)}
                    className="payment-input"
                    placeholder="Bank Cardholder Name"
                    type="text"
                  />
                </div>
                <br />
                <div className="input-container">
                  <label id="name"> Card Number </label>
                  <input
                    value={cardNumber}
                    onChange={(e) => setCardNumber(e.target.value)}
                    className="payment-input"
                    placeholder="Bank Card Numbers"
                    type="number"
                  />
                </div>
                <br />
                <div className="input-container">
                  <label id="name"> Card CVC </label>
                  <input
                    value={cvc}
                    onChange={(e) => setcvc(e.target.value)}
                    className="payment-input"
                    placeholder="Bank Card CVC"
                    type="text"
                  />
                </div>
                <br />
                <div className="input-container">
                  <label id="name"> Card Expiry Month </label>
                  <input
                    value={cardExpiryMonth}
                    onChange={(e) => setCardExpiryMonth(e.target.value)}
                    className="payment-input"
                    placeholder="Bank Card Expiry Month"
                    type="text"
                  />
                </div>
                <br />
                <div className="input-container">
                  <label id="name"> Card Expiry Year </label>
                  <input
                    value={cardExpiryYear}
                    onChange={(e) => setCardExpiryYear(e.target.value)}
                    className="payment-input"
                    placeholder="Bank Card Expiry Year"
                    type="text"
                  />
                </div>
                <br />
                <button
                  disabled={loading}
                  style={{ width: "100%" }}
                  onClick={(e) => {
                    e.preventDefault();
                    makePayment();
                  }}
                  className="btn"
                >
                  {!loading ? "Confirm" : "Confirming"} My Payment
                </button>
              </form>
            ) : (
              <div>
                <br />
                <h5 className="align-center">
                  Your {`$${price}`} purchase of {name} was successfull{" "}
                </h5>
                <br />
              </div>
            )}
          </div>
        </div>
      </div>
    </div>
  );
};

export default Checkout;
The form contains four input fields — name, number, expiration, and CVC — whose values are stored in local state. Clicking "Confirm my payment" triggers the makePayment function, which handles the purchase logic. This function sends a POST request with the credit card details in the body to the /purchase cloud function. Only after that request resolves with a 200 status code does a second POST go to /billing-data to store the purchased product's details.
Note: The product details saved via Auth0 (as discussed for productCard) are later used to identify which products a user has already bought from the home page.
To test, fill the inputs with one of Stripe's basic test cards intended for test-mode accounts, then click the confirm button:
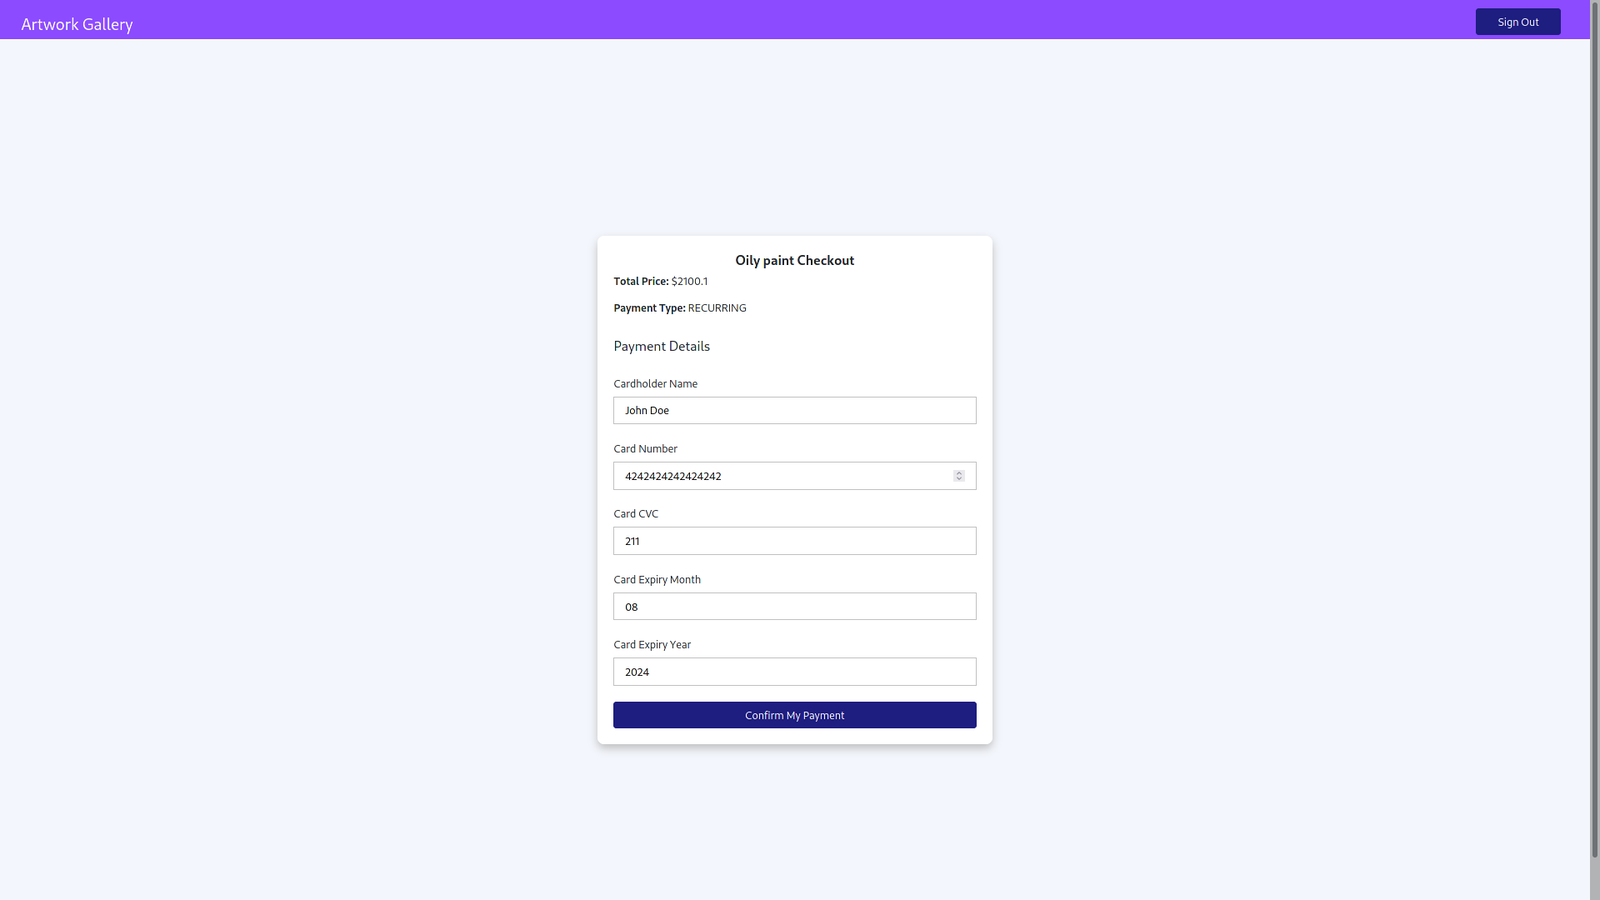
Note: The card shown is not real credit card data but one of the basic test cards Stripe provides for accounts in test mode.
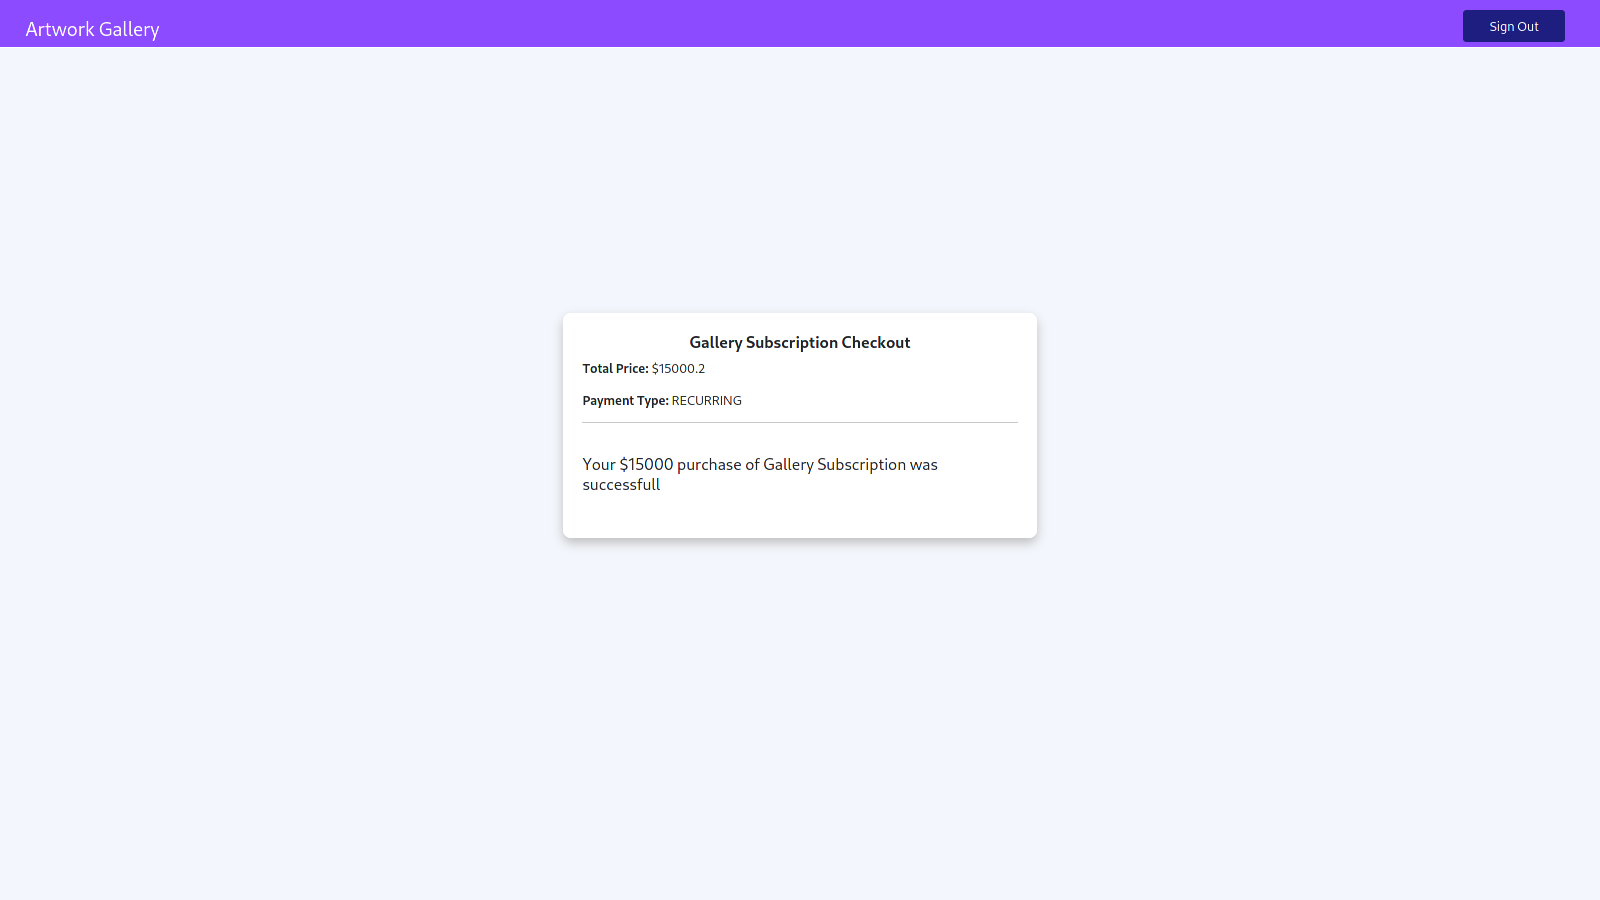
After submission, a payment is processed from the test card, and the checkout interface updates to show a successful response:
In the "Reports" section of the Stripe admin dashboard, the latest payment — the gallery subscription created on the checkout page — appears in the statistics:
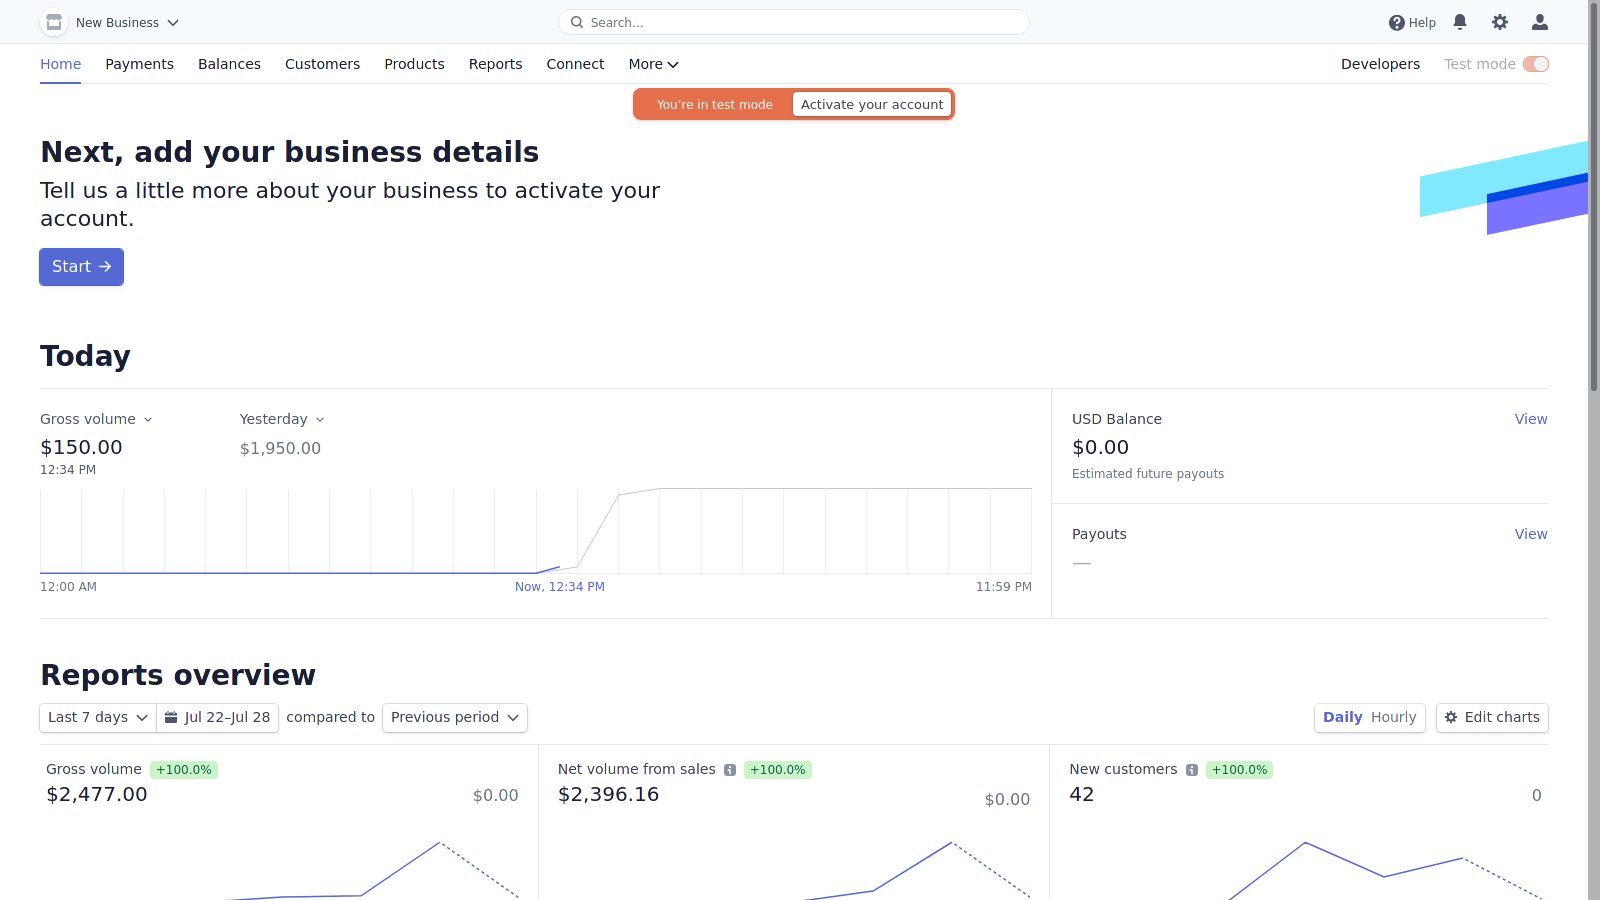
The image shows a gross volume of $150.00 from the test card used in this tutorial. Note: The chart also reflects other test operations performed while the article was being written.
With that, the whole payment flow is operational. New products can be created in the Stripe dashboard and purchased through this React client or any other consumer of the Azure Functions.
What Was Built
This tutorial walked through a full integration of Stripe, Azure Functions, and React. The first step was constructing an API layer that wrapped the Stripe API via a Node.js package. From there, the web application consumed the Azure Functions endpoints — retrieving products and processing payments — directly from its UI.
References
- Stripe Documentation
- auth0-react (React SPA SDK)
- Auth0


