
Netlify's "Deploy to Netlify" button clones a repository and deploys it as a new site in a single click. Less obvious is that the button can also carry pre-filled environment variables, which turns a fixed template into a configurable product. This walkthrough builds a "link in bio" site on top of that capability, with no sign-up flow and no per-user accounts.
The build splits into two repositories that have to agree on a contract:
- A template project — the repo that gets cloned, reading its configuration from environment variables passed into the deploy.
- A generator project — a form that collects a user's details and assembles the environment variables for the button link.
Both projects are built with Vite: the template uses React, the generator uses Vue.
The template: reading configuration from the environment
Start the template with a standard Vite/React scaffold:
npm init @vitejs/appAfter npm install, add a .local.env file containing the values the site should consume: the site owner's name, a profile picture, and the list of relevant links.
VITE_NAME=Cassidy Williams
VITE_PROFILE_PIC=https://github.com/cassidoo.png
VITE_GITHUB_LINK=https://github.com/cassidoo
VITE_TWITTER_LINK=https://twitter.com/cassidoo
The contents above are test data; the schema is yours to define. On the Vite side, variables exposed to client code must carry the VITE_ prefix and are read through import.meta.env.
The template app is mostly a parsing function that converts the raw environment strings into something the components can render:
function getPageContent() {
  // Pull in all variables that start with VITE_ and turn it into an array
  let envVars = Object.entries(import.meta.env).filter((key) => key[0].startsWith('VITE_'))

  // Get the name and profile picture, since those are structured differently from the links
  const name = envVars.find((val) => val[0] === 'VITE_NAME')[1].replace(/_/g, ' ')
  const profilePic = envVars.find((val) => val[0] === 'VITE_PROFILE_PIC')[1]

  // ...

  // Pull all of the links, and properly format the names to be all lowercase and normalized
  let links = envVars.map((k) => {
    return [deEnvify(k[0]), k[1]]
  })

  // This object is what is ultimately sent to React to be rendered
  return { name, profilePic, links }
}

function deEnvify(str) {
  return str.replace('VITE_', '').replace('_LINK', '').toLowerCase().split('_').join(' ')
}
That parsed data then feeds a React function that renders the actual components:
// ...
  return (
    <div>
      <img alt={vars.name} src={vars.profilePic} />
      <p>{vars.name}</p>
      {vars.links.map((l, index) => {
        return <Link key={`link${index}`} name={l[0]} href={l[1]} />
      })}
    </div>
  )

// ...
Add some CSS and the link-in-bio page is complete:
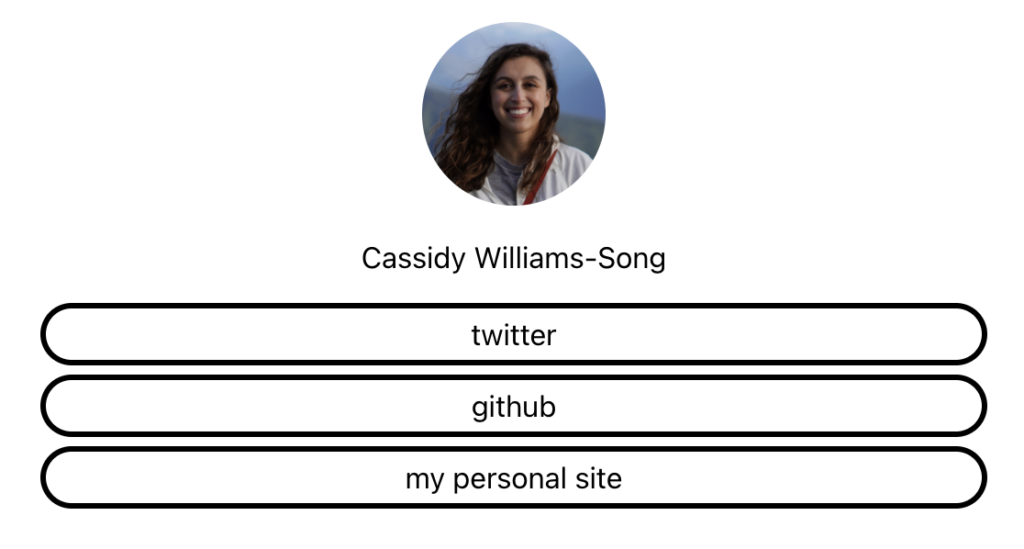
With hard-coded values this is still a static site. The generator is what removes that dependency.
The generator: collecting input and building the button
A second Vite project, this time in Vue, collects three things: a name, a profile picture, and however many links a user wants to publish.
The App.vue template separates those inputs:
<template>
  <div>
    <p>
      <span>Your name:</span>
      <input type="text" v-model="name" />
	</p>
    <p>
      <span>Your profile picture:</span>
      <input type="text" v-model="propic" />
    </p>
  </div>

  <List v-model:list="list" />

  <GenerateButton :name="name" :propic="propic" :list="list" />
</template>
The List component holds paired inputs for each link the user adds:
<template>
  <div class="list">
    Add a link: <br />
    <input type="text" v-model="newItem.name" />
    <input type="text" v-model="newItem.url" @keyup.enter="addItem" />
    <button @click="addItem">+</button>

    <ListItem
      v-for="(item, index) in list"
      :key="index"
      :item="item"
      @delete="removeItem(index)"
    />
  </div>
</template>
Its two inputs populate an object named newItem. A ListItem component renders every link created so far, and each entry can remove itself.
Those collected values are then handed to a GenerateButton component. Its template is nothing more than an <a> tag holding the link; the logic lives in the component's methods inside <script>:
// ...
methods: {
  convertLink(str) {
    // Convert each string passed in to use the VITE_WHATEVER_LINK syntax that our template expects
    return `VITE_${str.replace(/ /g, '_').toUpperCase()}_LINK`
  },
  convertListOfLinks() {
    let linkString = ''

    // Pass each link given by the user to our helper function
    this.list.forEach((l) => {
      linkString += `${this.convertLink(l.name)}=${l.url}&`
    })

    return linkString
  },
  // This function pushes all of our strings together into one giant link that will be put into our button that will deploy everything!
  siteLink() {
    return (
      // This is the base URL we need of our template repo, and the Netlify deploy trigger
      'https://app.netlify.com/start/deploy?repository=https://github.com/cassidoo/link-in-bio-template#' +
      'VITE_NAME=' +
      // Replacing spaces with underscores in the name so that the URL doesn't turn that into %20
      this.name.replace(/ /g, '_') +
      '&' +
      'VITE_PROFILE_PIC=' +
      this.propic +
      '&' +
      // Pulls all the links from our helper function above
      this.convertListOfLinks()
    )
  },
},
That is the whole mechanism. Styling is entirely optional, and the same pattern accepts any other variables worth passing — themes, toggles, and so on.
Results
Once both projects are deployed, the generator produces button links that deploy customized copies of the template:
- The template repository, which is populated from the environment variables, and a site built from it.
- The generator repository, and the deployed generator.
The pattern generalizes to anything that is a boilerplate with a few user-specific values: resume sites, e-commerce themes, "/uses" pages, marketing sites. The template stays a single maintained codebase, and each deployment arrives with its own environment variables already filled in.