

Why Offload Authentication to Auth0?
Building login systems from scratch is rarely a good use of engineering time. You have to design password storage, session management, email verification, and security hardening — then maintain and host all of it. Auth0 removes that burden by providing authentication and authorization as a managed service, with SDKs for popular web, mobile, and native platforms.
With Auth0, you define which identity providers your app accepts — Google, Facebook, GitHub, or others. When a user logs in, Auth0 verifies their identity and returns the authentication data to your application.
The recommended approach is Auth0's Universal Login. Instead of building a custom login page, your app redirects users to Auth0's hosted login page. After successful authentication, Auth0 redirects them back to your app. This is both the most secure option and the fastest to set up. You can start with simple username/password authentication and later add social logins or other methods without rewriting your frontend.
This article assumes basic familiarity with React and React Hooks. It does not cover the internals of authentication protocols; Auth0 provides separate resources for that.
What Auth0 Sends Back to Your App
When Auth0 redirects a user back to your application after authentication, the redirect URL contains several pieces of information about the authenticated session:
- access token: Authorizes your app to call an API on the user's behalf. It does not carry user information; it only grants access to protected resources.
- id token: A security token issued by the OpenID Provider, formatted as a JSON Web Token (JWT). It confirms the user is authenticated and can include claims such as their name.
- expires in: The number of seconds until the access token becomes invalid. The default is 1200 seconds (20 minutes); after expiry, the user must sign in again.
- scope: OpenID Connect (OIDC) scopes determine which user attributes (called claims) your app can access, such as name and picture. The requested scopes are returned in the ID token and are also available via the /userinfo endpoint.
Auth0 offers two client-side SDKs relevant to React developers: the JavaScript SDK for general Auth0 API access, and the React SDK (auth0-react.js) purpose-built for implementing authentication and authorization in React apps.
Setting Up the Auth0 Application
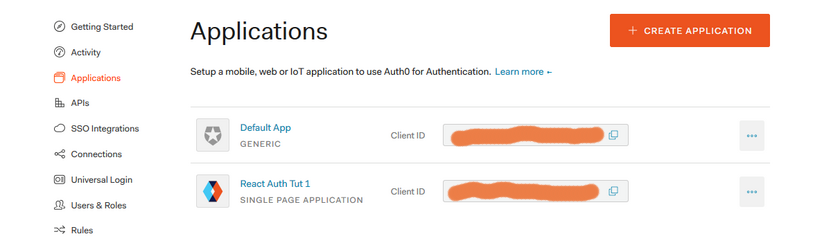
Before writing any React code, you need to register an application in your Auth0 dashboard.
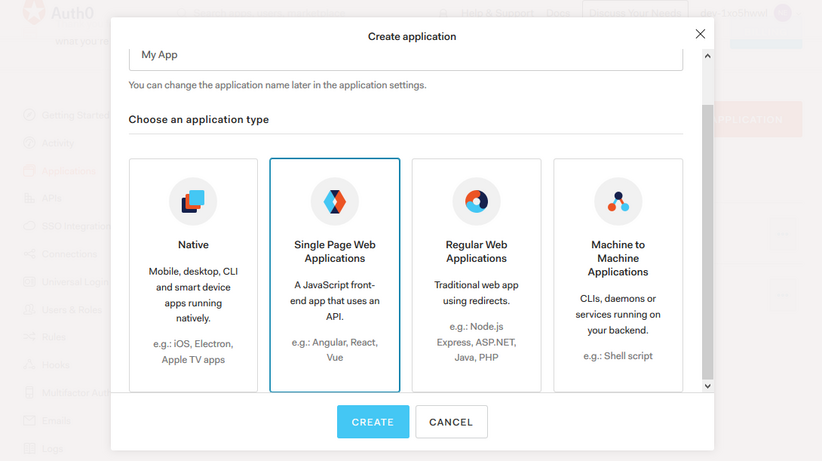
First, create your Auth0 application and select the application type. Since we are building a single-page app, choose the SPA option.
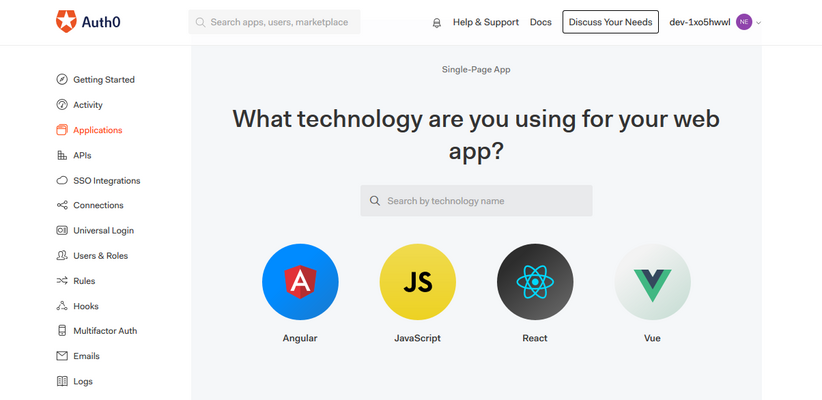
Next, select the technology your app uses — in this case, React.
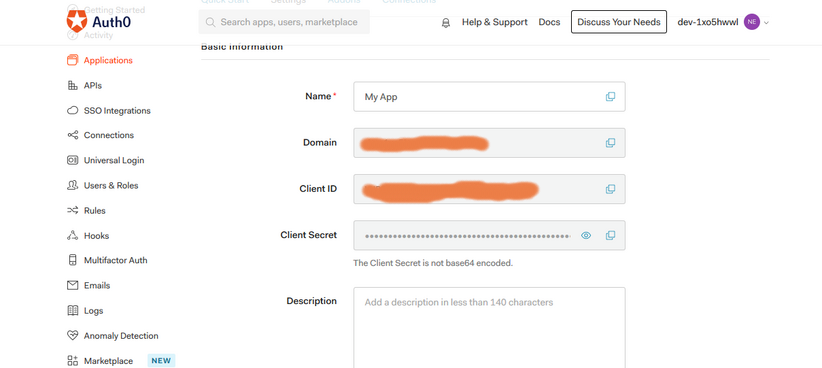
After creation, take note of your application credentials (domain, client ID, and client secret). You will need these values when integrating Auth0 into your React code.
Configuring App URLs
For login and logout to work, you must specify the correct URLs in your application settings within the Auth0 dashboard.
The Allowed Callback URL is where Auth0 redirects users after successful authentication. For our local development setup, set this to https://localhost:3000.
The Allowed Logout URL is where users are sent after Auth0 logs them out of the authorization server. Configure this as https://localhost:3000 as well. Auth0 validates these URLs strictly, because callback URLs can be manipulated — only URLs listed in the Allowed Callback URLs field are accepted.
Finally, set the Allowed Web Origins field to https://localhost:3000. This setting maintains the user's authentication state when they leave your app or refresh the page, ensuring consistent sessions.
Setting Up the JavaScript SDK Authentication Flow
To demonstrate how the Auth0 JavaScript SDK works in a React app, let's walk through a basic login flow. The demo consists of several components that work together: the root App.js passes an Auth class down to components that need it; Nav.js renders login and logout buttons; Profile.js displays user data; Home.js is the landing page; Auth.js holds all authentication utilities; and Callback.js is the destination after login. Credentials are stored as environment variables.
REACT_APP_AUTH0_DOMAIN=your-domain
REACT_APP_AUTH0_CLIENTID=your-client-id
REACT_APP_AUTH0_CALLBACK_URL=your-callback-url
Create a .env file to hold the app's domain and clientId credentials, along with a callback URL (for this app, https://localhost:3000).
Initializing the Auth0 Client
After installing the auth0-js package, the authentication setup lives in an Auth.js file, where the SDK is imported.
export default class Auth {
  constructor(history){
    this.history = history;
    this.auth0 = new auth0.WebAuth({
      domain: process.env.REACT_APP_AUTH0_DOMAIN,
      clientID: process.env.REACT_APP_AUTH0_CLIENTID,
      redirectUri: process.env.REACT_APP_AUTH0_CALLBACK_URL,
      responseType: "token id_token",
      scope: "openid profile email"
    })
}
The Auth class constructor initializes a new Auth0 instance, passing in an options object. While several parameters exist, only domain and clientID are strictly required:
domain: your Auth0 account tenant domain.clientID: your application's client identifier.redirectUri: where Auth0 sends the user post-authentication (defaults to the configured Callback URL).responseType: defines the response payload, set here to retrieve anid_token.scope: requests specific user data, like email and profile details, accessible via the OpenID Connect protocol.
The class constructor also accepts react-router's history object for programmatic navigation.
npm i auth0-js
import auth0 from 'auth0-js';
Values for domain, clientID, and redirectUri are pulled from the .env file.
Implementing Login and Callback Handling
A login() method references Auth0's authorize(), which triggers the Universal Login page and redirects the user upon success.
login = () => {
  this.auth0.authorize()
}
The central App component instantiates the Auth class and passes it to the relevant children as a prop.
import Auth from './Auth';

function App({history}) {
  const auth = new Auth(history)
  return (
    <div className="App">
      <Nav auth={auth}/>
      <Switch>
        <div className="body">
          <Route exact path="/" render={props => <Home auth={auth} {...props} />} />
          <Route exact path="/callback" render={props => <Callback auth={auth} {...props} />} />
          <Route exact path="/profile" render={props => <Profile auth={auth} {...props} />} />
        </div>
      </Switch>
    </div>
  );
}

export default withRouter(App);
Because the Auth class depends on history, the app wraps the root in withRouter to gain access to the router's history API.
import { Link } from 'react-router-dom'

const Nav = ({auth}) => {
  return (
    <nav>
      <ul>
        <li><Link to="/">Home</Link></li>
        <li>
          <button onClick={auth.login}>log in</button>
        </li>
      </ul>
    </nav>
  )
}
export default Nav
With the login method defined, the login button now redirects users to Auth0 and then to the designated callback route.
import React from 'react'

const Callback = () => {
  return (
    <div>
      <h1>I am the callback component</h1>
    </div>
  )
}
export default Callback
Auth0 sends authentication data embedded in the callback URL's hash. To extract it, the Callback component invokes a handleAuth() method defined in the Auth class upon mounting.
handleAuth = () => {
    this.auth0.parseHash((err, authResult) => {
      if(authResult && authResult.accessToken && authResult.idToken) {
        this.setSession(authResult);
        this.history.push("/");
      } else if (err) {
        alert(`Error: ${err.error}`)
        console.log(err);
      }
    })
}
The parseHash method decodes the URL payload, yielding an error object and an authResult. If an authResult containing accessToken and idToken exists, the app passes it to setSession() and redirects to the homepage. Any errors display via alert and are logged to the console.
import React, {useEffect} from 'react'
const Callback = ({auth}) => {
  useEffect(() => {
    auth.handleAuth()
  }, [])

  return (
    <div>
      <h1>I am the callback component</h1>
    </div>
  )
}
export default Callback
Inside Callback, the handleAuth() call sits inside a useEffect, firing when the user arrives post-login.
setSession = authResult => {
    //set the time the access token will expire
    const expiresAt = JSON.stringify(
      authResult.expiresIn * 1000 + new Date().getTime()
    )

    localStorage.setItem("access_token", authResult.accessToken)
    localStorage.setItem("id_token", authResult.idToken)
    localStorage.setItem("expires_at", expiresAt)
}
In the setSession() method, an expiresAt value is calculated by converting the expiresIn string (in seconds) to Unix epoch time. The expiresAt, accessToken, and idToken are then persisted to local storage.
Tracking Authentication State
To control access to protected views like Profile, an isAuthenticated method reads the stored expires_at value.
isAuthenticated = () => {
    const expiresAt =JSON.parse(localStorage.getItem("expires_at"));
    return new Date().getTime() < expiresAt;
}
This check parses the expiry timestamp and verifies the current time is still earlier, confirming the user is logged in.
This boolean state drives UI changes in Nav.js, which conditionally renders either the login or logout button using a ternary based on auth.isAuthenticated().
import React from 'react';
import { Link } from 'react-router-dom'

const Nav = ({auth}) => {
  return (
    <nav>
      <ul>
        <li><Link to="/">Home</Link></li>
        <li>
          <button onClick={auth.isAuthenticated() ? auth.logout : auth.login}>
            {auth.isAuthenticated() ? "log out" : "log in"}
           </button>
        </li>
      </ul>
    </nav>
  )
}

export default Nav
The Home component shares this pattern, showing a profile link only when the user is authenticated.
import {Link} from 'react-router-dom'
const Home = ({auth}) => {
  return (
    <div>
      <h1>home</h1>
      {
        auth.isAuthenticated() && (
          <h4>
            You are logged in! You can now view your{' '}
            <Link to="/profile">profile</Link>
          </h4>
        )
        }
    </div>
  )
}
export default Home
Fetching and displaying a user's profile data adds two more Auth class methods. The first, getAccessToken(), retrieves the token from local storage (throwing an error if it is absent); the second, getProfile(), supplies that token to Auth0's userInfo() call.
getAccessToken = () => {
    const accessToken = localStorage.getItem("access_token")
    if(!accessToken){
      throw new Error("No access token found")
    }
    return accessToken
}
getProfile = callback => {
this.auth0.client.userInfo(this.getAccessToken(), (err, profile) => {
callback(profile);
});
}Because the earlier scope was set to profile and email, the /userinfo endpoint returns only those fields. In Profile.js, a profile state populates via getProfile inside a useEffect, and the returned user data renders on screen.
import React, { useEffect, useState } from "react";

const Profile = ({ auth }) => {
  const [profile, setProfile] = useState(null);
  useEffect(() => {
    auth.getProfile((profile) => {
      setProfile(profile);
    });
  }, [auth]);

  if (!profile) {
    return <h1>Loading...</h1>;
  }

  return (
    <div>
      <h1>profile</h1>
      <>
        <p>{profile.name}</p>
        <p>{profile.nickname}</p>
        <img src={profile.picture} />
        <pre>{JSON.stringify(profile, null, 2)}</pre>
      </>
    </div>
  );
};
export default Profile;
Clearing the Session on Logout
A logout() method in the Auth class performs a cleanup step: it removes the authResult, accessToken, and idToken from local storage and then returns the user to the homepage.
logout = () => {
    localStorage.removeItem("access_token")
    localStorage.removeItem("id_token")
    localStorage.removeItem("expires_at")
    this.auth0.logout({
      clientID: process.env.REACT_APP_AUTH0_CLIENTID,
      returnTo: "https://localhost:3000"
    });
}
To end the session on Auth0's side, the logout() method accepts an options object with a clientID and a returnTo URL. This returnTo destination must be registered under Allowed Logout URLs in the Auth0 dashboard.
Integrating the Auth0 React SDK
The Auth0 React SDK simplifies authentication compared to the vanilla JavaScript SDK by leveraging React Context under the hood. The demo structure includes App.js as the root, separate button components for login and logout, a Navbar.js to hold them, and a Profile.js for displaying user info.
Start by installing the SDK:
npm install @auth0/auth0-reactStore your Auth0 credentials in a .env file, just as with the JavaScript SDK:
import {Auth0Provider} from '@auth0/auth0-react';

const domain = process.env.REACT_APP_AUTH0_DOMAIN
const clientId = process.env.REACT_APP_AUTH0_CLIENT_ID

ReactDOM.render(
  <Auth0Provider
    domain={domain}
    clientId={clientId}
    redirectUri={window.location.origin}
  >
    <App />
  </Auth0Provider>,
  document.getElementById('root')
);
Wrap the application in an Auth0Provider component, passing the credentials and a redirectUri. This provider gives all child components access to authentication state through React Context.
Building Login and Logout Handlers
For the login button, destructure loginWithPopup() from the useAuth0 hook and attach it to the button’s onClick event:
import {useAuth0} from '@auth0/auth0-react';
import {Button} from './Styles';

const LoginButton = () => {
  const {loginWithPopup} = useAuth0()
 return(
   <Button onClick={() => loginWithPopup()}>
    Log in
   </Button>
 )
}
The SDK offers loginWithPopup() and loginWithRedirect(). While the popup flow keeps the user on your page, the redirect flow sends them to the Auth0-hosted login page and back to your app afterward.
The logout button follows the same pattern, using the logout function:
import {Button} from './Styles';
import {useAuth0} from '@auth0/auth0-react';

const LogoutButton = () => {
  const {logout} = useAuth0()
  return(
    <Button onClick={() => logout()}>
      Log Out
    </Button>
 )
}
Calling logout() routes the user to the Auth0 logout endpoint at https://YOUR_DOMAIN/v2/logout and immediately redirects them to the URL listed in Allowed Logout URLs in your app settings.
Conditional Rendering and User Profile
To toggle between login and logout buttons in the Navbar, pull isAuthenticated from useAuth0 — a boolean that reflects the current session:
import {StyledNavbar} from './Styles';
import {useAuth0} from '@auth0/auth0-react';
import LoginButton from './LoginButton';
import LogoutButton from './LogoutButton';

const Navbar = () => {
  const {isAuthenticated} = useAuth0()
  return (
    <StyledNavbar>
     { isAuthenticated ? <LogoutButton/> :  <LoginButton/> }
    </StyledNavbar>
  )
}
This approach removes the need for custom methods to track authentication state, which was required with the JavaScript SDK.
Once a user is authenticated, the user object is available from useAuth0. Use it with isAuthenticated to render profile data only during an active session:
import {useAuth0} from '@auth0/auth0-react'
import {ProfileBox, Image, P} from './Styles';

const Profile = () => {
const {user, isAuthenticated} = useAuth0()
 return(
  isAuthenticated && (<ProfileBox>
    <Image src={user.picture} alt={user.name}/>
    <P>Name: {user.name}</P>
    <P>Username: {user.nickname}</P>
    <P>Email: {user.email}</P>
   </ProfileBox>)
 )
}
Unlike the JavaScript SDK, there is no need to call getAccessToken() or getProfile(); the profile is part of the context.
Enabling Social Login With GitHub
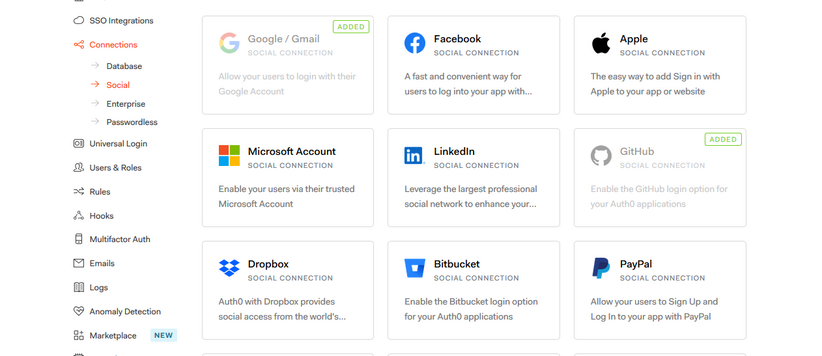
Google is activated by default. Adding GitHub requires a few steps on both Auth0 and GitHub.
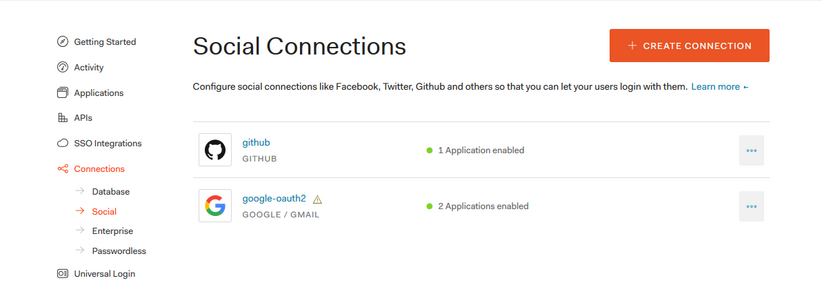
From the Auth0 dashboard, navigate to Connections > Social and click Create Connection:
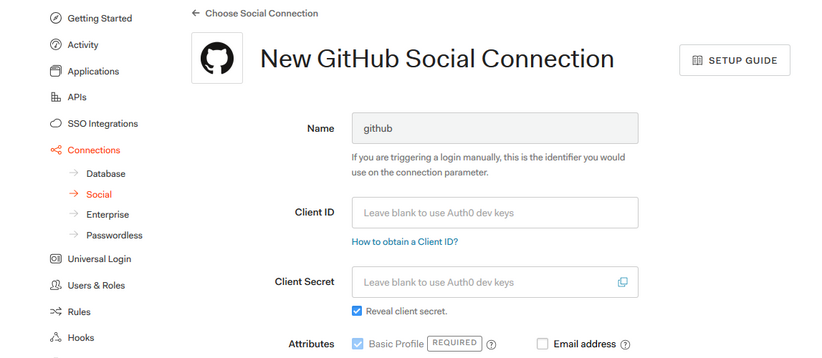
Select the GitHub connection and prepare the clientID and clientSecret obtained from GitHub:
You will need to register a new app on GitHub to get these credentials:
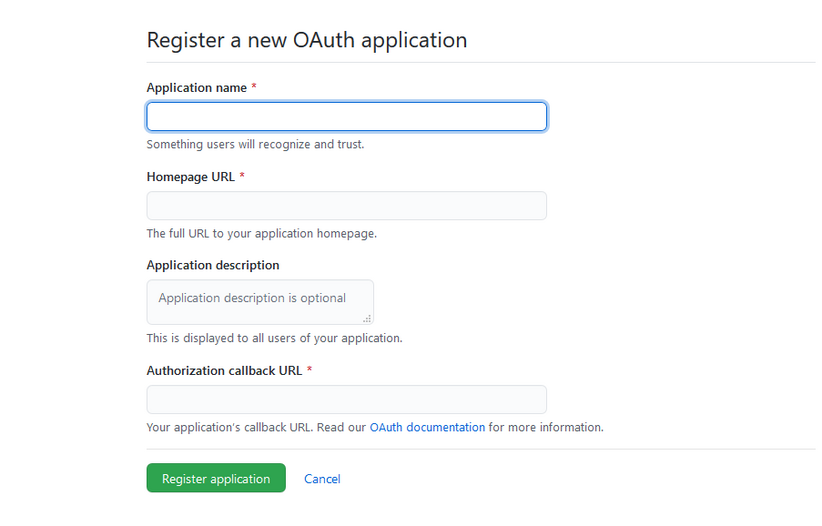
For the Homepage URL and Authorization callback URL, use https://localhost:3000 or your project’s actual domain. Paste the client ID and secret into your Auth0 GitHub connection settings to finish the setup.
Why Prefer the React SDK
The developer experience improves significantly with the React SDK. Authentication state tracking becomes trivial with isAuthenticated, and accessing user data no longer requires manually calling token and profile methods. The React Context pattern centralizes all authentication logic, making it easier to maintain and reason about within a React codebase.
Given these benefits, the React SDK is the recommended choice for React applications, while the JavaScript SDK remains a solid fallback for non-React projects or situations where you need closer control over the raw authentication flow.