SSH Tunnels in Go: Local and Remote Port Forwarding
The Go ecosystem's extended standard library includes golang.org/x/crypto/ssh, which provides a full-featured SSH client. This package makes it straightforward to implement both local and remote port forwarding—commonly known as SSH tunnels—directly in Go. Let's walk through how to set up both types of tunnels, starting with the basics of establishing an SSH connection.
Establishing an SSH Client Connection
Before any tunneling can happen, you need a working SSH client configuration. The following code sample reads your private key and sets up host key validation using your local known_hosts file:
func createSshConfig(username, keyFile string) *ssh.ClientConfig {
  knownHostsCallback, err := knownhosts.New(sshConfigPath("known_hosts"))
  if err != nil {
    log.Fatal(err)
  }

  key, err := os.ReadFile(keyFile)
  if err != nil {
    log.Fatalf("unable to read private key: %v", err)
  }

  // Create the Signer for this private key.
  signer, err := ssh.ParsePrivateKey(key)
  if err != nil {
    log.Fatalf("unable to parse private key: %v", err)
  }

  // An SSH client is represented with a ClientConn.
  //
  // To authenticate with the remote server you must pass at least one
  // implementation of AuthMethod via the Auth field in ClientConfig,
  // and provide a HostKeyCallback.
  return &ssh.ClientConfig{
    User: username,
    Auth: []ssh.AuthMethod{
      ssh.PublicKeys(signer),
    },
    HostKeyCallback:   knownHostsCallback,
    HostKeyAlgorithms: []string{ssh.KeyAlgoED25519},
  }
}

func sshConfigPath(filename string) string {
  return filepath.Join(os.Getenv("HOME"), ".ssh", filename)
}
This configuration takes the remote username and path to your private SSH key as parameters. The host callback is the programmatic equivalent of the host key verification you see with the standard ssh command-line client—it reads from known_hosts to validate the server. If you're having trouble with host key validation during development, you could use ssh.InsecureIgnoreHostKey as a fallback, but be aware that it skips security checks entirely.
With this configuration in hand, running a remote command is straightforward:
config := createSshConfig(*username, *keyFile)

client, err := ssh.Dial("tcp", *addr, config)
if err != nil {
  log.Fatal("Failed to dial: ", err)
}
defer client.Close()

// Each ClientConn can support multiple interactive sessions,
// represented by a Session.
session, err := client.NewSession()
if err != nil {
  log.Fatal("Failed to create session: ", err)
}
defer session.Close()

// Once a Session is created, you can a single command on
// the remote side using the Run method.
session.Stdout = os.Stdout
if err := session.Run("uname -a"); err != nil {
  log.Fatal("Failed to run: " + err.Error())
}
This code creates an interactive session (similar to logging in via ssh) and then executes uname -a on the remote server. The output matches what you'd see from the equivalent command-line invocation:
$ go run ssh-execute-remote-cmd.go \
    -addr 159.89.238.232:22 -user root \
    -keyfile ~/.ssh/id_ed25519
Linux testdrop6 5.19.0-23-generic #24-Ubuntu SMP PREEMPT_DYNAMIC Fri Oct 14 05:39:57 UTC 2022 x86_64 x86_64 x86_64 GNU/Linux
Local Port Forwarding
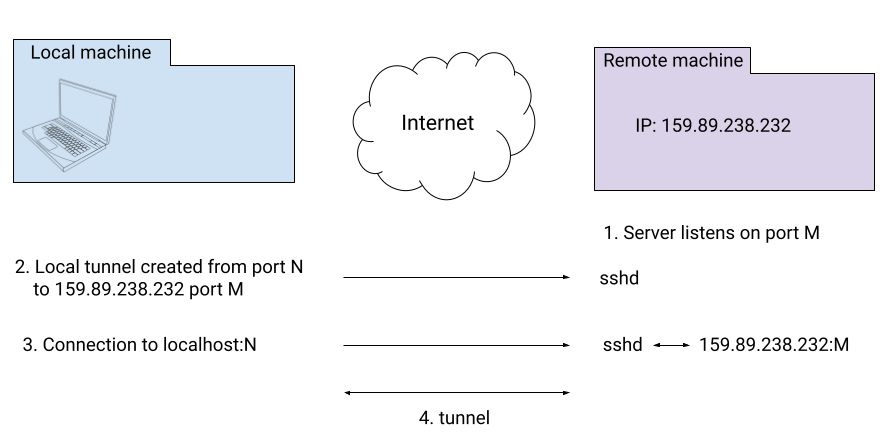
Local port forwarding creates a tunnel from a port on your local machine to a port on a remote machine. This is useful when you need to access a service on a remote server that isn't exposed to the public internet—for example, a database that only listens on the server's internal network.
The flow works like this: you have a server listening on port M on the remote machine (say, PostgreSQL on 5432). Your SSH client establishes a connection to the remote sshd server, and from that point onward, connecting to localhost:N on your local machine transparently routes traffic through that SSH connection to port M on the remote machine.
To test this with standard tools, you can use netcat. First, start a simple echo server on the remote machine:
remote# nc -lvk 7780
Listening on 0.0.0.0 7780
This listens on port 7780, which is not exposed through the firewall. You can't reach it directly from your local machine. Now set up the tunnel:
$ ssh -N -L 7777:localhost:7780 [email protected]
This creates a tunnel between localhost:7777 on your machine and port 7780 on the remote machine. Testing it locally:
$ echo "foo bar" | nc -N localhost 7777
On the remote machine's server logs, you'll see the echoed message:
remote# nc -lvk 7780
Listening on 0.0.0.0 7780
Connection received on localhost 53090
foo bar
The Go implementation is concise because of Go's interface design. Here's the complete tunnel setup:
func main() {
  addr := flag.String("addr", "", "ssh server address to dial as <hostname>:<port>")
  username := flag.String("user", "", "username for ssh")
  keyFile := flag.String("keyfile", "", "file with private key for SSH authentication")
  remotePort := flag.String("rport", "", "remote port for tunnel")
  localPort := flag.String("lport", "", "local port for tunnel")
  flag.Parse()

  config := createSshConfig(*username, *keyFile)

  client, err := ssh.Dial("tcp", *addr, config)
  if err != nil {
    log.Fatal("Failed to dial: ", err)
  }
  defer client.Close()

  listener, err := net.Listen("tcp", "localhost:"+*localPort)
  if err != nil {
    log.Fatal(err)
  }
  defer listener.Close()

  for {
    // Like ssh -L by default, local connections are handled one at a time.
    // While one local connection is active in runTunnel, others will be stuck
    // dialing, waiting for this Accept.
    local, err := listener.Accept()
    if err != nil {
      log.Fatal(err)
    }

    // Issue a dial to the remote server on our SSH client; here "localhost"
    // refers to the remote server.
    remote, err := client.Dial("tcp", "localhost:"+*remotePort)
    if err != nil {
      log.Fatal(err)
    }

    fmt.Println("tunnel established with", local.LocalAddr())
    runTunnel(local, remote)
  }
}
The runTunnel function copies data bidirectionally between two connections:
// runTunnel runs a tunnel between two connections; as soon as one connection
// reaches EOF or reports an error, both connections are closed and this
// function returns.
func runTunnel(local, remote net.Conn) {
  defer local.Close()
  defer remote.Close()
  done := make(chan struct{}, 2)

  go func() {
    io.Copy(local, remote)
    done <- struct{}{}
  }()

  go func() {
    io.Copy(remote, local)
    done <- struct{}{}
  }()

  <-done
}
It uses two goroutines—one for each direction—and closes both connections as soon as either one hits EOF or reports an error. The beauty of the ssh package's interface design is that ssh.Client.Dial returns a net.Conn, just like a regular TCP dial. To the rest of your code, an SSH-tunneled connection is indistinguishable from a direct socket connection.
You can now replace the ssh -N -L command with your Go program:
$ go run ssh-local-tunnel.go -addr 159.89.238.232:22 -user root \
    -keyfile ~/.ssh/id_ed25519 \
    -rport 7780 \
    -lport 7777
Remote Port Forwarding
Remote port forwarding inverts the relationship. Instead of exposing a remote service locally, it exposes a local service to the public internet through the remote machine. This is the technology behind tools like ngrok, but you can implement it with plain SSH.
This is useful when you have a web application running locally and need to test it from a public address, or when your local machine is behind NAT and you need to make a service accessible from elsewhere.
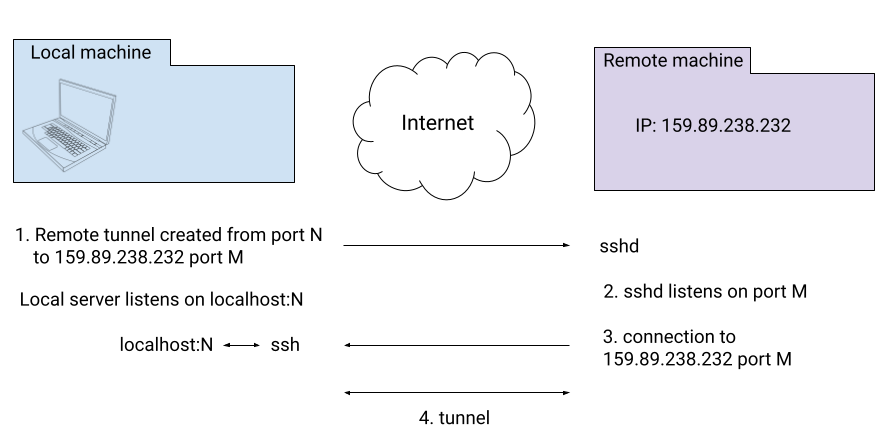
Here, the remote sshd server listens on port M on the remote machine. When connections come in on that port, they're forwarded through the established SSH connection back to your local machine, where your SSH client directs them to the local service on port N.
Setting this up requires two configuration changes on the remote machine. First, you must open the port you plan to use—if you're using ufw, this means adding a rule:
# ufw allow 23000
Rule added
Rule added (v6)

# ufw status
Status: active

To                         Action      From
--                         ------      ----
OpenSSH                    ALLOW       Anywhere
23000                      ALLOW       Anywhere
OpenSSH (v6)               ALLOW       Anywhere (v6)
23000 (v6)                 ALLOW       Anywhere (v6)

# ufw enable
Command may disrupt existing ssh connections. Proceed with operation (y|n)? y
Firewall is active and enabled on system startup
Second, you need to tell sshd that it's allowed to forward ports by setting GatewayPorts to yes in /etc/ssh/sshd_config.
Once those changes are in place, testing is simple. Start a local HTTP server on port 8080 and set up the remote tunnel:
$ ssh -N -R 23000:localhost:8080 [email protected]
Now a curl request to the remote machine's public address on port 23000 will reach your local server:
$ curl http://159.89.238.232:23000/hi/there
hello /hi/there
The Go implementation shares most of its code with the local tunnel example. The key differences are in the main loop:
func main() {
  addr := flag.String("addr", "", "ssh server address to dial as <hostname>:<port>")
  username := flag.String("user", "", "username for ssh")
  keyFile := flag.String("keyfile", "", "file with private key for SSH authentication")
  remotePort := flag.String("rport", "", "remote port for tunnel")
  localPort := flag.String("lport", "", "local port for tunnel")
  flag.Parse()

  config := createSshConfig(*username, *keyFile)

  client, err := ssh.Dial("tcp", *addr, config)
  if err != nil {
    log.Fatal("Failed to dial: ", err)
  }
  defer client.Close()

  listener, err := client.Listen("tcp", "localhost:"+*remotePort)
  if err != nil {
    log.Fatal(err)
  }
  defer listener.Close()

  for {
    remote, err := listener.Accept()
    if err != nil {
      log.Fatal(err)
    }

    go func() {
      local, err := net.Dial("tcp", "localhost:"+*localPort)
      if err != nil {
        log.Fatal(err)
      }

      fmt.Println("tunnel established with", local.LocalAddr())
      runTunnel(local, remote)
    }()
  }
}
There are two important distinctions from the local tunnel case:
- Reversed roles: Instead of listening on a local port and dialing out through SSH in response to local connections, you listen for incoming remote connections and spawn local connections in response to them.
- Concurrency: Since multiple remote clients may connect simultaneously, each incoming remote connection gets its own goroutine to handle the forwarding.
This remote forwarding pattern turns your SSH client into a mini reverse proxy—any service running on your local machine can be made publicly accessible through any server you control, without needing special-purpose tunneling software.
Under the hood: SSH's multiplexed tunnels
Networking protocols rely on layering to create useful abstractions. Lower-level protocols like IP only deal with individual packets that can be lost, corrupted, or reordered; they have no notion of connections or ports. TCP adds reliable, ordered streams on top of this packet layer, and in doing so gives two machines the illusion of maintaining many simultaneous socket connections across one physical link.
SSH follows the same pattern. It is an application-layer protocol that runs over a single TCP connection (typically on port 22). After cryptographic handshaking establishes a secure channel, SSH multiplexes all subsequent communication over that one socket. Multiple interactive terminal sessions, file transfers, and port-forwarding data streams all share the same underlying connection without interfering with one another.
SSH refers to these individual data streams as channels. The protocol's overall design is specified in RFC 4251, while RFC 4254 defines the connection protocol that governs channel multiplexing. RFC 4254 spells out the core mechanics:
All terminal sessions, forwarded connections, etc., are channels. Either side may open a channel. Multiple channels are multiplexed into a single connection.
Channels are identified by numbers at each end. The number referring to a channel may be different on each side. Requests to open a channel contain the sender's channel number. Any other channel-related messages contain the recipient's channel number for the channel.
Channels are flow-controlled. No data may be sent to a channel until a message is received to indicate that window space is available.
Port forwarding maps directly onto this channel model. Each forwarded port gets its own channel; traffic destined for that port is wrapped in connection-protocol packets that carry the channel's number. On the receiving end, the SSH server or client extracts the payload and routes it to the appropriate local port based on that channel identifier.
If you want to dig deeper, a couple of external resources are particularly helpful. This article on socket-level multiplexing offers useful context and background. A more code-focused walkthrough explains how SSH channels are implemented in DropBear, complete with C snippets.
Multiplexing as a design pattern continues to appear throughout modern networking. HTTP/2 multiplexes multiple streams over TLS/TCP, and QUIC (the basis for HTTP/3) extends the idea further by multiplexing directly over UDP, entirely bypassing TCP.