

Connecting Dialogflow to a React Frontend via Express
Dialogflow is Google's platform for building conversational agents that process natural language input, whether text or voice. While the Dialogflow console provides a way to design and test agents, real-world use requires connecting those agents to web applications. The @google-cloud/dialogflow npm package is the official client library for JavaScript, but because it relies on gRPC for network connections, it does not run directly in browsers. The solution is to put an Express.js back-end between a React frontend and the Dialogflow agent, handling API calls and serving responses to the web application.
This guide walks through attaching a trained Dialogflow agent to a React app using an Express.js middle layer. You should already be comfortable with Node.js and basic Dialogflow concepts before continuing.
Preparing the Dialogflow Agent
A Dialogflow agent consists of intents, fulfillment webhooks, knowledge bases, and other components that define its conversational behavior. For this project, we use an agent exported as a ZIP file that has already been trained to recommend wine based on a user's stated budget. To restore this agent, create a new agent in the Dialogflow console — you will need a unique name and a linked Google Cloud project. If no project exists, create one in the Google Cloud console, then use the agent settings' Export and Import feature to upload the ZIP file.
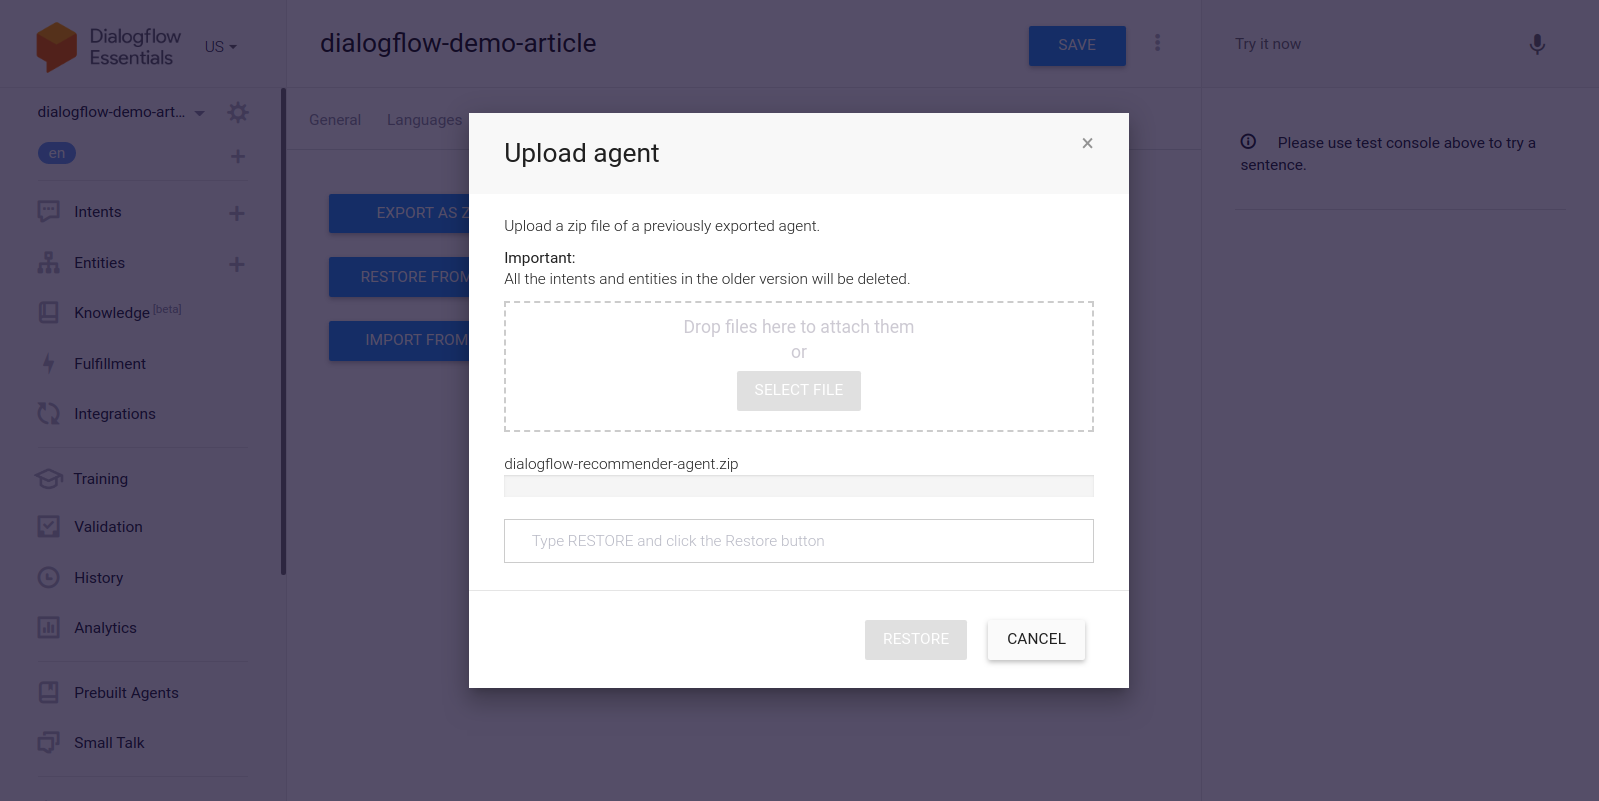
The imported agent defines three intents: a fallback intent for unrecognized input, a Welcome intent for starting conversations, and a get-wine-recommendation intent that suggests a bottle of wine based on the price a user mentions. The get-wine-recommendation intent has an input context called wine-recommendation, which is set by the Default Welcome intent. Contexts are how Dialogflow controls flow from one intent to another.
"A Context is a system within an Agent used to control the flow of a conversation from one intent to the other."
Below the context settings are training phrases — examples of user statements that teach the agent what to recognize. In the get-wine-recommendation intent, the training phrases pair a wine choice with a price category:
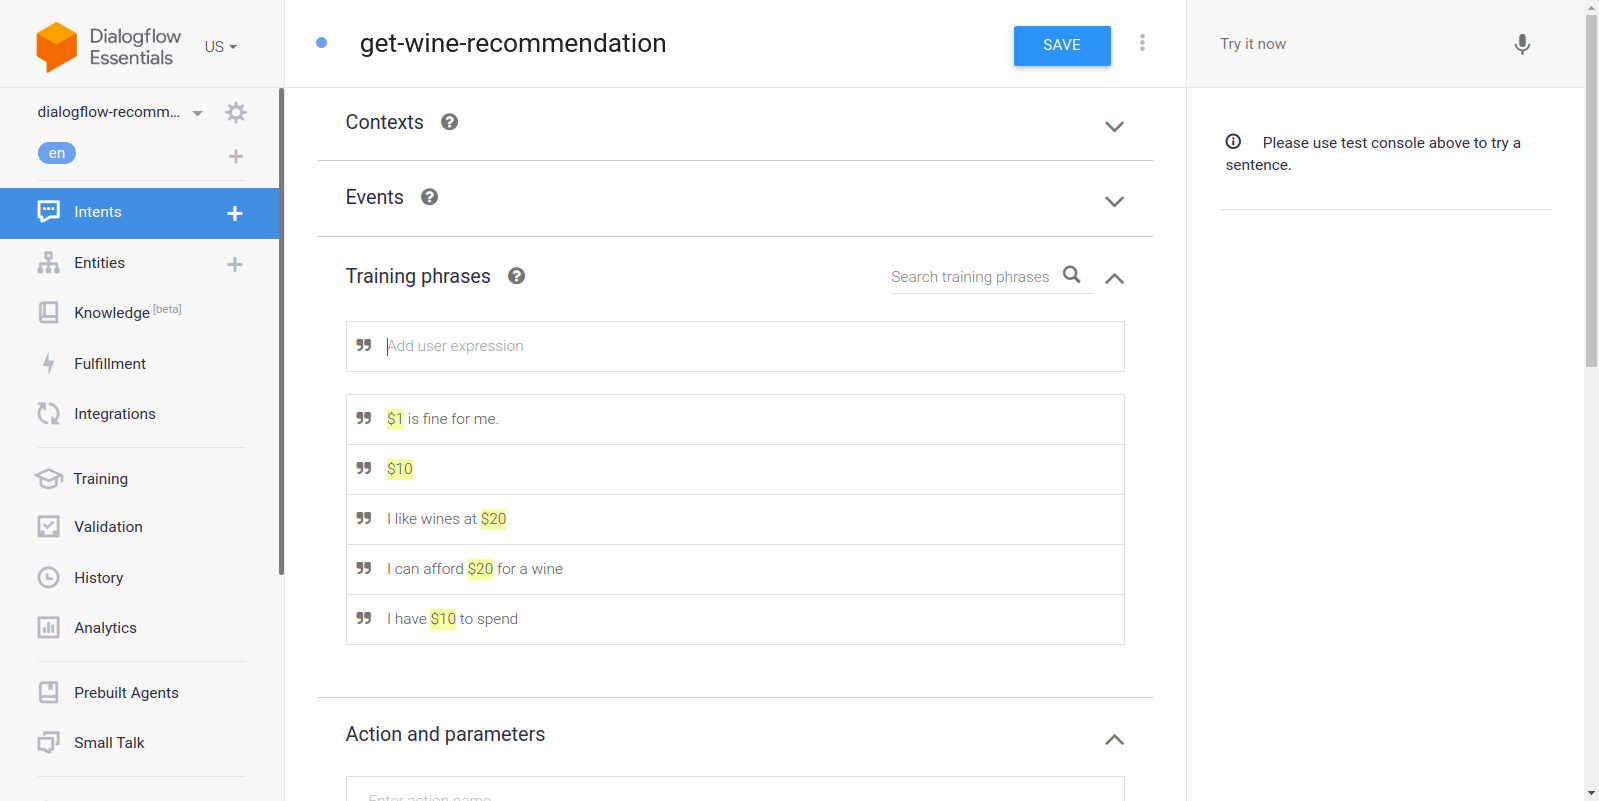
In the screenshot, each phrase has the currency figure highlighted in yellow. This highlighting is an annotation: Dialogflow automatically extracts recognized data types, called entities, from user sentences. When the intent matches, the agent triggers the webhook enabled in this intent's Fulfillment section, sending an HTTP request to an external service so it can fetch the recommended wine based on the price parameter extracted from the user's sentence. Testing the agent in the console's emulator, you can start with "Hi" and then state a budget; the webhook fires and returns a response like this:
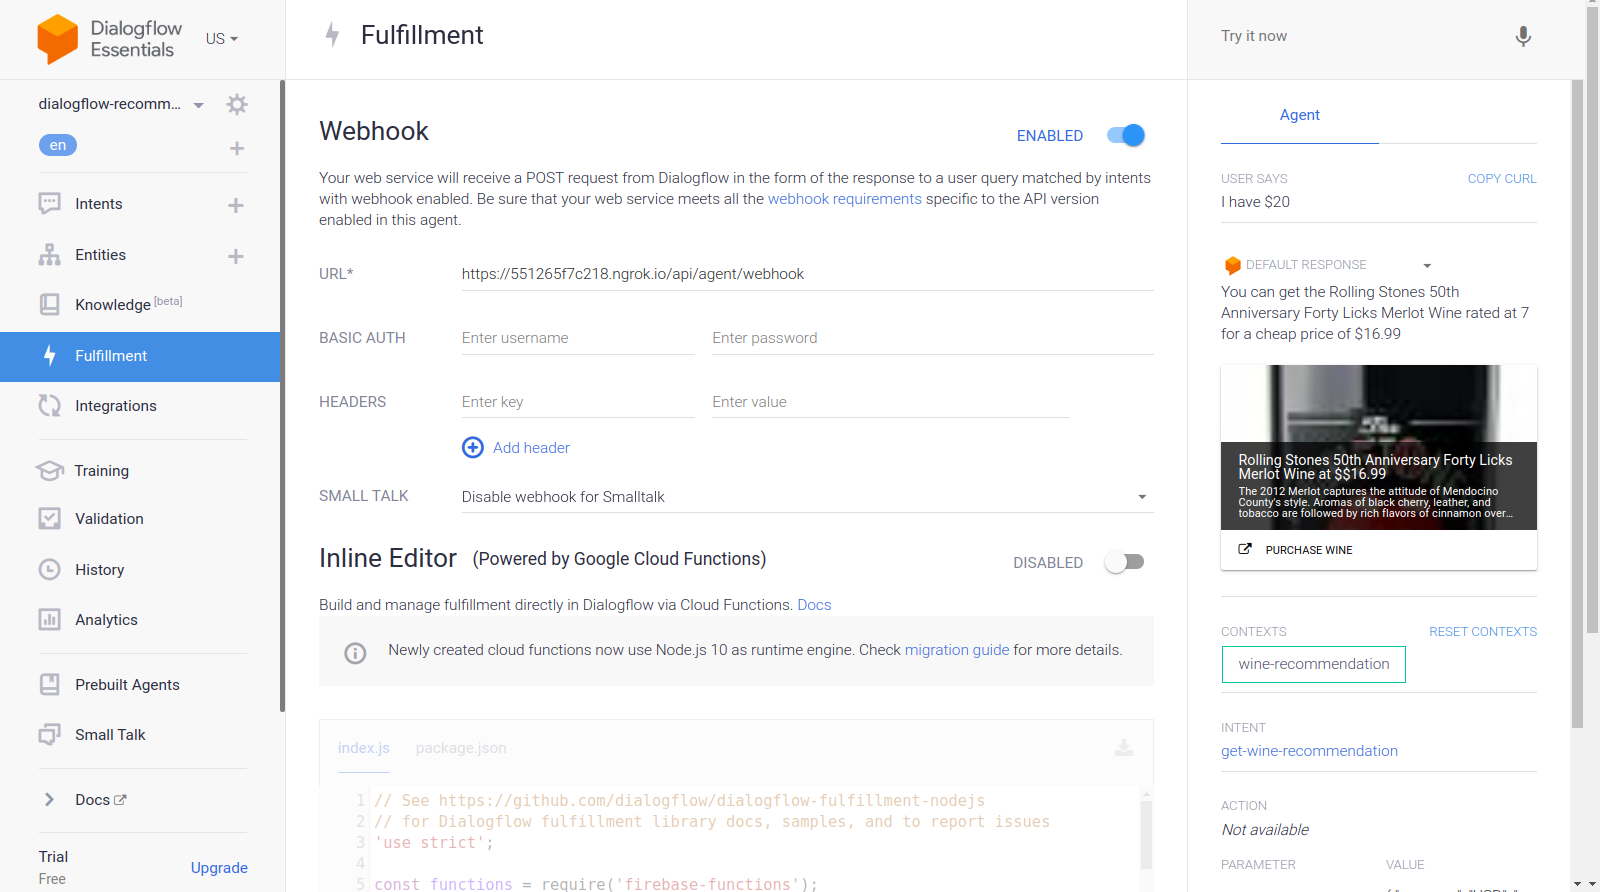
The webhook URL in that image was generated with Ngrok, and the response shows a wine option in the $20 range. With the agent configured, the next step is making it available inside a web app.
Building the Express Back-End
Since the Dialogflow client library does not support browsers out of the box, the Express.js server becomes the only component that talks directly to Dialogflow. The back-end exposes API endpoints that the React application consumes, keeping the gRPC-based library server-side.
Handling Authentication With Dialogflow
Authentication between the Express server and Dialogflow is handled through service accounts. A service account is an identity that belongs to your Google Cloud project — separate from any human user — and it authenticates requests with a private key in JSON format. You create the service account in the Google Cloud console, grant it access to the Dialogflow project, and then place its credentials file where your Node.js code can read it. The @google-cloud/dialogflow client finds these credentials through the GOOGLE_APPLICATION_CREDENTIALS environment variable or via explicit configuration in code.
Processing User Messages
The server's API accepts a user's message text and passes it to the Dialogflow client through a detectIntent-style call. The client sends the text along with the session ID — usually tied to the web browser's session or a generated ID — and Dialogflow returns the matched intent and any response text crafted earlier in the console. Additionally, if the user's message includes an amount, the server can read that parameter from the response, look up a fitting product (for instance, through a custom webhook that calls an external service), and return the recommendation to the frontend.
Integrating the React Frontend
With the Express API in place, the React application can call the back-end instead of Dialogflow directly. The frontend keeps a chat interface that sends each user message to the server, receives the response, and renders it in a conversation thread. The flow is simple on the client side: send a POST request with the user's text, await the JSON reply containing the agent's answer, and append it to the message history in state.
Recording Voice Input
For voice support, the frontend captures audio from the user's microphone, records it as a blob, and sends that recording to the back-end. Since Dialogflow handles both text and audio, your Express route can accept the audio blob, send it to Dialogflow with speech recognition enabled, and get back either the recognized text plus the agent's synthetic response — or use Dialogflow's own synthesized audio for playback. From the user's perspective, the chat window then behaves like a two-way voice-and-text conversation, with the web application acting purely as a thin shell over the Express API.
Building the Express Backend
Create a new project directory and install the required packages with yarn from the command line.
# create a new directory and ( && ) move into directory
mkdir dialogflow-server && cd dialogflow-server

# create a new Node project
yarn init -y

# Install needed packages
yarn add express cors dotenv uuid
With dependencies in place, set up a minimal Express server that listens on a designated port and enables CORS for the web application.
// index.js
const express =  require("express")
const dotenv =  require("dotenv")
const cors =  require("cors")

dotenv.config();

const app = express();
const PORT = process.env.PORT || 5000;

app.use(cors());

app.listen(PORT, () => console.log(`🔥  server running on port ${PORT}`));
Running this code starts an HTTP server that accepts connections on the specified PORT. The cors package is registered as Express middleware, allowing cross-origin requests from the frontend. At this stage the server only listens; it has no routes, so it can't respond yet.
Add two POST routes: one for text messages and another for voice recordings. Both will eventually forward request body data to the Dialogflow agent.
const express = require("express")

const app = express()

app.post("/text-input", (req, res) => {
  res.status(200).send({ data : "TEXT ENDPOINT CONNECTION SUCCESSFUL" })
});

app.post("/voice-input", (req, res) => {
  res.status(200).send({ data : "VOICE ENDPOINT CONNECTION SUCCESSFUL" })
});

module.exports = app
The snippet creates a separate router instance for the two POST endpoints. For now they return a 200 status with a hardcoded dummy response. Once Dialogflow authentication is implemented, these endpoints will be updated with the real connection logic.
Mount the router into the Express app with app.use, specifying a base path for the routes.
// agentRoutes.js

const express =  require("express")
const dotenv =  require("dotenv")
const cors =  require("cors")

const Routes =  require("./routes")

dotenv.config();
const app = express();
const PORT = process.env.PORT || 5000;

app.use(cors());

app.use("/api/agent", Routes);

app.listen(PORT, () => console.log(`🔥  server running on port ${PORT}`));
With the base path applied, test either endpoint via a POST request using cURL, passing an empty request body.
curl -X https://localhost:5000/api/agent/text-responseA successful request prints the object data response to the console.
The remaining work is establishing the actual Dialogflow connection: handling authentication and exchanging data with the agent through the @google-cloud/dialogflow package.
Service Account Authentication
Each Dialogflow agent is tied to a Google Cloud project. To connect externally, authenticate with that project and treat Dialogflow as one of its resources. Among the six available Google Cloud authentication methods, service accounts are the most practical for connecting through a client library.
Note: For production use, short-lived API keys are preferable to service account keys to minimize the risk of key exposure.
Service accounts are Google Cloud accounts designed for non-human interactions, typically through external APIs. The Dialogflow client library accesses the service account via a generated key to authenticate with Google Cloud.
Google Cloud's documentation on creating and managing service accounts is a solid resource. When creating the account, assign the Dialogflow API Admin role, granting administrative control over the associated agent.
Next, generate a Service Account Key in JSON format:
- Navigate to the newly created service account's page.
- Scroll to the Keys section, click the Add Key dropdown, and select Create new key.
- Choose the JSON file format and click Create.
Note: Keep service account keys private and never commit them to a version control system. Add the file to .gitignore to prevent accidental commits.
With the service account key stored in the project directory, the Dialogflow client library can send and receive data from the agent.
// agentRoute.js
require("dotenv").config();

const express = require("express")
const Dialogflow = require("@google-cloud/dialogflow")
const { v4 as uuid } = require("uuid")
const Path = require("path")

const app = express();

app.post("/text-input", async (req, res) => {
  const { message } = req.body;

  // Create a new session
   const sessionClient = new Dialogflow.SessionsClient({
    keyFilename: Path.join(__dirname, "./key.json"),
  });

  const sessionPath = sessionClient.projectAgentSessionPath(
    process.env.PROJECT_ID,
    uuid()
  );

  // The dialogflow request object
  const request = {
    session: sessionPath,
    queryInput: {
      text: {
        // The query to send to the dialogflow agent
        text: message,
      },
    },
  };

  // Sends data from the agent as a response
  try {
    const responses = await sessionClient.detectIntent(request);
    res.status(200).send({ data: responses });
  } catch (e) {
    console.log(e);
    res.status(422).send({ e });
  }
});

module.exports = app;
This route sends data to the Dialogflow agent and obtains a response through three stages:
- First
It authenticates with Google Cloud and creates a Dialogflow session using the projectID along with a random session identifier. A UUID is generated on each session via the JavaScript UUID package, helpful for logging or tracing conversations. - Second
A request object is built following the Dialogflow documentation format. It contains the session and the message data extracted from the request body. - Third
ThedetectIntentmethod sends the request asynchronously using ES6 async/await within a try-catch block. Any exception fromdetectIntentis caught and returned, preventing application crashes. The Dialogflow docs include a sample response object to guide data extraction.
Use Postman to test the Dialogflow connection in the dialogflow-response route.
Note: Postman's desktop app isn't required. Since September 2020, the web client is Generally Available and works directly in a browser.
Create a POST request to https://localhost:5000/api/agent/text-input in Postman, adding a query parameter with key message and value "Hi There".
Clicking Send dispatches the request to the Express server, returning a response like the one below.
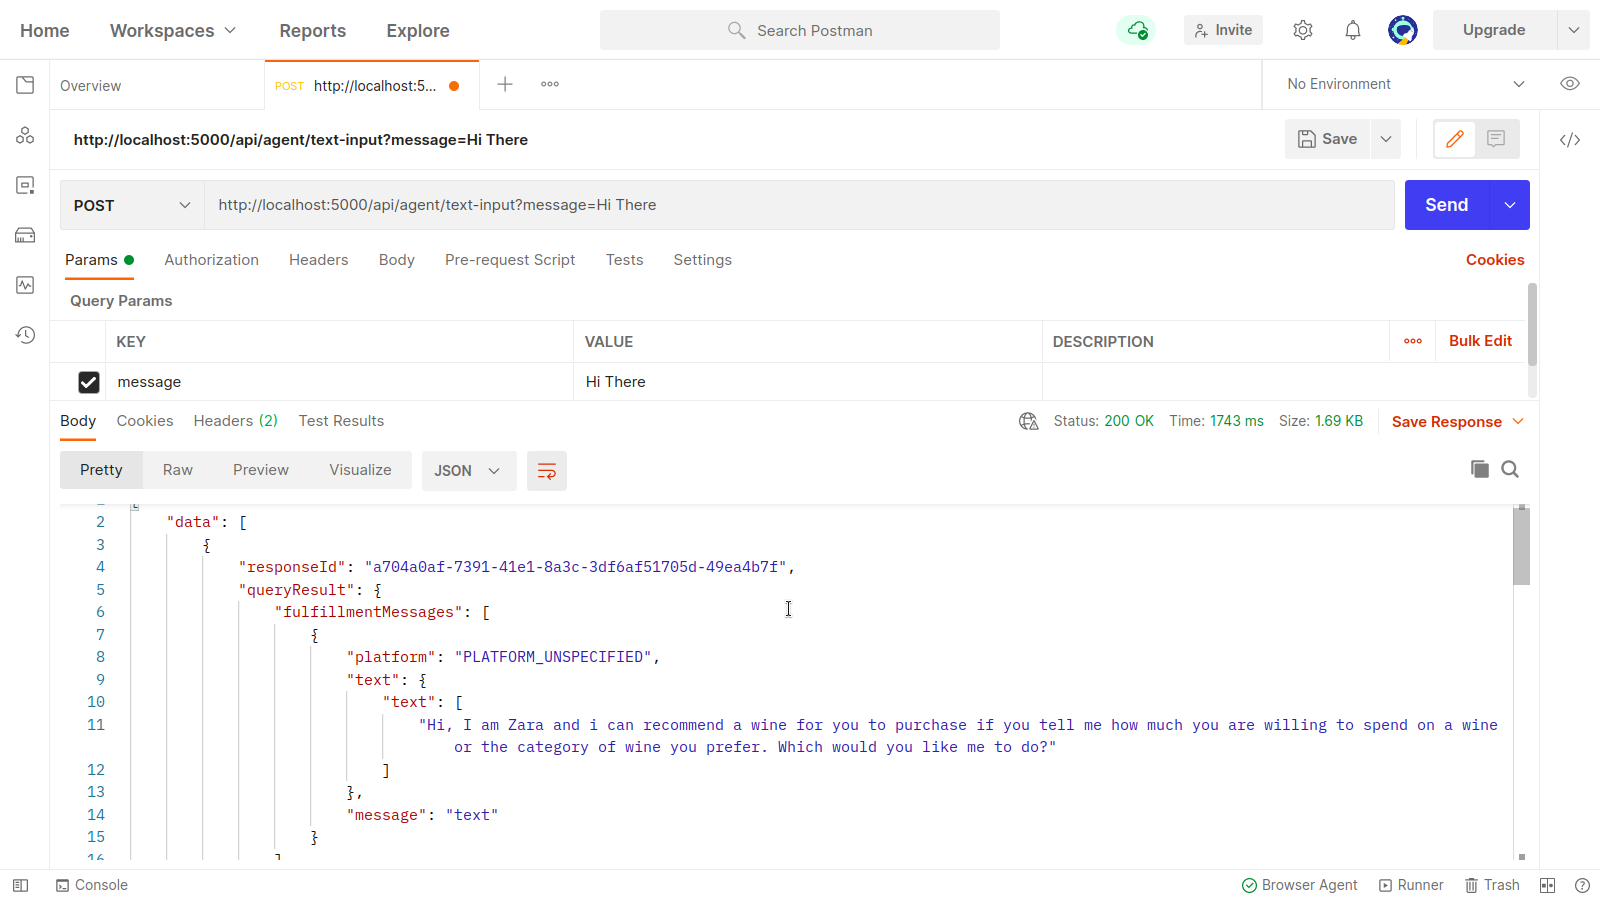
This image shows the prettified response from the Dialogflow agent routed through the Express server. The data structure matches the sample response in the Dialogflow Webhook documentation.
Processing Voice Inputs
All Dialogflow agents support text and audio input/output by default, though audio handling is notably more complex than text processing.
Now implement the /voice-input endpoint to receive audio files, forward them to Dialogflow, and return the agent's response.
// agentRoutes.js
import { pipeline, Transform } from "stream";
import busboy from "connect-busboy";
import util from "promisfy"
import Dialogflow from "@google-cloud/dialogflow"

const app = express();

app.use(
  busboy({
    immediate: true,
  })
);

app.post("/voice-input", (req, res) => {
  const sessionClient = new Dialogflow.SessionsClient({
    keyFilename: Path.join(__dirname, "./recommender-key.json"),
  });
  const sessionPath = sessionClient.projectAgentSessionPath(
    process.env.PROJECT_ID,
    uuid()
  );

  // transform into a promise
  const pump = util.promisify(pipeline);

  const audioRequest = {
    session: sessionPath,
    queryInput: {
      audioConfig: {
        audioEncoding: "AUDIO_ENCODING_OGG_OPUS",
        sampleRateHertz: "16000",
        languageCode: "en-US",
      },
      singleUtterance: true,
    },
  };

  const streamData = null;
  const detectStream = sessionClient
    .streamingDetectIntent()
    .on("error", (error) => console.log(error))
    .on("data", (data) => {
      streamData = data.queryResult
    })
    .on("end", (data) => {
      res.status(200).send({ data : streamData.fulfillmentText }}
    })

  detectStream.write(audioRequest);

  try {
    req.busboy.on("file", (_, file, filename) => {
      pump(
        file,
        new Transform({
          objectMode: true,
          transform: (obj, _, next) => {
            next(null, { inputAudio: obj });
          },
        }),
        detectStream
      );
    });
  } catch (e) {
    console.log(`error  : ${e}`);
  }
});
This route receives a user's voice input as an audio file and sends it to the Dialogflow agent. The process breaks down as follows:
- Add connect-busboy as Express middleware to parse form data from the request. Authenticate with Dialogflow using the service key and create a session as before. Use the promisify method from Node.js's built-in util module to get a promise-based version of the Stream pipeline method, handling stream piping and cleanup.
- Construct a request object with the Dialogflow session and audio configuration. The nested config enables Speech-To-Text conversion on the audio file.
- Call
detectStreamingIntentwith the session and request object, opening a data stream from Dialogflow to the backend. Incoming data arrives in chunks via the stream's "event" and gets stored instreamData. When the stream closes, the "end" event fires, and the accumulated response is sent to the web application. - Using the file stream event from connect-busboy, receive the incoming audio stream and pass it to the promise-based pipeline. This pipes the audio file stream into the Dialogflow stream opened by
detectStreamingIntent.
Test the /voice-input endpoint by sending a request with an audio file in the form-data body via Postman.
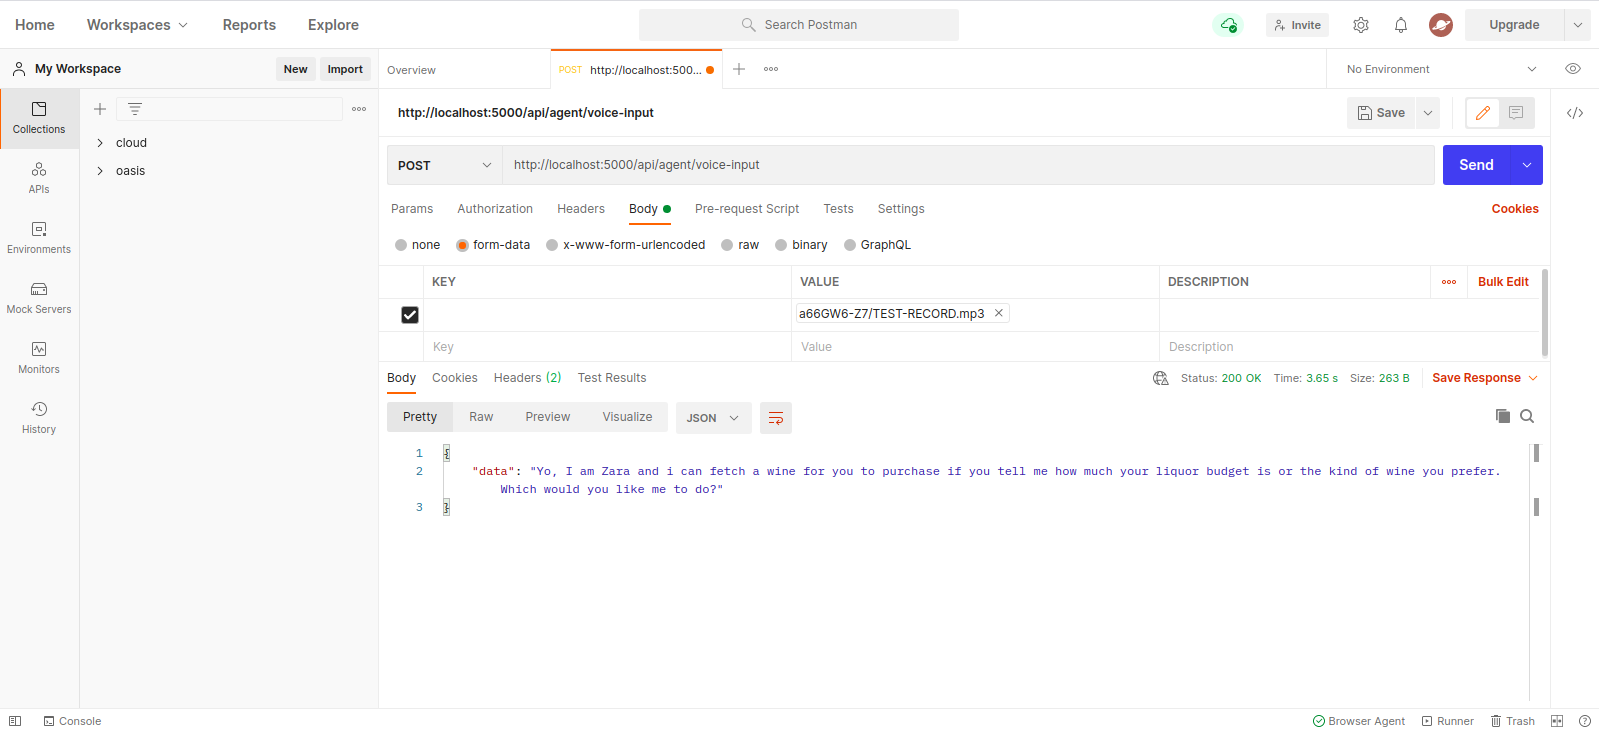
The Postman result shows the response after a POST request containing a recorded voice note saying "Hi" in the request body.
The Express.js application now successfully exchanges data with Dialogflow. The remaining task is integrating this agent into a web application by consuming these APIs from a React frontend.
Wiring the React Frontend to Dialogflow
The demonstration app is an existing React project with a wine list fetched from an API and decorator support via the Babel proposal plugin. We’ll introduce MobX for state management and add a chat feature that recommends wines by consuming the Express REST endpoints built earlier.
The first step is a MobX store holding the chat state and actions. The store declares observable values for UI state and an action that handles a full conversation turn: push the user’s message into an array, call the backend with Axios, then append the agent’s reply to the same array.
// store.js

import Axios from "axios";
import { action, observable, makeObservable, configure } from "mobx";

const ENDPOINT = process.env.REACT_APP_DATA_API_URL;

class ApplicationStore {
  constructor() {
    makeObservable(this);
  }

  @observable
  isChatWindowOpen = false;

  @observable
  isLoadingChatMessages = false;

  @observable
  agentMessages = [];

  @action
  setChatWindow = (state) => {
    this.isChatWindowOpen = state;
  };

  @action
  handleConversation = (message) => {
     this.isLoadingChatMessages = true;
     this.agentMessages.push({ userMessage: message });

     Axios.post(`${ENDPOINT}/dialogflow-response`, {
      message: message || "Hi",
     })
      .then((res) => {
        this.agentMessages.push(res.data.data[0].queryResult);
        this.isLoadingChatMessages = false;
      })
      .catch((e) => {
        this.isLoadingChatMessages = false;
        console.log(e);
      });
  };
}

export const store = new ApplicationStore();
The store exposes:
isChatWindowOpen— controls chat visibility.isLoadingChatMessages— drives a loading indicator during requests.agentMessages— accumulates all responses for rendering.handleConversation— the action that appends the user message and fetches the agent reply.
If decorators aren’t available, MobX’s makeObservable can replace them inside the store constructor. After the store is defined, wrap the app root in the MobX Provider and pass the store instance as a value.
import React from "react";
import { Provider } from "mobx-react";

import { store } from "./state/";
import Home from "./pages/home";

function App() {
  return (
    <Provider ApplicationStore={store}>
      <div className="App">
        <Home />
      </div>
    </Provider>
  );
}

export default App;
With the Provider set up, components can inject and observe store state.
Building the Chat Interface
A new chat component provides the markup: a header with the agent’s name and a close button, a message area, and an input field. A hardcoded message list shows the initial layout, and local useState captures typed input via onChange.
// ./chatComponent.js

import React, { useState } from "react";
import { FiSend, FiX } from "react-icons/fi";
import "../styles/chat-window.css";

const center = {
  display: "flex",
  jusitfyContent: "center",
  alignItems: "center",
};

const ChatComponent = (props) => {
  const { closeChatwindow, isOpen } = props;
  const [Message, setMessage] = useState("");

  return (
   <div className="chat-container">
      <div className="chat-head">
        <div style={{ ...center }}>
          <h5> Zara </h5>
        </div>
        <div style={{ ...center }} className="hover">
          <FiX onClick={() => closeChatwindow()} />
        </div>
      </div>
      <div className="chat-body">
        <ul className="chat-window">
          <li>
            <div className="chat-card">
              <p>Hi there, welcome to our Agent</p>
            </div>
          </li>
        </ul>
        <hr style={{ background: "#fff" }} />
        <form onSubmit={(e) => {}} className="input-container">
          <input
            className="input"
            type="text"
            onChange={(e) => setMessage(e.target.value)}
            value={Message}
            placeholder="Begin a conversation with our agent"
          />
          <div className="send-btn-ctn">
            <div className="hover" onClick={() => {}}>
              <FiSend style={{ transform: "rotate(50deg)" }} />
            </div>
          </div>
        </form>
      </div>
    </div>
  );
};

export default ChatComponent
The component renders a styled window with a sample bubble and bottom input. Next, refactor it to read from the MobX store instead of hardcoded data.
// ./components/chatComponent.js

import React, { useState, useEffect } from "react";
import { FiSend, FiX } from "react-icons/fi";
import { observer, inject } from "mobx-react";
import { toJS } from "mobx";
import "../styles/chat-window.css";

const center = {
  display: "flex",
  jusitfyContent: "center",
  alignItems: "center",
};

const ChatComponent = (props) => {
  const { closeChatwindow, isOpen } = props;
  const [Message, setMessage] = useState("");

  const {
    handleConversation,
    agentMessages,
    isLoadingChatMessages,
  } = props.ApplicationStore;

  useEffect(() => {
    handleConversation();
    return () => handleConversation()
  }, []);

  const data = toJS(agentMessages);

  return (
        <div className="chat-container">
          <div className="chat-head">
            <div style={{ ...center }}>
              <h5> Zara {isLoadingChatMessages && "is typing ..."} </h5>
            </div>
            <div style={{ ...center }} className="hover">
              <FiX onClick={(_) => closeChatwindow()} />
            </div>
          </div>
          <div className="chat-body">
            <ul className="chat-window">
              {data.map(({ fulfillmentText, userMessage }) => (
                <li>
                  {userMessage && (
                    <div
                      style={{
                        display: "flex",
                        justifyContent: "space-between",
                      }}
                    >
                      <p style={{ opacity: 0 }}> . </p>
                      <div
                        key={userMessage}
                        style={{
                          background: "red",
                          color: "white",
                        }}
                        className="chat-card"
                      >
                        <p>{userMessage}</p>
                      </div>
                    </div>
                  )}
                  {fulfillmentText && (
                    <div
                      style={{
                        display: "flex",
                        justifyContent: "space-between",
                      }}
                    >
                      <div key={fulfillmentText} className="chat-card">
                        <p>{fulfillmentText}</p>
                      </div>
                      <p style={{ opacity: 0 }}> . </p>
                    </div>
                  )}
                </li>
              ))}
            </ul>
            <hr style={{ background: "#fff" }} />
            <form
              onSubmit={(e) => {
                e.preventDefault();
                handleConversation(Message);
              }}
              className="input-container"
            >
              <input
                className="input"
                type="text"
                onChange={(e) => setMessage(e.target.value)}
                value={Message}
                placeholder="Begin a conversation with our agent"
              />
              <div className="send-btn-ctn">
                <div
                  className="hover"
                  onClick={() => handleConversation(Message)}
                >
                  <FiSend style={{ transform: "rotate(50deg)" }} />
                </div>
              </div>
            </form>
          </div>
        </div>
     );
};

export default inject("ApplicationStore")(observer(ChatComponent));
After connecting the store:
- The component injects
ApplicationStoreand observes it, re-rendering on state changes. useEffectinvokeshandleConversationon mount to greet the user.- While a reply is pending, the header shows “Zara is typing…” based on
isLoadingMessages. agentMessagesbecomes a MobX proxy; convert it back withtoJSbefore mapping over it.
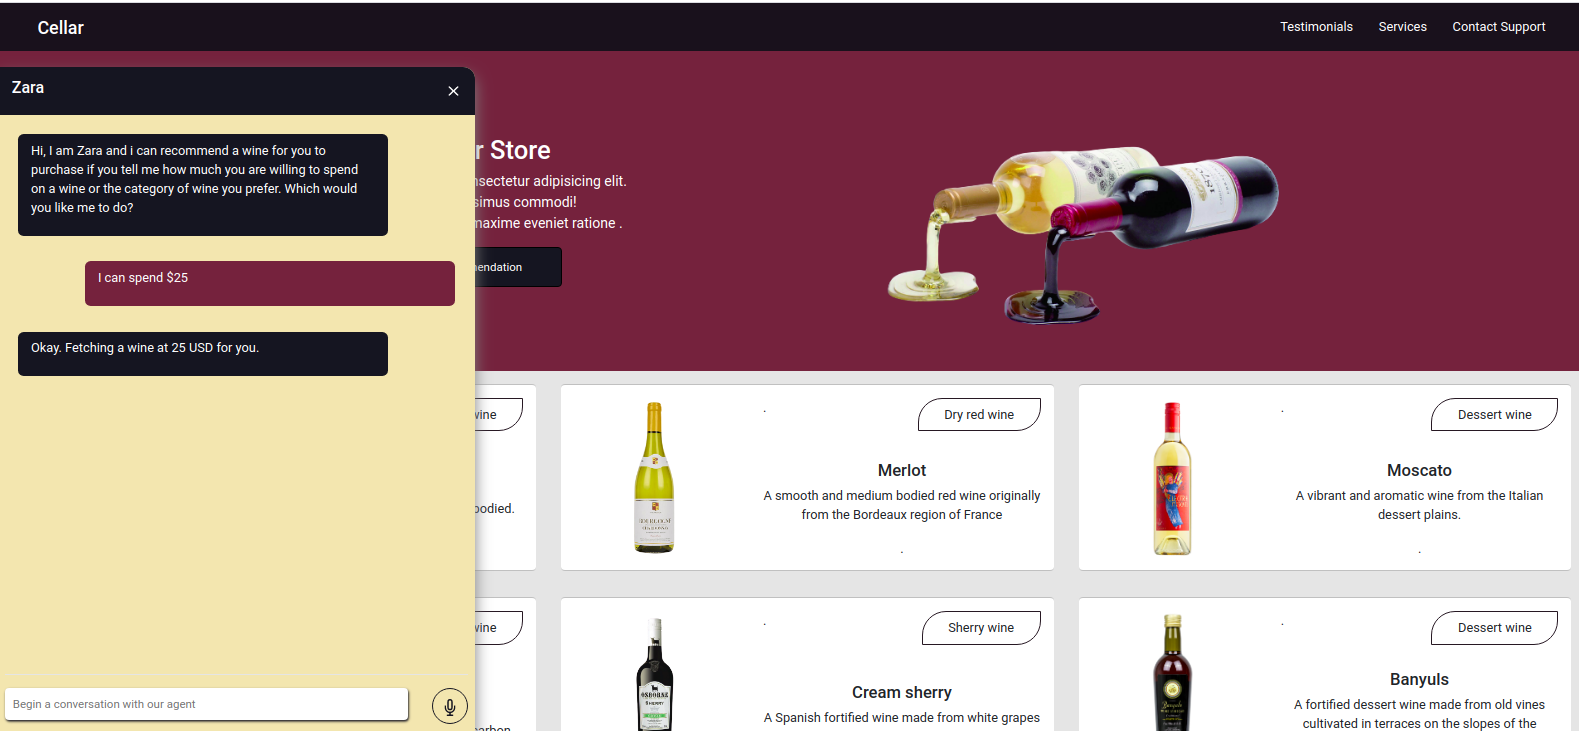
Typing a sentence now produces real agent responses.
Capturing Voice Input
Dialogflow agents natively accept voice input, but the web client must access the user’s microphone and record audio. Two new store methods handle this using the MediaStream Recording API.
// store.js

import Axios from "axios";
import { action, observable, makeObservable } from "mobx";

class ApplicationStore {
  constructor() {
    makeObservable(this);
  }

  @observable
  isRecording = false;

  recorder = null;
  recordedBits = [];

  @action
  startAudioConversation = () => {
    navigator.mediaDevices
      .getUserMedia({
        audio: true,
      })
      .then((stream) => {
        this.isRecording = true;
        this.recorder = new MediaRecorder(stream);
        this.recorder.start(50);

        this.recorder.ondataavailable = (e) => {
           this.recordedBits.push(e.data);
        };
      })
      .catch((e) => console.log(`error recording : ${e}`));
  };
};
startAudioConversation first sets an isRecording observable to true for visual feedback. It then accesses the browser’s media devices via navigator, requests the microphone with getUserMedia, and passes the returned MediaStream to a new MediaRecorder. The recorder instance is saved in a store property for later use.
Calling recorder.start() begins the session. When recording stops, the ondataavailable handler receives a Blob with the audio data, which is pushed into a recordedBits array.
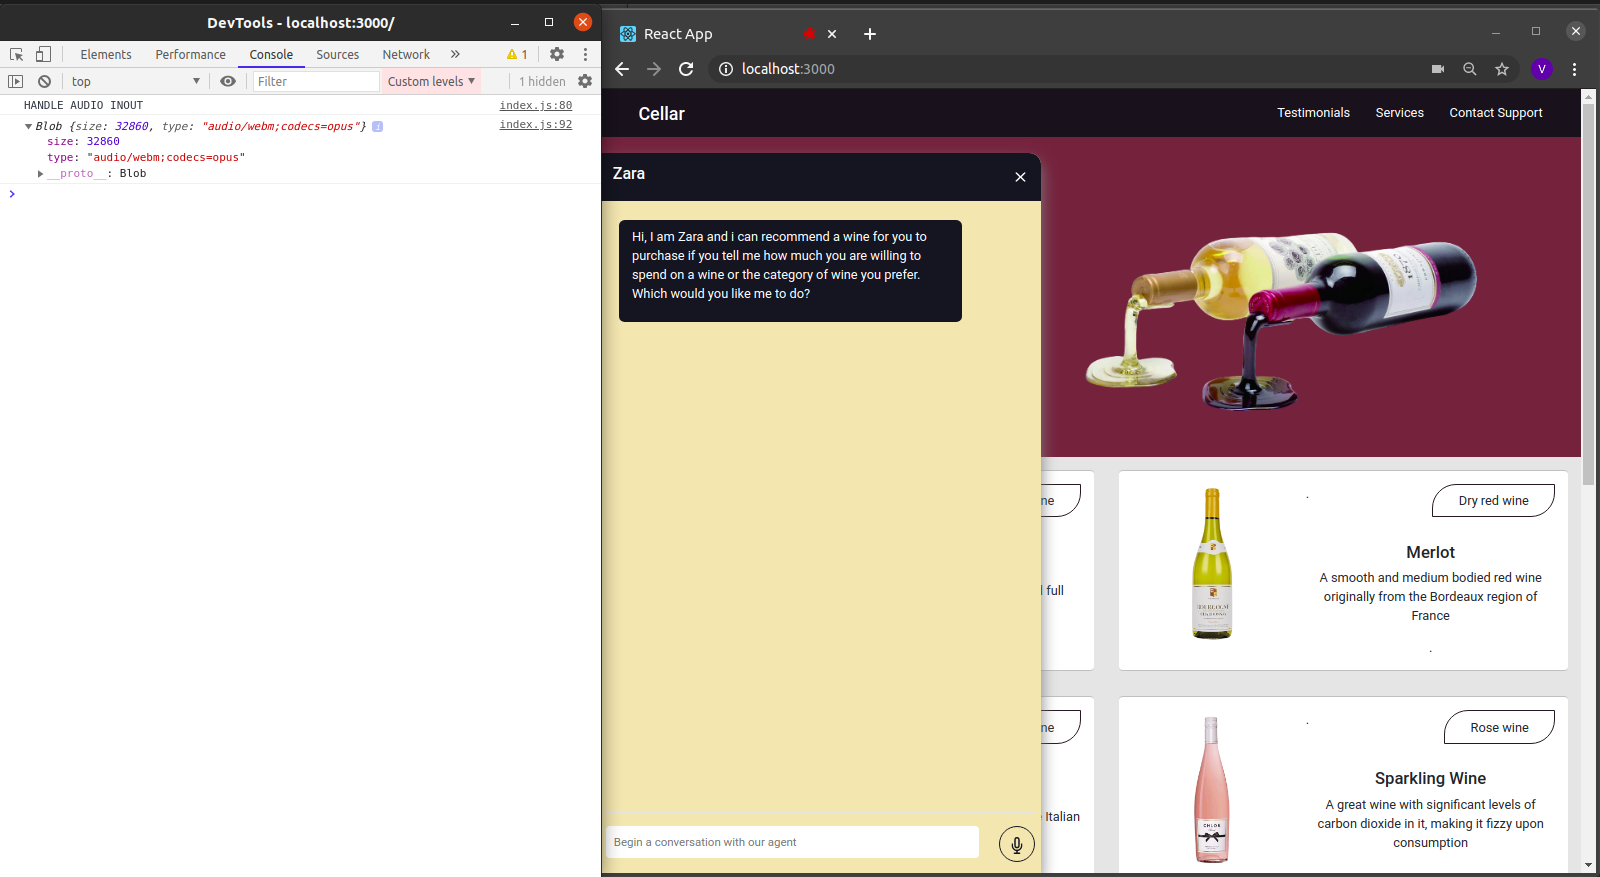
A second method terminates the stream and uploads the audio. Inside onstop, the Blob—typed as audio/mp3—is appended to a FormData object. A POST request is then sent with the Content-Type: multipart/formdata header so the backend’s connect-busboy middleware can parse the file.
//store.js

import Axios from "axios";
import { action, observable, makeObservable, configure } from "mobx";

const ENDPOINT = process.env.REACT_APP_DATA_API_URL;

class ApplicationStore {
  constructor() {
    makeObservable(this);
  }

  @observable
  isRecording = false;

  recorder = null;
  recordedBits = [];

  @action
  closeStream = () => {
    this.isRecording = false;
    this.recorder.stop();

    this.recorder.onstop = () => {
      if (this.recorder.state === "inactive") {
        const recordBlob = new Blob(this.recordedBits, {
          type: "audio/mp3",
        });

        const inputFile = new File([recordBlob], "input.mp3", {
          type: "audio/mp3",
        });
        const formData = new FormData();
        formData.append("voiceInput", inputFile);

        Axios.post(`${ENDPOINT}/api/agent/voice-input`, formData, {
          headers: {
            "Content-Type": "multipart/formdata",
          },
        })
          .then((data) => {})
          .catch((e) => console.log(`error uploading audio file : ${e}`));
      }
    };
  };
}

export const store = new ApplicationStore();
The chat header needs a control to trigger both record methods plus a visual indicator. Using a ternary expression, the header text changes to “Zara is listening ….” while recording is active. Below the header, the input row contains a microphone icon; when text is typed it conditionally switches to a Send button based on the input length. With these controls wired, the chat accepts both typed and spoken messages, and the agent replies as it would in the Dialogflow console.
import React from 'react'

const ChatComponent = ({ ApplicationStore }) => {
  const {
     startAudiConversation,
     isRecording,
     handleConversation,
     endAudioConversation,
     isLoadingChatMessages
    } = ApplicationStore

  const [ Message, setMessage ] = useState("")

    return (
        <div>
           <div className="chat-head">
            <div style={{ ...center }}>
              <h5> Zara {} {isRecording && "is listening ..."} </h5>
            </div>
            <div style={{ ...center }} className="hover">
              <FiX onClick={(_) => closeChatwindow()} />
            </div>
          </div>

          <form
              onSubmit={(e) => {
                  e.preventDefault();
                  handleConversation(Message);
                }}
                className="input-container"
              >
                <input
                  className="input"
                  type="text"
                  onChange={(e) => setMessage(e.target.value)}
                  value={Message}
                  placeholder="Begin a conversation with our agent"
                />
                <div className="send-btn-ctn">
                  {Message.length > 0 ? (
                    <div
                      className="hover"
                      onClick={() => handleConversation(Message)}
                    >
                      <FiSend style={{ transform: "rotate(50deg)" }} />
                    </div>
                  ) : (
                    <div
                      className="hover"
                      onClick={() =>  handleAudioInput()}
                    >
                      <FiMic />
                    </div>
                  )}
                </div>
              </form>
        </div>
    )
}

export default ChatComponent
Where to Go From Here
The finished demo is deployed on Netlify, and the backend Express project is available on GitHub; both repositories include a README documenting the relevant files. For deeper background, the Dialogflow documentation and the earlier Smashing article on building a Dialogflow-based conversational chatbot are the most direct references, along with the MediaStream Recording API guide on MDN and the MobX state-management docs.


