

The case for a custom group chat
Chat has become a default communication channel in both business and social contexts. Workplaces rely on Slack, Microsoft Teams, Chanty, HubSpot Live Chat and Help Scout, while Instagram, Facebook, Reddit and Twitter ship chat as a built-in feature. For Discord, Whatsapp and Telegram, chat — group chat in particular — is the product.
Off-the-shelf options do not cover every case. Many are standalone apps that cannot be embedded inside your own site, and sending users elsewhere to talk to each other can hurt both user experience and conversion. Writing a chat stack from scratch is equally unattractive. Communication APIs such as Twilio Conversations absorb the heavy parts: creating groups, adding participants, sending messages and notifications. A backend that sits on top of such an API only has to authenticate users and call the API, and the front end only has to render the conversations, groups and messages it receives.
This tutorial builds exactly that split. The backend is a Node.js app that authorizes chat participants and manages chat creation. The front end is HTML, CSS and Vanilla JavaScript, covering login, new group creation, friend invitations and message exchange. When it is done, several participants can hold a conversation in a single group.
What you need before starting
- Node.js — used for the backend and to install front-end dependencies. A pre-built installer is available on the Node.js downloads page.
- A Twilio account — sign up on the Twilio website.
http-serverto serve the front end — install it withnpm i -g http-server, or run it once withnpx http-server.- MongoDB for backend session storage — the installation page has a detailed setup guide.
Setting Up The Twilio Chat Server
Everything a chat client needs to talk to Twilio is issued here: a conversation holds the messages, participants are the users allowed to post inside it, and both are provisioned server-side. The client never talks to Twilio directly — it receives an access token, generated by this app, and uses it to load subscribed conversations and their messages.
Bootstrapping The Project
The backend is called twilio-chat-server. A scaffolded starter lives in the Twilio twilio-chat-demo-js repository; cloning it and installing yields the layout you will fill in. The app launches with node index.js.
git clone https://github.com/zaracooper/twilio-chat-server.git
cd twilio-chat-server
git checkout starter
.
├── app.js
├── config/
├── controllers/
├── package.json
├── routes/
└── utils/Eight Dependencies
Install the full set in one go, then start wiring code.
npm i connect-mongo— MongoDB backed session store;cors— CORS handling;dotenv— reads environment variables from the.envfile;express— the web framework;express-session— session middleware;http-errors— server error construction;morgan— request logging;twilio— Twilio client, token generation, conversation creation, participant management.
Configuration And Credentials
Configuration lives in the config folder and is read from environment variables, split into three groups: CORS, Twilio, and the MongoDB session database. When the environment is development, values come from the .env file through dotenv. That file is already listed in .gitignore, so the secrets it holds stay out of the repository.
touch .envThe file itself looks like this:
# Session DB Config
SESSION_DB_HOST=XXXX
SESSION_DB_USER=XXXX
SESSION_DB_PASS=XXXX
SESSION_DB_PORT=XXXX
SESSION_DB_NAME=XXXX
SESSION_DB_SECRET=XXXX

# Twilio Config
TWILIO_ACCOUNT_SID=XXXX
TWILIO_AUTH_TOKEN=XXXX
TWILIO_API_KEY=XXXX
TWILIO_API_SECRET=XXXX

# CORS Client Config
CORS_CLIENT_DOMAIN=XXXX
For the session database you need a Mongo user with write access — the MongoDB manual covers creating one. Fill SESSION_DB_USER, SESSION_DB_PASS and SESSION_DB_NAME accordingly; a local MongoDB instance means SESSION_DB_HOST=localhost and SESSION_DB_PORT=27017. SESSION_DB_SECRET is the string express-session uses to sign the session ID cookie and can be any secret you choose.
Credentials ending in the TWILIO_ prefix come from the Twilio Console. Because the front-end runs at http://localhost:3000 during local development, that is the value for CORS_CLIENT_DOMAIN.
config/index.js loads the variables and exports one object per category for the rest of the app to consume.
import dotenv from 'dotenv';

if (process.env.NODE_ENV == 'development') {
    dotenv.config();
}

const corsClient = {
    domain: process.env.CORS_CLIENT_DOMAIN
};

const sessionDB = {
    host: process.env.SESSION_DB_HOST,
    user: process.env.SESSION_DB_USER,
    pass: process.env.SESSION_DB_PASS,
    port: process.env.SESSION_DB_PORT,
    name: process.env.SESSION_DB_NAME,
    secret: process.env.SESSION_DB_SECRET
};

const twilioConfig = {
    accountSid: process.env.TWILIO_ACCOUNT_SID,
    authToken: process.env.TWILIO_AUTH_TOKEN,
    apiKey: process.env.TWILIO_API_KEY,
    apiSecret: process.env.TWILIO_API_SECRET
};

const port = process.env.PORT || '8000';

export { corsClient, port, sessionDB, twilioConfig };
Four Credentials From The Console
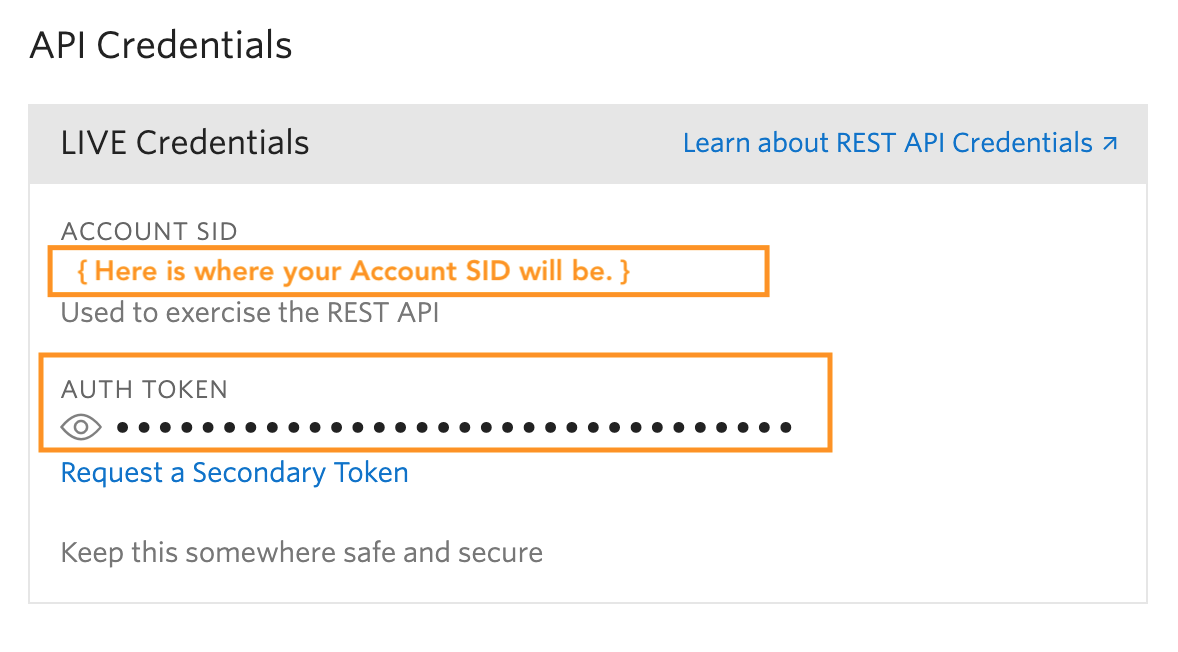
Four values are needed: Account SID, Auth Token, API key, and API secret. The first two sit in the General Settings page under the API Credentials section.
The key and secret come from the API Keys page, reached via the + button.
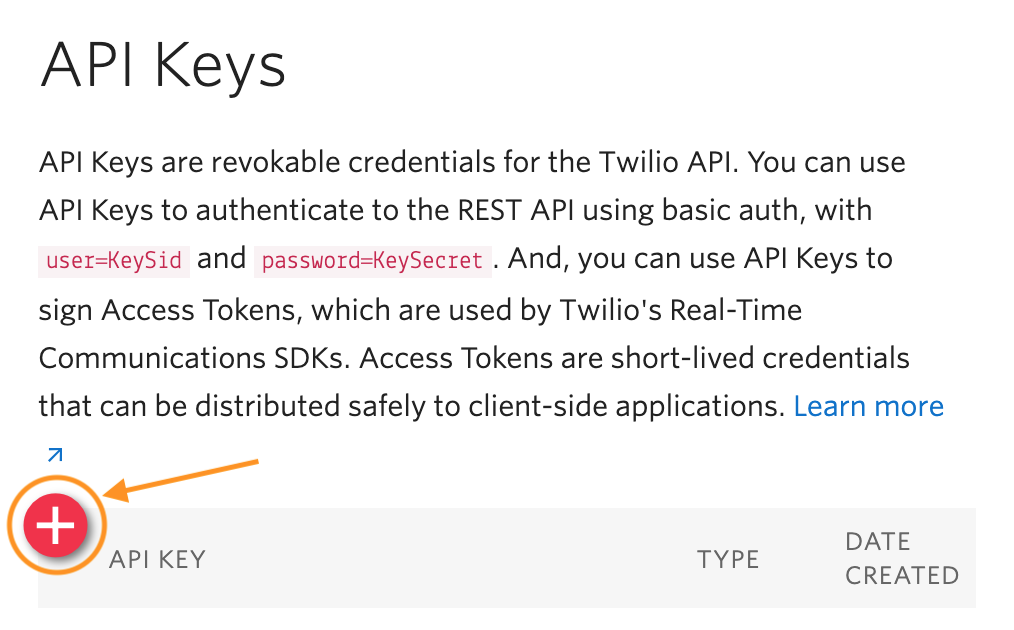
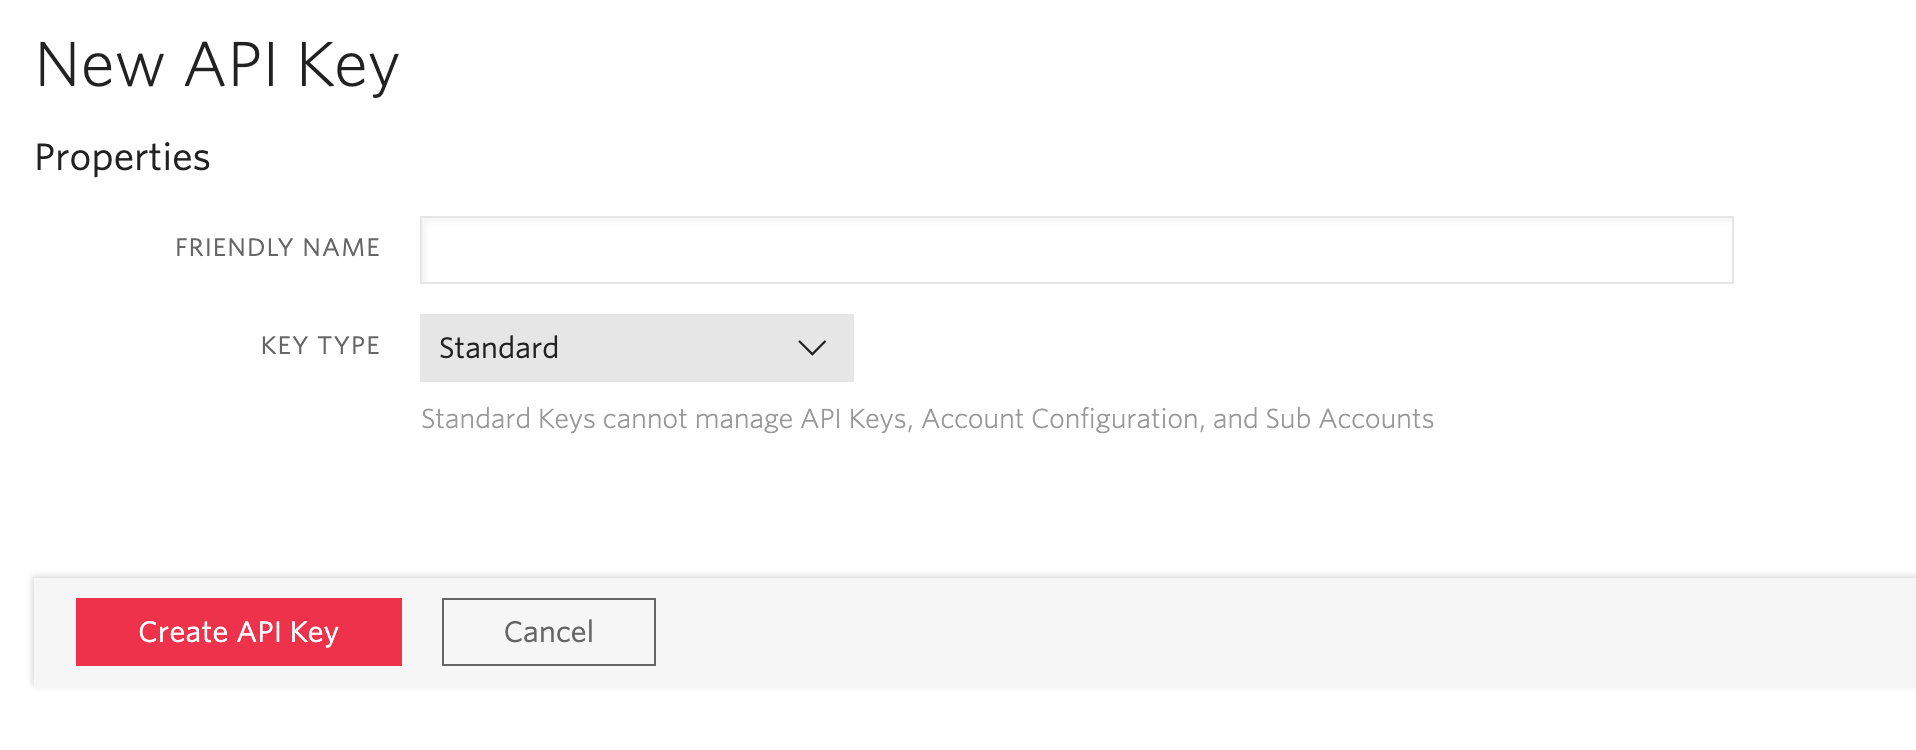
API Key button on API Key list page. (Large preview)Name the key, keep KEY TYPE set to Standard, press Create API Key, and copy the resulting key and secret.
Two Utility Functions
utils/token.js holds createToken, which generates a Twilio access token:
import { twilioConfig } from '../config/index.js';
import twilio from 'twilio';

function createToken(username, serviceSid) {
    const AccessToken = twilio.jwt.AccessToken;
    const ChatGrant = AccessToken.ChatGrant;

    const token = new AccessToken(
        twilioConfig.accountSid,
        twilioConfig.apiKey,
        twilioConfig.apiSecret,
        { identity: username }
    );

    const chatGrant = new ChatGrant({
        serviceSid: serviceSid,
    });

    token.addGrant(chatGrant);

    return token.toJwt();
}
The token is built from the Account SID, API key and API secret, with an optional unique identity such as a username or email. Once created, the token needs a chat grant, which may carry a conversation service ID along with other optional values, and the result is converted to a JWT before being returned.
utils/controller.js exports asyncWrapper, a wrapper for async controllers that catches whatever they throw:
function asyncWrapper(controller) {
    return (req, res, next) => Promise.resolve(controller(req, res, next)).catch(next);
}

export { asyncWrapper, createToken };
Controllers And Routes
Four controllers make up the API surface: two for authentication (creating and deleting a token) and two for conversations (creating a conversation and adding participants to it).
Conversations
In controllers/conversations.js, StartConversation is added first, imports included:
import { twilioConfig } from '../config/index.js';
import { createToken } from '../utils/token.js';
import twilio from 'twilio';

async function StartConversation(req, res, next) {
    const client = twilio(twilioConfig.accountSid, twilioConfig.authToken);

    const { conversationTitle, username } = req.body;

    try {
        if (conversationTitle && username) {
            const conversation = await client.conversations.conversations
                .create({ friendlyName: conversationTitle });

            req.session.token = createToken(username, conversation.chatServiceSid);
            req.session.username = username;

            const participant = await client.conversations.conversations(conversation.sid)
                .participants.create({ identity: username })

            res.send({ conversation, participant });
        } else {
            next({ message: 'Missing conversation title or username' });
        }
    }
    catch (error) {
        next({ error, message: 'There was a problem creating your conversation' });
    }
}
It instantiates a Twilio client from twilioConfig.accountSid and twilioConfig.authToken pulled out of config/index.js. Then it creates a conversation using a title taken from the request body. Nobody can post in a conversation without being added to it, and a participant cannot send anything without an access token, so an access token is generated for the username in the request body along with conversation.chatServiceSid, and that username is then added as a participant. The response carries the new conversation and participant.
AddParticipant goes below it in the same file:
async function AddParticipant(req, res, next) {
    const client = twilio(twilioConfig.accountSid, twilioConfig.authToken);

    const { username } = req.body;
    const conversationSid = req.params.id;

    try {
        const conversation = await client.conversations.conversations
            .get(conversationSid).fetch();

        if (username && conversationSid) {
            req.session.token = createToken(username, conversation.chatServiceSid);
            req.session.username = username;

            const participant = await client.conversations.conversations(conversationSid)
                .participants.create({ identity: username })

            res.send({ conversation, participant });
        } else {
            next({ message: 'Missing username or conversation Sid' });
        }
    } catch (error) {
        next({ error, message: 'There was a problem adding a participant' });
    }
}

export { AddParticipant, StartConversation };
This controller works on conversations that already exist. It reads the conversationSid route parameter, fetches that conversation, creates a token for the user named in the request body, and adds them. Both the conversation and the participant are returned.
Auth
The two functions in controllers/auth.js are GetToken and DeleteToken:
function GetToken(req, res, next) {
    if (req.session.token) {
        res.send({ token: req.session.token, username: req.session.username });
    } else {
        next({ status: 404, message: 'Token not set' });
    }
}

function DeleteToken(req, res, _next) {
    delete req.session.token;
    delete req.session.username;

    res.send({ message: 'Session destroyed' });
}

export { DeleteToken, GetToken };
GetToken reads the token and username off the session and returns them if present; DeleteToken destroys the session.
Three Route Files
The routes folder contains index.js, conversations.js, and auth.js.
Authentication first:
import { Router } from 'express';

import { DeleteToken, GetToken } from '../controllers/auth.js';

var router = Router();

router.get('/', GetToken);
router.delete('/', DeleteToken);

export default router;
The GET route on / returns a token; the DELETE route removes it.
Conversation routing comes next:
import { Router } from 'express';
import { AddParticipant, StartConversation } from '../controllers/conversations.js';
import { asyncWrapper } from '../utils/controller.js';

var router = Router();

router.post('/', asyncWrapper(StartConversation));
router.post('/:id/participants', asyncWrapper(AddParticipant));

export default router;
Here a conversations router is created and given a POST route at / for new conversations plus a POST route at /:id/participants for adding participants.
The main router mounts both:
import { Router } from 'express';

import authRouter from './auth.js';
import conversationRouter from './conversations.js';

var router = Router();

router.use('/auth/token', authRouter);
router.use('/api/conversations', conversationRouter);

export default router;
Mounting the two routers exposes them at /api/conversations and /auth/token respectively; the router is then exported.
Wiring The App Together
With the pieces in place, index.js assembles them:
import cors from 'cors';
import createError from 'http-errors';
import express, { json, urlencoded } from 'express';
import logger from 'morgan';
import session from 'express-session';
import store from 'connect-mongo';

import { corsClient, port, sessionDB } from './config/index.js';

import router from './routes/index.js';

var app = express();

app.use(logger('dev'));
app.use(json());
app.use(urlencoded({ extended: false }));

app.use(cors({
    origin: corsClient.domain,
    credentials: true,
    methods: ['GET', 'POST', 'DELETE'],
    maxAge: 3600 * 1000,
    allowedHeaders: ['Content-Type', 'Range'],
    exposedHeaders: ['Accept-Ranges', 'Content-Encoding', 'Content-Length', 'Content-Range']
}));
app.options('*', cors());

app.use(session({
    store: store.create({
        mongoUrl: `mongodb://${sessionDB.user}:${sessionDB.pass}@${sessionDB.host}:${sessionDB.port}/${sessionDB.name}`,
        mongoOptions: { useUnifiedTopology: true },
        collectionName: 'sessions'
    }),
    secret: sessionDB.secret,
    cookie: {
        maxAge: 3600 * 1000,
        sameSite: 'strict'
    },
    name: 'twilio.sid',
    resave: false,
    saveUninitialized: true
}));

app.use('/', router);

app.use(function (_req, _res, next) {
    next(createError(404, 'Route does not exist.'));
});

app.use(function (err, _req, res, _next) {
    res.status(err.status || 500).send(err);
});

app.listen(port);
The file creates the express app, enables JSON and URL-encoded payload parsing, registers the logging middleware, then configures CORS and sessions — MongoDB acting as the session store. After that it attaches the router, configures error handling, and starts listening on the port from the .env file, falling back to 8000 when none is set.
With MongoDB running, launch the server and pass the environment explicitly:
NODE_ENV=development npm startNODE_ENV=development makes the app load configuration from the local .env file.
Front-End Architecture
The browser-side app, named twilio-chat-app, is a scaffolded starter available on Github. Clone it with:
git clone https://github.com/zaracooper/twilio-vanilla-js-chat-app.git
cd twilio-vanilla-js-chat-app
git checkout starter
Its layout is:
.
├── index.html
├── pages
│   ├── chat.html
│   ├── conversation.html
│   ├── error.html
│   └── login.html
├── scripts
│   ├── chat.js
│   ├── conversation.js
│   └── login.js
└── styles
    ├── chat.css
    ├── main.css
    └── simple-page.css
Four pages cover the whole feature set: conversations (create a conversation), chat (list conversations and exchange messages), login (join via invite), and error. Styling and HTML markup ship with the starter; only the scripts need writing.
Dependencies
Two packages are required: axios for backend requests and @twilio/conversations for fetching conversations and sending messages. Install both from the terminal:
npm iLanding And Error Pages
index.html is the entry point, styled by styles/main.css (shared by all pages) and styles/simple-page.css (smaller pages). It looks like this:
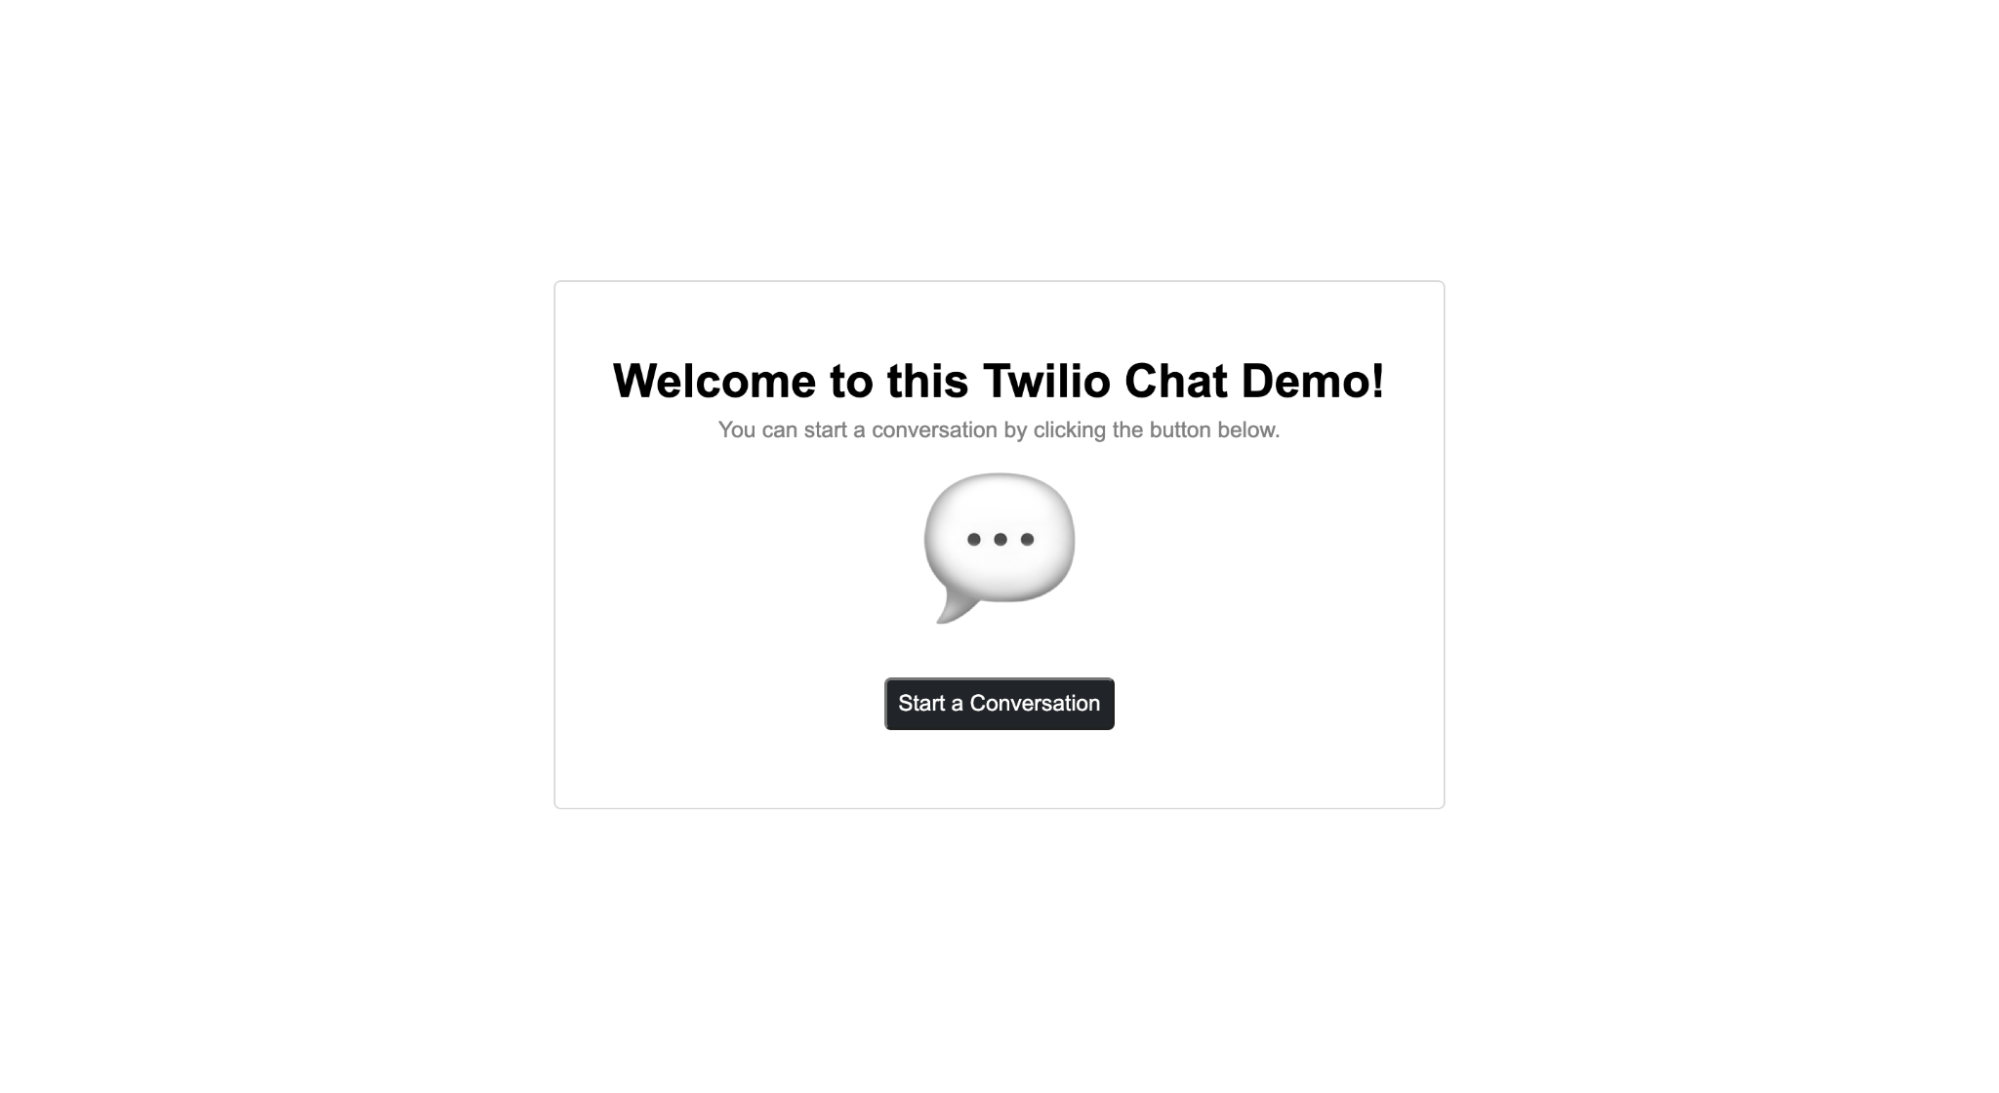
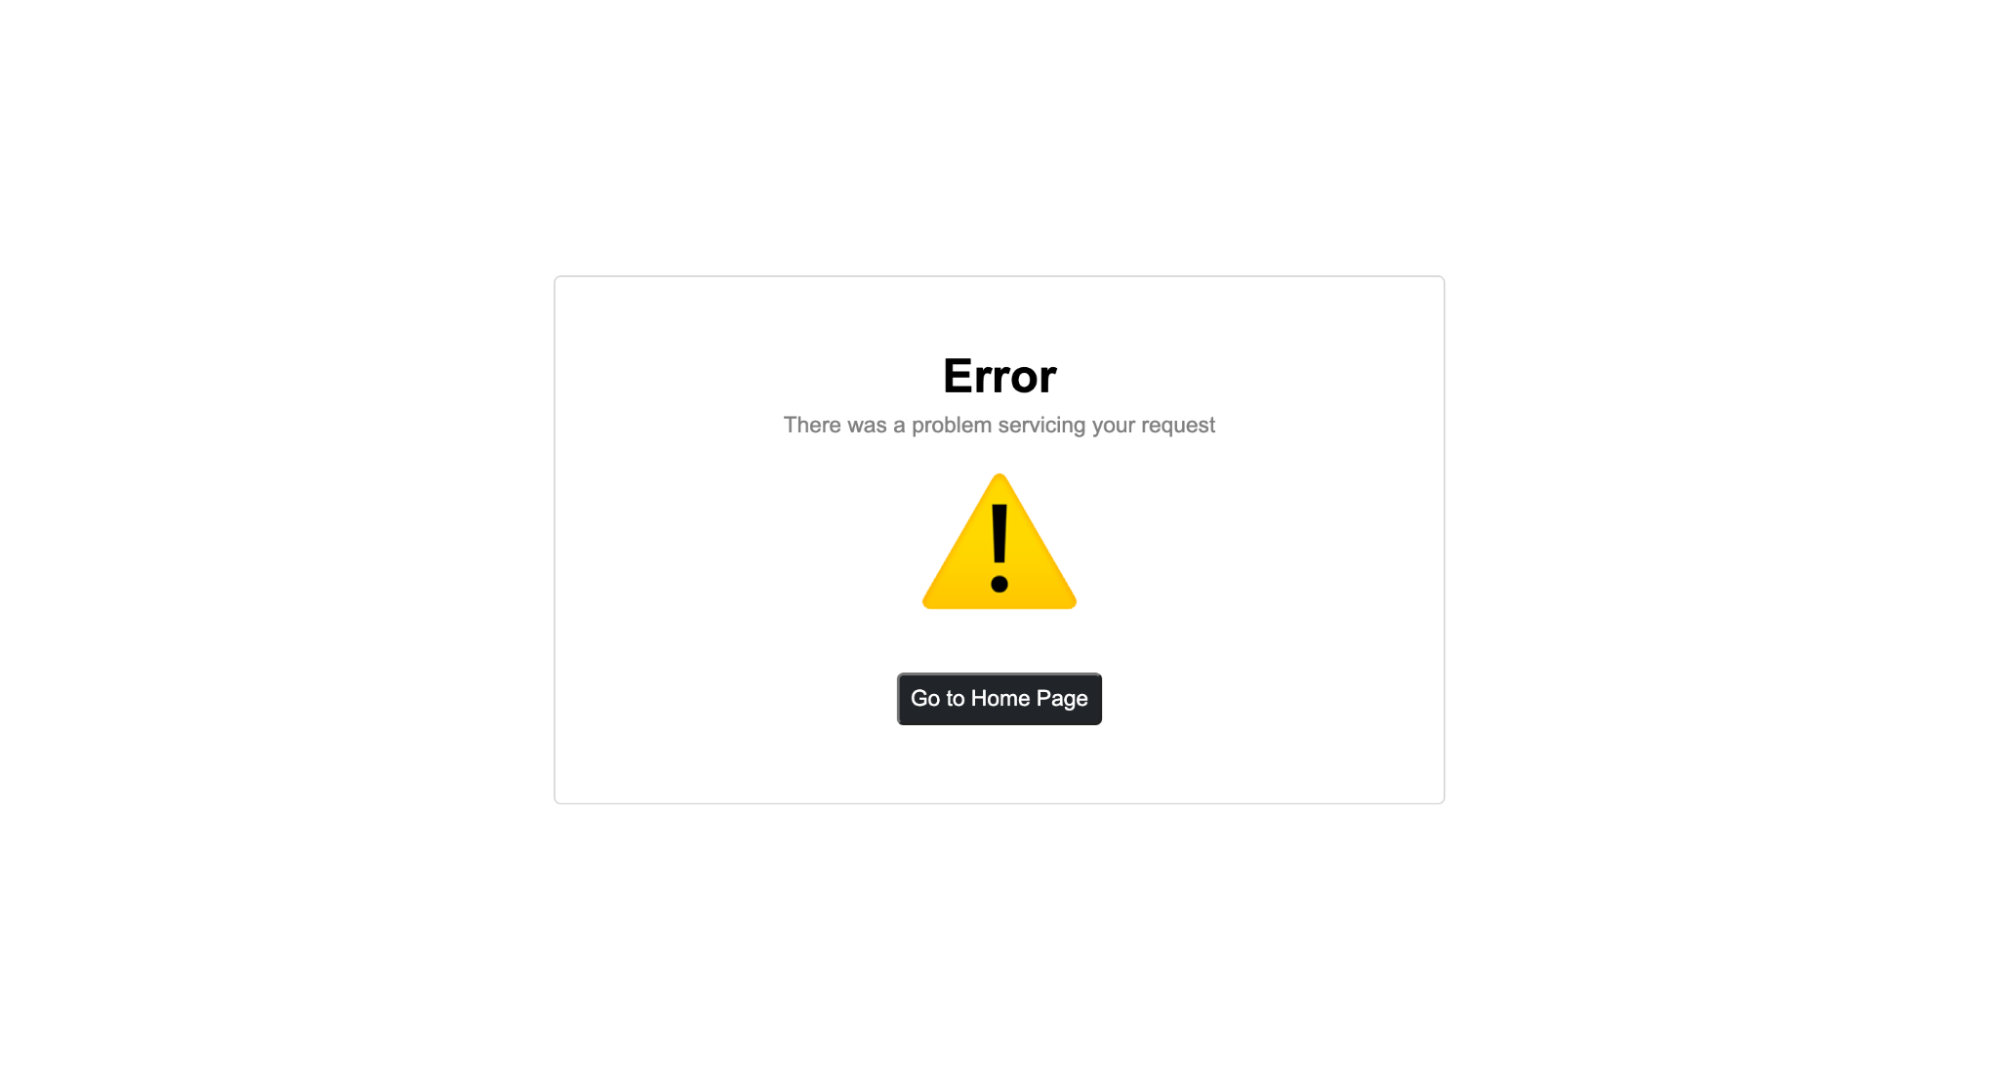
pages/error.html is rendered whenever something fails. Its button returns the user to the home page so they can retry the action. The markup is shown here:
Creating A Conversation
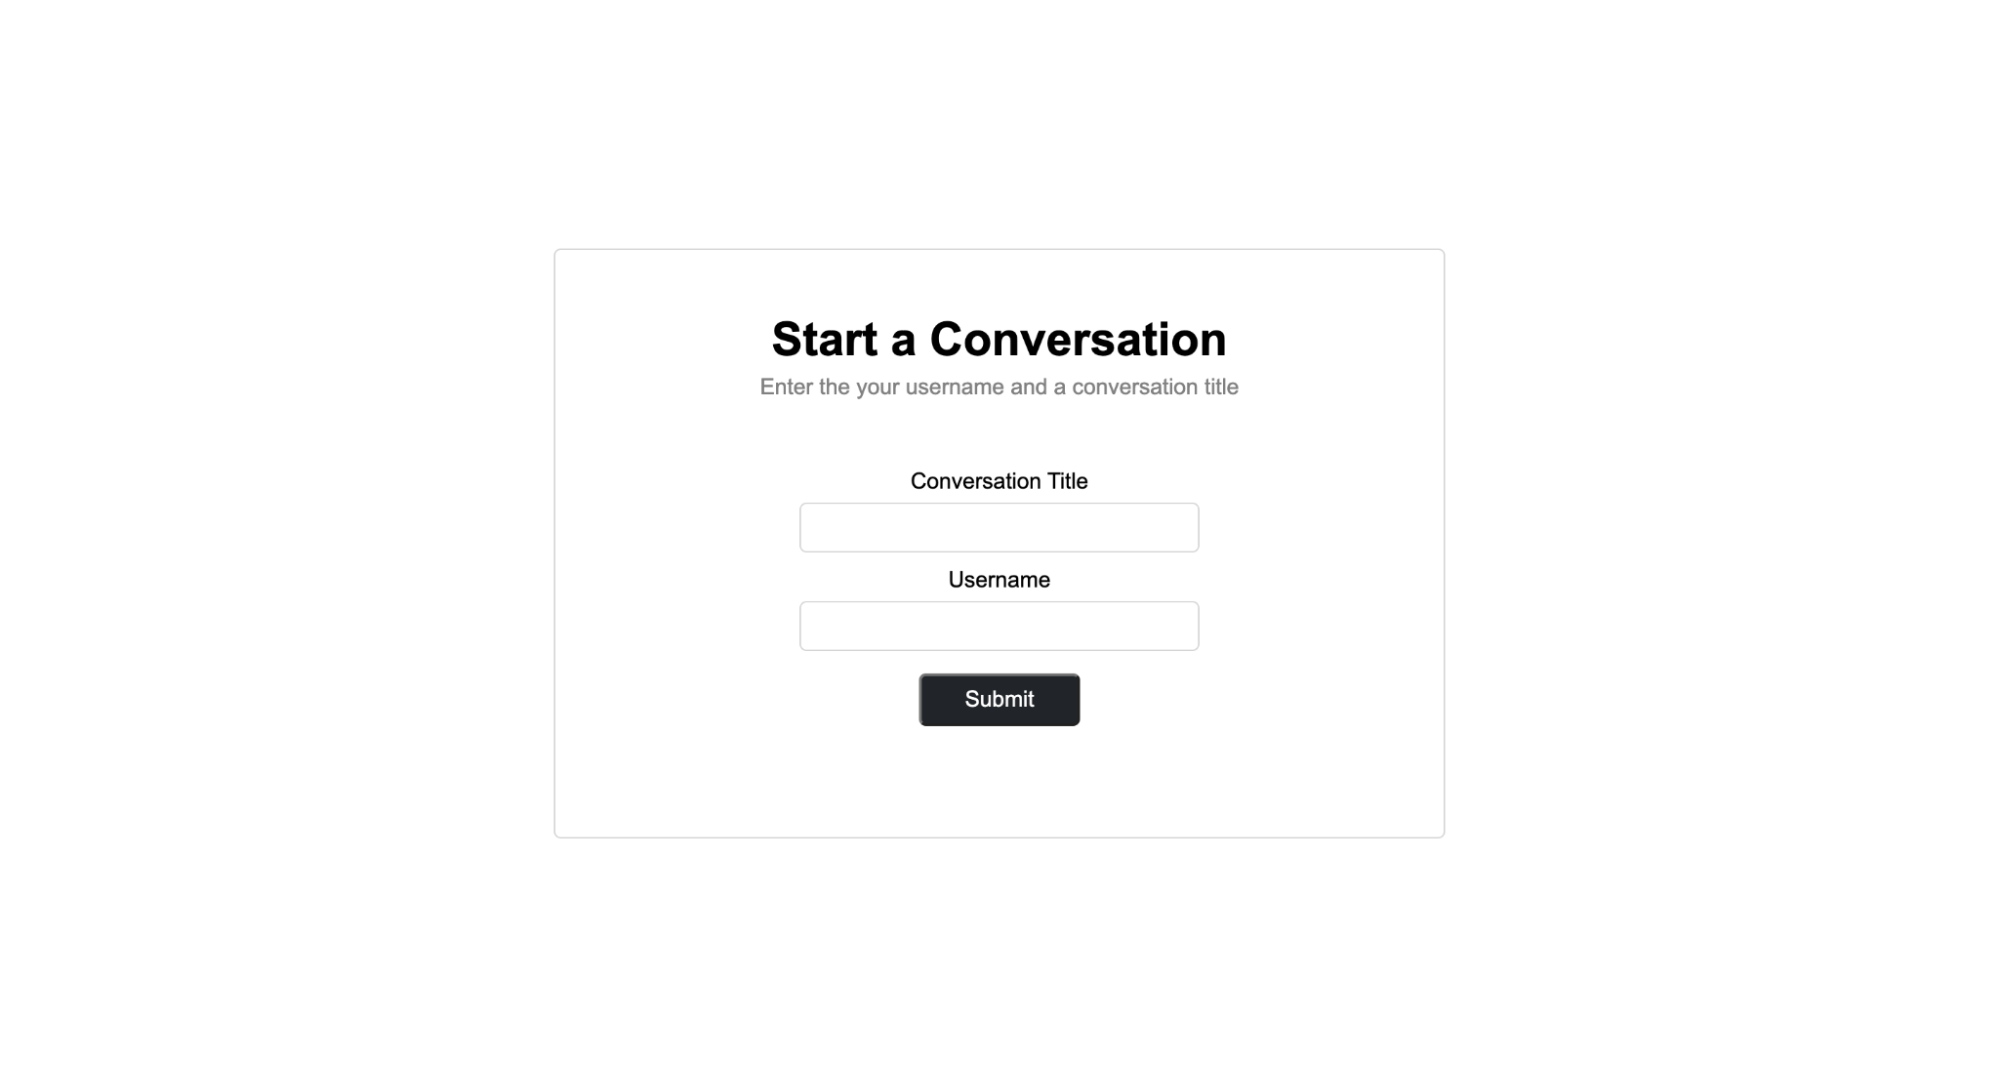
The conversations form in pages/conversation.html collects a conversation title and a username. Put this in scripts/conversation.js:
window.twilioChat = window.twilioChat || {};

function createConversation() {
    let convoForm = document.getElementById('convoForm');
    let formData = new FormData(convoForm);

    let body = Object.fromEntries(formData.entries()) || {};

    let submitBtn = document.getElementById('submitConvo');
    submitBtn.innerText = "Creating..."
    submitBtn.disabled = true;
    submitBtn.style.cursor = 'wait';

    axios.request({
        url: '/api/conversations',
        baseURL: 'http://localhost:8000',
        method: 'post',
        withCredentials: true,
        data: body
    })
        .then(() => {
            window.twilioChat.username = body.username;
            location.href = '/pages/chat.html';
        })
        .catch(() => {
            location.href = '/pages/error.html';
        });
}
A click on Submit invokes createConversation. The form values become the body of a POST to http://localhost:8000/api/conversations/ issued through axios. On success the conversation exists, the creator is enrolled in it, and the browser moves on to the chat page.
The Chat Script: Client And Conversations
The chat page lists the user's conversations and handles message sending; its markup lives in pages/chat.html and its styling in styles/chat.css. The script opens by declaring a namespace, twilioDemo.
window.twilioChat = window.twilioChat || {};Next comes initClient, which sets up the Twilio client and pulls in the conversation list.
async function initClient() {
    try {
        const response = await axios.request({
            url: '/auth/token',
            baseURL: 'http://localhost:8000',
            method: 'GETget',
            withCredentials: true
        });

        window.twilioChat.username = response.data.username;
        window.twilioChat.client = await Twilio.Conversations.Client.create(response.data.token);

        let conversations = await window.twilioChat.client.getSubscribedConversations();

        let conversationCont, conversationName;

        const sideNav = document.getElementById('side-nav');
        sideNav.removeChild(document.getElementById('loading-msg'));

        for (let conv of conversations.items) {
            conversationCont = document.createElement('button');
            conversationCont.classList.add('conversation');
            conversationCont.id = conv.sid;
            conversationCont.value = conv.sid;
            conversationCont.onclick = async () => {
                await setConversation(conv.sid, conv.channelState.friendlyName);
            };

            conversationName = document.createElement('h3');
            conversationName.innerText = `💬 ${conv.channelState.friendlyName}`;

            conversationCont.appendChild(conversationName);
            sideNav.appendChild(conversationCont);
        }
    }
    catch {
        location.href = '/pages/error.html';
    }
};
On page load it retrieves the user's access token from the backend, instantiates the client with that token, asks the client for every conversation the user is subscribed to, and renders them into the side-nav. Failures route the user to the error page.
Single conversations are handled by setConversation (note the typo—the function is referred to as setConversion in the surrounding prose), added below:
async function setConversation(sid, name) {
    try {
        window.twilioChat.selectedConvSid = sid;

        document.getElementById('chat-title').innerText = '+ ' + name;

        document.getElementById('loading-chat').style.display = 'flex';
        document.getElementById('messages').style.display = 'none';

        let submitButton = document.getElementById('submitMessage')
        submitButton.disabled = true;

        let inviteButton = document.getElementById('invite-button')
        inviteButton.disabled = true;

        window.twilioChat.selectedConversation = await window.twilioChat.client.getConversationBySid(window.twilioChat.selectedConvSid);

        const messages = await window.twilioChat.selectedConversation.getMessages();

        addMessagesToChatArea(messages.items, true);

        window.twilioChat.selectedConversation.on('messageAdded', msg => addMessagesToChatArea([msg], false));

        submitButton.disabled = false;
        inviteButton.disabled = false;
    } catch {
        showError('loading the conversation you selected');
    }
};
Clicking a conversation passes its conversation SID and name to that function. The SID fetches the conversation and its existing messages, which fill the chat area. A listener is then attached so that messages arriving later are appended as they come in. Any error surfaces as an error message.
The function that actually paints messages is addMessagedToChatArea:
function addMessagesToChatArea(messages, clearMessages) {
    let cont, msgCont, msgAuthor, timestamp;

    const chatArea = document.getElementById('messages');

    if (clearMessages) {
        document.getElementById('loading-chat').style.display = 'none';
        chatArea.style.display = 'flex';
        chatArea.replaceChildren();
    }

    for (const msg of messages) {
        cont = document.createElement('div');
        if (msg.state.author == window.twilioChat.username) {
            cont.classList.add('right-message');
        } else {
            cont.classList.add('left-message');
        }

        msgCont = document.createElement('div');
        msgCont.classList.add('message');

        msgAuthor = document.createElement('p');
        msgAuthor.classList.add('username');
        msgAuthor.innerText = msg.state.author;

        timestamp = document.createElement('p');
        timestamp.classList.add('timestamp');
        timestamp.innerText = msg.state.timestamp;

        msgCont.appendChild(msgAuthor);
        msgCont.innerText += msg.state.body;

        cont.appendChild(msgCont);
        cont.appendChild(timestamp);

        chatArea.appendChild(cont);
    }

    chatArea.scrollTop = chatArea.scrollHeight;
}
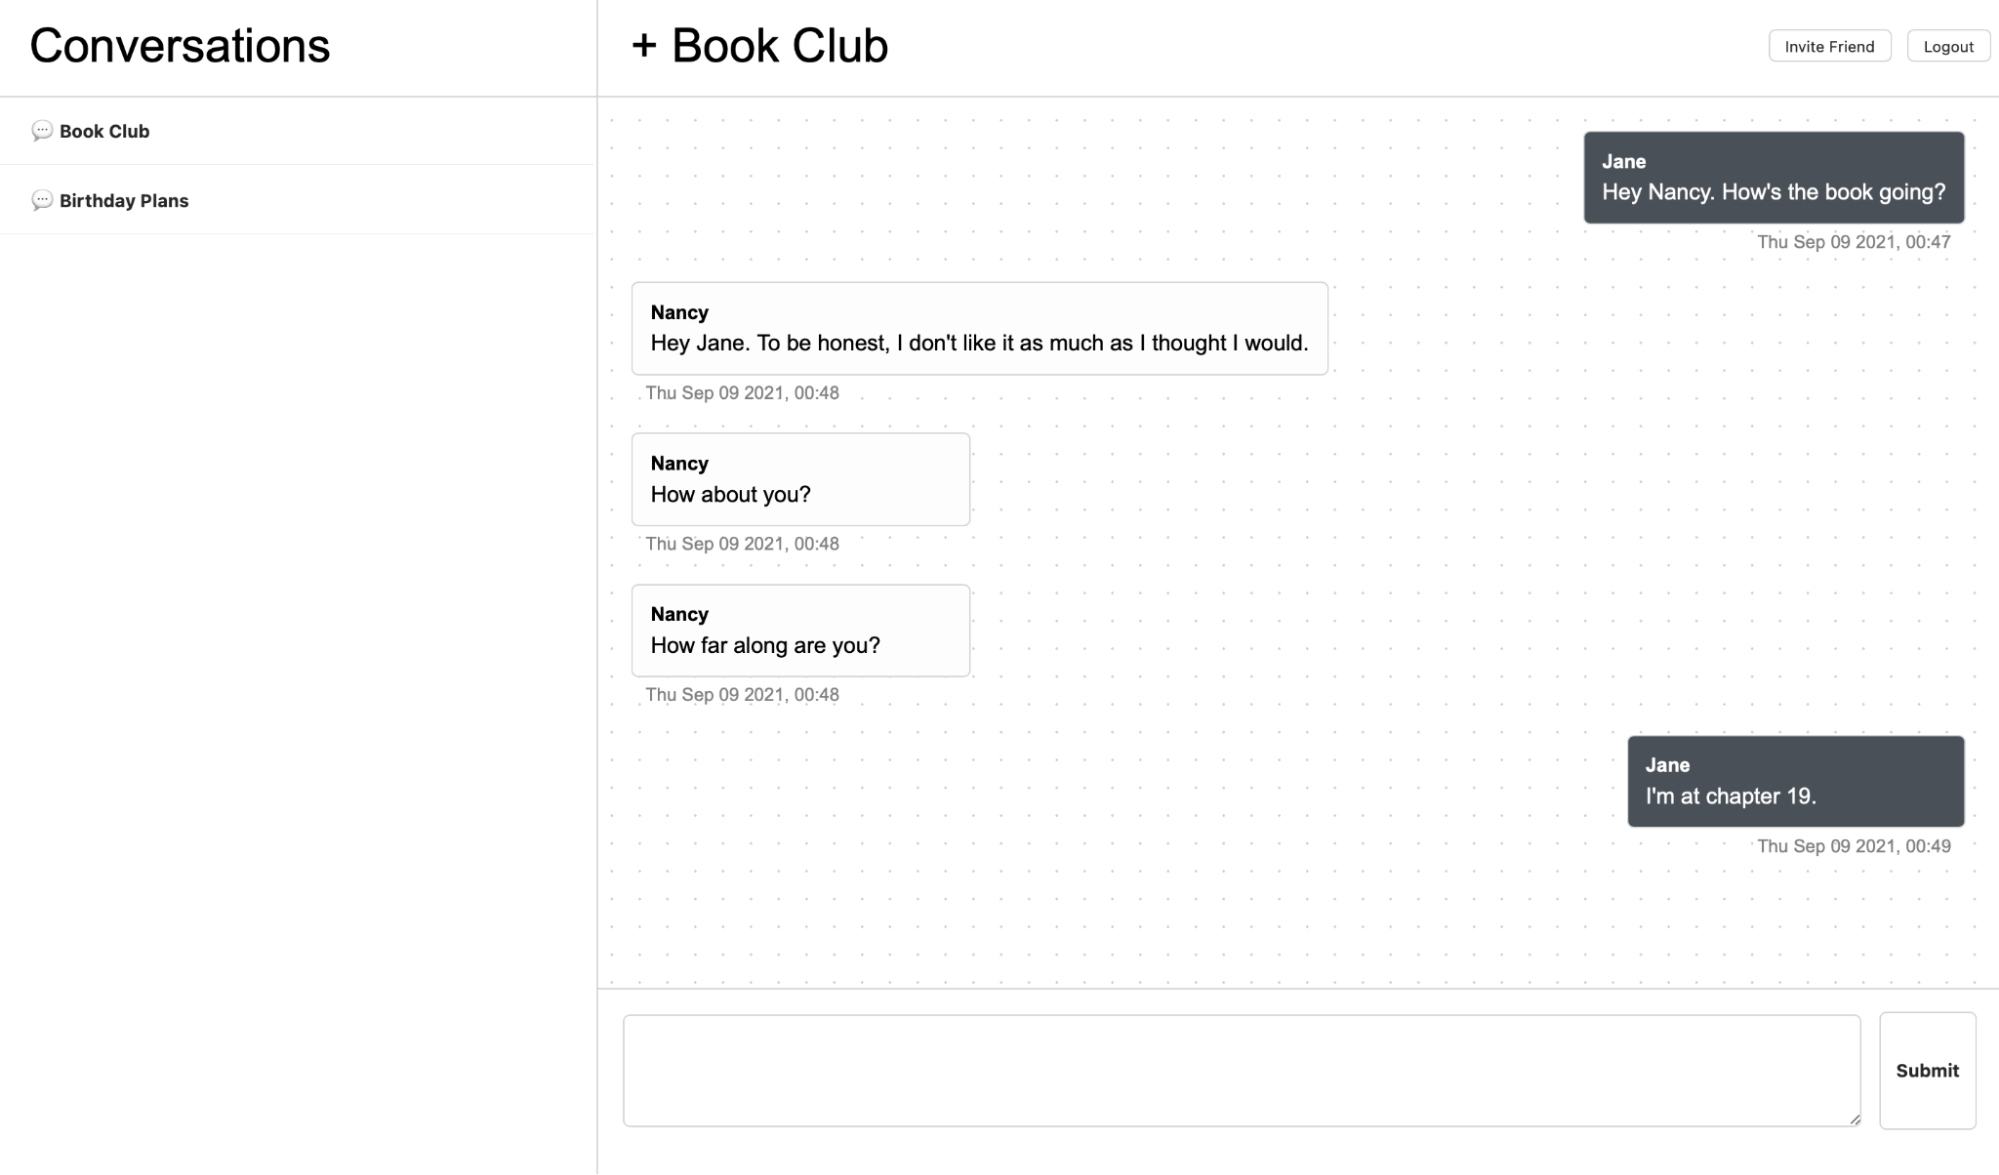
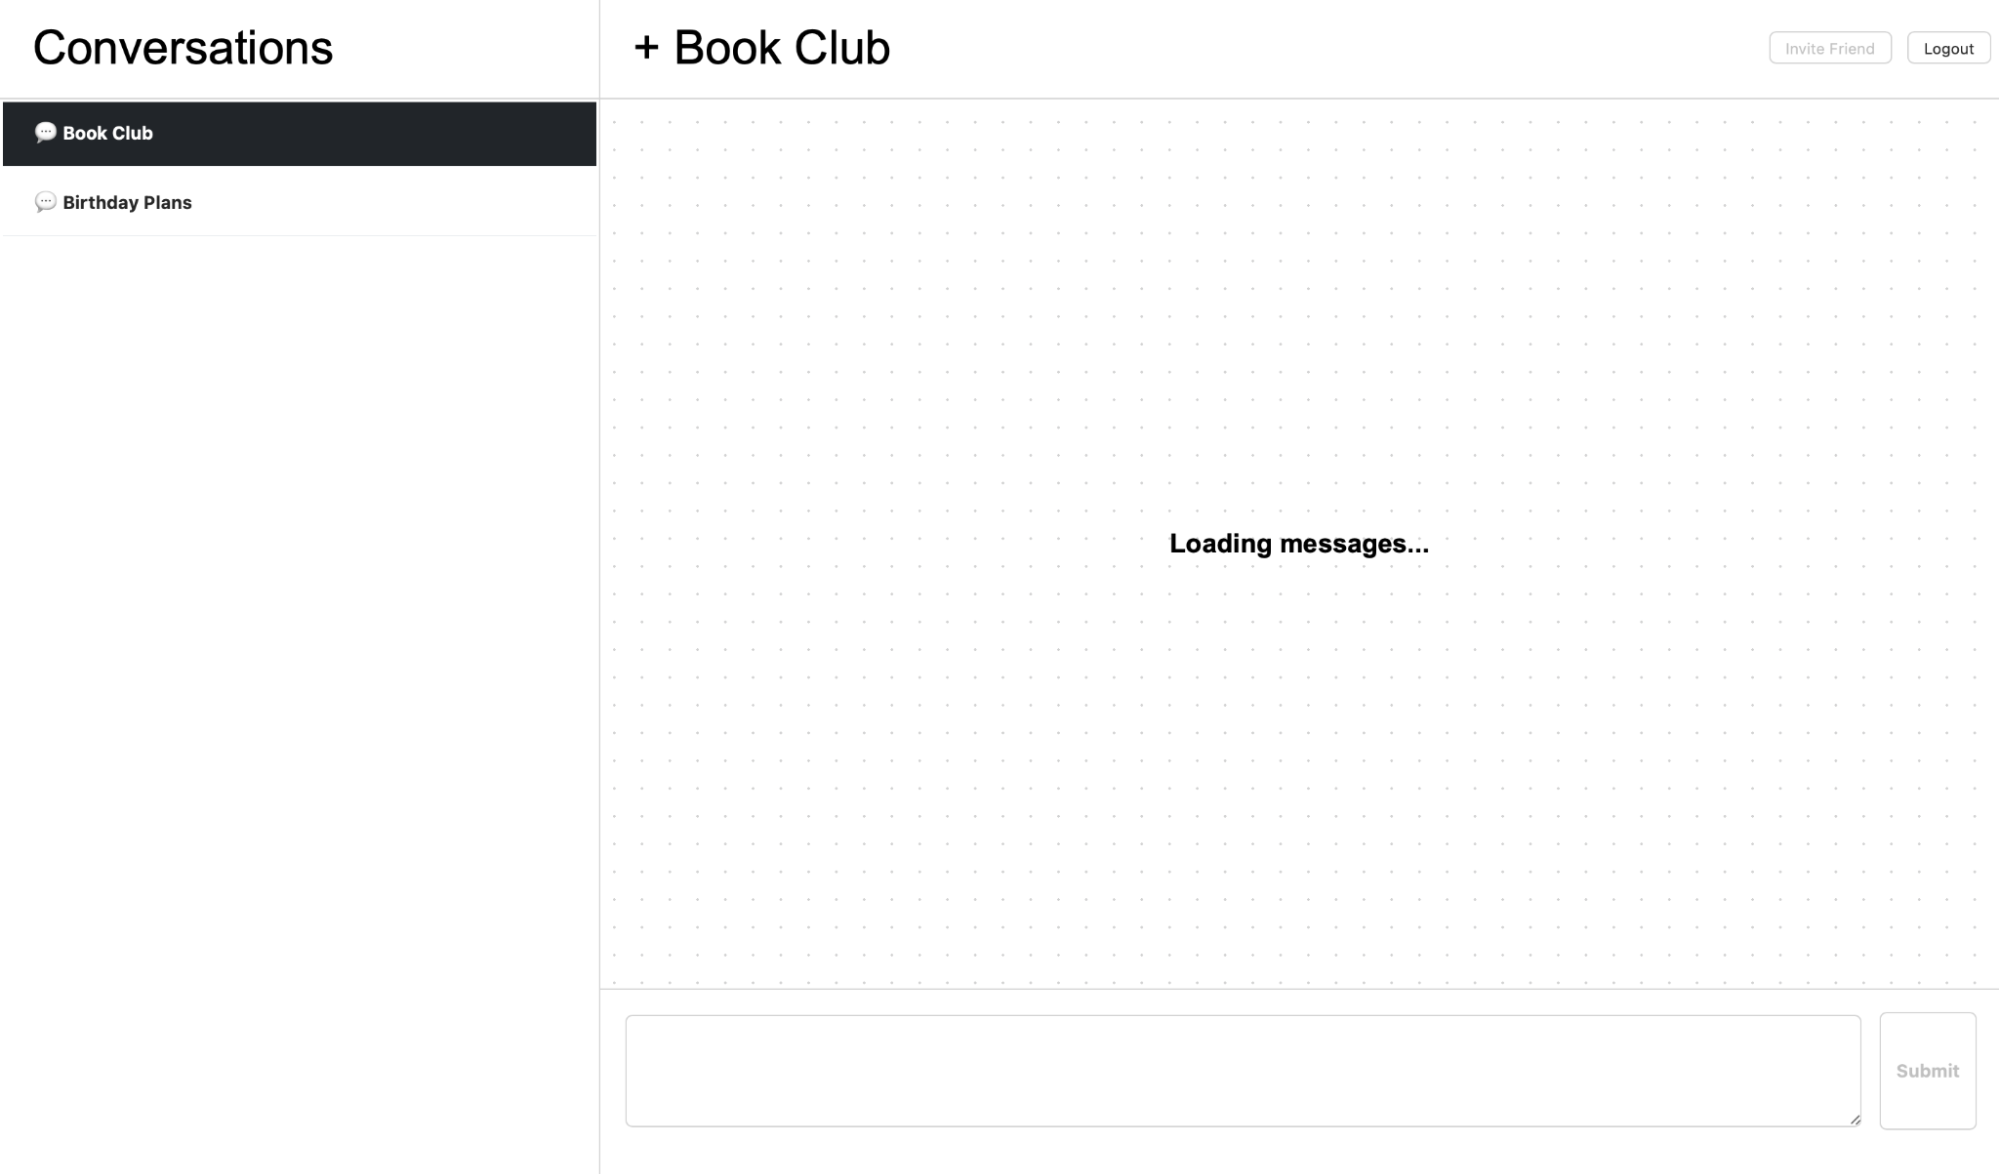
It runs both when a conversation is selected in the side nav and when a new message reaches the active conversation. While fetching is in flight a loading message is shown; it is removed before the real messages are inserted. The current user's messages are right-aligned, everyone else's left-aligned.
Sending, Errors And Invites
sendMessage handles outgoing text:
function sendMessage() {
    let submitBtn = document.getElementById('submitMessage');
    submitBtn.disabled = true;

    let messageForm = document.getElementById('message-input');
    let messageData = new FormData(messageForm);

    const msg = messageData.get('chat-message');

    window.twilioChat.selectedConversation.sendMessage(msg)
        .then(() => {
            document.getElementById('chat-message').value = '';
            submitBtn.disabled = false;
        })
        .catch(() => {
            showError('sending your message');
            submitBtn.disabled = false;
        });
};
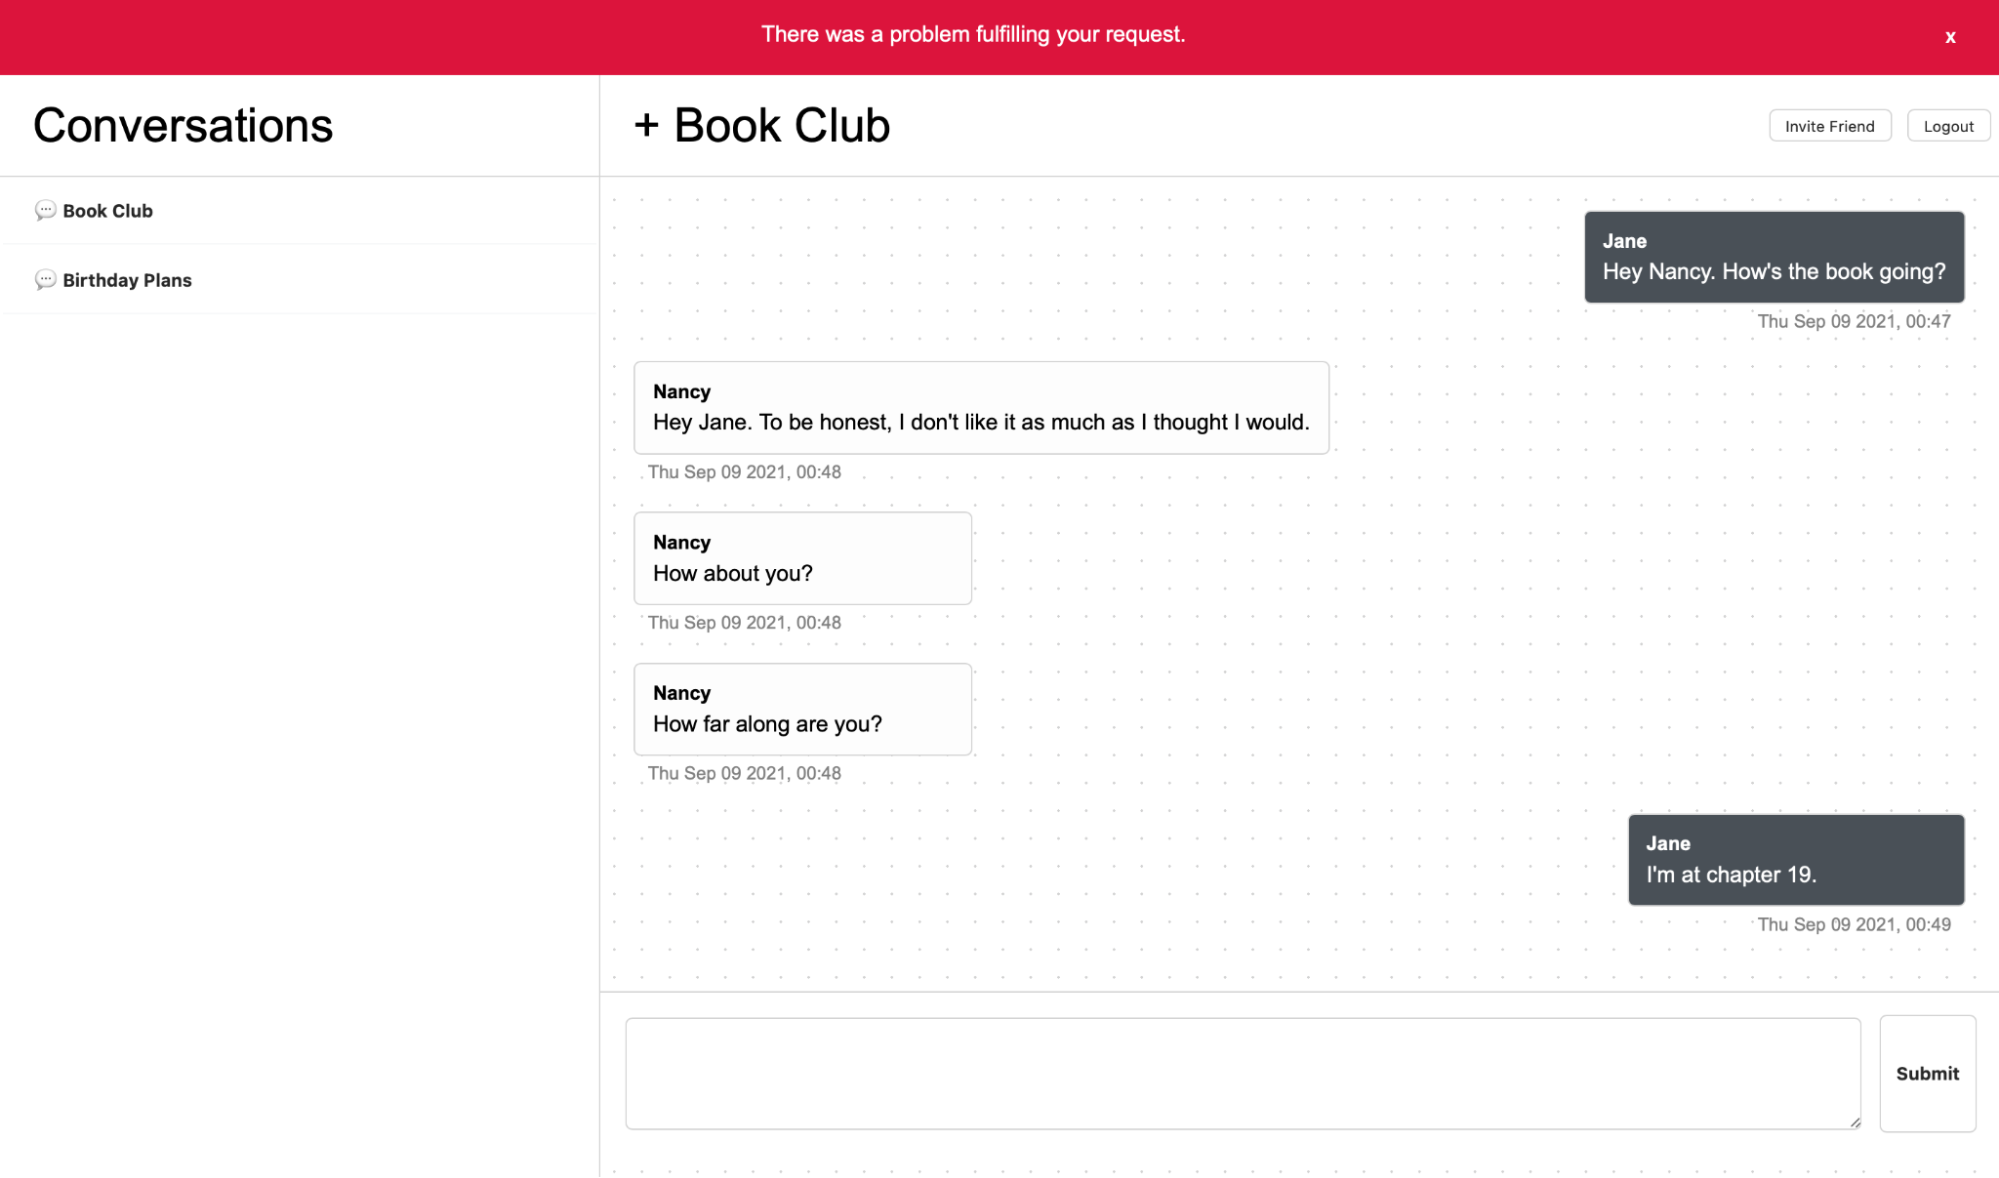
It reads the text area and disables the submit button, calls sendMessage on the currently selected conversation, and on success clears the text area and re-enables the button. A failure produces an error message instead. That message is rendered by showError and removed by hideError.
function showError(msg) {
    document.getElementById('error-message').style.display = 'flex';
    document.getElementById('error-text').innerText = `There was a problem ${msg ? msg : 'fulfilling your request'}.`;
}

function hideError() {
    document.getElementById('error-message').style.display = 'none';
}
logout asks the backend to clear the user's session and then redirects to the conversations page, where a fresh conversation can be created.
function logout(logoutButton) {
    logoutButton.disabled = true;
    logoutButton.style.cursor = 'wait';

    axios.request({
        url: '/auth/token',
        baseURL: 'http://localhost:8000',
        method: 'DELETEdelete',
        withCredentials: true
    })
        .then(() => {
            location.href = '/pages/conversation.html';
        })
        .catch(() => {
            location.href = '/pages/error.html';
        });
}
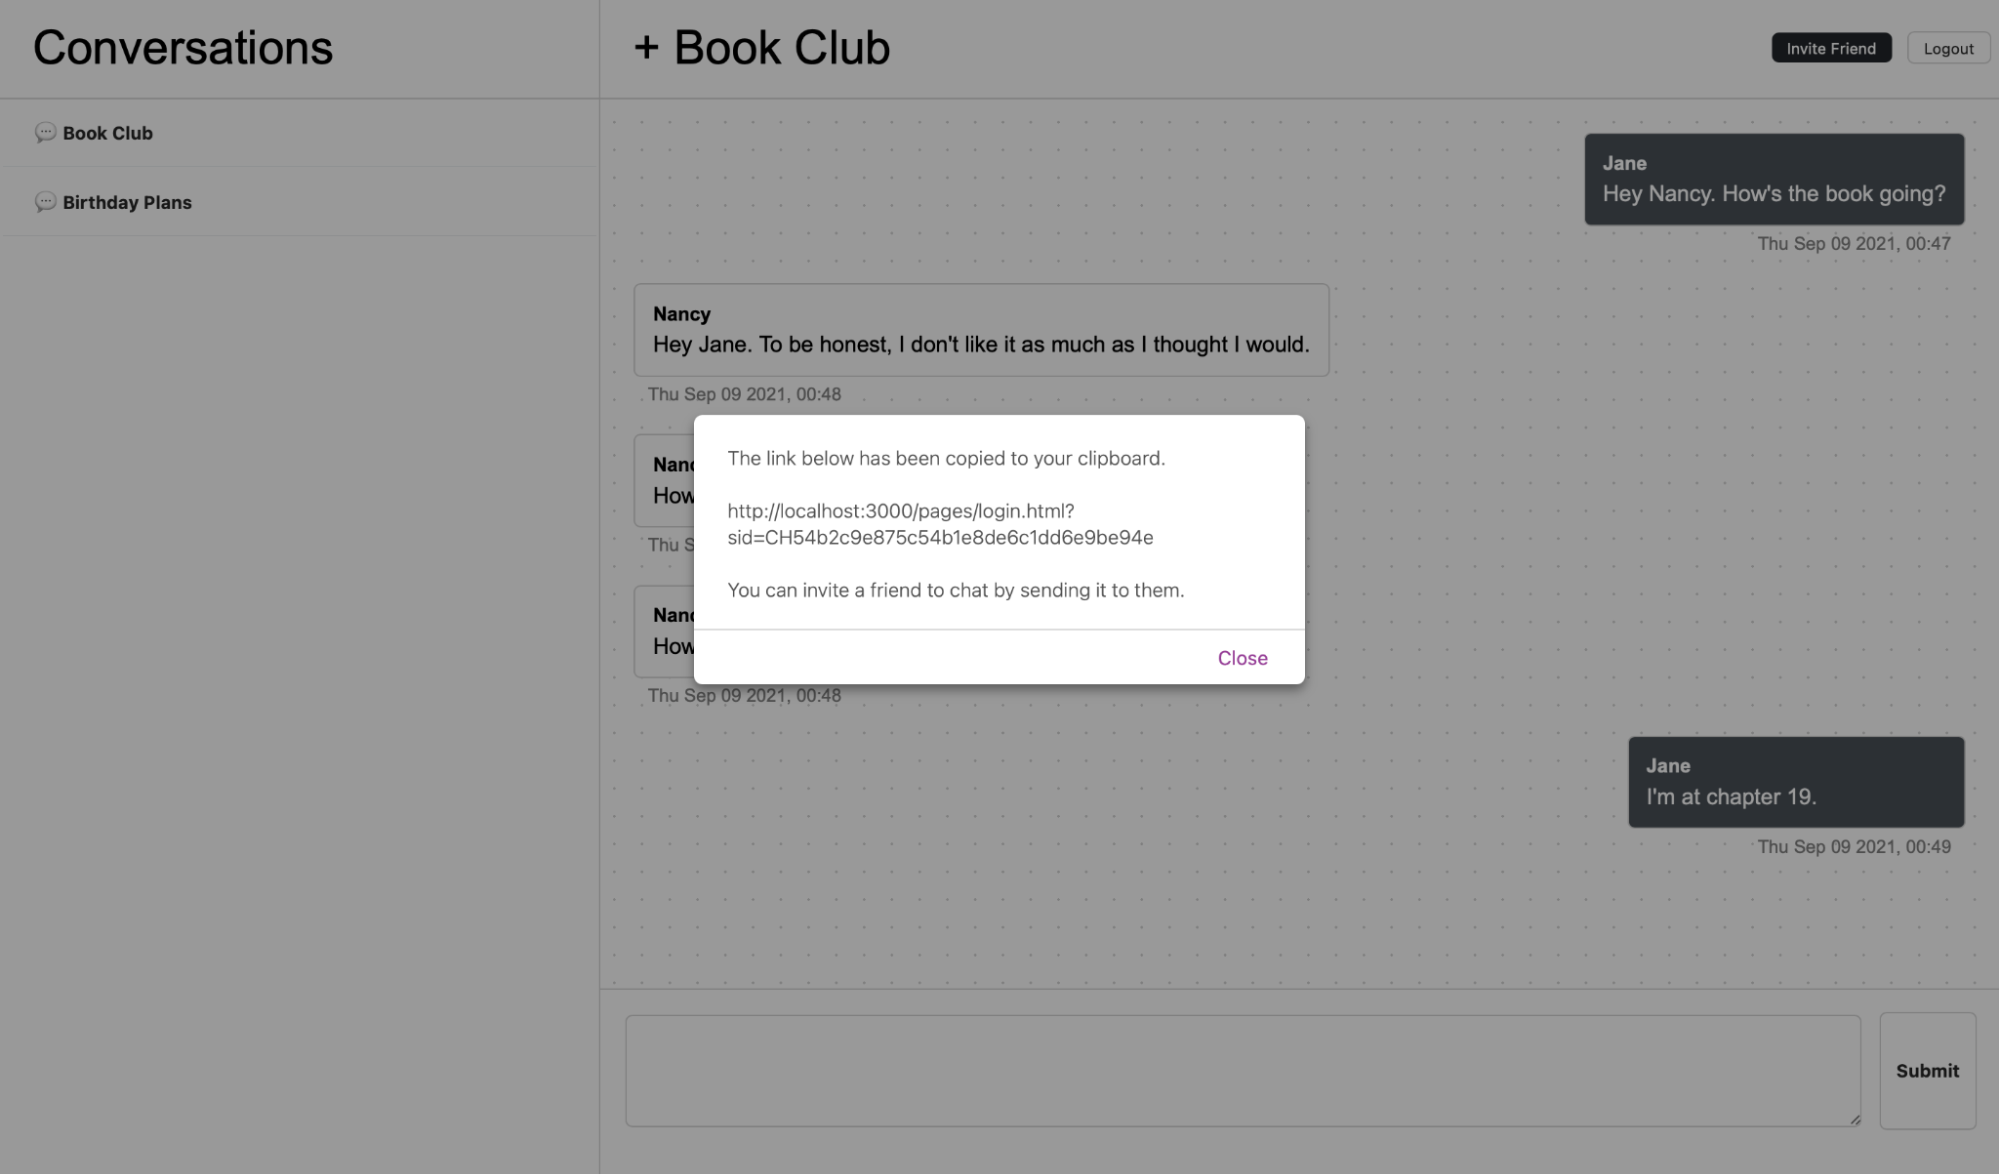
inviteFriend produces an invitation link pointing at the login page with the current conversation SID as a query parameter. Pressing the invite button copies the link to the clipboard and shows an alert with instructions.
async function inviteFriend() {
    try {
        const link = `http://localhost:3000/pages/login.html?sid=${window.twilioChat.selectedConvSid}`;

        await navigator.clipboard.writeText(link);

        alert(`The link below has been copied to your clipboard.\n\n${link}\n\nYou can invite a friend to chat by sending it to them.`);
    } catch {
        showError('preparing your chat invite');
    }
}
Joining Through The Login Page
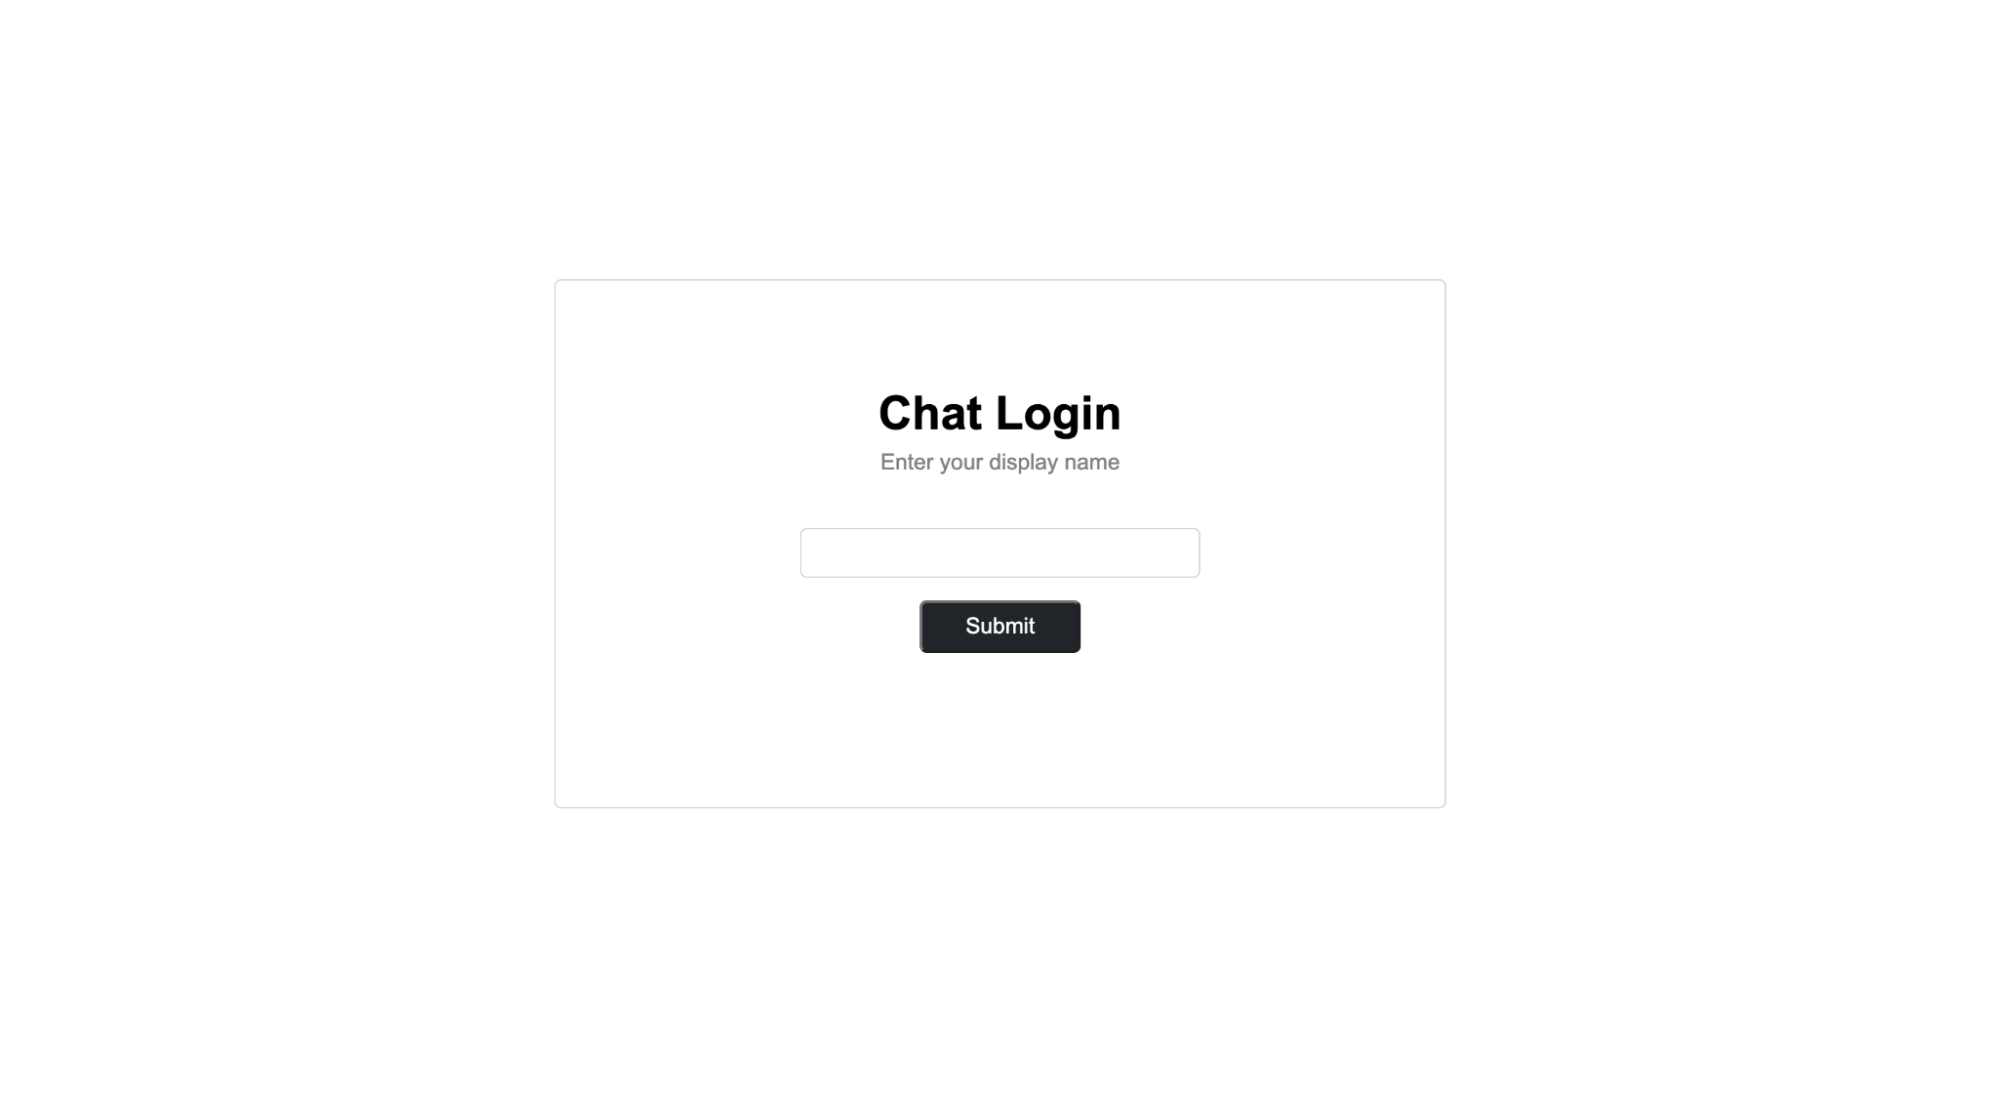
pages/login.html serves invited users, and scripts/login.js contains the login function:
function login() {
    const convParams = new URLSearchParams(window.location.search);
    const conv = Object.fromEntries(convParams.entries());

    if (conv.sid) {
        let submitBtn = document.getElementById('login-button');
        submitBtn.innerText = 'Logging in...';
        submitBtn.disabled = true;
        submitBtn.style.cursor = 'wait';

        let loginForm = document.getElementById('loginForm');
        let formData = new FormData(loginForm);
        let body = Object.fromEntries(formData.entries());

        axios.request({
            url: `/api/conversations/${conv.sid}/participants`,
            baseURL: 'http://localhost:8000',
            method: 'POSTpost',
            withCredentials: true,
            data: body
        })
            .then(() => {
                location.href = '/pages/chat.html';
            })
            .catch(() => {
                location.href = '/pages/error.html';
            });
    } else {
        location.href = '/pages/conversation.html';
    }
}
It reads the conversation sid from the URL and the username from the form, then POSTs to api/conversations/{sid}/participants/. The backend adds the participant, mints an access token for messaging, and starts a session. Success sends the user to the chat page, an error response to the error page, and a missing sid query parameter back to the conversation page.
Serving And Trying It Out
The backend must already be running — start it with:
NODE_ENV=development npm startThen, in another terminal window, serve the front end:
http-server -p 3000That listens on http://localhost:3000. Visit http://localhost:3000/pages/conversation.html, name the conversation, supply a username and create it. On the chat page, select the conversation and hit Invite. Paste the invite link into a separate incognito window under a different username; once at the chat page there, both windows can exchange messages in the same conversation.
Wrap-Up
What was built: a Node.js backend that issues user access tokens, keeps sessions, creates conversations and adds participants; plus an HTML/CSS/Vanilla JS front end that creates conversations, sends messages and invites others, pulling access tokens from the backend to do so. Twilio Conversations documentation is available for anything beyond this scope:



