

Next.js versus static React: What you gain
Next.js is a React framework from Vercel that sits on top of React, Node.js, Babel, and Webpack. Its key advantage over a "vanilla" React setup—including projects started with Create React App—is that it handles pre-rendering by default. Pages can be rendered on the server or exported as static HTML at build time, so the browser never has to wait for JavaScript to execute before content appears. That makes Next.js apps fast and easier for search-engine crawlers to index.
Create React App is convenient: it gives you a modern build setup without touching Webpack or Babel configuration and ships with TypeScript support and React Testing Library. But if your project is a multi-page app, you end up adding routing and server-rendering libraries yourself. Those extra dependencies inflate your bundle and complicate maintenance. Next.js removes that gap by shipping with:
- Pre-rendering. Pages can be statically exported at build time, eliminating per-request processing.
- Server-side rendering. Alternatively, pages can be rendered to HTML on each request.
- Automatic code splitting. JavaScript is loaded per page as needed, instead of all at once.
- File-system routing. Any file under the
pagesdirectory automatically becomes a route. - Fast refresh. Hot reloading is built in via React Fast Refresh.
- Styling flexibility. Styled JSX, CSS modules, Sass, and LESS are all supported out of the box.
Gatsby is the other main alternative for React static sites. It is a static site generator that relies on GraphQL to query local data and pages. While Gatsby has a strong ecosystem of plugins and themes, that GraphQL layer can be overkill for a modest project: it introduces a learning curve and slows down build times. Next.js queries local content with plain JavaScript, which keeps builds leaner for a simple blog. If SEO matters to your project, either framework works well, but Next.js gives you that benefit with less setup overhead.
Setting up the project
To start, create a new Next.js app with the recommended tool, Create Next App:
npx create-next-app
After initializing, your project structure should look like this:
src
├── components
|  ├── BlogPost.js
|  ├── Header.js
|  ├── HeadPost.js
|  ├── Layout.js
|  └── Post.js
├── pages
|  ├── blog
|  |  ├── post-1
|  |  |  └── index.mdx
|  |  ├── post-2
|  |  |  └── index.mdx
|  |  └── post-3
|  |     └── index.mdx
|  ├── index.js
|  └── \_app.js
├── getAllPosts.js
├── next.config.js
├── package.json
├── README.md
└── yarn.lock
Three files in that structure matter for this tutorial:
_app.jsappends global content to the app component.getAllPosts.jsfetches blog posts from thepages/blogdirectory. The name is arbitrary.next.config.jsholds configuration for the Next.js app.
Adding the MDX dependencies
MDX lets you write standard Markdown and embed React components directly in the same file. To enable it, install the @mdx-js/loader library first. With Yarn:
yarn add @mdx-js/loader
Or with npm:
npm install @mdx-js/loader
Then install @next/mdx, the Next.js-specific integration:
yarn add @next/mdx
Or with npm:
npm install @next/mdx
Configuring Next.js for MDX files
By default, Next.js treats files in the pages directory with .js or .jsx extensions as routes. Since the blog articles live in pages/blog as MDX files, you need to extend that default behavior in next.config.js so files ending in .md or .mdx are also recognized as pages:
const withMDX = require("@next/mdx")({
  extension: /\.mdx?$/
});

module.exports = withMDX({
  pageExtensions: ["js", "jsx", "md", "mdx"]
});
Fetching and displaying posts
A major convenience of this setup is that fetching local content is done with regular JavaScript—no GraphQL required. The getAllPosts.js file handles that:
function importAll(r) {
  return r.keys().map((fileName) => ({
    link: fileName.substr(1).replace(/\/index\.mdx$/, ""),
    module: r(fileName)
  }));
}

export const posts = importAll(
  require.context("./pages/blog/", true, /\.mdx$/)
);
This helper imports all MDX files from pages/blog and returns, for each post, an object containing the file path minus the extension (for example, /post-1) plus the post’s metadata.
Three components then render that data. A Layout component wraps pages with metadata for the document head:
import Head from "next/head";
import Header from "./Header";

export default function Layout({ children, pageTitle, description }) {
  return (
    <>
      <Head>
        <meta name="viewport" content="width=device-width, initial-scale=1" />
        <meta charSet="utf-8" />
        <meta name="Description" content={description}></meta>
        <title>{pageTitle}</title>
      </Head>
      <main>
        <Header />
        <div className="content">{children}</div>
      </main>
    </>
  );
}
A Post component renders a preview card for each article, pulling the link and meta data from the post object and handling navigation with Next.js’s Link component:
import Link from 'next/link'
import { HeadPost } from './HeadPost'

export const Post = ({ post }) => {
  const {
    link,
    module: { meta },
  } = post

  return (
      <article>
        <HeadPost meta={meta} />
        <Link href={'/blog' + link}>
          <a>Read more →</a>
        </Link>
      </article>
  )
}
Finally, a BlogPost component renders a full article from the post and its metadata:
import { HeadPost } from './HeadPost'

export default function BlogPost({ children, meta}) {
  return (
    <>
      <HeadPost meta={meta} isBlogPost />
      <article>{children}</article>
    </>
  )
}
Writing the articles
With the components in place, you can create articles. Each MDX file imports the BlogPost component and passes along the meta data. The content that follows the meta object becomes the children props, which is what actually renders the post body:
import BlogPost from '../../../components/BlogPost'

export const meta = {
  title: 'Introduction to Next.js',
  description: 'Getting started with the Next framework',
  date: 'Aug 04, 2020',
  readTime: 2
}

export default ({ children }) => <BlogPost meta={meta}>{children}</BlogPost>;

## My Headline

Lorem ipsum dolor sit amet, consectetur adipiscing elit. Quisque maximus pellentesque dolor non egestas. In sed tristique elit. Cras vehicula, nisl vel ultricies gravida, augue nibh laoreet arcu, et tincidunt augue dui non elit. Vestibulum semper posuere magna, quis molestie mauris faucibus ut.
Then, on the home page index, loop through the fetched posts and render each with the Post component:
import { Post } from "../components/Post";
import { posts } from "../getAllPosts";

export default function IndexPage() {
  return (
    <>
      {posts.map((post) => (
        <Post key={post.link} post={post} />
      ))}
    </>
  );
}
Applying a global layout
Wrapping each page with the Layout component individually is tedious. Placing it in _app.js instead applies it everywhere. The underscore in the filename is critical—omit it and Next.js would treat the file as a page route:
import Layout from "../components/Layout";

export default function App({ Component, pageProps }) {
  return (
    <Layout pageTitle="Blog" description="My Personal Blog">
      <Component {...pageProps} />
    </Layout>
  );
}
The App component is how Next.js initializes pages; overriding it here lets you inject global styles or shared data across the entire project.
You can now preview the finished blog locally. From the project root run:
yarn dev
Or with npm:
npm run dev
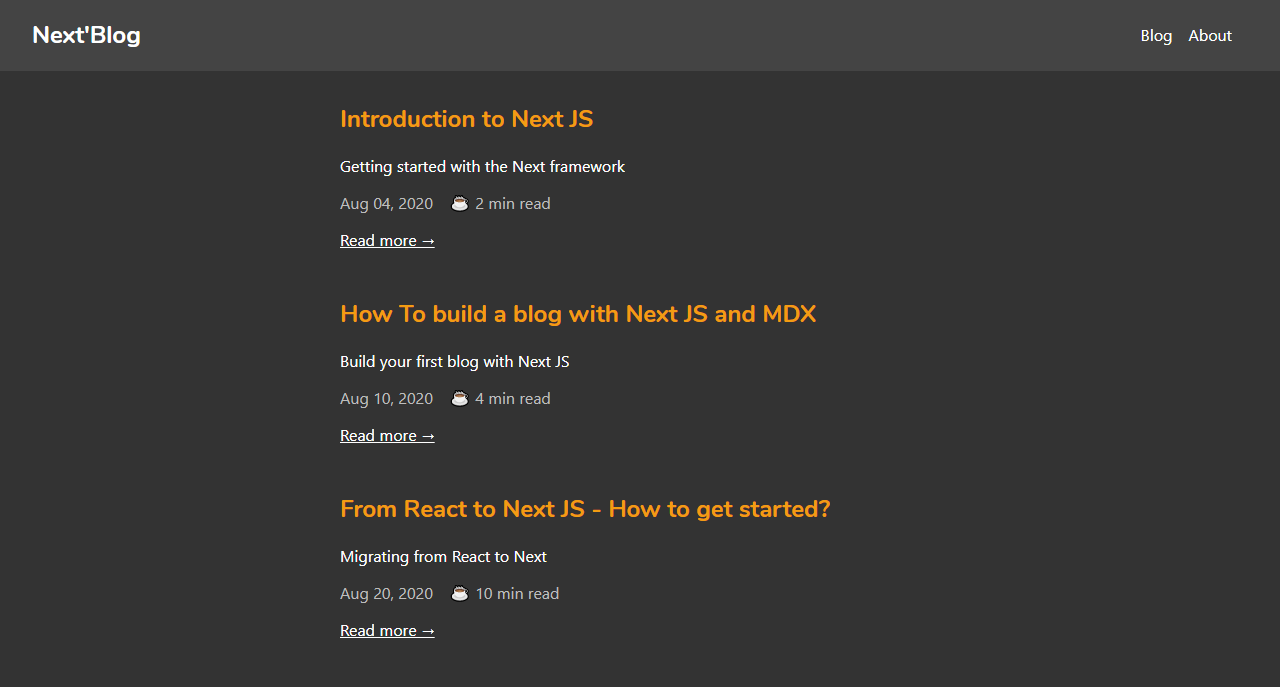
Opening https://localhost:3000 in a browser shows the rendered blog listing:
Next.js fills a specific niche: it gives you SEO-friendly, pre-rendered React pages without the ceremony of a Gatsby-style GraphQL layer or the manual plumbing of Create React App. For content-driven sites like a blog combined with the flexibility of MDX, the combination is hard to beat.



