

One Framework for API and UI
Next.js's API Routes let you run a GraphQL server and a React front end from the same project. That means you can skip the overhead of managing a separate API service and keep deployment simple. In this walkthrough, we'll connect that stack to Neo4j AuraDB, using the graph database's relationships to power movie search and recommendations.
The stack relies on two key pieces from Neo4j's ecosystem. The @neo4j/graphql library generates a GraphQL schema and resolver logic from your type definitions, so you don't hand-write database queries. GraphQL Yoga provides the server layer and works directly inside a Next.js API route.
Graph databases and GraphQL are a natural fit: both model data as connected nodes and edges. For our sample application, we'll use Neo4j's "Graph-based Recommendations" dataset, which contains movies, actors, genres, and user ratings.
Provisioning Neo4j AuraDB
Start by creating a free-tier instance on Neo4j AuraDB. During setup, you'll be given a randomly generated password and the option to download a .env file containing connection details. Save that file — you'll rename it .env.local and place it in the root of your Next.js project so the app can read the credentials.
Once the instance is ready, open Neo4j Workspace and use the Query tab to run Cypher statements. The interface visualizes results as a graph. For example, a simple pattern-matching query like this returns a movie plus its connected actors and genres:

Scaffolding the Next.js App
Create a new project with create-next-app. The tool generates the standard pages/ directory where file-based routing applies. Any file you add under pages/api/ becomes a serverless function endpoint, while files elsewhere in pages/ become React routes.
Start the dev server with npm run dev and visit http://localhost:3000 to see the splash page from pages/index.js. The template also includes a sample API route at /api/hello, implemented in pages/api/hello.js as a single exported function.
Before building out the API, move your downloaded Aura credentials into .env.local. Next.js loads variables from that file natively, so your API route will be able to connect to the database without extra configuration.
Defining the GraphQL Schema
Install the dependencies for the API layer — the Neo4j GraphQL Library and GraphQL Yoga — using npm.
npm install graphql-yoga @neo4j/graphql graphql neo4j-driver
Now create pages/api/graphql.js. First, define the GraphQL type definitions that mirror the movie dataset's structure. Notice the @relationship directive, which tells the Neo4j GraphQL Library how to map fields to graph relationships in the database.
 type Movie {
    title: String!
    plot: String
    poster: String
    imdbRating: Float
    actors: [Actor!]! @relationship(type: "ACTED_IN", direction: IN)
    genres: [Genre!]! @relationship(type: "IN_GENRE", direction: OUT)
  }

  type Genre {
    name: String!
    movies: [Movie!]! @relationship(type: "IN_GENRE", direction: IN)
  }

  type Actor {
    name: String
  }
Next, instantiate a Neo4j driver using the environment variables from .env.local. These hold the connection URI, username, and password you downloaded from AuraDB.
// Read our Neo4j connection credentials from environment variables (see .env.local)
const { NEO4J_URI, NEO4J_USERNAME, NEO4J_PASSWORD } = process.env;

// Create a Neo4j driver instance to connect to Neo4j AuraDB
const driver = neo4j.driver(
  NEO4J_URI,
  neo4j.auth.basic(NEO4J_USERNAME, NEO4J_PASSWORD)
);
With the driver and type definitions ready, create the Neo4j GraphQL instance:
// Type definitions and a Neo4j driver instance are all that's required for
// building a GraphQL API with the Neo4j GraphQL Library - no resolvers!
const neoSchema = new Neo4jGraphQL({
  typeDefs,
  driver,
});
Async Setup in an API Route
The Neo4j GraphQL Library builds its schema asynchronously. That operation verifies your type definitions against the database. To keep this clean, wrap the setup logic in an initServer function that logs each time it runs. Monitoring those logs tells you whether the schema is being rebuilt on every request, which you want to avoid.
// Building the Neo4j GraphQL schema is an async process
const initServer = async () => {
  console.log("Building GraphQL server");
  return await neoSchema.getSchema();
};

// Note the use of the top-level await here in the call to initServer()
export default createYoga({
  schema: await initServer(),
  graphqlEndpoint: "/api/graphql",
});
Since the server initialization is asynchronous, the API route needs to await it at the top level of the module. That's an experimental Next.js feature, so enable it in next.config.js first.
const nextConfig = {
  reactStrictMode: true,
  webpack: (config, options) => {
    config.experiments = {
      topLevelAwait: true,
      layers: true,
    };
    return config;
  },
};
Restart the dev server and navigate to http://localhost:3000/api/graphql. GraphQL Yoga serves its GraphiQL IDE there, letting you run queries immediately. The Neo4j GraphQL Library used your type definitions to generate the full set of operations — queries, mutations, filtering, and pagination — with no resolver code or Cypher written by hand.
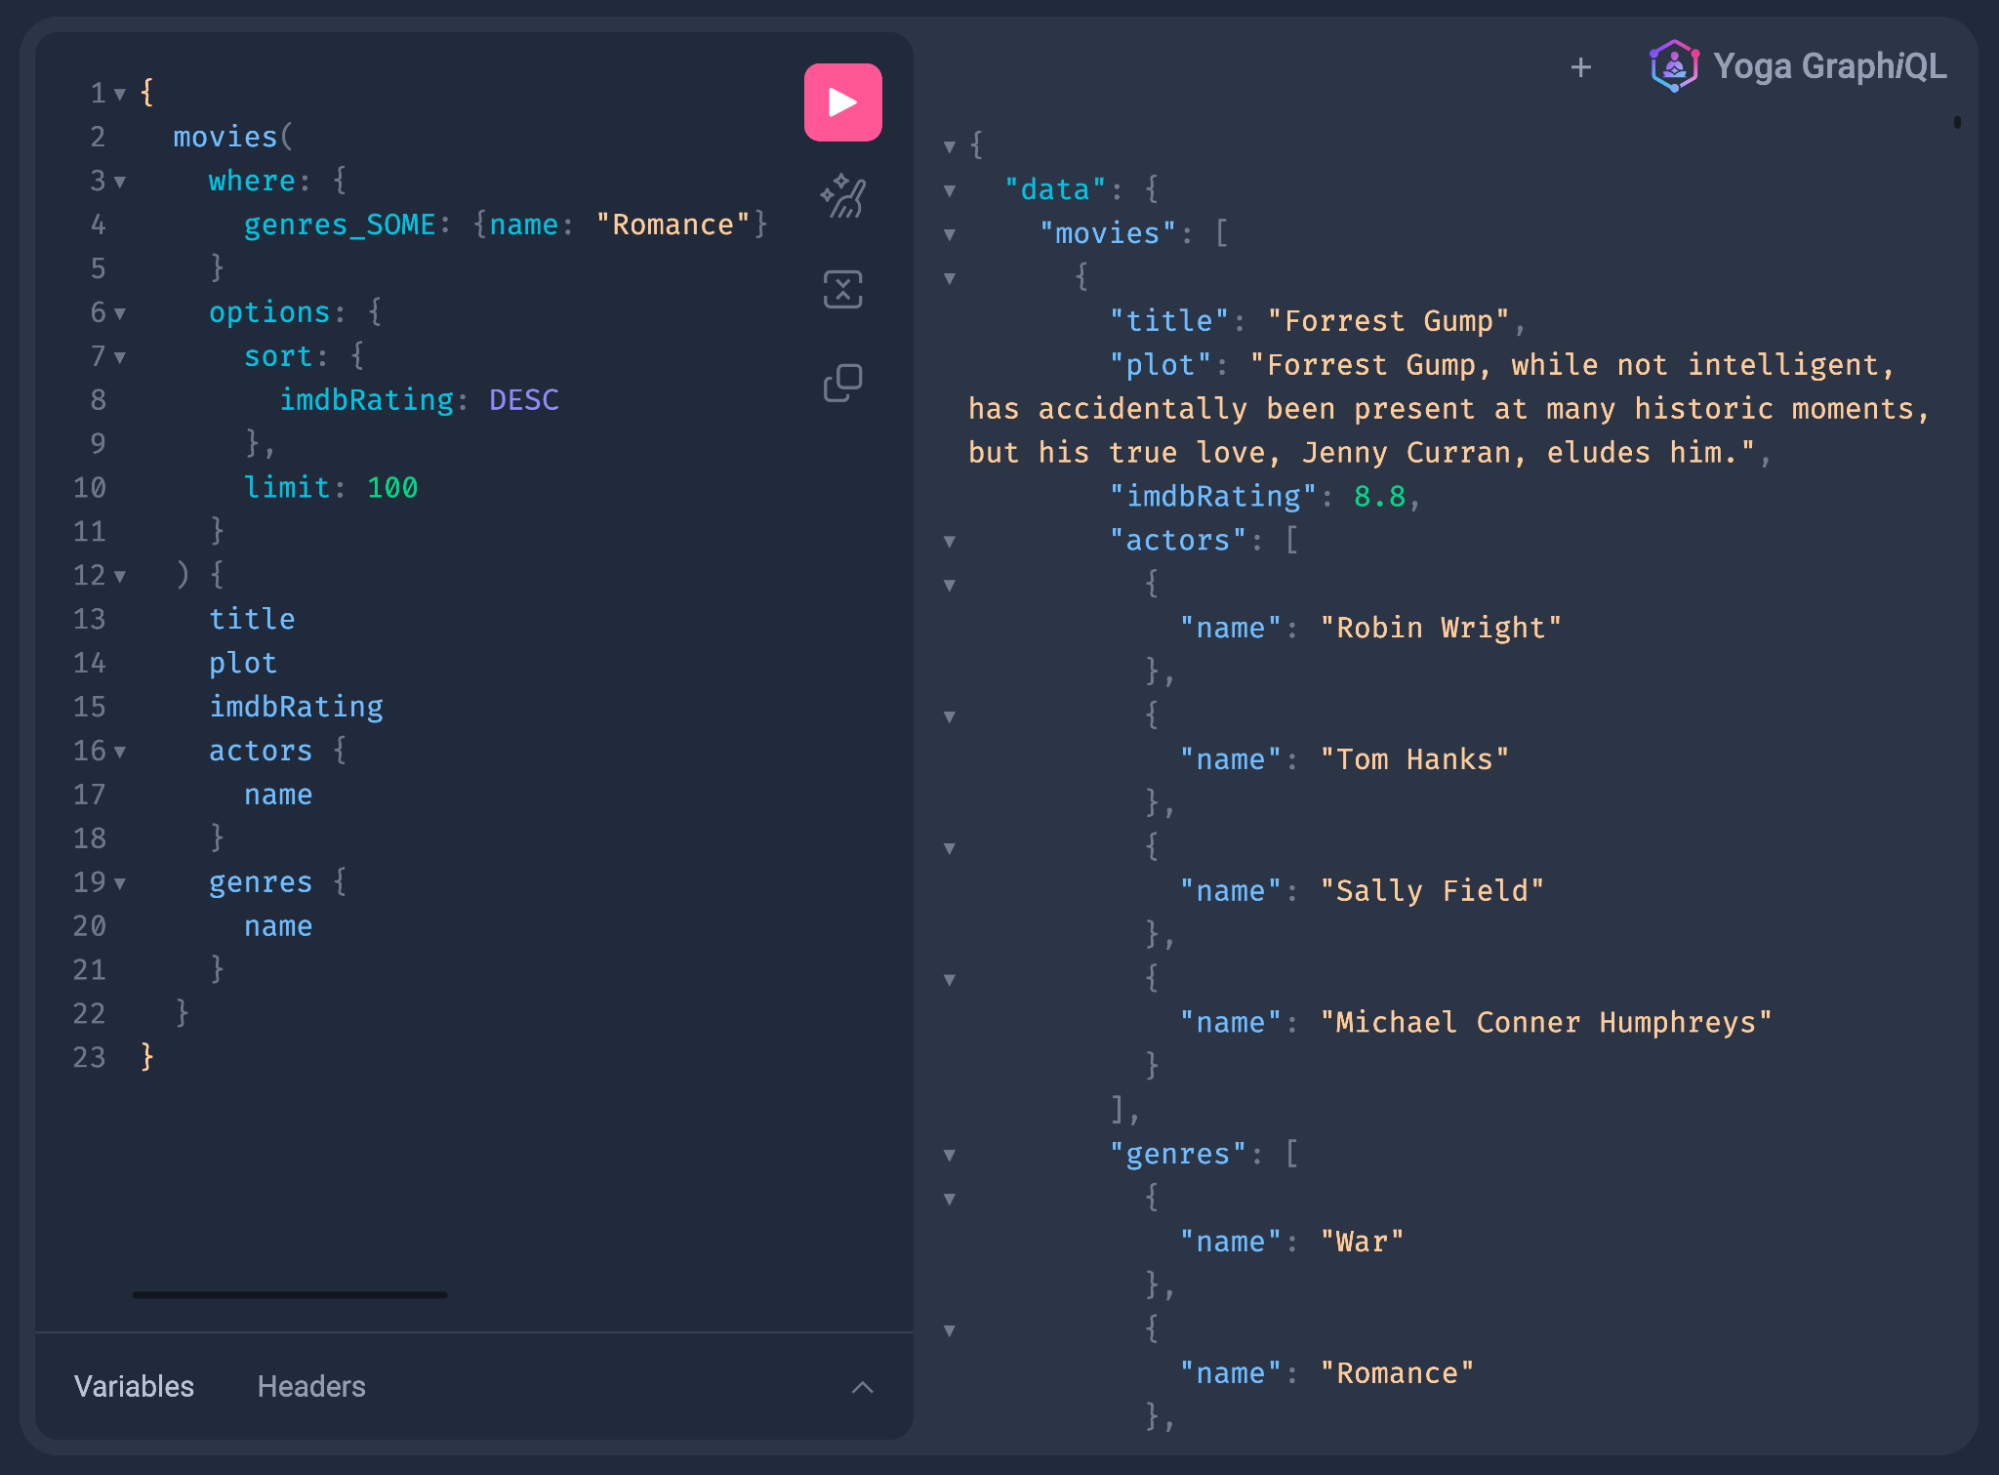
With the endpoint live, the remaining step is wiring your React components to consume the GraphQL API. We'll look at that next.
Apollo Client For Client-Side Data Fetching
With our GraphQL API in place, the next step is fetching data directly in the browser. We’ll use Apollo Client, which provides React hooks like useQuery and useMutation to interact with the API. Start by installing the necessary packages.
npm install @apollo/client
Next, update pages/_app.js so the Apollo Client instance is available throughout the component tree. Import the required Apollo modules first.
import {
  ApolloProvider,
  ApolloClient,
  InMemoryCache,
  HttpLink,
} from "@apollo/client";
ApolloProvider leverages React’s Context API to make the client accessible anywhere. InMemoryCache and HttpLink handle the client-side cache and the network layer, respectively. We then define a function to create the client, pointing to the GraphQL API route we built earlier.
const createApolloClient = () => {
  const link = new HttpLink({
    uri: "/api/graphql",
  });

  return new ApolloClient({
    link,
    cache: new InMemoryCache(),
  });
};
Wrap the application with ApolloProvider to put the client into the React hierarchy.
export default function App({ Component, pageProps }) {
  return (
    <ApolloProvider client={createApolloClient()}>
      <Component {...pageProps} />
    </ApolloProvider>
  );
Now the app can run GraphQL queries. We’ll replace the default landing page with a movie search page. Users can pick a genre and see the top-rated movies in that category, along with poster and cast information. Start by adding the imports to index.js.
import React, { useState } from "react";
import { gql, useQuery } from "@apollo/client";
useState manages local component state for the selected genre. useQuery is Apollo’s hook for running GraphQL operations, and the gql template tag parses the query string. Declare the state variable for the genre selection.
const [selectedGenre, setSelectedGenre] = useState("Action");
Next, define the query that filters movies by genre using a GraphQL variable. Include the fields we want back, such as poster URL and actors.
const MOVIE_SEARCH_QUERY = gql`
    query MovieSearch($selectedGenre: String!) {
      movies(
        where: {
          genres: { name: $selectedGenre }
          imdbRating_GTE: 0.0
          poster_NOT:""
        }
        options: { limit: 100, sort: { imdbRating: DESC } }
      ) {
        title
        plot
        poster
        imdbRating
        actors {
          name
        }
        genres {
          name
        }
      }
    }
  `;
Pass that query and the selectedGenre state value into useQuery. Render a loading or error placeholder while the operation is in flight.
 const { loading, error, data } = useQuery(MOVIE_SEARCH_QUERY, {
    variables: { selectedGenre },
  });

  if (error) return <p>Error</p>;
  if (loading) return <p>Loading...</p>;
A simple <select> element lets the user choose the genre. Because the form’s value is bound to the state variable, this becomes a controlled component. The movie results live in the data variable, whose structure mirrors the query’s selection set. Map over those results to build a table row for each film.
<h2>Results</h2>
      <table>
        <thead>
          <tr>
            <th>Poster</th>
            <th>Title</th>
            <th>Genre</th>
            <th>Rating</th>
          </tr>
        </thead>
        <tbody>
          {data &&
            data.movies &&
            data.movies.map((m, i) => (
              <tr key={i}>
                <td>
                  <img src={m.poster} style={{ height: "50px" }}></img>
                </td>
                <td>{m.title}</td>
                <td>
                  {m.genres.reduce(
                    (acc, c, i) =>
                      acc + (i === 0 ? " " : ", ") + c.name,
                    ""
                  )}
                </td>
                <td>{m.imdbRating}</td>
              </tr>
            ))}
        </tbody>
      </table>
Back in the browser, the app should now run locally. Change the genre in the select box and watch the GraphQL search results update.

Deploying With Vercel And Neo4j AuraDB
Next.js alone is powerful, but pairing it with Vercel brings real developer experience benefits. Our .env.local file with the database credentials is not under version control for security reasons. So when we set up the project in Vercel, we need to specify the Neo4j AuraDB credentials as environment variables. You can use a different database instance for each environment, giving you clean separation between development, staging, and production.
To deploy, first push the application to a GitHub repository. The git repo that create-next-app generated already exists, so commit the changes and push them.
git add -A
git commit -m "add fullstack graphql app"
git remote add origin [email protected]:johnymontana/fullstack-graphql-movies.git
git push -u origin main
Sign in to Vercel, create a new project, and connect the GitHub repo. Vercel’s free tier covers everything we need for this application.

After clicking Deploy, the app goes live in a few seconds with a fresh domain and SSL certificate. The React front end is served from Vercel’s CDN, while the API Routes run as serverless functions.
Preview Deployments For New Features
Vercel’s preview deployments let us test changes without touching production. To demonstrate, we’ll add a movie recommendation feature. We add a new field called similar to the Movie type in our GraphQL API. The @cypher schema directive lets us attach a Cypher query that finds movies sharing actors or genres with the currently resolved movie.
MATCH (m:Movie {title: "Matrix, The"})
MATCH (m)-[:ACTED_IN|:IN_GENRE]-()-[:ACTED_IN|:IN_GENRE]-(rec:Movie)
WITH rec, COUNT(*) AS score ORDER BY score DESC
RETURN rec LIMIT 3
In the type definitions inside api/graphql.js, add the similar field annotated with the Cypher recommendation logic. The this variable in the query references the resolved movie, and a $first parameter controls the maximum number of recommendations returned. User ratings could further refine these recommendations later, but this traversal over actors and genres is a solid baseline.
 extend type Movie {
    similar(first: Int = 4): [Movie!]! @cypher(statement: """
    MATCH (this)-[:ACTED_IN|:IN_GENRE]-()-[:ACTED_IN|:IN_GENRE]-(rec:Movie)
    WITH rec, COUNT(*) AS score ORDER BY score DESC
    RETURN rec LIMIT $first
    """)
 }
Including this new field in the front-end search query and result table will display a recommended movie for each entry in the results.

Commit the changes on a new git branch and push it. Vercel automatically creates a preview deployment with its own URL, ready for sharing and testing. After merging to the main branch, that preview moves to your production domain.
git checkout -b recommendations
git add -A
git commit -m "add recommendations feature"
git push origin recommendations

Each preview deployment also lets testers click anywhere on the page to leave annotations and feedback. Simply sharing the preview URL is an effective way to gather input before shipping a feature to production.

Next Steps
This project demonstrates a full stack GraphQL workflow: Next.js handles the front end and API Routes, Neo4j AuraDB provides a managed graph database, and the Neo4j GraphQL Library rapidly builds an API backed by that database as a serverless function. Vercel adds smooth deployment and the preview deployment workflow.
For deeper exploration of full stack GraphQL development, the book Full Stack GraphQL Applications covers more advanced topics like authorization rules, mutations, and client state management with GraphQL. The companion code for this example is also available on GitHub.


