

Building and Deploying a Notes App With Serverless UI
Serverless UI is an open-source command-line utility for building and deploying serverless applications on AWS. It handles both static sites and applications that use serverless functions to process API requests. This walkthrough covers setting up a Notes application in TypeScript and deploying it to AWS with minimal configuration.
Prerequisites
To work through this deployment, you'll need:
- Familiarity with React, React Hooks, Material UI, and TypeScript
- Node.js version
12.x.xor higher installed locally - An AWS account that has been verified
- AWS CLI configured with local credentials
npmoryarnavailable as a package manager
Advantages and Limitations
Serverless UI offers several practical benefits for developers:
- Pre-configured infrastructure with no middleman services required
- Compatible with virtually any CI environment because it's an npm-installed CLI tool
- CDK constructs available for applications that already use CloudFormation or CDK infrastructure
- Comprehensive deployment options for static websites, Lambda functions, and production code
- Configuration and deployment handled entirely from the command line
- Works with any front-end framework that compiles to static code, including React, Vue, Svelte, and jQuery
- Serverless scaling without capacity planning or provisioning
There are also some constraints worth considering. The platform supports only TypeScript or JavaScript projects. Because the core infrastructure is written with aws-cdk, AWS is the only deployment target.
Deploying as a Static Application
The deployment flow treats Lambda functions in the ./functions folder as automatically deployed serverless functions. Code written in TypeScript or JavaScript gets bundled and deployed as Node.js 14 Lambda functions, invoked in event format.
A native JavaScript or TypeScript project pairs well with Serverless UI. Since the tool is a command-line utility, it can be installed globally with npm install -g @serverlessui/cli or as a devDependency, avoiding any increase in application bundle size.
Pull down the Notes application repository and install its dependencies:
git clone https://github.com/smashingmagazine/serverless-UI-typescript.git

yarn install
The project's package.json includes the dependencies and type definitions needed for TypeScript support:
{
  ...
  "dependencies": {
    "@testing-library/jest-dom": "^5.11.4",
    "@testing-library/react": "^11.1.0",
    "@testing-library/user-event": "^12.1.10",
    "@types/jest": "^26.0.15",
    "@types/node": "^12.0.0",
    "@types/react": "^17.0.0",
    "@types/react-dom": "^17.0.0",
    "react": "^17.0.1",
    "react-dom": "^17.0.1",
    "react-scripts": "4.0.3",
    "typescript": "^4.1.2",
    "web-vitals": "^1.0.1"
  },
  ...
}
Start with the type definitions in /src/interfaces.ts. These define the data structure for notes and the props passed between components:
export interface INote {
  note: string;
}
export interface Props {
  content: INote;
  delContent(noteToDelete: string): void;
}
The INote interface names the unit of state in our application. In the /src/components/Note.tsx file, the UI for an individual note is defined:
import { INote } from "../Interfaces";

interface Props {
  content: INote;
  delContent(noteToDelete: number): void;
}

const Note = ({ content, delContent }: Props) => {
  return (
    <div className="note">
      <div className="content">
        <span>{content.note}</span>
      </div>
      <button
        onClick={() => {
          delContent(content.id);
        }}
      >
        X
      </button>
    </div>
  );
};
export default Note;
Inside the Note component, a destructured Props parameter exposes a content field (containing the note's note field for user input) and a delContent function for deleting that note entry.
The main App component splits into two sections: one for creating notes and one for displaying them:
const App: FC = () => {
  return (
    <div className="App">
      <div className="header">
      </div>

      <div className="noteList">
      </div>
    </div>
  );
};
export default App;
The header section includes the input field and the submit button:
const App: FC = () => {
  return (
    <div className="App">
      <div className="header">
        <div className="inputContainer">
          <input
            type="text"
            placeholder="Add Note..."
            name="note"
            value={noteContent}
            onChange={handleChange}
          />
        </div>
        <button onClick={addNote}>Add Note</button>
      </div>

      ...
    </div>
  );
};
export default App;
State for noteContent tracks the input value. An onChange handler updates it, and the button's onClick event passes the value up to populate the note list. At this point the UI appears as a clean note-taking form:

The component declares two state variables — noteContent and noteList — along with two event-handling functions:
import { FC, ChangeEvent, useState } from "react";
import "./App.css";
import { INote } from "./Interfaces";

const App: FC = () => {
  const [noteContent, setNoteContent] = useState<string>("");
  const [noteList, setNoteList] = useState<INote[]>([]);

  const handleChange = (event: ChangeEvent<HTMLInputElement>) => {
      setNoteContent(event.target.value.trim());
  };

  const addNote = (): void => {
    const newContent = { Date.now(), note: noteContent };
    setNoteList([...noteList, newContent]);
    setNoteContent("");
  };

  return (
    <div className="App">
      <div className="header">
        <div className="inputContainer">
          <input
            type="text"
            placeholder="Add Note..."
            name="note"
            value={noteContent}
            onChange={handleChange}
          />
        </div>
        <button onClick={addNote}>Add Note</button>
      </div>

      ...
    </div>
  );
};
export default App;
noteList maintains all notes in the application. handleChange continuously synchronizes noteContent with the input via setNoteContent. The addNote function builds a newContent object containing the note text, then updates noteList by combining its previous state with newContent.
The display section of the App component maps over noteList to render each note:
...

import Note from "./Components/Note";

const App: FC = () => {
  ...

  return (
    <div className="App">
      <div className="header">
        ...
      </div>

      <div className="noteList">
        {noteList.map((content: INote) => {
          return <Note key={content.id} content={content} delContent={delContent} />;
        })}
      </div>
    </div>
  );
};

export default App;
Using Array.prototype.map, each item renders as a Note component receiving key, content, and delContent props. The delContent function removes individual notes:
...
import Note from "./Components/Note";

const App: FC = () => {
  ...
  const [noteList, setNoteList] = useState<INote[]>([]);

  ...

  const delContent = (noteID: number) => {
    setNoteList(
      noteList.filter((content) => {
        return content.id !== noteID;
      })
    );
  };
  return (
    <div className="App">
      <div className="header">
        ...
      </div>

      <div className="noteList">
        {noteList.map((content: INote) => {
          return <Note key={content.id} content={content} delContent={delContent} />;
        })}
      </div>
    </div>
  );
};
export default App;
This filter removes any content from noteList that doesn't match the value of the noteToDelete argument. When a note is created, noteToDelete equals content.note and gets passed down into delContent.
The complete App component ties both sections together:
import { FC, ChangeEvent, useState } from "react";
import "./App.css";
import Note from "./Components/Note";
import { INote } from "./Interfaces";

const App: FC = () => {
  const [noteContent, setNoteContent] = useState<string>("");
  const [noteList, setNoteList] = useState<INote[]>([]);

  const handleChange = (event: ChangeEvent<HTMLInputElement>) => {
      setNoteContent(event.target.value.trim());
  };

  const addNote = (): void => {
    const newContent = { id: Date.now(), note: noteContent };
    setNoteList([...noteList, newContent]);
    setNoteContent("");
  };

  const delContent = (noteID: number): void => {
    setNoteList(
      noteList.filter((content) => {
        return content.id !== noteID;
      })
    );
  };

  return (
    <div className="App">
      <div className="header">
        <div className="inputContainer">
          <input
            type="text"
            placeholder="Add Note..."
            name="note"
            value={noteContent}
            onChange={handleChange}
          />
        </div>
        <button onClick={addNote}>Add Note</button>
      </div>

      <div className="noteList">
        {noteList.map((content: INote) => {
          return <Note key={content.id} content={content} delContent={delContent} />;
        })}
      </div>
    </div>
  );
};
export default App;
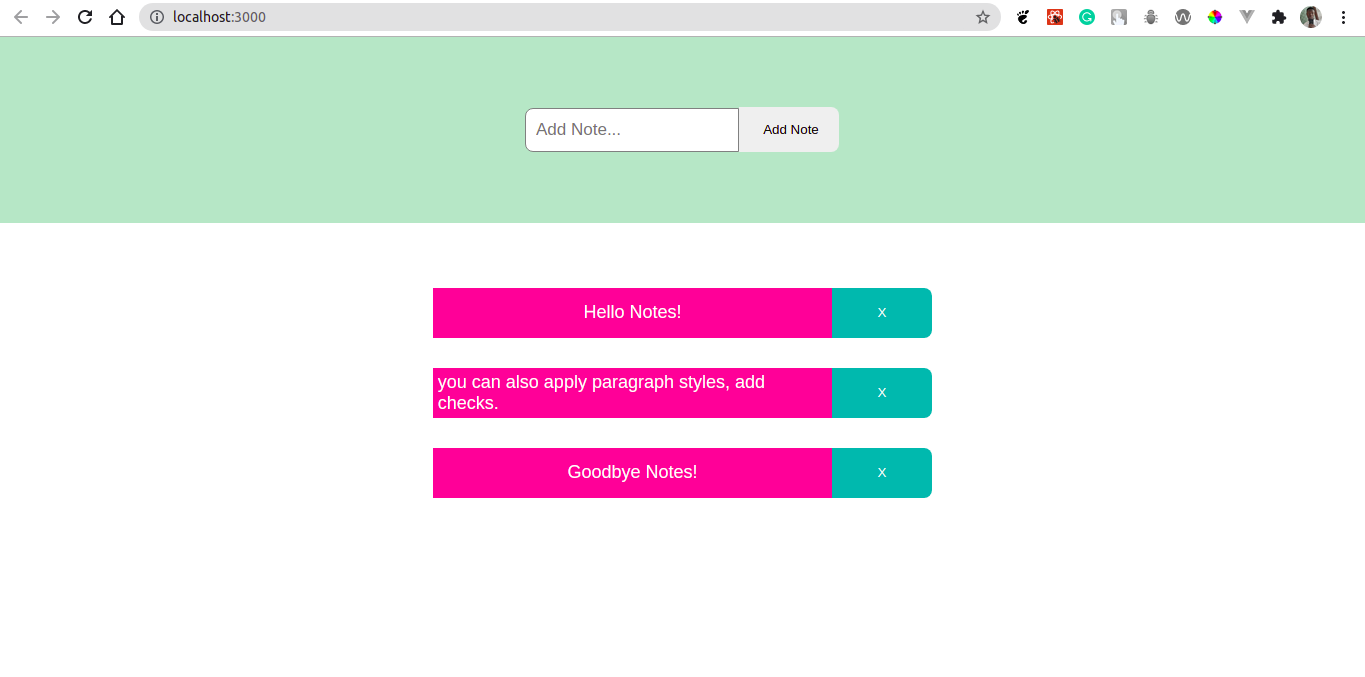
After adding notes, the resulting UI shows the full application:
Deploying to AWS
With the Notes application functional, we can deploy it through Serverless UI from the command line. First configure the AWS CLI on your machine.
Install Serverless UI globally:
npm install -g @serverlessui/cliGlobal installation keeps the package out of the application bundle, so the deployed code contains only what's essential. Then create a build directory of the project:
sui deploy --dir="build"
...
❯ Website Url: https://xxxxx.cloudfront.net
Use yarn to build the static assets into the build folder, then invoke Serverless UI for deployment:
yarn build
...
Done in 80.63s.

sui deploy --dir="build"
...

✅  ServerlessUIAppPreview1c9ec9f1

Outputs:
ServerlessUIAppPreview1c9ec9f1.ServerlessUIBaseUrlCA2DC891 = https://dal254gl37fow.cloudfront.net

Stack ARN:
arn:aws:cloudformation:us-west-2:261955174750:stack/ServerlessUIAppPreview1c9ec9f1/e4dc82e0-fe44-11eb-b959-064619847e85
Deployment finished in under five minutes and the site is live on CloudFront.
Deploying Lambda Functions From the CLI
Deploying Lambda functions written in your local environment with Serverless UI removes much of the initial configuration work. Before you start, make sure your local runtime—specifically the Node.js version—matches what AWS Lambda supports.
The code for this part lives in the /serverless folder in the associated repository. It contains a single source file that requests a random joke from an external API.
const nodefetch = require("node-fetch");

exports.handler = async (event, context) => {
  const url = "https://icanhazdadjoke.com/";
  try {
    const jokeStream = await nodefetch(url, {
      headers: {
        Accept: "application/json"
      }
    });
    const jsonJoke = await jokeStream.json();
    return {
      statusCode: 200,
      body: JSON.stringify(jsonJoke)
    };
  } catch (err) {
    return { statusCode: 422, body: err.stack };
  }
};
To prepare the project for deployment, install esbuild; it speeds up and simplifies bundling the application files.
npm install esbuild --save-devWith the dependency installed, tell Serverless UI where the functions live using the --functions flag—the same way you’d pass the --dist flag when deploying a static site.
sui deploy --functions="serverless"The build and deployment happen in one step:
...

✅  ServerlessUIAppPreview560dbd41

Outputs:
ServerlessUIAppPreview560dbd41.ServerlessUIFunctionPathjokesD9F032B9 = https://dwh6k64yrlqcn.cloudfront.net/api/jokes

Stack ARN:
arn:aws:cloudformation:us-west-2:261955174750:stack/ServerlessUIAppPreview560dbd41/21de6780-fb93-11eb-a0fb-061a2a83f0b9- The serverless function is now live at this CloudFront URL: https://dwh6k64yrlqcn.cloudfront.net/api/jokes.
If you deploy both the UI and the /api functions at the same time, your frontend code can reference the API by relative path (e.g., /api/jokes) instead of the full URL. This works even with CORS, since the UI and API share the same origin.
Be aware that Serverless UI creates a brand-new stack for every preview deployment by default, which means each URL is unique. To deploy to the same URL repeatedly, you must pass the --prod flag.
sui deploy --prod --dir="dist" --functions="serverless"Create a new folder at /src/components/Quote and add an index.tsx file inside it. This holds the JSX that renders each quote.
import { useState } from "react";

const Quote = () => {
  const [joke, setJoke] = useState<string>();
  return (
    <div className="container">
      <p className="fade-in">{joke}</p>
    </div>
  );
};
export default Quote;
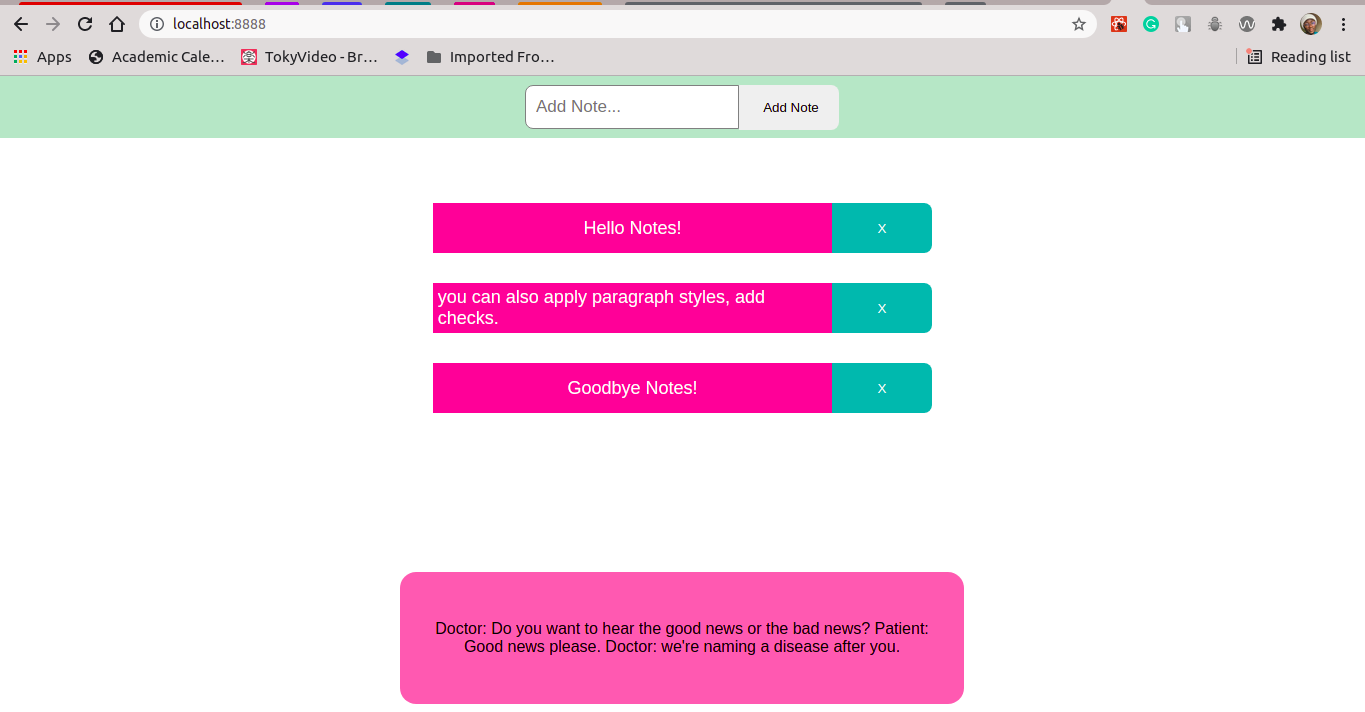
The UI polls the deployed serverless function on a fixed interval, refreshing the joke in the <p className="fade-in">{joke}</p> element every 2000 milliseconds.
import { useEffect, useState } from "react";

const Quote = () => {
  const [joke, setJoke] = useState<string>();

  useEffect(() => {
    const getRandomJokeEveryTwoSeconds = setInterval(async () => {
      const url = process.env.API_LINK || "https://dwh6k64yrlqcn.cloudfront.net/api/jokes";
      const jokeStream = await fetch(url);
      const res = await jokeStream.json();
      const joke = res.joke;
      setJoke(joke);
    }, 2000);
    return () => {
      clearInterval(getRandomJokeEveryTwoSeconds);
    };
  }, []);

  return (
    <div className="container">
      <p className="fade-in">{joke}</p>
    </div>
  );
};
export default Quote;
The added code uses the useEffect hook to call the serverless API, and the setJoke function from useState to update the displayed text in the UI.
Restart the local development server to see the changes:
Before pushing a new build, you can optionally attach a custom domain and then continue deploying updates to that domain.
Using Your Own Domain
Instead of the default CloudFront URL, you can point Serverless UI at a custom domain. Full DNS propagation can take anywhere from 20 to 48 hours, but you only need to go through this once. From your project directory, run:
sui configure-domain --domain="<custom-domain.com>"Swap the value of the --domain flag for your own URL. After this is set up, you can keep updating the same deployment by adding the --prod flag to subsequent sui deploy commands.
Summary
Serverless UI is a practical way to deploy both static frontends and Lambda-backed APIs straight from the CLI. It reduces the setup overhead of AWS and makes previews easy, while keeping the door open to more advanced configurations.
For existing serverless projects, or those using additional CloudFormation or CDK infrastructure, Serverless UI offers CDK constructs that wrap each CLI action. It also supports private S3 buckets for improved security. More details, including domain configuration, are in the official Serverless UI documentation on GitHub.
- The complete sample code is on GitHub.


