Three integration points
Web components can be brought into WordPress in three main ways. The first is manual: place the custom element directly in widgets or text blocks, essentially anywhere ordinary HTML is accepted. The second is through a theme, with the element rendered as the output of a theme file. The third is through a custom block, where the component is produced as the block's output.
Entering markup by hand
Because custom elements are just tags, the manual route needs nothing beyond a spot that accepts HTML. Dropping an element into a block editor text block or a widget is enough. The key settings are on the JavaScript side: the script that defines the element needs attributes and shadow DOM, and both get wired up when the script is compiled and built.
Whether the markup is hand-written or generated, WordPress must not be allowed to alter it. That calls for registering the element's tag as valid markup:
function my_web_component_kses_allowed_html( $tags ) {
  $tags['my-web-component'] = array(
    'type' => true,
    'data-cloudimage-id' => true,
    'cloudimage-token' => true,
    'image-id' => true,
    'src' => true,
    'data-src' => true,
  );
  return $tags;
}
add_filter( 'wp_kses_allowed_html', 'my_web_component_kses_allowed_html' );
Collect all the attributes the component relies on, not just a couple of them, and add them to the array above.
A self-closing tag is also valid, as long as you ask WordPress to recognize that syntax:
function add_self_closing_tags( $allowedposttags ) {
  $allowedposttags['my-web-component'] = array(
    'class' => true,
    'id' => true,
    'type' => true,
    'data-cloudimage-id' => true,
    'cloudimage-token' => true,
    'image-id' => true,
    'src' => true,
    'data-src' => true,
  );
  return $allowedposttags;
}
add_filter( 'wp_kses_allowed_html', 'add_self_closing_tags' );
With that in place, the element can be placed straight into the markup end users see.
Rendering from a theme file
A theme gives you full control over where and how the element is rendered.
Rendering from a custom block
The trick when the other two approaches fall short is to build the element into a custom block whose save function performs the rendering—a good fit for handing the component to editorial users.
{{{BLOCK_0}}}Set supports.innerHTML to false so WordPress hands the block's raw inline HTML to the editor for rendering rather than saving it unprocessed as HTML.
There is still the problem of building the component into the theme—and how that is done successfully comes down to the JavaScript. The trick is to import the script and bundle its editor version in PHP:
// Enqueue the JavaScript from the theme's index.js
wp_enqueue_script(
  'web-components-theme-script',
  get_theme_file_uri( '/build/index.js' ),
  array( 'wp-block-editor', 'wp-blocks' ),
  filemtime( get_theme_file_path( '/build/index.js' ) )
);
There is one caveat: any code wrapped in an IIFE or inside a webpack configuration will break, because the component then can't access the window and won't be recognized inside the editor.
The last piece of the puzzle is making the block discoverable by WordPress when the theme loads, through calls to the block registration functions:
function enqueue_blocks() {
  wp_enqueue_script(
    'web-components-block-script',
    get_theme_file_uri( '/build/index.js' ),
    array( 'wp-blocks', 'wp-i18n', 'wp-element', 'wp-block-editor' ),
    filemtime( get_theme_file_path( '/build/index.js' ) )
  );
}
add_action( 'enqueue_block_editor_assets', 'enqueue_blocks' );
With the block registered this way, the custom element written into the save function appears correctly wherever the theme is loaded.
One final edge case
Of the three methods, the theme approach demands the most work out of the gate if requirements later shift. But a final, arguably plainest, possibility remains open: since WordPress lets themes change templates completely, a page template could be created and the component written directly into it.
Next let's continue the series by examining what's involved in incorporating a component, plumbing included.
Regardless of how a component reaches a WordPress site, three things have to be in place: the custom element's template must be available when it is needed, any JavaScript must be properly enqueued, and any un-encapsulated styles must be enqueued as well. The example throughout is the <zombie-profile> component built in the earlier interactive web components article.
Wiring up template, script, and styles
Dropping the template straight into the theme's footer.php works, but hooking into wp_footer is preferable, so the component loads independently of both the file and the theme overall. This assumes the theme calls wp_footer, which most do — if the template doesn't appear, check that footer.php actually invokes it.
<?php function diy_ezwebcomp_footer() { ?>
  <!-- print/echo Zombie profile template code. -->
  <!-- It's available at https://codepen.io/undeadinstitute/pen/KKNLGRg -->
<?php }
add_action( 'wp_footer', 'diy_ezwebcomp_footer');
For the JavaScript, enqueueing is WordPress's recommended approach rather than pasting a script tag into the footer. The script lives in a file called ezwebcomp.js, kept in the theme's JavaScript directory, and is registered from functions.php.
wp_enqueue_script( 'ezwebcomp_js', get_template_directory_uri() . '/js/ezwebcomp.js', '', '1.0', true );
The last parameter must be true so the script loads before the closing body tag. Loading it in the head means it runs before the HTML template exists and throws a pile of errors.
Fully encapsulated components let you skip the next step. If yours isn't encapsulated, the styles need enqueueing too, again rather than being dropped directly into the footer:
wp_enqueue_style( 'ezwebcomp_style', get_template_directory_uri() . '/ezwebcomp.css', '', '1.0', 'screen' );
With that, sites where every user is an Administrator are done. Anything else needs more care.
Getting past WordPress's filtering
WordPress filters editor input to keep the markup valid and to stop users pasting in script-laden content. Dropping that filtering entirely defeats the purpose, but it can be modified to let a specific component through. The wp_kses_allowed filter handles the element side: adding the component to the allowed tags array passed to the filter effectively whitelists it.
function add_diy_ezwebcomp_to_kses_allowed( $the_allowed_tags ) {
  $the_allowed_tags['zombie-profile'] = array();
}
add_filter( 'wp_kses_allowed_html', 'add_diy_ezwebcomp_to_kses_allowed');
The empty array matters because WordPress filters attributes as well as elements. The slot attribute isn't permitted by default, so it has to be allowed explicitly on each element that will use it — and on any element a user might add it to, which is rarely the same list. Here slot is set to true on <span>, <img> and <ul>, the three elements slotted into <zombie-profile>.
function add_diy_ezwebcomp_to_kses_allowed( $the_allowed_tags ) {
  $the_allowed_tags['zombie-profile'] = array();
  $the_allowed_tags['span']['slot'] = true;
  $the_allowed_tags['ul']['slot'] = true;
  $the_allowed_tags['img']['slot'] = true;
  return $the_allowed_tags;
}
add_filter( 'wp_kses_allowed_html', 'add_diy_ezwebcomp_to_kses_allowed');
Allowing slot on every permitted element is also possible:
function add_diy_ezwebcomp_to_kses_allowed($the_allowed_tags) {
  $the_allowed_tags['zombie-profile'] = array();
  foreach ($the_allowed_tags as &$tag) {
    $tag['slot'] = true;
  }
  return $the_allowed_tags;
}
add_filter('wp_kses_allowed_html', 'add_diy_ezwebcomp_to_kses_allowed');
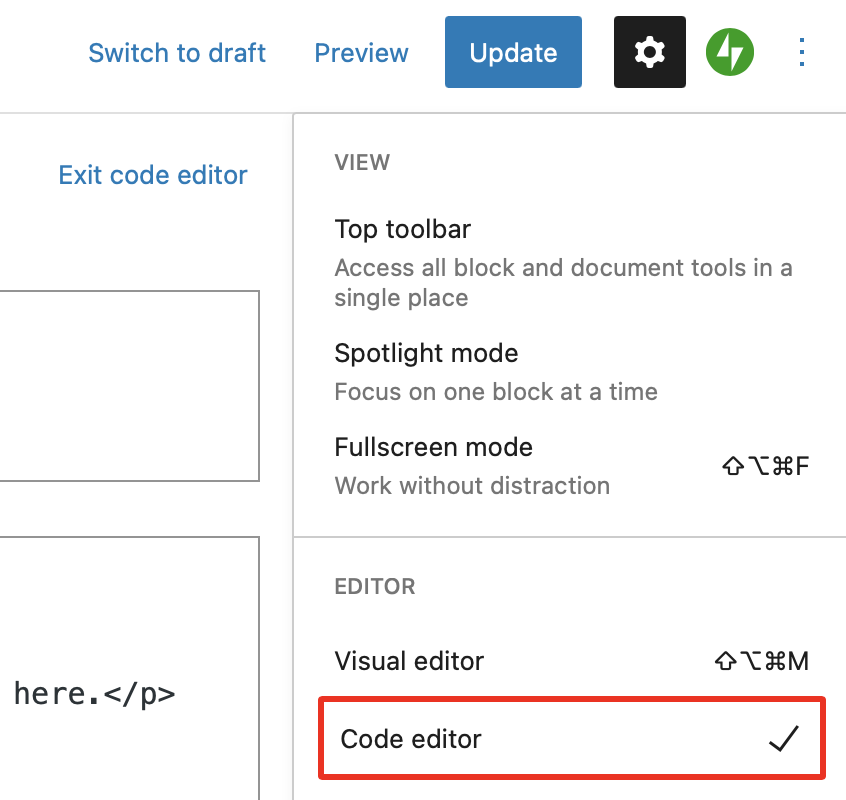
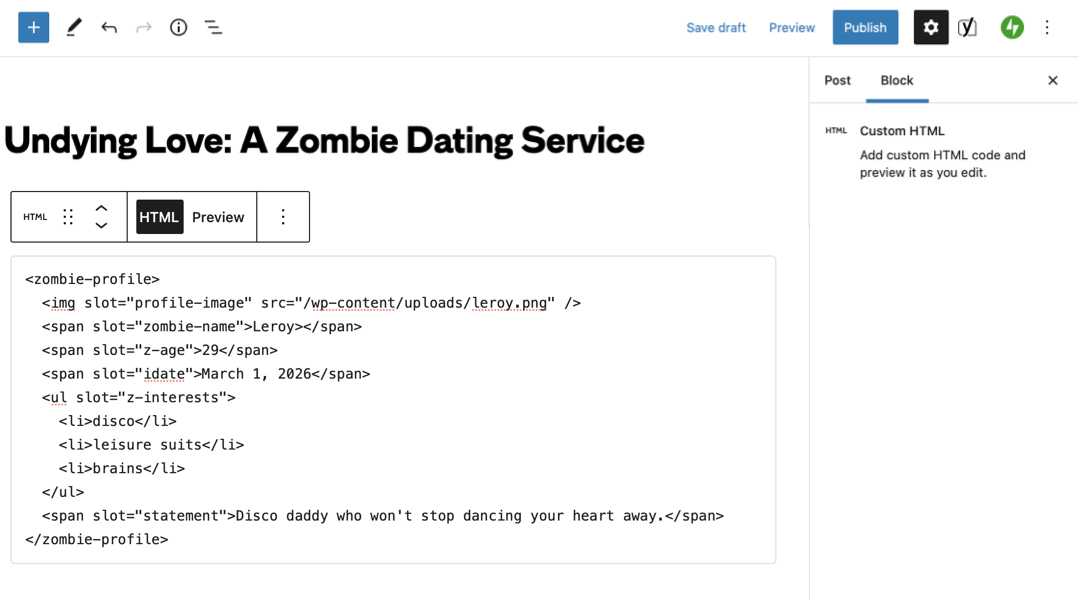
One more wrinkle remains. It may never surface if every slotted element is inline, but a block-level element will collide with the Code Editor's block parser. The client-side parser assumes a web component contains only inline elements, so a <ul>, <div>, <h1> or similar causes it to relocate the closing component tag to just after the last inline element. According to the WordPress Developer Handbook, replacing the client-side parser is currently "not possible."
The workaround is to place the web component inside a Custom HTML block in the Block Editor directly.
Printing components from posts
Outputting a web component in a theme file is simple, provided nothing updates it outside the HTML block: add it as in any other context, and with template, scripts and styles in place it just works.
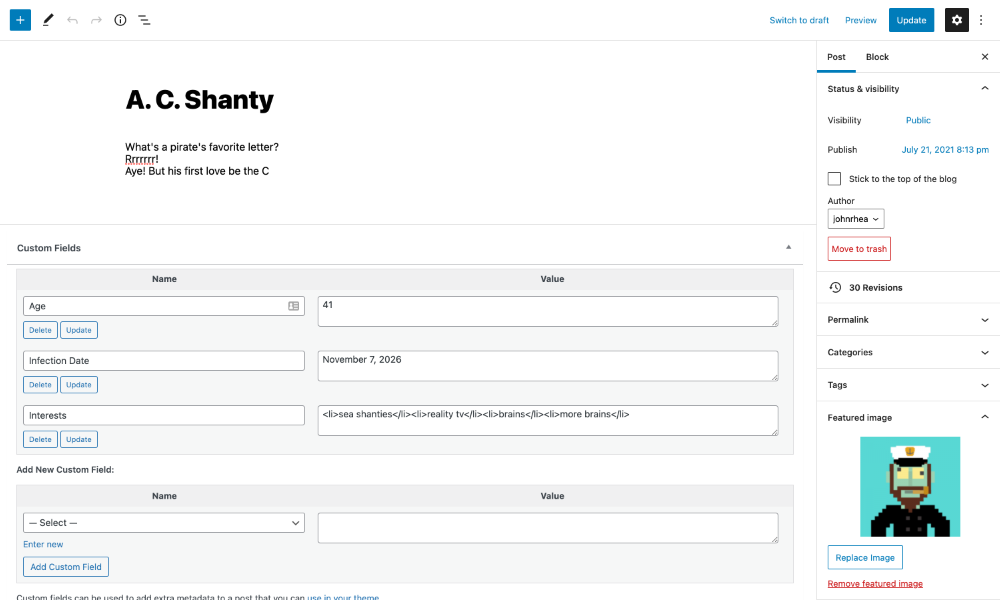
Things get more interesting when the contents of a post or custom post type become the component's content — writing a post that supplies one <zombie-profile>, and publishing many posts to produce an archive of profiles. The editor already covers most of the needed UI: the post title serves as the zombie's name, a standard paragraph block supplies the statement, and the featured image acts as the profile picture. Age, infection date and interests come from WordPress's built-in Custom Fields.
The template part that prints each post — content.php, for example — outputs the component: opening <zombie-profile> tag first, followed by the post thumbnail if one exists.
<zombie-profile>
  <?php
    // If the post featured image exists...
    if (has_post_thumbnail()) {
      $src = wp_get_attachment_image_url(get_post_thumbnail_id()); ?>
      <img src="<?php echo $src; ?>" slot="profile-image">
    <?php
    }
  ?>
Then the title, for the name:
<?php
  // If the post title field exits...
  if (get_the_title()) { ?>
  <span slot="zombie-name"><?php echo get_the_title(); ?></span>
  <?php
  }
?>
Each field is checked before printing, for two reasons. First, hiding labels and elements around empty fields is generally good practice. Second, outputting an empty <span> — say <span slot="zombie-name"></span> — would display as empty in the final profile instead of falling back to the component's built-in default text or image. To intentionally allow blanks, put a space in the custom field or drop the if statement.
Next, the custom fields go into their slots, again in the theme template that outputs post content.
<?php
  // Zombie age
  $temp = get_post_meta(the_ID(), 'Age', true);
  if ($temp) { ?>
    <span slot="z-age"><?php echo $temp; ?></span>
    <?php
  }
  // Zombie infection date
  $temp = get_post_meta(the_ID(), 'Infection Date', true);
  if ($temp) { ?>
    <span slot="idate"><?php echo $temp; ?></span>
    <?php
  }
  // Zombie interests
  $temp = get_post_meta(the_ID(), 'Interests', true);
  if ($temp) { ?>
    <ul slot="z-interests"><?php echo $temp; ?></ul>
    <?php
  }
?>
WordPress custom fields can't do special formatting, so a non-technical editor filling one in would have to write out the <li> markup for every interest in the list by hand. A more capable custom field plugin such as Advanced Custom Fields or Pods can work around that limitation.
Finally, the zombie's statement and the closing <zombie-profile> tag:
<?php
  $temp = get_the_content();
  if ($temp) { ?>
    <span slot="statement"><?php echo $temp; ?></span>
  <?php
  }
?>
</zombie-profile>
Using the post body for the statement brings some extra markup along, such as paragraph tags around the content. Moving the statement into a custom field mitigates that, though the current behavior may suit some purposes. Publishing each post then yields as many profiles as needed.
Custom blocks: components without the code
A custom block lets editors fill in the required fields and get the component's output with no technical knowledge. Blocks are also completely independent of themes, so one built for a site can be installed on other WordPress sites — much as a web component is expected to travel.
There are two main parts: PHP and JavaScript.
function ez_webcomp_register_block() {
  // Enqueues the JavaScript needed to build the custom block
  wp_register_script(
    'ez-webcomp',
    plugins_url('block.js', __FILE__),
    array('wp-blocks', 'wp-element', 'wp-editor'),
    filemtime(plugin_dir_path(__FILE__) . 'block.js')
  );

  // Enqueues the component's CSS file
  wp_register_style(
    'ez-webcomp',
    plugins_url('ezwebcomp-style.css', __FILE__),
    array(),
    filemtime(plugin_dir_path(__FILE__) . 'ezwebcomp-style.css')
  );

  // Registers the custom block within the ez-webcomp namespace
  register_block_type('ez-webcomp/zombie-profile', array(
    // We already have the external styles; these are only for when we are in the WordPress editor
    'editor_style' => 'ez-webcomp',
    'editor_script' => 'ez-webcomp',
  ));
}
add_action('init', 'ez_webcomp_register_block');
A little CSS helps the editing experience by keeping the zombie's profile image from overlapping content in the editor.
/* Sets the width and height of the image.
 * Your mileage will likely vary, so adjust as needed.
 * "pic" is a class we'll add to the editor in block.js
*/
#editor .pic img {
  width: 300px;
  height: 300px;
}
/* This CSS ensures that the correct space is allocated for the image,
 * while also preventing the button from resizing before an image is selected.
*/
#editor .pic button.components-button {
  overflow: visible;
  height: auto;
}
The JavaScript is more involved. It's written in ES5 so no compilation step is needed, keeping it as accessible as possible.
(function (blocks, editor, element, components) {
  // The function that creates elements
  var el = element.createElement;
  // Handles text input for block fields
  var RichText = editor.RichText;
  // Handles uploading images/media
  var MediaUpload = editor.MediaUpload;

  // Harkens back to register_block_type in the PHP
  blocks.registerBlockType('ez-webcomp/zombie-profile', {
    title: 'Zombie Profile', //User friendly name shown in the block selector
    icon: 'id-alt', //the icon to usein the block selector
    category: 'layout',
    // The attributes are all the different fields we'll use.
    // We're defining what they are and how the block editor grabs data from them.
    attributes: {
      name: {
        // The content type
        type: 'string',
        // Where the info is available to grab
        source: 'text',
        // Selectors are how the block editor selects and grabs the content.
        // These should be unique within an instance of a block.
        // If you only have one img or one <ul> etc, you can use element selectors.
        selector: '.zname',
      },
      mediaID: {
        type: 'number',
      },
      mediaURL: {
        type: 'string',
        source: 'attribute',
        selector: 'img',
        attribute: 'src',
      },
      age: {
        type: 'string',
        source: 'text',
        selector: '.age',
      },
      infectdate: {
        type: 'date',
        source: 'text',
        selector: '.infection-date'
      },
      interests: {
        type: 'array',
        source: 'children',
        selector: 'ul',
      },
      statement: {
        type: 'array',
        source: 'children',
        selector: '.statement',
      },
  },
  // The edit function handles how things are displayed in the block editor.
  edit: function (props) {
    var attributes = props.attributes;
    var onSelectImage = function (media) {
      return props.setAttributes({
        mediaURL: media.url,
        mediaID: media.id,
      });
    };
    // The return statement is what will be shown in the editor.
    // el() creates an element and sets the different attributes of it.
    return el(
      // Using a div here instead of the zombie-profile web component for simplicity.
      'div', {
        className: props.className
      },
      // The zombie's name
      el(RichText, {
        tagName: 'h2',
        inline: true,
        className: 'zname',
        placeholder: 'Zombie Name…',
        value: attributes.name,
        onChange: function (value) {
          props.setAttributes({
            name: value
          });
        },
      }),
      el(
        // Zombie profile picture
        'div', {
          className: 'pic'
        },
        el(MediaUpload, {
          onSelect: onSelectImage,
          allowedTypes: 'image',
          value: attributes.mediaID,
          render: function (obj) {
            return el(
              components.Button, {
                className: attributes.mediaID ?
                  'image-button' : 'button button-large',
                onClick: obj.open,
              },
              !attributes.mediaID ?
              'Upload Image' :
              el('img', {
                src: attributes.mediaURL
              })
            );
          },
        })
      ),
      // We'll include a heading for the zombie's age in the block editor
      el('h3', {}, 'Age'),
      // The age field
      el(RichText, {
        tagName: 'div',
        className: 'age',
        placeholder: 'Zombie\'s Age…',
        value: attributes.age,
        onChange: function (value) {
          props.setAttributes({
            age: value
          });
        },
      }),
      // Infection date heading
      el('h3', {}, 'Infection Date'),
      // Infection date field
      el(RichText, {
        tagName: 'div',
        className: 'infection-date',
        placeholder: 'Zombie\'s Infection Date…',
        value: attributes.infectdate,
        onChange: function (value) {
          props.setAttributes({
            infectdate: value
          });
        },
      }),
      // Interests heading
      el('h3', {}, 'Interests'),
      // Interests field
      el(RichText, {
        tagName: 'ul',
        // Creates a new <li> every time `Enter` is pressed
        multiline: 'li',
        placeholder: 'Write a list of interests…',
        value: attributes.interests,
        onChange: function (value) {
          props.setAttributes({
            interests: value
          });
        },
        className: 'interests',
      }),
      // Zombie statement heading
      el('h3', {}, 'Statement'),
      // Zombie statement field
      el(RichText, {
        tagName: 'div',
        className: "statement",
        placeholder: 'Write statement…',
        value: attributes.statement,
        onChange: function (value) {
          props.setAttributes({
            statement: value
          });
        },
      })
    );
  },

  // Stores content in the database and what is shown on the front end.
  // This is where we have to make sure the web component is used.
  save: function (props) {
    var attributes = props.attributes;
    return el(
      // The <zombie-profile web component
      'zombie-profile',
      // This is empty because the web component does not need any HTML attributes
      {},
      // Ensure a URL exists before it prints
      attributes.mediaURL &&
      // Print the image
      el('img', {
        src: attributes.mediaURL,
        slot: 'profile-image'
      }),
      attributes.name &&
      // Print the name
      el(RichText.Content, {
        tagName: 'span',
        slot: 'zombie-name',
        className: 'zname',
        value: attributes.name,
      }),
      attributes.age &&
      // Print the zombie's age
      el(RichText.Content, {
        tagName: 'span',
        slot: 'z-age',
        className: 'age',
        value: attributes.age,
    }),
      attributes.infectdate &&
      // Print the infection date
      el(RichText.Content, {
        tagName: 'span',
        slot: 'idate',
        className: 'infection-date',
        value: attributes.infectdate,
    }),
      // Need to verify something is in the first element since the interests's type is array
      attributes.interests[0] &&
      // Pint the interests
      el(RichText.Content, {
        tagName: 'ul',
        slot: 'z-interests',
        value: attributes.interests,
      }),
      attributes.statement[0] &&
      // Print the statement
      el(RichText.Content, {
        tagName: 'span',
        slot: 'statement',
        className: 'statement',
        value: attributes.statement,
    })
    );
    },
  });
})(
  //import the dependencies
  window.wp.blocks,
  window.wp.blockEditor,
  window.wp.element,
  window.wp.components
);
Packaging it as a plugin
A coding template for all of this is published on GitHub as Do It Yourself – Easy Web Components for WordPress. The plugin registers the custom web component, enqueues the scripts and styles it needs, provides examples of the custom block fields, and handles editor styling. Installation is the usual manual route: drop it into a new folder in /wp-content/plugins, update it with your own web component, and activate it on the "Installed Plugins" screen.
The amount of code notwithstanding, these are standard WordPress operations for registering and rendering a component. Most of the effort goes into making the component work as well in the block editor as on the front end; without that requirement, far less code would be needed. What the work produces is the same component from the earlier articles, now inside a CMS, paired with WordPress blocks to make a reusable block for a reusable web component.