

Your daily Git workflow, explained
Once you understand what Git does, the next step is mastering the commands you'll reach for constantly. These are the ones we use for everything from setting up a project to sharing changes with a team.
Configure your identity
Right after installing Git, set your username and email so your commits are credited to you. The git config command handles this:
git config --global user.name "username"git config --global user.email "[email protected]"

Start tracking a project
The git init command turns an ordinary folder into a repository you can track. For example, create a folder with mkdir project1, move into it with cd project1, and run git init to make it a Git repository.

Check the state of your work
The git status command reports which files have been added, deleted, or changed in your working directory. After git init, it will return "nothing to commit" because no files exist yet.
Create a file with touch hello.md and run git status again. You'll now see an untracked file — one that hasn't been added to the staging area.

Stage files
To move files into the staging area, use git add:
git add .— stages all files from the working directory.git add filename— stages a specific file.
If you create learning.py and waiting.py, then run git add learning.py, only that file becomes tracked. A second git status shows learning.py in the staging area while waiting.py remains untracked.

Staging keeps a snapshot of a file at a given moment. If you later modify a tracked file — for instance, adding print ("I'm learning git") to learning.py — Git will show it as modified until you stage it again.

Save a version with commit
The git commit command stores a version of your project in Git's history. With only learning.py and hello.md staged, run git commit -m "initial commit". The output confirms two files changed with one insertion, while waiting.py is still untracked.
To commit new work along with other staged changes, combine commands:git add . git commit -m "add waiting file and new function"

Copy a remote repository locally
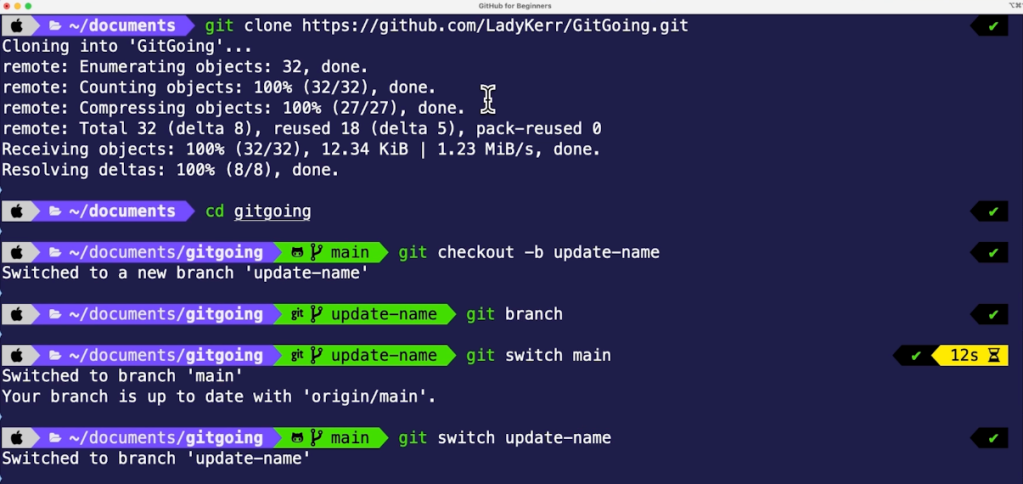
When you need your own copy of a repository, git clone pulls it down from a remote location. On GitHub, click the green "Code" button, choose HTTPS, copy the URL, then run git clone <url link> in your terminal.

You'll see "done" in the output, and the repository is now on your machine with full edit access.
Isolate work on branches
Branches let you create copies of a project so you don't disturb the original. To create and switch to a new branch in one step, use git checkout -b update-name.

The git branch command lists all branches — expect to see main, a branch named init, and your new update-name. Press q to exit the list.
Move between branches
The git switch command changes your current branch. Type git switch main to return to the main branch, then git switch update-name to go back to your feature branch.
After switching, open the project's index.html file and rename the app — say, to "Git Going." Run git status to confirm the file was modified. Stage and commit the change with git add . git commit -m "update app name" git status.
Upload commits to a remote
To move local changes into the remote repository, run git push <remote> <branch>. In practice, that's git push origin update-name, where origin is the remote and update-name is the branch.

The remote repository will now show the new branch. From there you can open a pull request to merge it into another branch.
Keep your local repo current
Your local copy of main remains stale after you push changes elsewhere. To update it, switch to main and run git pull, which fetches all remote changes and merges them into the current local branch.

Afterwards, git status will show one file changed with one insertion and one deletion.
Review your changes
The git show command displays changes on your current branch and serves as a project history viewer. Run it on the main branch and you'll get:
- The commit ID (SHA)
- The author, time, and date of the commit
- The commit message
- The actual content change to the file

Closing the loop: branches and merges
Once your pull request is open, the typical next step is to invite teammates to review your changes and address their feedback. After the review passes, you merge the pull request into the main branch. The final housekeeping step in the GitHub flow is cleaning up the branch you worked on, since it has served its purpose.
Deleting a branch locally uses the -d flag. When you run git branch -d update-name, Git removes the branch from your local repository, provided it has been fully merged. For the remote copy, run git push --delete origin update-name to remove it from the repository on GitHub.

With that, you’ve completed the full GitHub flow: clone the repo, create a branch, commit your changes, push, open a pull request, merge, and clean up. That cycle is the foundation of professional Git work.
Where to go from here
The commands covered here are the ones you will reach for daily. It takes practice to internalize them, and the best way is to keep moving through the GitHub flow on your own projects. The more often you create branches and merge them, the more natural these commands become.
If you have questions, the GitHub Community thread for this content is a good place to ask for help. For further learning, these resources are worth bookmarking:
- The Git cheat sheet from GitHub Education
- Hands-on labs on GitHub Skills
- The Introduction to GitHub course
- The GitHub Foundations Certificate learning collection


