

Why Pair a Headless CMS with a Static Site?
Blogging platforms often force a trade-off between ease of use and creative control. For developers, the admin-friendly interfaces of traditional CMSs can feel restrictive when it comes to front-end customization. A headless CMS setup resolves this by decoupling content management from content delivery.
Ghost is an excellent headless CMS choice due to its open-source nature and robust API. By combining it with Gatsby, a static site generator, you get a powerful and flexible system for your blog. This guide covers the complete setup process, including handling the technical challenges that arise. Best of all, the entire stack can run on free tiers from local development to Netlify deployment.
Initial Setup Checklist
To establish a working baseline, you’ll need to perform the following steps. For detailed instructions on each, refer to the referenced materials or the provided GitHub repository.
- Set up a local instance of the Gatsby Starter Blog.
- Install a local version of Ghost.
- Switch the data source from Markdown files to Ghost by replacing
gatsby-source-filewithgatsby-source-ghost. - Update your GraphQL queries in
gatsby-node, templates, and pages to align with thegatsby-source-ghostschema.
Configuring Cloud-Based Image Storage
A significant issue with a locally built, headless blog is image management. Ghost defaults to serving images from its own server, which is problematic when your content is served from a CDN. It prevents local builds and requires a publicly accessible Ghost instance, often incurring server costs.
To resolve this, you can use Ghost's storage adapters to move images to a cloud provider. For this setup, we will use an AWS S3 bucket with CloudFront for content delivery. Two open-source adapters are available: ghost-storage-adapter-s3 and ghost-s3-compat. The former is recommended for its recent updates and clearer documentation, though following its instructions may require some troubleshooting.
Here is a working configuration process for AWS:
- Create an S3 bucket, ensuring "Disable Static Hosting" is selected.
- Set up a CloudFront distribution with your S3 bucket as the origin.
- In the CloudFront configuration, under "S3 Bucket Access":
- Select "Yes, use OAI (bucket can restrict access to only Cloudfront)".
- Create a New OAI.
- Choose "Yes, update the bucket policy".
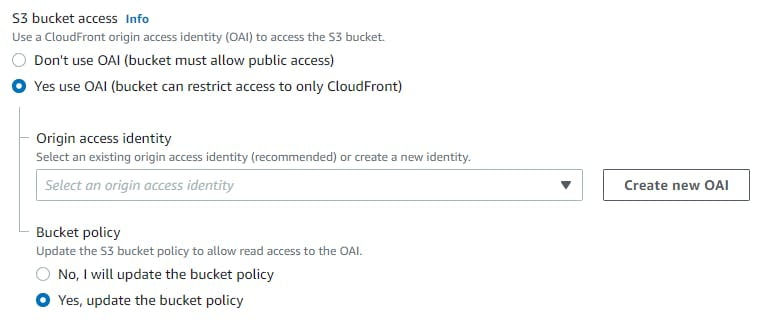
This establishes a secure S3 bucket accessible only through your CloudFront distribution. Next, you must create an AWS IAM User with programmatic access for Ghost to write images. Attach a policy with the necessary permissions to this user.
{
    "Version": "2012-10-17",
    "Statement": [
        {
            "Sid": "VisualEditor0",
            "Effect": "Allow",
            "Action": "s3:ListBucket",
            "Resource": "arn:aws:s3:::YOUR-S3-BUCKET-NAME"
        },
        {
            "Sid": "VisualEditor1",
            "Effect": "Allow",
            "Action": [
                "s3:PutObject",
                "s3:GetObject",
                "s3:PutObjectVersionAcl",
                "s3:DeleteObject",
                "s3:PutObjectAcl"
            ],
            "Resource": "arn:aws:s3:::YOUR-S3-BUCKET-NAME/*"
        }
    ]
}
With your AWS infrastructure ready, you need to configure Ghost to use it. In your Ghost installation directory, open your environment configuration file, either ghost.development.json or ghost.production.json. Add the following block to it:
{
  "storage": {
  "active": "s3",
  "s3": {
    "accessKeyId": "[key]",
    "secretAccessKey": "[secret]",
    "region": "[region]",
    "bucket": "[bucket]",
    "assetHost": "https://[subdomain].example.com", // cloudfront
    "forcePathStyle": true,
    "acl": "private"
  }
}
The accessKeyId and secretAccessKey are from your IAM setup. The region and bucket fields specify your S3 bucket's location and name. Finally, assetHost is the URL for your CloudFront distribution.
After a Ghost restart, any new images you upload will be stored in your S3 bucket, and Ghost will correctly link to them there. Be aware that this change is not retroactive; it's best to configure this on a fresh Ghost install before uploading any media.
Fixing Internal Links in Your Content
When you create content in Ghost, it automatically rewrites internal links to include your full site URL. For instance, a relative link to /my-post/ will be transformed into https://mysite.com/my-post/. This behavior creates issues for a headless setup where the Ghost instance is not the public-facing site.
To correct this, you'll need to process your content and convert these absolute links back to relative paths. This is done by adding a script that parses your post and page HTML. Create a new file, replaceLinks.js, in a utils folder at src/utils.
const url = require(`url`);
const cheerio = require('cheerio');

const replaceLinks = async (htmlInput, siteUrlString) => {
  const siteUrl = url.parse(siteUrlString);
  const $ = cheerio.load(htmlInput);
  const links = $('a');
  links.attr('href', function(i, href){
    if (href) {
      const hrefUrl = url.parse(href);
      if (hrefUrl.protocol === siteUrl.protocol && hrefUrl.host === siteUrl.host) {
        return hrefUrl.path
      }

      return href;
    }

  });
  return $.html();
}

module.exports = replaceLinks;
Next, you'll modify your gatsby-node.js file to use this script during node creation.
exports.onCreateNode = async ({ actions, node, getNodesByType }) => {
  if (node.internal.owner !== `gatsby-source-ghost`) {
    return
  }
  if (node.internal.type === 'GhostPage' || node.internal.type === 'GhostPost') {
    const settings = getNodesByType(`GhostSettings`);
    actions.createNodeField({
      name: 'html',
      value: replaceLinks(node.html, settings[0].url),
      node
    })
  }
}
This script imports two new NPM packages that you'll need to install.
npm install --save url cheerio
This code hooks into Gatsby's onCreateNode API, filtering for nodes created by gatsby-source-ghost. It specifically targets Ghost Pages and Posts, which are the only node types containing linkable content. The function retrieves the full URL of your Ghost instance from the settings and passes it, along with the node's HTML, to the removeLinks function in your script.
Using cheerio, replaceLinks.js parses the HTML, iterates over all anchor tags, and checks their href attributes. If an href matches the Ghost site's URL, it is replaced with just the path (e.g., /my-post/). Due to Gatsby's build constraints, the modified HTML is exposed via createNodeField rather than overwriting the original field.
You can then access this updated content in your blog-post.js template by modifying your GraphQL query.
ghostPost(slug: { eq: $slug }) {
  id
  title
  slug
  excerpt
  published_at_pretty: published_at(formatString: "DD MMMM, YYYY")
  html
  meta_title
  fields {
  html
  }
}
Finally, update your template to use the new HTML field instead of the original.
Instead of this:
<section
  dangerouslySetInnerHTML={{ __html: post.html }}
  itemProp="articleBody"
/>
You will use this:
<section
 dangerouslySetInnerHTML={{ __html: post.fields.html }}
  itemProp="articleBody"
/>
While this makes your links functionally correct, they are still standard anchor tags. For a more seamless Gatsby user experience without page reloads, you should use Gatsby's Link component. The gatsby-plugin-catch-links plugin automates this transformation. Install it using NPM and then add it to the plugins array in your gatsby-config file.
npm install --save gatsby-plugin-catch-links
Templates for Every Ghost Content Type
The base Gatsby Starter Blog only ships with an index page and a template for individual posts. Ghost, however, supports pages, tag archives, and author archives by default. Porting over templates from the Ghost team’s Gatsby starter fills this gap quickly. From that repository, you’ll want to copy the entire src/components/common/meta folder into your src/components directory, the Pagination.js and PostCard.js components, the fragments.js and siteConfig.js utility files, and the tag.js, page.js, author.js, and post.js templates.
The meta files add structured JSON-LD data to your templates — a default Ghost feature that the starter translates for Gatsby use. With PostCard.js in place, the copied templates function as-is. The fragments.js file becomes the central home for GraphQL query fragments, keeping individual page queries clean, while siteConfig.js holds several Ghost-specific configuration values in one place.
Next, install the required packages — gatsby-awesome-pagination, @tryghost/helpers, and @tryghost/helpers-gatsby — and update your gatsby-node file:
npm install --save gatsby-awesome-pagination @tryghost/helpers @tryghost/helpers-gatsby
Add new imports at the top of the file:
const { paginate } = require(`gatsby-awesome-pagination`);
const { postsPerPage } = require(`./src/utils/siteConfig`);
Then revise the GraphQL query in exports.createPages to pull everything Gatsby needs to construct pages from those new templates:
{
  allGhostPost(sort: { order: ASC, fields: published_at }) {
      edges {
          node {
              slug
          }
      }
  }
  allGhostTag(sort: { order: ASC, fields: name }) {
      edges {
          node {
              slug
              url
              postCount
          }
      }
  }
  allGhostAuthor(sort: { order: ASC, fields: name }) {
      edges {
          node {
              slug
              url
              postCount
          }
      }
  }
  allGhostPage(sort: { order: ASC, fields: published_at }) {
      edges {
          node {
              slug
              url
          }
      }
  }
}
Extract those queries into their own variables:
// Extract query results
  const tags = result.data.allGhostTag.edges
  const authors = result.data.allGhostAuthor.edges
  const pages = result.data.allGhostPage.edges
  const posts = result.data.allGhostPost.edges
Load all of your templates next. Note that this replaces your old blog-post.js with post.js, so you can delete blog-post.js from the templates folder:
// Load templates
  const tagsTemplate = path.resolve(`./src/templates/tag.js`)
  const authorTemplate = path.resolve(`./src/templates/author.js`)
  const pageTemplate = path.resolve(`./src/templates/page.js`)
  const postTemplate = path.resolve(`./src/templates/post.js`)
Finally, loop through tags, authors, pages, and posts to generate pages. For pages and posts this means creating slugs and pointing Gatsby at the correct template. For tag and author pages, you add pagination context via gatsby-awesome-pagination:
// Create tag pages
tags.forEach(({ node }) => {
    const totalPosts = node.postCount !== null ? node.postCount : 0

    // This part here defines, that our tag pages will use
    // a `/tag/:slug/` permalink.
    const url = `/tag/${node.slug}`

    const items = Array.from({length: totalPosts})

    // Create pagination
    paginate({
        createPage,
        items: items,
        itemsPerPage: postsPerPage,
        component: tagsTemplate,
        pathPrefix: ({ pageNumber }) => (pageNumber === 0) ? url : `${url}/page`,
        context: {
            slug: node.slug
        }
    })
})

// Create author pages
authors.forEach(({ node }) => {
    const totalPosts = node.postCount !== null ? node.postCount : 0

    // This part here defines, that our author pages will use
    // a `/author/:slug/` permalink.
    const url = `/author/${node.slug}`

    const items = Array.from({length: totalPosts})

    // Create pagination
    paginate({
        createPage,
        items: items,
        itemsPerPage: postsPerPage,
        component: authorTemplate,
        pathPrefix: ({ pageNumber }) => (pageNumber === 0) ? url : `${url}/page`,
        context: {
            slug: node.slug
        }
    })
})

// Create pages
pages.forEach(({ node }) => {
  // This part here defines, that our pages will use
  // a `/:slug/` permalink.
  node.url = `/${node.slug}/`

  createPage({
      path: node.url,
      component: pageTemplate,
      context: {
          // Data passed to context is available
          // in page queries as GraphQL variables.
          slug: node.slug,
      },
  })
})

// Create post pages
posts.forEach(({ node }) => {
    // This part here defines, that our posts will use
    // a `/:slug/` permalink.
    node.url = `/${node.slug}/`
    createPage({
        path: node.url,
        component: postTemplate,
        context: {
            // Data passed to context is available
            // in page queries as GraphQL variables.
            slug: node.slug,
        },
    })
})
With all content building correctly, styling comes next. Copy the styles from the top of the “Layout” section to the end of Ghost starter’s app.css and paste them at the end of your existing styles.css. The classes prefixed with kg — representing Koenig, the Ghost editor — are particularly important; they handle how content composed in the Ghost editor renders on the page or post templates.
One final tweak on the new templates: update the queries in page.js and post.js to account for the internal link transformation from the prior step.
Page.js
ghostPage(slug: { eq: $slug } ) {
  ...GhostPageFields
    fields {
      html
     }
}
Post.js
ghostPost(slug: { eq: $slug } ) {
  ...GhostPostFields
    fields {
      html
    }
}
Then swap the HTML fields where templates render content:
<section
className="content-body load-external-scripts"
dangerouslySetInnerHTML={{ __html: post.html }} />
becomes:
<section
className="content-body load-external-scripts"
dangerouslySetInnerHTML={{ __html: post.fields.html }} />
In page.js, change page.html to page.fields.html as well.
Dynamic Content with Ghost Pages
Traditional Ghost themes force you to hard-code callouts like testimonials or calls-to-action directly into the theme files. Going headless removes that limitation. You can create a normal Ghost page — for example, one named “Message” with content and an “internal” tag such as #message — and pull its content into any Gatsby page via GraphQL.
To keep internal content off the public URL list, adjust the createPages GraphQL query to filter out tags whose slugs match /^((?!hash-).)*$/. Any tag with # at the start gets a hash- slug, and this regex excludes those from page generation:
allGhostTag(sort: { order: ASC, fields: name }, **filter: {slug: {regex: "/^((?!hash-).)*$/"}}**) {
    edges {
        node {
            slug
            url
            postCount
        }
    }
}
//...
allGhostPage(sort: { order: ASC, fields: published_at }, **filter: {tags: {elemMatch: {slug: {regex: "/^((?!hash-).)*$/"}}}}**) {
    edges {
        node {
            slug
            url
            html
        }
    }
}
Internal pages remain accessible through GraphQL even though they aren’t built as standalone routes. Add a query for the #message-tagged page to your index query:
query GhostIndexQuery($limit: Int!, $skip: Int!) {
    site {
      siteMetadata {
        title
      }
    }
    message: ghostPage
      (tags: {elemMatch: {slug: {eq: "hash-message"}}}) {
        fields {
          html
        }
    }
    allGhostPost(
        sort: { order: DESC, fields: [published_at] },
        limit: $limit,
        skip: $skip
    ) {
      edges {
        node {
          ...GhostPostFields
        }
      }
    }
  }
Then render the page content on your index component:
//...
const BlogIndex = ({ data, location, pageContext }) => {
  const siteTitle = data.site.siteMetadata?.title || `Title`
  const posts = data.allGhostPost.edges
  const message = data.message;
//...
return (
  <Layout location={location} title={siteTitle}>
    <Seo title="All posts" />
    <section
      dangerouslySetInnerHTML={{
        __html: message.fields.html,
      }}
    />
  )
}
Pagination, RSS, and Sitemap
Pagination requires converting the index page from a static Gatsby page into a template. Move index.js from src/pages to src/templates and register the template file:
// Load templates
 const indexTemplate = path.resolve(`./src/templates/index.js`)
Now build the index route with its pagination context. Place this code right after the post page creation block:
// Create Index page with pagination
  paginate({
      createPage,
      items: posts,
      itemsPerPage: postsPerPage,
      component: indexTemplate,
      pathPrefix: ({ pageNumber }) => {
          if (pageNumber === 0) {
            return `/`
          } else {
              return `/page`
            }
      },
  })
Back in the index.js template, import the Pagination component and render it below the post listing:
import Pagination from '../components/pagination'
//...
      </ol>
      <Pagination pageContext={pageContext} />
    </Layout>
//...
Change the internal post links from:
<Link to={post.node.slug} itemProp="url">
to:
<Link to={`/${post.node.slug}/`} itemProp="url">
That swap prevents Gatsby’s Link from applying the pagination prefix, so a post on page 2 isn’t routed as /page/2/my-post/.
For the RSS feed, copy the generate-feed.js script from the Ghost starter into src/utils and reference it from the gatsby-config.js file, replacing the default gatsby-plugin-feed setup:
{
  resolve: `gatsby-plugin-feed`,
  options: {
      query: `
      {
          allGhostSettings {
              edges {
                  node {
                      title
                      description
                  }
              }
          }
      }
    `,
      feeds: [
          generateRSSFeed(config),
      ],
  },
}
Import the script and the site configuration alongside it:
const config = require(`./src/utils/siteConfig`);
const generateRSSFeed = require(`./src/utils/generate-feed`);
//...
Add one required piece to generate-feed.js — a title field after the GraphQL query and output configuration. Without it, the feed plugin fails the build:
#...
output: `/rss.xml`,
title: "Gatsby Starter Blog RSS Feed",
#...
Finally, add a sitemap via gatsby-plugin-advanced-sitemap:
npm install --save gatsby-plugin-advanced-sitemap
Configure the plugin along with its query, which the Ghost starter supplies and which builds separate sitemaps for pages, posts, and tag/author archives:
{
  resolve: `gatsby-plugin-advanced-sitemap`,
  options: {
      query: `
        {
            allGhostPost {
                edges {
                    node {
                        id
                        slug
                        updated_at
                        created_at
                        feature_image
                    }
                }
            }
            allGhostPage {
                edges {
                    node {
                        id
                        slug
                        updated_at
                        created_at
                        feature_image
                    }
                }
            }
            allGhostTag {
                edges {
                    node {
                        id
                        slug
                        feature_image
                    }
                }
            }
            allGhostAuthor {
                edges {
                    node {
                        id
                        slug
                        profile_image
                    }
                }
            }
        }`,
        mapping: {
            allGhostPost: {
                sitemap: `posts`,
            },
            allGhostTag: {
                sitemap: `tags`,
            },
            allGhostAuthor: {
                sitemap: `authors`,
            },
            allGhostPage: {
                sitemap: `pages`,
            },
        },
        exclude: [
            `/dev-404-page`,
            `/404`,
            `/404.html`,
            `/offline-plugin-app-shell-fallback`,
        ],
        createLinkInHead: true,
        addUncaughtPages: true,
    }
}
}
Just as with page creation, those queries need the same internal tag filter applied, swapping the hash- slug override in:
allGhostPage(filter: {tags: {elemMatch: {slug: {regex: "/^((?!hash-).)*$/"}}}}) {
    edges {
        node {
            id
            slug
            updated_at
            created_at
            feature_image
        }
    }
}
allGhostTag(filter: {slug: {regex: "/^((?!hash-).)*$/"}}) {
    edges {
        node {
            id
            slug
            feature_image
        }
    }
}
Going Live
Your Ghost blog now runs fully on Gatsby. Keep Ghost running locally for authoring content, and when it is time to deploy, export the static site and push it to Netlify:
gatsby build
Netlify’s CLI handles the deployment:
netlify deploy -p
Because all editorial content lives in the local Ghost instance, make periodic backups using Ghost’s export feature. This produces a JSON file of all your content — note that images are not included, but those remain safe in cloud storage so they don’t require manual backup.
What this setup delivers overall:
- A Ghost content backend paired with a Gatsby frontend.
- Image handling through a storage converter.
- Automatic conversion of internal Ghost links to Gatsby links.
- Templates covering every Ghost content type.
- Editable content sections powered by internal Ghost pages.
- Full RSS, sitemap, and pagination support.
For more experiments with headless CMS architectures — including a similar stack used for local news and independent publishing — the author has shared a working implementation on GitHub and a live demo.



