
Building the Wheels in Sketch
Now that the body of the Porsche 911 is complete in parts one and two, the final phase is dedicated to the wheels and finishing touches. This part leaves the body behind and focuses on a crucial visual element: the tires and the iconic five-spoke rims. The design here nods to the classic Fuchs wheel, the first lightweight forged alloy wheel used on a production car, which is defined by its unique cloverleaf or wing-shaped spokes.
Crafting the Base Tire
Begin by revealing the wheel base group in the Layers panel. Turn off its Borders and set the Fills to #2A2A2A. Duplicate this shape, change its fill to #000000, press Move Backward so it sits behind the original, and nudge it 20px to the right.
Before building the tread pattern, add guides to lock in alignment. Show the rulers with Ctrl + R, then click on the upper and left rulers to place vertical and horizontal guidelines at the exact center of the base wheel.
Hide the guides and create a tiny rectangle, 2px wide and 8px high, with a #000000 fill and no border. Center it horizontally on the base wheel. Use the Transform tool to skew it—select the top middle point and push it 2px right, then the bottom middle point and push it 2px left. Bring the guides back and put this shape in a group named treads.
The first real time-saver is the Rotate Copies tool. With the rectangle selected inside the group, go to Layer → Path → Rotate Copies, and enter 71. This produces 72 total tread marks. When the circular indicator appears, position it precisely at the intersection of the guides—getting this wrong throws off the entire distribution. Press Esc or Enter when finished. A quick tip: this operation is memory intensive, so turning off Borders on your shapes beforehand helps on older machines.
Shaping the Inner Layers
Moving inward, duplicate the base wheel and bring it above treads in the layer list. Scale it down by 14px, change its fill to #3F3F3F, and enable a 1px inside stroke with color #000000.
Duplicate that circle, remove the fill entirely, and set the border width to 20px. To show only a quarter of this ring at a time, use a dash formula for precision. Type 254*3.14*0.25 into the Dash field to calculate the length for a quarter of the circle’s circumference, and press Enter to copy it into the Gap field automatically. This yields a dashed border with visible segments on the top-left and bottom-right quarters. Rotate it as needed to position those dashes correctly.
Now duplicate that circle, scale it down, and change the border width to 12px. Fill the stroke with an Angular Gradient cycling through #9D9D9D, transparent, #595959, and back. A Gaussian Blur with an Amount of 4 softens this ring, giving it a recessed, machined look. Turn the blur off on a new duplicate and scale it further. This circle receives a linear gradient fill from #000000 to #444444, a 1px outside border, a subtle #FFFFFF inner shadow at 20% alpha, and a hard black drop shadow at 90% alpha to create a pronounced lip.
To give the tire surface some texture, copy the wheel base and move it beneath this latest layer. Instead of a solid color, fill it with a Pattern Fill choosing the bottom right pattern type, and drop its opacity to 10%.
A layered shadow effect adds depth to the center. Start with the current ring duplicated, Blur set to 4, and a #000000 fill. Push it down 3px, and create a second one above it moved 6px in the opposite direction. Make a third copy with the blur removed, pushed down by 3px, and scaled down by 4px. Add a light #FFFFFF shadow at 90% alpha to it for a lit edge.
Next are the decorative bezels. Duplicate that circle, scale down by 2px, and give it a 1px inside border with a controlled linear gradient grayscale. The fill now becomes an Angular Gradient—you’ll need a long list of grays to simulate the machined finish of the rim barrel. Add an inner shadow of #000000 at 50% alpha with a 2 blur and spread to give it an inset appearance.
Another circle duplicates this one but is scaled down by 14px. Set the fill to #434343 and adjust the border position to Outside. This center element needs two heavy black shadows at 90% alpha, and a deep inner shadow with a blur and spread of 24 to create a strong, thick rim. One final scale down by 8px removes the shadows and fills, leaving a simple #414141 stroke as the edge of the hub.
Creating the Wheel Bolt Pattern
With the tire and rim base mostly settled, attention turns to the fasteners. Choose the Oval tool to draw a circle outward from the guide intersection. Remove fills, set a 1px inside border of #575757, and duplicate it of it to create multiple concentric rings with 1px strokes. Stop at nine circles total and group them.
Now produce one “wing” of the Fuchs-style spoke design. Draw a circle centered on the guides, then place a vertical rectangle over it. Double-click to enter editing mode and move the top two points outward; set their Radius to 20 to round the outer corners. Group it with the circle and use Rotate Copies again, this time entering 4 to get five wings. Align the rotate markers to the guide intersection, exit the operation, and the cloverleaf is in place.
Run a Subtract on the whole group to carve the spokes from the circle. Fill the result black, and add an inner shadow of #FFFFF at 50% alpha and a tight drop shadow for crisp definition.
The Bolt Head Symbol
Zoom in on a blank section of canvas. Draw the base circle of a bolt head, fill it #4F4F4F, add a 1px light outside border, and a second 1px black center border for a beveled look. For the inner hex, make a square, turn of borders, and enter vector editing mode. Use Shift-click to add points at the midpoint of the left and right sides, then move those points left and right 2px respectively, shearing the square into a hexagon.
Fill this with a subtle top-to-bottom linear gradient using #AEAEAE and #727272, and add a slim black shadow. A layer on top pulls off the classic allen-head look: duplicate the hexagon, then enter editing mode and bring each side in by 1px—top down, bottom up, left left won’t render properly---meaning move right points left, left points right. Clear the extra shadows and lighten the overall gradient. An inner shadow finishes the bevel.
Grouping the two hexagons and circle into a bolt head group, right-click and select Create Symbol. Duplicate it and manually distribute instances around the hub by dragging the crosshair marker to the guides and rotating by 72 degrees for each of the five bolts. For the best realism, set each instance to a random, distinct rotation angle once placed in position.
The Center Hub and Logo
Fill the bolt circle with a domed look. Draw a disk with a bottom-to-top linear gradient (#D8D8D8 to #848484). Use a trio of effects—first a bright inner shadow, then a darker one, followed by a soft drop—to make it look raised and polished.
The final chrome ring sits on top—a smaller copy scaled, a single border of #B5B5B5 placed on the outside, and a second dark one centered for contrast. For this tutorial, reproduce a precise vector version of the Porsche crest using the steps above—or bring in the porsche-line-logo-f.svg seen in the main illustration. Scale the logo uniformly using the Scale tool (enter 20px for the height) if needed, and center it horizontally over the disk.
Completing All Four Wheels
At this point we have one full front wheel. The fastest way to fill out the car is to spend a little extra time setting up a nested symbol so future edits affect both front and rear immediately.
First, use the Vector tool to draw an arched shape over the left side of the wheel, set it to black, and give it a Gaussian Blur with an Amount of 10. This recreated the car body’s natural shadow falling on the wheel well. Select the entire wheel, base layer, and this new shadow, and group them, calling it wheel. Create a symbol out of it and then immediately create another symbol from the front wheel group, making the first symbol a nested component.
Next, open the Symbols page in Sketch, duplicate the front wheel symbol, nudge its contents appropriately (move the wheel itself 20px right and the base copy 20px left to change the fit), and rename that new component rear wheel. Back on the canvas, replace one of the duplicated front wheels with the rear wheel instance from the Inspector. Any adjustments made later inside the wheel symbol will now sync to both the front and rear wheels automatically—exactly the benefit nested symbols exist for.
Final Composition and Ground Shadow
Zoom out. All four wheels are now in alignment. Use the Oval tool to draw several flat dark ellipses beneath the wheels at #000000 with varying opacities (around 50% to 80%). Adjust each so they fit naturally under the tires. Apply a Gaussian Blur with an Amount of 5 to soften all three shadow shapes, then group them into a single shadows container and push that group to the very bottom of the layer list.
The sides, wheels, and shadows together now complete the illustration. With the procedural shortcut of symbols in place, the project also scales well beyond this single car—another vehicle in perspective only requires separate overlays. The final detail comes down to placing fresh copies and having the workflow handle the rest.
Badging the Bodywork
With the major body panels complete, the next step is adding the sponsor decals and racing liveries that turn a road car into a race car. These badges sit inside the bodywork group in the Layers panel, above the door layer.
Start with the Porsche Wortmarke, available as an SVG from Wikimedia Commons. Import it, scale it up, and position it on the rear quarter panel. Create simple rectangles set to a fill of #0F0F13 with no borders to frame it. Select all of these elements and group them as porsche sticker, then drag the group into bodywork.
Next are the classic racing sponsors. For each, download the SVG, clean it up in Sketch if needed, and place it into the design:
- Shell: Remove the white rectangle at the bottom of the logo group. Position the cleaned logo above the
porsche stickerin the layer list. - Dunlop: Delete the yellow rectangle from the source. Scale it down and place it near the tail light, above the Shell sticker.
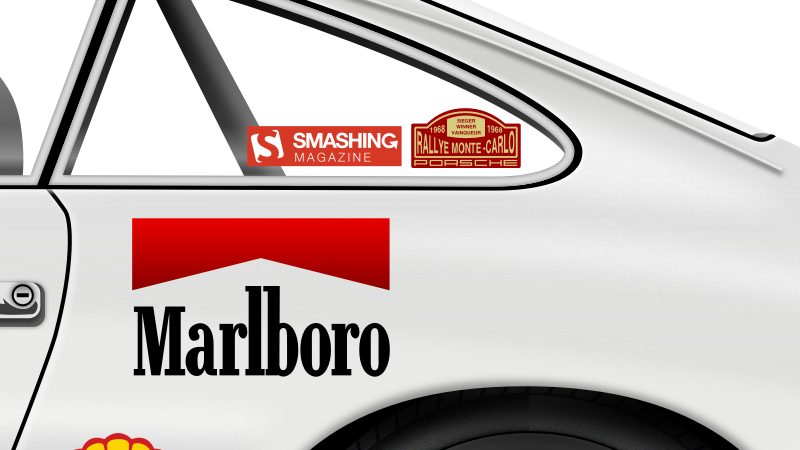
- Marlboro: Squeeze the red shape with the resize handles, adjust the letter placement, and change the red shape's fill to a linear gradient with these color stops:
#E60202,#BB0101,#860000. Keep this logo above the Dunlop sticker.
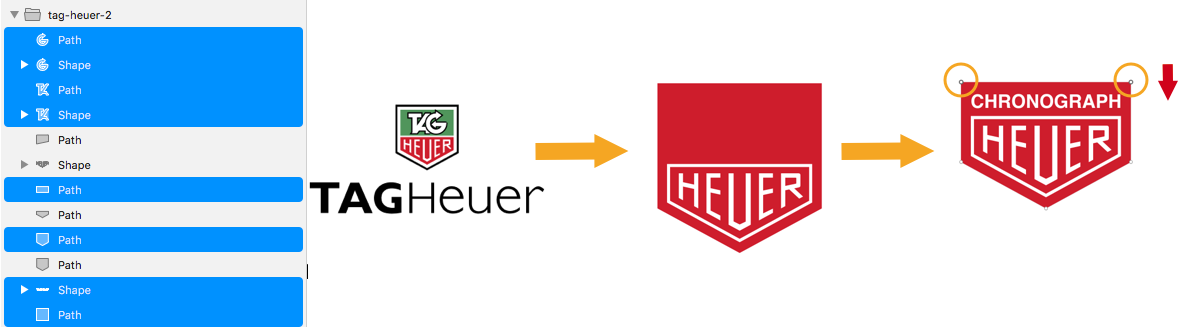
The Tag Heuer logo requires more surgery. Delete everything except the black-bordered rectangle, the inner red rectangle, and the word "Heuer". Remove the border from the outer rectangle and set its fill to #CC2132. Give the inner red rectangle a white border set to 12px and positioned Outside. Use the Type tool (T) to add the word Chronograph in Helvetica Bold at 72px, or Arial Bold as a fallback. Right-click and Convert to Outlines to vectorize the text. In vector editing mode, select the top two points of the larger red rectangle and push them down slightly to give the badge a subtle taper. Group everything as heuer chronograph logo and add it to the body above the Marlboro sticker.
The Crest and the Rallye Sticker
The Porsche crest needs simplification before it can be used at this scale. Open the SVG, delete the amw-link and d-link groups, and then remove the "Porsche" wordmark from the top shape. For the second compound crest shape, drag its four component paths outside the compound, and change their color to #B12B28. In the first compound crest shape, delete the paths that spell "Porsche".
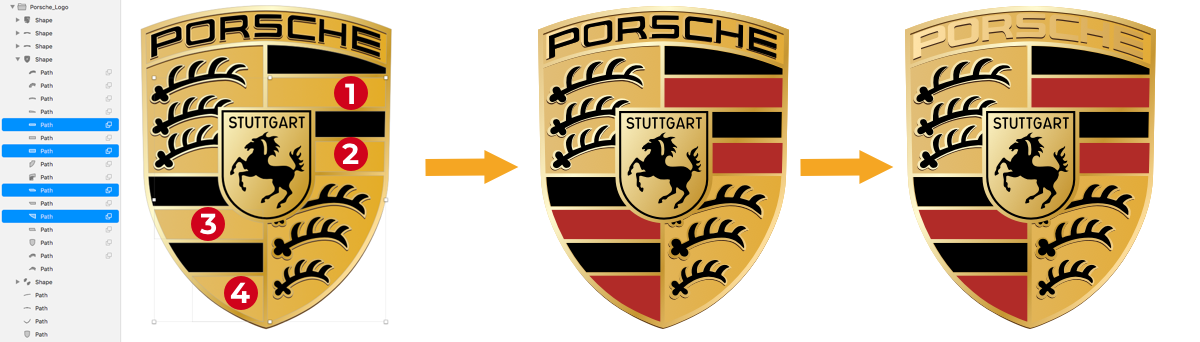
Place this modified crest on the front fender. To make it pop, select the last path inside the Porsche logo group and apply a Shadows effect with a #000000 color at 50% Alpha and a Blur of 2.
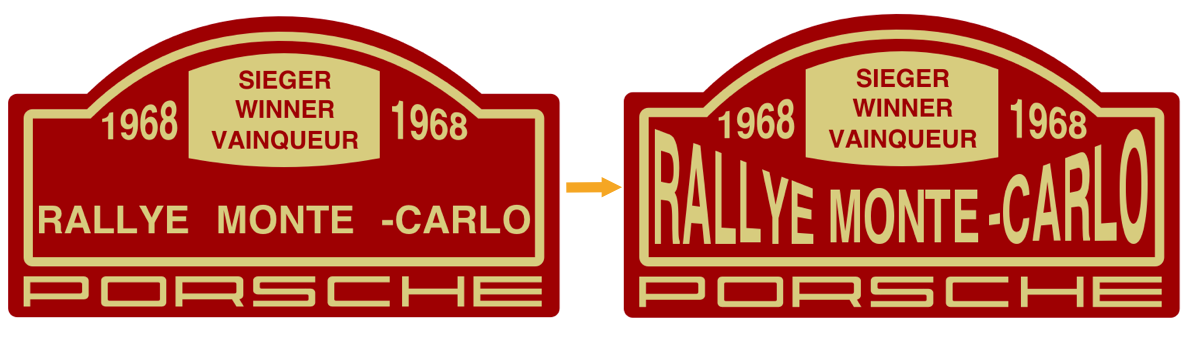
For the Rallye Monte-Carlo sticker on the side windshield, draw a rounded rectangle and reshape it with vector points. Set its fill to #9C010E and remove borders. Create a black duplicate to work with, and use the vector points to shrink it symmetrically. Then, remove its fill and give it an Inside border of 6px in #D7CB82. Convert this border to a shape via Layer → Convert to Outlines.
Build a gold #D7CB82 rectangle without borders and pull its top and bottom center points outward. Add text for "SIEGER, WINNER, VAINQUEUR, 1968" and the Porsche Wortmarke, in Helvetica Bold or Arial Bold. Convert text to outlines and use the Transform tool to skew the "1968" shapes at each end of the banner by moving the relevant side points. Add the words "RALLYE", "MONTE", and "-CARLO" as separate text pieces in the same gold color, convert to outlines, then use Transform to elongate and skew them into a coherent badge. Group all of these parts as rallye monte-carlo and place it inside the windshields group on top.
Finish the windshield decals with a Smashing Magazine logo. Add a red (#D33A2C) rectangle below the logo and group them as a Smashing Magazine sticker before placing it beside the Rallye sticker.
Final Numbers and Assembly
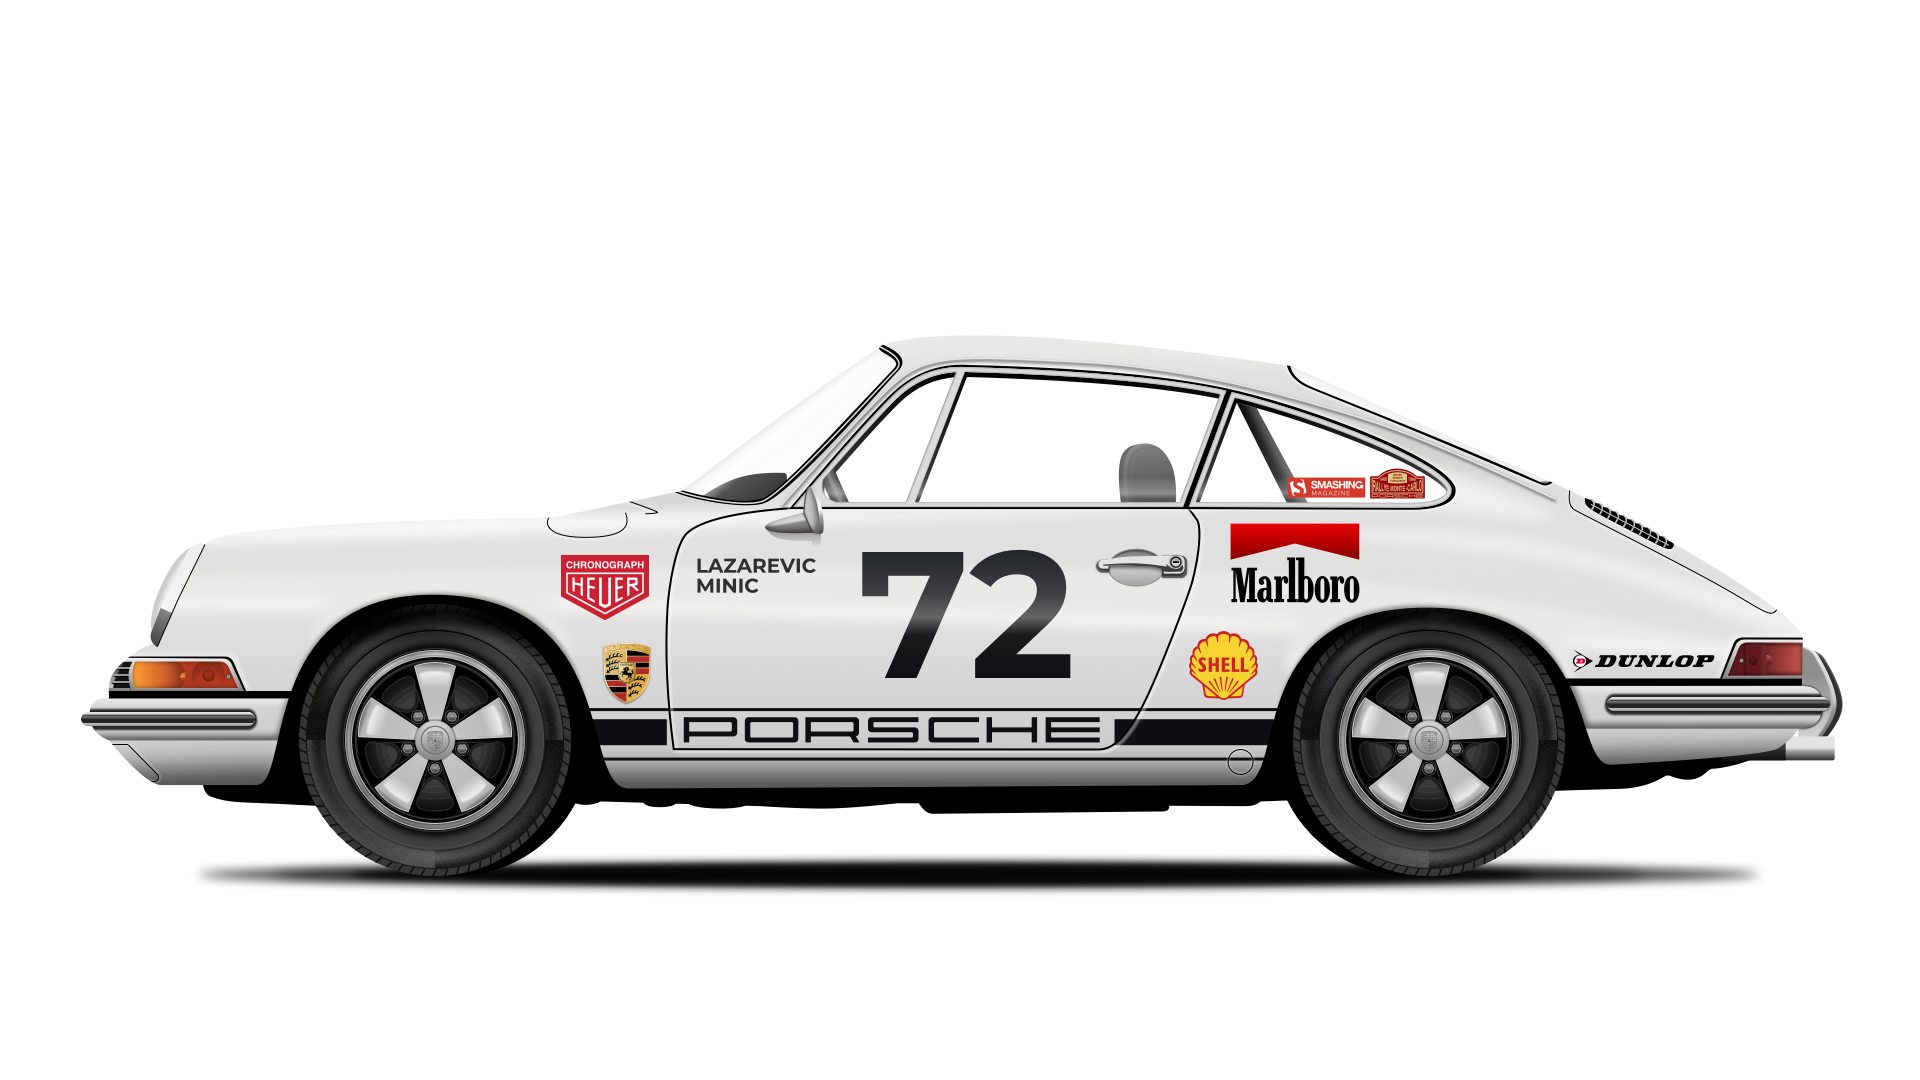
No racing car is complete without a competition number and driver names. Install Montserrat Bold and type out the racing number at 180px in black. Convert it to outlines, then apply a linear gradient with the stops #22222B, #3E3E42, #656566, #1B1B1E, and #0F0F13. Add driver last names beneath the number using the same font at 20px, with a color of #2F2F2F.
Move the names and number into the bodywork group, just above the door layer.
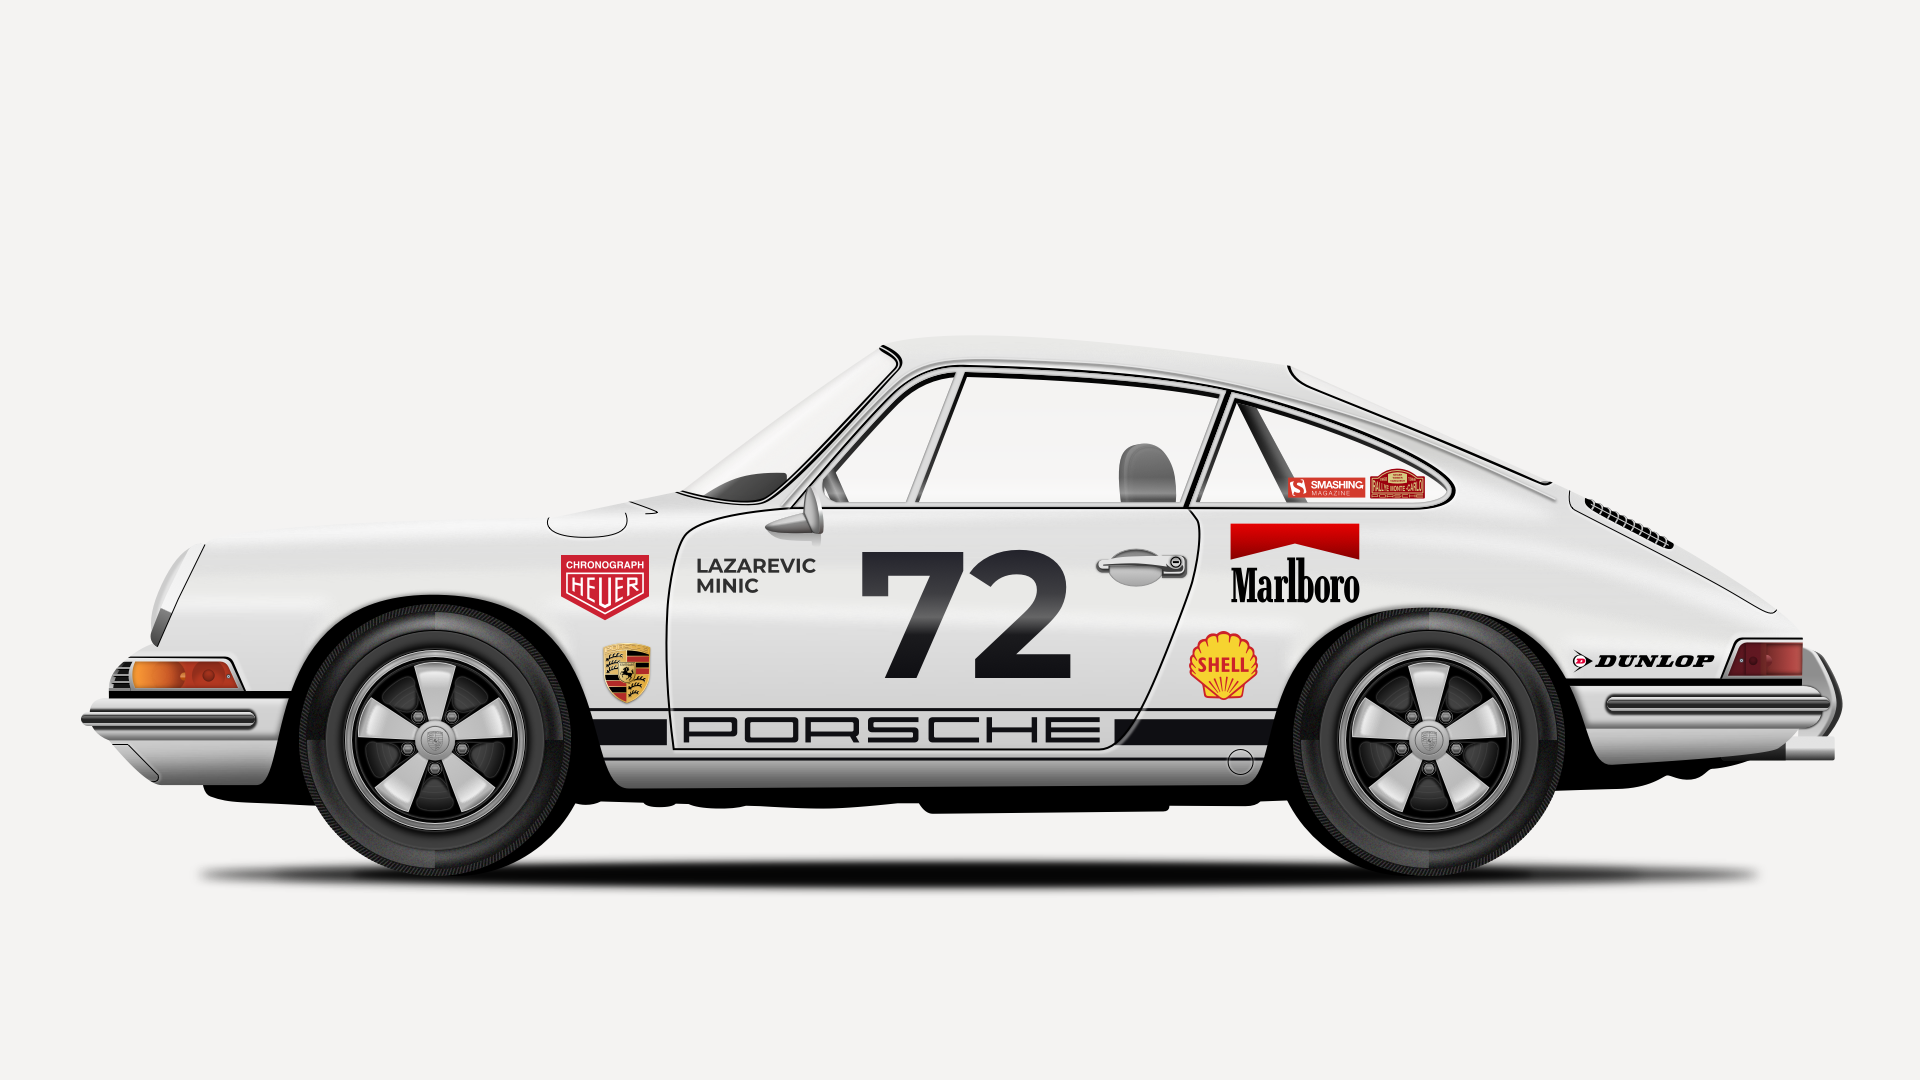
With the decals in place, the car is complete. Select all elements and group them as Porsche 911. Finally, create a rectangle matching the artboard size, fill it with #F4F3F2, and push it below the car group in the layer stack to serve as the background.
Wrapping Up the Vector Build
The completed Porsche 911 tutorial demonstrates how a combination of patience and Sketch's core vector tools can reproduce a complex, detailed subject entirely in vector form. While the process is demanding, the workflow remains consistent: gather reference material, break the subject into manageable shapes, and build each component methodically.
The techniques covered here extend beyond this single project. The way you layer shapes, manage groups, and name every element is what keeps a large illustration navigable and editable. Getting into the habit of naming layers and stacking them logically pays off as file complexity grows, making it much easier to revisit and adjust specific parts later.
When you move on to your own projects, pick a subject you are genuinely interested in and source multiple reference photos from different angles. A clear view of each detail from various perspectives helps you understand how the parts fit together, which is crucial for creating an accurate representation.
Mastering Sketch's Core Features
A few of Sketch's features do most of the heavy lifting in this type of work:
- Vector editing, specifically mastering Bézier curves, for creating the smooth, flowing body panels and glass surfaces.
- Copying and pasting styles to maintain consistency across similar parts, like trim or lighting components.
- Symbols and nested symbols, which are instrumental for repeating elements such as wheels, badges, and grilles, ensuring uniformity and allowing for swift global edits.
- The Rotate Copies tool, which simplifies creating radial patterns often found in hubcaps or dashboard instruments.
Fills and shape styling have been covered in detail, and they are where the car starts to gain depth and realism. Combined with the proper ordering of layers, these features let you build up a convincing rendering from basic geometric foundations rather than requiring a single, impossibly complex path.
Taking It Further
With the complete process demonstrated, the next step is to apply these same principles to your own subjects. The successful completion of this detailed model shows that with careful observation and the right approach, Sketch can handle illustration work that goes well beyond simple UI layouts.
If you run into questions while building your own projects, the Sketch documentation on vector editing, shapes, fills and symbols is a solid reference. The broader design community has also produced numerous tutorials on mastering curves and getting pixel-perfect results in Sketch. One particularly useful suggestion from the design community is to ensure that your initial photo reference set is comprehensive—it makes the entire process of replicating details far smoother.


