

Refining the Greenhouse Area
With the tail lights complete, the next stage focuses on the window surrounds. We will add the rubber seals that frame the glass and then build out the door handle assembly.
Window Seals
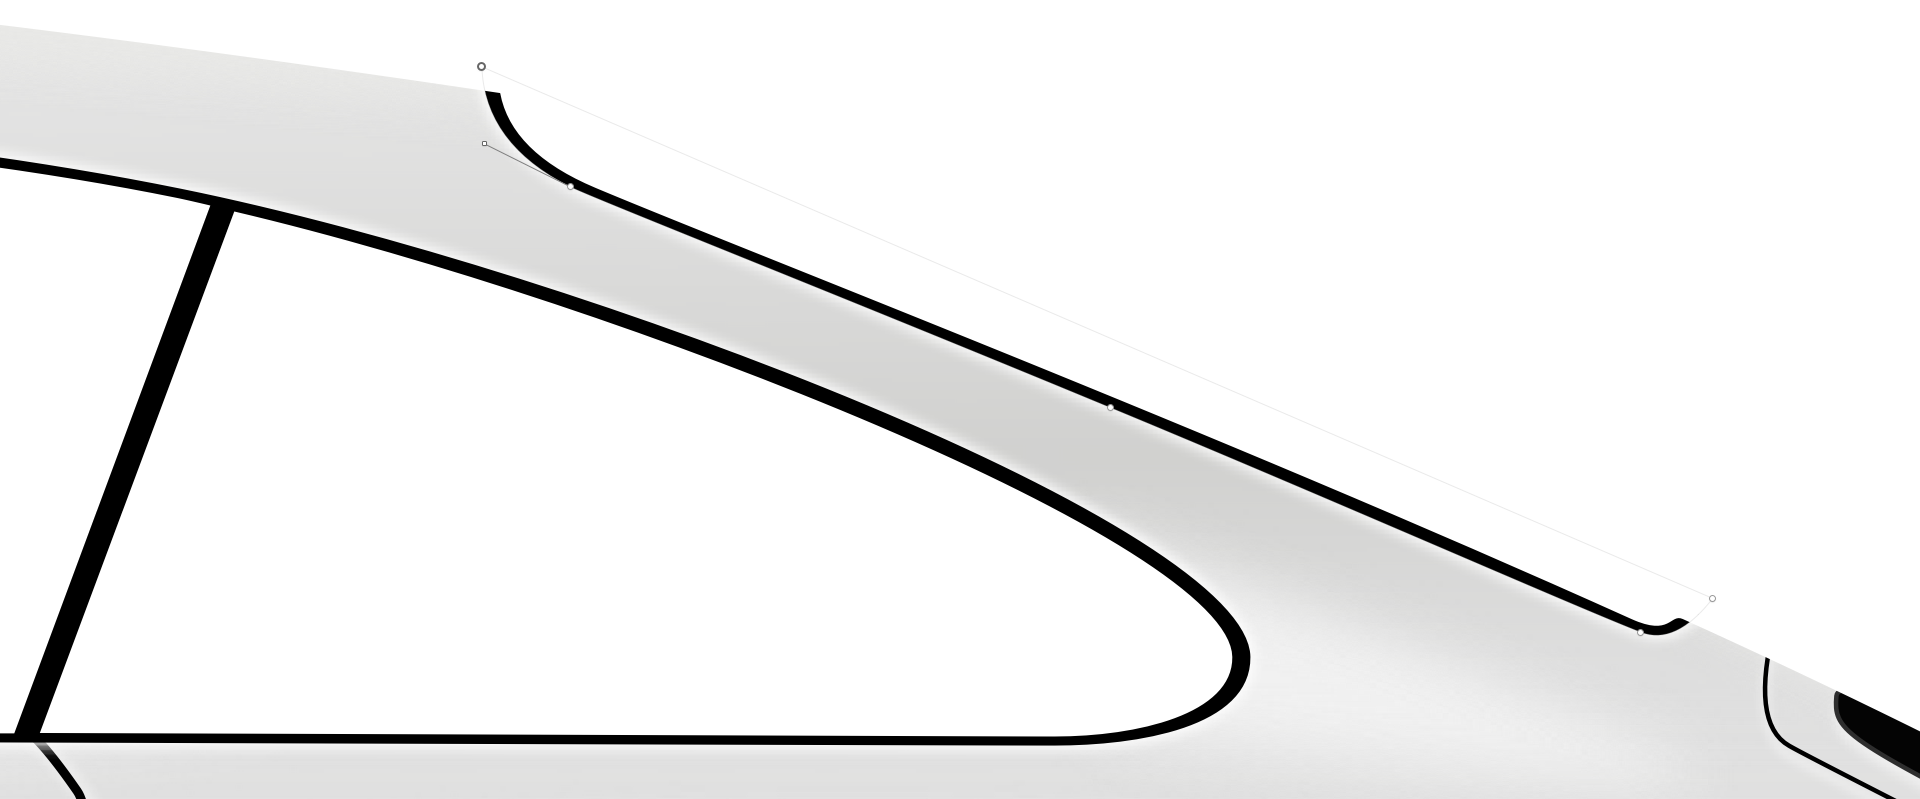
We are still working inside the bodywork group. To create the seal for the side window, use the Vector tool (V) to draw a shape that follows the window's outline.
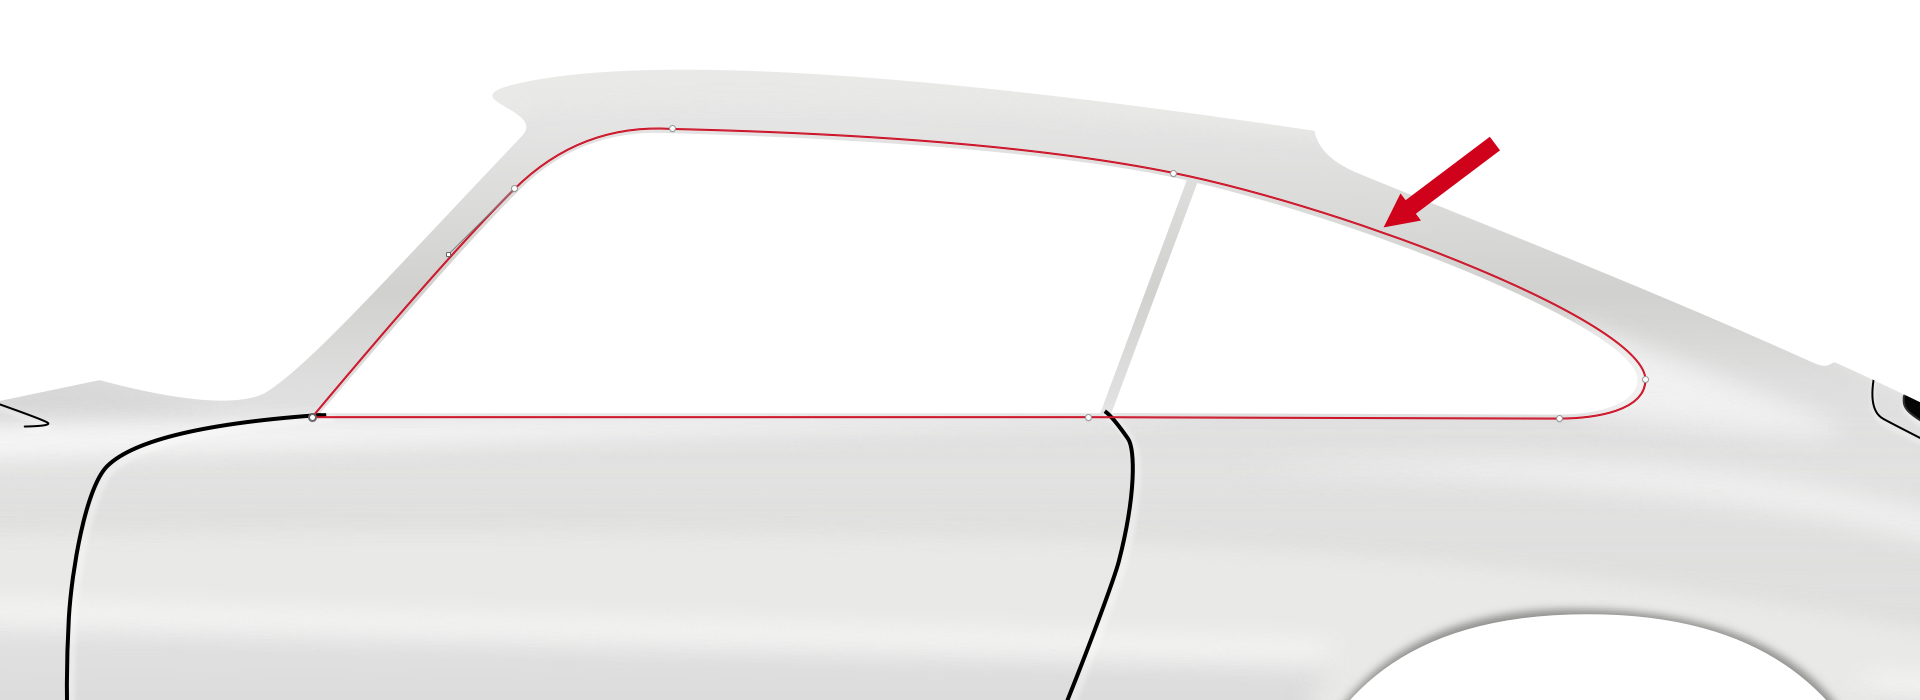
For this shape, turn off Borders and set Fills to #000000. To give the rubber some definition, add a Shadows effect with these settings:
- Color:
#FFFFFF - Alpha:
90% - X:
0; Y:0; Blur:3; Spread:1
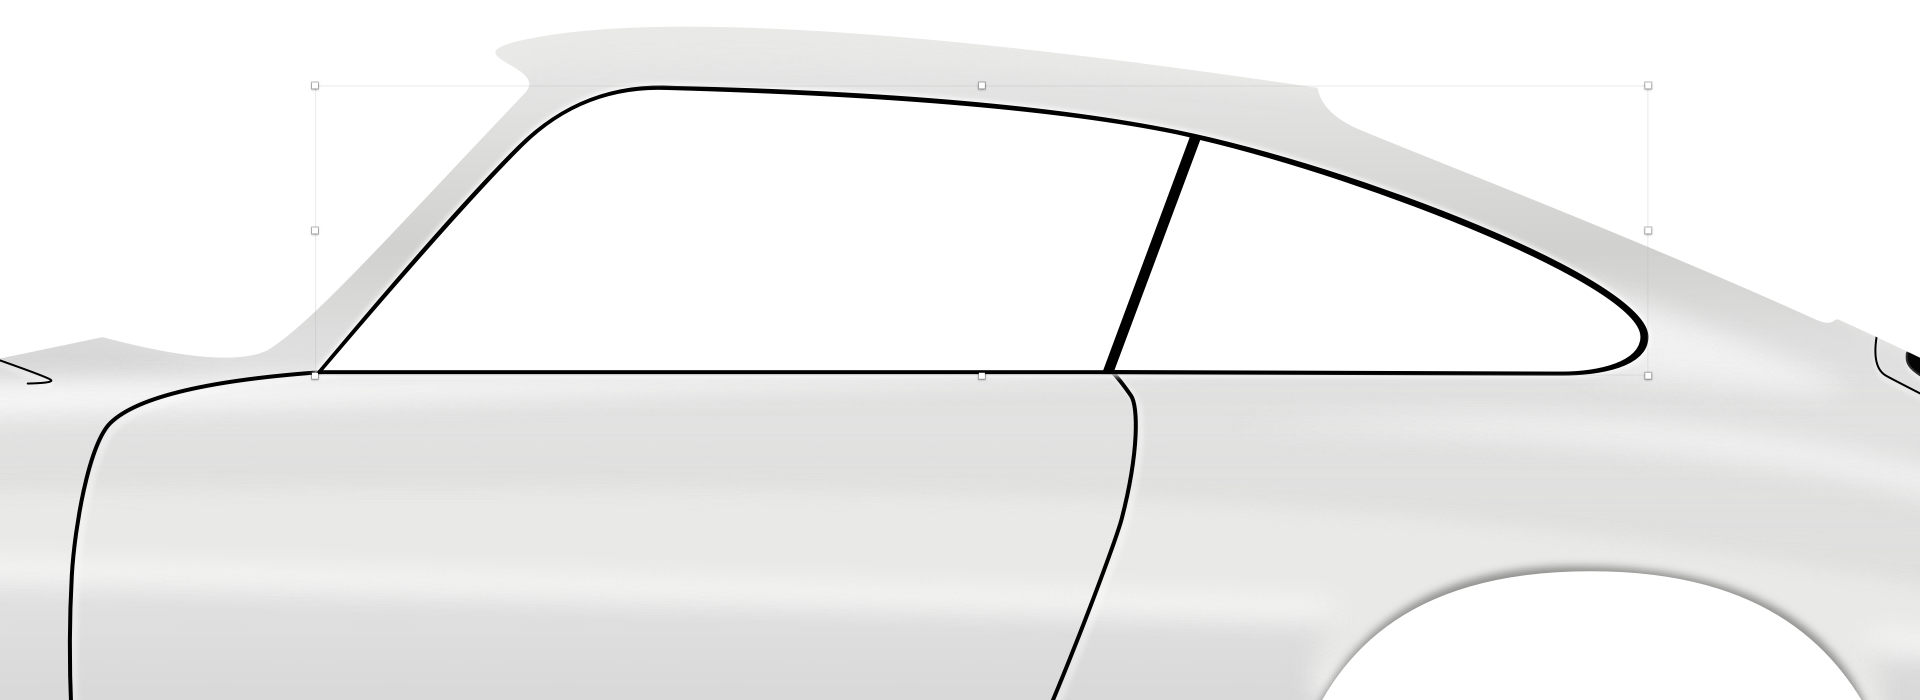
Repeat this process for the front windshield, drawing a black seal shape with the same shadow parameters applied.
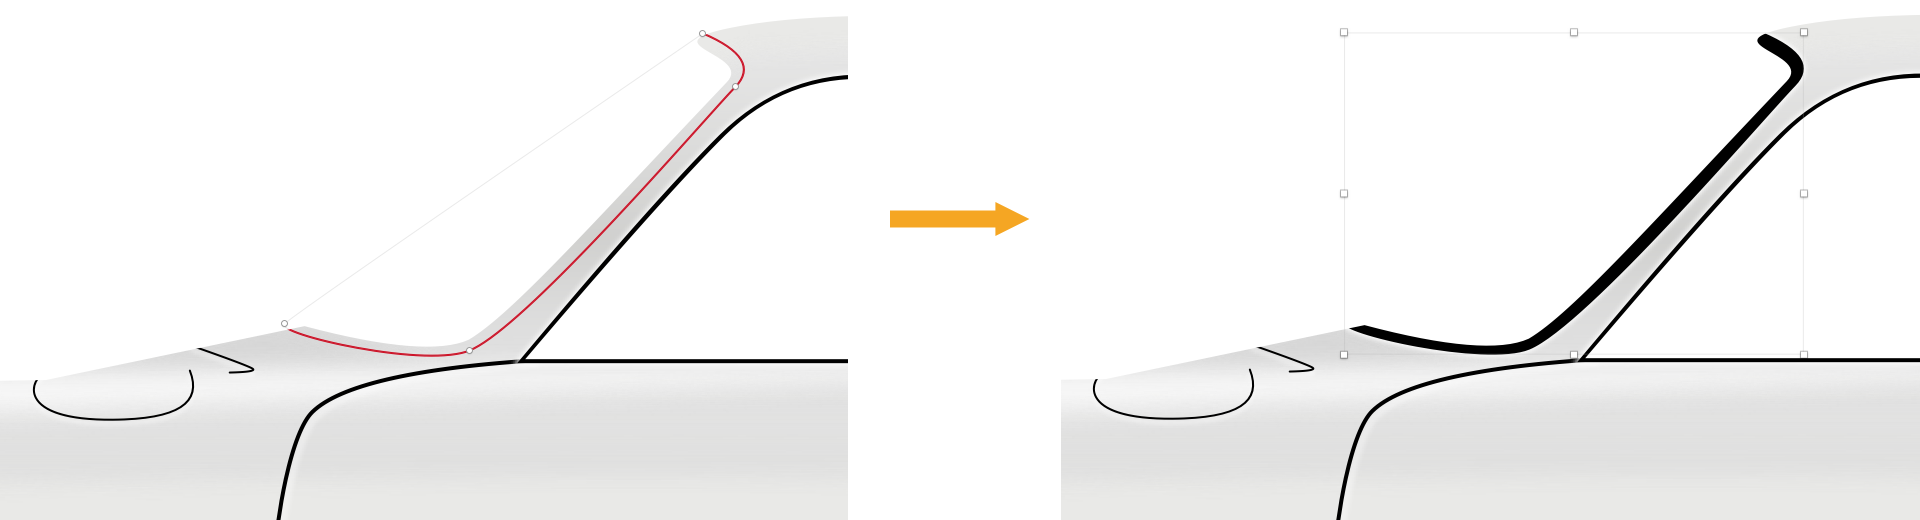
A finer trim is now needed on top of the windshield seal. Duplicate the seal shape, then turn off Fills and the existing Shadows effect. Instead, enable Borders with a Color of #E0E0E0, set the position to Inside, and the Width to 1.5px. Enter vector editing mode by double-clicking the shape and adjust the points until the trim aligns neatly with the seal. This step requires patience to get the curves right.
A note on precision: while it is generally best to avoid half-pixels in Sketch, a 1.5px border width proved to be the most visually accurate option for this specific trim piece.
Also, remember to change point types (straight, mirrored, disconnected) as needed when reshaping the vector points.
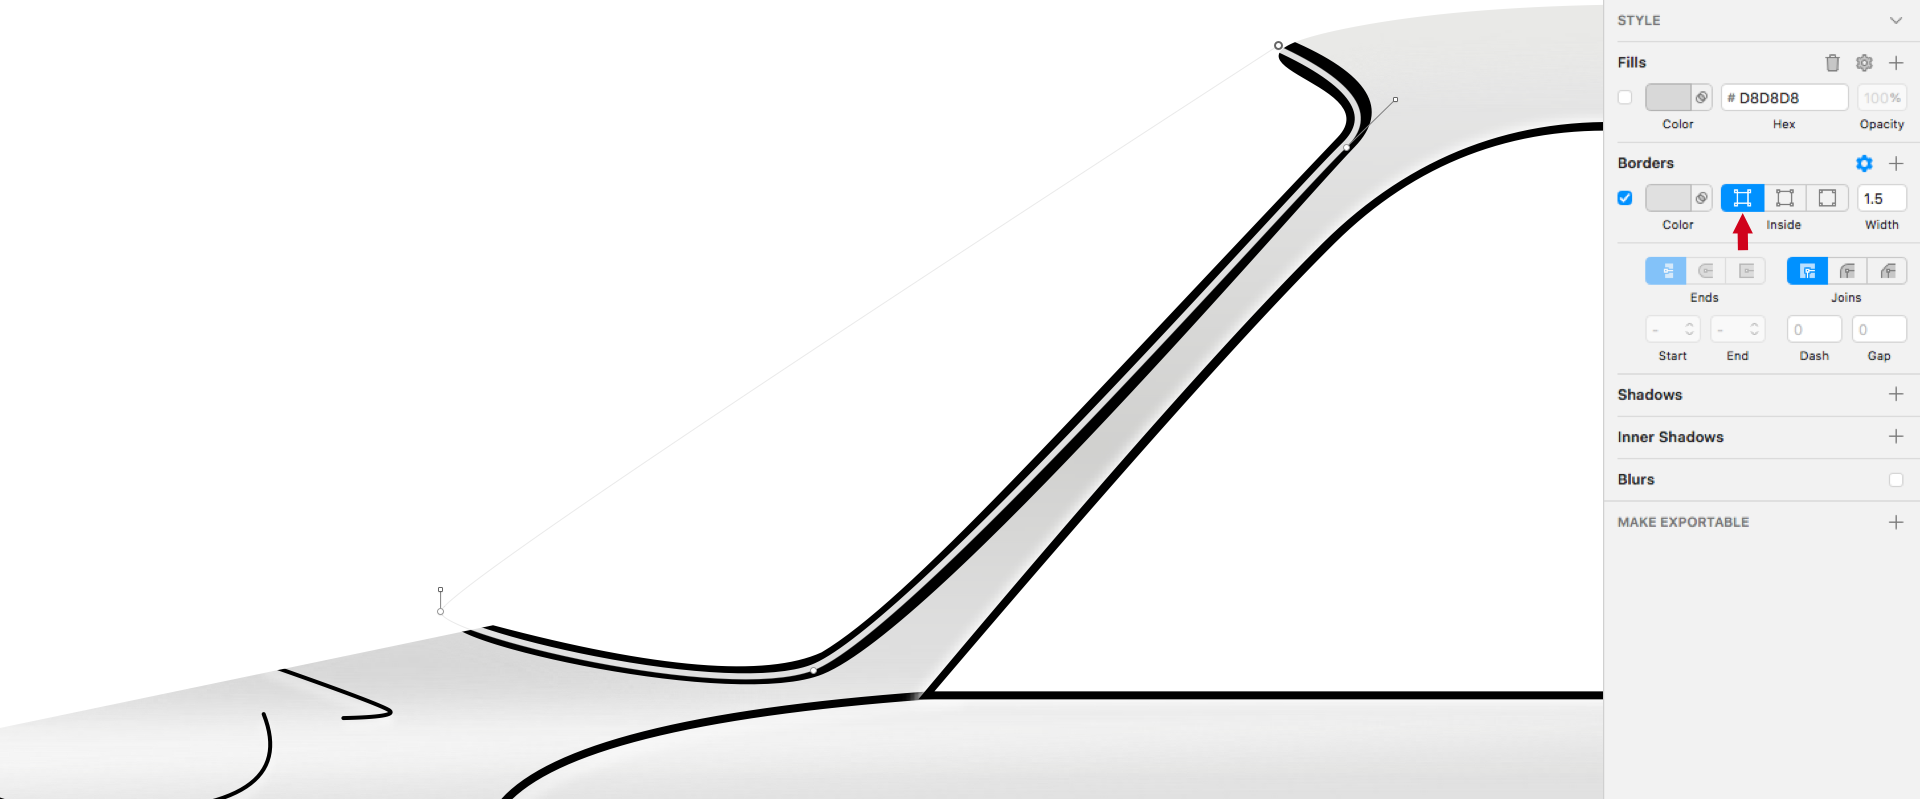
Finally, create a seal for the rear windshield. Draw a shape around its perimeter, turn off Borders, set Fills to #000000, and apply the same Shadows effect used for the other seals.
Door Handle Construction
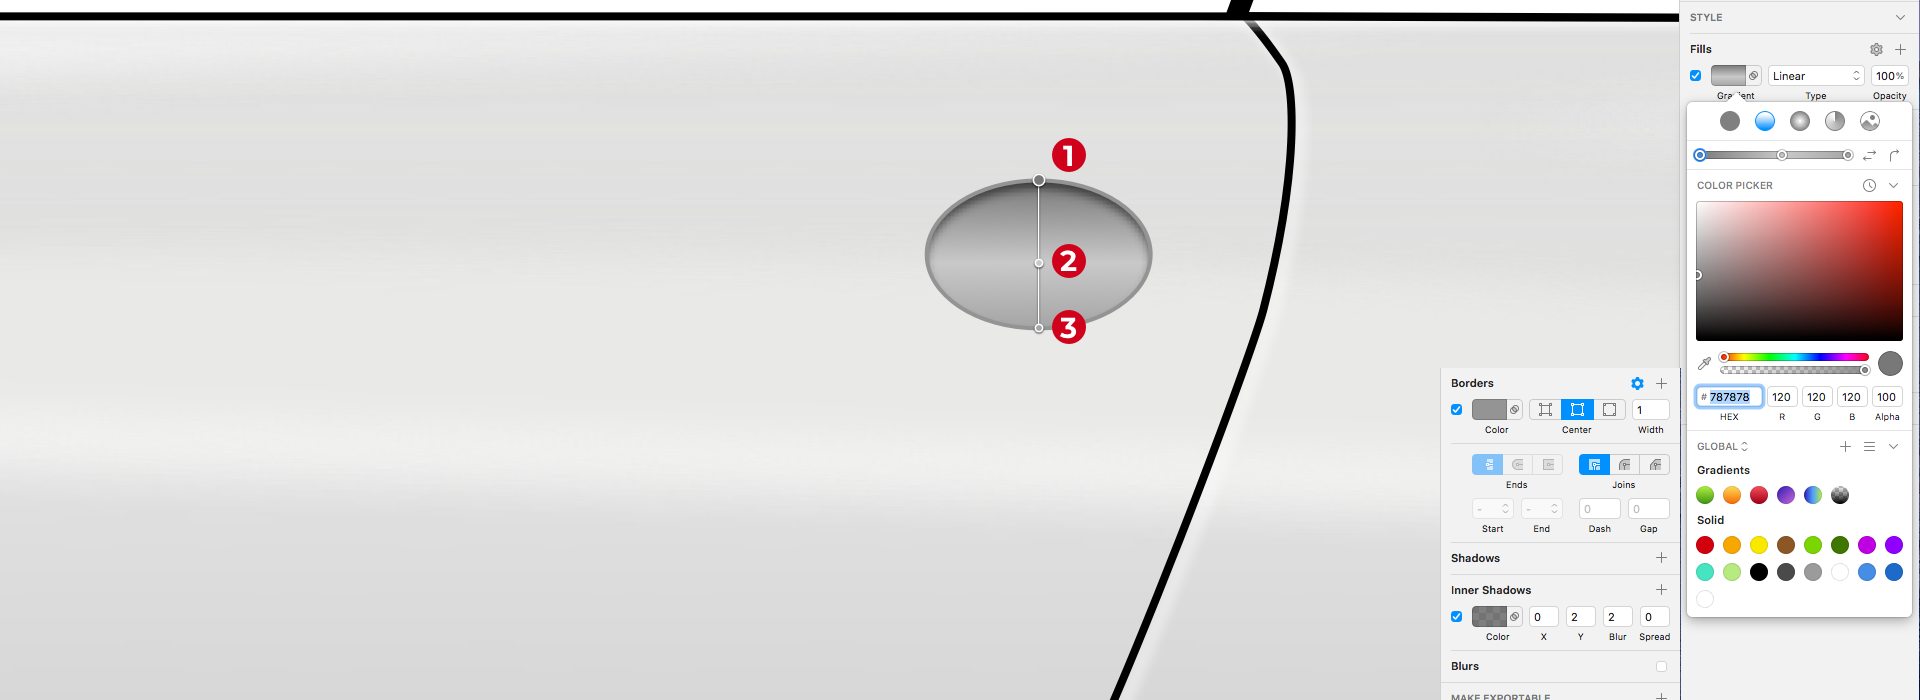
The door handle is built from several distinct parts. First, use the Oval tool (O) for the handle's recessed base. Configure the Border with a Color of #949494, position Center, and Width of 1px. Apply a Linear Gradient for the Fills with these color stops:
#787878#C9C9C9#A5A5A5
Add an Inner Shadows effect to the oval for depth:
- Color:
#000000 - Alpha:
50% - X:
0; Y:2; Blur:2; Spread:0
Next, use the Rectangle tool (R) to create two small shapes on the left and right sides of the ellipse, representing the handle's mounting points. Use the Radius property in the Inspector to round the outer corners. Set their Fills to #333333 and turn off Borders.
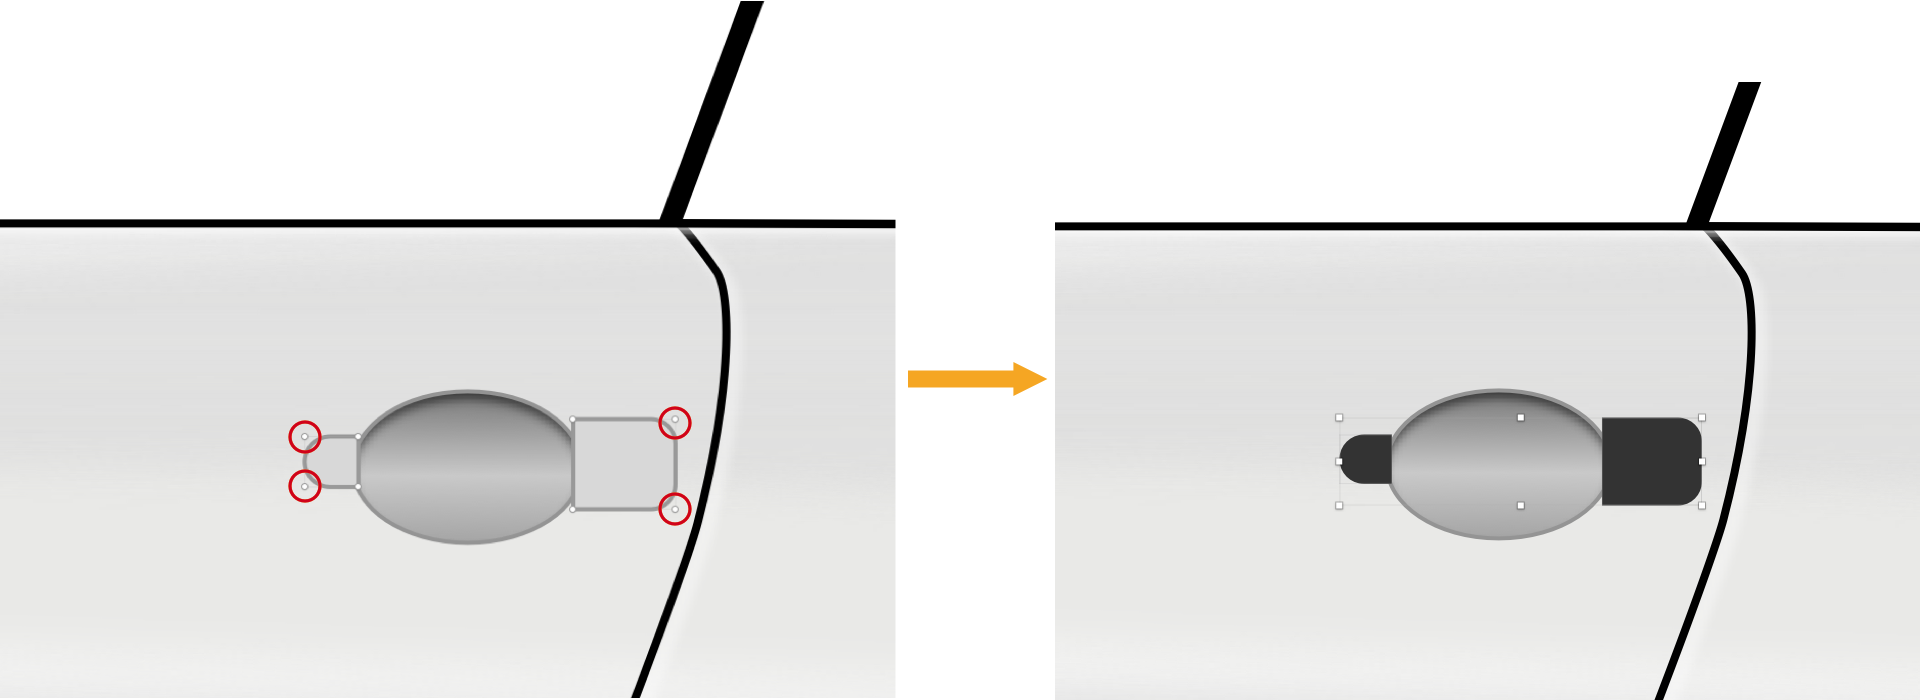
These side pieces need subtle lighting to look slightly raised. For the left rectangle, add an Inner Shadows effect with these properties:
- Color:
#FFFFFF - Alpha:
20% - X:
2; Y:-2; Blur:1; Spread:0
Then, add a drop Shadows effect:
- Color:
#000000 - Alpha:
50% - X:
0; Y:0; Blur:2; Spread:0
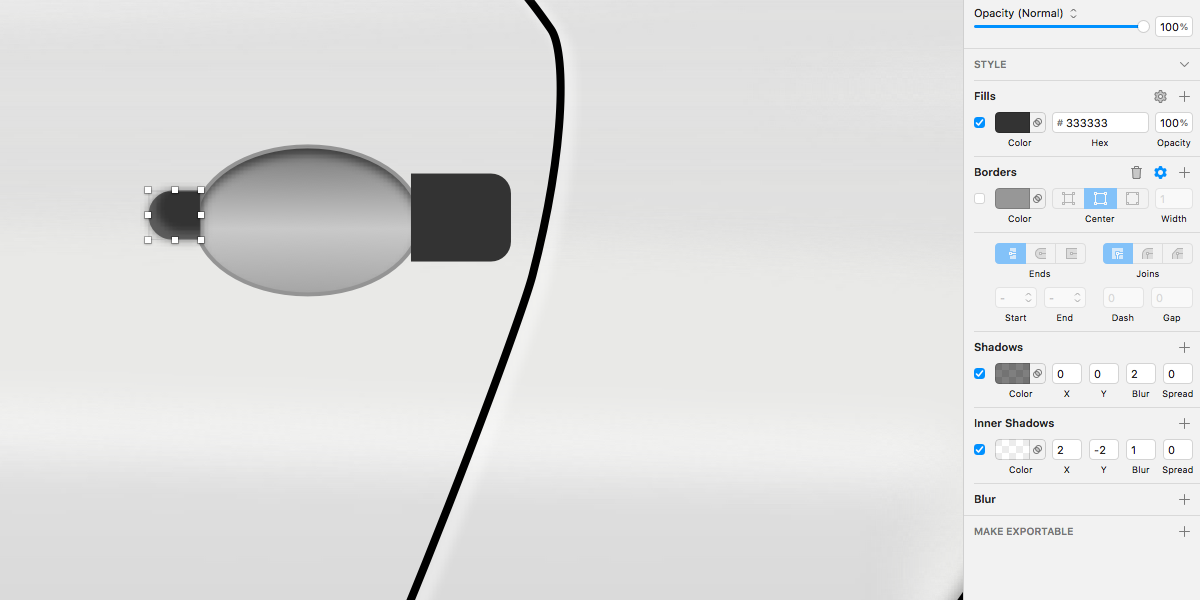
Repeat this process for the right rectangle, but reverse the inner shadow's X axis.
- Color:
#FFFFFF - Alpha:
20% - X:
-2; Y:-2; Blur:1; Spread:0
And the same drop Shadows effect:
- Color:
#000000 - Alpha:
50% - X:
0; Y:0; Blur:2; Spread:0
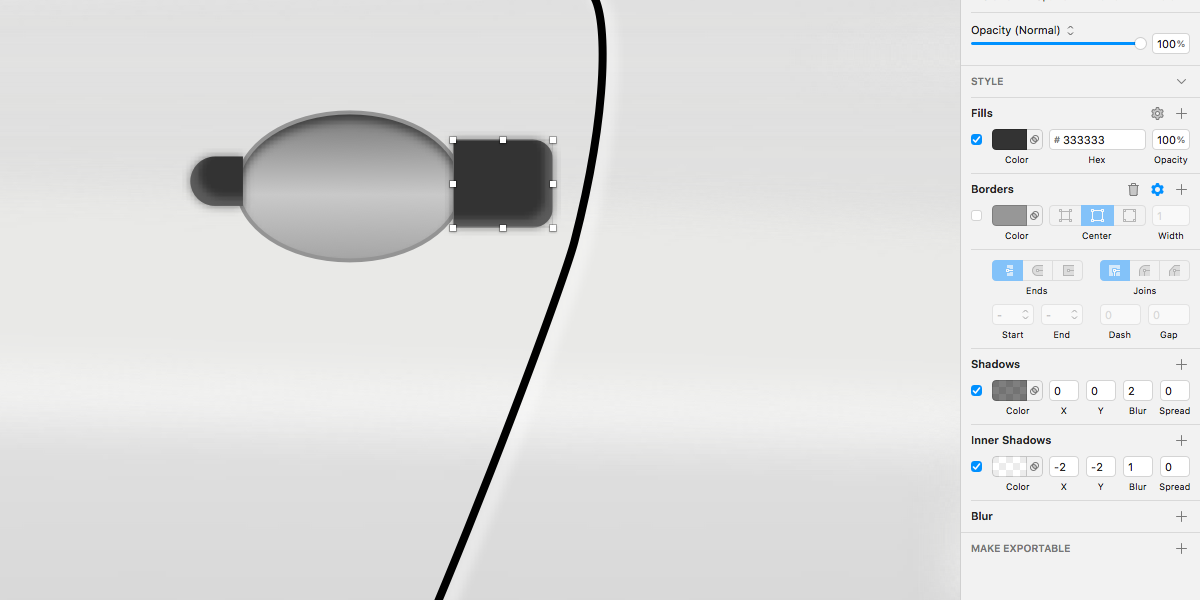
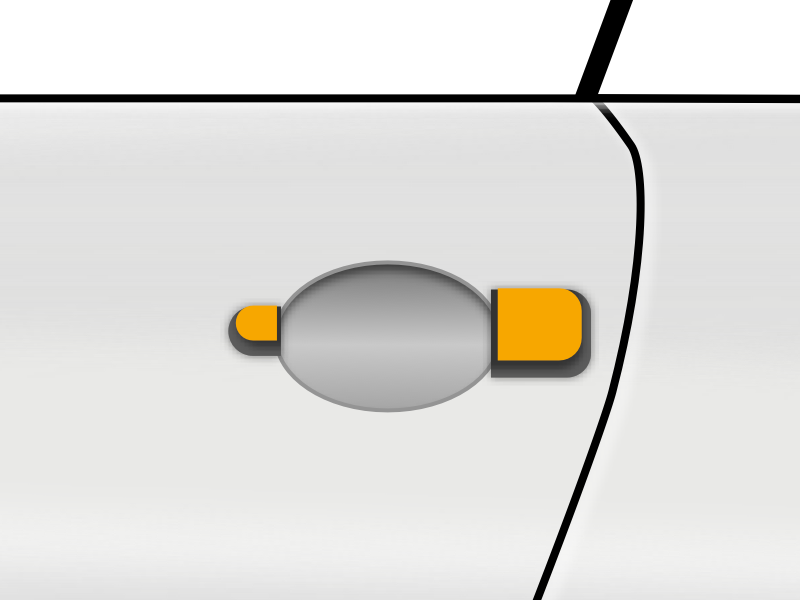
Moving to the handle body itself, which is assembled from three shapes. Create two rounded rectangles with the Rectangle tool (R), adjusting their Radius settings accordingly.
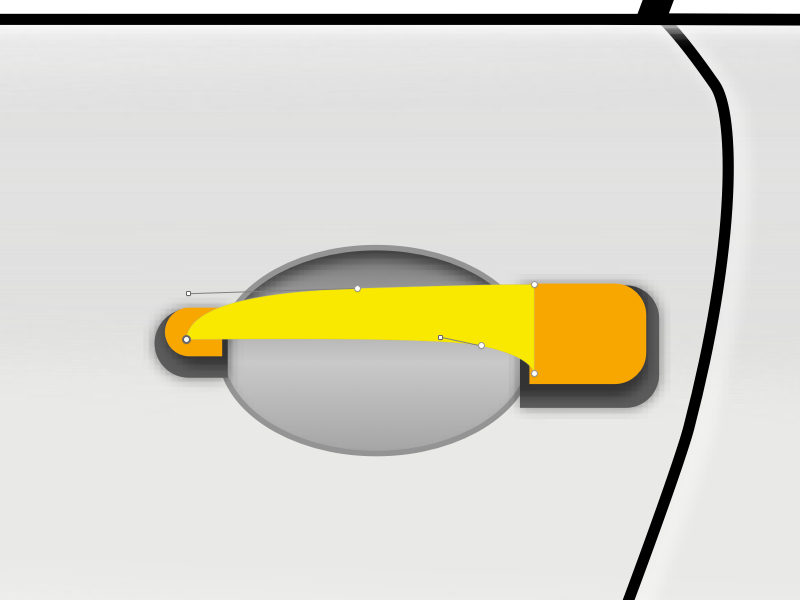
Draw a connecting shape between the two rectangles using the Vector tool (V).
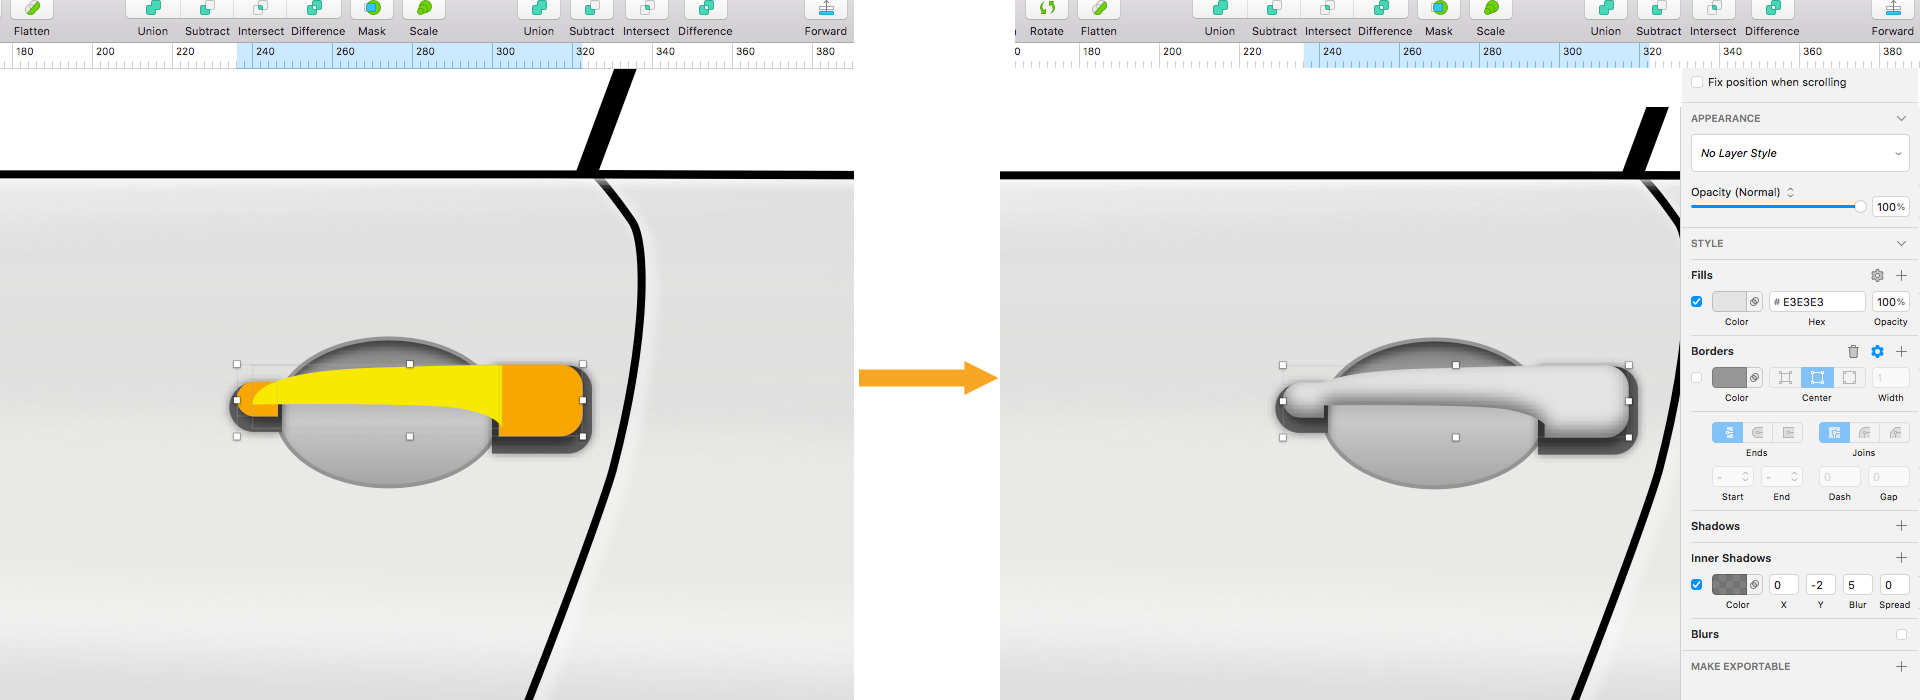
With all three parts selected, perform a Union operation from the Sketch toolbar to merge them into a single object. Name this layer handleshape. Change its Color to #E3E3E3 and add an Inner Shadows effect:
- Color:
#000000 - Alpha:
50% - X:
0; Y:-2; Blur:5; Spread:0
To add a subtle shadow under the handle, zoom in and draw a custom shape with the Vector tool. It's fine if the shape covers the bottom area of the handle; we will constrain it with a mask. For this shadow shape, turn off Borders and set Fills to #3D3D3D.
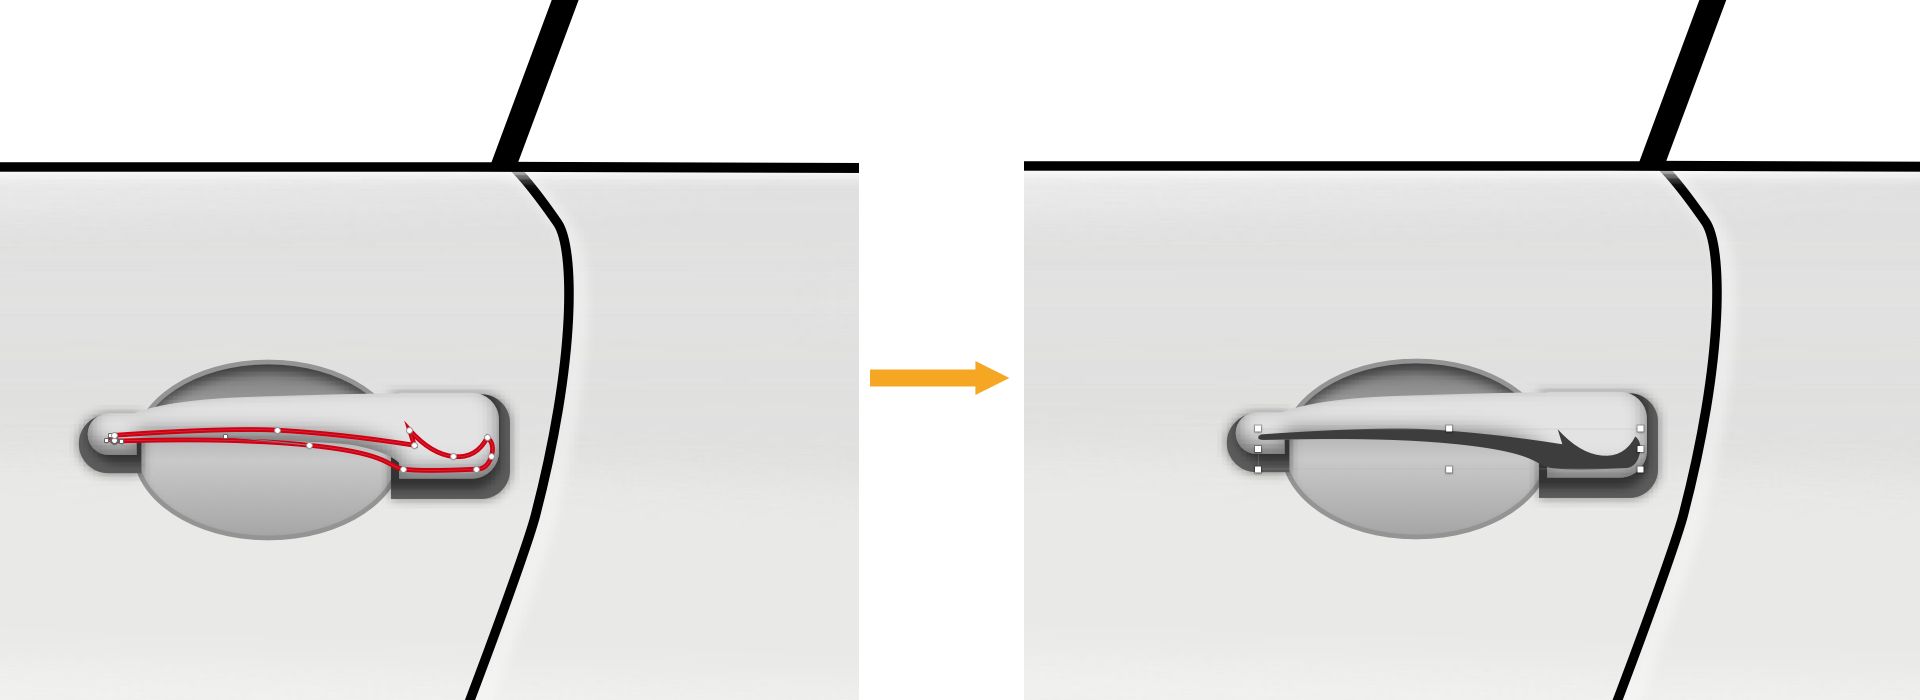
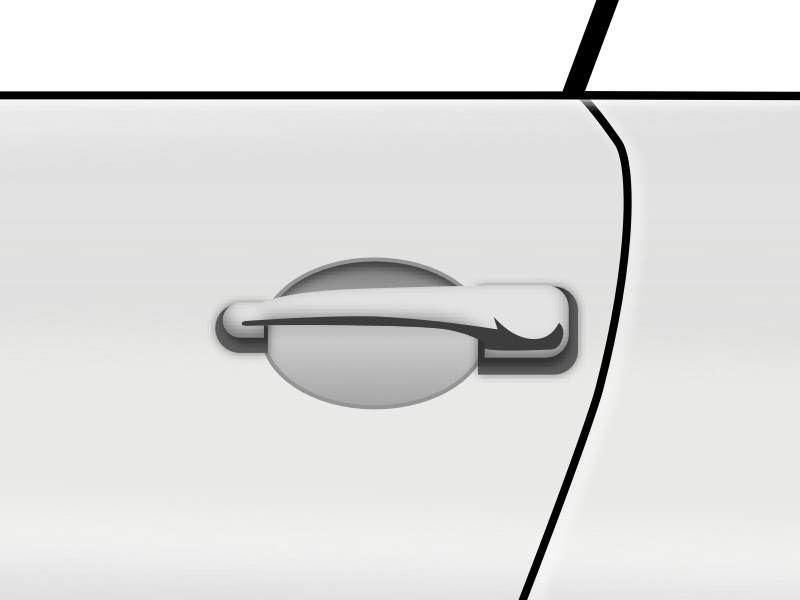
Fit the shadow within the handle by selecting both the handleshape and the new shadow, then clicking Mask in the top toolbar. Sketch will automatically place this in a new group. Rename this group to handle.
Double-check that the Masking operation did not disable the Inner Shadows for the handle; if it did, simply re-enable them.
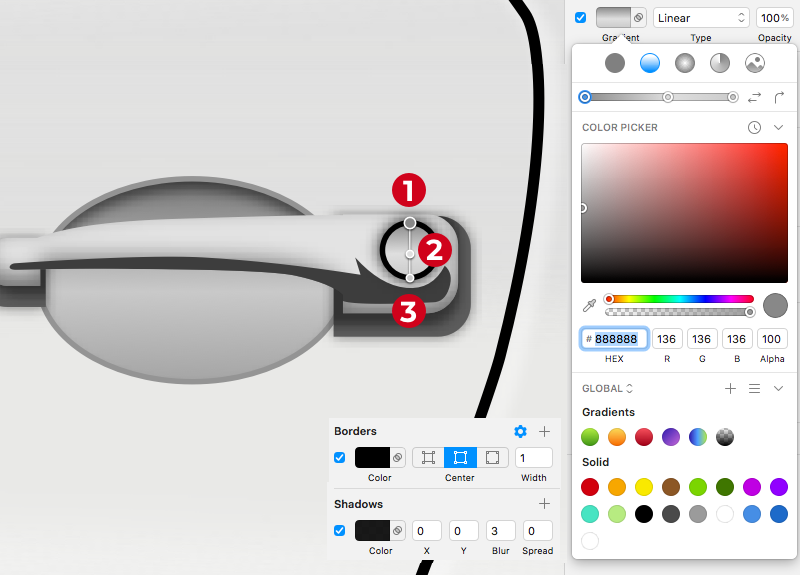
The key lock is next. Draw a small circle to serve as its base. Set a Center Border with a Width of 1px and Color #000000. For the Fills, use a Linear Gradient with these stops:
#888888#DFDFDF#CACACA
Apply a Shadow effect with Color #000000 at 90% alpha, Blur 3, and X, Y, and Spread all set to 0.
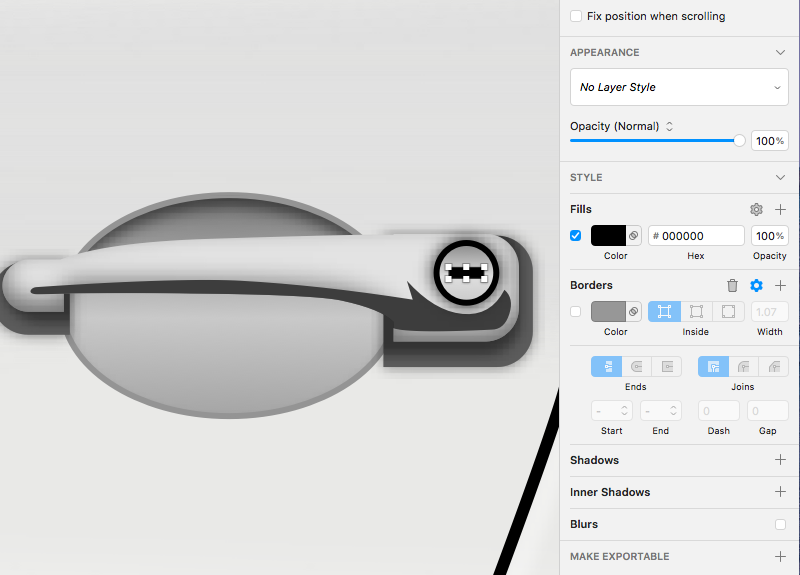
Create the keyhole by drawing a tiny black rectangle without Borders in the center of the circle. Group the circle and rectangle together, and name the group key-lock.
The final element is the handle's shadow, which should be cast upon the ellipse within the recess. In the Layers panel, reveal the contents of the handleshape group and copy the bridge shape that connects the two rectangles.
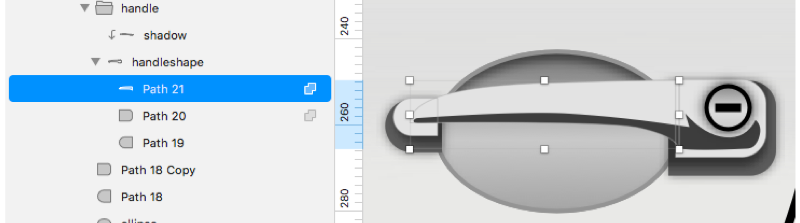
Select the ellipse below the handle and paste (Cmd + V) to add the shape on top. Set its Color to #505050, nudge it down by 2px, and apply a Gaussian Blur with an Amount of 2. Select both the ellipse and this new shadow, and group them together (Cmd + G).
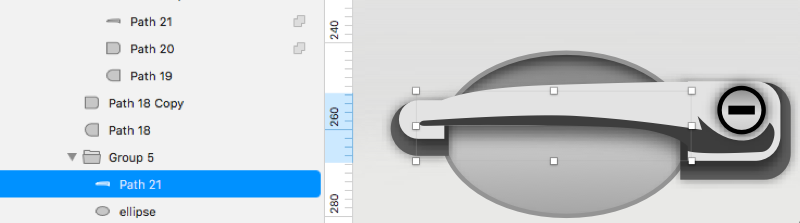
Within this group, right-click on the ellipse and choose Mask to confine the shadow strictly to the ellipse's boundary.
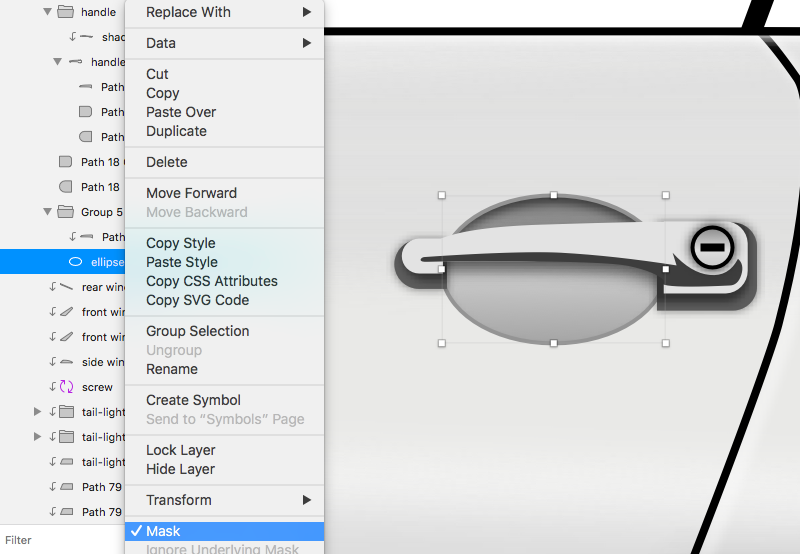
Finally, select all the elements created in this section and group them under the name door handle.
Shaping the Bumpers
Start with the front bumper using the Vector tool (V). Draw the shape, set Fills Opacity to 0%, make sure Borders are off, then apply two Inner Shadows effects: a light one with #FFFFFF at 50% alpha and X: 0, Y: 5, Blur: 6, Spread: 0, followed by a dark one with #000000 at 50% alpha and X: -2, Y: -5, Blur: 6, Spread: 0. Repeat for the rear bumper, but set the dark Inner Shadow to X: 3 instead. Name the shapes front bumper and rear bumper.
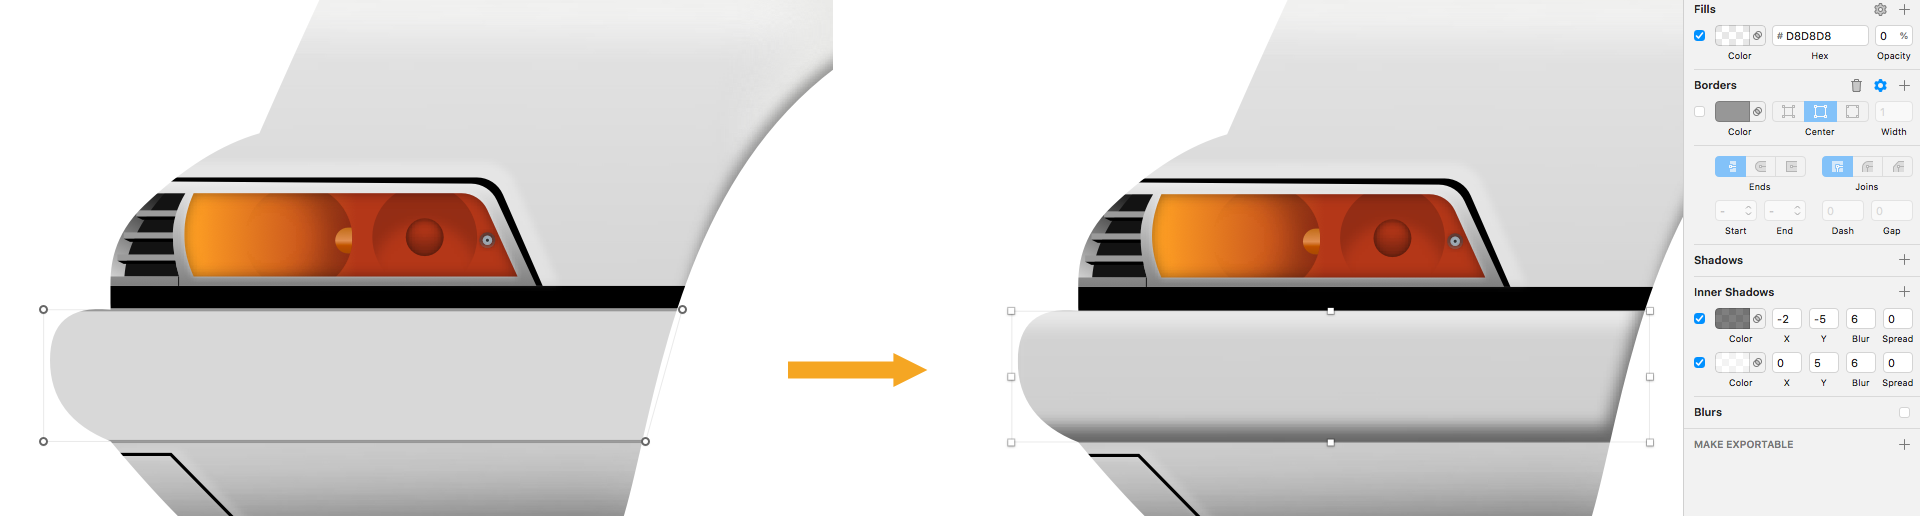
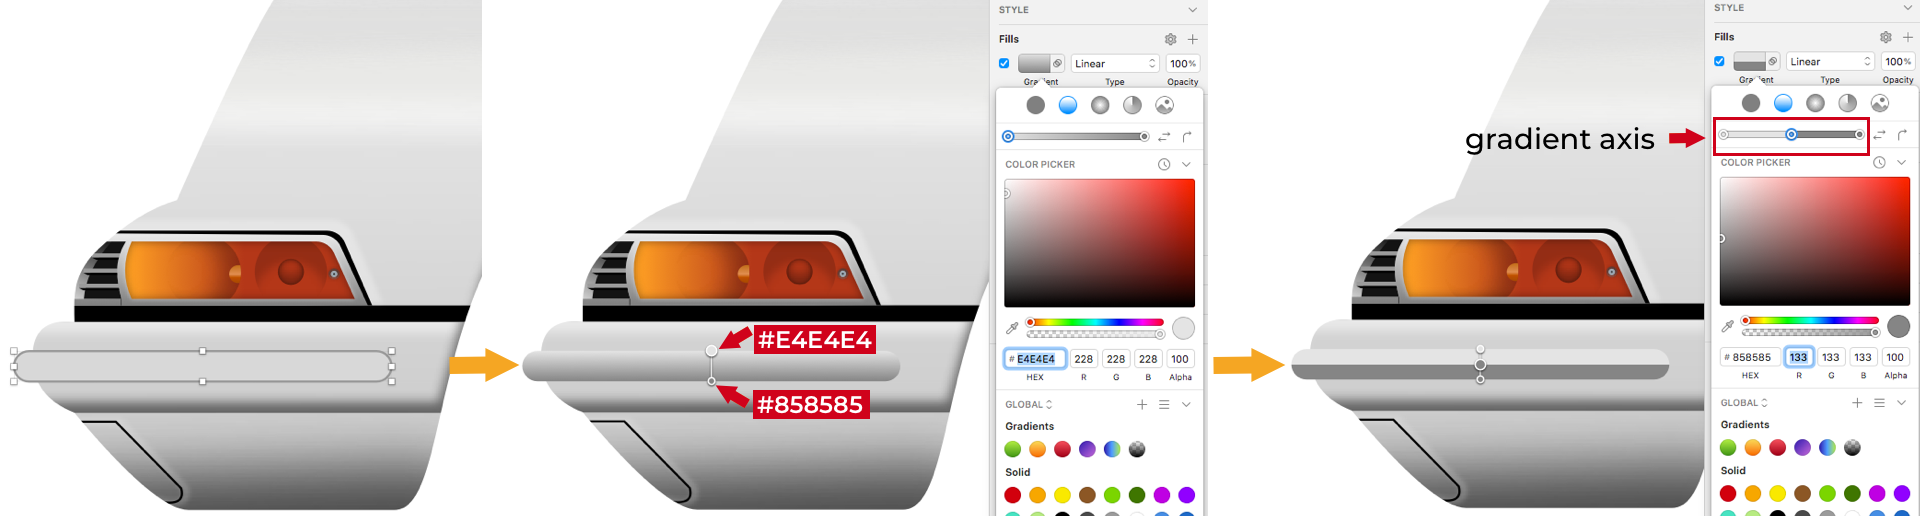
For the front bumper decoration, use the Rounded Rectangle tool (U) to draw a 174px by 14px shape outside the bodywork group, and name it bumper deco base. Turn off Borders and apply a Linear Gradient with stops at #E4E4E4, #858585, then add two more stops in the middle by clicking the gradient axis and pressing 5 to center each; make the left middle stop #E4E4E4 and the right one #858585, all at 100% alpha.
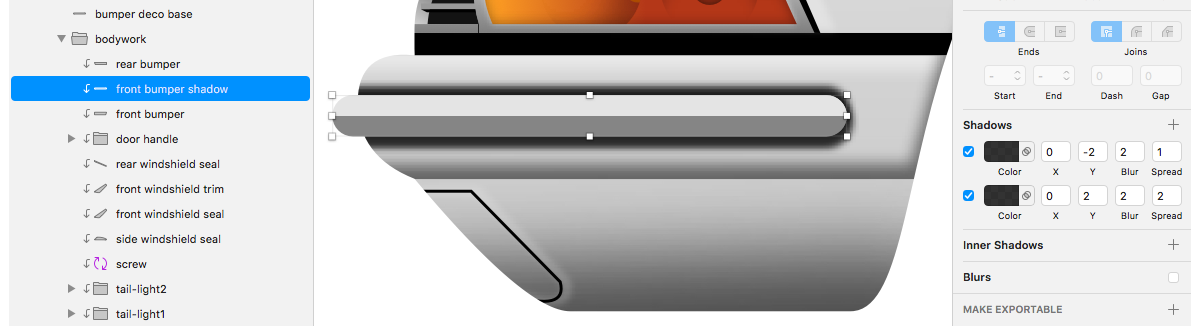
Duplicate this shape, rename the copy front bumper deco shadow, and drag it into the bodywork group just above the front bumper shape. Apply two Shadows effects. First: #000000 at 80% alpha with X: 0, Y: 2, Blur: 2, Spread: 2. Second: #000000 at 80% alpha with X: 0, Y: -2, Blur: 2, Spread: 1.
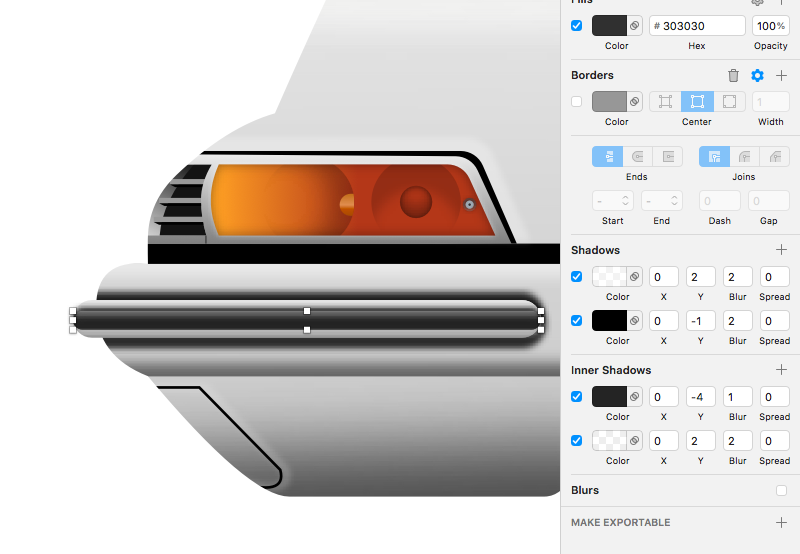
To add the rubber strip in the middle, duplicate bumper deco base, name the copy rubber, and change its fill to #303030 solid color. Reduce its Height to half, then align it to the center of bumper deco base using the Inspector panel. Add these effects to rubber:
- A light Inner Shadow:
#FFFFFFat30%alpha, X:0, Y:2, Blur:2, Spread:0. - A dark Inner Shadow:
#000000at100%alpha, X:0, Y:-4, Blur:1, Spread:0. - A dark Shadow:
#000000at100%alpha, X:0, Y:-1, Blur:2, Spread:0. - A light Shadow:
#FFFFFFat50%alpha, X:0, Y:2, Blur:2, Spread:0.
Select both bumper deco base and rubber, then apply a Mask operation so the rubber shadows stay inside the base. Name the resulting group front bumper deco. Repeat the whole method for the rear bumper deco element.
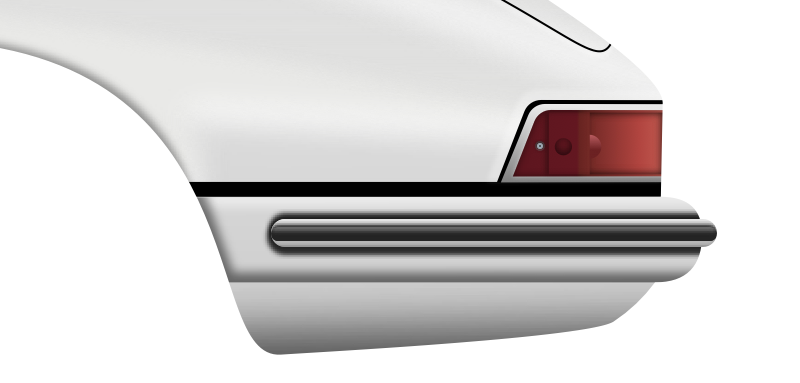
For the rear bumper guard, draw a base shape with the Vector tool and give it a Linear Gradient with stops at #EEEEEE, #C9C9C9, #939393, and #6C6C6C. Duplicate this shape, move it backward with Move Backward from the context menu, and fill it with #2D2D2D solid color. Shift it a few pixels right and slightly reduce its height with the resize handles. Name it rubber buffer, then add an Inner Shadow of #FFFFFF at 30% alpha with Y: 2 and Blur: 2, X and Spread at 0.
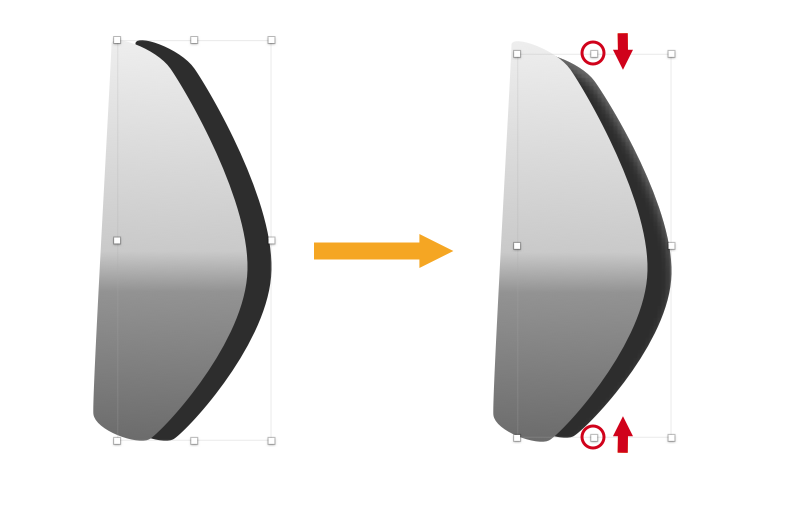
Go back to the top shape, duplicate it again, and nudge the copy left with the ← key. Edit its Linear Gradient: remove the two middle stops, set the top to #8E8E8E and bottom to #DEDEDE, then shift the top stop downward slightly. Finish with a Gaussian Blur at an Amount of 0.6. Select this shape and the one directly below it, apply a Mask, and name the resulting group bumper guard base. Then group that with rubber buffer into rear bumper guard, and place the group just below bodywork in the Layers panel.
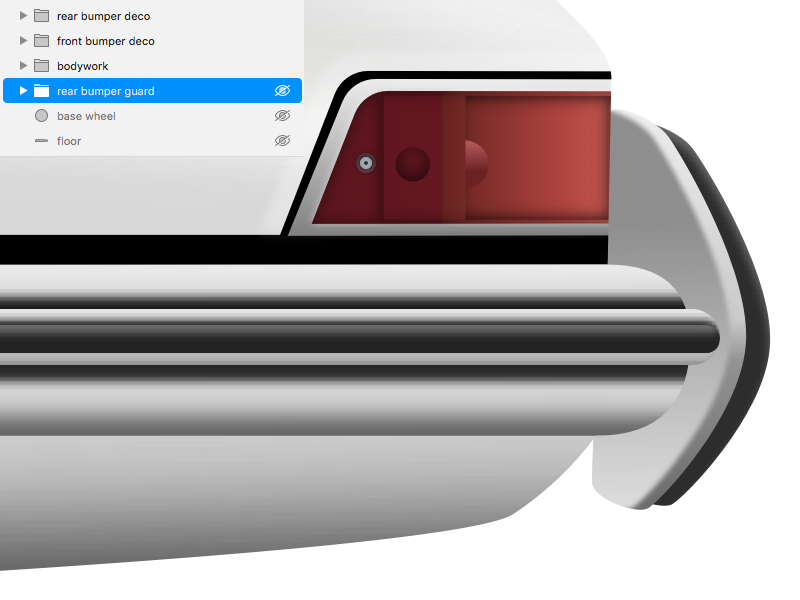
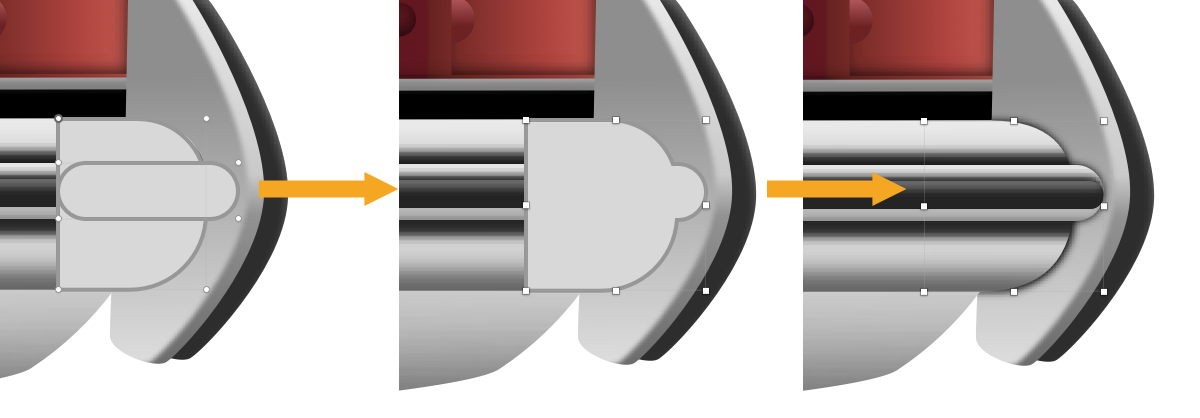
With the Rectangle tool, create two rectangles whose corners you round using Radius in the Inspector. Apply a Union operation to merge them, move the result inside rear bumper guard and on top of the bumper guard base group. Set its color to #000000, disable Borders, and apply a Gaussian Blur with an Amount of 1.
Building the Glasshouse
Side Windows and Windshields
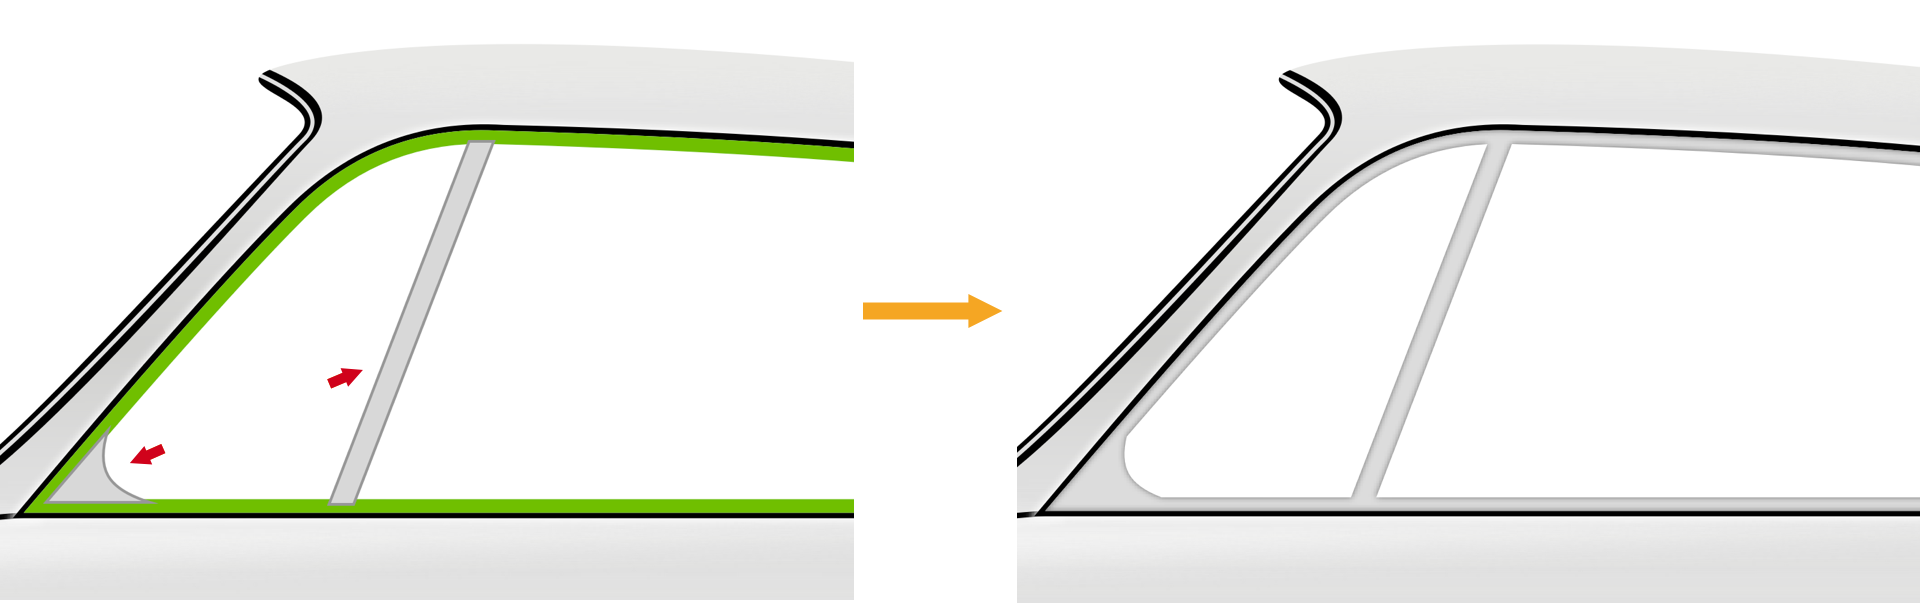
Un-hide the side window 1 and side window 2 copies from Part 1. With Fills off, give them 5px Borders in #72BD20, positioned Inside. These will become window frames, but since Inner Shadows can't be applied to borders directly, convert both shapes first: select them and use Layer → Convert to Outlines (Alt + Cmd + O). Each outline becomes two combined shapes — one for the outer boundary and one for the inner — which is what creates the stroke effect.
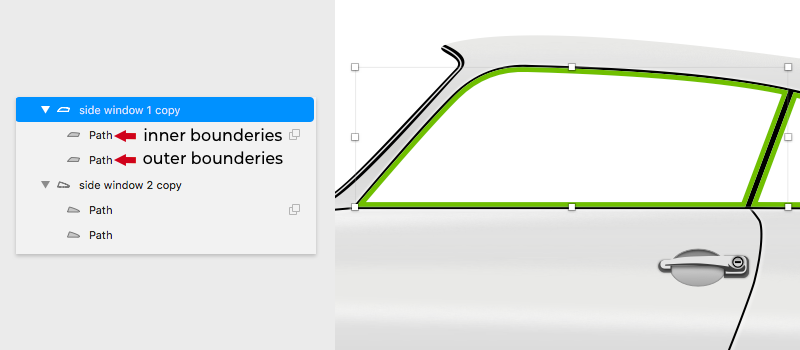
Copy (Cmd + C) the inner shapes, press Esc to deselect, then paste (Cmd + V); these copies land on top and will serve as the windshields. Name them side windshield 1 and side windshield 2, then hide them temporarily. Back on the frame shapes, draw two additional vectors with the Vector tool, select those together with side window 1, and perform a Union to create a single shape. Set Fills to #DCDCDC and add an Inner Shadow of #000000 at 50% alpha with Blur 2. Apply the same fill and shadow style to side window 2.
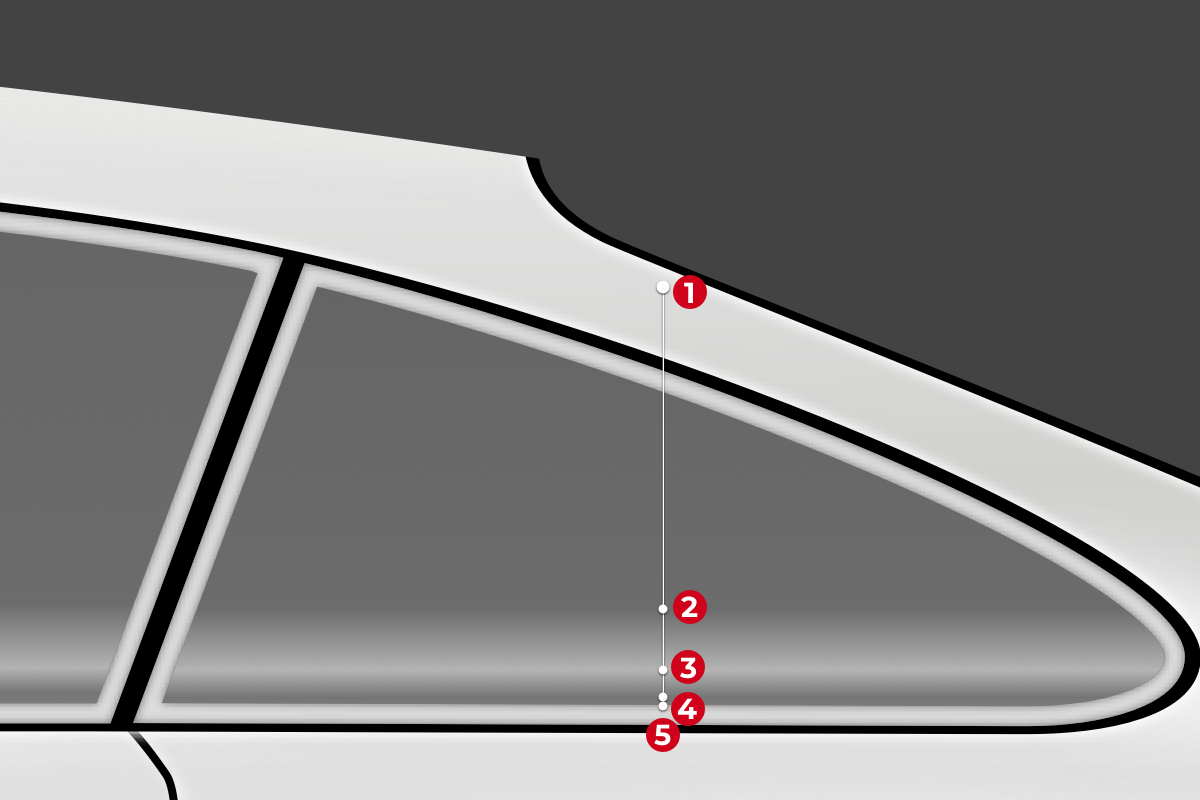
Un-hide the side windshields. To make transparent content visible while you work, select the artboard and enable Background color in the Inspector, choosing a dark shade like #434343. Place the side windshields below the bodywork group in the Layers panel, then style the first one: turn off Borders and set a Linear Gradient fill with five stops, all #FFFFFF, at alpha values of 0%, 22%, 50%, 27%, and 30% in sequence. Replicate the same gradient on the other side windshield; the shapes aren't the same height, so you may need to move the points slightly to match the angle. Sketch's Copy Style and Paste Style options via right-click can speed this up.
Front and Rear Windshields
Draw the front windshield with the Vector tool, applying a Linear Gradient with four stops: #F3F2F0 at 40%, #FFFFFF at 50%, #F3F2F0 at 20%, and #F3F2F0 at 10%. Add an Inner Shadow of #000000 at 10% alpha with Y: 2 and Blur: 8. Name it front windshield. Draft the rear windshield the same way, reusing the front's style, and call it rear windshield.
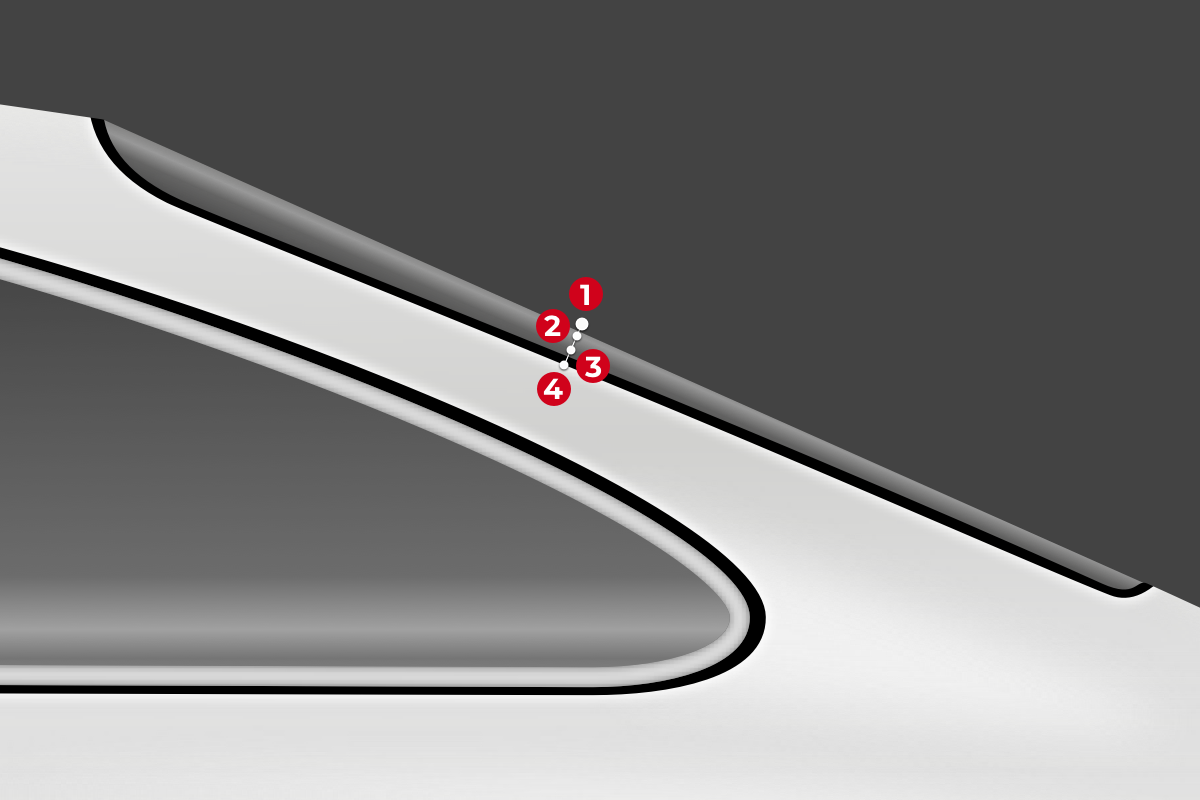
Group all the windshield shapes into a windshields group and check that it sits below bodywork in the Layers panel. Once done, you can switch off the artboard's background color in the Inspector.
Building the Headlight Assembly
With the Vector tool, draw the headlight glass shape. Set the fill to a Solid Color of #E4E4E4, disable Borders, and apply an Inner Shadows effect with these values:
- Color:
#000000 - Alpha:
10% - X:
5; Y:-2; Blur:2; Spread:0
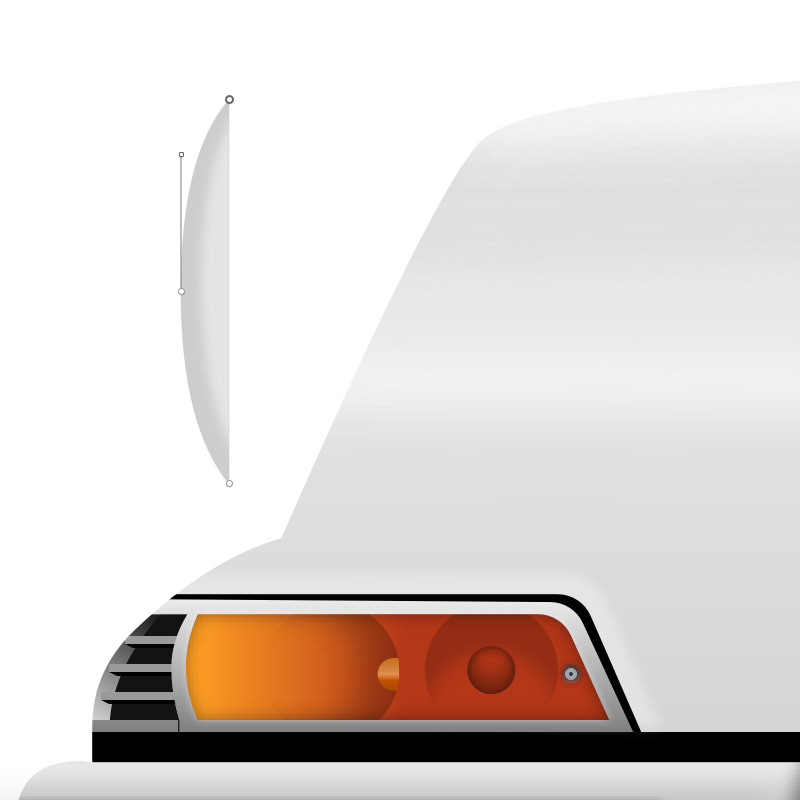
Next, add a black (#000000) shape over the glass. Duplicate it (Cmd + D), shift it 1px to the left, and apply a vertical Linear Gradient with the following stops:
#EEEEEE#F5F5F5#828282#484848
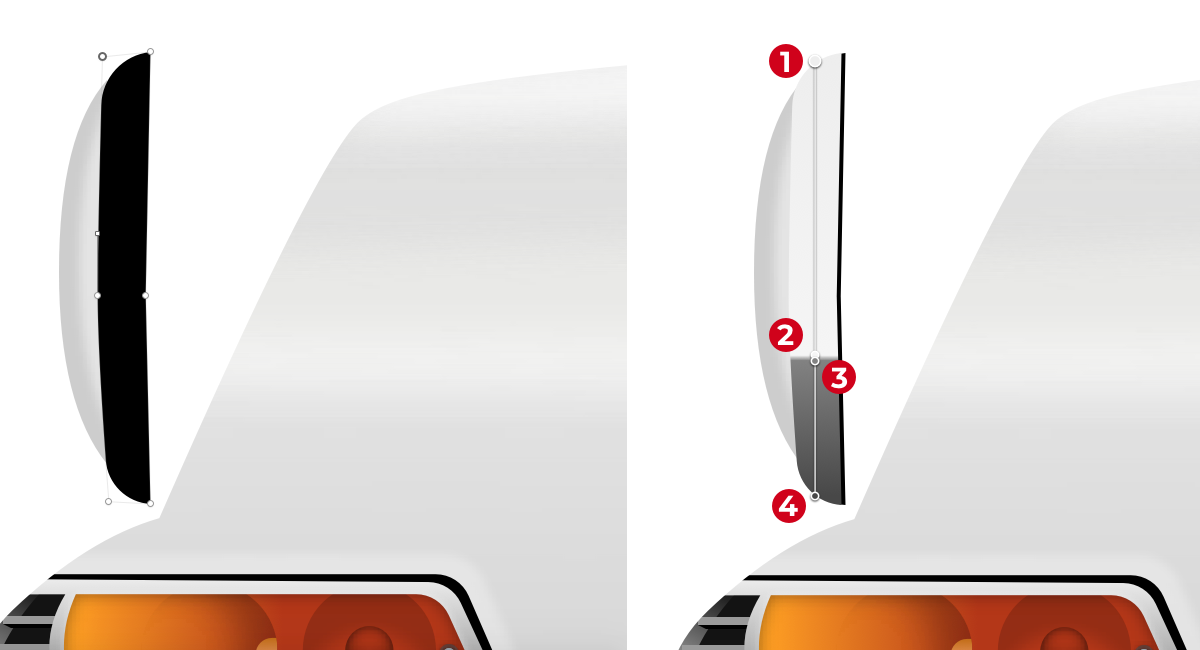
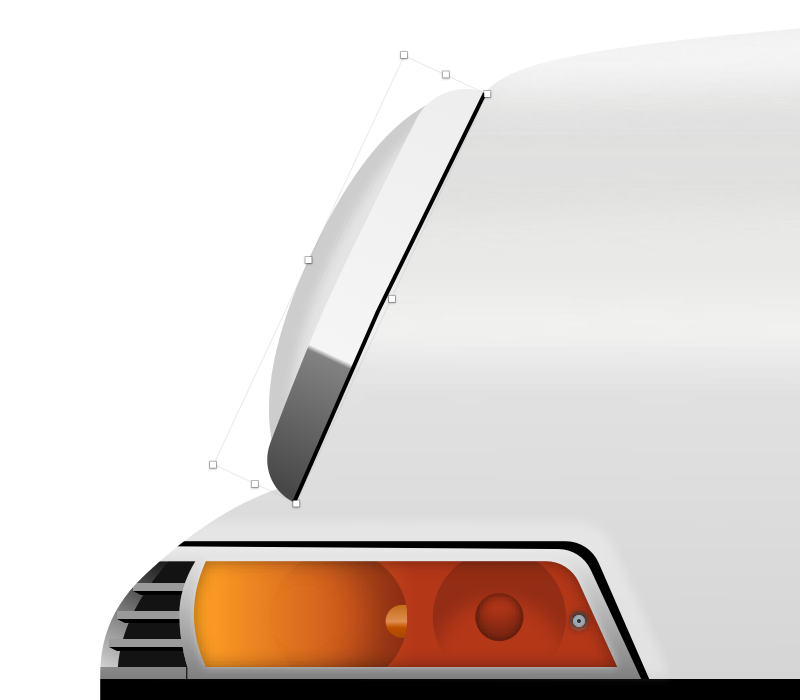
Group all headlight shapes (Cmd + G) into a headlight group. Rotate it by 25 degrees and position it above the bodywork group in the Layers panel.
Rear Engine Grille
For the grille over the engine lid, draw a shape with the Vector tool (V). Fill it with #000000 and add an Inner Shadows effect using #FFFFFF at 80% Alpha, with X set to -2.
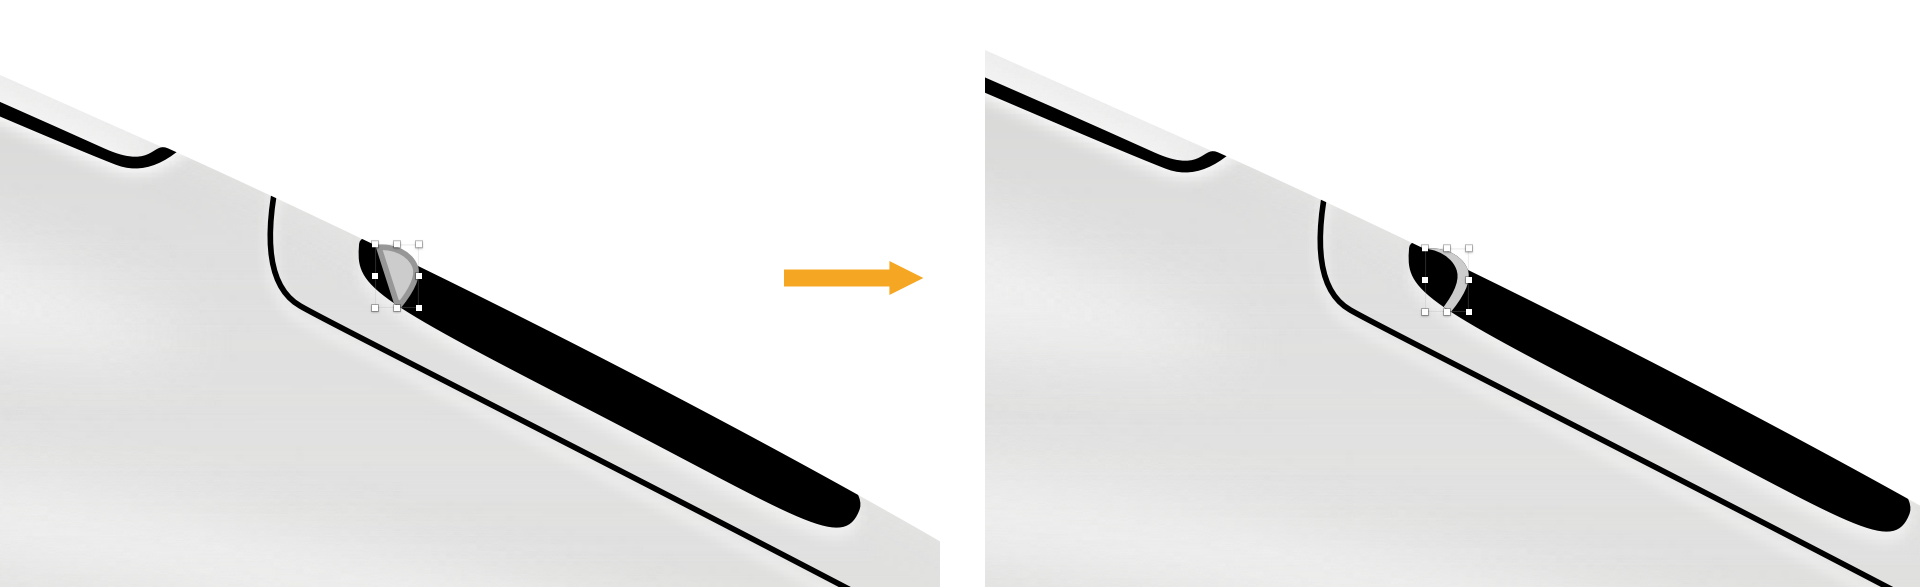
Duplicate this shape, nudge it left and down, then enter vector editing mode. Adjust the points so the shape edges meet the engine lid contour, as shown in the reference. Repeat this eight more times to complete the grille pattern.
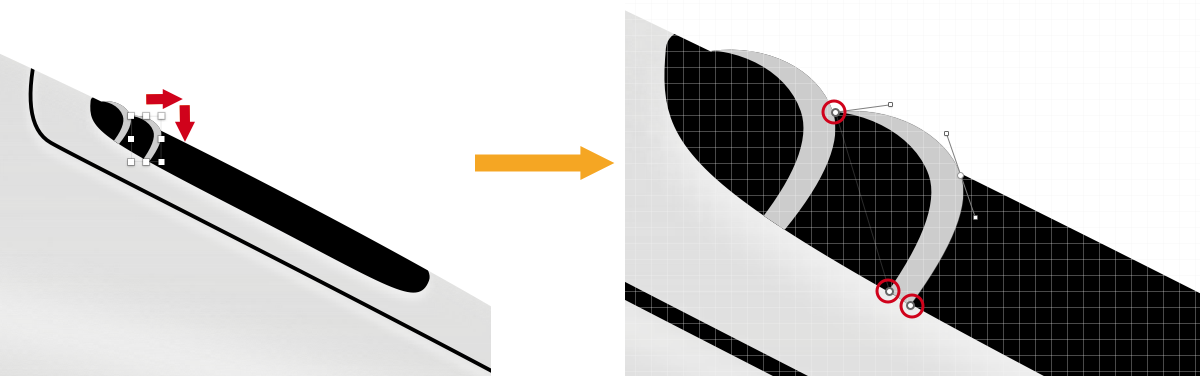
Draw a line with the Line tool (L). Set its Color to #CCCCCC, Width to 1px, and use Round cap for the Border ends. Apply a Shadows effect with black (#000000) at 100% Alpha and 2 Blur.
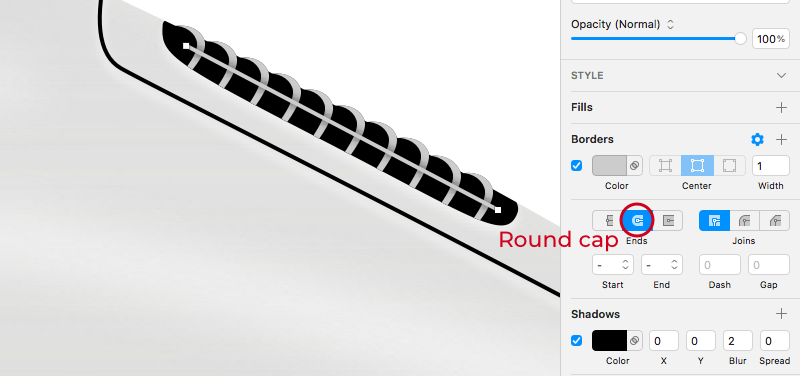
Combine all grille layers into a group named rear engine grille.
Side Mirror Details
Create the mirror base shape with the Vector tool. Disable Borders and use a Linear Gradient for the fill:
#E5E5E5#D5D5D5#878787#6A6463
Add an Inner Shadows effect:
- Color:
#000000 - Alpha:
50% - X:
2; Y:-2; Blur:6; Spread:0
Name this shape side mirror base.
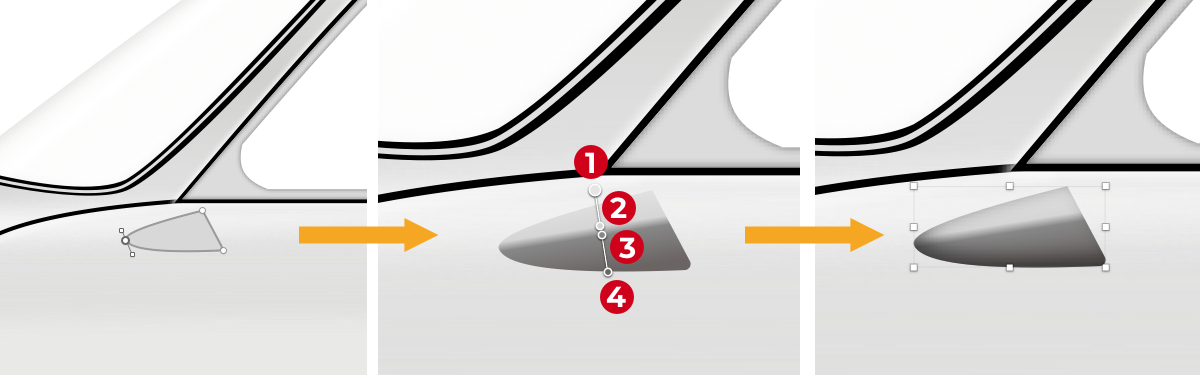
Draw the mirror cover shape next, again with Borders off and a Linear Gradient fill:
#CCCACB#FEFEFE#A1A5A4#4A413F
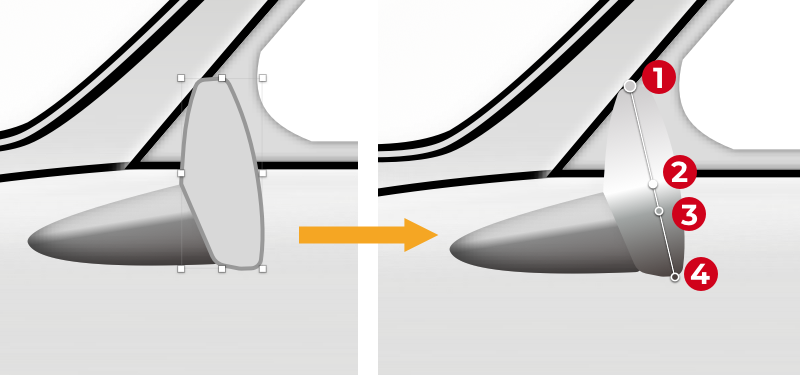
Label this mirror cover base. Duplicate the shape, move it 4px left with the ← key, change its Color to #C4C4C4, and add two Inner Shadows. The first uses:
- Color:
#000000 - Alpha:
60% - X:
5; Y:0; Blur:1; Spread:0
The second:
- Color:
#000000 - Alpha:
50% - X:
-4; Y:5; Blur:6; Spread:0
Select both shapes and apply a Mask so the top shape stays within the cover. Group the result as mirror cover.
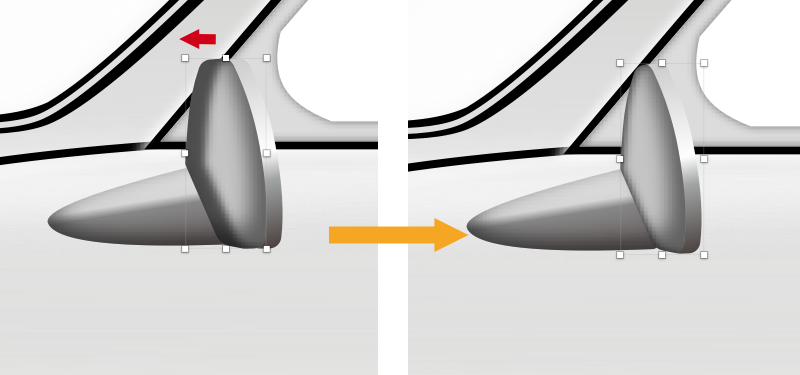
On side mirror base, add a third Inner Shadows effect to simulate the cover's shadow. Use #000000 at 50% Alpha, X of -1, and Blur of 1.
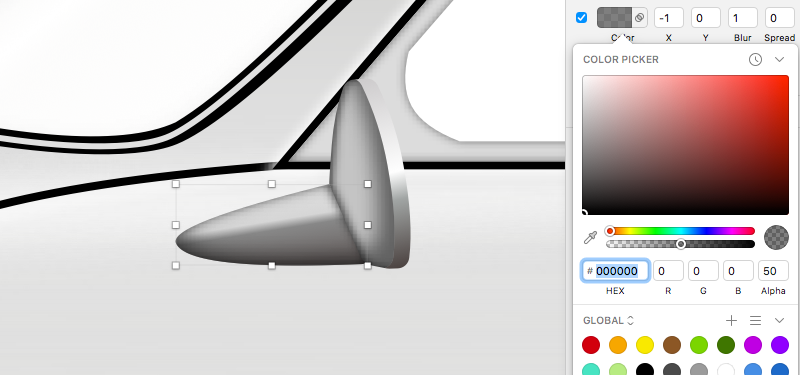
Now build the mirror's ground shadow. Draw a shape with the Vector tool, place it below side mirror base, and push it up slightly so it sits behind. Apply a vertical Linear Gradient with #000000 at 40% Alpha on top, fading to #000000 at 0% Alpha at the bottom. Keep Borders off.
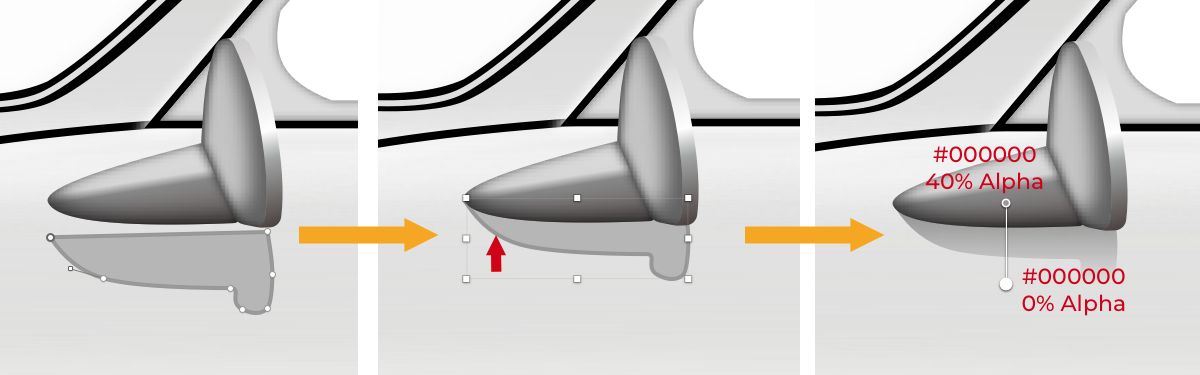
Name this side mirror shadow, then group everything from this section as side mirror.
Exhaust Pipe
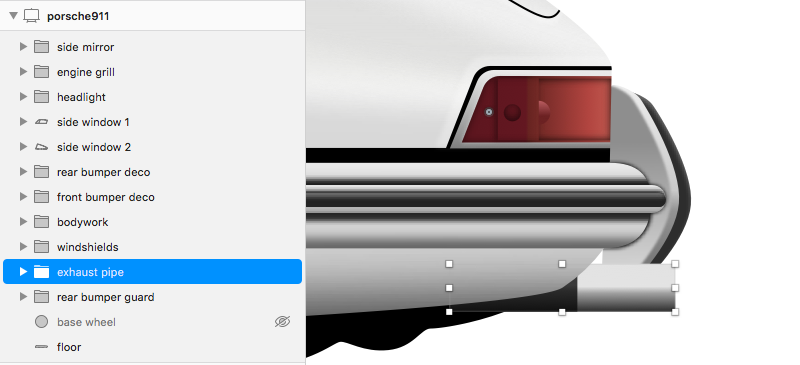
Un-hide the floor layer from Step 2. Using the Rectangle tool (R), draw a rectangle with Radius 2. Disable Borders and apply this Linear Gradient fill:
#E2E2E2#E3E3E3#A0A0A0#2C2C2C
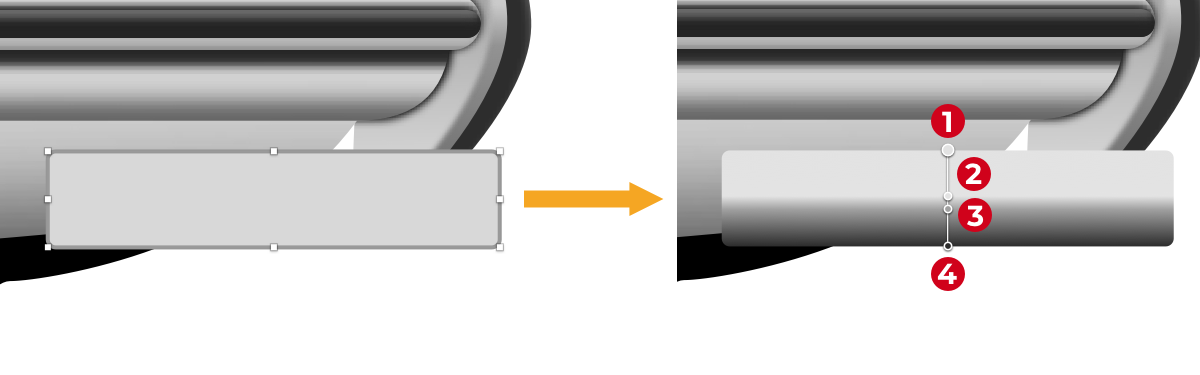
Duplicate the rectangle and reduce its width. Enter vector editing mode, select the right-hand points, and set their Radius to 0. Update the gradient:
#1E1E1E#3A3A3A#2A2A2A#111111
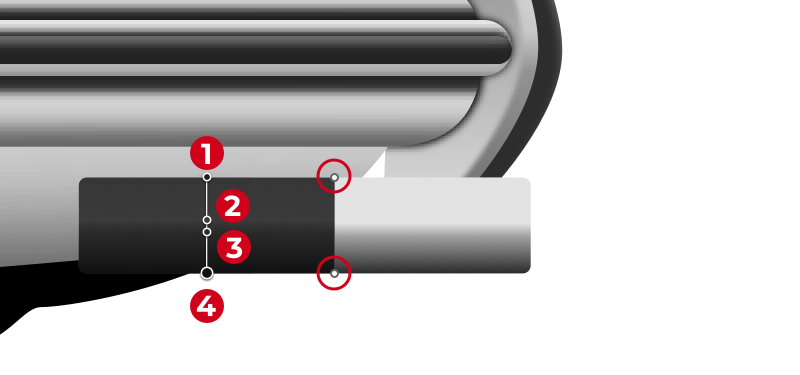
Group both rectangles as exhaust pipe and place the group just above rear bumper guard in the Layers list.
Interior: Windows, Dashboard, and Seat
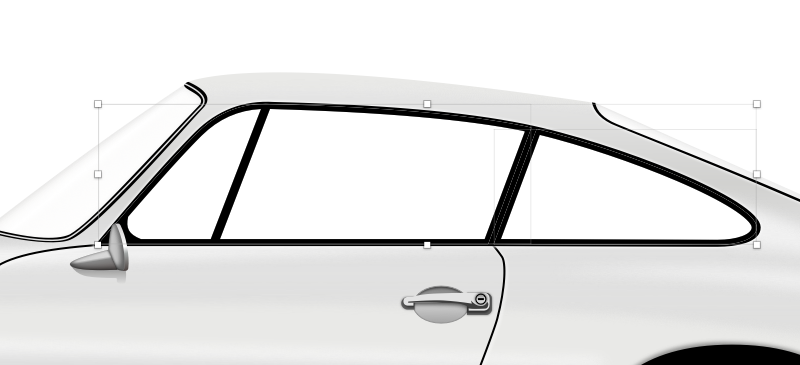
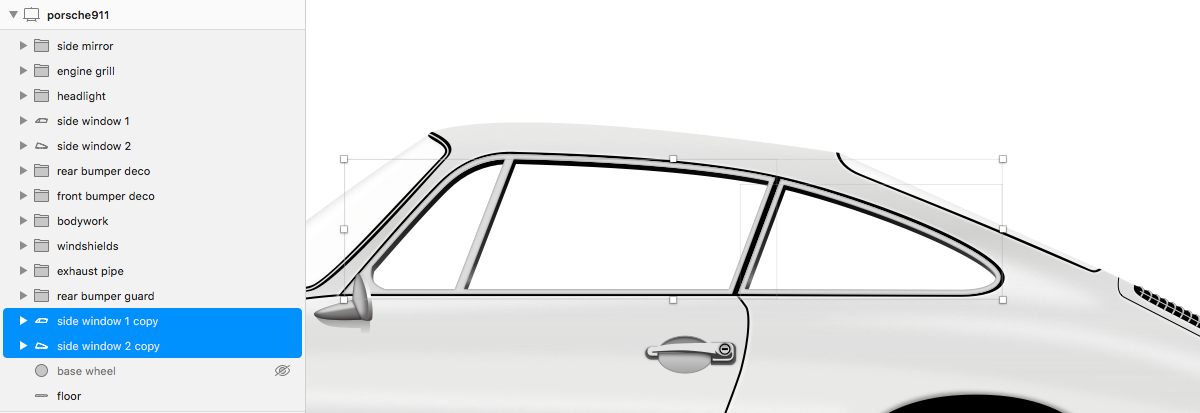
Duplicate side window 1 and side window 2 (Cmd + D), set their Color to #000000, and remove the Inner Shadows. Position these copies below rear bumper guard in the layer stack, then shift them 5px down and 2px right.
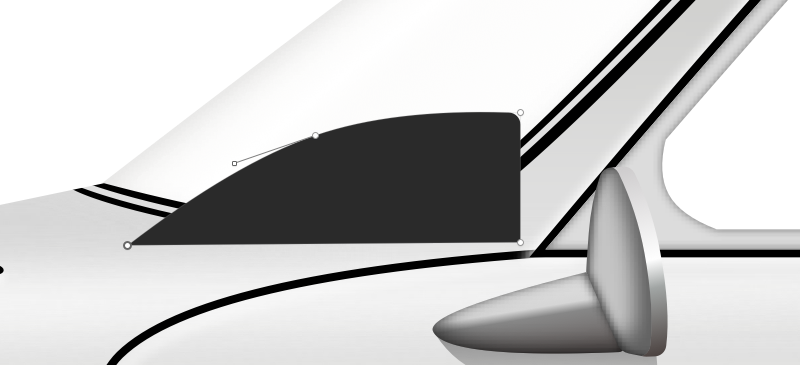
Draw the visible dashboard portion with the Vector tool. Turn off Borders and fill with #2A2A2A.
Create the steering wheel with the Rounded Rectangle tool (U). Disable Borders and use a horizontal Linear Gradient:
#000000#676767#292929#090909
Rotate the rectangle -24 degrees and move it slightly to the left.
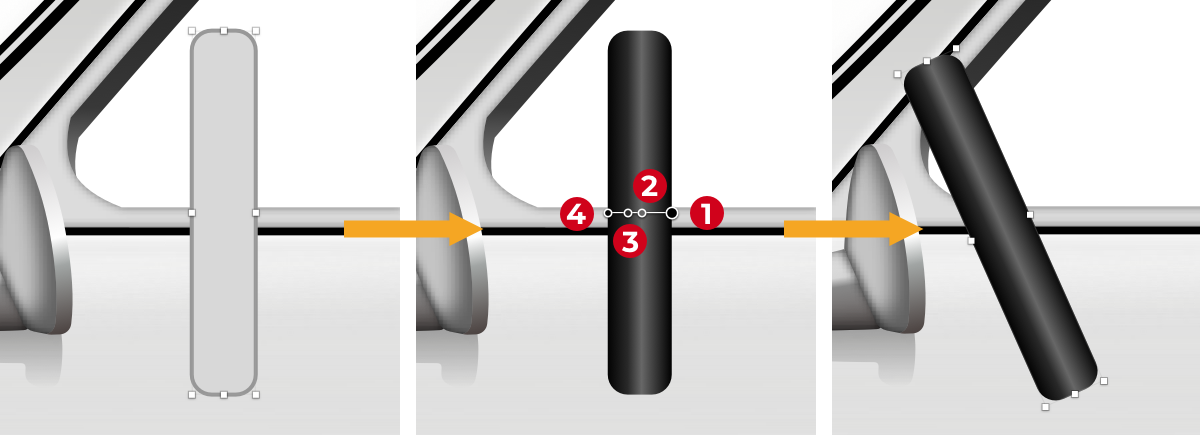
For the remaining interior trim, draw a shape with the Vector tool. Set Border off, Color to #000000, and add an Inner Shadows effect:
- Color:
#FFFFFF - Alpha:
30% - X:
-12; Y:-6; Blur:8; Spread:0
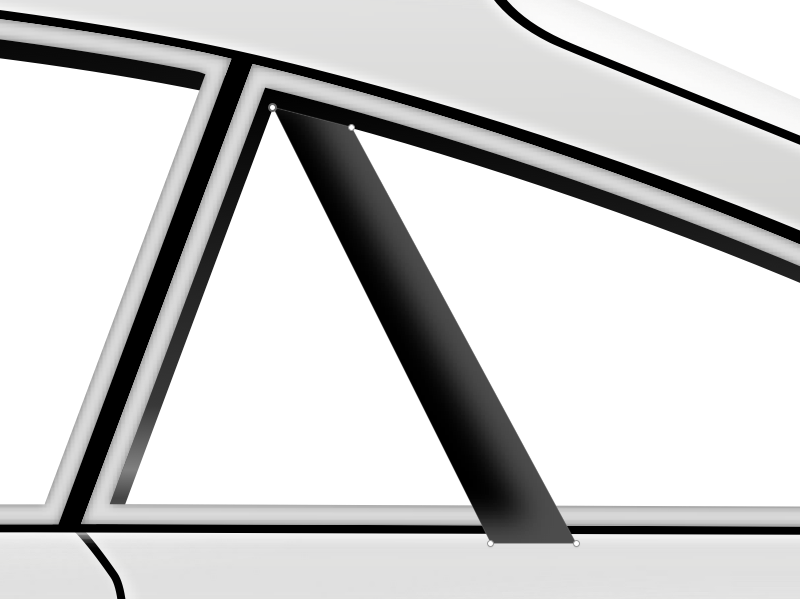
Use the Oval tool (O) to add a small ellipse, fill with #717171, and keep Borders off.
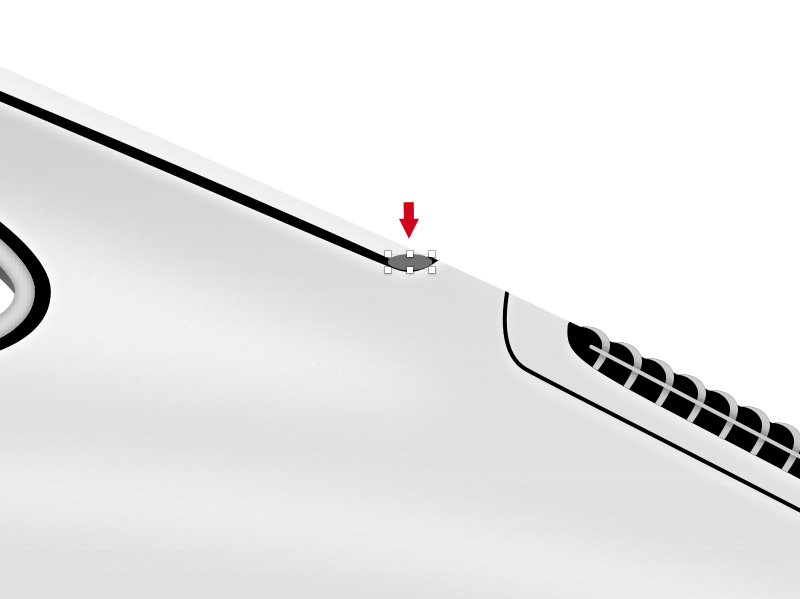
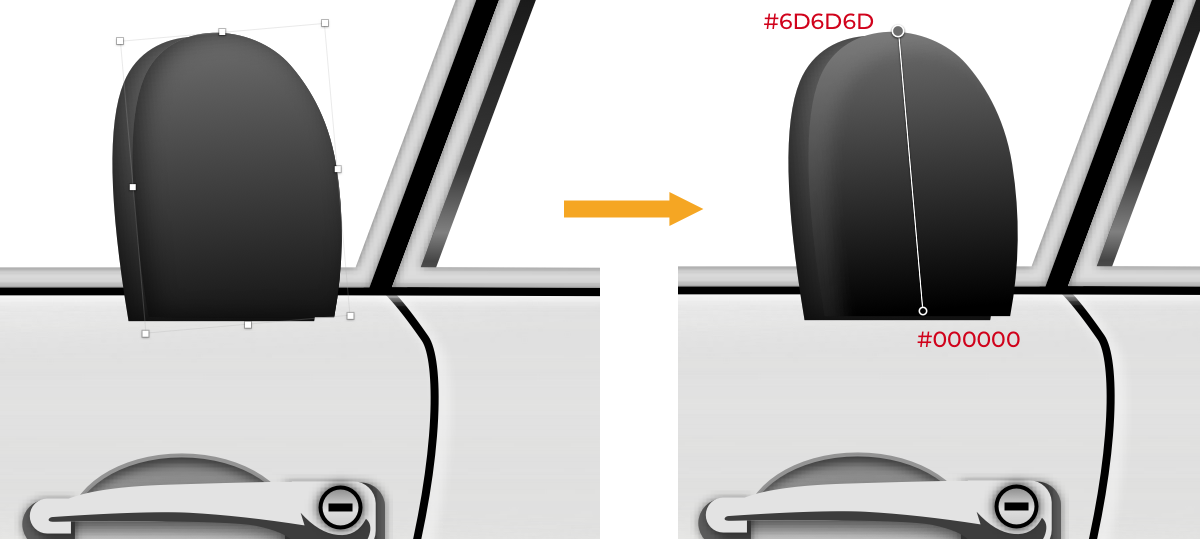
For the visible part of the driver's seat, create a shape with the Vector tool. Use a vertical Linear Gradient with #6D6D6D at the top and #171717 at the bottom. Apply an Inner Shadows effect with #000000 at 50% Alpha, X of 2, and Blur of 7.
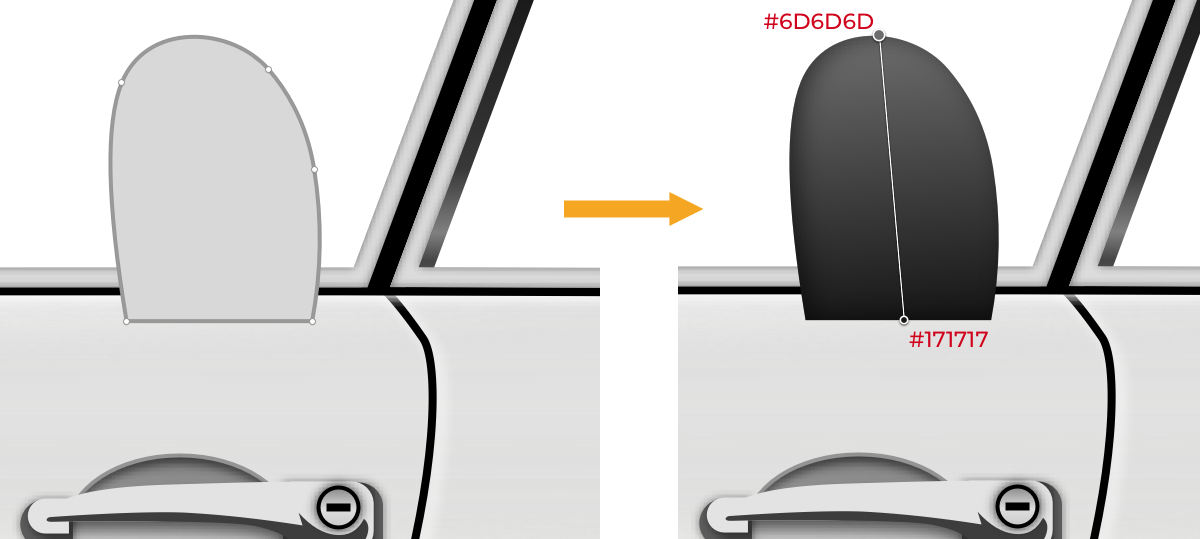
Duplicate the seat shape, shift it 5px right and 1px up. Change the gradient's bottom stop to #000000, then adjust the Inner Shadows: Color #FFFFFF at 10% Alpha, X and Y of 5, and Blur of 5.
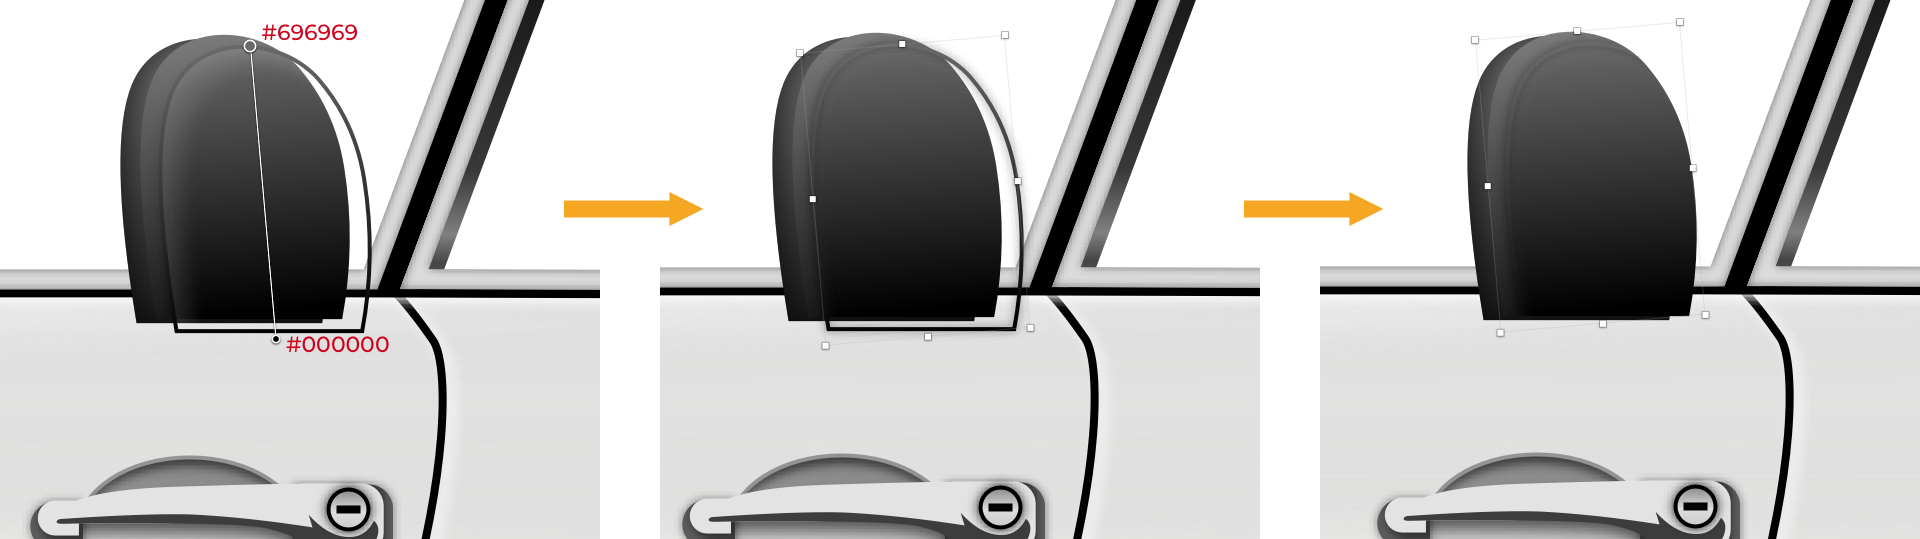
Add stitching by duplicating the seat shape again and moving it 5px right and 3px down. Clear the fill and Inner Shadows, re-enable Borders with a Linear Gradient border color (#696969 to #000000). Add a Shadow effect with #000000 at 50% Alpha and 2 Blur. Mask this shape against the seat underneath so the stitches stay within bounds.
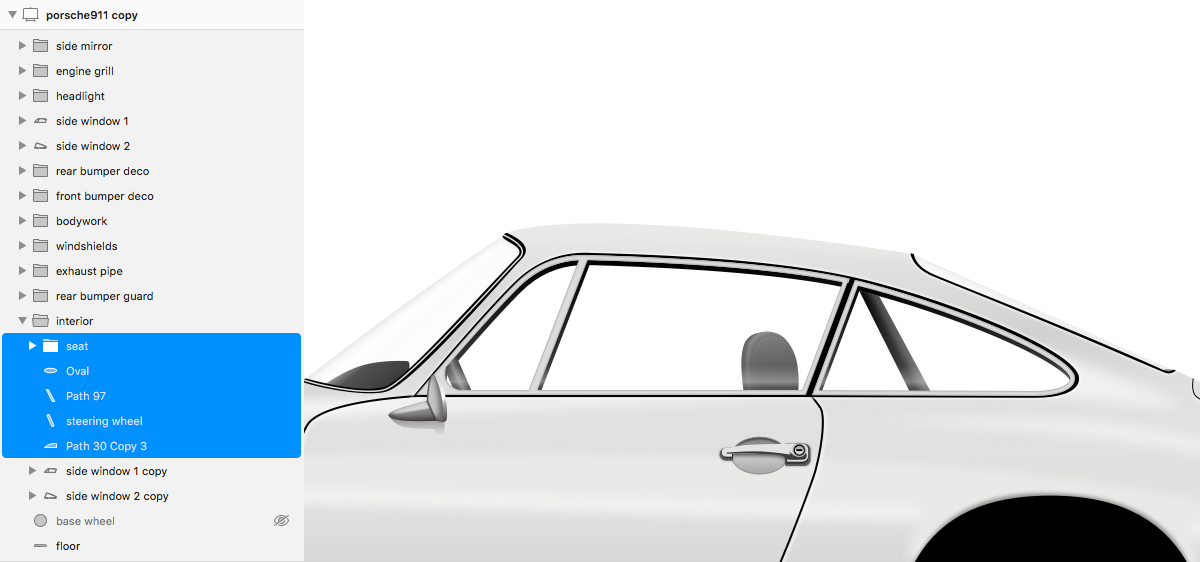
Select all layers from this interior step that sit above the car body, plus side window 1 copy and side window 2 copy, and group them (Cmd + G) as interior.
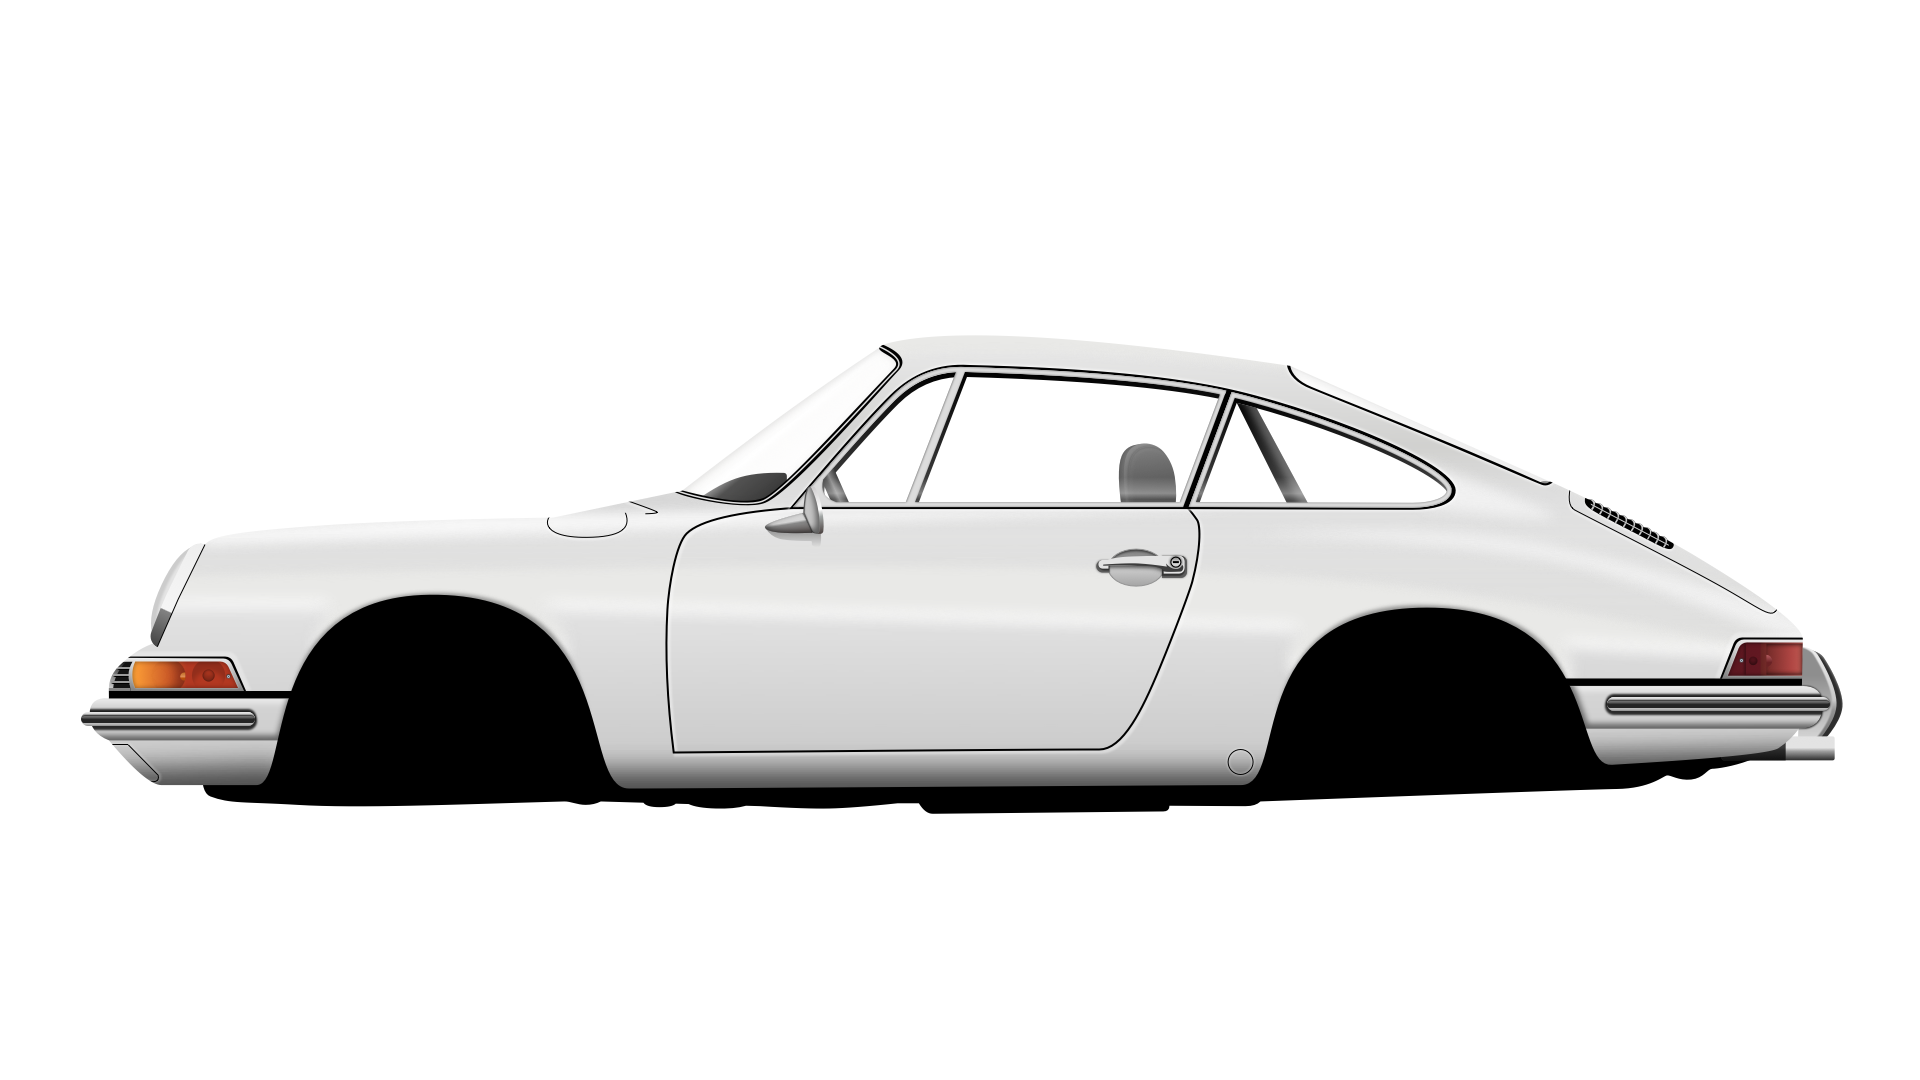
View the full composition to check progress.
Finally, add a thin accent line to the bodywork. With the Line tool (L), draw a line with Color #E5E5E5, Width 2px, and Round cap for the Border ends. Apply a Shadows effect: #000000 at 80% Alpha, Y of 2, and Blur of 3. Place this line inside the bodywork group.
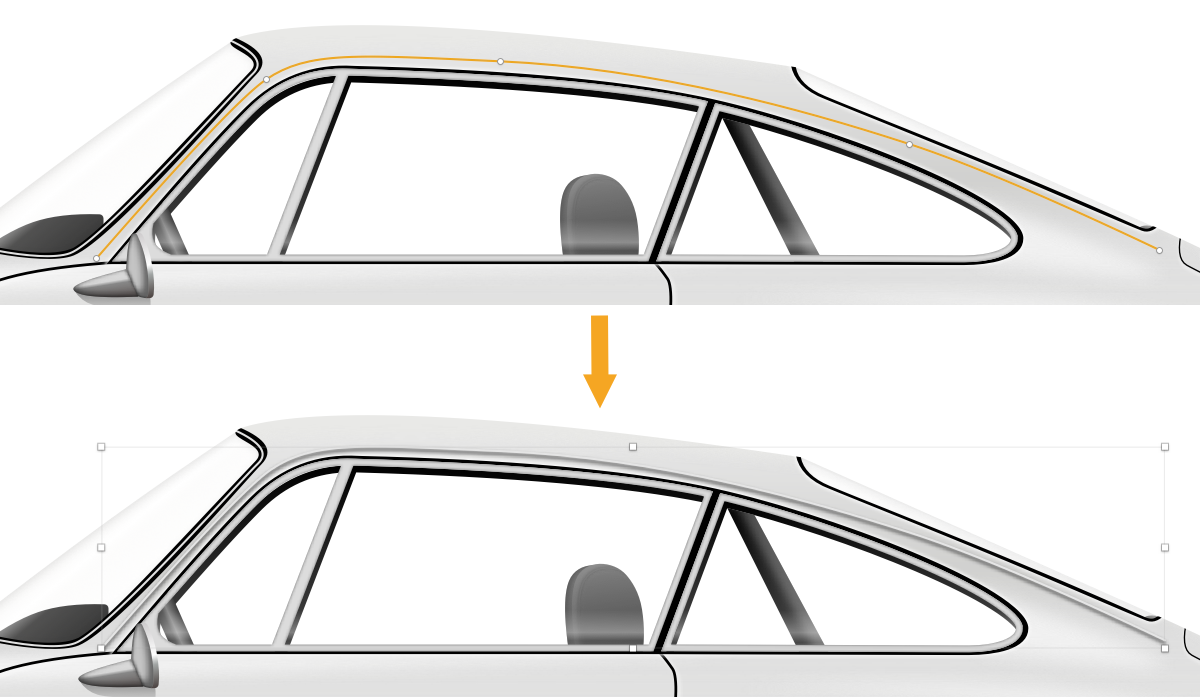
The body, windows, bumpers, lighting units, and interior are now complete. The next stage covers wheels, rims, and tires, plus final touches and racing decals.


