

Why i18n Matters—and How Nuxt Handles It
Internationalization (i18n) is about designing software so it can adapt to different languages and regional conventions without a major code rewrite. For teams serving a global audience, that means moving away from hardcoded strings and accounting for things like date formats, number formatting, and character encodings. Giving users the ability to read a site in their native language has a measurable impact on their experience, which makes i18n a key consideration for any serious web project.
Nuxt has a purpose-built library for this: nuxt-i18n. It builds on Vue I18n, the standard i18n solution for Vue apps, and adds Nuxt-specific conveniences like lazy-loaded locale messages, per-locale route generation, SEO metadata, and support for locale-specific domains. In this tutorial, we'll walk through building a multilingual Nuxt site that uses nuxt-i18n for static translations, explores advanced features like pluralization and date formatting, and then pulls dynamic localized content from an API. We'll use Vuetify as the UI framework and Hygraph as the content API. You can follow along with the complete source code or check the live demo.
Setting Up Basic Translations
To get started, create a new Nuxt project and set up a couple of simple pages—say, a Blog page and an About page—so we have templates to work with. The problem is that all the text in those templates is hardcoded, which is exactly what i18n is meant to solve.
Install the @nuxtjs/i18n module and add it to the modules array in nuxt.config.ts. Then create an i18n.config.ts file to hold your Vue I18n configuration:
// i18n.config.ts
export default defineI18nConfig(() => ({
  legacy: false,
  locale: "en",
  messages: {
    en: {
      homePage: {
        title: "Home",
        description: "This is the home page description."
      },
      aboutPage: {
        title: "About",
        description: "This is the about page description."
      },
    },
  },
}));
In that file, we set the default locale to en and provide the actual message strings for that locale. Back in the Nuxt config, link to the i18n.config.ts file using the i18n property so Nuxt knows where to find your locale messages. With the setup in place, you can use the $t function directly in your components—no import needed thanks to Nuxt's auto-import feature—to reference those strings.
Adding Languages and Lazy Loading
To support multiple locales, you can add additional language blocks directly to your configuration file. For a production site with lots of content, however, bundling every locale's messages into the main JavaScript bundle is a bad idea. The better approach is to split messages into per-locale files and load them only when needed. This keeps the initial bundle smaller and makes translation files easier to manage as they grow.
To enable lazy loading in nuxt.config.ts, set lazy: true and point the library to a locales directory. Inside that directory, create one file per language—en.json, fr.json, es.json, and so on—each containing its own set of messages. The module picks up the right file based on the user's locale.
Switching Locales at Runtime
Now that we have several locales, users need a way to switch between them. Build a small component that uses the useI18n hook (provided by Vue I18n) and exposes a computed property called language. A <select> element gets and sets the current locale through that property:
<!-- components/select-locale.vue -->
<script setup>
const { locale, locales, setLocale } = useI18n();

const language = computed({
  get: () => locale.value,
  set: (value) => setLocale(value),
});
</script>

<template>
  <v-select
    :label="$t('selectLocale.label')"
    variant="outlined"
    color="primary"
    density="compact"
    :items="locales"
    item-title="name"
    item-value="code"
    v-model="language"
  ></v-select>
</template>
To make this feel like a real site, wrap the language switcher in a small navigation component that links the site's pages together. This gives you a layout shell with a working locale switcher, ready for more advanced i18n features.
Dynamic Text: Pluralization and Interpolation
Real-world text is rarely static. Interpolation lets you insert dynamic values into translated strings, and pluralization handles grammar rules that vary by count. Both are documented Vue I18n features and work out of the box in a Nuxt app.
For pluralization, define a key in the locale file that returns different messages based on the count. For example, a key called apple could show "No Apple" for zero, "One Apple" for one, and "X Apples" for any larger number. In the template, you pass a numeric count to the key and the correct string is selected automatically.
<!-- pages/playground.vue -->
<script setup>
let appleCount = ref(0);
const addApple = () => {
  appleCount.value += 1;
};
</script>
<template>
  <v-container fluid>
    <!-- PLURALIZATION EXAMPLE  -->
    <v-card color="cardBackground">
      <v-card-title class="text-overline">
        {{ $t("playgroundPage.pluralization.title") }}
      </v-card-title>

      <v-card-text>
        {{ $t("playgroundPage.pluralization.apple", { count: appleCount }) }}
      </v-card-text>
      <v-card-actions>
        <v-btn
          @click="addApple"
          color="primary"
          variant="outlined"
          density="comfortable"
          >{{ $t("playgroundPage.pluralization.addApple") }}</v-btn
        >
      </v-card-actions>
    </v-card>
  </v-container>
</template>
Interpolation comes in three common forms. Named interpolation expects an object with named keys, like sayHello expecting a name property. List interpolation takes an array and uses positional values, like hobby pulling the element at index 0. Literal interpolation lets you combine multiple variables with literal text—for example, an email message that joins account and domain with the @ character. Each approach serves a different use case and is easy to set up in the locale config and reference in your components.
Formatting Dates and Times
Dates and times have their own localization challenges. Different locales express them in completely different ways—ordering of day and month, use of 12- vs 24-hour time, and localized day and month names. Vue I18n handles this through the datetimeFormats key in the config object, letting you define named formats (like short and long) for each locale.
// i18n.config.ts
export default defineI18nConfig(() => ({
  fallbackLocale: "en",
  datetimeFormats: {
    en: {
      short: {
        year: "numeric",
        month: "short",
        day: "numeric",
      },
      long: {
        year: "numeric",
        month: "short",
        day: "numeric",
        weekday: "short",
        hour: "numeric",
        minute: "numeric",
        hour12: false,
      },
    },
    fr: {
      short: {
        year: "numeric",
        month: "short",
        day: "numeric",
      },
      long: {
        year: "numeric",
        month: "short",
        day: "numeric",
        weekday: "long",
        hour: "numeric",
        minute: "numeric",
        hour12: true,
      },
    },
    es: {
      short: {
        year: "numeric",
        month: "short",
        day: "numeric",
      },
      long: {
        year: "2-digit",
        month: "short",
        day: "numeric",
        weekday: "long",
        hour: "numeric",
        minute: "numeric",
        hour12: true,
      },
    },
  },
}));
If you're using an editor with TypeScript support, you'll get helpful autocompletion for the available date fields like month and year. To display a formatted date in your component, use the $d function, passing it the date object and the format name you defined.
Fetching Localized Content from an API
So far, all translations have been static. For dynamic content—like blog posts—you need an API that can serve content in the requested locale. Hygraph's localization API is well-suited for this task.
If you haven't already, create a free Hygraph account. In Project Settings → Locales, add the languages your API should support:
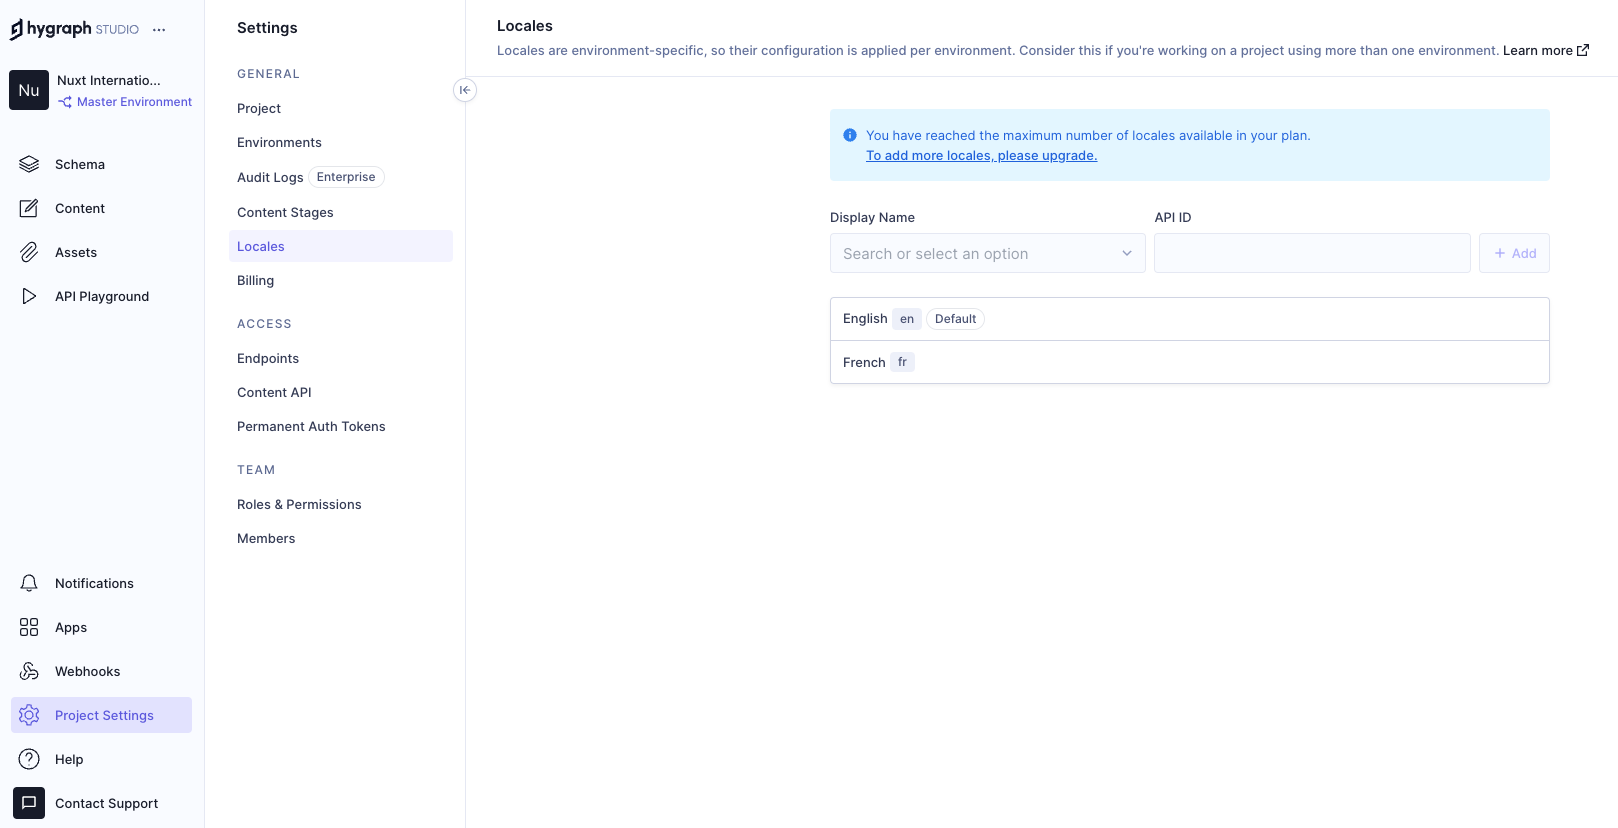
For this example, we'll add English and French. Next, create a localized_post model in your schema with two fields: title and body. During field creation, mark each field as "Localized" so Hygraph stores translated versions of them.
To make content publicly queryable, navigate to Project settings → Access → API Access → Public Content API and grant Read permissions to the localized_post model:
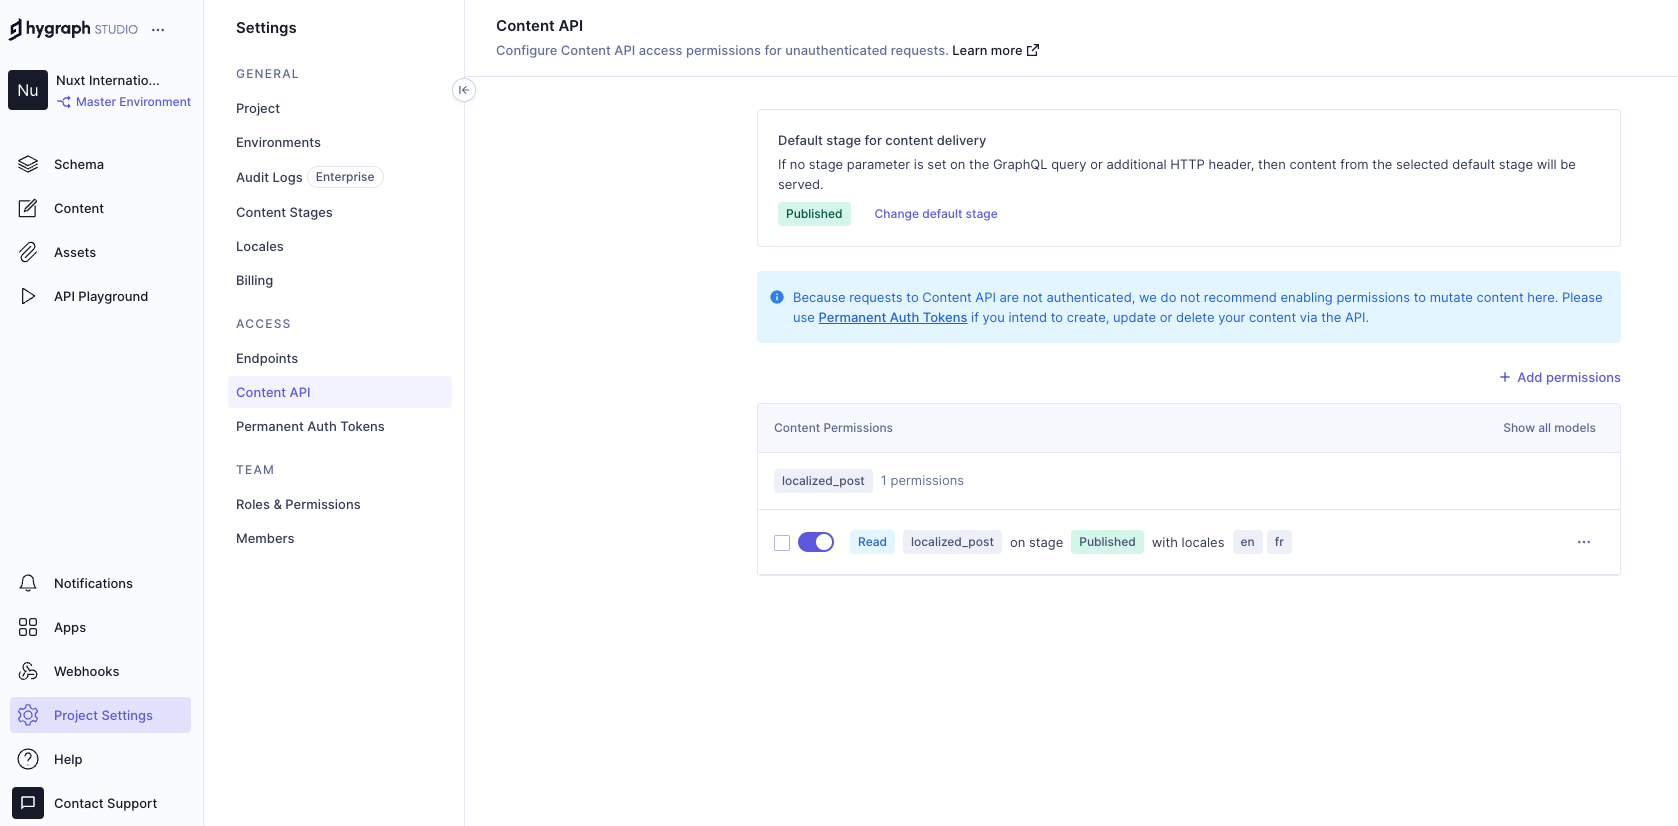
Now use the Hygraph API playground to seed the database. Run a GraphQL mutation that creates a post with both an English and a French version:
mutation createLocalizedPost {
  createLocalizedPost(
    data: {
      title: "A Journey Through the Alps",
      body: "Exploring the majestic mountains of the Alps offers a thrilling experience. The stunning landscapes, diverse wildlife, and pristine environment make it a perfect destination for nature lovers.",
      localizations: {
        create: [
          {locale: fr, data: {title: "Un voyage à travers les Alpes", body: "Explorer les majestueuses montagnes des Alpes offre une expérience palpitante. Les paysages époustouflants, la faune diversifiée et l'environnement immaculé en font une destination parfaite pour les amoureux de la nature."}}
        ]
      }
    }
  ) {
    id
  }
}
That mutation handles writes. To fetch localized content in your Nuxt app, you'll send a GraphQL query that includes a locale argument; Hygraph returns the correct localized field values based on the locale you pass. This pattern lets your frontend request content dynamically per user, combining static locale messages with database-driven translations in one coherent i18n strategy.
Assembling the Locale-Aware Data Layer
With the Hygraph schema and localized content in place, the next step is wiring the Nuxt application to consume that API. The chosen tool is nuxt-graphql-client, a minimal GraphQL client that handles operations without the overhead of elaborate configuration, code generation, or manual typing.
Install the module and register it in the Nuxt configuration:
npx nuxi@latest module add graphql-client
// nuxt.config.ts
export default defineNuxtConfig({
  modules: [
    // ...
    "nuxt-graphql-client"
    // ...
  ],
  runtimeConfig: {
    public: {
      GQL_HOST: 'ADD_YOUR_GQL_HOST_URL_HERE_OR_IN_.env'
    }
  },
});
Queries live in graphql/queries.graphql. The client scans .graphql and .gql files automatically, generating typed functions and client code inside .nuxt/gql. After a full restart of the Nuxt dev server, the generated GqlGetPosts function becomes available to trigger the query.
query getPosts($locale: [Locale!]!) {
  localizedPosts(locales: $locale) {
    title
    body
  }
}
Fetching Content Per Locale
The Blog page component drives the data retrieval. On mount, it reads the current locale from the useI18n composable and passes that value to a fetchPosts method, which forwards it to the GraphQL query as a variable. A watcher on the locale ref ensures that when the user switches languages, a fresh API call is made and the correct localized posts are returned.
// pages/blog.vue
<script lang="ts" setup>
  import type { GetPostsQueryVariables } from "#gql";
  import type { PostItem, Locale } from "../types/types";

  const { locale } = useI18n();
  const posts = ref<PostItem[]>([]);
  const isLoading = ref(false);
  const isError = ref(false);

  const fetchPosts = async (localeValue: Locale) => {
    try {
      isLoading.value = true;
      const variables: GetPostsQueryVariables = {
        locale: [localeValue],
      };
      const data = await GqlGetPosts(variables);
      posts.value = data?.localizedPosts ?? [];
    } catch (err) {
      console.log("Fetch Error, Something went wrong", err);
      isError.value = true;
    } finally {
      isLoading.value = false;
    }
  };

  // Fetch posts on component mount
  onMounted(() => {
    fetchPosts(locale.value as Locale);
  });

  // Watch for locale changes
  watch(locale, (newLocale) => {
    fetchPosts(newLocale as Locale);
  });
</script>
For displaying the results, a simple markup section iterates over the fetched posts, rendering each one's title and content as needed.
<!-- pages/blog.vue -->
<template>
  <v-container fluid>
    <v-card-title class="text-overline">Blogs</v-card-title>
    <div v-if="isLoading">
      <v-skeleton-loader type="card" v-for="n in 2" :key="n" class="mb-4" />
    </div>
    <div v-else-if="isError">
      <p>Something went wrong while getting blogs please check the logs.</p>
    </div>
    <div v-else>
      <div
        v-for="(post, index) in posts"
        :key="post.title || index"
        class="mb-4"
      >
        <v-card color="cardBackground">
          <v-card-title class="text-h6">{{ post.title }}</v-card-title>
          <v-card-text>{{ post.body }}</v-card-text>
        </v-card>
      </div>
    </div>
  </v-container>
</template>
If the setup is correct, switching the locale in the UI triggers an automatic refetch, and the page content updates to reflect the selected language.
Conclusion: The Translation Pipeline in Practice
What we have built is a complete, functional translation mechanism for a multilingual website. The user picks a locale from a list, and the app responds by querying Hygraph with the appropriate locale code and rendering the returned content.
The implementation may have seemed involved, but the actual steps are minimal: a GraphQL client, an i18n module, and a CMS with localized fields. The key achievement is connecting these pieces in a way that dynamic translations flow naturally from the backend to the browser.
While other libraries and platforms exist for internationalization, the specific combination matters less than the underlying pattern—how to handle locale-based data fetching and how to synchronize client-side state with an external content source.


