What a Block Actually Is
The terminology around WordPress blocks has become muddled. Everything developed leading up to WordPress 5.0 was codenamed "Gutenberg," and the name now covers the Block Editor, the Site Editor, and a plugin where experimental features are tested. For clarity, in this article "blocks" means components used to build content in the Block Editor — components inserted into a post or page that supply structure for a given content type. WordPress ships core blocks such as Paragraph, List, Image, Video and Audio. Block development is about creating custom blocks, or filtering core blocks to change their behavior.
A block can be thought of as an entity with properties called attributes. It exists in two forms: a graphical interface in the editor, and a piece of data in the database.

Credit: WordPress Block Editor Handbook
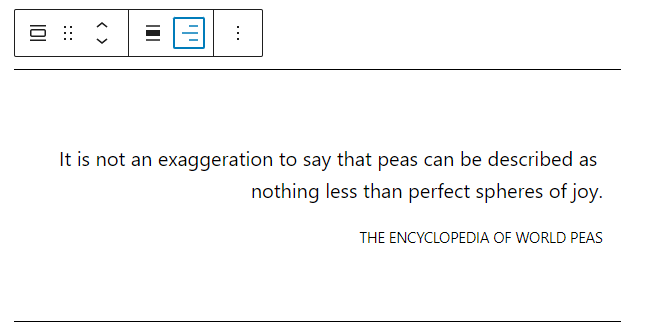
Publishing a post stores it in wp_posts once again, but now a serialized representation of each block sits in the post_content field. The representation looks like ordinary HTML with JSON in an HTML comment:
<!-- wp:pullquote {"textAlign":"right"} -->
<figure class="wp-block-pullquote has-text-align-right">
  <blockquote>
    <p>It is not an exaggeration to say that peas can be described as nothing less than perfect spheres of joy.</p>
    <cite>The Encyclopedia of world peas</cite>
  </blockquote>
</figure>
<!-- /wp:pullquote -->
The JSON attribute here is "textAlign": "right". When the editor reopens the post, it parses that output, recognizes the Pullquote block, reads its attributes, and uses its JavaScript to reconstruct the interface from them:
<!-- wp:pullquote {"textAlign":"right"} -->...<!-- /wp:pullquote -->Block development therefore has three parts:
- Register the block type with WordPress, along with its details.
- Supply the JavaScript that renders the block in the editor and serializes it for storage.
- Supply any supporting resources the block needs, such as styles and fonts.
The conversion between serialized data and interface happens only inside the Block Editor; the front end displays content exactly as stored. In that sense, blocks are a sophisticated way of writing data to the database.

Setting Up a Block Plugin
Blocks are, technically, plugins — though they can live in themes and a single plugin can contain several blocks. If you have built a WordPress plugin before, you are partly there already. To get started you need Node installed, which provides npm (installing dependencies and compiling) and npx (running package commands without installing them). macOS users can use nvm to update versions; Windows users install Node from nodejs.org.
Many tutorials begin by installing @wordpress/create-block, which scaffolds a complete project. It is convenient, but it is an automation tool rather than a requirement. Stripped to the baseline, the needed pieces are:
readme.txt— describes the plugin and populates its WordPress Plugin Directory page; if you host on GitHub, consider a matchingREADME.md.package.json— defines the Node packages required for development. In classic plugin development, this is the counterpart tocomposer.json.plugin.php— the main plugin file. Classic PHP: plugin header, metadata, registration.src/— the block's source code.
Only plugin.php is technically necessary; the rest either inform or manage the environment. To scaffold with the utility instead, run:
npx @wordpress/create-blockDependencies
Dependencies are declared in package.json. The @wordpress/create-block utility generates the following (comments added here; JSON does not support them, so strip them if copying):
{
  // Defines the name of the project
  "name": "block-example",
  // Sets the project version number using semantic versioning
  "version": "0.1.0",
  // A brief description of the project
  "description": "Example block scaffolded with Create Block tool.",
  // You could replace this with yourself
  "author": "The WordPress Contributors",
  // Standard licensing information
  "license": "GPL-2.0-or-later",
  // Defines the main JavaScript file
  "main": "build/index.js",
  // Everything we need for building and compiling the plugin during development
  "scripts": {
    "build": "wp-scripts build",
    "format": "wp-scripts format",
    "lint:css": "wp-scripts lint-style",
    "lint:js": "wp-scripts lint-js",
    "packages-update": "wp-scripts packages-update",
    "plugin-zip": "wp-scripts plugin-zip",
    "start": "wp-scripts start"
  },
  // Defines which version of the scripts packages are used (24.1.0 at time of writing)
  // https://developer.wordpress.org/block-editor/reference-guides/packages/packages-scripts/
  "devDependencies": {
    "@wordpress/scripts": "^24.1.0"
  }
}
View without comments
{
  "name": "block-example",
  "version": "0.1.0",
  "description": "Example block scaffolded with Create Block tool.",
  "author": "The WordPress Contributors",
  "license": "GPL-2.0-or-later",
  "main": "build/index.js",
  "scripts": {
    "build": "wp-scripts build",
    "format": "wp-scripts format",
    "lint:css": "wp-scripts lint-style",
    "lint:js": "wp-scripts lint-js",
    "packages-update": "wp-scripts packages-update",
    "plugin-zip": "wp-scripts plugin-zip",
    "start": "wp-scripts start"
  },
  "devDependencies": {
    "@wordpress/scripts": "^24.1.0"
  }
}
The main dependency is @wordpress/scripts. As a devDependency, it aids development by exposing the wp-scripts binary, which compiles code from src into build, among other tasks.
WordPress maintains other packages for various purposes; @wordpress/components, for example, provides pre-built UI components for the editor that keep a block consistent with WordPress design standards. These packages do not need to be installed to be used: @wordpress dependencies are not bundled into block code. Instead, import statements for utility packages are used to build an "assets" file during compilation, and they are converted to references on a global object. For example, import { __ } from "@wordpress/i18n" becomes a minified form of const __ = window.wp.i18n.__, where window.wp.i18n is guaranteed to exist once the corresponding package file is enqueued.
At block registration, that assets file tells WordPress which package dependencies the block has, and they are enqueued automatically — all handled behind the scenes when the scripts package is in use. You can still install the packages locally for code completion and parameter info:
// etc.
"devDependencies": {
  "@wordpress/scripts": "^24.1.0"
},
"dependencies": {
  "@wordpress/components": "^19.17.0"
}
With package.json ready, run npm install from the project folder:

Plugin Header and File Structure
Every plugin carries a block of information at the top of its main file so WordPress can recognize it and display details on the Plugins screen. @wordpress/create-block generated the following for a plugin named "Hello World":
<?php
/**
 * Plugin Name:       Block Example
 * Description:       Example block scaffolded with Create Block tool.
 * Requires at least: 5.9
 * Requires PHP:      7.0
 * Version:           0.1.0
 * Author:            The WordPress Contributors
 * License:           GPL-2.0-or-later
 * License URI:       https://www.gnu.org/licenses/gpl-2.0.html
 * Text Domain:       css-tricks
 *
 * @package           create-block
 */
The main file can have any name — index.php, plugin.php, and so on. The package names it after the project name, which is why this example produced block-example.php. You will want to adjust fields such as the author, and not all of it is required. A leaner, from-scratch header could look like this:
<?php
/**
 * Plugin Name:       Block Example
 * Plugin URI:        https://css-tricks.com
 * Description:       An example plugin for learning WordPress block development.
 * Version:           1.0.0
 * Author:            Arjun Singh
 * License:           GPL-2.0-or-later
 * License URI:       https://www.gnu.org/licenses/gpl-2.0.html
 * Text Domain:       css-tricks
 */
The meaning of each line is already documented in the WordPress Plugin Handbook, so it is not repeated here. Using @wordpress/create-block leaves additional files in the project folder:
block-example/
├── build
├── node_modules
├── src/
│   ├── block.json
│   ├── edit.js
│   ├── editor.scss
│   ├── index.js
│   ├── save.js
│   └── style.scss
├── .editorconfig
├── .gitignore
├── block-example.php
├── package-lock.json
├── package.json
└── readme.txt
The notable entries:
build/— compiled assets for production.node_modules— development dependencies fromnpm install.src/— source code, compiled intobuild..editorconfig— editor settings for code consistency..gitignore— files excluded from version control;node_modulesbelongs here.package-lock.json— auto-generated record of package updates fromnpm install.
Block Metadata
src/block.json is the focus of registration. WordPress is standardizing on it as the canonical way to register a block, since it gives WordPress the context to recognize the block and render it in the editor. @wordpress/create-block generates it; otherwise create it yourself. Here is what the utility produced:
{
  "$schema": "https://schemas.wp.org/trunk/block.json",
  "apiVersion": 2,
  "name": "create-block/block example",
  "version": "0.1.0",
  "title": "Block Example",
  "category": "widgets",
  "icon": "smiley",
  "description": "Example block scaffolded with Create Block tool.",
  "supports": {
    "html": false
  },
  "textdomain": "css-tricks",
  "editorScript": "file:./index.js",
  "editorStyle": "file:./index.css",
  "style": "file:./style-index.css"
}
Plenty of fields are available, but only name and title are strictly required. A minimal version:
{
  "$schema": "https://schemas.wp.org/trunk/block.json",
  "apiVersion": 2,
  "name": "css-tricks/block-example",
  "version": "1.0.0",
  "title": "Block Example",
  "category": "text",
  "icon": "format-quote",
  "editorScript": "file:./index.js",
}$schema— optional despite its look of importance; it lets supporting editors validate the syntax and offer tooltips and autocomplete.apiVersion— the version of the Block API in use; Version 2 is currently the latest.name— a required unique string. Thecss-tricks/prefix acts as a namespace to avoid collisions with similarly named plugins; your initials would serve (e.g.as/block-example).version— WordPress suggests this for cache-busting on new releases.title— the other required field; the name shown wherever the block appears.category— groups the block with others in the editor. Existing categories includetext,media,design,widgets,themeandembed; custom categories are possible.icon— a Dashicons choice for visual representation. This example usesformat-quote. Reusing existing icons is convenient, though custom icons are possible.editorScript— the location of the main JavaScript file,index.js.
Registration in PHP and JavaScript
Registration happens in two places: PHP and JavaScript. In the main plugin file, add the following directly after the plugin header:
function create_block_block_example_block_init() {
  register_block_type( __DIR__ . '/build' );
}
add_action( 'init', 'create_block_block_example_block_init' );
That function name came from create-block and can be changed. The priority is uniqueness, so namespace the function name to avoid conflicts with other plugins:
function css_tricks_block_example_block_init() {
  register_block_type( __DIR__ . '/build' );
}
add_action( 'init', 'css_tricks_block_example_block_init' );
The path points at build even though block.json lives in src, because the code must be compiled first. The scripts package processes src, places production files in build, and copies block.json along the way.
On the JavaScript side, src/index.js should look like this:
import { registerBlockType } from "@wordpress/blocks";

import metadata from "./block.json";
import Edit from "./edit.js";
import Save from "./save.js";

const { name } = metadata;

registerBlockType(name, {
  edit: Edit,
  save: Save,
});
This code imports registerBlockType from @wordpress/blocks, imports metadata from block.json, and imports the Edit and Save components from their files. It then registers the block and uses those components for rendering in the editor and saving content to the database.
The edit and save functions are central to the back-end/front-end distinction: edit handles rendering in the back end, while save writes content from the Block Editor to the database for the front end.
Verifying the Setup
A quick test shows both contexts working. In index.js, return basic content from the functions directly:
import { registerBlockType } from "@wordpress/blocks";
import metadata from "./block.json";

const { name } = metadata;

registerBlockType(name, {
  edit: () => {
    return (
      "Hello from the Block Editor"
    );
  },
  save: () => {
    return (
      "Hello from the front end"
    );
  }
});
This is a stripped-down version of the previous code, fetching the block name straight from the block.json metadata and calling the functions without the Edit and Save components. Compile it with npm run build, and a block named "Block Example" appears in the Block Editor:

Dropping the block into the content area displays the edit output:
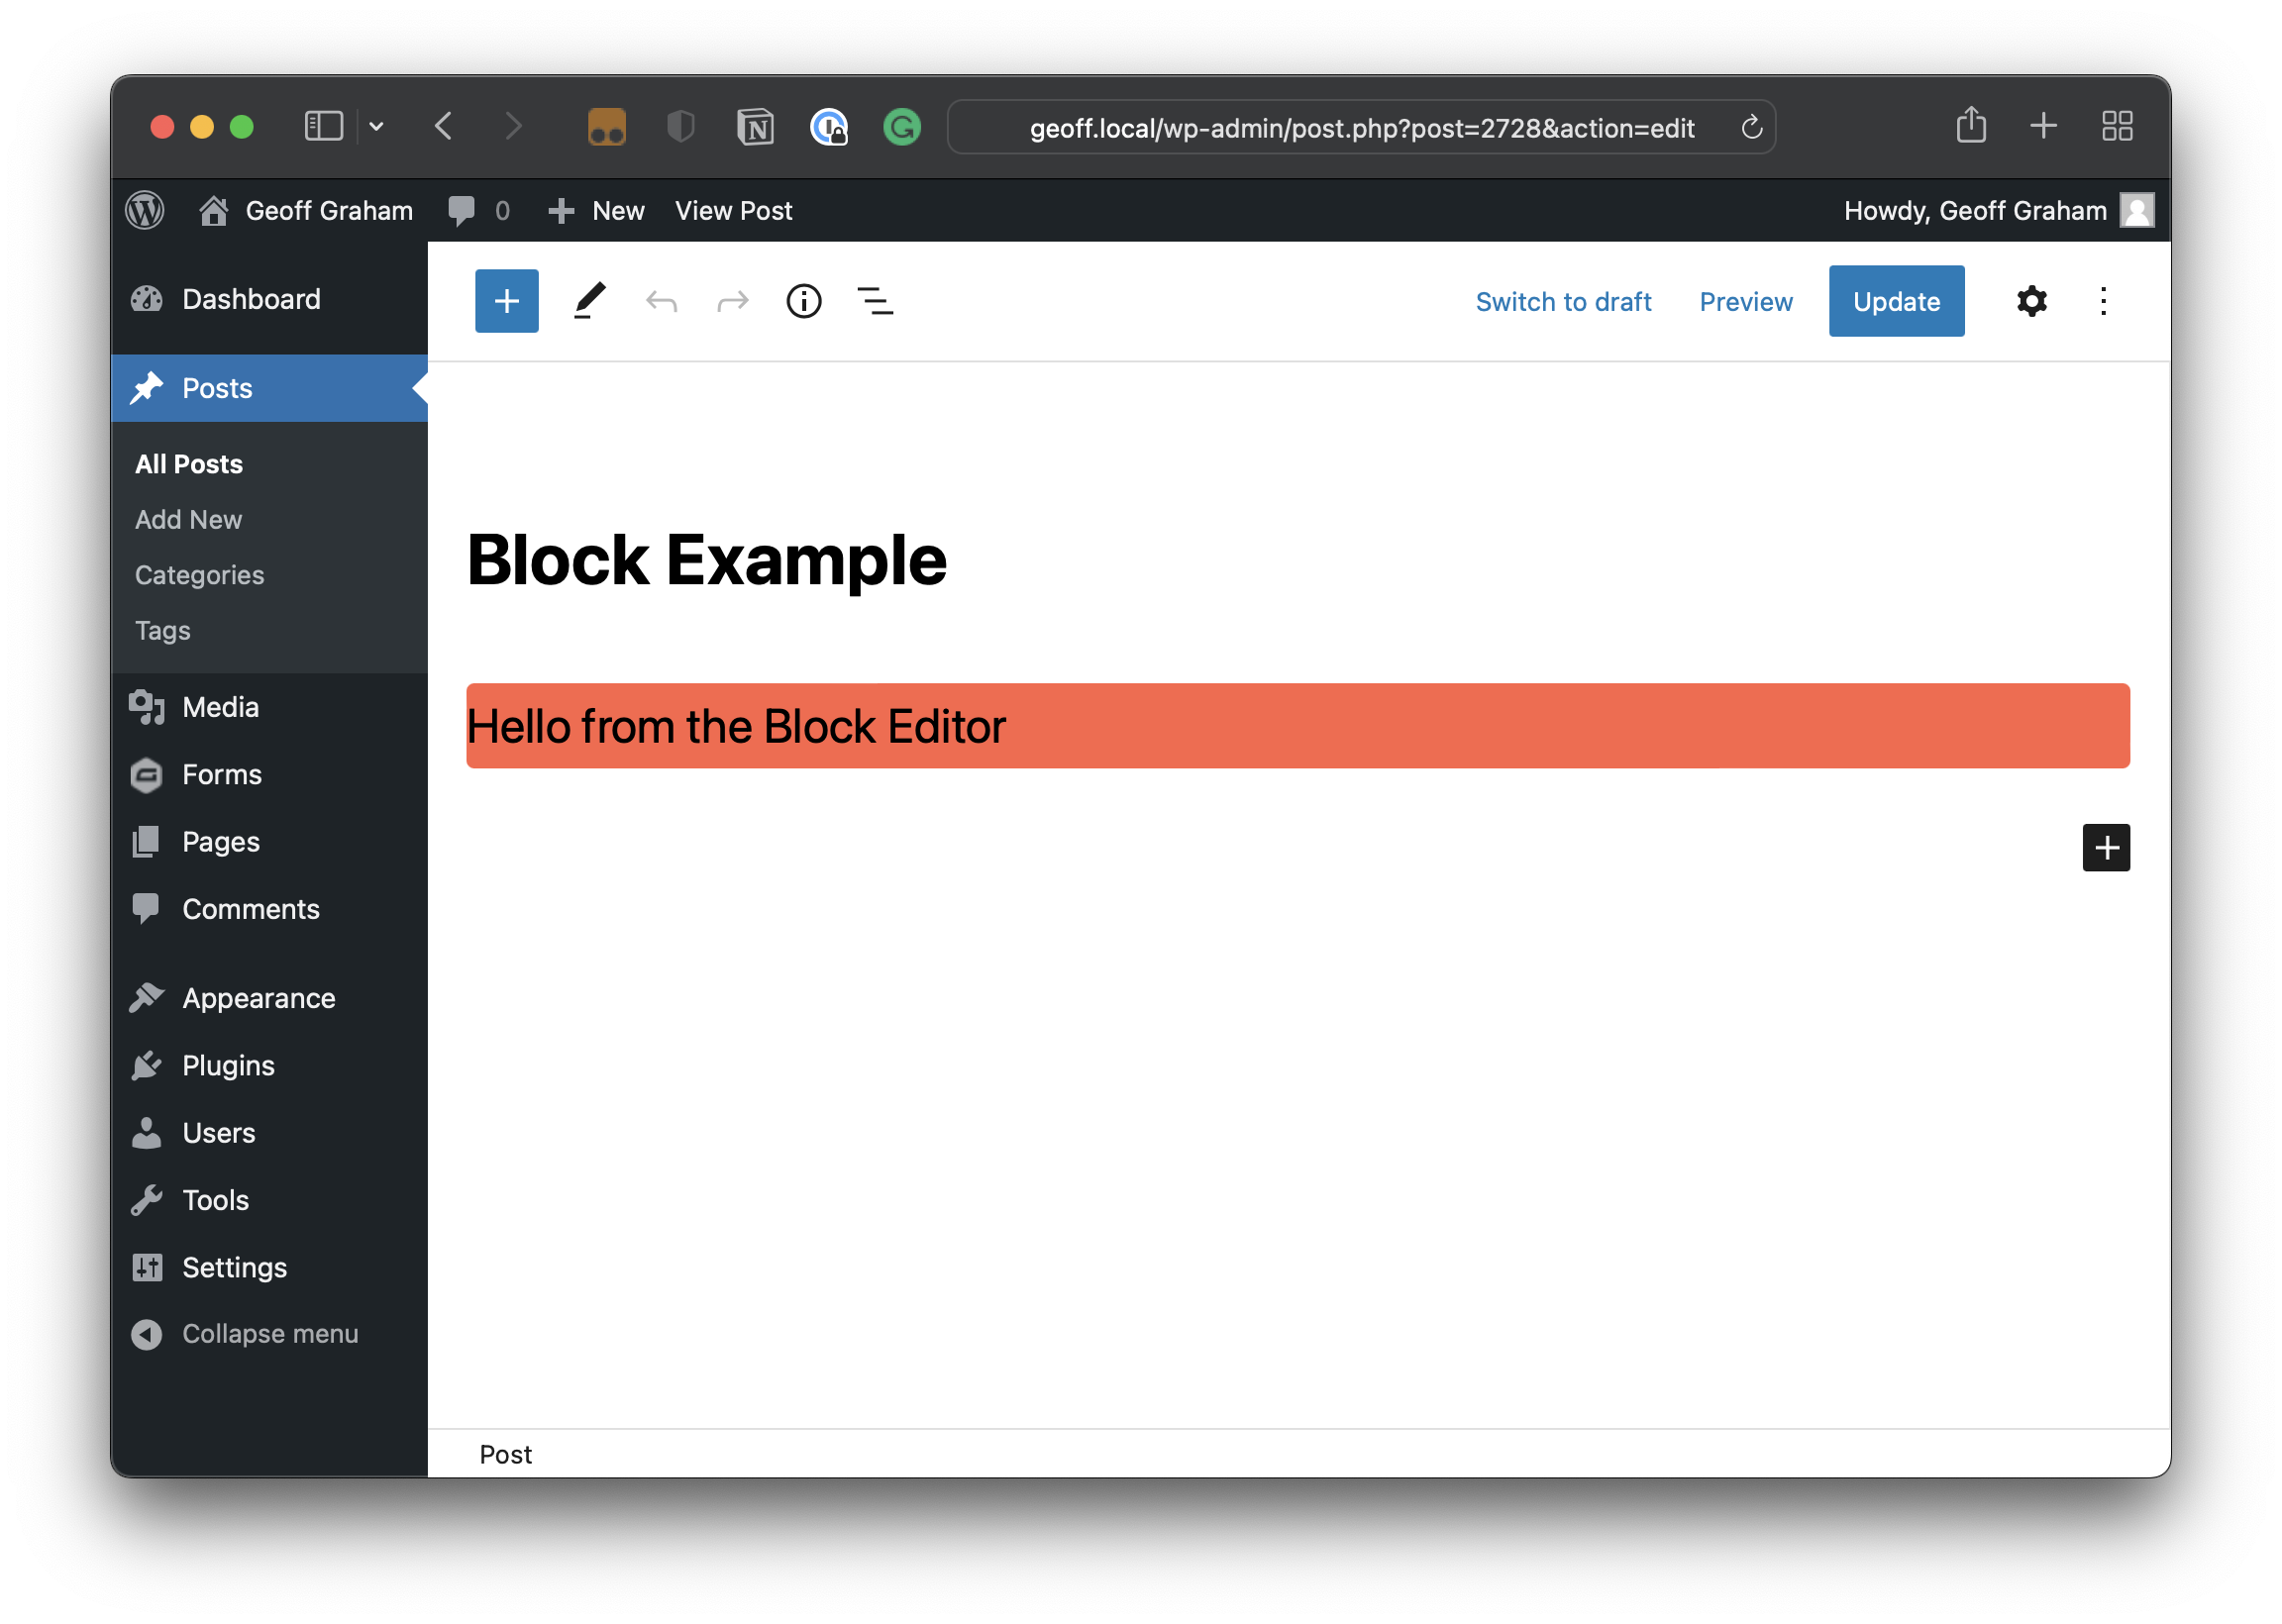
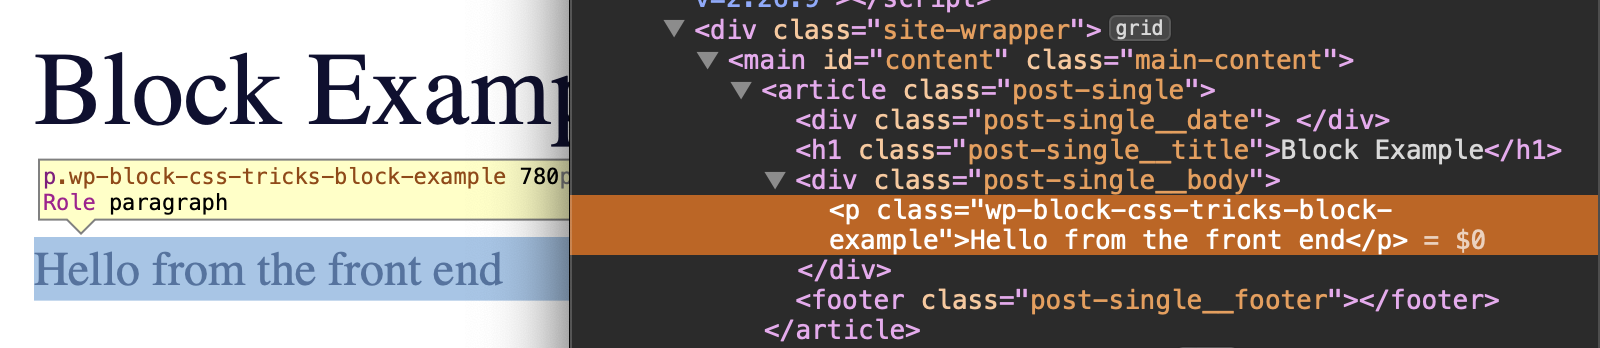
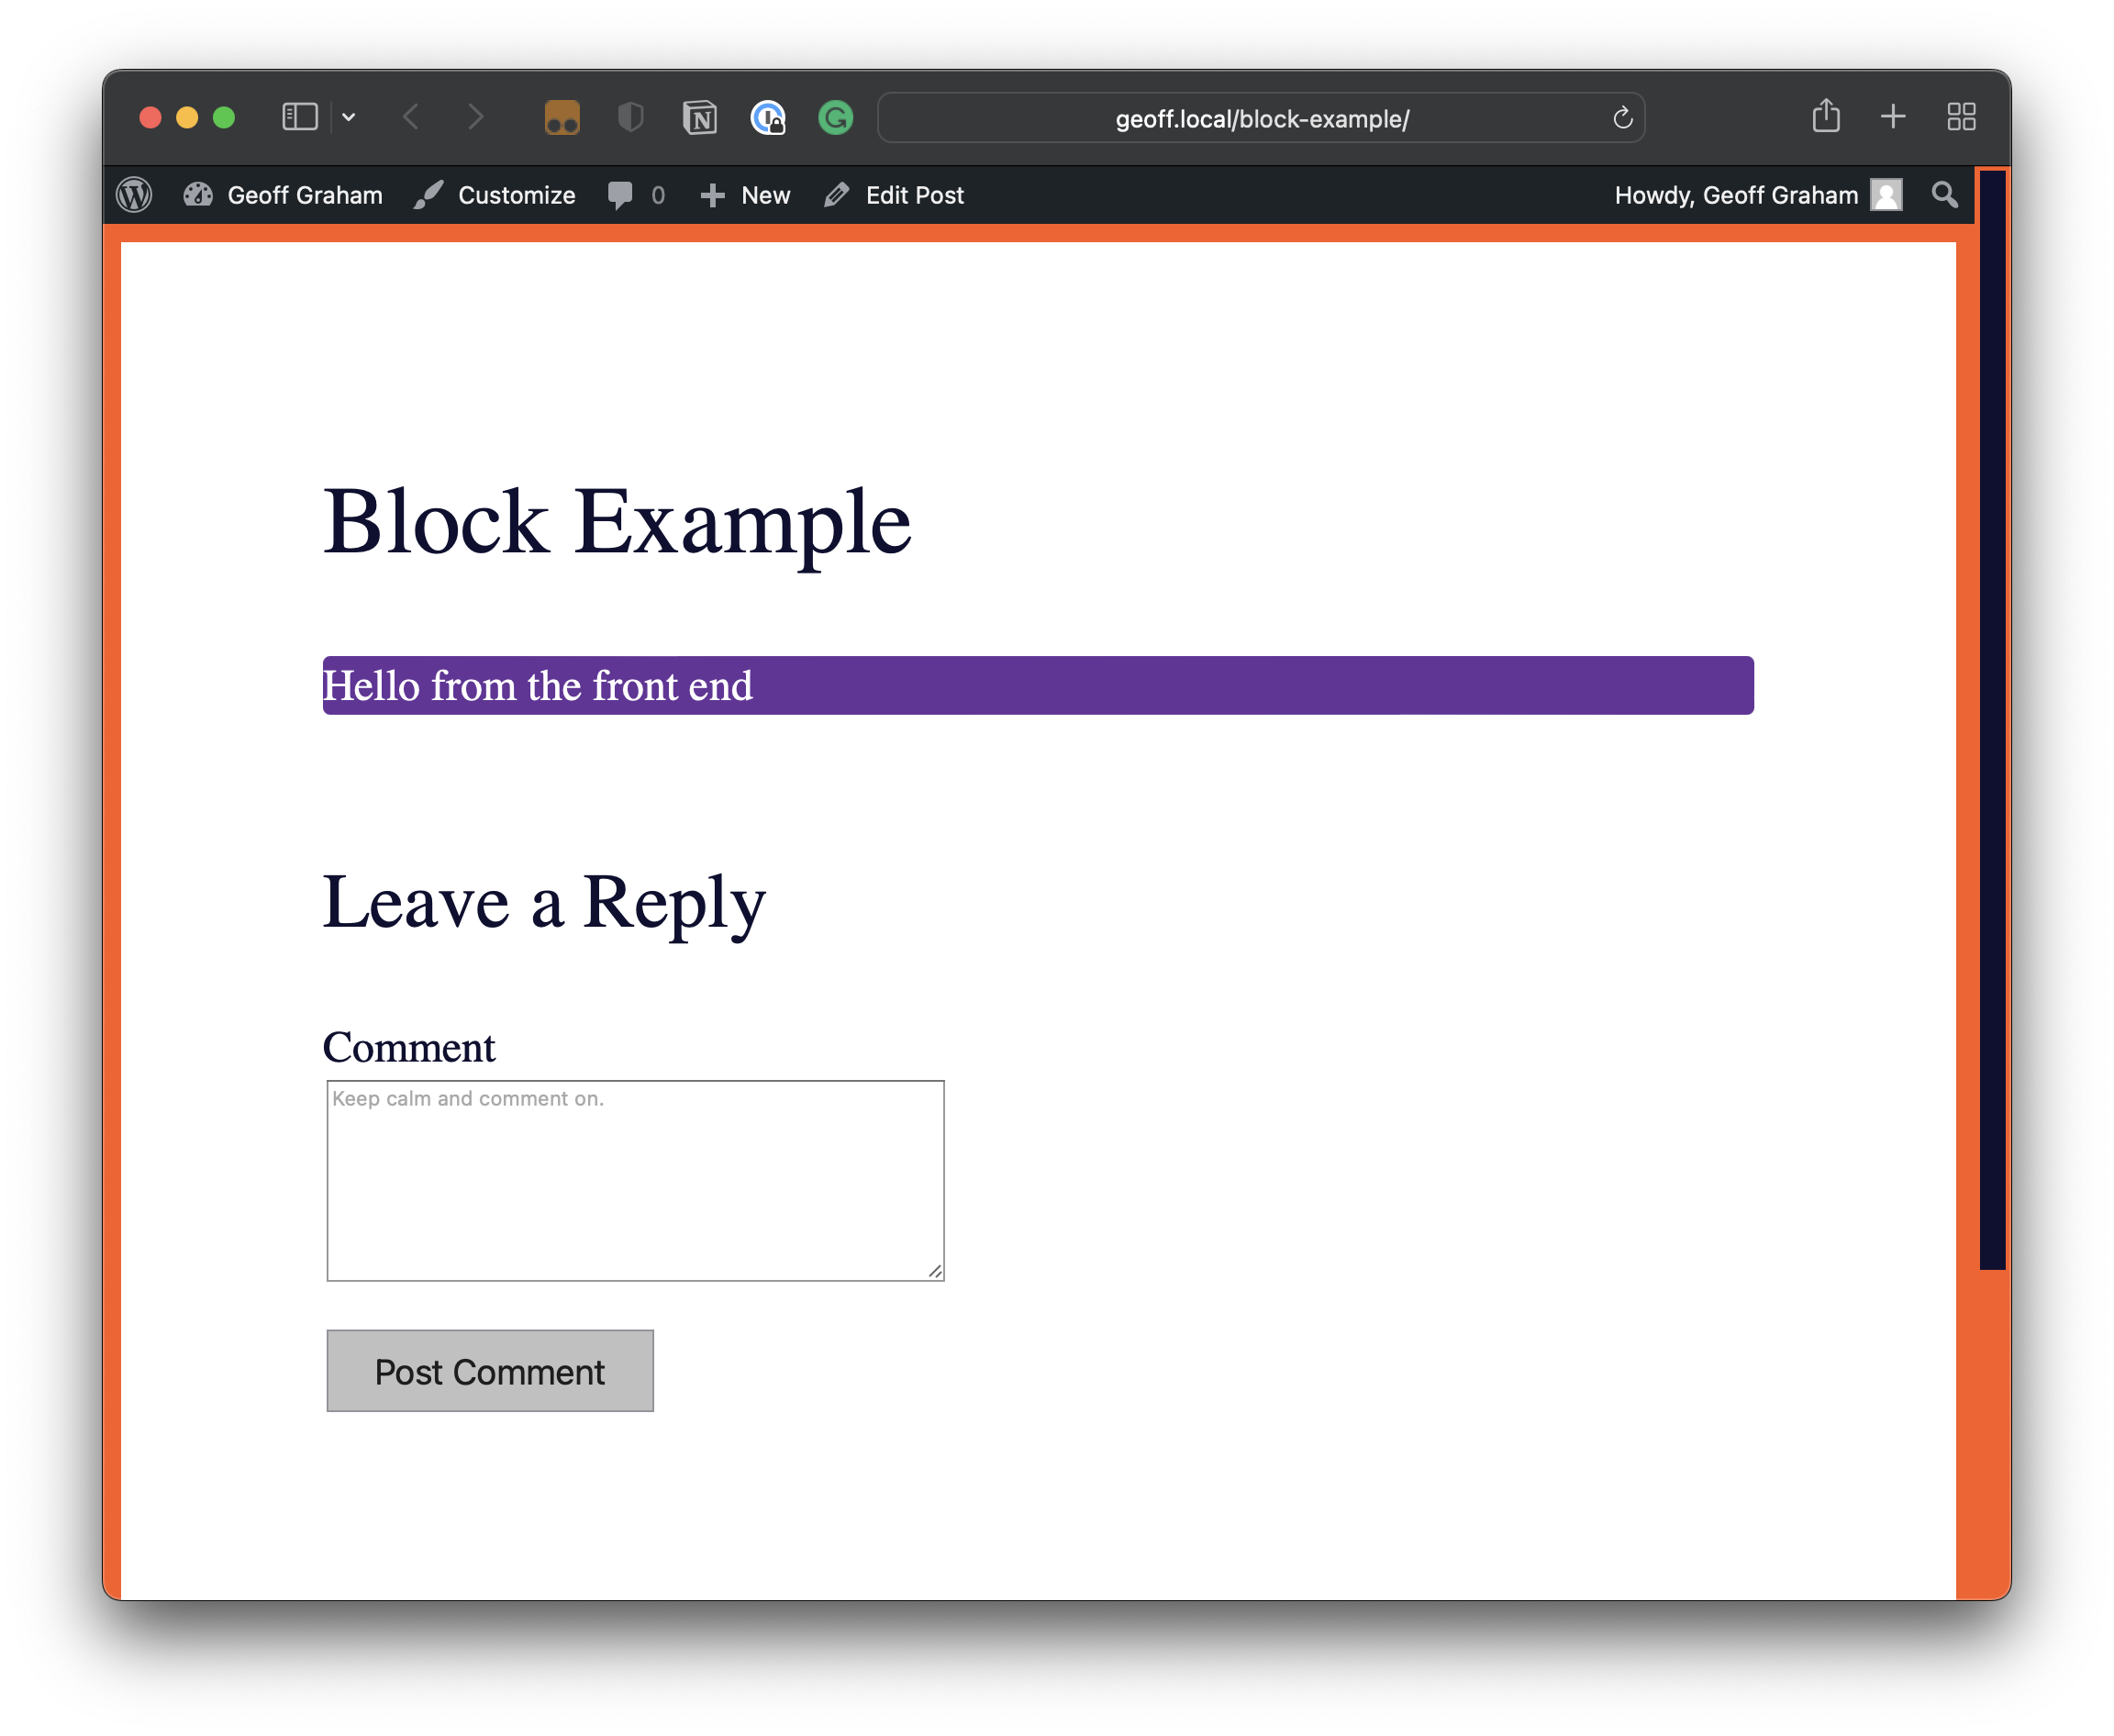
Saving and publishing shows the save output on the front end:

With that confirmed, revert index.js to its earlier form:
import { registerBlockType } from "@wordpress/blocks";

import metadata from "./block.json";
import Edit from "./edit.js";
import Save from "./save.js";

const { name } = metadata;

registerBlockType(name, {
  edit: Edit,
  save: Save,
});
The edit and save functions now point to two files in src that @wordpress/create-block generated, each carrying the imports it needs and establishing the component that holds the block's markup.
The Editor Component
import { useBlockProps } from "@wordpress/block-editor";
import { __ } from "@wordpress/i18n";

export default function Edit() {
  return (
    <p {...useBlockProps()}>
      {__("Hello from the Block Editor", "block-example")}
    </p>
  );
}
Props imported from @wordpress/block-editor generate classes for styling, and the __ internationalization function handles translations.

The Save Component
import { useBlockProps } from "@wordpress/block-editor";
import { __ } from "@wordpress/i18n";

export default function Save() {
  return (
    <p {...useBlockProps.save()}>
      {__("Hello from the front end", "block-example")}
    </p>
  );
}
This mirrors src/edit.js with slightly different text, and again yields a class usable in CSS:
Styling Workflow
Two fields in src/block.json control styles: editorStyle points to back-end styles, and style points to styles shared by both front and back ends.
Because the scripts package copies block.json as it compiles src into build, registration actually uses build/block.json. Any path given in src/block.json must therefore be written relative to build/block.json.
Rather than dropping CSS in build and referencing it, you can exploit the compilation pipeline, which handles Sass. Style files live in src and are imported in JavaScript, with these rules:
- A file named
style.css,style.scssorstyle.sass, imported into JavaScript, compiles tostyle-index.css. - All other style files are bundled into
index.css.
Bundling uses webpack, and styles go through the PostCSS plugin; PostCSS extends with plugins, and the scripts package ships plugins for Sass, SCSS and Autoprefixer, all usable without extra installs. @wordpress/create-block starts you off with editor.scss for back-end styles and style.scss for styles shared across both contexts.
Shared Styles
Create src/style.scss (already present with @wordpress/create-block) and import it in index.js:
import "./style.scss";Add basic styles using the class generated from block props:
.wp-block-css-tricks-block-example {
  background-color: rebeccapurple;
  border-radius: 4px;
  color: white;
  font-size: 24px;
}
After a build, these compile into build/style.css and are referenced by both the editor and the front end.
Editor-Only Styles
Create src/editor.scss (also generated for you) with editor-specific rules:
.wp-block-css-tricks-block-example {
  background-color: tomato;
  color: black;
}
Import it in edit.js, which holds the Edit component — it can go anywhere, but that is the logical spot for editor styles:
import "./editor.scss";Running npm run build applies the styles in both contexts:
Referencing Compiled Styles
The imports in edit.js and index.js compile to two files in build: index.css and style-index.css. Add statements for these generated files to the block.json metadata:
{
  "$schema": "https://schemas.wp.org/trunk/block.json",
  "apiVersion": 2,
  "name": "css-tricks/block-example",
  "version": "1.0.0",
  "title": "Block Example",
  "category": "text",
  "icon": "format-quote",
  "editorScript": "file:./index.js",
  "editorStyle": "file:./index.css",
  "style": "file:./style-index.css"
}
Run npm run build once more, install and activate the plugin, and the block is ready to use. npm run start runs the build in watch mode, recompiling on every save.
Where This Leaves You
Real blocks also use the editor's Settings sidebar and other WordPress features for richer experiences. And since each block effectively has two versions, edit and save, you need to think about organizing code to avoid duplication. What this walkthrough provides is the baseline: registering a block, understanding serialization, and knowing what the scaffolding does and why.