
Beyond Static: Adding a Data Layer to the JAMstack
The JAMstack has become a standard approach for building high-performance, content-driven sites. The same architectural principles that make it great for static content — global delivery, no server management, and a clean separation of concerns — can be applied to full applications. What’s needed is a data service that fits the model.
For content sites, the ecosystem offers a wide range of APIs for specific tasks: sending email (Twilio), handling form submissions (Formspree, Formingo, Formstack), and more. These services handle discrete operations well. But when data becomes relational, stateful, or requires real-time updates, a dedicated database is the right tool.
Hosting your own database server runs against JAMstack principles. The better fit is a database-as-a-service that shares the same operational traits:
- Accessible via API from a browser or build process.
- Flexible data modeling to match the needs of your application.
- Global data distribution, much like a CDN distributes static assets.
- Automatic scaling without the need for a DBA or developer intervention.
This is the core of serverless data. In the examples below, we’ll use FaunaDB, a global serverless database with native GraphQL support, to demonstrate how you can move from static site to dynamic app while staying true to the JAMstack model.

Setting Up a Serverless Database
FaunaDB’s data model is built around documents, collections, and indexes. Documents are JSON-like objects stored in collections, and indexes let you query your data efficiently. For a typical app, you’ll define a collection for each entity type you need.
Create a database in the FaunaDB dashboard, then set up a collection for your initial data type. For our first example, we’ll start by ingesting data from a form submission into a collection called messages.
Securing Serverless Data Access
One of the critical concerns with client-side data access is security. FaunaDB addresses this with a token-based authentication system. You create a key with specific permissions, generate a token from that key, and pass the token to your client. The token can be scoped to a particular database or to a specific user’s data.
For end-user applications, you’ll want to use user-defined functions (UDFs) to encapsulate business logic. Instead of allowing a client to perform arbitrary queries, you define a function on the server and call it from the client. This gives you control over what data can be accessed or modified.
Building a JAMstack Guestbook With Gatsby and Fauna
A guestbook is a perfect example of a classic web concept that demonstrates the power of the JAMstack. It combines user-generated content with static site performance. Readers can view past entries and leave their own, with data managed through FaunaDB and the site built with Gatsby. Here is how to construct that application.
Project Setup and Initial Cleanup
Assuming you have Node and NPM installed, the first step is to install the Gatsby CLI and create a new project. For this demo, a simple starter equipped with the Bulma CSS framework provides a solid structural foundation and ready-made styles.
npm install -g gatsby-cligatsby new <directory-to-install-into> <starter>gatsby new guestbook-app https://github.com/amandeepmittal/gatsby-bulma-quickstartBefore adding any functionality, we should remove the starter's template content. First, simplify the component in components/header.js to strip out branded content.
import React from 'react';

import './style.scss';

const Header = ({ siteTitle }) => (
  <section className="hero gradientBg ">
    <div className="hero-body">
      <div className="container container--small center">
        <div className="content">
          <h1 className="is-uppercase is-size-1 has-text-white">
            Sign our Virtual Guestbook
          </h1>
          <p className="subtitle has-text-white is-size-3">
            If you like all the things that we do, be sure to sign our virtual guestbook
          </p>
        </div>
      </div>
    </div>
  </section>
);

export default Header;
Next, clean out components/midsection.js, which will host the application's primary components. This file will render our guestbook's form for new submissions and the list of existing signatures.
import React, { useState } from 'react';
import Signatures from './signatures';
import SignForm from './sign-form';

const Midsection = () => {

    const [sigData, setSigData] = useState(data.allSignatures.nodes);
    return (
        <section className="section">
            <div className="container container--small">
                <section className="section is-small">
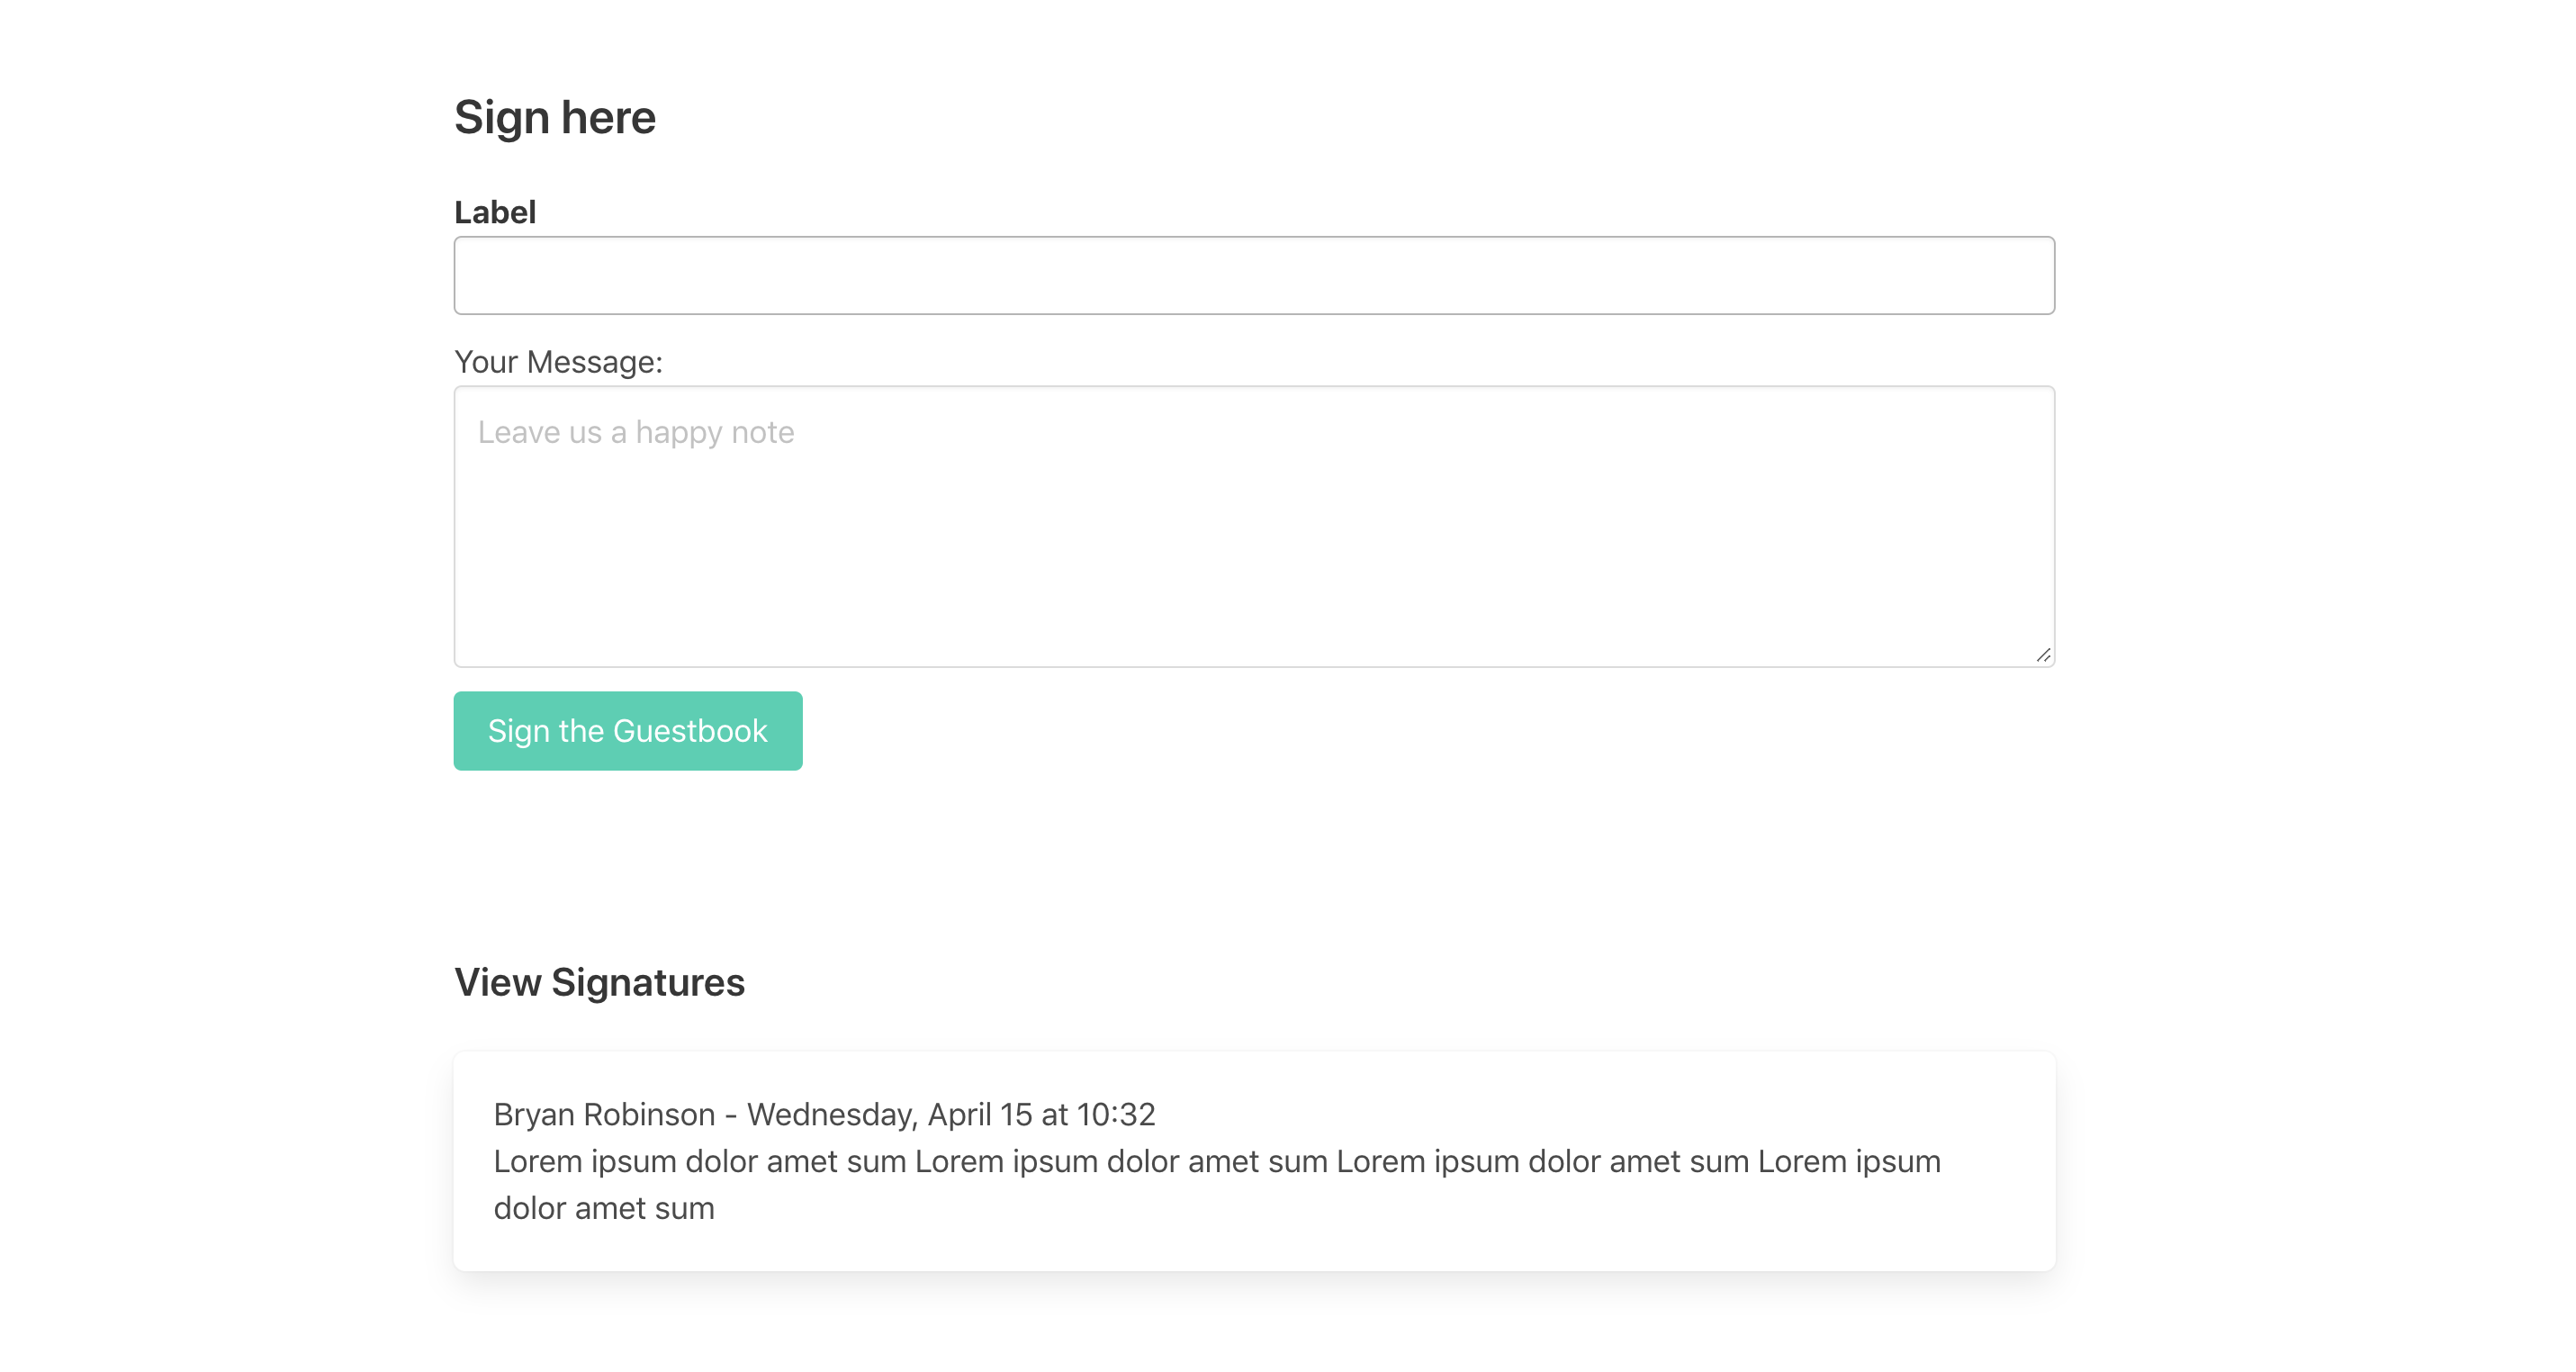
                    <h2 className="title is-4">Sign here</h2>
                    <SignForm></SignForm>
                </section>

                <section className="section">
                    <h2 className="title is-5">View Signatures</h2>
                    <Signatures></Signatures>
                </section>
            </div>
        </section>
    )
}

export default Midsection;
With a blank slate ready, we can now establish the database layer.
Creating the FaunaDB Collection
After logging into Fauna and creating a new database named guestbook, define a "Collection" called signature. Collections group Documents, which are JSON objects representing our individual data entries.
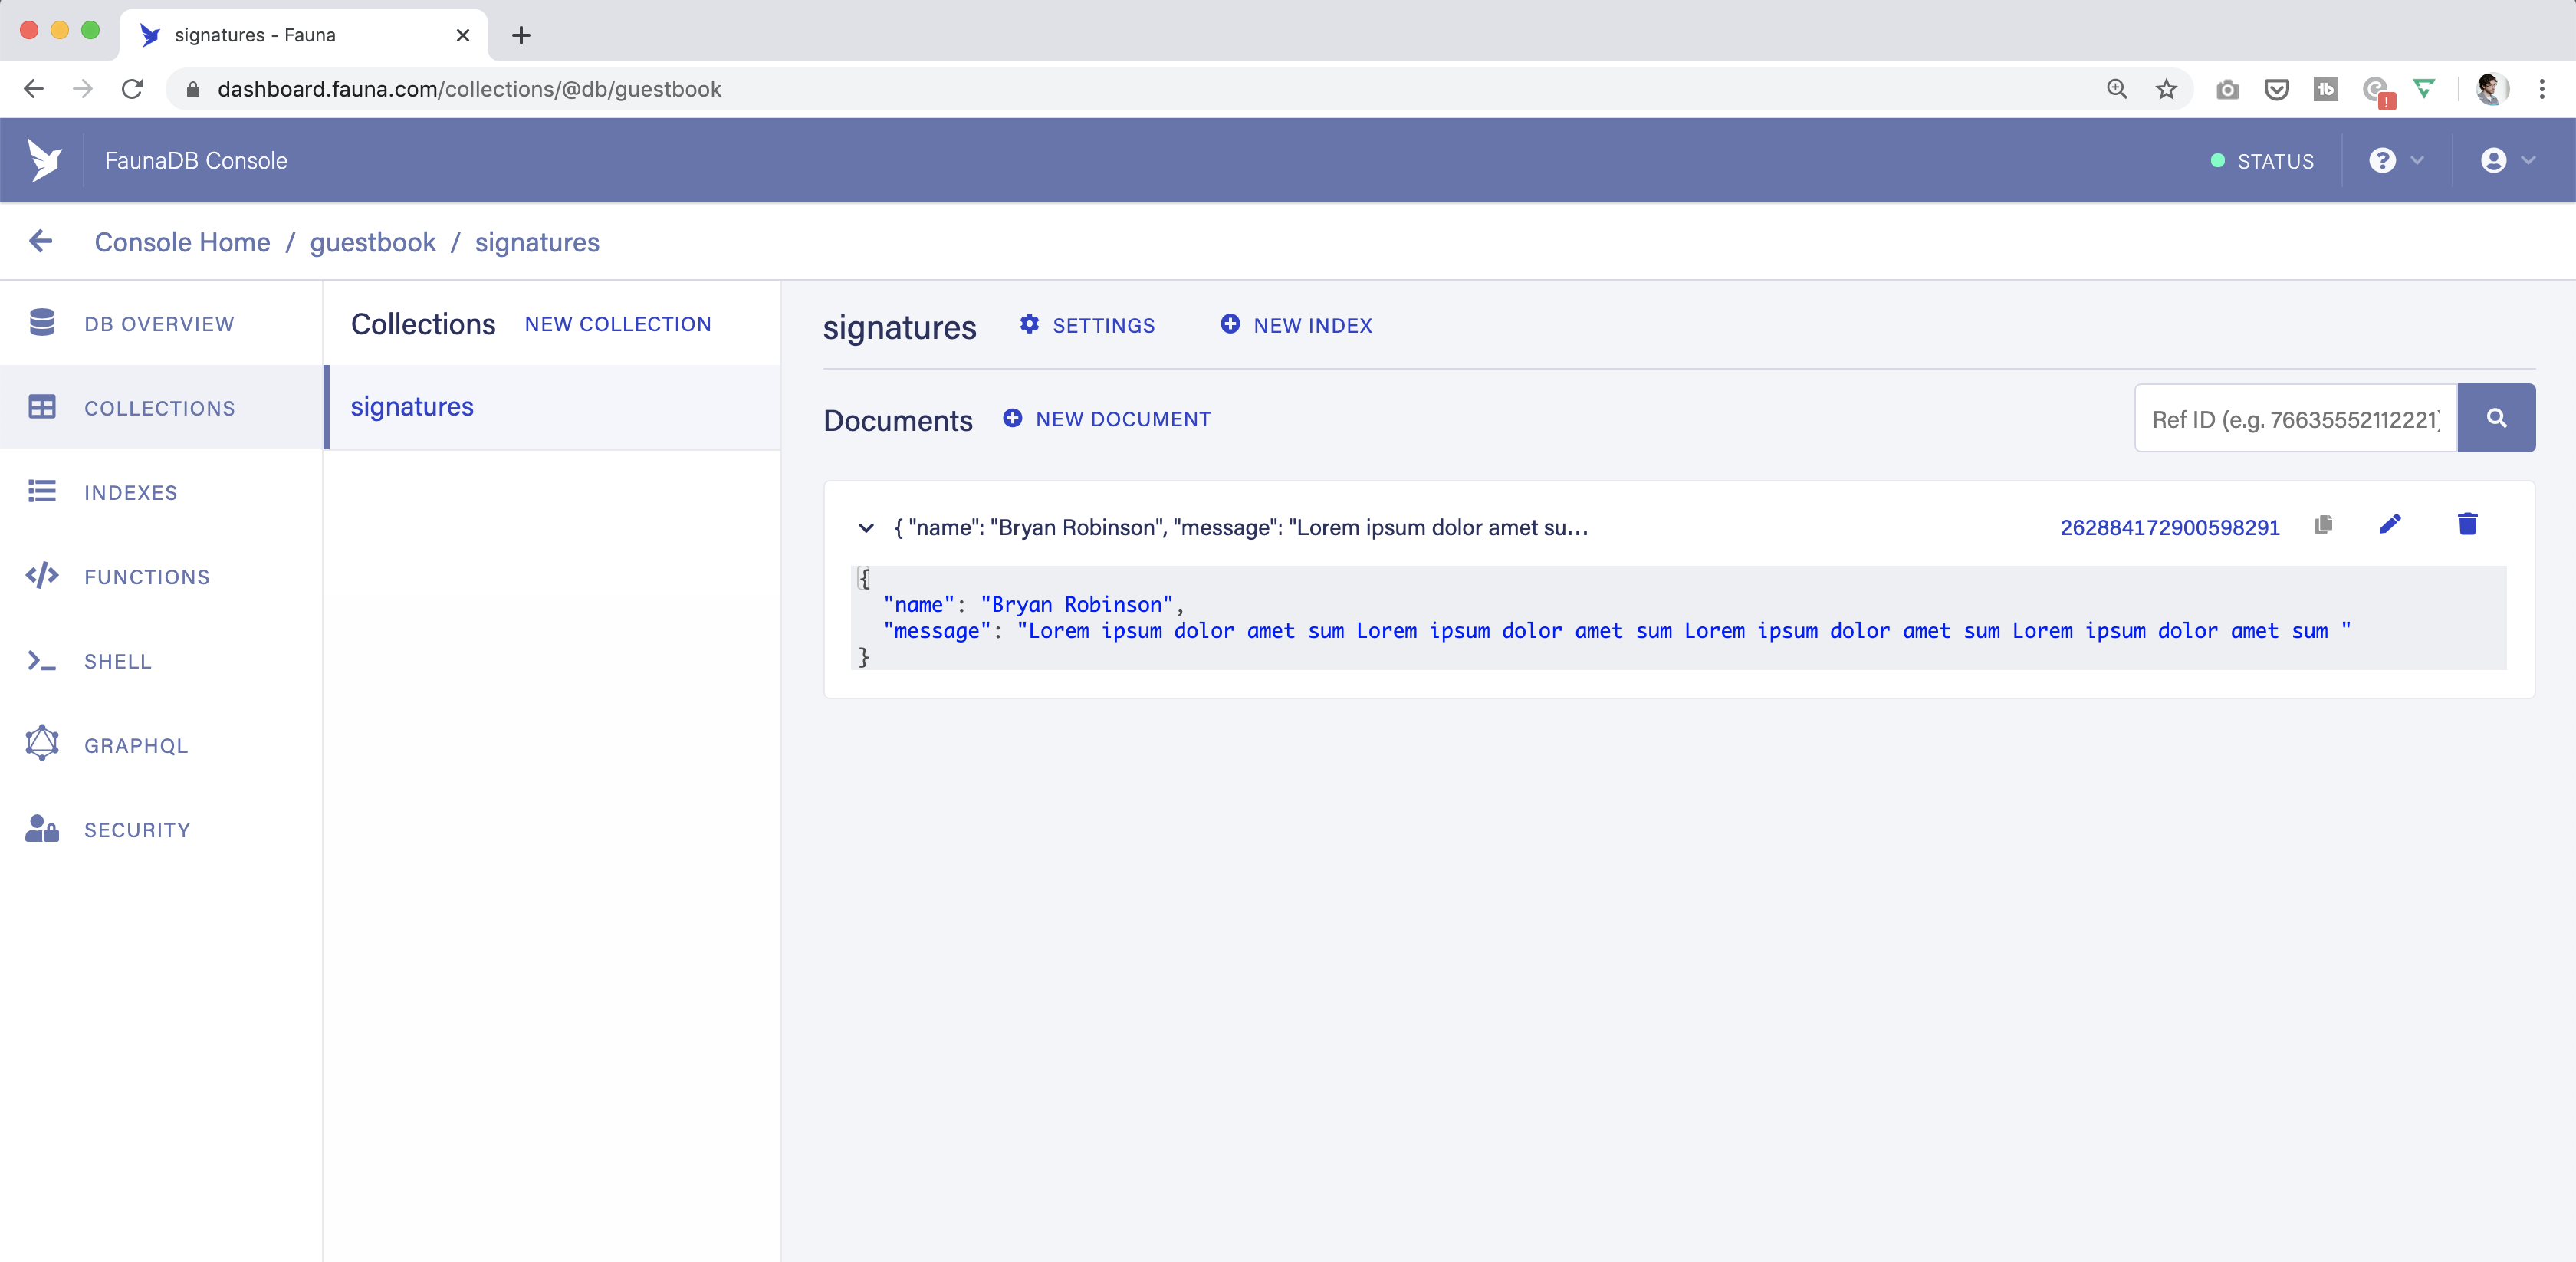
Within this new Collection, create a Document with the following JSON structure. This will serve as the schema for each signature.
{
 name: "Bryan Robinson",
 message:
   "Lorem ipsum dolor amet sum Lorem ipsum dolor amet sum Lorem ipsum dolor amet sum Lorem ipsum dolor amet sum"
}
For each Document, Fauna automatically generates additional metadata surrounding the JSON you provide.
{
 "ref": Ref(Collection("signatures"), "262884172900598291"),
 "ts": 1586964733980000,
 "data": {
   "name": "Bryan Robinson",
   "message": "Lorem ipsum dolor amet sum Lorem ipsum dolor amet sum Lorem ipsum dolor amet sum Lorem ipsum dolor amet sum "
 }
}
Here, ref represents the unique identifier inside of Fauna, and ts is the Unix timestamp for when the Document was last created or updated. To fetch all these Documents efficiently in a single query, create an Index named allSignatures on the Collection.
Connecting Fauna to Gatsby
To bridge the data source and the static site generator, we will use a dedicated Gatsby plugin. Install it into the project and then add it to the plugins array in gatsby-config.js.
npm install gatsby-source-faunadb{
resolve: `gatsby-source-faunadb`,
options: {
// The secret for the key you're using to connect to your Fauna database.
// You can generate on of these in the "Security" tab of your Fauna Console.
secret: process.env.YOUR_FAUNADB_SECRET,
// The name of the index you want to query
// You can create an index in the "Indexes" tab of your Fauna Console.
index: `allSignatures`,
// This is the name under which your data will appear in Gatsby GraphQL queries
// The following will create queries called `allBird` and `bird`.
type: "Signatures",
// If you need to limit the number of documents returned, you can specify a
// Optional maximum number to read.
// size: 100
},
},
This configuration requires your Fauna secret Key, the Index name, and the "type" name that will be used in Gatsby's GraphQL queries.
The secret is referenced via process.env.YOUR_FAUNADB_SECRET. Always store secrets in a .env file that is listed in .gitignore to prevent it from being committed to version control. Generate a key from the "Security" tab in your Fauna dashboard, selecting the "Server" role. This key is displayed only once, so copy it immediately.
YOUR_FAUNADB_SECRET = "value from fauna"Once configured, we can query the data. A GraphQL query is added to the Midsection component to make the data accessible by both child components.
const Midsection = () => {
 const data = useStaticQuery(
 graphql`
            query GetSignatures {
                allSignatures {
                  nodes {
                    name
                    message
                    _ts
                    _id
                  }
                }
            }`
        );
// ... rest of the component
}
This query fetches data from the Signatures type. It grabs all signatures as an array of nodes, extracting the specified fields: name, message, ts, and id. The component then calls useState to hold that data in the component's state, facilitating live updates when a new signature is added.
const [sigData, setSigData] = useState(data.allSignatures.nodes);The state variable sigData is passed down as a prop to the <Signatures> component, while the setSigData setter is passed to the <SignForm> component for future updates.
<SignForm setSigData={setSigData}></SignForm>

<Signatures sigData={sigData}></Signatures>
Rendering It All With Templates
Inside the Signatures component, we iterate over the signature data array using the .map() function to create a collection of markup elements. Each item is passed to a specific <Signature> component that formats the data and returns the appropriate HTML.
import React from 'react';
import Signature from './signature'

const Signatures = (props) => {
    const SignatureMarkup = () => {
        return props.sigData.map((signature, index) => {
            return (
                <Signature key={index} signature={signature}></Signature>
            )
        }).reverse()
    }

    return (
        <SignatureMarkup></SignatureMarkup>
    )
}

export default Signatures
import React from 'react';

const Signature = ({signature}) => {
    const dateObj = new Date(signature._ts / 1000);
    let dateString = `${dateObj.toLocaleString('default', {weekday: 'long'})}, ${dateObj.toLocaleString('default', { month: 'long' })} ${dateObj.getDate()} at ${dateObj.toLocaleTimeString('default', {hour: '2-digit',minute: '2-digit', hour12: false})}`

    return (
    <article className="signature box">
        <h3 className="signature__headline">{signature.name} - {dateString}</h3>
        <p className="signature__message">
            {signature.message}
        </p>
    </article>
)};

export default Signature;
Starting the Gatsby development server at this stage will display all current signatures stored in the Fauna database as static HTML components.
gatsby developNow that data can be read, we need a mechanism to write it back.
Adding Interactivity to the Guestbook
The next phase involves processing form submissions. The basic structure of the form component is straightforward, containing a text input for the name, a textarea for the message, and a submit button.
import React from 'react';

import faunadb, { query as q } from "faunadb"

var client = new faunadb.Client({ secret: process.env.GATSBY_FAUNA_CLIENT_SECRET  })

export default class SignForm extends React.Component {
    constructor(props) {
        super(props)
        this.state = {
            sigName: "",
            sigMessage: ""
        }
    }

    handleSubmit = async event => {
        // Handle the submission
    }

    handleInputChange = event => {
        // When an input changes, update the state
    }

    render() {
        return (
            <form onSubmit={this.handleSubmit}>
                <div className="field">
                    <div className="control">
                 <label className="label">Label
                    <input
                        className="input is-fullwidth"
                        name="sigName"
                        type="text"
                        value={this.state.sigName}
                        onChange={this.handleInputChange}
                    />
                    </label>
                    </div>
                </div>
                <div className="field">
                    <label>
                        Your Message:
                        <textarea
                            rows="5"
                            name="sigMessage"
                            value={this.state.sigMessage}
                            onChange={this.handleInputChange}
                            className="textarea"
                            placeholder="Leave us a happy note"></textarea>

                    </label>
                </div>
                <div className="buttons">
                    <button className="button is-primary" type="submit">Sign the Guestbook</button>
                </div>
            </form>
        )
    }

}
We initialize the component state with default blank strings for the name and message, binding them to the <textarea> and <input> values. Changes made by the user are handled by the handleInputChange method.
  handleInputChange = event => {
 const target = event.target
 const value = target.value
 const name = target.name
 this.setState({
            [name]: value,
        })
    }
This event handler captures the current target's value and name, using a computed property to update the corresponding field in the state object (such as sigName or sigMessage).
With the state updated, the submission logic in handleSubmit can now execute.
  handleSubmit = async event => {
        event.preventDefault();
 const placeSig = await this.createSignature(this.state.sigName, this.state.sigMessage);
 this.addSignature(placeSig);
    }
The submission handler calls a new asynchronous createSignature() function, which connects directly to Fauna. After the database write completes and returns a response, the addSignature() method updates the guestbook list with the new data, giving immediate visual feedback to the user.
Implementing Secure Writes
Writing to the database from the client requires a key with limited permissions. While the Server key (used during build) has higher privileges and remains out of the source code, the client key must be scoped for security. This allows only the Create action on the signatures collection.
Note: A malicious user could still misuse this key in theory, but the potential damage is limited to spam-form submissions.
In the Fauna dashboard's "Security" tab, create a new "Role" with specific collection permissions. Select the signatures collection and enable only the "Create" functionality, then generate a new key using that role rather than the default Server role.

This key is used to instantiate a new Fauna JavaScript SDK client. The SDK is already available as a dependency of the Gatsby plugin.
import faunadb, { query as q } from "faunadb"

var client = new faunadb.Client({ secret: process.env.GATSBY_FAUNA_CLIENT_SECRET })
To make the key accessible in browser-side JavaScript, prefix the environment variable with GATSBY_. This exposes it without the need for server-side processing. The SDK provides access to the query object, which contains methods from Fauna's Query Language (FQL) for interacting with the database.
The application uses the Create method passed to the client's .query() function. This method requires a reference to the target Collection via q.Collection and an object containing the info for the new document. The data type in the second argument is specified as a data property. The response we get back from this operation contains the full Document object, including the submitted name and message fields along with metadata such as the Fauna ID reference and the creation timestamp. This returned data is formatted to match the structure our Signatures list expects.
createSignature = async (sigName, sigMessage) => {
 try {
 const queryResponse = await client.query(
                q.Create(
                    q.Collection('signatures'),
                    {
                        data: {
                            name: sigName,
                            message: sigMessage
                        }
                    }
                )
            )
 const signatureInfo = { name: queryResponse.data.name, message: queryResponse.data.message, _ts: queryResponse.ts, _id: queryResponse.id}
 return signatureInfo
        } catch(err) {
            console.log(err);
        }
    }
Rebuilding the Site With New Data
Updates are instantaneous in the browser, but the static output still needs to be refreshed. This requires triggering a rebuild on the JAMstack host using a deployment webhook. For instance, on Netlify, one can define a webhook URL in the admin dashboard and call it via a triggerBuild function. Using the native JavaScript fetch() API, the function sends a POST request to the webhook. Netlify then rebuilds the Gatsby application to include the latest signatures.
  triggerBuild = async () => {
 const response = await fetch(process.env.GATSBY_BUILD_HOOK, { method: "POST", body: "{}" });
 return response;
    }
Both Gatsby Cloud and Netlify support incremental builds for Gatsby, dramatically reducing build times. This means a build can execute nearly as fast as a traditional server-rendered request. Every new signature provides immediate feedback to the submitting user, is persisted in the Fauna database, and is eventually served as static HTML once the build completes.
Building a User-Scoped JAMstack App with Auth0 and Fauna UDFs
A mindful-moment app is a good exercise in user-scoped data on the JAMstack: one randomized idea per day, with a personal history that must stay private to each user. That means authentication, and with it the question of where keys live. Keeping Fauna secret keys in front-end code would be a non-starter, and routing authentication through serverless functions shifts security burden onto the application developer. The cleaner path is to have Auth0 itself request a Fauna token and embed it in the JWT your client already receives.
Configuring Auth0 to Issue a Fauna Token
Start by registering a single-page application in Auth0 and following their vanilla JS configuration steps — make sure the localhost port for your bundler is in the list of authorized domains.
Next, create an Auth0 Rule. The Rule's function receives the user, context, and a callback. Inside it, grab a server token for Fauna (created in the Dashboard under Security), initialize the JavaScript SDK, and run a login-or-create query. To keep the Rule code small and reusable, that logic goes into a Fauna User-Defined Function (UDF).
Set up a users Collection — no seed document needed, as the Rule will create users on first login. Then create an Index named user_by_email on that Collection, with Terms set to data.email.
Now create the UDF user_login_or_create in the Dashboard under "Functions". It takes an email address and the rest of the user information. If a matching document exists in users, the UDF returns a token for that user; otherwise it creates the user document first and then returns a token.
Back in the Rule code, attach that token to the context as an idToken. Any URL will work as the key, but since it is a Fauna token, a Fauna URL keeps intent clear.
That token has no permissions yet. Create a Role named "AuthedUser". You will not attach permissions right away, but you will come back to them as Collections and UDFs appear. Under the Role's Memberships, select the users Collection. Documents in that Collection — the users — receive the Role's permissions through their tokens. No new static Key is needed.
Client-Side Logic for the Logged-In State
Install the Auth0 SPA SDK and configure it with your client_id, which is safe to store in code. Write a helper that checks auth0.isAuthenticated() and returns user data via auth0.getUser(). Add login() and logout() functions, plus a loadAuth() handler that processes the return from Auth0 and switches the UI to the day's mission view.
For database access, create a wrapper that reads the Fauna token from the Auth0 JWT and returns a new Fauna client:
That client works just like the one keyed from a static secret in a serverless setup, except the credentials now live only in memory.
Storing and Fetching a Random Mindful Item
Seed a mindful_things Collection with a set of canned prompts. In JavaScript, instantiate the user client and paginate over that Collection; Paginate() returns up to 64 documents by default, which is enough here. Pick one at random — Fauna returns a Ref, a full document reference — and pass it to a new UDF.
Create the UDF addUserMindful in the Dashboard. With Lambda(), the function takes that Ref. Crucially, it needs no user argument: the token automatically identifies the caller via Identity(). The UDF runs Get() on the Ref to pull the full object, then calls Create() on a user_things Collection, stamping the document with the user Ref and the random prompt. Return the created object and parse it in JavaScript.
Render With Caching in Mind
When authenticated, the UI switches to a mission view and calls a render function. The fetch logic follows a strict order to minimize database round-trips:
- Check
localStoragefor a cachedcurrentMindfulItem. If present and dated today, render it — no network call. - Otherwise ask Fauna for the user's most recent stored item. If that item is from today, cache it in
localStorageand render. - Only if both checks fail, call the random-item function, store the result locally, and render.
For step two, a new UDF plus an Index is required. Create an Index named getMindfulByUserReverse in the Fauna Shell with custom FQL. The Index searches user_things on the user field, returns the Ref and Timestamp as values, and applies the reverse property to order newest first.
Then build a UDF that calls this Index. Its Lambda() needs no arguments, since the token determines the user. It checks the Index has at least one result, and if so returns the first item's data and timestamp merged together. JavaScript formats that response into the structure the render and cache helpers expect.
Pulling a History of Past Items
The last missing feature is a review of prior missions. A JavaScript method, getSomeFromFauna, takes an integer count and passes it to a new UDF. That UDF mirrors the latest-item version, but instead of returning just the first result, it calls Take() on the Index results for the requested number of documents. It starts with the same empty-state conditional, in case the user has no stored items.
With that method in place, the app delivers a full daily-routine loop: random prompt generation, per-user persistence, today's cached view, and a scrollable history. The data sits behind a CDN for fast delivery, while UDFs and Indexes keep the database queries narrow and the number of requests minimal.
Choosing Your Data Layer For JAMstack Applications
The JAMstack model is not limited to static marketing pages or content-driven sites. It is capable of supporting full, dynamic applications — games, CRUD tools, or anything in between. The key constraint is that the entire stack remains distributed and serverless, avoiding the operational burden of a self-hosted, always-on database engine.
Performance is often the primary reason teams move to the JAMstack, whether driven by infrastructure cost or user experience. But with that move comes the critical challenge of supplying your application with durable, low-latency data access. The data store you select must meet three sets of requirements simultaneously: those of your application's logic, those of your end users, and those implied by the JAMstack architecture itself.
Selecting a data layer for a distributed application means matching the database's capabilities to how you have structured your endpoints and functions. You need to weigh pricing models, connection handling, replication guarantees, and how easily the data layer integrates with your existing build tooling. The right choice will minimize friction between your serverless functions and the data they operate on, preserving the performance characteristics of your application as it scales.

- Exploring The Potential Of Web Workers For Multithreading On The Web
- A Guide To Image Optimization On Jamstack Sites
- The Case For Prisma In The Jamstack
- Databases For Front-End Developers: The Rise Of Serverless Databases (Part 1)


