Slack slash commands offer a way to answer frequently asked questions without waiting for a human to reply. The following walkthrough builds a /faq command that stores answers in FaunaDB, queries them with FQL, and reaches Slack through a Netlify function.
Before you begin
- A GitHub account — used to sign in to Netlify and Fauna and to host the code.
- A Slack workspace where you are permitted to create and install new apps.
- Node.js v12.
The npm package and its dependencies
Create a folder, run npm init -y, then install the packages the project needs:
npm install express body-parser faunadb encoding serverless-http netlify-lambda- Express — simplifies writing multiple endpoints. Netlify functions require a handler per endpoint; paired with
serverless-http, Express lets all endpoints live in one place. - Body-parser — parses the
application/x-www-form-urlencodedpayload Slack sends. - faunadb — the FaunaDB JavaScript driver, which sends queries from the function to the database.
- serverless-http — wraps an Express application in the format Netlify functions expect, so the code doesn't change between local development and Netlify.
- netlify-lambda — builds and serves functions locally the same way Netlify will build and deploy them.
- encoding — added because of a plugin error in
@netlify/plugin-functions-coreat the time of writing; it may not be necessary.
Building the function locally
Create netlify.toml with the following contents:
[build]
  functions = "functions"
Add a .gitignore covering functions/ and node_modules/. The project layout is a src folder containing server.js:

A minimal Express app goes in server.js:
const express = require("express");
const bodyParser = require("body-parser");
const fauna = require("faunadb");
const serverless = require("serverless-http");

const app = express();

module.exports.handler = serverless(app);
The final line differs from a standard Express app: instead of listening on a port, the app is passed to serverless and this becomes the handler Netlify invokes.
Next, configure the body parser for application/x-www-form-urlencoded data and mount a router immediately after the app is defined:
const router = express.Router();
app.use(bodyParser.json());
app.use(bodyParser.urlencoded({ extended: true }));
app.use("/.netlify/functions/server", router);
The router's base path is /.netlify/functions/server, which lets Netlify deploy the function correctly later. Every base URL must include this prefix to invoke the function.
A test route
Add a GET route that returns a JSON object:
router.get("/test", (req, res) => {
 res.json({ hello: "world" });
});
Add these lines to the scripts section of package.json, where the build command will also serve Netlify deployment:
"start": "./node_modules/.bin/netlify-lambda serve src",
   "build": "./node_modules/.bin/netlify-lambda build src"
Run npm start; netlify-lambda then serves the function on port 9000, imitating Netlify locally. Visiting http://localhost:9000/.netlify/functions/server/test confirms it works

netlify-lambda watches for changes and recompiles automatically, so it can stay running throughout.
Making the endpoint publicly reachable
ngrok exposes the local function through a public URL. Install it globally with npm install -g ngrok if needed, then run ngrok http 9000 to direct traffic to the function on port 9000.

Open the forwarding URL shown in the terminal and append /.netlify/functions/server/test; the same result as on localhost confirms the endpoint is reachable online and can be handed to Slack. Note that restarting ngrok generates a new URL, and the endpoint configured in Slack must be updated accordingly.
Creating the Slack app
The step-by-step summary below follows on from Slack's official slash-command documentation:
- Go to https://api.slack.com/apps, select Create New App, name it, and choose a development workspace.
- From the app's menu, open Slash Commands and create a new command: give it a name (here
/faq) and supply the ngrok URL, appending/.netlify/functions/server/at the end. - Return to Basic Information, use the Install app to your workspace dropdown, and install the app.
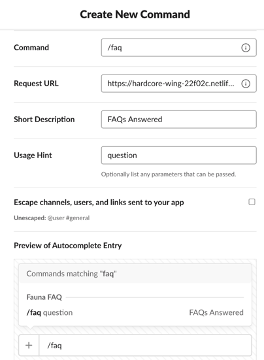

Once access is granted, the app is installed and the command is usable in the workspace.
The Slack endpoint: endpoint and response format
The root endpoint suits Slack's requests. It must accept a POST with application/x-www-form-urlencoded data and return a 200 status with a message. Add the new post route to server.js:
router.post("/", async (req, res) => {

});
To inspect what Slack sends, add this line before setting the status:
const text = req.body.text;
console.log(`Input text: ${text}`);
Passing the text straight into the response and sending it back verifies that app and function communicate:
res.status(200);
res.send(text);
Type /faq <somequestion> in a channel and the same message comes back.
Formatting with Block Kit
Slack's Block Kit adds specialised UI elements in place of plaintext; a Block Kit builder is available for designing more complex layouts. For now, a simple design where each answer is separated by a divider comes from this helper function, added to server.js after the post route:
const format = (answers) => {
 if (answers.length == 0) {
   answers = ["No answers found"];
 }

 let formatted = {
   blocks: [],
 };

 for (answer of answers) {
   formatted["blocks"].push({
     type: "divider",
   });
   formatted["blocks"].push({
     type: "section",
     text: {
       type: "mrkdwn",
       text: answer,
     },
   });
 }

 return formatted;
};
Update the root post route so answers are passed through that function before being returned:
let answers = text;
const formattedAnswers = format(answers);
The command now produces the same message in a formatted version.
Setting up the FaunaDB database
Database, collection and documents
In the Fauna dashboard, click New Database, name it (the example uses slack-faq), and save it. Then create a collection (here faq); leave history days and TTL at their defaults, and make sure no TTL value is entered so documents aren't removed automatically.
Each document follows this structure:
{
   question: "a question string",
   answer: "an answer string",
   qTokens: [
       "first token",
       "second token",
       "third token"
   ]
}
The qToken values should be key terms in each question, since they drive a tokenised search when a question can't be matched exactly. More relevant tokens give more accurate results: for "where are the bathrooms", include tokens such as "bathroom", "bathrooms", "toilet", "toilets" and any other likely search terms. The questions used for the proof of concept were:
{
  question: "where is the lobby",
  answer: "On the third floor",
  qTokens: ["lobby", "reception"],
},
{
  question: "when is payday",
  answer: "On the first Monday of each month",
  qTokens: ["payday", "pay", "paid"],
},
{
  question: "when is lunch",
  answer: "Lunch break is *12 - 1pm*",
  qTokens: ["lunch", "break", "eat"],
},
{
  question: "where are the bathrooms",
  answer: "Next to the elevators on each floor",
  qTokens: ["toilet", "bathroom", "toilets", "bathrooms"],
},
{
  question: "when are my breaks",
  answer: "You can take a break whenever you want",
  qTokens: ["break", "breaks"],
}
Indexes for lookups
Two indexes enable searching the documents. Create answers_by_question with question as the term and answer as the value, to search by associated question. Then create answers_by_qTokens with qTokens as the term and answer as the value, to search across all questions' tokens.
Search queries in the Fauna shell
The search runs in two stages: an exact match first, so a user gets one precise answer, then a token-based search if no exact result exists. Both can be tested in Fauna's online shell before use in code.
For an exact match, query the answers_by_question index and paginate the answers:
q.Paginate(q.Match(q.Index("answers_by_question"), "where is the lobby"))With a question matching the "where is the lobby" example, this returns the answer "On the third floor".
When nothing matches exactly, match against the answers_by_qTokens index and paginate the answers:
q.Paginate(q.Match(q.Index("answers_by_qTokens"), "break"))Any questions containing the qToken "break" from the examples will all be returned.
Hooking the function up to Fauna
Server key and client
Create a server key from the database dashboard: open Security in the left sidebar, create a new key with a recognisable name, and select Server in the dropdown rather than Admin. Put the following in server.js before the test route, substituting the secret Fauna provides for <secretKey>:
const q = fauna.query;
const client = new fauna.Client({
 secret: "<secretKey>",
});
Storing the key as a Netlify environment variable would be preferable to embedding it in code, though that exceeds this tutorial's scope (Netlify documents its environment-variable configuration separately).
Client-side query helpers
Add the code below to server.js after the post route; it reproduces the functionality of the shell queries so the function can use them:
const searchText = async (text) => {
 console.log("Beginning searchText");
 const answer = await client.query(
   q.Paginate(q.Match(q.Index("answers_by_question"), text))
 );
 console.log(`searchText response: ${answer.data}`);
 return answer.data;
};

const getTokenResponse = async (text) => {
 console.log("Beginning getTokenResponse");
 let answers = [];
 const questionTokens = text.split(/[ ]+/);
 console.log(`Tokens: ${questionTokens}`);
 for (token of questionTokens) {
   const tokenResponse = await client.query(
     q.Paginate(q.Match(q.Index("answers_by_qTokens"), text))
   );
   answers = [...answers, ...tokenResponse.data];
 }
 console.log(`Token answers: ${answers}`);
 return answers;
};
Deploying to Netlify and switching the Slack URL
Add a GitHub repository and push the code to it. In Netlify, sign up or log in with the GitHub profile, and choose New site from git to deploy from that repository. During setup, set the build command to npm run build so Netlify builds the function before deploying; leave the publish directory blank since only a function is being deployed.
Netlify builds and deploys the repository and generates a unique URL for the deployment; combine its base URL with the test endpoint from earlier to confirm everything still works:
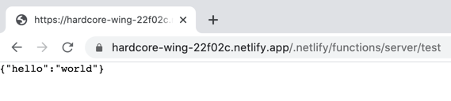
Finally, open the Slack app, select Slash Commands, click the pencil icon, and paste the new function URL into the command. The slash command is then available in authorised channels.
The result is a fully serverless FAQ command: answers stored in FaunaDB, reached through a Netlify function. Using Express also makes it straightforward to add further endpoints to the same function, for example to insert new questions.