

An Editor-First Approach to Interactive Fiction
Building an interactive fiction experience usually requires coordination between a writer, a front-end developer, and often a backend engineer. The writer crafts the prose, the developer builds the forms and logic, and someone else wires the two together. For a Mad Libs-style experience—where readers supply words based on parts of speech before revealing a story—all that coordination can be collapsed into a single editor's workflow.
Using Sanity's content platform, Portable Text's rich-text specification, 11ty's static site generator, and Netlify's On-Demand Builders, you can build a system where one content creator writes the template, and the front end automatically generates the form and final story. Here's how we'll approach it:
- Test the live demo at the Mad Libs generator site.
- Review the complete source code in the GitHub repository.
- Deploy a fully pre-configured version via the Sanity template.
How the Pieces Interact
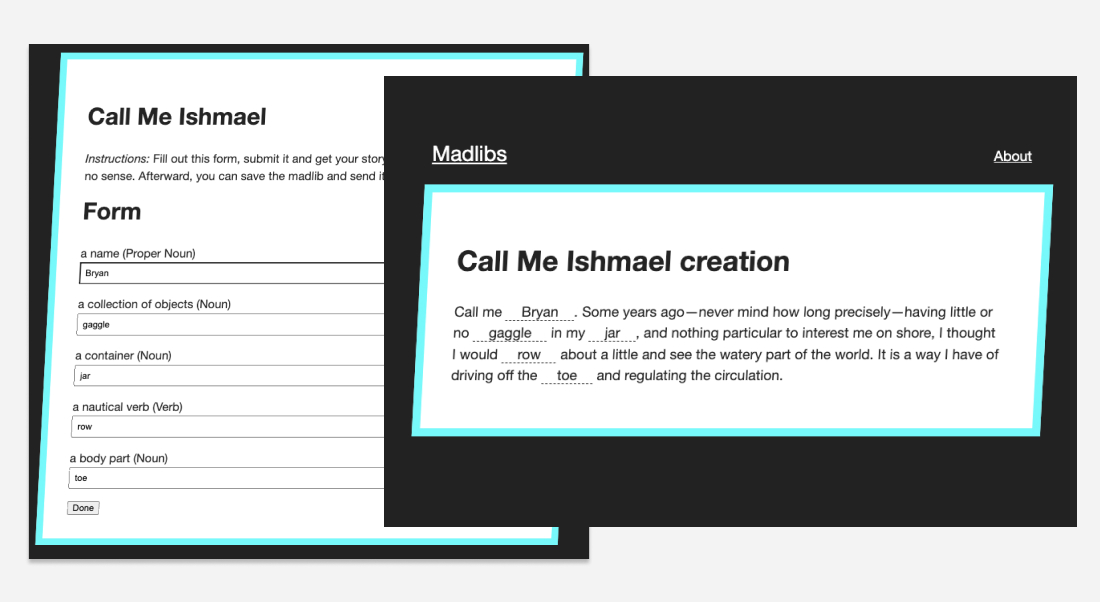
The core workflow is straightforward: an editor writes a story template inside Sanity Studio, marking blank spaces with custom inline components that specify a grammatical category and display text. To the editor, this appears no different from standard rich-text formatting. The stored data, however, contains enough structured information for the front end to infer what form fields to render.
The end-user's journey begins with a form listing each requested part of speech, complete with the editor's contextual hints. Once submitted, the story displays with the user's words inserted. This output lives only in the browser until the user chooses to save it. Clicking the Save button sends the completed text to a Netlify serverless function, which persists it to Sanity's datastore and returns a permanent, shareable URL.
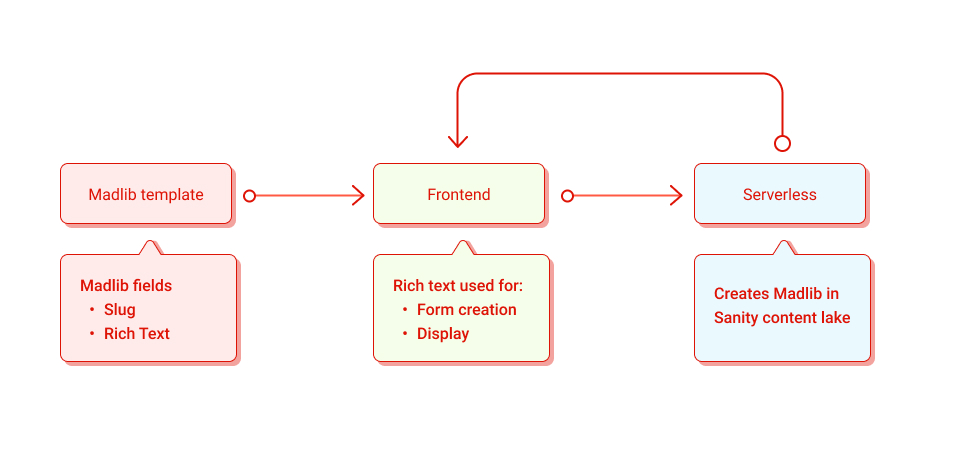
Because 11ty is a static site generator, we can't rely on a rebuild to generate each saved instance on the fly. Instead, we use 11ty Serverless mode combined with Netlify's On-Demand Builders to render the page upon first request and cache subsequent views, as illustrated below.
The Technology Stack
Sanity and Portable Text for Content as Data
Sanity's foundation is the concept that content is structured data. It provides a real-time datastore and open-source tools, including GROQ for querying, a customizable CMS called Sanity Studio, and Portable Text—an open specification for rich text that remains queryable and composable.
By using Portable Text for the mad lib templates, the editor's paragraphs carry enough semantic metadata for the front end to build a dynamic form without any additional file transformations or backend logic.
11ty and Serverless Rendering
11ty is a Node-based static site generator that pulls data from various sources, supports multiple templating languages and outputs clean HTML. In its upcoming 1.0 release, 11ty introduces Serverless mode, which reuses the same templates and data to render pages via serverless functions or on-demand builders. This mode blends static generation with server-rendered performance.
Netlify On-Demand Builders
Netlify offers on-demand builders for caching server-rendered pages. The first call to a builder function acts like a standard serverless function, but Netlify caches the resulting HTML at the edge. Each subsequent request serves the cached copy, giving pre-rendered performance and infinite scalability without a full site rebuild.
Preparing the Data Layer
The data architecture must be in place before we tackle the front end. Start by creating a project directory—here called madlibs—to hold both the studio and the site. Then run the following commands to initialize a Sanity project:
npm i -g @sanity/cli
sanity init
During sanity init, select the project name madlibs, assign production as the dataset name, and set the output path to studio. Choose the clean-project template to avoid schema conflicts. The CLI then installs Sanity Studio and all dependencies in that subdirectory. Run sanity start from the studio directory to launch the studio locally.
A Schema for Madlib Templates
Sanity Studio's editing interface derives from JavaScript schema files. Each schema object defines the document's title, type, and fields. For mad lib templates, we need a title and an auto-generating slug.
// madlibs/studio/schemas/madlib.js

export default {
  // Name in the data
  name: 'madlib',
  // Title visible to editors
  title: 'Madlib Template',
  // Type of schema (at this stage either document or object)
  type: 'document',
  // An array of fields
  fields: [
    {
      name: 'title',
      title: 'Title',
      type: 'string'
    },
    {
      title: 'Slug',
      name: 'slug',
      type: 'slug',
      options: {
        source: 'title',
        maxLength: 200, // // will be ignored if slugify is set
      }
    },
  ]
}
After creating the schema file, register it in the main schema.js file. Adding a rich-text field requires an array that references Sanity's built-in block type. This block type gives us standard paragraph formatting as Portable Text.
// /madlibs/studio/schema/schema.js

// First, we must import the schema creator
import createSchema from 'part:@sanity/base/schema-creator'

// Then import schema types from any plugins that might expose them
import schemaTypes from 'all:part:@sanity/base/schema-type'

// Imports our new schema
import madlib from './madlib'

// Then we give our schema to the builder and provide the result to Sanity
export default createSchema({
  // We name our schema
  name: 'default',
  // Then proceed to concatenate our document type
  // to the ones provided by any plugins that are installed
  types: schemaTypes.concat([
    // document
    // adds the schema to the list the studio will display
    madlib,
  ])
})
Within a block, we can extend its of array to include custom inline elements. This is where we'll define our mad lib fields—elements that flow inside paragraphs, headers, and lists, rather than living as standalone blocks.
export default {
  // Name in the data
  name: 'madlib',
  // Title visible to editors
  title: 'Madlib Template',
  // Type of schema (at this stage either document or object)
  type: 'document',
  // An array of fields
  fields: [
    {
      name: 'title',
      title: 'Title',
      type: 'string'
    },
    {
      title: 'Slug',
      name: 'slug',
      type: 'slug',
      options: {
        source: 'title',
        maxLength: 200, // // will be ignored if slugify is set
      }
    },
    {
      title: 'Madlib Text',
      name: 'text',
      type: 'array',
      of: [
        {
          type: 'block',
          name: 'block',
          of: [
            // A new type of field that we'll create next
            { type: 'madlibField' }
          ]
        },
      ]
    },
  ]
}
The block configuration pulls the editable content into Portable Text's JSON structure. Custom types handle objects like images or videos, but here the block's own of array accepts additional data types.
Defining an Inline Madlib Component
Now we create a custom object type to include within the Portable Text blocks. Unlike the document types, this object needs two concise fields: label for the visible text and type for what the editor picks from a dropdown list (e.g., noun, verb, adjective).
// /madlibs/studio/schemas/object/madLibField.js
import React from 'react'

// A React Component that takes hte value of data
// and returns a simple preview of the data that can be used
// in the rich text editor
function madlibPreview({ value }) {
  const { text, grammar } = value

  return (

      {text} ({grammar})

  );
}

export default {
  title: 'Madlib Field Details',
  name: 'madlibField',
  type: 'object',
  fields: [
    {
      name: 'displayText',
      title: 'Display Text',
      type: 'string'
    },
    {
      name: 'grammar',
      title: 'Grammar Type',
      type: 'string'
    }
  ],
  // Defines a preview for the data in the Rich Text editor
  preview: {
    select: {
      // Selects data to pass to our component
      text: 'displayText',
      grammar: 'grammar'
    },

    // Tells the field which preview to use
    component: madlibPreview,
  },
}
To enhance the editing experience beyond raw field values, this custom type can include a React preview component. With two fields set and a preview component defined, the final mad lib input block displays full grammatical and contextual clues at a glance.
// /madlibs/studio/schemas/schema.js
// First, we must import the schema creator
import createSchema from 'part:@sanity/base/schema-creator'

// Then import schema types from any plugins that might expose them
import schemaTypes from 'all:part:@sanity/base/schema-type'

import madlib from './madlib'
// Import the new object
import madlibField from './objects/madlibField'

// Then we give our schema to the builder and provide the result to Sanity
export default createSchema({
  // We name our schema
  name: 'default',
  // Then proceed to concatenate our document type
  // to the ones provided by any plugins that are installed
  types: schemaTypes.concat([
    // documents
    madlib,
    //objects
    madlibField
  ])
})
A Speedy Read-Only Schema for Generated Stories
User-generated content technically doesn't need its own schema, but registering one makes moderating submissions in the Studio far easier. Both sections—new documents and generated ones—share a similar structure. The main deviations are the schema name and title, and you can set all fields to read-only here to avoid accidental edits.
// /madlibs/studio/schema/userLib.js
export default {
  name: 'userLib',
  title: 'User Generated Madlibs',
  type: 'document',
  fields: [
    {
      name: 'title',
      title: 'Title',
      type: 'string',
      readOnly: true
    },
    {
      title: 'Slug',
      name: 'slug',
      type: 'slug',
      readOnly: true,
      options: {
        source: 'title',
        maxLength: 200, // // will be ignored if slugify is set
      },
    },
    {
      title: 'Madlib Text',
      name: 'text',
      type: 'array',
      readOnly: true,
      of: [
        {
          type: 'block',
          name: 'block',
          of: [
            { type: 'madlibField' }
          ]
        },
      ]
    },
  ]
}
Both schema types get registered in schema.js. Create at least one mad lib template to test against. Every editor's template will render the user-requested fields automatically, ready for the small collection of code that generates the actual input forms.
Making the Generated Pages Interactive
With 11ty generating unique pages for each madlib, the next step is handling user input on the client side. For this project, plain JavaScript keeps the interaction layer simple while integrating with a Sanity-powered static build.
Preparing Static Assets
Before wiring up the interactions, 11ty needs to know which files to pass through to the output. The assets we need live in specific paths:
assets/css/style.css— additional styling beyond the CMS-managed content,assets/js/madlib.js— the interaction logic for forms and display,.eleventy.js— the 11ty configuration file at the site root.
The .eleventy.js configuration tells 11ty to copy the assets directory as-is into the final build.
module.exports = function(eleventyConfig) {
 eleventyConfig.addPassthroughCopy("assets/");
}
Most of the page's styling comes from CSS, but one crucial snippet handles the visibility toggle for the completed madlib text. The full stylesheet can be found in the repository's style.css if you want the complete visual treatment.
.madlibtext {
 display: none
}
.madlibtext.show {
 display: block;
}
Mapping Form Inputs to the Template
When a viewer fills out the form, the script needs to translate those inputs into text replacements inside the hidden madlib preview. The logic splits into three steps: attach a submit listener, collect and insert form values into the DOM, then reveal the finished text.
// Attach the form handler
const form = document.querySelector('.madlibForm')
form.addEventListener('submit', completeLib);

function showText() {
  // Find the madlib text in the document
  const textDiv = document.querySelector('.madlibtext')
  // Toggle the class "show" to be present
  textDiv.classList.toggle('show')
}

// A function that takes the submit event
// From the event, it will get the contents of the inputs
// and write them to page and show the full text
function completeLib(event) {
  // Don't submit the form
  event.preventDefault();
  const { target } = event // The target is the form element

  // Get all inputs from the form in array format
  const inputs = Array.from(target.elements)

  inputs.forEach(input => {
    // The button is an input and we don't want that in the final data
    if (input.type != 'text') return
    // Find a span by the input's name
    // These will both be the _key value
    const replacedContent = document.getElementById(input.name)
    // Replace the content of the span with the input's value
    replacedContent.innerHTML = input.value
  })
  // Show the completed madlib
  showText();
}
On form submission, the code converts the form's inputs into an array. It then finds DOM elements whose ids match each input's name attribute. Both the ids and names derive from the _key values of the original Portable Text blocks, so the pairing lines up naturally. Each matching element's content gets replaced by the user-supplied value.
After all replacements are done, a class toggle reveals the complete madlib text on the page.
Loading the Script on Generated Pages
To include the JavaScript on every generated madlib page, we add an intermediate template. A new file, _includes/lib.njk, extends the base template and injects the script tag just before the closing body tag.
{% extends 'base.njk' %}

{% block scripts %}
<script>
  var pt = {{ madlib.text | dump | safe }}
  var data = {
      libId: `{{ madlib._id }}`,
      libTitle: `{{ madlib.title }}`
  }
</script>
<script src="https://www.smashingmagazine.com/assets/js/madlib.js"></script>
{% endblock %}
The madlib.njk pagination template then points to lib.njk as its layout, which supersedes the base layout specified earlier.
---
layout: 'lib.njk'
pagination:
  data: madlibs
  alias: madlib
  size: 1
permalink: "madlibs/{{ madlib.slug | slug }}/index.html"
---

// page content
That completes the core function: visitors can fill in prompts, see their answers applied to the stored template text, and confirm the finished result. For broader usability, the next layer is giving users a way to persist and distribute their created madlibs.
Persisting User Madlibs to Sanity
To save a user-generated madlib, we need to pass additional context from Sanity into our front-end JavaScript. We add new variables to the scripts block on lib.njk.
{% extends 'base.njk' %}

{% block scripts %}
<script>
  // Portable Text data
  var pt = {{ madlib.text | dump | safe }}
  var data = {
      libId: `{{ madlib._id }}`,
      libTitle: `{{ madlib.title }}`
  }
</script>
<script src="https://www.smashingmagazine.com/assets/js/madlib.js"></script>
{% endblock %}
A new function sends these values and the user's answers to a serverless function for document creation. We wire this to the "Save" link via an event listener.
// /madlibs/site/assets/js/madlib.js

// ... completeLib()

async function saveLib(event) {
  event.preventDefault();

  // Return an Map of ids and content to turn into an object
  const blocks = Array.from(document.querySelectorAll('.empty')).map(item => {
    return [item.id, { content: item.outerText }]
  })
  // Creates Object ready for storage from blocks map
  const userContentBlocks = Object.fromEntries(blocks);

  // Formats the data for posting
  const finalData = {
    userContentBlocks,
    pt, // From nunjucks on page
    ...data // From nunjucks on page
  }

  // Runs the post data function for createLib
  postData('/.netlify/functions/createLib', finalData)
    .then(data => {
      // When post is successful
      // Create a div for the final link
      const landingZone = document.createElement('div')
      // Give the link a class
      landingZone.className = "libUrl"
      // Add the div after the saving link
      saver.after(landingZone)
      // Add the new link inside the landing zone
      landingZone.innerHTML = `Your url is /userlibs/${data._id}/`

    }).catch(error => {
      // When errors happen, do something with them
      console.log(error)
    });
}

async function postData(url = '', data = {}) {
  // A wrapper function for standard JS fetch
  const response = await fetch(url, {
    method: 'POST',
    mode: 'cors',
    cache: 'no-cache',
    credentials: 'same-origin',
    headers: {
      'Content-Type': 'application/json'
    },
    body: JSON.stringify(data)
  });
  return response.json(); // parses JSON response into native JavaScript objects
}
The saveLib function bundles the page data with the user responses into a payload for the serverless endpoint. That endpoint creates a fresh Sanity document and returns its _id, which we then use to build a unique permanent link on the page.
Local Development with Netlify
First, create a netlify.toml at the project root so Netlify knows to serve and build from the site directory.
[build]
 command = "npm run build" # Command to run
 functions = "functions"            # Directory we store the functions
 publish = "_site"                        # Folder to publish (11ty automatically makes the _site folder
 base = "site"                                # Folder that is the root of the build
Install the Netlify CLI globally and run netlify dev instead of your usual start script. The CLI will guide you through linking the repository, after which you're set to build a function.
npm install -g netlify-cliThe Save Function
Inside the functions directory (specified in the TOML), create createLib.js. The standard Sanity client is read-only, so we reconfigure it with a token that has "Editor" permissions, generated from the Sanity project dashboard. Store that token as SANITY_TOKEN in Netlify's environment variables, which netlify dev picks up automatically.
To reconfigure, require our utility client and call .config(), setting the token and disabling useCdn.
// Sanity JS Client
// The build client is read-only
// To use to write, we need to add an API token with proper permissions
const client = require('../utils/sanityClient')
client.config({
    token: process.env.SANITY_TOKEN,
    useCdn: false
})
A Netlify function exports a handler that receives an event and returns a status code and string body.
// Grabs local env variables from .env file
// Not necessary if using Netlify Dev CLI
require('dotenv').config()

// Sanity JS Client
// The build client is read-only
// To use to write, we need to add an API token with proper permissions
const client = require('../utils/sanityClient')
client.config({
  token: process.env.SANITY_TOKEN,
  useCdn: false
})

// Small ID creation package
const { nanoid } = require('nanoid')

exports.handler = async (event) => {
  // Get data off the event body
  const {
    pt,
    userContentBlocks,
    id,
    libTitle
  } = JSON.parse(event.body)

  // Create new Portable Text JSON
  // from the old PT and the user submissions
  const newBlocks = findAndReplace(pt, userContentBlocks)

  // Create new Sanity document object
  // The doc's _id and slug are based on a unique ID from nanoid
  const docId = nanoid()
  const doc = {
    _type: "userLib",
    _id: docId,
    slug: { current: docId },
    madlib: id,
    title: `${libTitle} creation`,
    text: newBlocks,
  }

  // Submit the new document object to Sanity
  // Return the response back to the browser
  return client.create(doc).then((res) => {
    // Log the success into our function log
    console.log(`Userlib was created, document ID is ${res._id}`)
    // return with a 200 status and a stringified JSON object we get from the Sanity API
    return { statusCode: 200, body: JSON.stringify(doc) };
  }).catch(err => {
    // If there's an error, log it
    // and return a 500 error and a JSON string of the error
    console.log(err)
    return {
      statusCode: 500, body: JSON.stringify(err)
    }
  })
}

// Function for modifying the Portable Text JSON
// pt is the original portable Text
// mods is an object of modifications to make
function findAndReplace(pt, mods) {
  // For each block object, check to see if a mod is needed and return an object
  const newPT = pt.map((block) => ({
    ...block, // Insert all current data
    children: block.children.map(span => {
      // For every item in children, see if there's a modification on the mods object
      // If there is, set modContent to the new content, if not, set it to the original text
      const modContent = mods[span._key] ? mods[span._key].content : span.text
      // Return an object with all the original data, and a new property
      // displayText for use in the frontends
      return {
        ...span,
        displayText: modContent
      }
    })
  }))
  // Return the new Portable Text JSON
  return newPT
}
We destructure the submitted data from event.body. Then, we compare the original Portable Text against the user's modifications. A find-and-replace maps over the original blocks; for each child, we swap in the corresponding user content, falling back to the original text when no modification exists.
With the modified Portable Text ready, we create a new document object. For a unique identifier and slug, we use the nanoid package. The remaining fields map to our userLib schema, and the authenticated client's .create() method submits it. The result—success or failure—is returned to the front end.
Rendering On-Demand with 11ty Serverless
We're using the 11ty 1.0 beta specifically because it includes the 11ty Serverless plugin. Add it to .eleventy.js.
const { EleventyServerlessBundlerPlugin } = require("@11ty/eleventy");

module.exports = function (eleventyConfig) {
  eleventyConfig.addPassthroughCopy("assets/");

  eleventyConfig.addPlugin(EleventyServerlessBundlerPlugin, {
    name: "userlibs", // the name to use for the functions
    functionsDir: "./functions/", // The functions directory
    copy: ["utils/"], // Any files that need to be copied to make our scripts work
    excludeDependencies: ["./_data/madlibs.js"] // Exclude any files you don't want to run
  });
};
After restarting netlify dev, 11ty generates a functions/userlibs directory with all necessary boilerplate. The default index.js uses standard serverless functions, which would rebuild on every request. Instead, we switch to Netlify's On-Demand Builders: the page is built on the first hit and cached until the next site build.
// Comment this line out
exports.handler = handler

// Uncomment these lines
const { builder } = require("@netlify/functions");
exports.handler = builder(handler);
That file relies on Netlify's functions package, so install it.
npm install @netlify/functionsData and Routing for User Libs
Create a JavaScript data file named userlibs.js in _data. Unlike the madlibs data file, this returns an object where keys are the slugs used by the serverless bundle to fetch the correct madlib on request.
// /madlibs/site/_data/userlibs.js

const client = require('../utils/sanityClient')
const {prepText} = require('../utils/portableTextUtils')

const query = `*[_type == "userLib"]{
    title,
    "slug": slug.current,
    text,
    _id
  }`

module.exports = async function() {
    const madlibs = await client.fetch(query);
    // Protect against no madlibs returning
    if (madlibs.length == 0) return {"404": {}}

    // Run through our portable text serializer
    const preppedMadlib = madlibs.map(prepText)

    // Convert the array of documents into an object
    // Each item in the Object will have a key of the item slug
    // 11ty's Pagination will create pages for each one
    const mapLibs = preppedMadlib.map(item => ([item.slug, item]))
    const objLibs = Object.fromEntries(mapLibs)
    return objLibs
}
Next, create userlibs.njk at the site root, resembling madlibs.njk but non-interactive and based on base.njk.
---
layout: 'base.njk'
pagination:
  data: userLibs
  alias: userlib
  size: 1
  serverless: eleventy.serverless.path.slug

permalink:
  userlibs: "/userlibs/:slug/"
---

<h2>{{ userlib.title }}</h2>
<div>
  {{ userlib.htmlText | safe }}
</div>
Pagination uses the userlibs data source. The serverless property on the pagination object tells 11ty what dynamic path element to match. The eleventy.serverless.path object exposes the requested URL's pieces; here we look for slug. That slug must match a key in the pagination data.
The permalink object defines the route, named userlibs to match the plugin config. A static /userlibs/ prefix plus :slug/ creates dynamic routes. With this mapping, the save links generated earlier now resolve to actual pages.
Extensions and Ideas
- Pre-build user-generated content alongside on-demand rendering.
- Add a counter per template tracking total saved madlibs.
- Compile lists of user-supplied words by part of speech.
This hybrid foundation—statically built where possible and dynamically assembled when needed—opens the door to far richer applications.


