
Why a custom camera is needed
Dropbox’s document scanner lets a user photograph a document and get a clean, rectangular PDF. The machine learning backend and its iOS counterpart were covered in earlier posts; this one looks at the Android side, specifically what it takes to augment the live camera preview with a real-time document outline.
The usual way a third-party app captures a photo is to launch the device’s native camera app and receive the final image, with no control over what happens in between.
Intent takePictureIntent = new Intent(MediaStore.ACTION_IMAGE_CAPTURE);
startActivityForResult(takePictureIntent, REQUEST_TAKE_PHOTO);
That approach will not work here. To draw a blue quadrilateral over the preview that tracks the document’s edges, we have to build a custom camera pipeline that processes every incoming frame and renders the detected boundaries directly on the preview. The full cycle involves these steps:
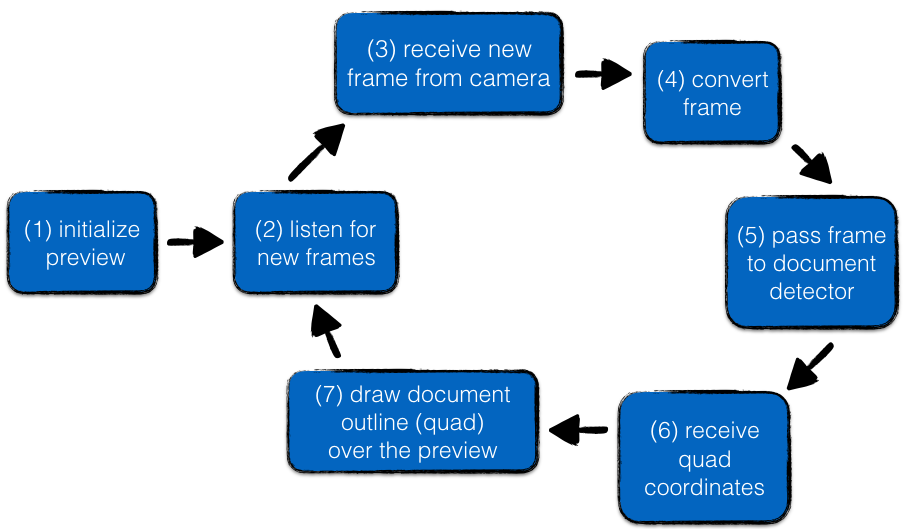
The loop from frame acquisition through detection to drawing has to stay fast enough that the overlay feels responsive. Roughly 10–12 frames per second is the minimum for perceived smooth motion, which puts a budget of about 80 ms per frame. Android hardware is inconsistent — sensors run from 0.3 to 24 megapixels, and no feature like autofocus, a rear camera, or an LED flash can be assumed. Every capability must be checked explicitly before it is used.
Setting up the camera and preview
The foundation is a custom preview made with the android.hardware.Camera class. This API is deprecated since Android 5.0 in favor of the android.hardware.camera2 interface. However, at the time of implementation roughly half of active devices ran pre-5.0 versions, so the older API was the only realistic option.
Before the preview starts, the presence of a rear-facing camera must be confirmed — a Nexus 7, for instance, only has a front camera. The feature check uses PackageManager.FEATURE_CAMERA, which per the documentation refers to a camera facing away from the screen. A separate flag, FEATURE_CAMERA_FRONT, exists for the front camera.
PackageManager pm = context.getPackageManager();
pm.hasSystemFeature(PackageManager.FEATURE_CAMERA);
The manifest also needs the proper camera feature and permission declarations, marked as optional so the app still installs on devices without them, and the permission.CAMERA runtime permission on Android M and newer:
<uses-feature android:name="android.hardware.camera" android:required="false" />
<uses-feature android:name="android.hardware.camera.autofocus" android:required="false" />
<uses-feature android:name="android.hardware.camera.flash" android:required="false" />
+ runtime request forpermission.CAMERA.
Camera sensor orientation is device-specific. The typical setting is landscape (90 degrees), but some devices — notably the Nexus 5X — use a “reverse landscape” orientation, causing upside-down output for apps that assume otherwise. Display orientation has to be derived from the sensor orientation and set explicitly:
private void setCorrectOrientation() {
    CameraInfo info = new CameraInfo();
    Camera.getCameraInfo(getBackCameraId(), info);
    int orientation = getWindowManager().getDefaultDisplay().getRotation();
    int degrees = 0;
    switch (orientation) {
        case Surface.ROTATION_0:
            degrees = 0;
            break;
        case Surface.ROTATION_90:
            degrees = 90;
            break;
        case Surface.ROTATION_180:
            degrees = 180;
            break;
        case Surface.ROTATION_270:
            degrees = 270;
            break;
        default:
            throw new RuntimeException("Unsupported display orientation");
    }

    mCamera.setDisplayOrientation((info.orientation - degrees + 360) % 360);
}
Another difference from iOS is that there are multiple aspect ratios in play, depending on whether a device puts capture controls over the preview or in a dedicated panel. The camera parameters method getSupportedPreviewSizes() provides the list of possible dimensions; the best match is the one closest to the preview rectangle’s aspect ratio within a tolerance. This check is what keeps the scanner working in situations such as multi-window mode where the preview’s aspect ratio is not one of the standard screen ratios.
Choosing a preview surface
Two view classes are commonly used to host the camera feed. SurfaceView is the oldest and simplest; the official Google camera demo uses it. Its weakness is that it is a drawing surface behind the window, not part of the view hierarchy proper, so multiple SurfaceView instances cannot be overlaid cleanly. That makes z-ordering fragile and device-dependent, which is a problem for augmented reality overlays.
TextureView is integrated into the view hierarchy like any other view, so it supports standard transforms, scaling, and animation. Once the camera parameters are set, the preview is started with mCamera.startPreview(). The camera object should be held only while the app is foregrounded and released in onPause; otherwise, the camera can become unavailable to other apps or to the app itself after a restart.
Placing control buttons over the live preview is straightforward with a FrameLayout, since its vertical order matches the order of the child views in the layout file:
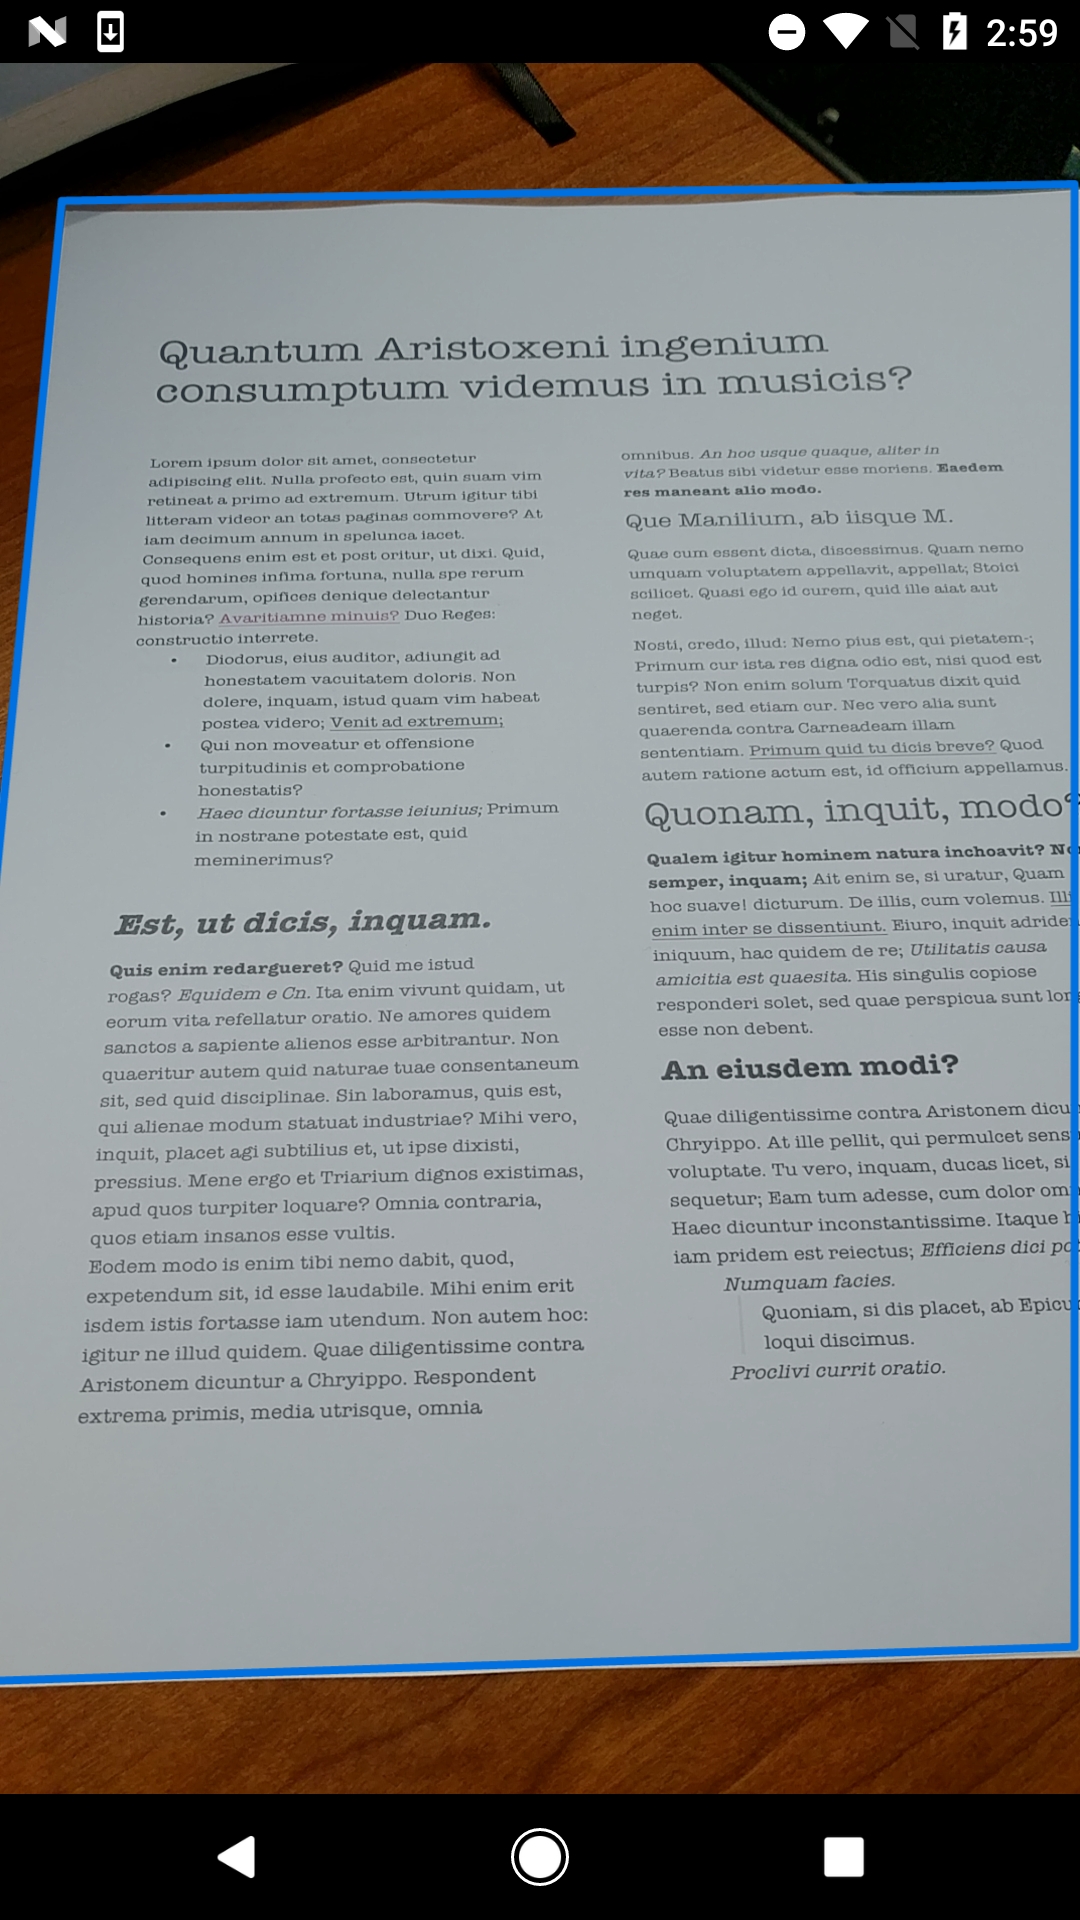
For a TextureView, overlays simply stack. If a SurfaceView were used instead, z-order would need setZOrderMediaOverlay.
Flash, torch, and focus
Low-light scanning is supported via flash and torch toggles, implemented with the camera parameters FLASH_MODE_TORCH and FLASH_MODE_ON. Since tablets often lack a physical LED, the controls are shown only if the device reports flash support. Toggling the flash mode requires stopping the preview first with mCamera.stopPreview(), then calling mCamera.getParameters().setFlashMode() and restarting with mCamera.startPreview(). Skipping the stop/start sequence can produce undefined behavior on some devices.
For focus, devices that support it use FOCUS_MODE_CONTINUOUS_PICTURE for aggressive refocusing to keep the subject sharp. Lacking that mode, the app emulates it by issuing a manual autofocus request on each camera movement, detected through the accelerometer. Supported focus modes come from mCamera.getParameters().getSupportedFocusModes().
Acquiring and converting frames
Frame delivery works through a registered listener. With TextureView, the callback is SurfaceTextureListener.onSurfaceTextureUpdated(); with SurfaceView, it is Camera.PreviewCallback.onPreviewFrame(). Frames arrive roughly 20–30 times per second on most devices.
When using onPreviewFrame, the data buffer must be returned to the camera by calling camera.addCallbackBuffer() once processing is done; otherwise the camera will not write to that buffer again. With the SurfaceTexture path, each update simply provides a chance to process or discard the frame at our discretion.
The detector requires a 200×200 px frame in RGBA space. The onPreviewFrame data arrives in NV21, the standard Android preview format. The naive conversion to RGBA via framework bitmap methods takes 300–500 ms on a 1920×1080 frame — far too slow for real-time overlay. A faster route is two RenderScript intrinsic scripts, ScriptIntrinsicResize plus ScriptIntrinsicYuvtoRGB, which run hardware-accelerated in 10–25 ms:
Camera.Parameters = camera.getParameters();
YuvImage yuv = new YuvImage(data, parameters.getPreviewFormat(), width, height, null);
ByteArrayOutputStream out = new ByteArrayOutputStream();
yuv.compressToJpeg(new Rect(0, 0, width, height), 100, out);

byte[] bytes = out.toByteArray();
Bitmap bitmap = BitmapFactory.decodeByteArray(bytes, 0, bytes.length);
The TextureView path avoids format conversion entirely by pulling the RGBA bitmap directly from the surface once a frame update fires. Getting the bitmap is generally considered slow, but at the small size needed here the cost drops to 5–15 ms, making it the quickest and simplest approach for this application.
int expectedImageWidth = pageDetector.getExpectedImageWidth();
int expectedImageHeight = pageDetector.getExpectedImageHeight();
Bitmap bitmap = mTextureView.getBitmap(expectedImageWidth, expectedImageHeight);
Because most sensors are oriented at either 90 or 270 degrees, the resulting frame will typically be rotated. Rather than rotating the full bitmap, the quadrilateral corners returned by the detector get rotated instead — a much cheaper operation that keeps the overlay aligned with the camera’s rotation.
With frame delivery at 20–30 Hz, conversion under 25 ms, and detection lightweight enough to run on a thumbnail-sized input, the augmented preview loop fits within the 80 ms budget, keeping the document outline tracking the live scene smoothly across a wide range of Android hardware.
Feeding frames to the detector
Alongside the scaled bitmap, the document detector needs a rotation matrix. This matrix encodes the direction of device movement (tilts, for example), which lets the detector predict where the quadrilateral outlining the document will be next. Given the current quad coordinates and the device motion, the detector can estimate a future position and cut down on computation time.
Build the rotation matrix from sensor data by listening for Sensor.TYPE_MAGNETIC_FIELD and Sensor.TYPE_ACCELEROMETER events, then calling SensorManager.getRotationMatrix. The detector itself is implemented in C++, so the call goes through JNI. If sensor data is unavailable, an identity matrix is passed instead.
Detection calls can take 20–100ms depending on the device, so they must not run on the UI thread. They execute sequentially on a separate thread with elevated priority.
From detector output to preview overlay
The detector returns four points that delimit the document edges. Those coordinates refer to the downscaled frame (for example, a 200×200 square), so they must be scaled back to match the original preview size and rotated if the camera orientation differs from the preview orientation as described in the frame conversion step.
Drawing happens in a custom View with an overridden onDraw() method, which keeps the quad below camera controls and gives straightforward z-order control. Hardware-accelerated canvas drawing has been the default since Android 4.0 (Ice Cream Sandwich), which helps here significantly. Each updated frame triggers invalidate(), although the exact interval between that call and the system invoking onDraw() is not predictable. In practice this still achieves at least 15 FPS on most devices.
KeeponDraw()very lightweight — avoid expensive operations like object allocation. If a custom view is still too slow, alternatives such as a separateTextureViewor OpenGL offer faster but more complex rendering paths.
Performance context
Per-step timings were logged on several devices where Dropbox was the only non-preinstalled app. These are illustrative only, not benchmark results — factors like hand movement heavily influence the numbers.
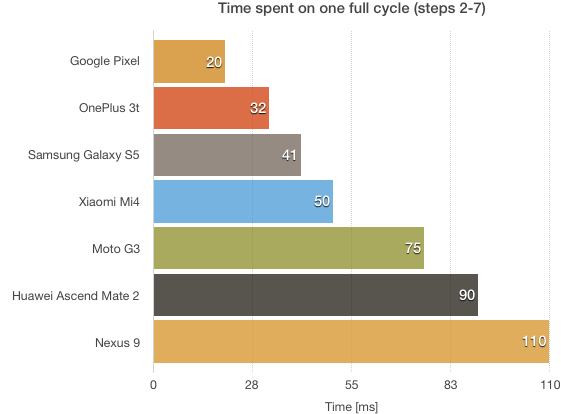
Faster hardware generally pairs with higher-resolution cameras, meaning more pixels to process. The hardest case for the scanner is a slow device with a very high resolution camera.
Scanning from the gallery
The thumbnail in the lower left corner shows the most recent gallery item. Tapping it opens the camera roll so the user can pick an existing photo to scan.
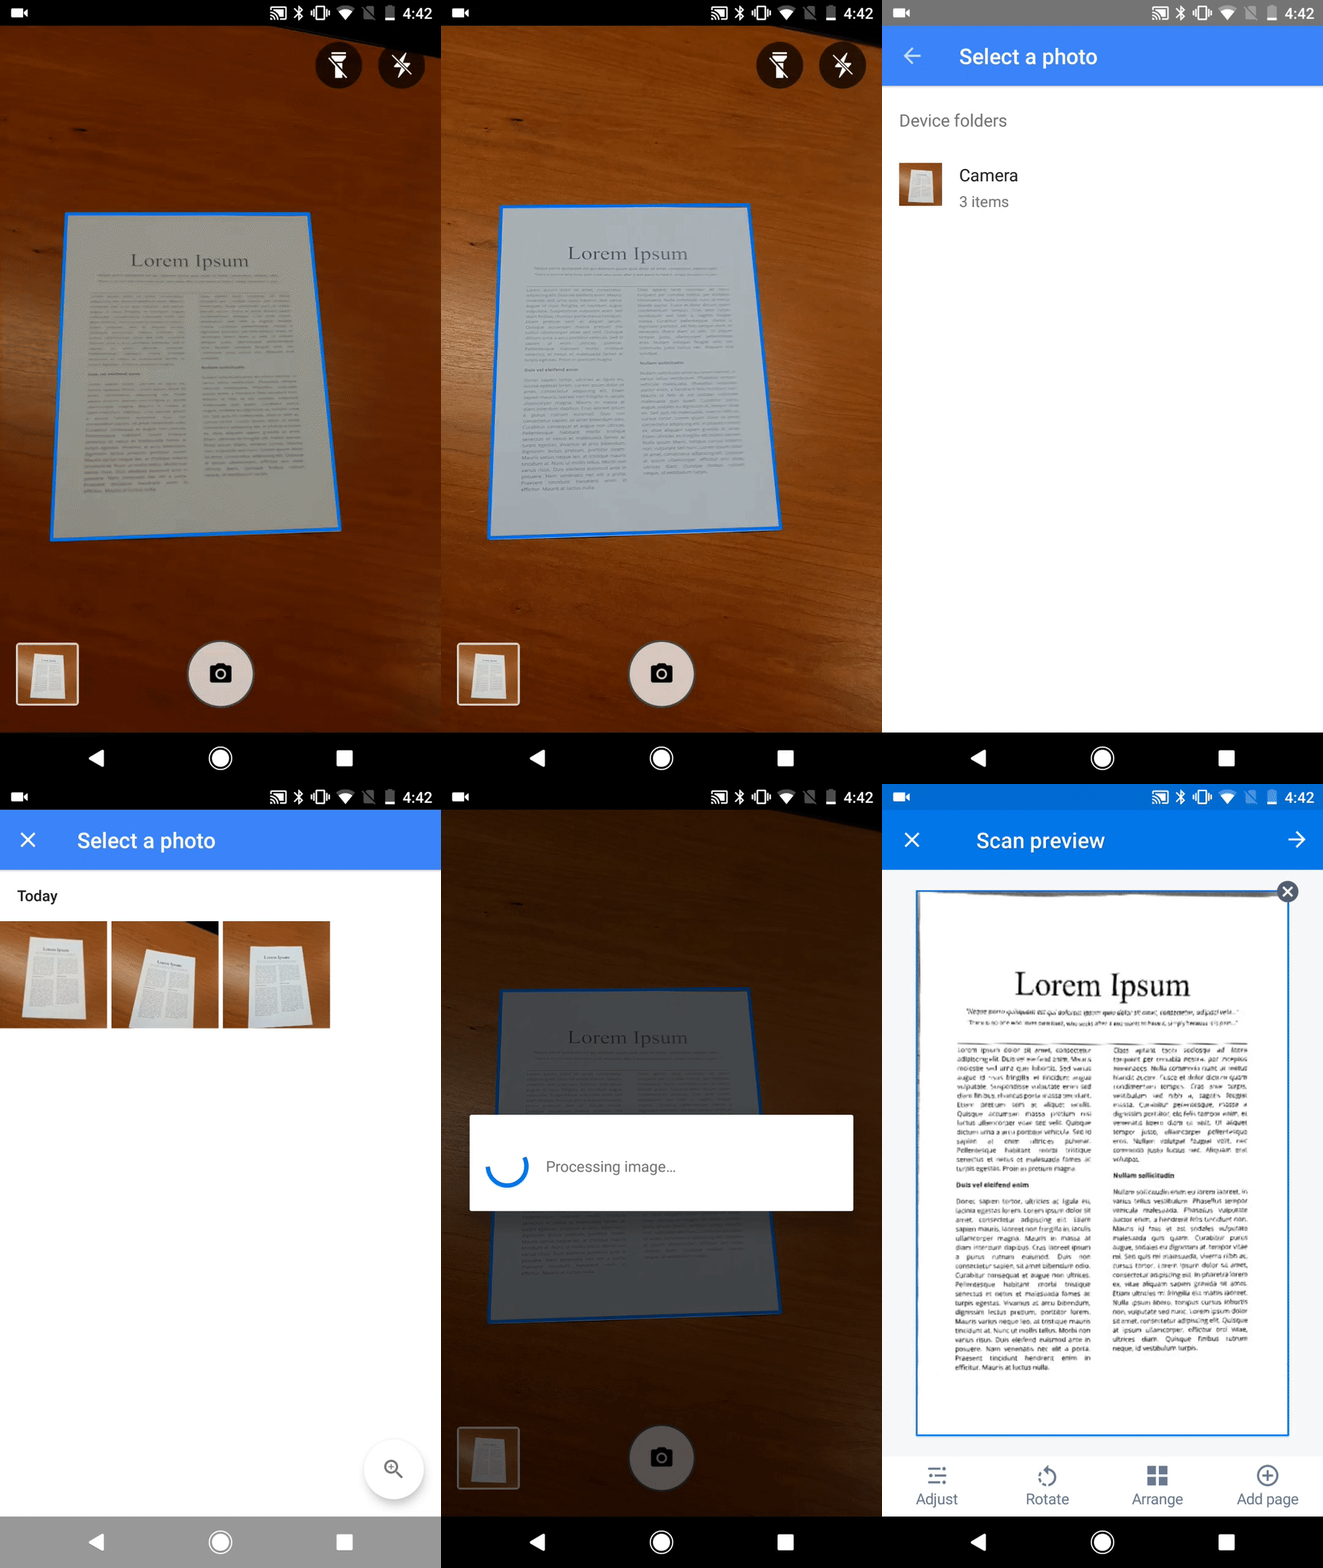
That last available thumbnail can be loaded with the following query:
String[] projection =
        new String[] {
            ImageColumns._ID, ImageColumns.DATA, ImageColumns.DATE_TAKEN,
        };
Cursor cursor =
        getContentResolver()
                .query(
                        MediaStore.Images.Media.EXTERNAL_CONTENT_URI,
                        projection,
                        null,
                        null,
                        ImageColumns.DATE_TAKEN + " DESC");
Thumbnail and full-size photo orientation requires reading and interpreting itsExifTags. Theandroid.media.ExifInterfaceclass exposes eight orientation tags that must be handled correctly.
If the resulting cursor is empty (no gallery photos) or bitmap retrieval fails (null bitmap or exception), the thumbnail is hidden and gallery scanning is disabled.


