

Why Search Matters
Search is a core part of how users move through content-heavy sites. Done well, it keeps visitors engaged, helps them find what they need, and encourages them to explore more of what you offer. Poorly implemented search, on the other hand, can frustrate users and drive them away.
This tutorial shows how to add a fast, reliable search experience to a Nuxt app using Algolia. Algolia provides the backend tools needed to index and query content, while Algolia InstantSearch gives you pre-built UI components to wire it together. We’ll pair this with Nuxt Content, which lets you manage content as Markdown files, and style everything with TailwindCSS.
Before You Begin
Make sure you have Node installed, along with a text editor and terminal. A basic grasp of HTML/CSS/JavaScript, Vue, Nuxt, and TailwindCSS will help you follow along without friction.
Scaffold the Nuxt Project
Nuxt handles a lot of the heavy lifting for Vue apps, including server-side rendering, file-based routing, and component auto-importing. To start, create a new project:
npx create-nuxt-app <project-name>When the setup prompts ask which Nuxt modules to include, select Content - Git-based headless CMS. This ensures the nuxt/content package is installed alongside the core app.
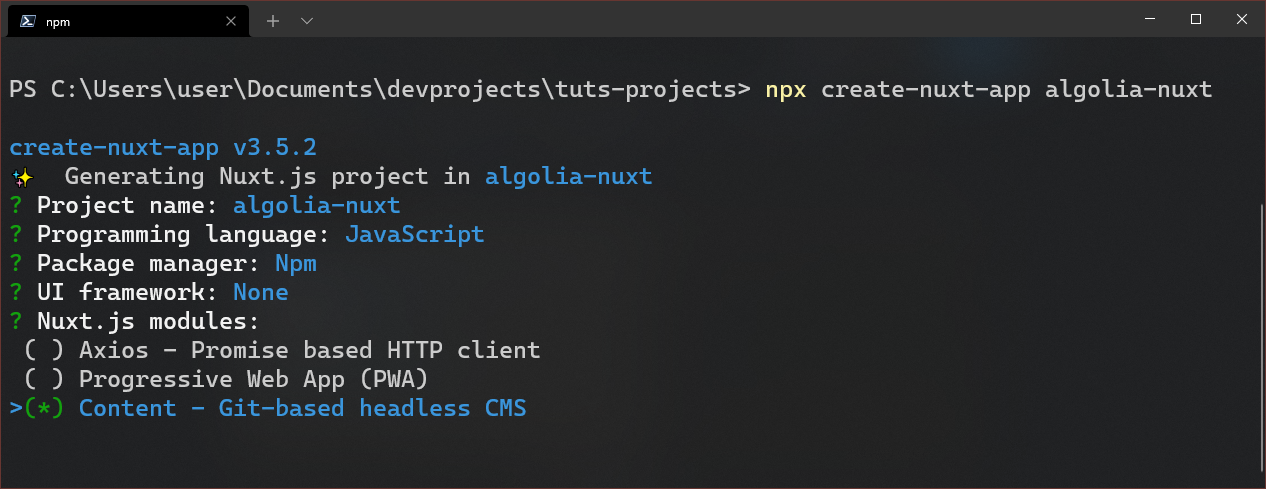
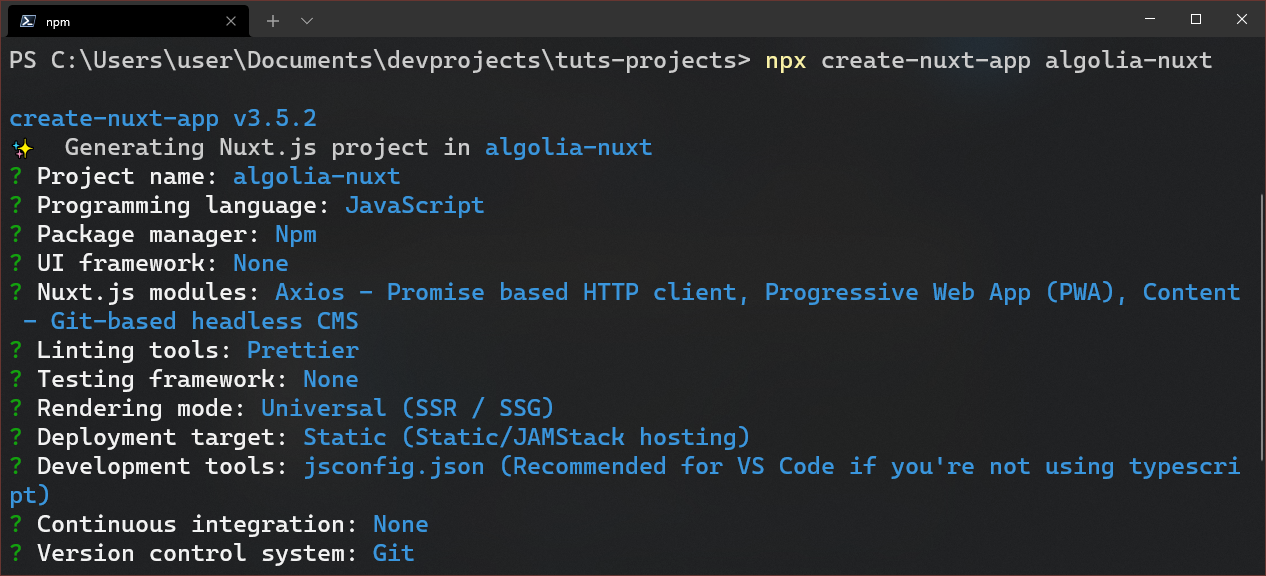
Once installation completes, move into the project directory:
cd algolia-nuxtAdding Content to an Existing Setup
If you’re adding Nuxt Content to an already-existing Nuxt project, install the module separately:
#install nuxt content

npm install @nuxt/content
Then register it in the modules array inside nuxt.config.js:
//nuxt.config.js

export default {
  modules: ['@nuxt/content']
}
Set Up TailwindCSS
The easiest path to Tailwind in Nuxt is via the @nuxtjs/tailwindcss module. You'll also want the Typography plugin to style Markdown-rendered content nicely out of the box.
Install everything with npm:
npm install -D @nuxtjs/tailwindcss tailwindcss@latest postcss@latest autoprefixer@latestAdd the Tailwind module to buildModules in nuxt.config.js:
// nuxt.config.js

export default {
  buildModules: ['@nuxtjs/tailwindcss']
}
Configuration File
Generate the Tailwind config file:
npx tailwindcss initThis creates a minimal tailwind.config.js. Next, create a stylesheet in assets/css/tailwind.css and inject Tailwind’s base, component, and utility styles using the @tailwind directive:
/*assets/css/tailwind.css*/

@tailwind base;
@tailwind components;
@tailwind utilities;
Make it globally available by adding the file path to the CSS array in nuxt.config.js. The @/ prefix tells Nuxt to resolve the path from the project root:
  /* nuxt.config.js*/

  // Global CSS: https://go.nuxtjs.dev/config-css
  css: [
    // CSS file in the project
    '@/assets/css/tailwind.css',
  ],
Typography and Purge Config
Install the Typography plugin:
# Using npm
npm install @tailwindcss/typography
Register it in tailwind.config.js:
// tailwind.config.js
module.exports = {
  purge: [],
  darkMode: false, // or 'media' or 'class'
  theme: {
    extend: {},
  },
  variants: {
    extend: {},
  },
  plugins: [
    require('@tailwindcss/typography'),
  ],
}
Also define the purge option so Tailwind can strip unused styles during production builds:
// tailwind.config.js
module.exports = {
  purge: [
    './components/**/*.{vue,js}',
    './layouts/**/*.vue',
    './pages/**/*.vue',
    './plugins/**/*.{js,ts}',
    './nuxt.config.{js,ts}',
  ],
  darkMode: false, // or 'media' or 'class'
  theme: {
    extend: {},
  },
  variants: {
    extend: {},
  },
  plugins: [
    require('@tailwindcss/typography'),
  ],
}
Now start the dev server:
npm run devCreate Base Components and Content
Let’s build a minimal site shell with a header, then add some Markdown articles and a blog listing page.
Site Header
Create components/siteHeader.vue. It links to the home page and a future /blog route using <nuxt-link>. Both the Logo component and routing are picked up automatically by Nuxt, so no manual imports are needed.
<!-- components/siteHeader.vue -->

<template>
  <header class="fixed top-0 w-full bg-white bg-opacity-90 backdrop-filter backdrop-blur-md">
    <div class="wrapper flex items-center justify-between p-4 m-auto max-w-5xl">
      <nuxt-link to="/">
        <Logo />
      </nuxt-link>

      <nav class="site-nav">
        <ul class="links">
          <li>
            <nuxt-link to="/blog">Blog</nuxt-link>
          </li>
        </ul>
      </nav>
    </div>
  </header>
</template>
Replace the contents of components/Logo.vue with a simpler SVG mark:
<!-- components/Logo.vue -->

<template>
  <figure class="site-logo text-2xl font-black inline-block">
    <h1>Algolia-nuxt</h1>
  </figure>
</template>
Add <site-header /> to layouts/default.vue just above <Nuxt />, which renders the active page for the current route:
<!-- layouts/default.vue -->

<template>
  <div>
    <site-header />
    <Nuxt />
  </div>
</template>

...
Write Your First Article
Inside the auto-generated content/ directory, create articles/first-blog-post.md. The YAML block between the --- markers stores metadata that we can query later:
<!-- content/articles/first-blog-post.md -->

---

title: My first blog post
description: This is my first blog post on algolia nuxt
tags: [first, lorem ipsum, Iusto]

---

## Lorem ipsum

Lorem ipsum dolor sit amet consectetur, adipisicing elit.
Assumenda dolor quisquam consequatur distinctio perferendis.

## Iusto nobis nisi

repellat magni facilis necessitatibus, enim temporibus.

- Quisquam
- assumenda
- sapiente explicabo
- totam nostrum inventore
Now create the dynamic page that renders an article. In pages/blog/, create _slug.vue. The asyncData hook fetches content using $content in the Nuxt context, reads the slug from the route params, and renders the Markdown body via the <nuxt-content> component:
<!-- pages/blog/_slug.vue -->

<template>
  <article class="prose prose-lg lg:prose-xl p-4 mt-24 m-auto max-w-4xl">
    <header>
      <h1>{{ article.title }}</h1>
      <p>{{ article.description }}</p>
      <ul class="list-none">
        <li class="inline-block mr-2 font-bold font-monospace" v-for="tag in article.tags" :key="tag" > {{tag}} </li>
      </ul>
    </header>
    <!-- this is where we will render the article contents -->
    <nuxt-content :document="article" />
  </article>
</template>

<script>
export default {
  async asyncData({ $content, params }) {
    //here, we will fetch the article from the articles/ folder using the name provided in the `params.slug`
    const article = await $content('articles', params.slug).fetch()

    //return `article` which contains our custom injected variables and the content of our article
    return { article }
  },
}
</script>
Visiting http://localhost:3000/blog/first-blog-post should display the article. For a more useful demo, duplicate the file a few times by copying it:
<!-- content/articles/second-blog-post.md -->

---

title: My first blog post
description: This is my first blog post on algolia nuxt
tags: [first, Placeat amet, Iusto]

---

## Lorem ipsum

Lorem ipsum dolor sit amet consectetur, adipisicing elit.
Assumenda dolor quisquam consequatur distinctio perferendis.

## Iusto nobis nisi

repellat magni facilis necessitatibus, enim temporibus.

- Quisquam
- assumenda
- sapiente explicabo
- totam nostrum inventore
Blog Listing Page
Create pages/blog/index.vue to list all posts and act as the home for the search UI.
<!-- pages/blog/index.vue -->

<template>
  <main>
    <section class="p-4 mt-24 m-auto max-w-4xl">
      <header>
        <h1 class="font-black text-2xl">All posts</h1>

        <!-- dummy search bar -->
        <div class="search-cont inline-flex gap-2 bg-white p-2 rounded-lg shadow-lg">
          <input class="px-2 outline-none" type="search" name="search" id="search">
          <button class="bg-blue-600 text-white px-2 rounded-md" type="submit">Search</button>
        </div>
      </header>
      <ul class="prose prose-xl">
          <!-- list out all fetched articles -->
        <li v-for="article in articles" :key="article.slug">
          <nuxt-link :to="{ name: 'blog-slug', params: { slug: article.slug } }">
            <h2 class="mb-0">{{ article.title }}</h2>
            <p class="mt-0">{{ article.description }}</p>
          </nuxt-link>
        </li>
      </ul>
    </section>
  </main>
</template>

<script>
export default {
  async asyncData({ $content }) {
    // fetch all articles in the folder and return the:
    const articles = await $content('articles')
      // title, slug and description
      .only(['title', 'slug', 'description'])
      // sort the list by the `createdAt` time in `ascending order`
      .sortBy('createdAt', 'asc')
      .fetch()

    return { articles }
  },
}
</script>
In asyncData, fetch the articles collection. Chain .only() to pull just the fields you need, .sortBy() to order by date, and .fetch() to resolve the promise. The returned data then powers a simple list with links generated from each post’s slug:

Connecting Algolia To Your Nuxt Content
With the packages listed earlier installed, the next step is creating an Algolia account and preparing your project to talk to it. Head to algolia.com and sign up; the free trial period of 14 days is plenty for development, and the free tier remains viable afterward for a project of this scale.
After the onboarding flow creates an app for you, open the API Keys section from the sidebar. You need three identifiers:
- Application ID: your unique app identifier used by Algolia’s API.
- Search Only API Key: a public key for frontend code, restricted to search queries and the Insights API.
- Admin API Key: for creating, updating, and deleting indices, plus managing other API keys.
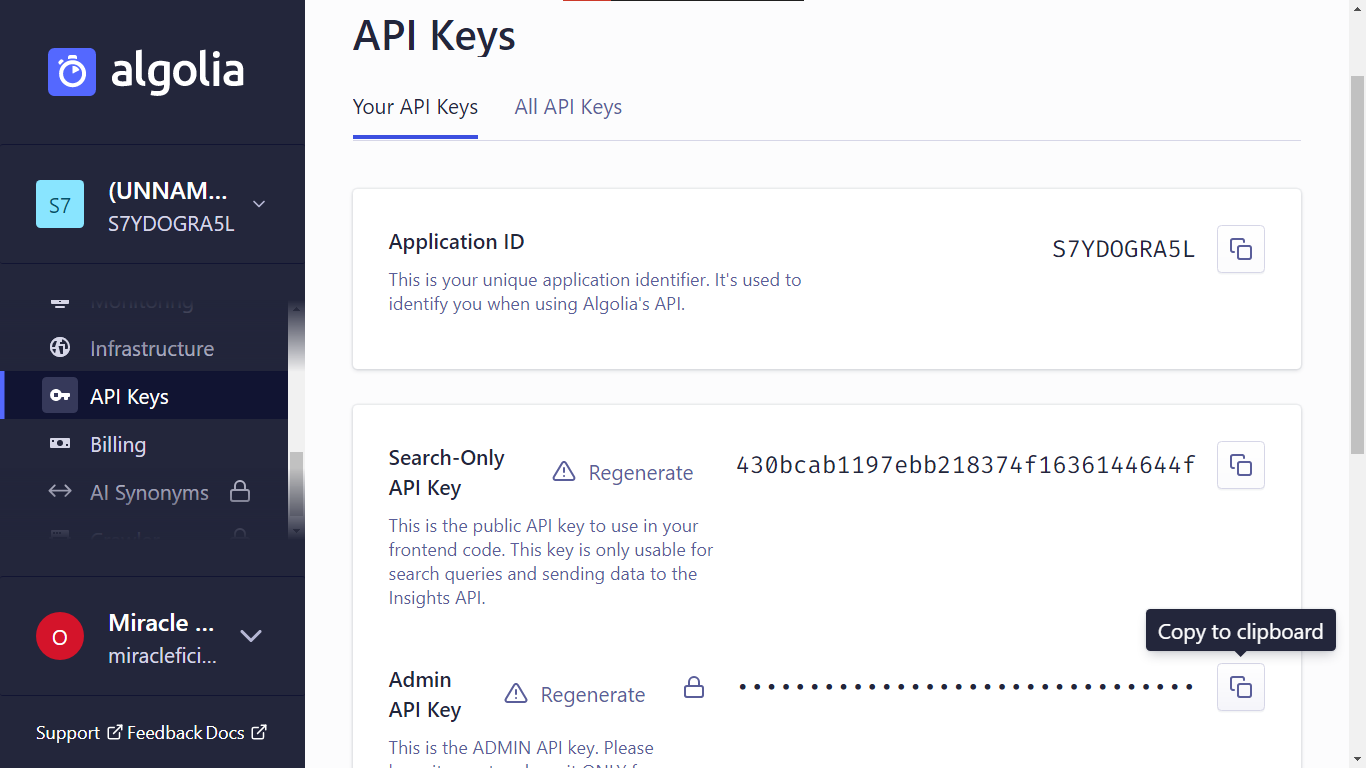
Store two of these in a new .env file at the project root:
.env

ALGOLIA_APP_ID=algolia-app-id
ALGOLIA_API_KEY=algolia-admin-api-key
Substitute algolia-app-id and algolia-admin-api-key with your actual Application ID and Admin API Key.
Next, create an index inside your Algolia dashboard by navigating to Indices and clicking create Index. Name it articles to match the content directory we’ll be working with.

'articles' index on Algolia. (Large preview)
'articles' index created. (Large preview)Indexing Nuxt Content With nuxt-content-algolia
Now we configure the nuxt-content-algolia module in nuxt.config.js. First, add it to buildModules:
// nuxt.config.js

...

// Modules for dev and build (recommended): https://go.nuxtjs.dev/config-modules
buildModules: ['@nuxtjs/tailwindcss', 'nuxt-content-algolia'],

...
Then define a nuxtContentAlgolia object:
// nuxt.config.js

export default {
...

nuxtContentAlgolia: {

  // Application ID
  appId: process.env.ALGOLIA_APP_ID,

  // Admin API Key
  // !IMPORTANT secret key should always be an environment variable
  // this is not your search only key but the key that grants access to modify the index
  apiKey: process.env.ALGOLIA_ADMIN_API_KEY,

  paths: [
    {
      name: 'articles',
      index: process.env.ALGOLIA_INDEX || 'articles',
      fields: ['title', 'description', 'tags', 'bodyPlainText']
    }
  ]
},

...
}
That object takes these properties:
appId: your Application ID.apiKey: your Admin API Key.paths: an array of index objects. Each one has:name: the folder insidecontent/, here'articles'.index: the index name on Algolia.fields: the document fields Algolia will search against.
Creating A Plain-Text Field
There’s a problem: the fields array includes bodyPlainText, but Nuxt Content doesn’t provide that property. What you get instead is body, a complex object meant for rendering. To produce plain text, install and use the remove-markdown package we installed. The cleanest way is a Nuxt hook — 'content:file:beforeInsert' — which lets you modify a document before it gets inserted into the content store.
// nuxt.config.js

export default {
...

hooks: {
  'content:file:beforeInsert': (document)=>{
    const removeMd = require('remove-markdown');

    if(document.extension === '.md'){
      document.bodyPlainText = removeMd(document.text);
    }
  }
},

...
}
Inside that hook, we require remove-markdown, verify the file is markdown, then use removeMd on document.text. The output becomes a new document.bodyPlainText property, available everywhere Nuxt Content works.
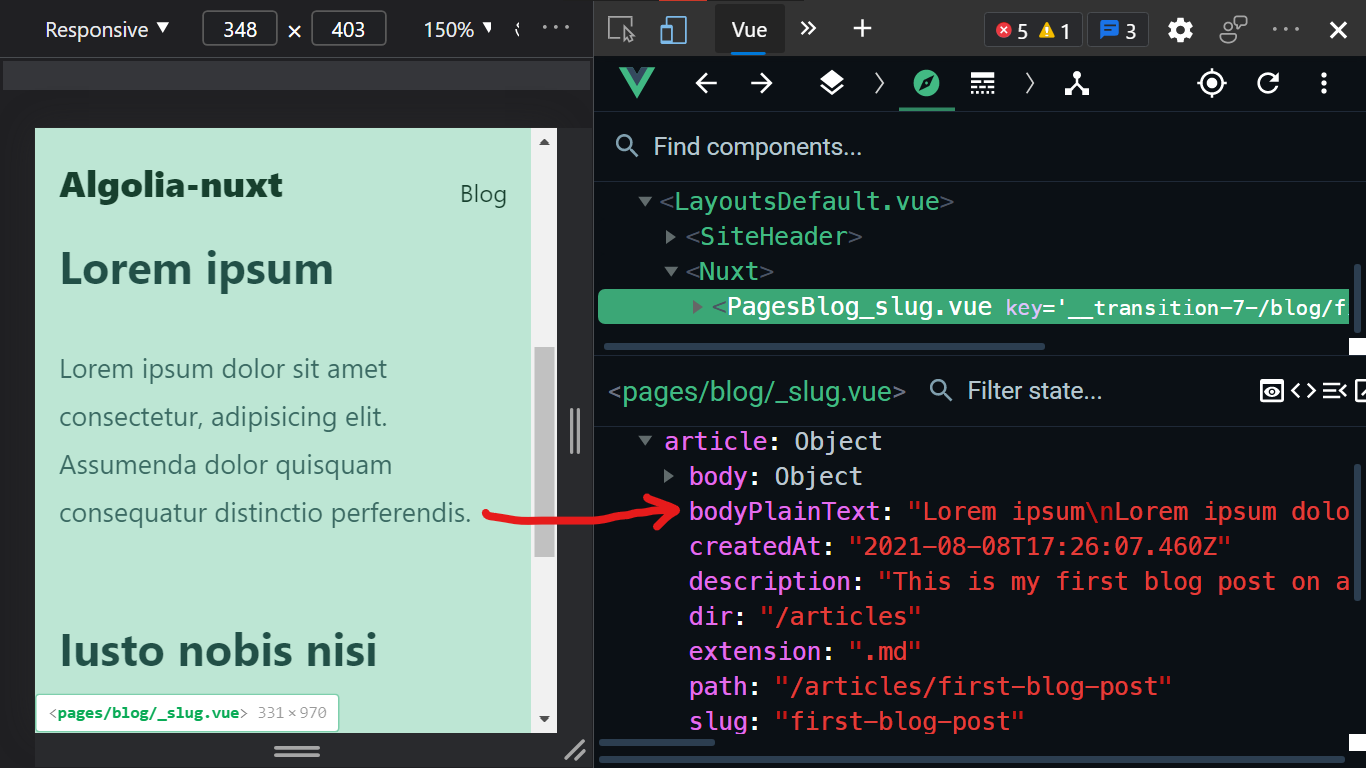
BodyPlainText generated and visible in Nuxt. (Large preview)Pushing The Index
Everything is ready. Run nuxt generate in the terminal to build the production bundle:
npm run generateThe build executes the nuxtContentAlgolia configuration and sends the data off. You’ll see indexing output in your terminal when the build finishes:
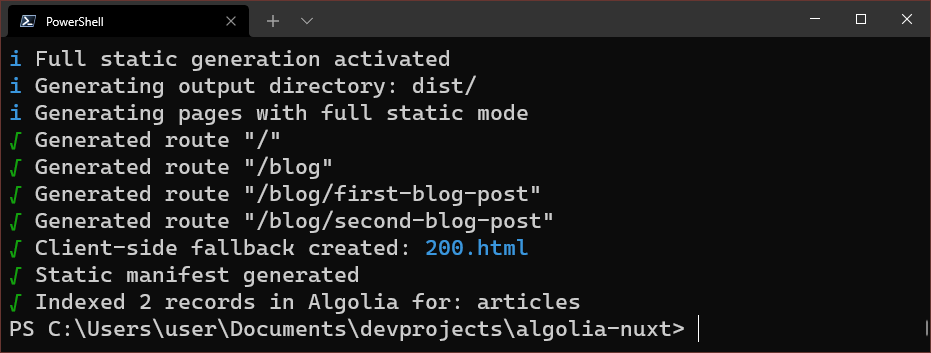
Confirm it worked by opening your Algolia dashboard. Under Indices, check the Search API logs for the API call your Nuxt project made; it should contain the fields you specified in the config.

Building The Search UI In Vue
Indexing is only half the job. To get results inside your app, we build a search interface with the vue-instantsearch components.
Registering The Plugin
vue-instantsearch isn’t a Nuxt plugin out of the box. Create plugins/vue-instantsearch.js:
// plugins/vue-instantsearch.js

import Vue from 'vue'
import InstantSearch from 'vue-instantsearch'

Vue.use(InstantSearch)
That registers InstantSearch on the Vue instance. The library ships as ES modules, so Nuxt has to transpile it. Add the plugin and its build option in nuxt.config.js:
// nuxt.config.js

export default {
...

// Plugins to run before rendering page: https://go.nuxtjs.dev/config-plugins
plugins: ['@/plugins/vue-instantsearch.js'],

// Build Configuration: https://nuxtjs.org/docs/2.x/configuration-glossary/configuration-build#transpile
build: {
  transpile: ['vue-instantsearch', 'instantsearch.js/es']
}

...
}
The Search Component Skeleton
Now create components/Search.vue and import the search client and default styling:
<!-- components/Search.vue -->

...

<script>
import algoliaSearch from 'algoliasearch/lite'
import 'instantsearch.css/themes/satellite-min.css'

// configurations for Algolia search
const searchClient = algoliaSearch(
  // Applictaion ID
  '34IIDW6KKR',

  // Search API key
  '3f8d80be6c42bb030d27a7f108eb75f8'
)
export default {
    data(){
        return{
            searchClient
        }
    }
}
</script>
In the script, pass your Application ID and Search API key to algoliaSearch and assign the result to searchClient. The template then uses the key widgets:
ais-instant-search: the root component wrapping everything. Its two required props areindex-name(here,articles) andsearch-client.ais-configure: forwards query parameters to Algolia. Useful options includeattributesToSnippetfor highlighting andhits-per-pagefor page size.
<!-- components/Search.vue -->

<template>
  <div class="search-cont inline-flex gap-2 bg-white p-2 rounded-lg shadow-lg">
    <ais-instant-search index-name="articles" :search-client="searchClient">
    </ais-instant-search>
  </div>
</template>

...
<!-- components/Search.vue -->
<template>
<div class="search-cont inline-flex gap-2 bg-white p-2 rounded-lg shadow-lg">
<ais-instant-search index-name="articles" :search-client="searchClient">
<ais-configure
:attributesToSnippet="['bodyPlainText']"
:hits-per-page.camel="5"
snippetEllipsisText="…"
>
</ais-configure>
</ais-instant-search>
</div>
</template>
...Both of those widgets render no UI. The interaction happens in ais-autocomplete, which supports slots for a custom dropdown. Inside its default slot you inherit three scopes:
currentRefinement: the current query text.indices: an array of index objectsrefine: the function that updates the query
...
<template v-slot="{ currentRefinement, indices, refine }">
...
...
<input
type="search"
:value="currentRefinement"
placeholder="Search for an article"
@input="refine($event.currentTarget.value)"
/>
......
<template v-if="currentRefinement">
<ul v-for="index in indices" :key="index.indexId">
<li>
<h3>{{ index.indexName }}</h3>
...The core element is a simple text <input> bound to those scopes. Below it, results from that query come back as indices[].hits:
...
<ul>
    <li v-for="hit in index.hits" :key="hit.objectID">
      <h1>
        <ais-highlight attribute="title" :hit="hit" />
      </h1>
      <h2>
        <ais-highlight attribute="description" :hit="hit" />
      </h2>
      <p>
        <ais-snippet attribute="bodyPlainText" :hit="hit" />
      </p>
    </li>
</ul>

...
For each hit, two widgets format the output:
<ais-highlight>: marks matching portions of the field named in itsattributeprop.<ais-snippet>: shows a relevant excerpt from the attribute declared inattributesToSnippetand highlights it.
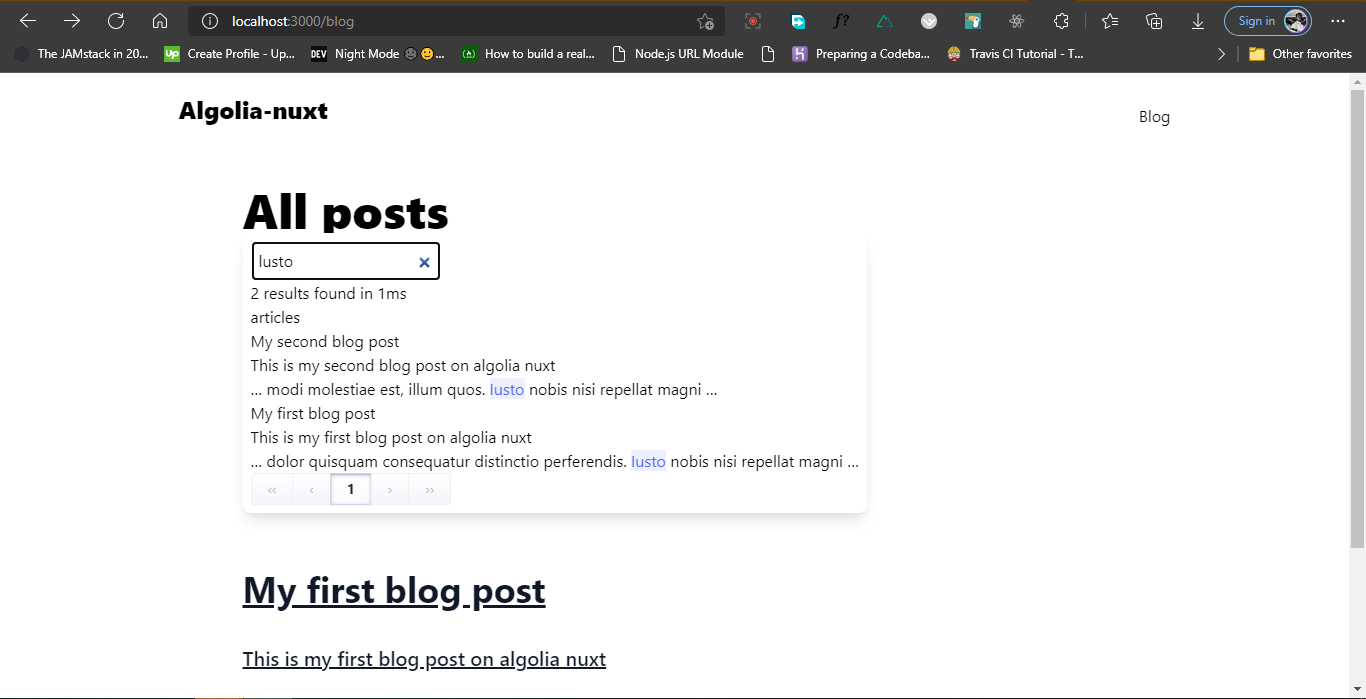
Run your dev server and test the dropdown:
Overriding InstantSearch Styling
The instantsearch.css package provides basic defaults. Most widgets accept a class-names prop to override those built-in styles. One common tweak is the highlight color on <ais-highlight>:
<!-- components/Search.vue -->

...
<h1>
  <ais-highlight
    :class-names="{
      'ais-Highlight-highlighted': 'customHighlighted',
    }"
    attribute="title"
    :hit="hit"
  />
</h1>

...
<!-- components/Search.vue -->
...
<style>
.customHighlighted {
@apply text-white bg-gray-600;
}
</style>
...With your own CSS class attached, the highlighted text follows your theme:
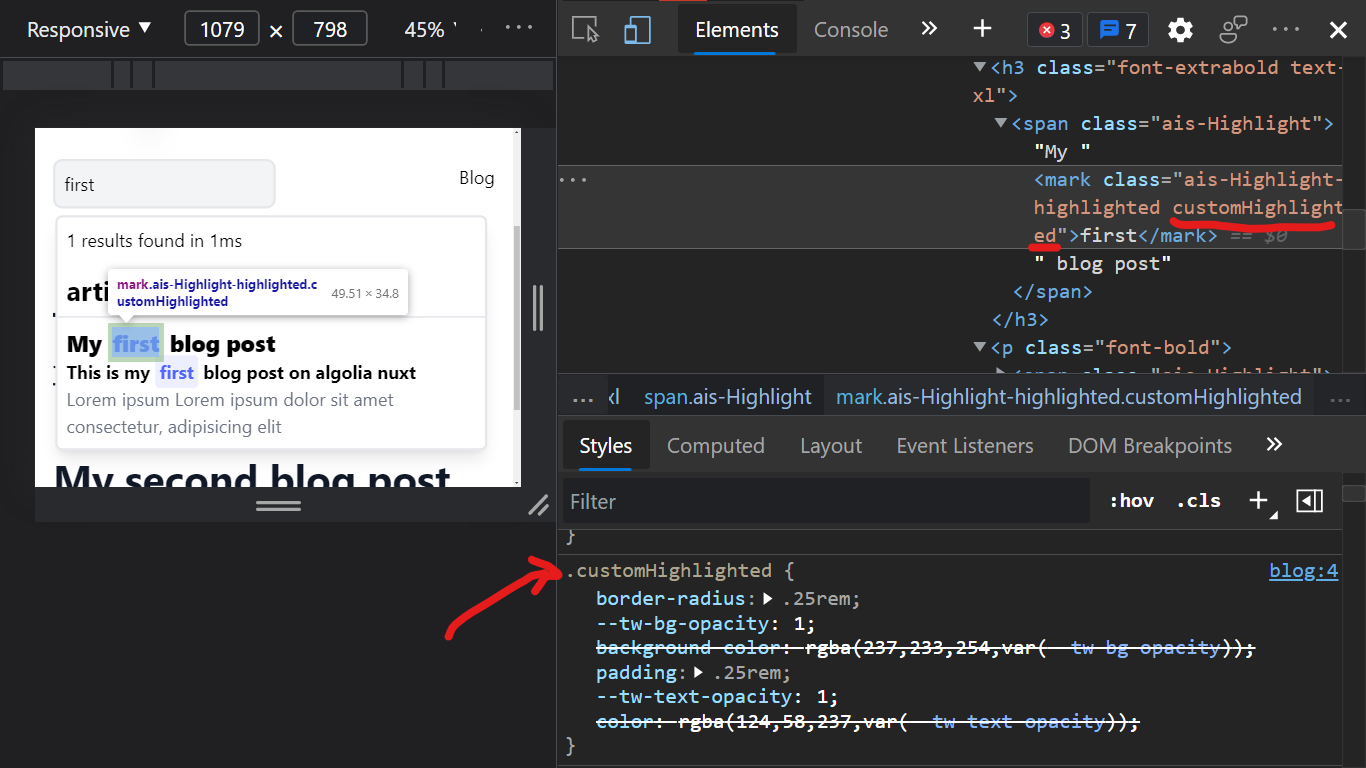
You can then restyle the entire component using Tailwind (or any CSS approach) and add navigation links to article pages. Once the dropdown reflects your custom styling—complete with <nuxt-link> routing to each article—the search experience is fully integrated:
<!-- components/Search.vue -->

<template>
  <div class="search-cont relative inline-flex mt-6 bg-gray-100 border-2 rounded-lg focus-within:border-purple-600">
    <ais-instant-search-ssr index-name="articles" :search-client="searchClient">
      <ais-configure :attributesToSnippet="['bodyPlainText']" :hits-per-page.camel="5">
        <ais-autocomplete class="wrapper relative">
          <div slot-scope="{ currentRefinement, indices, refine }">
            <input class="p-2 bg-white bg-opacity-0 outline-none" type="search" :value="currentRefinement" placeholder="Search for an article" @input="refine($event.currentTarget.value)" />
            <div class="results-cont relative">
              <div
                class=" absolute max-h-96 overflow-y-auto w-96 top-2 left-0 bg-white border-2 rounded-md shadow-lg" v-if="currentRefinement">
                <ais-stats class="p-2" />
                <ul v-for="index in indices" :key="index.indexId">
                  <template v-if="index.hits.length > 0">
                    <li>
                      <h2 class="font-bold text-2xl p-2">
                        {{ index.indexName }}
                      </h2>
                      <ul>
                        <li
                          class="border-gray-300 border-t p-2 hover:bg-gray-100" v-for="hit in index.hits" :key="hit.objectID" >
                          <nuxt-link
                            :to="{
                              name: 'blog-slug',
                              params: { slug: hit.objectID },
                            }"
                          >
                            <h3 class="font-extrabold text-xl">
                              <ais-highlight
                                :class-names="{
                                  'ais-Highlight-highlighted':
                                    'customHighlighted',
                                }"
                                attribute="title"
                                :hit="hit"
                              />
                            </h3>
                            <p class="font-bold">
                              <ais-highlight
                                :class-names="{
                                  'ais-Highlight-highlighted':
                                    'customHighlighted',
                                }"
                                attribute="description"
                                :hit="hit"
                              />
                            </p>
                            <p class="text-gray-500">
                              <ais-snippet
                                :class-names="{
                                  'ais-Snippet-highlighted':
                                    'customHighlighted',
                                }"
                                attribute="bodyPlainText"
                                :hit="hit"
                              />
                            </p>
                          </nuxt-link>
                        </li>
                      </ul>
                    </li>
                  </template>
                </ul>
              </div>
            </div>
          </div>
        </ais-autocomplete>
      </ais-configure>
    </ais-instant-search-ssr>
  </div>
</template>

...

<style>
.customHighlighted {
  @apply text-purple-600 bg-purple-100 rounded p-1;
}
</style>
<nuxt-link :to="{ name: 'blog-slug', params: { slug: hit.objectID }}">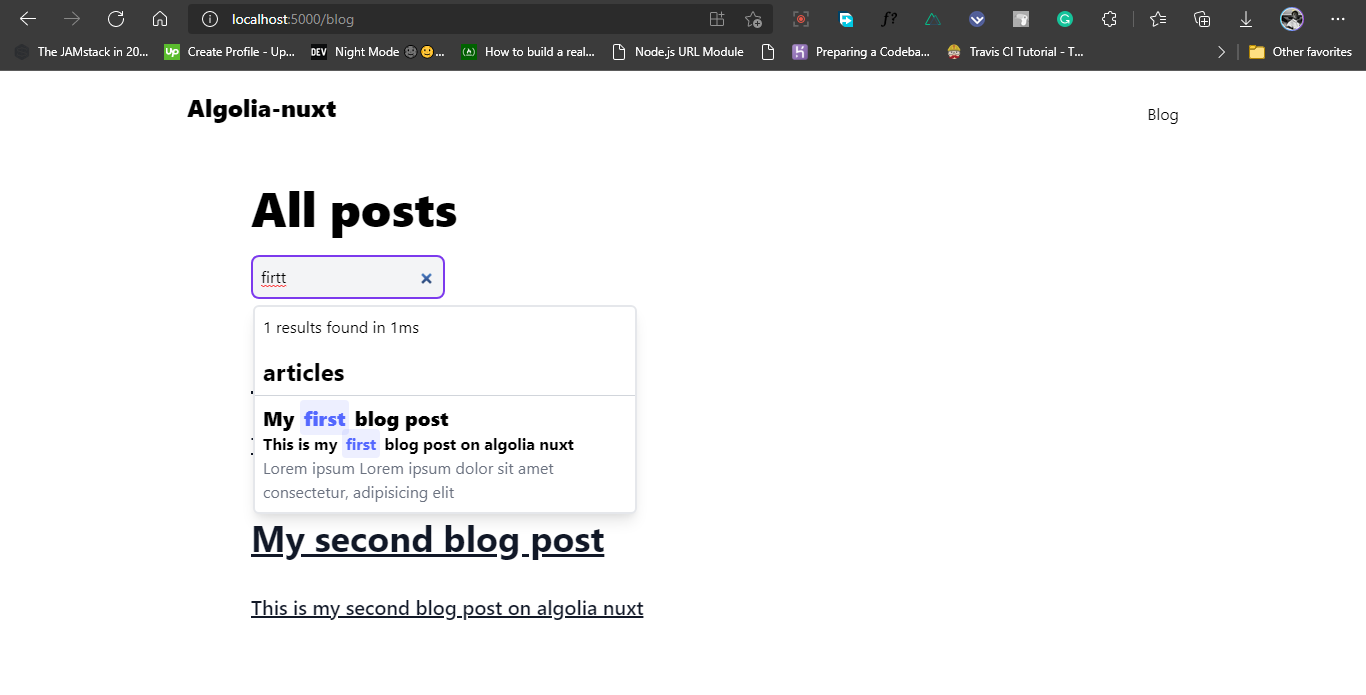
Moving Search to the Server
At this point the search component only renders client-side, so users have to wait for it to load even after the rest of the page appears. Rendering search on the server eliminates that delay.
Algolia’s recommended SSR flow works like this:
- Server: query Algolia for results, render the Vue app with those results, store the results on the page, and return the complete HTML string.
- Client: read the stored results from the page and hydrate the Vue app with them.
Required Code Changes
To implement this in Nuxt, you replace the setup with:
<!-- components/Search.vue -->

...
<script>
// import 'vue-instantsearch';
import { createServerRootMixin } from 'vue-instantsearch'

import algoliaSearch from 'algoliasearch/lite'
import 'instantsearch.css/themes/satellite-min.css'

const searchClient = algoliaSearch(
  '34IIDW6KKR',
  '3f8d80be6c42bb030d27a7f108eb75f8'
)

export default {
  data() {
    return {
      searchClient,
    }
  },

  mixins: [
    createServerRootMixin({
      searchClient,
      indexName: 'articles',
    }),
  ],

  serverPrefetch() {
    return this.instantsearch.findResultsState(this).then((algoliaState) => {
      this.$ssrContext.nuxt.algoliaState = algoliaState
    })
  },

  beforeMount() {
    const results =
      (this.$nuxt.context && this.$nuxt.context.nuxtState.algoliaState) ||
      window.__NUXT__.algoliaState

    this.instantsearch.hydrate(results)

    // Remove the SSR state so it can’t be applied again by mistake
    delete this.$nuxt.context.nuxtState.algoliaState
    delete window.__NUXT__.algoliaState
  },
}
</script>createServerRootMixinbuilds a reusable search instance.findResultsStateruns inserverPrefetchto perform the search query on the backend.- The
hydratemethod is called insidebeforeMounton the client.
In the template, swap ais-instant-search for ais-instant-search-ssr:
<!-- components/Search.vue -->

...
<ais-instant-search-ssr index-name="articles" :search-client="searchClient">
    ...
</ais-instant-search-ssr>
...
Wrapping Up
The project is now a Nuxt site where content lives in Nuxt Content and Algolia powers search, with SSR enabled for faster perceived load. With the basics in place, you can explore the Algolia widgets showcase to enrich the interface, and find more details on the widgets used here.
Code and Demo
- Source code: github.com/miracleonyenma/algolia-nuxt
- Live demo: algolia-nuxtx.netlify.app
Further Reading
Related Smashing Magazine articles:


