

Conditionally Rendering Navigation Based on Authentication State
Most React Native applications need to restrict certain screens to authenticated users. A common pattern is maintaining separate navigation stacks for logged-in and logged-out states. When a user successfully authenticates, the pre-auth screens should be completely removed — not just hidden — so they cannot be navigated back to. Similarly, when the user logs out, the protected screens must unmount entirely.
Why Protected Routes Matter
Protected routes serve a security function: they prevent unauthorized users from accessing sensitive content. Properly implemented conditional navigation ensures that protected screens aren't reachable via back navigation or deep links when the session isn't active. This goes beyond simply hiding UI elements; the screens themselves should be unmounted from the navigation tree.
This tutorial demonstrates the mounting and unmounting pattern in React Native. We'll use Expo to avoid setup overhead — the same approach applies to a bare React Native project.
Prerequisites
You should be comfortable with the following before proceeding:
- Creating custom React Native components and working with props.
- React Navigation, particularly the Stack Navigator.
- Core React Native components such as
<View/>and<Text/>. - React Native's
AsyncStoragefor local persistence. - The React Context API for global state management.
Setting Up the Project Base
Expo projects start with a blank template and then pull in the specific libraries needed for navigation and local storage. Once the Expo CLI installs the base dependencies, you'll need these packages:
- @react-native-community/async-storage — key-value persistence, like
localStorageon the web. - @react-navigation/native — the core navigation library.
- @react-navigation/stack — stack-based navigation.
- @react-native-community/masked-view, react-native-screens, react-native-gesture-handler — core utilities the navigators depend on.
npm install @react-native-community/async-storage @react-native-community/masked-view @react-navigation/native @react-navigation/stack react-native-screens react-native-gesture-handleRun expo start from the project directory to launch the app, then view it via the Expo mobile app, an Android emulator, or an iOS simulator.
Organize the codebase into two top-level folders from the start:
- context — will hold global state management files using Context API.
- views — contains the navigation and screens subfolders.
Inside context, create authContext with two files: AuthContext.js and AuthState.js. Within views/screens, split further into postAuthScreens and preAuthScreens since those two states will have different navigation stacks.
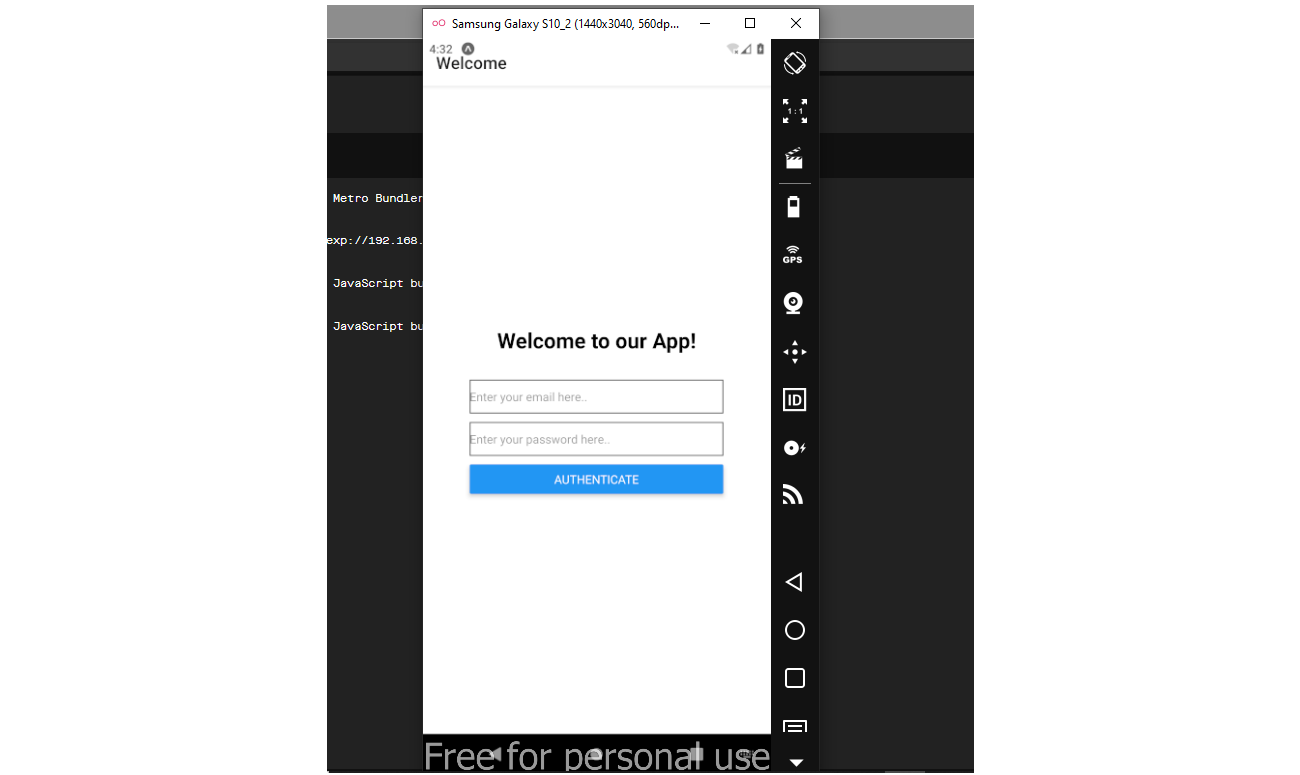
The Welcome Screen
The first screen lives at preAuthScreens > welcomeScreen.js:
import React from 'react';
import { View, Text, Button, StyleSheet, TextInput } from 'react-native';

const WelcomeScreen = () => {

  const onUserAuthentication = () => {
    console.log("User authentication button clicked")
  }

  return (
    <View style={styles.container}>
      <Text style={styles.header}>Welcome to our App!</Text>
      <View>
        <TextInput style={styles.inputs} placeholder="Enter your email here.." />
        <TextInput style={styles.inputs} secureTextEntry={true} placeholder="Enter your password here.." />
<Button  title="AUTHENTICATE" onPress={onUserAuthentication} />
      </View>
    </View>
  )
}

const styles = StyleSheet.create({
  container: {
    flex: 1,
    backgroundColor: '#fff',
    alignItems: 'center',
    justifyContent: 'center',
  },
  header: {
    fontSize: 25,
    fontWeight: 'bold',
    marginBottom: 30
  },
  inputs: {
    width: 300,
    height: 40,
    marginBottom: 10,
    borderWidth: 1,
  }
})

export default WelcomeScreen
This imports the usual React Native primitives (View, Text, Button, TextInput) and StyleSheet for styling. Next, bring in useState and useCallback from React so the form can hold and update its field values:
import React, { useState, useCallback } from 'react';...
const WelcomeScreen = () => {
const [email, setEmail] = useState('')
const [password, setPassword] = useState('')
return (
...
)
}
...Each TextInput gets its value bound to the corresponding state and an onChangeText handler. That handler calls a shared onInputChange function with two arguments: the current input value from onChangeText and the relevant state setter (setEmail or setPassword). The function then updates state with the new value.
import React, { useState, useCallback } from 'react';
import { View, Text, Button, StyleSheet, TextInput } from 'react-native';

const WelcomeScreen = () => {
  const [email, setEmail] = useState('')
  const [password, setPassword] = useState('')

  const onInputChange = (value, setState) => {
    setState(value);
  }
  return (
    <View>
      ...
      <View>
        <TextInput
          style={styles.inputs}
          placeholder="Enter your email here.."
          value={email}
          onChangeText={(value) => onInputChange(value, setEmail)}
        />
        <TextInput
          style={styles.inputs}
          secureTextEntry={true}
          placeholder="Enter your password here.."
          value={password}
          onChangeText={(value) => onInputChange(value, setPassword)}
        />
        ...
      </View>
    </View>
  )
}
...
Because there's no backend to validate against, the app uses a fixed reference object holding the acceptable credentials. The onUserAuthentication() function checks the email and password states against that object and responds accordingly:
...

const correctAuthenticationDetails = {
  email: '[email protected]',
  password: 'password'
}
const WelcomeScreen = () => {
  ...

  // This function gets called when the `AUTHENTICATE` button is clicked
  const onUserAuthentication = () => {
    if (
      email !== correctAuthenticationDetails.email ||
      password !== correctAuthenticationDetails.password
    ) {
      alert('The email or password is incorrect')
      return
    }
      // In here, we will handle what happens if the login details are       // correct
  }

  ...
  return (
    ...
  )
}
...
A few important details from that block:
correctAuthenticationDetails, the hard-coded login object, sits outside theWelcomeScreen()function.- The conditional check fails the user if either the email or password in state doesn't match the reference object.
Swap out the default content of App.js to render this screen and verify your work:
import { StatusBar } from 'expo-status-bar';
import React from 'react';
import { View } from 'react-native';
import WelcomeScreen from './views/screens/preAuthScreens/welcomeScreen';
export default function App() {
  return (
    <View>
      <StatusBar style="auto" />
      <WelcomeScreen />
    </View>
  );
}
Global State with Context API
Context API handles the app-wide authentication state without pulling in an additional state management library. For lightweight needs it's straightforward to wire up and avoids extra dependencies.
The AuthContext.js file initializes the actual context. It currently defaults to undefined; later it will carry values shaped like {loading: false, userToken: 'abcd'}:
import React, { createContext } from 'react';
const AuthContext = createContext();
export default AuthContext;
AuthState.js contains the logic backing that context. Import what's needed — useState from React, the instance of AuthContext, and AsyncStorage for persistence:
import React, { useState } from 'react';
import AuthContext from './AuthContext';
import AsyncStorage from '@react-native-community/async-storage';
Here's what the file does:
- Declares
userTokenandisLoadingstates. The token state stores the value persisted inAsyncStorage;isLoadingtracks whether the app is still booting off-storage (initiallytrue). - Writes
onAuthentication(), which runs only when the login button is clicked. Real backends would issue a JWT here; in this project the token is a hard-coded constant (USER_TOKEN). - Below it, writes the token to
AsyncStorageasynchronously underuser-token. The precedingconsole.warn()verifies the write and can be removed. - The function is exposed globally by passing it into
<AuthContext.Provider>as a value.
In welcomeScreen.js, import AuthContext and pull the authentication function through useContext:
import React, { useState, useContext } from 'react';
import AuthContext from '../../../context/authContext/AuthContext'
...
Destructure onAuthentication from the context, then call it inside onUserAuthentication() in place of the old console.log(). But this alone throws because nothing provides the context yet. Wrap the app's top-level file in AuthState:
import React from 'react';
import WelcomeScreen from './views/screens/preAuthScreens/welcomeScreen';
import AuthState from './context/authContext/AuthState'

export default function App() {
  return (
    <AuthState>
      <WelcomeScreen />
    </AuthState>
  );
}
The Authenticated Home Screen
Before routing, create the screen that should render only after authentication succeeds. In screens > postAuth, create HomeScreen.js:
import React from 'react';
import { View, Text, Button, StyleSheet } from 'react-native';

const HomeScreen = () => {

  const onLogout = () => {
    console.warn("Logout button cliked")
  }

  return (
    <View style={styles.container}>
      <Text>Now you're authenticated! Welcome!</Text>
      <Button title="LOG OUT" onPress={onLogout} />
    </View>
  )
}

const styles = StyleSheet.create({
  container: {
    flex: 1,
    backgroundColor: '#fff',
    alignItems: 'center',
    justifyContent: 'center',
  },
})

export default HomeScreen
The logout button currently just fire a dummy console.log() statement; the actual logout handler will come shortly from context.
Building the Navigator Files
Inside the navigation folder, we create three files:
postAuthNavigator.jspreAuthNavigator.jsAppNavigator.js
In preAuthNavigator.js, we build the stack shown to unauthenticated users:
navigation > preAuthNavigator.js
import React from "react";
import { createStackNavigator } from "@react-navigation/stack";
import WelcomeScreen from "../screens/preAuthScreens/welcomeScreen";

const PreAuthNavigator = () => {
    const { Navigator, Screen } = createStackNavigator();

    return (
        <Navigator initialRouteName="Welcome">
            <Screen
                name="Welcome"
                component={WelcomeScreen}
            />
        </Navigator>
    )
}
export default PreAuthNavigator;
This imports createStackNavigator from @react-navigation/stack, destructures its Navigator and Screen components, and exports a PreAuthNavigator that renders the WelcomeScreen. Multiple pre-login screens would simply mean more <Screen/> entries here.
The postAuthNavigator.js follows the same pattern, differing only in that it renders the HomeScreen for authenticated users:
navigation > postAuthNavigator.js
import React from "react";
import { createStackNavigator } from "@react-navigation/stack";
import HomeScreen from "../screens/postAuthScreens/HomeScreen";
const PostAuthNavigator = () => {
  const { Navigator, Screen} = createStackNavigator();
  return (
    <Navigator initialRouteName="Home">
      <Screen
        name="Home"
        component={HomeScreen}
      />
    </Navigator>
  )
}
export default PostAuthNavigator;
Before putting together AppNavigator.js, we need two supporting pieces:
- A TransitionScreen to show while the app determines which navigation stack to load. This is typically a spinner or custom animation, but here a simple
<Text/>tag withloading…suffices. - A
checkAuthenticationStatus()function, defined in our auth context, that decides which stack gets mounted.
In screens > TransitionScreen.js:
import React from 'react';
import { Text, View } from 'react-native';

const TransitionScreen = () => {
  return (
    <View>
      <Text>Loading...</Text>
    </View>
  )
}

export default TransitionScreen
Next, we add checkAuthenticationStatus() to our AuthState.js:
context > authContext > AuthState.js
import React, { useState, useEffect } from 'react';
import AuthContext from './AuthContext';
import AsyncStorage from '@react-native-community/async-storage';

const AuthState = (props) => {
    const [userToken, setUserToken] = useState(null);
    const [isLoading, setIsLoading] = useState(true);

    ...
    useEffect(() => {
        checkAuthenticationStatus()
    }, [])

    const checkAuthenticationStatus = async () => {
        try {
            const returnedToken = await AsyncStorage.getItem('user-toke             n');
            setUserToken(returnedToken);
            console.warn('User token set to the state value)
        } catch(err){
            console.warn(`Here's the error that occured while retrievin             g token: ${err}`)
        }
        setIsLoading(false)
    }

    const onAuthentication = async() => {
        ...
    }

    return (
        <AuthContext.Provider
            value={{
                onAuthentication,
                userToken,
                isLoading,
            }}
        >
            {props.children}
        </AuthContext.Provider>
    )
}
export default AuthState;
Inside this function, we use await to read our token from AsyncStorage, which returns null when no token exists — matching our initial userToken state. We then update userToken with whatever AsyncStorage returned. Once the try{}…catch(){} block completes, we set isLoading to false. In a production app, you'd likely want to catch token retrieval errors and expose a "Retry" button to the user. We trigger this check on mount via the useEffect() hook and expose both states through the <AuthContext.Provider/>.
Conditional Stack Mounting
Back in AppNavigator.js, we first gather all necessary imports:
import React, { useEffect, useContext } from "react";
import PreAuthNavigator from "./preAuthNavigator";
import PostAuthNavigator from "./postAuthNavigator";
import { NavigationContainer } from "@react-navigation/native"
import { createStackNavigator } from "@react-navigation/stack";
import AuthContext from "../../context/authContext/AuthContext";
import TransitionScreen from "../screens/TransitionScreen";
The AppNavigator() function is then declared:
...
const AppNavigator = () => {

}

export default AppNavigator
Finally, we implement its body:
import React, { useState, useEffect, useContext } from "react";
import PreAuthNavigator from "./preAuthNavigator";
import PostAuthNavigator from "./postAuthNavigator";
import { NavigationContainer } from "@react-navigation/native"
import { createStackNavigator } from "@react-navigation/stack";
import AuthContext from "../../context/authContext/AuthContext";
import TransitionScreen from "../screens/transition";

const AppNavigator = () => {
    const { Navigator, Screen } = createStackNavigator();
    const authContext = useContext(AuthContext);
    const { userToken, isLoading } = authContext;
    if(isLoading) {
      return <TransitionScreen />
    }
    return (
    <NavigationContainer>
      <Navigator>
        {
          userToken == null ? (
            <Screen
              name="PreAuth"
              component={PreAuthNavigator}
              options={{ header: () => null }}
            />
          ) : (
            <Screen
              name="PostAuth"
              component={PostAuthNavigator}
              options={{ header: () => null }}
            />
          )
        }
      </Navigator>
    </NavigationContainer>
  )
}

export default AppNavigator
The logic works as follows:
- We create a stack navigator, destructuring
NavigatorandScreen. userTokenandisLoadingare pulled fromAuthContext.- While
isLoadingistrue— meaningcheckAuthenticationStatus()hasn't finished — we return the<TransitionScreen />. - After that completes,
isLoadingbecomesfalse, and we return the real navigation structure. - This structure wraps everything in the
<NavigationContainer>from@react-navigation/native, which is used only once at this top level — note it's absent frompreAuthNavigator.jsandpostAuthNavigator.js. - Using a ternary operator, we render
PreAuthNavigatorwhenuserTokenisnullandPostAuthNavigatorwhen it holds a value fromAsyncStorage.
Now the AppNavigator gets passed to App.js:
App.js
 ...
import AppNavigator from './views/navigation/AppNavigator';

...
return (
    <AuthState>
      <AppNavigator />
    </AuthState>
  );
Implementing Logout
The logout button lives in HomeScreen.js, where its onPress currently fires a placeholder console.log(). To make it functional, we write a userSignout() function in AuthState.js that removes the stored token:
context > authContext > AuthState.js
...
const AuthState = (props) => {
    ...

    const userSignout = async() => {
        await AsyncStorage.removeItem('user-token');
        setUserToken(null);
    }

    return (
      ...
    )
}

export default AuthState;
This asynchronous function clears the user-token from AsyncStorage. Back in HomeScreen.js, we bring in the useContext hook, import our AuthContext, destructure userSignout, and call it from onLogout():
screens > postAuthScreens > HomeScreen.js
import React, { useContext } from 'react';
import { View, Text, Button, StyleSheet } from 'react-native';
import AuthContext from '../../../context/authContext/AuthContext'

const HomeScreen = () => {
  const { userSignout } = useContext(AuthContext)

  const onLogout = () => {
    userSignout()
  }
  return (
    <View style={styles.container}>
      <Text>Now you're authenticated! Welcome!</Text>
 <Button title="LOG OUT" onPress={onLogout} />
    </View>
  )
}
...
After clicking logout, the AsyncStorage token is gone, and our auth state updates.
Behavior after login — pressing the hardware back button:
And after logging out:
Two notable things emerge from this pattern:
- No manual
navigation.navigate()ornavigation.push()is needed after login. The rendered stack changes purely because theuserTokenstate is updated. - The back button cannot return to the login screen after authentication — it exits the app. The same holds after logout, preventing a back-navigation to the previously mounted
HomeScreen.
Where To Go From Here
This pattern solidifies the core auth flow, but real-world apps will likely require more. Good next steps include adding validation with Formik and Yup, wiring up Firebase authentication (covering Google, GitHub, Facebook, Twitter, or custom credentials), and understanding authentication versus authorization more deeply.
References
- React Native: User Authentication Flow Explained
- 10 React Security Best Practices
- Authentication Methods That Can Prevent The Next Breach
Try a live preview on Snack or explore the full source on GitHub.