

Easy Peasy: A Redux Alternative For React State
Easy Peasy is an abstraction layer over Redux that aims to reduce boilerplate while keeping the same architectural guarantees. It provides a reimagined API focused on developer experience, making it possible to set up and manage application state quickly. This article walks through building a notes app and a currency converter to demonstrate key Easy Peasy concepts.
Core Concepts And Setup
Easy Peasy relies on a few foundational pieces:
- Store — Powered by React Context, it exposes application state to components.
- State — Defined by a model object that shapes the store.
- Actions — Functions that update state, acting as reducers.
- Thunks — For side effects like API calls, built on Redux Thunk.
- Hooks —
useStoreStateanduseStoreActionslet components read state and dispatch actions. - Provider — Wraps the app to make the store available.
Installation is straightforward via npm or yarn:
npm install easy-peasyOr with yarn:
yarn add easy-peasyEasy Peasy uses Immer under the hood, allowing you to write mutable-style logic while preserving immutable state updates. It also supports Redux middlewares out of the box, so asynchronous operations fit naturally. A typical thunk for fetching data looks like this:
import { action, computed, createContextStore, thunk } from 'easy-peasy';
import { deleteUser, getUserById } from './user';

const UserStore = createContextStore({
  getUsers: thunk(async actions => {
    actions.setIsLoading();
    try {
      const { data } = await getUsers();
      actions.setUsers(data);
    } catch (e) {
      actions.setError(e);
    }
    actions.setIsLoading();
  }),
  getUserById: thunk(async (actions, id) => {
    actions.setIsLoading();
    try {
      const { data } = await getUserById(id);
      actions.setUser(data);
    } catch (e) {
      actions.setError(e);
    }
    actions.setIsLoading();
  })
});
The getUser thunk retrieves user data from an API and updates state, while deleteUser removes a user asynchronously.
How It Compares To Other State Managers
Like Redux and MobX, Easy Peasy centralizes state in a single store and uses actions to modify it. The key differences are its minimal boilerplate and the direct use of useStoreState and useStoreActions hooks for component access. This makes state management nearly as straightforward as local component state, without sacrificing global access patterns. While libraries like HookState offer lightweight local state tools, Easy Peasy’s advantage lies in managing shared state with minimal configuration. It also supports TypeScript out of the box.
Building A Notes Application
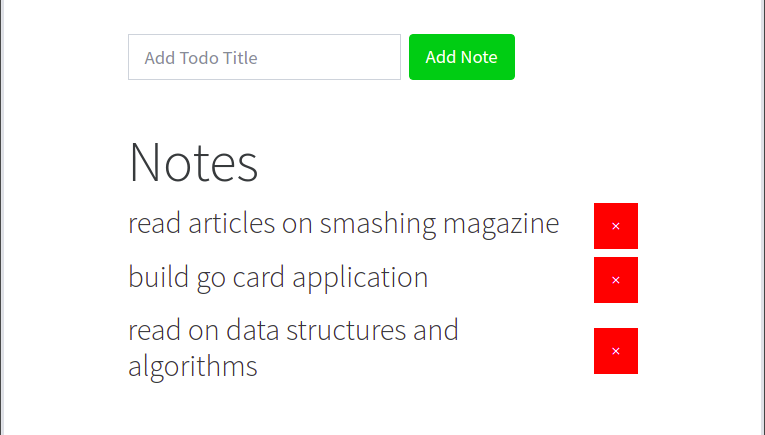
To see Easy Peasy in action, we’ll create a simple notes app that lets users add, toggle, and delete notes.
Project Setup
Create a new React app and install the required packages:
create-react-app easy-peasy-notes-appAdd the following dependencies:
cd easy-peasy-notes-appyarn add easy-peasy uuid
In the above code block, we installedThe easy-peasy package handles state management, while uuid generates unique identifiers for notes. Start the development server with:
yarn startDefining The Store
In src/Store.js, set up the store with actions for adding, toggling, and removing notes:
import { action } from "easy-peasy";
import uuid from "uuid";

export default {
  notes: [],
  setNote: action((state, notes) => {
    state.notes = notes;
  }),
  addNote: action((state, note) => {
    note.id = uuid.v4();
    state.notes.push(note);
  }),
  toggleNote: action((state, id) => {
    state.notes.map((note) => {
      return note.id === id ? (note.completed = !note.completed) : note;
    });
  }),
  removeNote: action((state, id) => {
    state.notes = state.notes.filter((note) => note.id !== id);
  })
};
Here, setNote initializes the notes list, addNote assigns a uuid and appends a new note, toggleNote flips the completed flag using map, and removeNote filters out the note with the given id.
Building The Components
Create three components under src/components: Note.jsx, Notes.jsx, and NotesForm.jsx.
The Note component uses useStoreActions to access toggleNote and removeNote:
import React from "react";
import { useStoreActions } from "easy-peasy";

const Note = ({ note }) => {
  const { completed } = note;
  const removeNote = useStoreActions(actions => actions.removeNote);
  const toggleNote = useStoreActions(actions => actions.toggleNote);
  return (
    <li className="d-flex justify-content-between align-items-center mb-2">
      <span
        className="h2 mr-2"
        style={{
          textDecoration: completed ? "line-through" : "",
          cursor: "pointer"
        }}
        onClick={() => toggleNote(note.id)}
      >
        {note.title}
      </span>
      <button
        onClick={() => removeNote(note.id)}
        className="btn btn-danger btn-lg"
      >
        ×
      </button>
    </li>
  );
};

export default Note;
Each rendered note includes a delete button and a click handler to toggle its completed state.

The Notes component reads state with useStoreState and conditionally renders notes or a prompt when the list is empty:
import React from "react";
import { useStoreState } from "easy-peasy";
import Note from "./Note";
const Notes = () => {
  const notes = useStoreState((state) => state.notes);
  return (
    <>
      <h1 className="display-4">Notes</h1>
      {notes.length === 0 ? (
        <h2 className="display-3 text-capitalize">Please add note</h2>
      ) : (
        notes.map((note) => <Note key={note.id} note={note} />)
      )}
    </>
  );
};
export default Notes;
The NotesForm component handles new note submissions:
import React, { useState } from "react";
import { useStoreActions } from "easy-peasy";

const NotesForm = () => {
  const [title, setTitle] = useState("");
  const [err, setErr] = useState(false);
  const addNote = useStoreActions(actions => actions.addNote);
  const handleSubmit = e => {
    e.preventDefault();
    if (title.trim() === "") {
      setErr(true);
    } else {
      setErr(false);
      addNote({
        title,
        completed: false
      });
    }
    setTitle("");
  };
  return (
    <>
      <form onSubmit={handleSubmit} className="d-flex py-5 form-inline">
        <input
          type="text"
          placeholder="Add Todo Title"
          value={title}
          className="form-control mr-sm-2 form-control-lg"
          onChange={e => setTitle(e.target.value)}
        />
        <button type="submit" className="btn btn-success btn-lg rounded">
          Add Note
        </button>
      </form>
      {err && (
        <div className="alert alert-dismissible alert-danger">
          <button
            type="button"
            className="close"

            onClick={() => setErr(false)}
          >
            ×
          </button>
          <strong>Oh oh!</strong>{" "}
          <span className="alert-link">please add a valid text</span></div>
      )}
    </>
  );
};
export default NotesForm;
It manages the form input and calls addNote on submission, preventing empty entries with a simple alert.
Wiring It All Together
Finally, update App.js to create the store and wrap the component tree with the StoreProvider:
import React from "react";
import "./styles.css";
import Notes from './components/Notes';
import NotesForm from './components/NotesForm'

import { StoreProvider, createStore } from "easy-peasy";
import store from "./Store";

const Store = createStore(store);
function App() {
  return (
    <StoreProvider store={Store}>
      <div className="container">
        <NotesForm />
        <Notes />
      </div>
    </StoreProvider>
  );
}
The createStore helper builds the global store from the model, and StoreProvider exposes it to all child components.
Handling API Calls With TypeScript
For more complex scenarios, Easy Peasy works well with TypeScript. To illustrate, we’ll build a currency converter that fetches live rates and converts amounts.
Set up a new React app with TypeScript:
create-react-app currency-converterAdd TypeScript configuration and supporting files:
yarn add @testing-library/jest-dom @testing-library/react @testing-library/user-event @types/jest @types/node @types/react @types/react-dom axios bootstrap easy-peasy reactstrap typescript{
"compilerOptions": {
"target": "es5",
"lib": [
"dom",
"dom.iterable",
"esnext"
],
"allowJs": true,
"skipLibCheck": true,
"esModuleInterop": true,
"allowSyntheticDefaultImports": true,
"strict": true,
"forceConsistentCasingInFileNames": true,
"noFallthroughCasesInSwitch": true,
"module": "esnext",
"moduleResolution": "node",
"resolveJsonModule": true,
"isolatedModules": true,
"noEmit": true,
"jsx": "react-jsx"
},
"include": [
"src"
]
}/// <reference types="react-scripts" />Typed Store And Hooks
Inside src/store, create two files. The index.ts file defines interfaces and the store itself:
import { createStore, Action, action, Thunk, thunk } from "easy-peasy";
import axios from "../axios";

export interface ICurrency {
  currency_name: string;
  currency_code: string;
  decimal_units: string;
  countries: string[];
}
interface IAllCurrencies {
  data: ICurrency[];
  updateResult: Action<IAllCurrencies, ICurrency[]>;
  getAllCurrencies: Thunk<IAllCurrencies>;
}
interface ICurrencyRates {
  rates: { [key: string]: string };
  updateRates: Action<ICurrencyRates, any>;
  getCurrencyRates: Thunk<ICurrencyRates>;
}
interface IConversion {
  data: {
    to: string;
    amount: string;
  };
  updateTo: Action<IConversion, string>;
  updateAmount: Action<IConversion, string>;
}
export interface IStore {
  allCurrencies: IAllCurrencies;
  currencyRates: ICurrencyRates;
  conversion: IConversion;
}

const store = createStore<IStore>({
  allCurrencies: {
    data: [],
    updateResult: action((state, payload) => {
      state.data = Object.values(payload);
    }),
    getAllCurrencies: thunk(async (actions) => {
      try {
        const res = await axios.get(`/currencies`);
        actions.updateResult(res?.data?.response?.fiats);
      } catch (error) {
        console.log(error);
      }
    }),
  },
  currencyRates: {
    rates: {},
    updateRates: action((state, payload) => {
      state.rates = payload;
    }),
    getCurrencyRates: thunk(async (actions) => {
      try {
        const res = await axios.get(`/latest`);
        actions.updateRates(res?.data?.response?.rates);
      } catch (error) {
        console.log(error);
      }
    }),
  },
  conversion: {
    data: {
      to: "",
      amount: "",
    },
    updateTo: action((state, payload) => {
      state.data.to = payload;
    }),
    updateAmount: action((state, payload) => {
      state.data.amount = payload;
    }),
  },
});
export default store;
Interfaces like ICurrency and ICurrencyRates enforce the data shapes received from the API. Actions update state with payloads, while thunks like getAllCurrencies handle the asynchronous fetching logic, using try...catch to manage errors.
The second file, typehook.ts, provides typed versions of Easy Peasy’s hooks:
import { createTypedHooks } from "easy-peasy";
import { IStore } from "./index";

const typedHooks = createTypedHooks<IStore>();

export const useStoreActions = typedHooks.useStoreActions;
export const useStoreDispatch = typedHooks.useStoreDispatch;
export const useStoreState = typedHooks.useStoreState;
By typing the hooks with the IStore interface, the actions and state available to components become strongly typed, catching mistakes at compile time.
Building The Converter UI
Create a Header component that renders input fields for the amount and target currency. It uses the typed hooks to access currency list and dispatch conversion actions:
import { useState } from "react";
import { Button, Form, FormGroup, Input, Jumbotron } from "reactstrap";
import { ICurrency } from "../../store";
import { useStoreState, useStoreActions } from "../../store/typehook";

const Header = () => {
  const allCurrencies = useStoreState((state) => state.allCurrencies.data);
  const setAmountToConvert = useStoreActions((actions) => actions.conversion.updateAmount);
  const setCurrencyToConvertTo = useStoreActions((actions) => actions.conversion.updateTo);
  const [to, setTo] = useState<string>("");
  const [amount, setAmount] = useState<string>("");

  const onSubmitHandler = (e: { preventDefault: () => void }) => {
    e.preventDefault();
    (to && amount) && setAmountToConvert(amount);
    (to && amount) && setCurrencyToConvertTo(to);
  };
The onSubmitHandler function calls the updateAmount action to store the user’s input. Rendering is done with reactstrap components for quick styling:
return (
    <div className="text-center">
      <Jumbotron fluid>
        <h1 className="display-4">Currency Converter</h1>
        <div className="w-50 mx-auto">
          <Form id='my-form' onSubmit={onSubmitHandler}>
            <FormGroup className="d-flex flex-row mt-5 mb-5">
              <Input
                type="number"
                value={amount}
                onChange={(e) => setAmount(e.target.value)}
                placeholder="Amount in Number"
              />
              <Input
                type="text"
                value="from USD ($)"
                className='text-center w-50 mx-4'
                disabled
              />
              <Input
                type="select"
                value={to}
                onChange={(e) => setTo(e.target.value)}
              >
                <option>Converting to?</option>
                {allCurrencies.map((currency: ICurrency) => (
                  <option
                    key={currency?.currency_code}
                    value={currency?.currency_code}
                  >
                    {currency?.currency_name}
                  </option>
                ))}
              </Input>
            </FormGroup>
          </Form>
          <Button
            color="primary"
            size="lg"
            block
            className="px-4"
            type="submit"
            form='my-form'
          >
            Convert
          </Button>
        </div>
      </Jumbotron>
    </div>
  );
};
export default Header;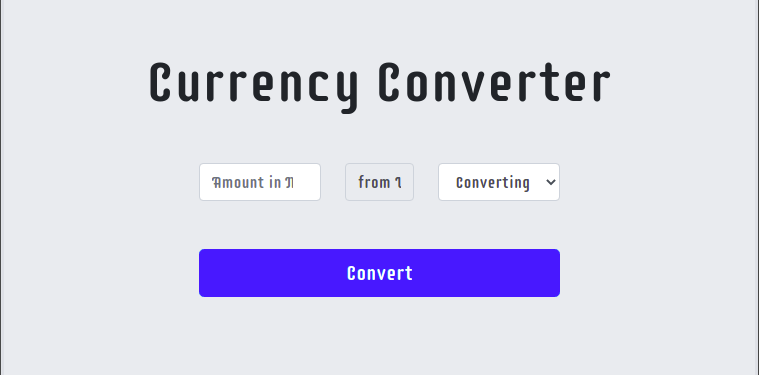
Set up a reusable Axios instance in src/axios/index.tsx with the Rapid API base URL and key:
import axios from "axios";
export default axios.create({
  baseURL: "https://currencyscoop.p.rapidapi.com",
  headers: {
    "your api key goes here",
    "x-rapidapi-host": "currencyscoop.p.rapidapi.com",
  },
});
Connecting The App
In App.tsx, use the typed hooks to fetch currencies and rates on mount, then calculate the converted amount:
import { useEffect } from "react";
import { useStoreActions, useStoreState } from "./store/typehook";
import Header from "./components/header/Header";

const App = () => {
  const getAllCurrencies = useStoreActions(
    (actions) => actions.allCurrencies.getAllCurrencies
  );
  const getCurrencyRates = useStoreActions(
    (actions) => actions.currencyRates.getCurrencyRates
  );
  const currencyRates = useStoreState((state) => state.currencyRates.rates);
  const amountToConvert = useStoreState(
    (state) => state.conversion.data.amount
  );
  const currencyConvertingTo = useStoreState(
    (state) => state.conversion.data.to
  );

  useEffect(() => {
    getAllCurrencies();
    getCurrencyRates();
  }, [getAllCurrencies, getCurrencyRates]);

  const equivalence = () => {
    const val = Number(currencyRates[currencyConvertingTo]);
    return val * parseInt(amountToConvert);
  };

  return (
    <div
      style={{ background: "#E9ECEF", height: "100vh" }}
      className="container-fluid"
    >
      <Header />
      <div className="w-50 mx-auto">
        {amountToConvert && currencyConvertingTo ? <h2>Result:</h2> : null}
        {amountToConvert ? (
          <h3>
            ${amountToConvert} = {equivalence()}
          </h3>
        ) : null}
      </div>
    </div>
  );
};
export default App;
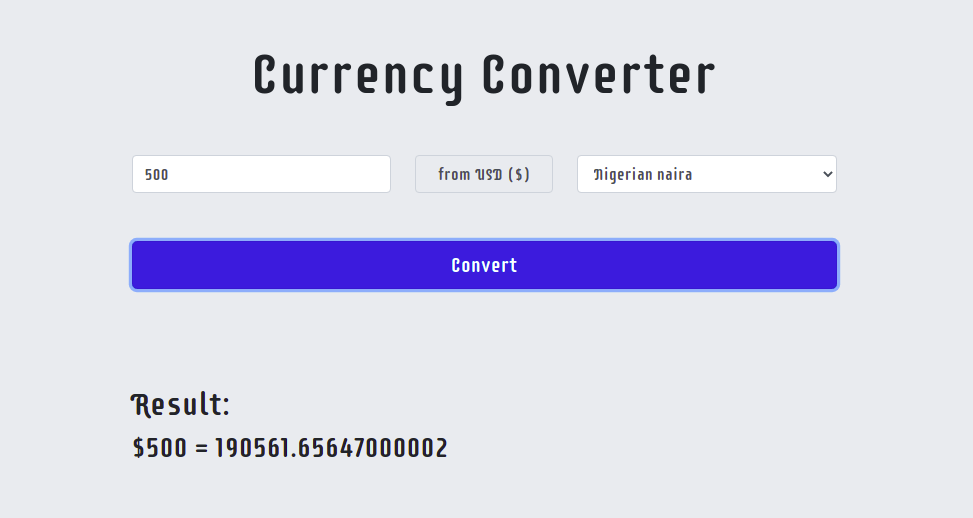
A function like equivalence reads the exchange rate object, multiplies it by the user-provided amount, and displays the result.
Both working versions — the notes app and the currency converter — are available on CodeSandbox, offering a useful reference for your own implementations.


