

Structuring Vue Projects for Growth
Vue.js is intentionally minimalist, but as projects expand beyond the default CLI scaffold, the familiar file-based layout — where components, views, stores, and assets each live in their own top-level folders — tends to become unwieldy. When a notification component and an authentication component both sit in the same root component folder, navigating the codebase becomes a chore, and unrelated logic gets tangled together.
+-- src/
|   +-- assets/
|       +-- logo.png
|       +-- userprofile.png
|   +-- components
|       +-- NotificationBar.vue
|       +-- LoginForm.vue
|       +-- DashboardInfo.vue
|       +-- AuthenticationModal.vue
|   +-- main.js
A more scalable approach is module-based structuring, where the project is organized around business domains rather than file types. Instead of a generic components folder, you would have folders like authentication, product, or payout.
+-- modules/
|   +-- AuthModule/
|       +-- assets/
|           +-- userprofile.png
|       +-- Components/
|           +-- Authentication.vue
|           +-- login.vue
|   +-- NotificationModule
|       +-- assets/
|            +-- Alert.png
|       +-- Components/
|            +-- NotificationBar.vue
|   +-- ProductModule/
This style of organization works particularly well with two kinds of modules:
- Vue.js core modules — Infrastructure shared across the app, such as a service module that centralizes all network requests.
- App feature modules — Modules that encapsulate everything related to a specific feature, from components and styles to state management.
Feature-based modularization keeps team members working on isolated sections of the codebase, reduces the chance of merge conflicts, and simplifies debugging. When a feature's requirements change, you only touch that module without breaking unrelated parts of the application.
+-- modules/
|   +-- payout/
|       +-- index.js
|       +-- assets/
|       +-- Components/
|            +-- PayOut.vue
|            +-- UserInfo.vue
|       +-- store/
|            +-- index.js
|            +-- actions.js
|            +-- mutations.js
|       +-- Test/
In the payout module example above, the index.js file registers plugins used only by that feature, the asset folder holds feature-specific images and styles, the component folder contains only payout-related components, and the store folder manages that feature's actions, mutations, and getters, along with a dedicated test folder.
Writing Custom Directives
Out-of-the-box directives like v-if, v-model, and v-for cover common scenarios, but when you need behavior Vue doesn't provide, you can build a custom directive. For instance, creating a directive that changes a page's background color each time you navigate to it — call it colorChange — requires attaching a directive to the element in the template.
<template>
  <div id="app" v-color-change>
    <HelloWorld msg="Hello Vue in CodeSandbox!"/>
  </div>
</template>
Directives can be registered globally in the main.js file or locally inside individual components. When registering globally, the first argument is the directive name and the second is an options object that controls its behavior:
// custom directive
Vue.directive("color-change", {
  bind: function (el) {
    const random = Math.floor(Math.random() * 900000) + 100000;
    el.style.backgroundColor = `#${random}`
  }
})
The bind hook in that example fires when the directive is first attached to the element. Hook functions receive three arguments:
el— The element node the directive is bound to.binding— An object with properties that influence the directive's behavior.vnode— The virtual node for the element.
In this case, a random six-digit number generates a hex code used to update the background color.
When writing custom directives, keep a few rules in mind. Aside from el, the hook arguments should be treated as read-only because modifying them could produce side effects; native methods on the binding object are especially risky. If you need to pass data between hooks, use Vue's dataset instead. Also, custom directives meant to be used across the entire CLI-based project should be defined in main.js so that all .vue files can access them, and always give directives names that clearly describe what they do.
Managing Component Re-Renders
Vue's reactivity system normally handles view updates automatically. But there are edge cases where the view doesn't refresh as expected — for example, when looping with v-for without providing a :key to track each node's identity, or when setting an array item by index.
<div v-for="item in itemsArray" :key="item">var app = new Vue({
data: {
items: ['1', '2']
}
})
app.items[1] = '7' //vue does not notice any changeAlthough forcing an update is a rare necessity, some developers resort to hacky workarounds — such as toggling a v-if to hide and recreate a component — which is wasteful and fragile.
<template>
    <div v-if="show">
       <button @click="rerender">re-render</button>
    </div>
</template>
<script>
export default {
data() {
return {
show: true,
};
},
methods: {
rerender() {
this.show= false;
this.$nextTick(() => {
this.show = true;
});
}
}
};
</script>There are two acceptable approaches when you genuinely need to trigger a re-render:
- Vue's
$forceUpdate: This forces only the Vue instance to re-render, not child components (except for those with slots). It can be invoked globally:
import Vue from 'vue';
Vue.forceUpdate();
Or locally:
export default {
  methods: {
    methodThatForcesUpdate() {
      this.$forceUpdate();
    }
  }
}- Key changing pattern: The recommended alternative is to bind a dynamic
:keyto the component. Changing the key tells Vue that the component is tied to a specific piece of data; when the key changes, Vue destroys the old component instance and creates a new one, which is more efficient and predictable.
<template>
  <Child
    :key="key"
  />
</template>

<script>
  export default {
    data() {
      return {
        key: 0,
      };
    },
    methods: {
      forceRerender() {
        this.key += 1;
      }
    }
  }
</script>
Optimizing Third-Party Dependencies
Third-party libraries are nearly unavoidable, but they can quickly bloat your bundle and slow down load times. For instance, importing the full Vuetify component library into a project can produce a single file around 500kb minified — a serious performance bottleneck. To see what's consuming space, use the webpack-bundle-analyzer plugin:
npm install --save-dev webpack-bundle-analyzerThen wire it into the webpack configuration:
const BundleAnalyzerPlugin = require('webpack-bundle-analyzer').BundleAnalyzerPlugin;

module.exports = {
  plugins: [
    new BundleAnalyzerPlugin()
  ]
}
A few good practices help you keep bundle sizes in check:
- Place only critical application dependencies like
vueandvuexin the main bundle; leave route-specific libraries out of it. - Import only the components you actually need from large component libraries. Instead of pulling in the entire library, cherry-pick the bits you use — doing so for Vuetify significantly trims both the bundle size and the amount of dead code, since only the components used in a particular route are loaded.
<template>
  <v-app>
    <v-navigation-drawer app>
    <!-- -->
  </v-navigation-drawer>
  <v-app-bar app>
    <!-- -->
  </v-app-bar>
 </v-app>
</template>
<script>
import { VApp, VNavigationDrawer, VAppBar } from 'vuetify/lib'

export default {
  components: {
    VApp,
    VNavigationDrawer,
    VAppBar,
  }
}
</script>
When State Management Actually Pays Off
Deciding whether to include Vuex from day one is a recurring question. For small side projects, props and events can handle communication fine for a while. But as an app grows, that approach becomes messy. The factors that matter are project size, code complexity, routing needs, the dataset involved, and component nesting depth. If there’s any real chance the project will grow, starting with Vuex is the safer call — though the Vue 3 Composition API is increasingly discussed as a potential alternative to a dedicated store.
Structuring the Store for Scale
The store relies on four core components: state holds data, getters retrieve it, mutations change it, and actions commit mutations. Actions should always be the ones committing mutations, so the Vue Devtools can reliably track state changes and allow time-travel debugging. Business logic and async operations belong in actions, not mutations.
For better organization, keep each store concept in its own file:
├── services
├── main.js
└── store
    ├── index.js
    ├── actions.js
    ├── mutations.js
    └── Getters.js
├── components
On larger team projects, modularize the store by feature. This keeps complex projects manageable, but careful structuring is required to avoid extra complexity. A feature-based store layout looks like this:
store/
   ├── index.js
   └── modules/
       ├── cart
           ├── index.js
           ├── actions.js
           ├── mutations.js
       ├── product.js
       ├── login.js
Module Best Practices
As modules grow, manual imports become tedious. Put an index.js at each module root to consolidate its files, and adopt a consistent naming scheme — for example, camelCase module names with a .store.js extension like CartData.store.js.
modules/
       ├── cart.js
           ├── index.js   -> auto export module
           ├── userProduct.store.js
           ├── userData.store.js
Keep mutations free of async code or business logic — that’s what actions are for. Avoid reading state objects directly; use getters instead, since they can be mapped into components via mapGetters and behave like computed properties with dependency caching. Each module should be namespaced rather than accessed from the global scope.
Provide/Inject vs. Prop Drilling
Imagine a component tree where the root holds user address data needed by a deeply nested component F, while components A and C also need it, but intermediate components don’t. Prop drilling to each level would be verbose and fragile.
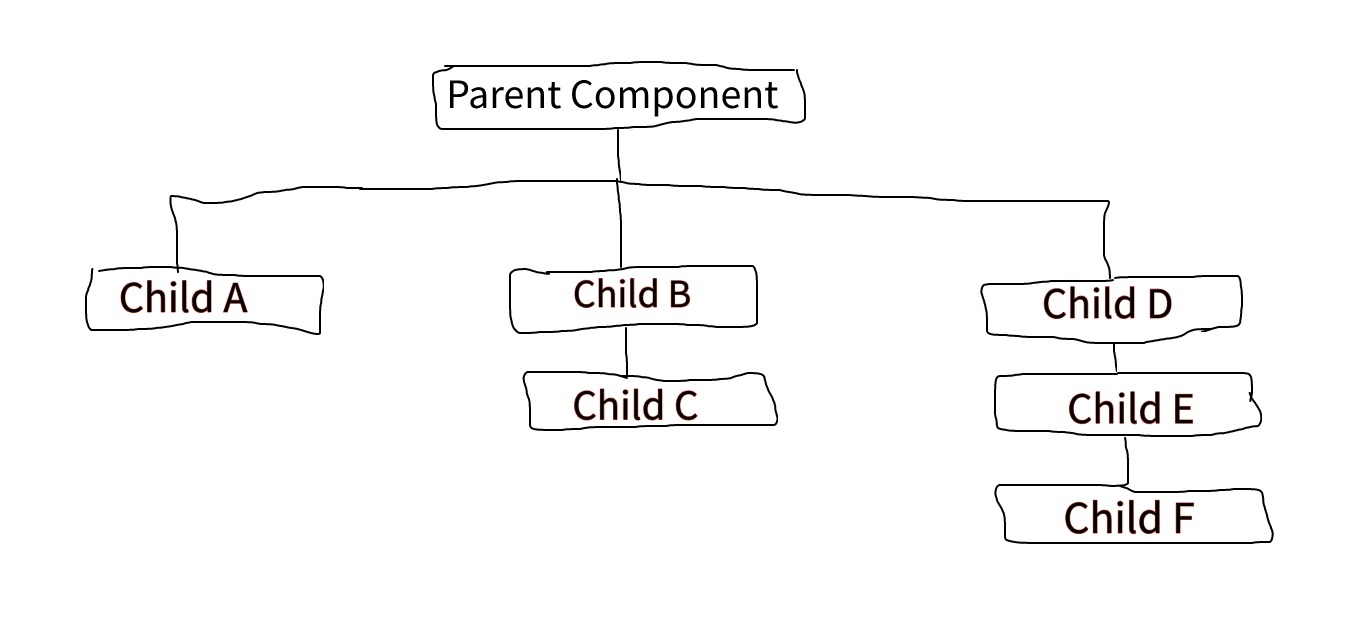
Instead, the root (dependency provider) can supply the value:
app.component('parent-component', {
  data() {
    return {
      user: {name:"Uma Victor", address:"No 33 Rumukwurushi"}
    }
  },
  provide() {
    return {
     userAddress: this.user.address
    }
  },
  template: `
    ...
  `
})
Using provide as a function returning an object allows access to component instance properties. Then the consumer — component F — injects it:
app.component('child-f', {
  inject: ['userAddress'],
  template: `
    <h2>Injected property: {{ this.userAddress }}</h2>
  `
})
One limitation: provided values are not reactive by default. Updating user.address won’t propagate to the injected value. The fix is to hand provide a reactive object, ideally backed by a computed property:
app.component('parent-component', {
  data() {
    return {
      user: {name:"Uma Victor", address:"No 33 Rumukwurushi"}
    }
  },
  provide() {
    return {
     userAddress: Vue.computed(() => this.user)

    }
  },
  template: `
    ...
  `
})
For many cases this is simpler than pulling in Vuex. And with Vue 3’s context providers, sharing data across multiple components now works much like the Vuex store model.
Reusable Form Inputs With Props
Forms with consistent design and behavior benefit greatly from a shared BaseInput component. Consider a sign-in page:
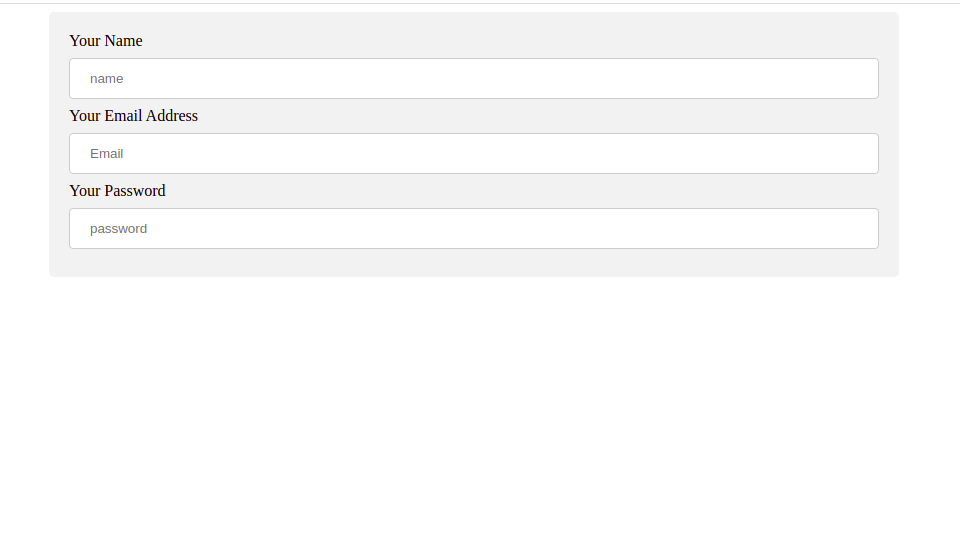
Its template looks like:
<template>
  <div class="form-group">
  <form>
    <label for="email">Your Name</label>
    <input
      type="text"
      id="name"
      class="form-control"
      placeholder="name"
      v-model="userData.name"
    />
    <label for="email">Your Email Address</label>
    <input
      type="text"
      id="email"
      class="form-control"
      placeholder="Email"
      v-model="userData.email"
    />
    <label for="email">Your Password</label>
    <input
      type="text"
      id="password"
      class="form-control"
      placeholder="password"
      v-model="userData.password"
    />
  </form>
  </div>
</template>
<script>
    export default {
        data() {
            return {
                userData: {
                    name: '',
                    email: '',
                    password: ''
                }
            }
        },
    }
</script>
The reusable input should accept a label prop — always a string — and conditionally render it:
<template>
 <div>
   <label v-if="label">{{ label }}</label>
   <input type="email" @value="value" @input="updateInput" v-bind="$attrs">
 </div>
</template>
<script>
    export default {
      props: {
        label: {
          type: String,
          default: ""
        },
        value: [String, Number]
      },
      methods: {
        updateInput(event) {
          this.$emit('input', event.target.value)
        }
      }
    }
</script>
On input, the updateInput method emits an input event with event.target.value:
<BaseInput label="Your Name" v-model="userData.name" placeholder="Name"/>The parent’s v-model listens for that event and assigns the payload to userData.name.
Adding a placeholder to such a component can fail in Vue 2, because extra attributes attach to the parent element. Set inheritAttrs to false and bind attrs where the placeholder should appear:
<script>
    export default {
      inheritAttrs: false,
      props: {
        label: {
          type: String,
          default: ""
        },
        value: [String, Number]
      },
      methods: {
        updateInput(event) {
          this.$emit('input', event.target.value)
        }
      }
    }
</script>
The form page then uses the component cleanly:
<template>
  <div class="form-group">
    <form>
      <BaseInput label="Your Name" v-model="userData.name" placeholder="Name"/>
      <BaseInput label="Your Email Address" v-model="userData.email" placeholder="Email"/>
      <BaseInput label="Your Password" v-model="userData.password" placeholder="Password"/>
    </form>
  </div>
</template>
Note that in Vue 3, $attrs also includes listeners, style bindings, and classes.
Getting More From Vue Devtools
Vue Devtools excels at debugging with Vuex, letting you watch mutations and track state changes in real time. It’s commonly used as a browser extension, but a standalone app is available too. It only runs in development mode, never in production builds.
Standalone Setup
The standalone version lets you inspect apps in any browser. Install and launch it with:
// Globally
npm install -g @vue/devtools
// or locally
npm install --save-dev @vue/devtoolsvue-devtoolsThen add the following to index.html in the public folder, and reload the app — it will connect automatically:
<script src="https://localhost:8098"></script>Handy Capabilities
- Dark theme. Global settings now offer light, dark, and contrast themes.
- Timeline. Displays events chronologically, next to the inspector and settings views.
- Component name format. Switch between camelCase and kebab-case display.
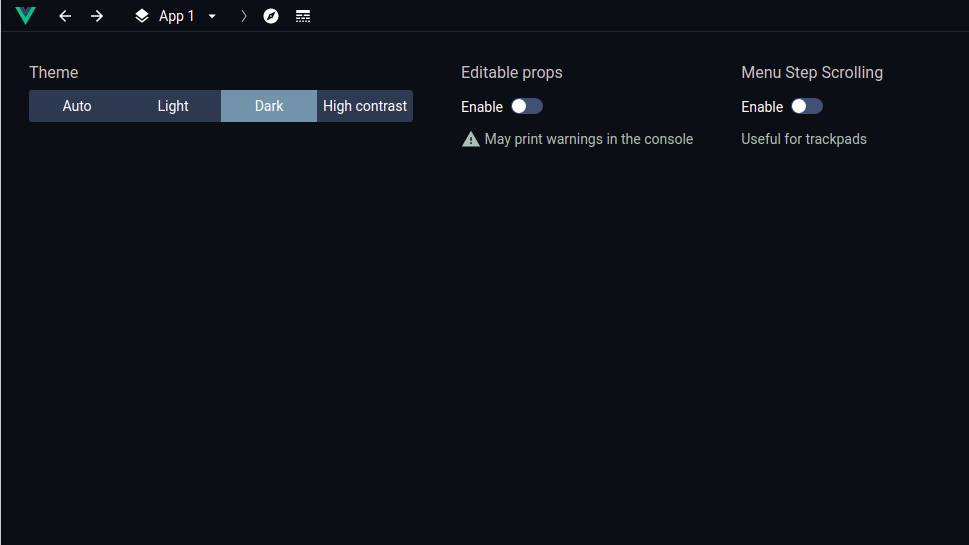
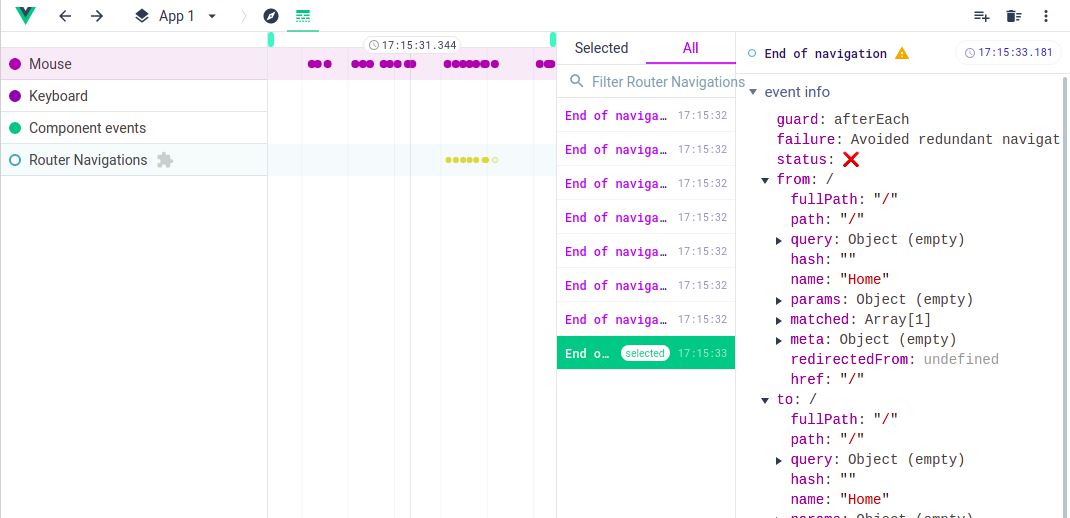
More features are documented in the Devtools changelog.
External Tools Worth Adding
Some implementations are too time-consuming to hand-roll, which is where helper libraries come in.
Testing
- Component testing: Vue Testing Library, Vue Test Utils.
- Unit testing: Jest, Mocha.
- End-to-end: Nightwatch.js, Cypress.
Component Libraries
- Vue Material Kit: Material design UI kit with 60+ handcrafted components.
- Buefy: Lightweight library built on Bulma; works well if you know SASS.
- Vuetify: Material component framework with scaffolding, a large community, and frequent updates.
- Quasar: High-performance framework for web, mobile, and desktop from one codebase.
Utility Libraries
- FilePond: Handles image uploads with built-in optimization.
- Vuelidate: Lightweight, model-based form validation.
- vue-clickaway: Detects clicks outside an element — useful for dropdowns, which Vue lacks natively.
Further options are discoverable on madewithvuejs.com and vuejsexamples.com.
Editor Extensions
- Vetur: Essential VS Code extension with highlighting, snippets, IntelliSense, and debugging.
- Bookmarks: Mark places in large codebases and jump straight to them.
- ESLint: Catches coding errors through warnings; pair it with Prettier formatting.
- Vue.js Extension Pack: Bundles Prettier, Vetur, Night Owl, and other useful extensions.
Key Takeaways For Faster Vue Workflows
The practices covered here are mostly tied to Vue.js 2, so keep that in mind when applying them to existing or new projects. The main wins come from pairing disciplined project organization with editor-level tooling and a clear understanding of framework-specific features like custom directives and the reactivity system.
For deeper dives, the official documentation on custom directives and reactivity is the best starting point. The Vue Devtools extension remains an essential debugging companion, and that talk on Composition API vs Vuex is worth watching if you are choosing a state-management strategy. For broader context on related utilities, this roundup of useful Vue and JavaScript tools by Timi Omoyeni complements the points above.




