

Why Intersection Observer?
Building a UI where components respond to elements as they scroll in and out of view, or cross a certain viewport threshold, often tempts developers to attach a scroll event listener. But firing a callback on every scroll position update can quickly become a performance bottleneck. The Intersection Observer API offers a more efficient approach: it asynchronously watches a target element and fires a callback only when that element actually intersects with a specified root, which is usually the viewport but can be any ancestor element.
Observer Setup and Options
Creating an observer requires two arguments: an options object and the callback function to execute upon intersection. After instantiation, you instruct the observer to watch a target element. All options have defaults, so you can omit any of them.
const options = {
  root: document.querySelector('[data-scroll-root]'),
  rootMargin: '0px',
  threshold: 1.0
}

const callback = (entries, observer) => {
  entries.forEach((entry) => console.log(entry))
}

const observer = new IntersectionObserver(callback, options)
const targetEl = document.querySelector('[data-target]')

observer.observe(targetEl)
The available options, rootMargin and threshold, can be unintuitive, so it's worth breaking them down.
Understanding rootMargin
This value works like a CSS margin applied to the root element, and it accepts multiple values, including negative ones. The target is considered intersecting relative to this expanded or contracted root box. This means an element can be classed as “intersecting” even when it's technically outside the visible viewport.
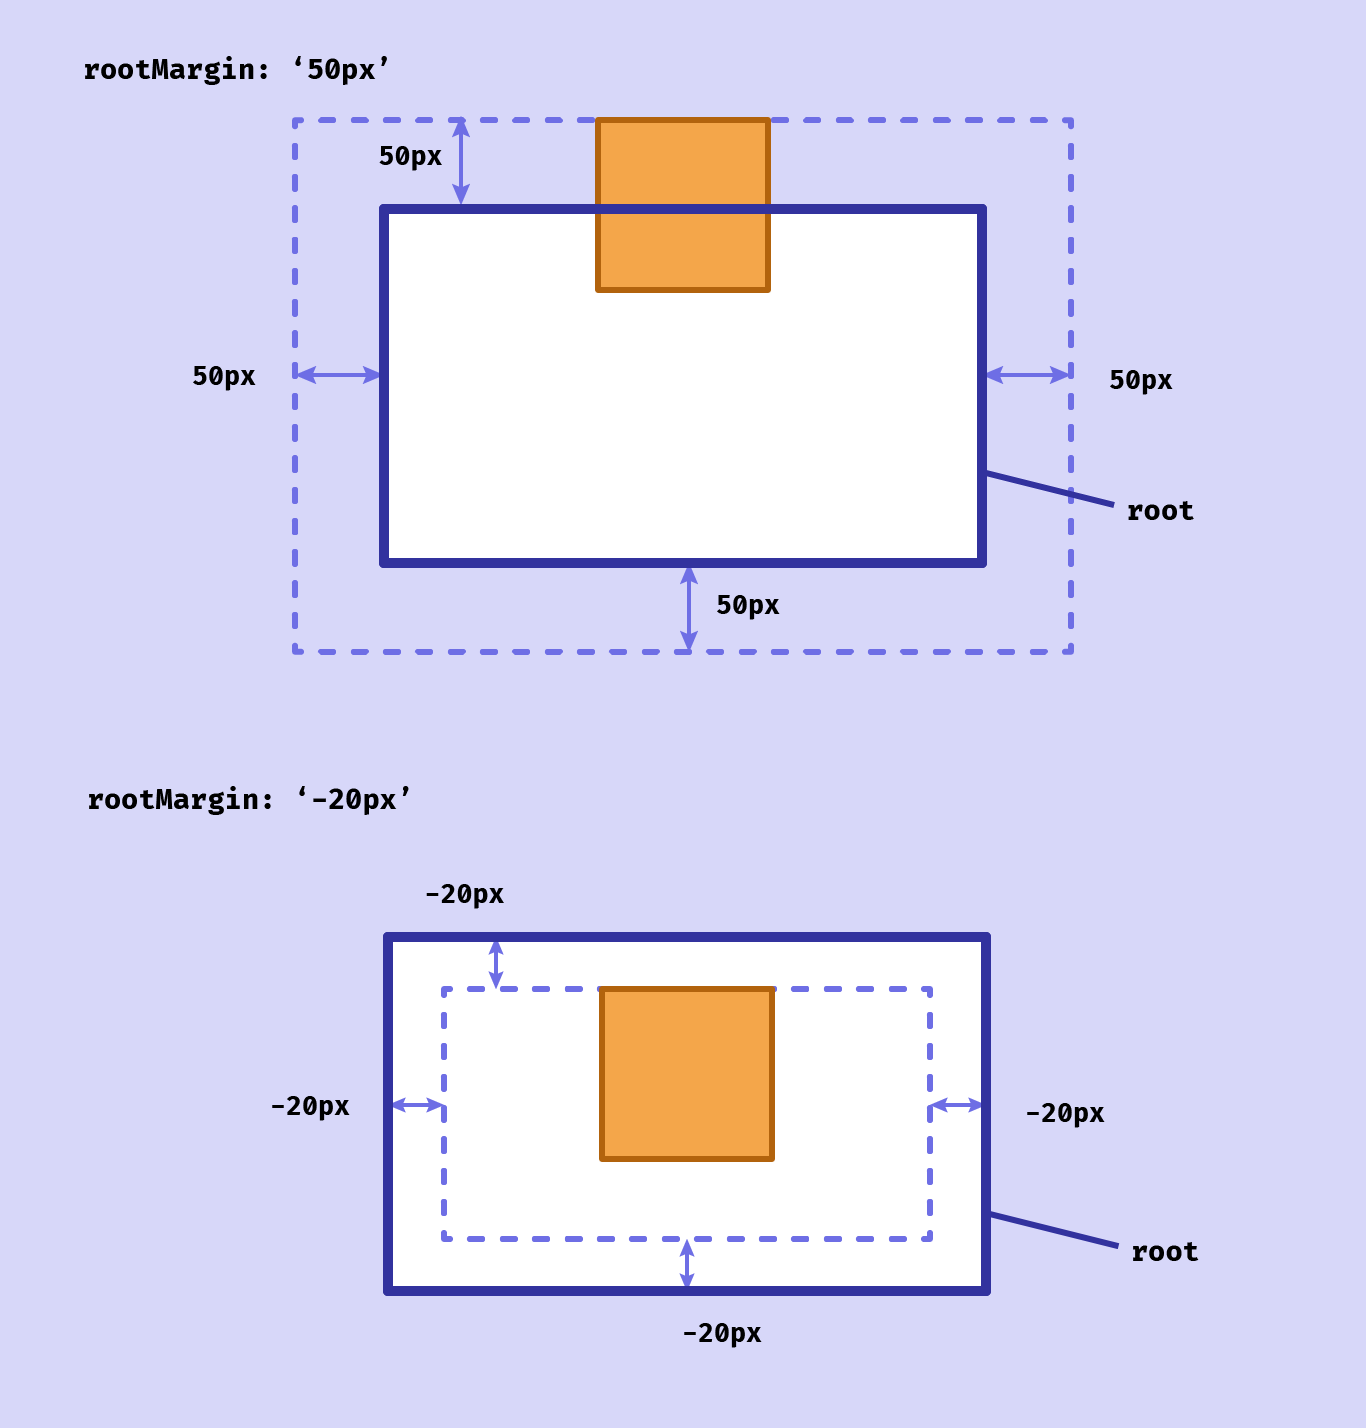
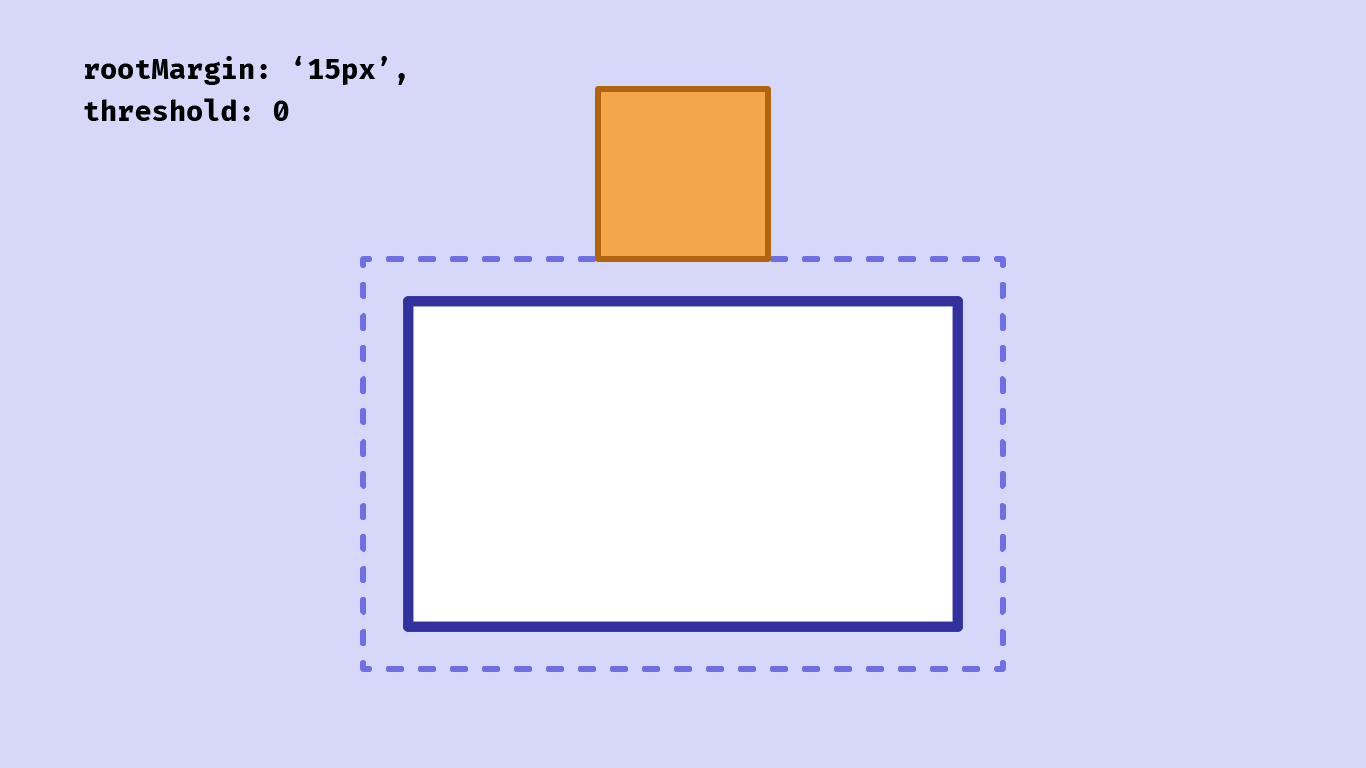
The default is 0px.
Understanding threshold
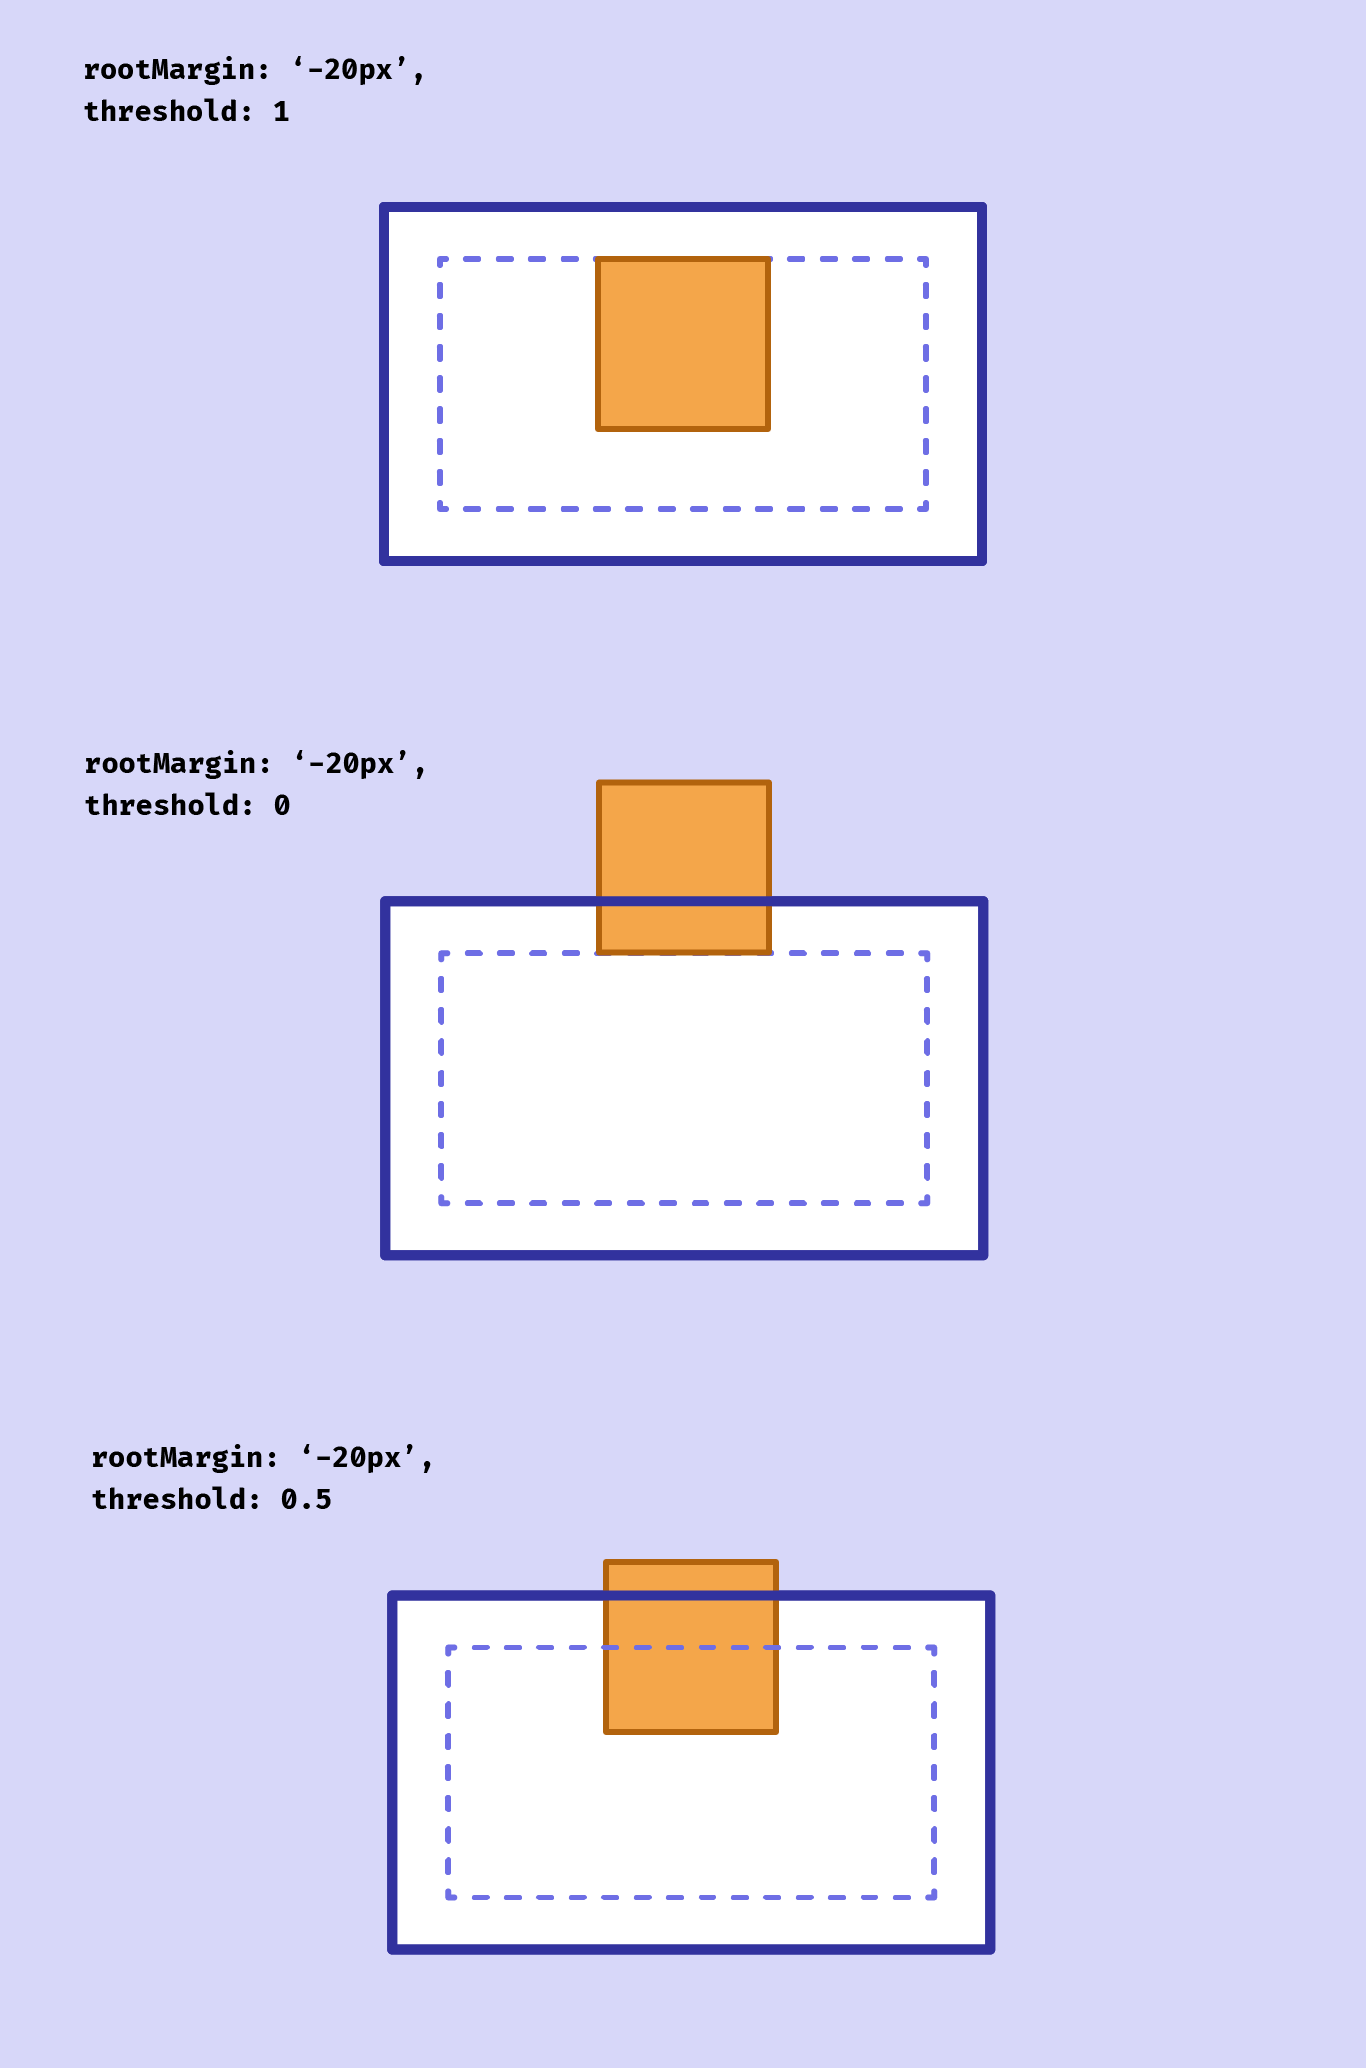
The threshold is a value or array of values between 0 and 1, representing the proportion of the target that must be visible within the root for the element to be considered intersecting. With the default of 1, the callback fires only when the entire target is visible.
Building the Page Structure
To demonstrate, we'll build a page with a fixed header that changes its color scheme based on the section currently aligned with it. The layout consists of full-height sections, each with a distinct background color.

The header is fixed at the top via position: fixed. We'll use data attributes for JavaScript targeting: data-header on the header element, and data-link on the navigation anchor links. Each page section has an id matching one of those links, plus a data attribute indicating its color theme.
<header data-header>
  <nav class="header__nav">
    <div class="header__left-content">
      <a href="#0">Home</a>
    </div>
    <ul class="header__list">
      <li>
        <a href="#about-us" data-link>About us</a>
      </li>
      <li>
        <a href="#flavours" data-link>The flavours</a>
      </li>
      <li>
        <a href="#get-in-touch" data-link>Get in touch</a>
      </li>
    </ul>
  </nav>
</header>
<main>
  <section id="home">
    <!--Section content-->
  </section>
  <section id="about-us">
    <!--Section content-->
  </section>
  <section id="the-flavours">
    <!--Section content-->
  </section>
  <section id="get-in-touch">
    <!--Section content-->
  </section>
</main>
header {
  position: fixed;
  width: 100%;
}
section {
  padding: 5rem 0;
  min-height: 100vh;
  display: flex;
  justify-content: center;
  align-items: center;
}
iframes and Intersection Roots
Be aware that content rendered inside an iframe—such as in a CodePen demo—is treated differently by the observer. The intersection is calculated against the iframe's viewport, which can cause callbacks to fire at unexpected points. A workaround is to wrap the page markup in a container element that acts as the scroll root, instead of relying on the browser viewport. The complete demo uses this approach.
<div class="scroller" data-scroller>
  <header data-header>
    <!--Header content-->
  </header>
  <main>
    <!--Sections-->
  </main>
</div>
Styling with Custom Properties
We'll define custom properties for all colors, including two specifically for the header's text and background. These two properties will be updated via JavaScript as the user scrolls.
:root {
  --mint: #5ae8d5;
  --chocolate: #573e31;
  --raspberry: #f2308e;
  --vanilla: #faf2c8;

  --headerText: var(--vanilla);
  --headerBg: var(--raspberry);
}
header {
  background-color: var(--headerBg);
  color: var(--headerText);
}
The section colors are set using their data attributes as selectors, and header styles for each section are also pre-defined.
[data-section="raspberry"] {
  background-color: var(--raspberry);
  color: var(--vanilla);
}

[data-section="mint"]  {
  background-color: var(--mint);
  color: var(--chocolate);
}

[data-section="vanilla"] {
  background-color: var(--vanilla);
  color: var(--chocolate);
}

[data-section="chocolate"] {
  background-color: var(--chocolate);
  color: var(--vanilla);
}
/* Header */
[data-theme="raspberry"]  {
  --headerText: var(--raspberry);
  --headerBg: var(--vanilla);
}

[data-theme="mint"] {
  --headerText: var(--mint);
  --headerBg: var(--chocolate);
}

[data-theme="chocolate"]  {
  --headerText: var(--chocolate);
  --headerBg: var(--vanilla);
}
Creating the Observer
Our goal is to fire a callback when a section touches the bottom of the header. To do this, we set a negative rootMargin equal to the header's height. With a threshold of 0, the callback fires as soon as any part of a section enters that margin.
const header = document.querySelector('[data-header]')
const sections = [...document.querySelectorAll('[data-section]')]
const scrollRoot = document.querySelector('[data-scroller]')

const options = {
  root: scrollRoot,
  rootMargin: `${header.offsetHeight * -1}px`,
  threshold: 0
}
The scroll direction determines which section's colors the header should adopt. As you scroll down, the header should match the section entering from the top, not the one leaving. The opposite is true when scrolling up.
let direction = 'up'
let prevYPosition = 0

const setScrollDirection = () => {
  if (scrollRoot.scrollTop > prevYPosition) {
    direction = 'down'
  } else {
    direction = 'up'
  }

  prevYPosition = scrollRoot.scrollTop
}

const onIntersect = (entries, observer) => {
  entries.forEach((entry) => {
    setScrollDirection()

    /* ... */
  })
}
A function updates the header's data-theme attribute based on the target section passed to it.
/* The callback that will fire on intersection */
const onIntersect = (entries) => {
  entries.forEach((entry) => {
    const theme = entry.target.dataset.section
    header.setAttribute('data-theme', theme)
  })
}
const updateColors = (target) => {
  const theme = target.dataset.section
  header.setAttribute('data-theme', theme)
}

const onIntersect = (entries) => {
  entries.forEach((entry) => {
    setScrollDirection()
    updateColors(entry.target)
  })
}
Within the callback, we check the scroll direction. When scrolling down, we use the next section as the target; when scrolling up, we use the entry target.
const getTargetSection = (target) => {
  if (direction === 'up') return target

  if (target.nextElementSibling) {
    return target.nextElementSibling
  } else {
    return target
  }
}

const onIntersect = (entries) => {
  entries.forEach((entry) => {
    setScrollDirection()

    const target = getTargetSection(entry.target)
    updateColors(target)
  })
}
The observer fires the callback twice per entry: once entering and once leaving. To prevent the header from updating when the next section merely enters the bottom of the viewport, we need to check the isIntersecting property on the entry object. A helper function determines whether the header should update based on the scroll direction and intersection state.
const shouldUpdate = (entry) => {
  if (direction === 'down' && !entry.isIntersecting) {
    return true
  }

  if (direction === 'up' && entry.isIntersecting) {
    return true
  }

  return false
}
Updating the main intersection function with this logic ensures the colors change only when a section actually meets the header. A CSS transition then smooths the color change.
/* Create the observer */
const observer = new IntersectionObserver(onIntersect, options)

/* Set our observer to observe each section */
sections.forEach((section) => {
  observer.observe(section)
})
const onIntersect = (entries) => {
  entries.forEach((entry) => {
    setScrollDirection()

    /* Do nothing if no need to update */
    if (!shouldUpdate(entry)) return

    const target = getTargetSection(entry.target)
    updateColors(target)
  })
}
header {
  transition: background-color 200ms, color 200ms;
}
See the Pen [Happy Face Ice Cream Parlour – Step 3](https://codepen.io/smashingmag/pen/bGWEaEa) by Michelle Barker.
The Sliding Marker
We'll add a visual marker to the header, styled as a pseudo-element to avoid extra HTML. It uses currentColor for its background, inheriting the header's text color.
header::after {
  content: '';
  position: absolute;
  top: 0;
  left: 0;
  height: 0.4rem;
  background-color: currentColor;
}
Two custom properties control the marker: one for its width and one for its translate-x position, both defaulting to 0. These values are updated in the callback when a new section intersects.
header::after {
  content: '';
  position: absolute;
  top: 0;
  left: 0;
  height: 0.4rem;
  width: var(--markerWidth, 0);
  background-color: currentColor;
  transform: translate3d(var(--markerLeft, 0), 0, 0);
}
A dedicated function calculates these values based on the target section's link and updates the marker's position.
const updateMarker = (target) => {
  const id = target.id

  /* Do nothing if no target ID */
  if (!id) return

  /* Find the corresponding nav link, or use the first one */
  let link = headerLinks.find((el) => {
    return el.getAttribute('href') === `#${id}`
  })

  link = link || headerLinks[0]

  /* Get the values and set the custom properties */
  const distanceFromLeft = link.getBoundingClientRect().left

  header.style.setProperty('--markerWidth', `${link.clientWidth}px`)
  header.style.setProperty('--markerLeft', `${distanceFromLeft}px`)
}
This function is called during the same intersection event as the color update. On page load, it's called with the first section as the target to set a sensible starting position.
const onIntersect = (entries) => {
  entries.forEach((entry) => {
    setScrollDirection()

    if (!shouldUpdate(entry)) return

    const target = getTargetSection(entry.target)
    updateColors(target)
    updateMarker(target)
  })
}
document.addEventListener('readystatechange', e => {
  if (e.target.readyState === 'complete') {
    updateMarker(sections[0])
  }
})
Adding a CSS transition on the width and transform properties makes the marker slide smoothly between links. Using will-change lets the browser optimize these animations.
header::after {
  transition: transform 250ms, width 200ms, background-color 200ms;
  will-change: width;
}
Smooth Scrolling and Enhancements
Implementing smooth scrolling for anchor links can be done purely in CSS. For accessibility, this should only apply when the user hasn't requested reduced motion in their system settings.
@media (prefers-reduced-motion: no-preference) {
  .scroller {
    scroll-behavior: smooth;
  }
}
Support and Fallbacks
Intersection Observer is widely supported in modern browsers, and a polyfill exists for legacy ones. A progressive enhancement approach is ideal: the header functions fine as a static element for users without support. Feature detection is straightforward with a simple conditional check.
if ('IntersectionObserver' in window && 'IntersectionObserverEntry' in window && 'intersectionRatio' in window.IntersectionObserverEntry.prototype) {
  /* Code to execute if IO is supported */
} else {
  /* Code to execute if not supported */
}
The final assembled demo shows all these pieces working in concert.
See the Pen [Happy Face Ice Cream Parlour – Intersection Observer example](https://codepen.io/smashingmag/pen/XWRXVXQ) by Michelle Barker.
Going Further With Intersection Observer
Intersection Observer is a surprisingly versatile API, and the resources below offer both solid reference material and ideas for more advanced applications. If you are new to the API, MDN’s documentation remains the best starting point, pairing a thorough explanation with practical examples of the IntersectionObserver interface.
References and Tools
For debugging and experimentation, an interactive visualiser tool for Intersection Observer is a handy way to see how thresholds, root margins, and target elements behave in real time. It gives you immediate visual feedback that can make abstract concepts like rootMargin far easier to grasp.
MDN also covers timing element visibility with the API in a separate tutorial. That guide looks specifically at using IO to track ad visibility on a page, but the principles it demonstrates — measuring how long an element remains in the viewport — apply to any scenario where you need to monitor exposure over time.
Lazy Loading and Beyond
An article by Denys Mishunov from the Smashing Magazine archive outlines several other uses for Intersection Observer, most notably lazy-loading assets. Native loading attributes have reduced the necessity for some of those techniques, but the broader discussion of the API’s performance characteristics and event-driven nature still holds plenty of value for developers tackling more custom problems.
Further Reading on Smashing Magazine
- Creating Accessible UI Animations — A guide to animation patterns that do not exclude or hinder users with vestibular disorders or other sensitivities.
- Advanced Form Control Styling With Selectmenu And Anchoring API — A deep dive into newer form controls and the Anchoring API for better positioned UI elements.
- Creating An Effective Multistep Form For Better User Experience — Practical strategies for splitting forms into logical steps without losing users or accessibility.
- The Fight For The Main Thread — An investigation into long tasks, rendering bottlenecks, and why the main thread is often the last frontier of performance tuning.



