
React Native emerged from Facebook's React work and became the most widely adopted JavaScript framework for mobile apps, with many companies shipping production software on it. The following walkthrough is based on building a GPS and navigation product with Expo and Firebase — specifically Firestore, Firebase Functions and Expo push notifications. It assumes working knowledge of ES6 features such as imports and arrow functions; React fundamentals are covered in the React Native documentation, and Firebase's JavaScript setup guide covers account and project configuration. Android Studio and Xcode are not required, because Expo handles the native toolchain.
What gets built
The sample project is an on-demand merchandise transporter. A user supplies transport details — vehicle type and loading and unloading locations — and nearby vehicles appear on a map. After the request is confirmed, drivers are notified one at a time; each notification stays active for 25 seconds, and if it is ignored or declined the system moves to the next driver. Once a driver accepts, the user can follow the whole transport on the map, including from the web application.
Installing Expo and configuring the app
The first step is the Expo CLI, used for testing in a simulator or on real devices and for cloud builds.
npm install -g expo-cliWith the CLI in place, the project can be created:
expo initThe appeal of Expo is that the whole app configuration lives in one JSON file, app.json. A few settings materially affect store review and runtime behavior.
- If the app uses Google Maps, the API key belongs in
app.json, otherwise the map will not work. Native map rendering is not billed; rendering directions and other paid API services are. - Background location updates and similar background tasks on iOS require keys under
ios.infoPlist:
...
"ios": {
    ...
    "infoPlist": {
        ...
        "UIBackgroundModes": [
          "location",
          "fetch"
        ]
    }
}
Leaving permissions undefined causes Expo to generate an app that requests every available authorization, which leads Google Play to reject it — so declare only what is needed. Apple likewise requires a purpose string explaining each access request, and omitting it results in rejection. For each new Google Play release, the android.versionCode key must be incremented.
...
"android": {
    ...
    "permissions": [...],
 }
...
"ios": {
...
"infoPlist": {
...
"NSCameraUsageDescription": "Why are you requesting access to the device’s camera?",
"NSLocationWhenInUseUsageDescription": "Why are you requesting access to the device’s camera?"
}
}...
"ios": {
...
"config": {
"googleMapsApiKey": "YOUR_API_KEY"
}
},
"android": {
...
"config": {
"googleMaps": {
"apiKey": "YOUR_API_KEY"
}
}
}Expo can ship updates over the air, bypassing both stores, except when changing: the Expo SDK version; anything under the ios, android or notification keys; the app's splash; its icon; its name; its owner; its scheme; the facebookScheme; or bundled assets under assetBundlePatterns. Setting fallbackToCacheTimeout to 0 under the updates key is preferable: the app starts immediately from the cached bundle while a newer one downloads in the background. A complete app.json looks like this:
{
  "expo": {
    "name": "Transportili",
    "slug": "transportili",
    "scheme": "transportili",
    "privacy": "public",
    "sdkVersion": "36.0.0",
    "notification": {
      "icon": "./assets/notification-icon.png",
      "androidMode": "default"
    },
    "platforms": [
      "ios",
      "android",
      "web"
    ],
    "version": "0.3.2",
    "orientation": "portrait",
    "icon": "./assets/icon.png",
    "splash": {
      "image": "./assets/splash.png",
      "resizeMode": "contain",
      "backgroundColor": "#ffffff"
    },
    "updates": {
      "fallbackToCacheTimeout": 0
    },
    "assetBundlePatterns": [
      "\**/\*"
    ],
    "ios": {
      "bundleIdentifier": "com.transportili.driver",
      "supportsTablet": false,
      "infoPlist": {
        "UIBackgroundModes": [
          "location",
          "fetch"
        ],
        "LSApplicationQueriesSchemes": [
          "transportili"
        ],
        "NSCameraUsageDescription": "L’application utilise l’appareil photo pour prendre une photo ou numériser vos documents.",
        "NSLocationWhenInUseUsageDescription": "L’application utilise votre position pour aider les chauffeurs ou les transporteurs à vous trouver sur la carte."
      },
      "config": {
        "googleMapsApiKey": "***"
      }
    },
    "android": {
      "googleServicesFile": "./google-services.json",
      "package": "com.transportili.driver",
      "versionCode": 6,
      "permissions": [
        "ACCESS_COARSE_LOCATION",
        "ACCESS_FINE_LOCATION"
      ],
      "config": {
        "googleMaps": {
          "apiKey": "***"
        }
      }
    },
    "description": "",
    "githubUrl": "https://github.com/chafikgharbi/transportili-native.git"
  }
}
Firebase comes next:
expo install firebaseA single firebase.js file in the app's root holds the Firebase configuration; in this case only Firestore and Storage are in use.
const firebaseConfig = {
    apiKey: "api-key",
    authDomain: "project-id.firebaseapp.com",
    databaseURL: "https://project-id.firebaseio.com",
    projectId: "project-id",
    storageBucket: "project-id.appspot.com",
    messagingSenderId: "sender-id",
    appId: "app-id",
    measurementId: "G-measurement-id"
};
Elsewhere in the app, Firebase functionality is reached by importing that file:
import { firebase, firestore, storage } from "./firebase";Choosing and querying a database
Firebase offers two cloud databases. The real-time database stores data as a JSON object; Firestore, its more advanced successor, stores documents inside collections. Both are NoSQL with synchronization and change listeners, but they bill differently: the real-time database on the volume of data exchanged, Firestore on the number of document operations — reads, writes and deletes.
This project used Firestore for users, requests, vehicles and other data. Consolidating everything into one document to reduce operation counts backfires: a document holds at most 1 MB.
Besides strings, numbers and objects, Firebase can store a geoPoint — an object carrying latitude and longitude — but geographic queries such as "users nearby" are not supported natively. GeoFirestore fills that gap, at the cost of constraining the user document to a fixed shape:
User: {
d: {all user data here}
g: (location geohash)
l: {firstore location geopoint}
}
Embedding it in an existing user collection therefore means moving the user's data under the d key. Unexpected operation counts are easiest to avoid by following three rules:
- Enable offline persistence — it is off by default on the web.
- Paginate Firestore queries with cursors rather than fetching everything at once.
- Unsubscribe listeners when finished or when a component unmounts.
When a back end is necessary
Firestore can be managed and Expo notifications sent directly from the mobile client, but some operations need a server. Firebase Functions provides a cloud back end for running Node.js on scalable infrastructure. In this project it handled four jobs:
- Push notifications. These reach a user's device even when the app is inactive, and they must not be interrupted by a connectivity drop, so a server has to issue them.
- Cron jobs. These manage scheduled requests and notifications.
- Database cleanup. Removing useless or ignored requests.
- Sensitive, expensive or long-running work. Registration, user retrieval and order scheduling belong here; running them from the client risks security holes and incomplete tasks.
Joaquin Cid's article on building a role-based API with Firebase Authentication covers Firebase Functions setup and building an Express back end, in TypeScript, which converts to JavaScript without much effort.
Push notification mechanics
Expo delivers a notification to a device from its own servers, addressing the device by token. When the app runs, it obtains that token and stores it server-side; here Firestore holds the tokens, and incoming tokens are compared against stored ones to detect a login from another device.
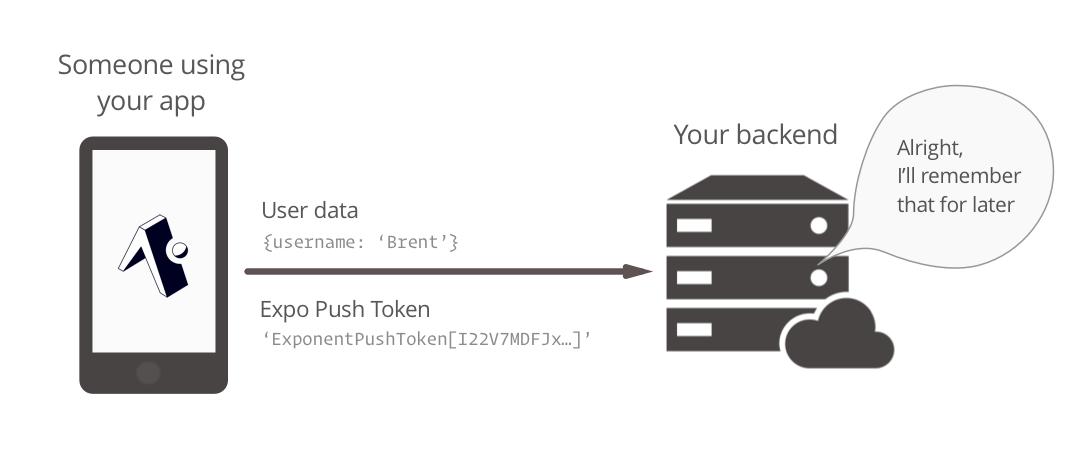
The token itself is retrieved like this:
token = await Notifications.getExpoPushTokenAsync();Permission must be requested before pushing to a user — the Expo documentation has example usage. Sending a notification means calling Expo's servers with the token already on file:
curl -H "Content-Type: application/json" -X POST "https://exp.host/--/api/v2/push/send" -d '{ "to": "ExponentPushToken[xxxxxxxxxxxxxxxxxxxxxx]", "title":"hello", "body": "world" }'The simple example below pushes to all users and is explicitly not secure; authorization and authentication are covered in Cid's article.
After initializing the project with the Firebase CLI, the Express framework handles the API:
npm install expressCORS support and a JSON body-parser middleware are needed so that requests can arrive from any URL and JSON bodies can be parsed.
npm install --save cors body-parser
npm install --save-dev @types/cors
The main index.js of the functions directory:
const express = require("express");
const cors = require("cors");
const bodyParser = require("body-parser");
const admin = require("firebase-admin");
const functions = require("firebase-functions");

// Initialize the firebase-admin SDK module
admin.initializeApp(functions.config().firebase);

// Set the Express app
const app = express();
app.use(bodyParser.json());
app.use(cors({ origin: true }));

// Handle push notifications request
app.post("/pushNotifications", require("./controllers/pushNotifications"));

// Handle another request
// app.post("/anotherRoute", require("./controllers/anotherController"));

// Export the https endpoint API handled by the Express app
export const api = functions.https.onRequest(app);
And the pushNotifications.js controller inside controllers:
const admin = require("firebase-admin");
const axios = require("axios");
const chunkArray = require("./chunkArray");
const firestore = admin.firestore();

async function pushNotifications(req, res) {
  try {
    const data = req.body;

    // Get users from Firestore, then build notifications array
    await firestore
      .collection("users").get()
      .then((querySnapshot) => {
        if (querySnapshot.size) {

          // This array will contain each user’s notification
          let notificationsArray = [];

          querySnapshot.forEach((doc) => {
            let docData = doc.data();
            if (docData && docData.d) {
              let userData = docData.d;

              // The pushNotificationsToken retrieved from the app and stored in Firestore
              if (userData.pushNotificationsToken) {
                notificationsArray.push({
                  to: userData.pushNotificationsToken,
                  ...data,
                });
              }
            }
          });

          // Send notifications to 100 users at a time (the maximum number that one Expo push request supports)
          let notificationsChunks = chunkArray(notificationsArray, 100);
          notificationsChunks.map((chunk) => {
            axios({
              method: "post",
              url: "https://exp.host/--/api/v2/push/send",
              data: chunk,
              headers: {
                "Content-Type": "application/json",
              },
            });
          });
          return res.status(200).send({ message: "Notifications sent!" });
        } else {
          return res.status(404).send({ message: "No users found" });
        }
      })
      .catch((error) => {
        return res
          .status(500)
          .send({ message: `${error.code} - ${error.message}` });
      });
  } catch (error) {
    return res
      .status(500)
      .send({ message: `${error.code} - ${error.message}` });
  }
}

module.exports = pushNotifications;
That controller pulls every app user from Firestore, each with a push token, and splits the list into sets of 100 — a single request to Expo can carry only 100 notifications — before sending them with Axios. The splitting is done by chunkArray:
function chunkArray(myArray, chunk_size) {
  var index = 0;
  var arrayLength = myArray.length;
  var tempArray = [];

  for (index = 0; index < arrayLength; index += chunk_size) {
    myChunk = myArray.slice(index, index + chunk_size);
    tempArray.push(myChunk);
  }

  return tempArray;
}
Sending a notification through the API with Axios looks like this:
axios({
  method: "post",
  url: "https://...cloudfunctions.net/api/pushNotifications",
  data: {
    title: "Notification title",
    body: "Notification body",
  },
});
Web Side: Next.js On Netlify
The website and web application were built with Next.js and deployed on Netlify. Three considerations drove that choice:
- Cost: no server to maintain, and Netlify's free plan covers the project's needs. Unlimited private repositories are now free on GitHub as well.
- Workflow: commit and push, then let Netlify handle the rest.
- Delivery speed: the sites are static and hosted on a CDN, which routes each request to the nearest copy to minimize latency.
Where Expo Stops
Expo supports two ways of building an app. In the managed workflow you write only JavaScript and let Expo's tools and services handle the rest. In the bare workflow you retain full control over the native project, at the cost of less help from those tools.
The managed path comes with documented limitations: some functionality found in major apps is not available yet, including background music playback as used by Spotify and call notifications as used by Messenger.
Trade-Offs To Accept
Expo suits developers without native experience who want to skip the overhead of creating and regularly deploying an application. Firebase can remove significant time and work through its scalability and range of services. Both are third-party services, though, and therefore outside your control — and Firestore is not built for complex queries and data relationships.
Further Reading
- Styling Components In React
- Best Practices With React Hooks
- Creating Sortable Tables With React
- Implementing Skeleton Screens In React



