
Starting With Discord.js: Project Setup And A Joke Command
Discord.js is a Node.js module that wraps the official Discord API with an object-oriented interface. Its event-driven design means you attach functions to events emitted by Discord, and the library handles the connection details for you.
Before writing any code, you need a Discord server with admin rights. Without that, you cannot add a bot. Be aware that authentication is unified across Discord — one account grants access to every server you belong to, unlike Slack's per-workspace logins.
Creating The Server And Registering The App
Using the Discord web client, log in and click the plus icon in the left-hand server list. Choose "Create My Own" from the template options, then name your server — for example, "Smashing Example" — and finish creation.
Registration happens in Discord's developer portal. Create a new application, name it, then open the "Bot" tab on the right sidebar. Click "Add Bot" and confirm. You will see a token on this page — copy it. That token authenticates all API communication between your bot code and Discord.
Initializing The Project
The example uses two npm packages: dotenv and discord.js. The first loads environment variables from a .env file into process.env; the second is the API library itself.
Create a project folder and run
npm init -y.Install dependencies:
npm i dotenv discord.js.Create two files:
.envfor sensitive values and a main file, here calledapp.js.
Folder structure:

├── .env
├── app.js
├── node_modules/
├── package.json
└── package-lock.json
Token Handling And The Ready Event
Open .env and define a variable for the bot token:
BOT_TOKEN=your-bot-token-here
At the top of app.js, load the modules:
require("dotenv").config();
const Discord = require("discord.js");
Discord.js is event-based. The first event to handle is ready, which fires once the connection is established. Add a client constructor and the event listener:
const client = new Discord.Client();

client.on("ready", () => {
  console.log("Bot is online!");
});
A login step is mandatory. Without it, the client constructor never connects to Discord's API:
client.login(process.env.BOT_TOKEN);
Running node app.js (or nodemon app.js with nodemon installed) logs the ready message and confirms the connection.
Authorizing The Bot On Your Server
Until now the bot exists only in code. To attach it to your server, go back to Discord's developer portal, select your application, and open the "OAuth2" section. Under "Scopes", check the "bot" option — a URL will appear. Open that URL, pick your server, click "Authorize", and solve the Captcha. Your server now lists the bot in its member roster, and Discord posts a notification about the new addition.
A first round of functionality uses the message event, which fires for every new message:
client.on("message", (message) => {
  if (message.content === "Hello") {
    message.reply("Hi");
  }
});
This responds with "Hi" whenever you type Hello. With the server connection verified, replace that demonstration logic with something more useful: a random joke command.
The Joke Command Pattern
Special characters in front of input distinguish bot commands from ordinary chat. Use a leading ?, making the trigger ?joke. A predefined array stores the jokes:
const jokes = [
  "Why do programmers prefer dark mode? Because light attracts bugs.",
  "Debugging: Being the detective in a crime film where you are also the murderer.",
];
A random index is chosen with Math.floor(Math.random() * jokes.length). The Math.random() call produces a fraction between 0 and 1; multiplying by the array length brings it within range; Math.floor rounds it down to a valid index.
Unlike the message.reply() method used earlier — which tags the sender — the channel.send() method posts a plain message into the channel where the command was written:
if (message.content === "?joke") {
  const randomJoke = jokes[Math.floor(Math.random() * jokes.length)];
  message.channel.send(randomJoke);
}
The full app.js now reads:
require("dotenv").config();
const Discord = require("discord.js");

const client = new Discord.Client();
const jokes = [
  "Why do programmers prefer dark mode? Because light attracts bugs.",
  "Debugging: Being the detective in a crime film where you are also the murderer.",
];

client.on("ready", () => {
  console.log("Bot is online!");
});

client.on("message", (message) => {
  if (message.content === "?joke") {
    const randomJoke = jokes[Math.floor(Math.random() * jokes.length)];
    message.channel.send(randomJoke);
  }
});

client.login(process.env.BOT_TOKEN);
Send ?joke from any channel where the bot is present and you get one joke at random. This basic example uses no external API, but it establishes the command pattern you will extend for more complex features like reaction roles and Twitter integration.
Handling Reactions With Partials
Discord.js caches messages it has seen since the bot started. Reactions on messages sent before the bot was running won't trigger events unless you opt in to partials. Partials let the library work with incomplete data and fetch the full object when needed.
Version 12 of Discord.js supports five partial types: USER, CHANNEL, GUILD_MEMBER, MESSAGE, and REACTION. For a reaction-role system, you need three of them:
USER— the person reactingMESSAGE— the message receiving the reactionREACTION— the reaction itself
Enabling partials is a one-line change to the client constructor:
const client = new Discord.Client({
  partials: ['MESSAGE', 'REACTION', 'CHANNEL'],
});
Setting Up Roles For The Bot
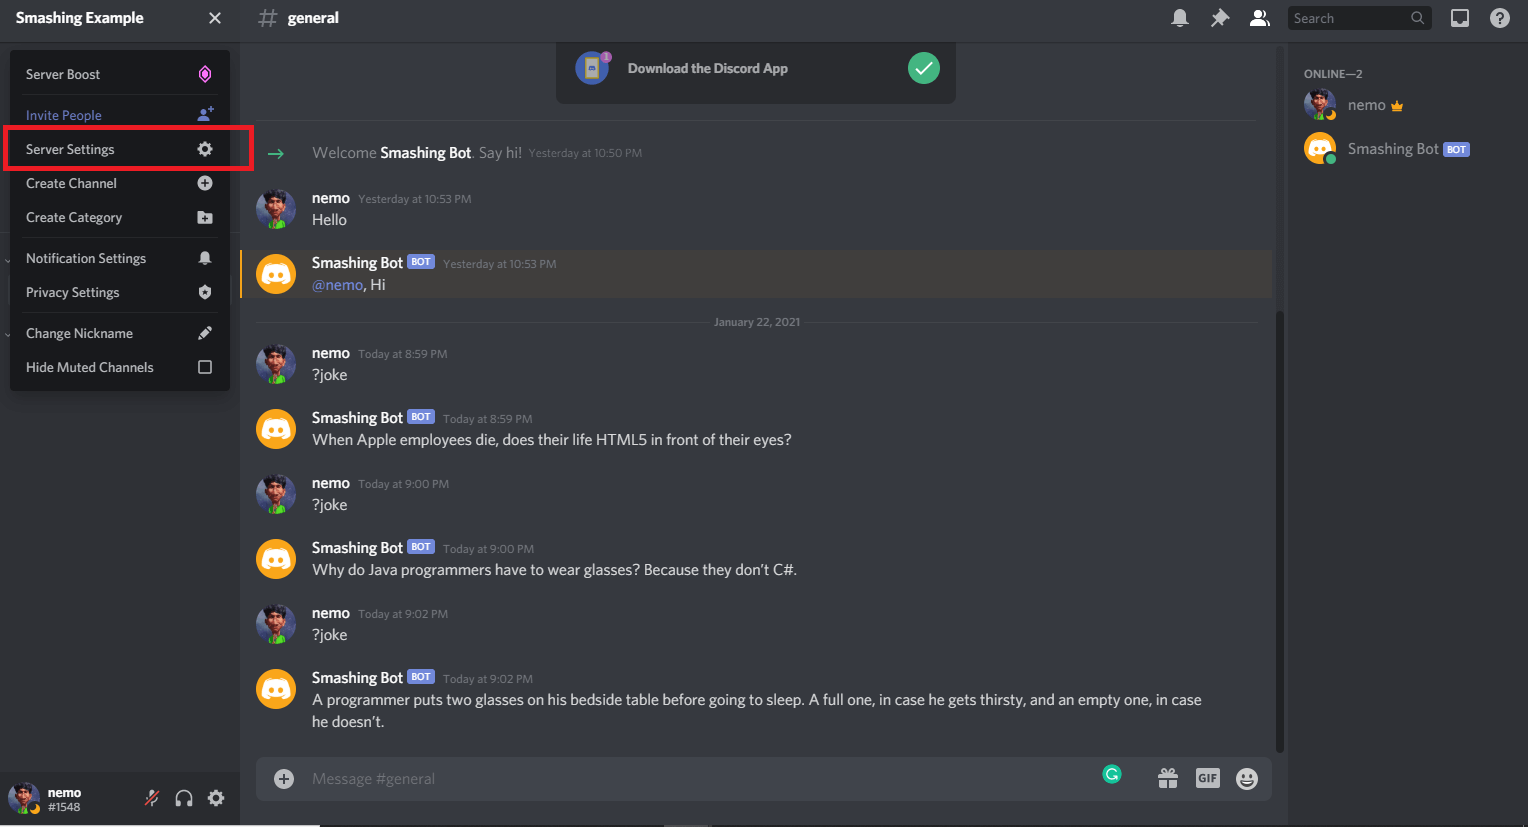
Before writing any reaction-handling code, you need roles on your server. Open Server Settings and go to the Roles section. Click the + icon next to "Roles" to create a new role.
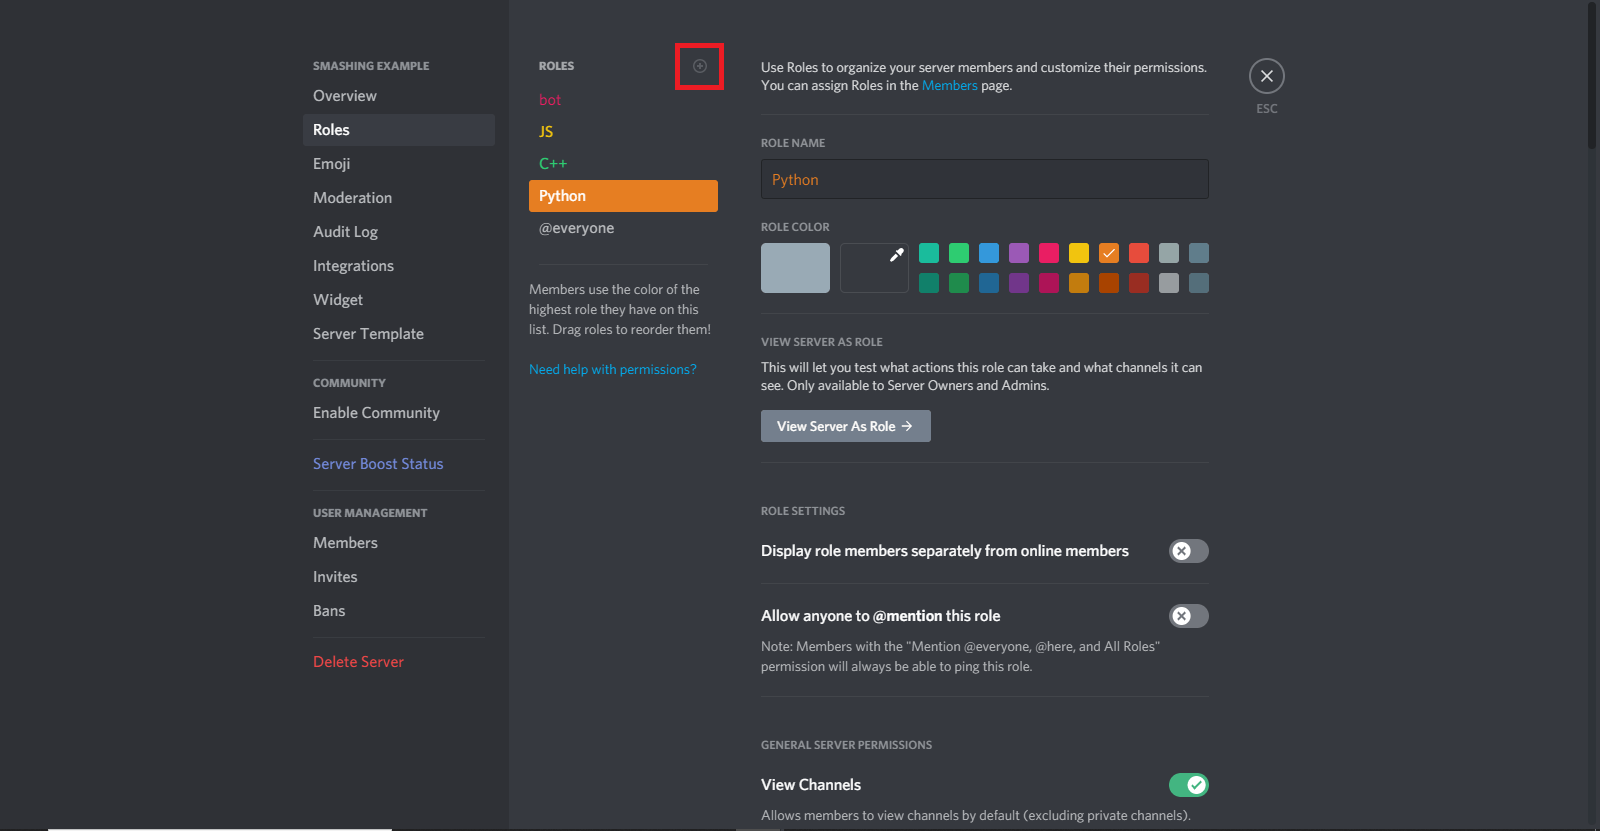
Create a bot role first and enable the "Manage Roles" permission on it. Then add the roles your bot will assign — for example, js, c++, and python. Those don't need special permissions, though you can grant them if you want.
Role hierarchy matters in Discord. A role can only manage roles positioned below it. Since the bot role needs to assign the language roles, drag it above them in the Roles menu. After that, assign the bot role to your bot by clicking its name in the member list, selecting the + icon, and choosing bot.
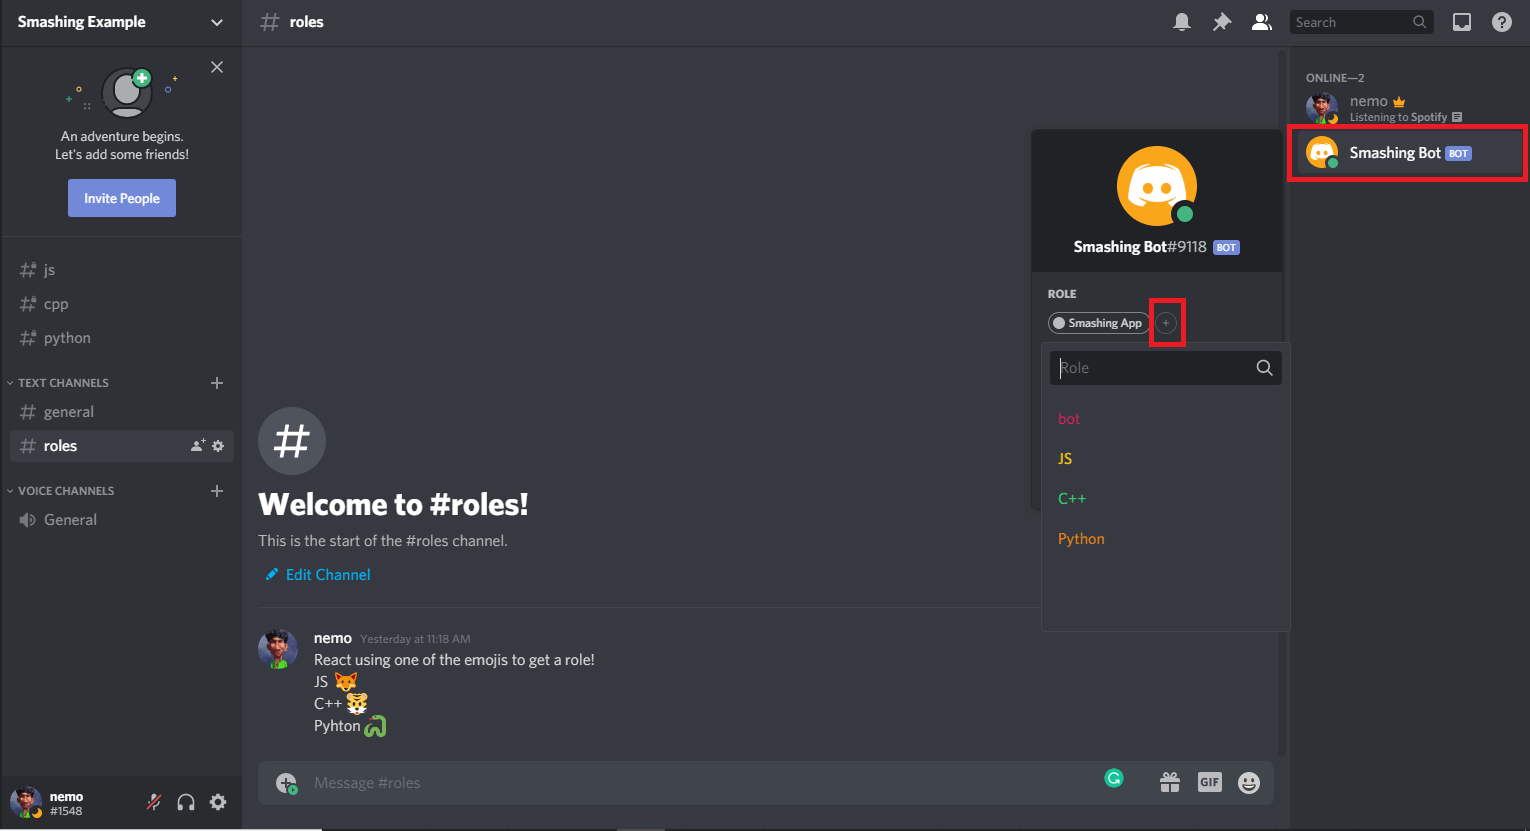
Code can't reference roles by name. Everything in Discord — messages, channels, roles, users — has a unique ID. To copy those IDs, you must enable Developer Mode first. Open Discord's user settings (the gear icon next to your username), go to Appearance under App Settings, and toggle Developer Mode on. Now you can right-click any message, channel, or role and copy its ID.
Writing The Reaction-Role Code
The event you listen for when a user adds a reaction is messageReactionAdd. Removing a reaction emits messageReactionRemove. Both events pass a reaction object and a user object to their callbacks.
Start by creating a message in a dedicated roles channel that shows which emoji grants which role:
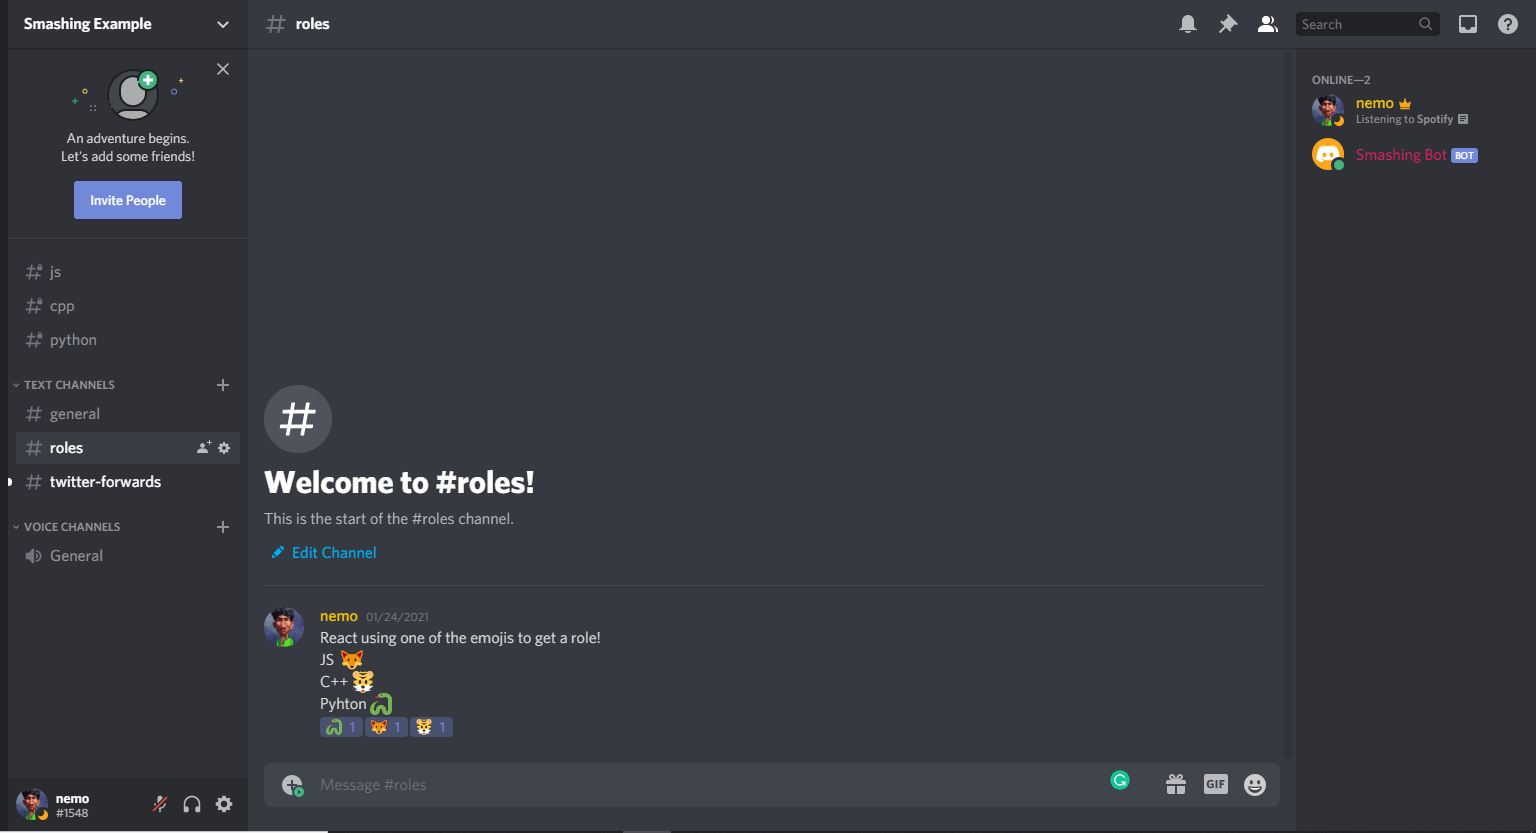
To get the Unicode version of an emoji for your code, type \:emojiName: in Discord and press Enter. For example, typing \:fox: produces a fox emoji you can copy into your source.
The handler begins by checking edge cases:
// Adding reaction-role function
client.on('messageReactionAdd', async (reaction, user) => {
  if (reaction.message.partial) await reaction.message.fetch();
  if (reaction.partial) await reaction.fetch();
  if (user.bot) return;
  if (!reaction.message.guild) return;
});
The callback is asynchronous. It first checks whether the message is a partial and fetches it if so. The same check applies to the reaction itself. Then it confirms the reacting user isn't a bot — otherwise your bot would try to assign roles to itself. Finally, it verifies the message belongs to a server (a guild in Discord.js terms); if not, the function stops.
The rest of the logic restricts role assignment to the roles channel. Copy that channel's ID by right-clicking it, then compare it against reaction.message.channel.id:
if (reaction.message.channel.id == '802209416685944862') {
  if (reaction.emoji.name === '🦊') {
    await reaction.message.guild.members.cache
      .get(user.id)
      .roles.add('802208163776167977');
  }
  if (reaction.emoji.name === '🐯') {
    await reaction.message.guild.members.cache
      .get(user.id)
      .roles.add('802208242696192040');
  }
  if (reaction.emoji.name === '🐍') {
    await reaction.message.guild.members.cache
      .get(user.id)
      .roles.add('802208314766524526');
  }
} else return;
If the channel matches, the code checks reaction.emoji.name against the Unicode emoji you copied. When they match, it fetches the member from reaction.message.guild.members.cache using user.id as the key. The cache is a JavaScript Map with extra utilities, including the get method. Finally, roles.add assigns the role using its ID, which you copy from the server's Roles settings.
Removing a role when someone takes back their reaction is nearly identical. Listen for messageReactionRemove instead of messageReactionAdd and call roles.remove rather than roles.add. The complete add/remove logic looks like this:
// Adding reaction-role function
client.on('messageReactionAdd', async (reaction, user) => {
  if (reaction.message.partial) await reaction.message.fetch();
  if (reaction.partial) await reaction.fetch();
  if (user.bot) return;
  if (!reaction.message.guild) return;
  if (reaction.message.channel.id == '802209416685944862') {
    if (reaction.emoji.name === '🦊') {
      await reaction.message.guild.members.cache
        .get(user.id)
        .roles.add('802208163776167977');
    }
    if (reaction.emoji.name === '🐯') {
      await reaction.message.guild.members.cache
        .get(user.id)
        .roles.add('802208242696192040');
    }
    if (reaction.emoji.name === '🐍') {
      await reaction.message.guild.members.cache
        .get(user.id)
        .roles.add('802208314766524526');
    }
  } else return;
});

// Removing reaction roles
client.on('messageReactionRemove', async (reaction, user) => {
  if (reaction.message.partial) await reaction.message.fetch();
  if (reaction.partial) await reaction.fetch();
  if (user.bot) return;
  if (!reaction.message.guild) return;
  if (reaction.message.channel.id == '802209416685944862') {
    if (reaction.emoji.name === '🦊') {
      await reaction.message.guild.members.cache
        .get(user.id)
        .roles.remove('802208163776167977');
    }
    if (reaction.emoji.name === '🐯') {
      await reaction.message.guild.members.cache
        .get(user.id)
        .roles.remove('802208242696192040');
    }
    if (reaction.emoji.name === '🐍') {
      await reaction.message.guild.members.cache
        .get(user.id)
        .roles.remove('802208314766524526');
    }
  } else return;
});
Forwarding Tweets To Discord
This feature watches a Twitter account and forwards every new tweet to a specified Discord channel. It requires credentials from the Twitter developer portal.
In the portal, create a new app from the Overview tab, name it, and store all the tokens in your .env file. Go to App Settings and enable three-legged OAuth. Add the callback URLs below for testing:
https://127.0.0.1/
https://localhost/
If you have a website, add its address and save. Then generate access keys and tokens under the "Keys and Tokens" tab and save those to .env as well.
Back in your editor, install the twit npm package, a Twitter API client for Node.js that supports both REST and streaming:
npm install twitRequire it and create a Twit instance with your tokens:
const Twit = require('twit');
const T = new Twit({
  consumer_key: process.env.API_TOKEN,
  consumer_secret: process.env.API_SECRET,
  access_token: process.env.ACCESS_KEY,
  access_token_secret: process.env.ACCESS_SECRET,
  bearer_token: process.env.BEARER_TOKEN,
  timeout_ms: 60 * 1000,
});
The configuration also includes a timeout_ms value. Create a channel for forwards — "Twitter forwards" works — and copy its ID for later use.
// Destination Channel Twitter Forwards
const dest = '803285069715865601';
Streaming APIs deliver data in chunks, and you subscribe by setting up a stream object:
// Create a stream to follow tweets
const stream = T.stream('statuses/filter', {
  follow: '32771325', // @Stupidcounter
});
The follow key takes a Twitter user ID. The example uses @Stupidcounter because it posts every minute, which is useful for testing. Use TweeterID to look up the numeric ID for any handle. The stream.on method then listens for incoming tweets:
stream.on('tweet', (tweet) => {
  const twitterMessage = `Read the latest tweet by ${tweet.user.name} (@${tweet.user.screen_name}) here: https://twitter.com/${tweet.user.screen_name}/status/${tweet.id_str}`;
  client.channels.cache.get(dest).send(twitterMessage);
  return;
});
Each tweet event fires a callback that builds a message and sends it to the target channel:
Read the latest tweet by The Count (@Stupidcounter) here: https://twitter.com/Stupidcounter/status/1353949542346084353
That code grabs the channel via client.channels.cache.get and delivers the message with .send. Here is the full Twitter forwarding implementation:
// Adding Twitter forward function
const Twit = require('twit');
const T = new Twit({
  consumer_key: process.env.API_TOKEN,
  consumer_secret: process.env.API_SECRET,
  access_token: process.env.ACCESS_KEY,
  access_token_secret: process.env.ACCESS_SECRET,
  bearer_token: process.env.BEARER_TOKEN,
  timeout_ms: 60 * 1000,
});

// Destination channel Twitter forwards
const dest = '803285069715865601';
// Create a stream to follow tweets
const stream = T.stream('statuses/filter', {
  follow: '32771325', // @Stupidcounter
});

stream.on('tweet', (tweet) => {
  const twitterMessage = `Read the latest tweet by ${tweet.user.name} (@${tweet.user.screen_name}) here: https://twitter.com/${tweet.user.screen_name}/status/${tweet.id_str}`;
  client.channels.cache.get(dest).send(twitterMessage);
  return;
});
Deploying To Heroku
For cloud deployment, create a Procfile in the project root containing worker: node app.js. This tells Heroku which file to execute at startup.
Initialize a git repository and push to GitHub. Add node_modules and .env to .gitignore to keep the repo small and credentials private. Then go to Heroku, create a new app, and choose GitHub as the deployment method.
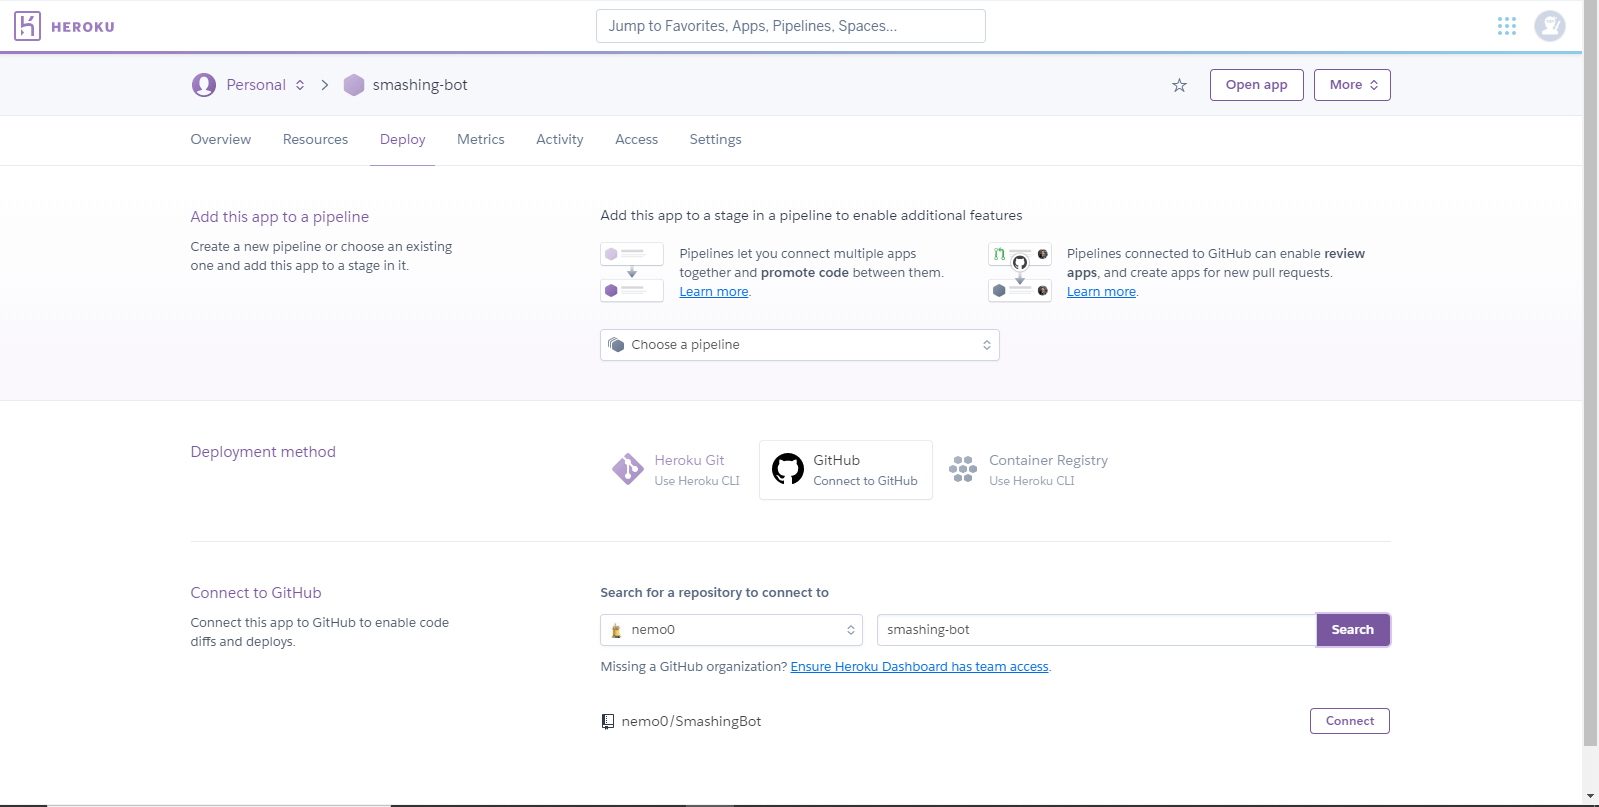
Search for your repository and connect it. Enable automatic deploys so every push updates the live app. Then navigate to Settings, click "Reveal Config Vars," and add the same key-value pairs from your .env file:
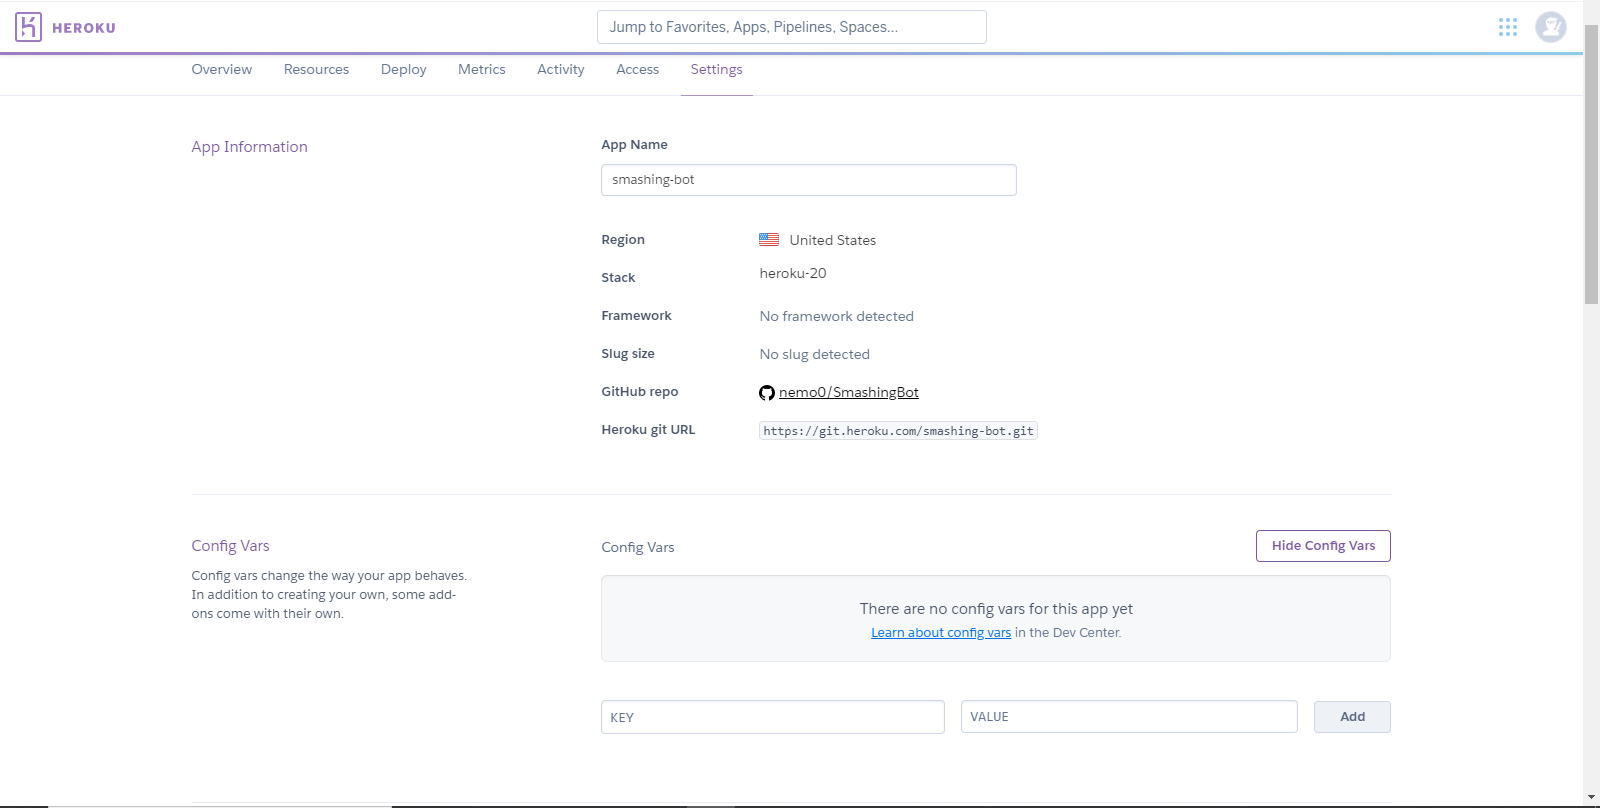
Return to the Deploy tab and click "Deploy Branch" under Manual Deploy.
One common failure mode is the 60-second error crash. To avoid it, change the dyno type. Under the Resources tab, you'll see web npm start enabled by default under Free Dynos. Turn that off and enable worker node app.js instead. Confirm the change and restart the dynos. Your bot will stay online without timing out.
Where to Go From Here
Discord.js’ official documentation is the best next step for diving deeper into bot development — it offers clear and detailed explanations of the library’s features. The full source code for the bot built in this article is available in the GitHub repository, so you can review the implementation in one place.
Helpful Resources
- Discord Developer Portal documentation
- The official Discord API server
- Twitter’s Developer Portal
- The
twitpackage and its documentation



