
What Happens When a Library Sends a Push?
Libraries simplify push messaging, but under the hood they're just making network requests in a very specific format. That format is defined by the Web Push Protocol.
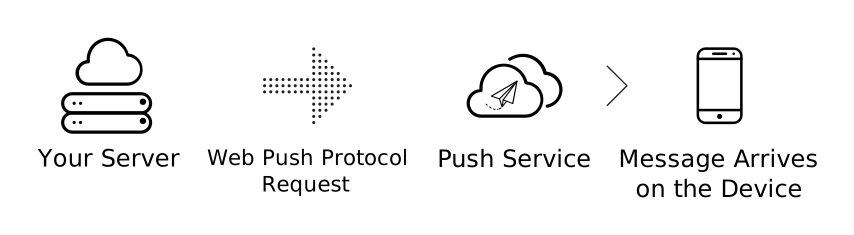
The protocol is built around two requirements: the server must prove its identity to the push service using application server keys, and the message payload must be encrypted. This section covers both, plus how associated data travels with the payload.
Application Server Keys: Proving Who You Are
When your server sends a push, it needs a way to tell the push service "I am who I say I am." The Web Push Protocol handles this with a set of cryptographic keys tied to your application server.
The server's identity is established using a digital signature, and the push service validates that signature against the public key you registered with the client. This prevents other servers from sending messages to your users without authorization.
These keys are generated once and stored on the server. The public key is supplied to the browser when the user subscribes to push, and the private key stays on the server to sign each push request.
Payload Encryption
Push payloads are encrypted because the push service—which delivers the message—is not supposed to read its contents. The encryption happens between your server and the user's browser, with the push service only acting as a delivery intermediary.
This requires a shared secret. The browser generates the secret during the subscription process and hands it to your server, along with the client's public key. Your server then uses these to encrypt the payload before sending it.
The encryption scheme is based on Elliptic Curve Diffie-Hellman (ECDH) key exchange combined with AES-GCM for the actual payload encryption. Each request generates fresh ephemeral keys—this is not something you want to hand-roll yourself.
Associated Data: Metadata That Isn't Encrypted
The encryption header and other metadata aren't part of the encrypted payload itself. This data travels separately, in plaintext. It's known as associated data and is included in the request so the receiving browser can authenticate and decrypt the message correctly.
For example, the salt value used in the encryption process is sent as associated data. Without it, the browser wouldn't be able to decrypt the payload. The protocol binds this associated data cryptographically to the encrypted payload, so it cannot be tampered with without breaking the decryption.
The VAPID Difference
An earlier version of the protocol relied on a different authentication mechanism, but the modern approach—used by the libraries you're likely to encounter—is VAPID (Voluntary Application Server Identification). VAPID is what enables the application server keys described above. It lets your server generate a key pair, sign each request, and have the push service verify that signature without any pre-shared secrets between server and push service.
It's not the prettiest part of web push, and encryption is genuinely complex territory. But this is what those libraries handle for you—correctly formatted, signed, and encrypted requests, every time.
Authenticating the Application Server
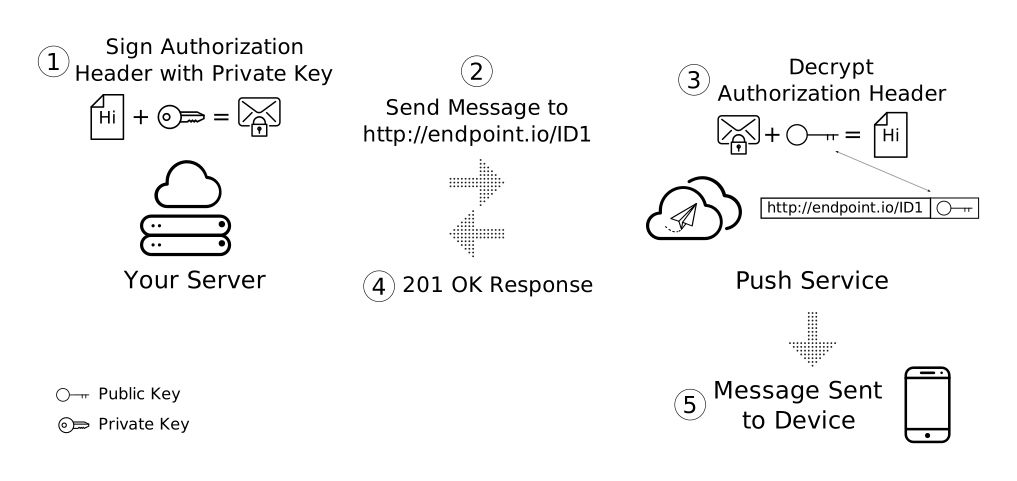
The applicationServerKey passed into pushManager.subscribe() establishes a binding between the subscribing application and the server that will later send it messages. When a push request arrives at the push service, a set of headers authenticate the sender, as defined by the VAPID spec.
The authentication flow works like this:
- The application server signs JSON metadata with its private application key.
- The signed data is attached as a header to a POST request.
- The push service verifies the signature against the public key it received from the subscribe call.
- If verification succeeds, the message is delivered to the subscription.
JSON Web Tokens
The signed data carried in the request header is a JSON Web Token (JWT), a format that lets a receiver validate the sender's identity by checking the signature against a known public key. Many libraries on jwt.io handle the signing; hand-rolling is an option for understanding the mechanics.
Anatomy of a signed JWT
A signed JWT is three base64url-encoded strings concatenated with dots:
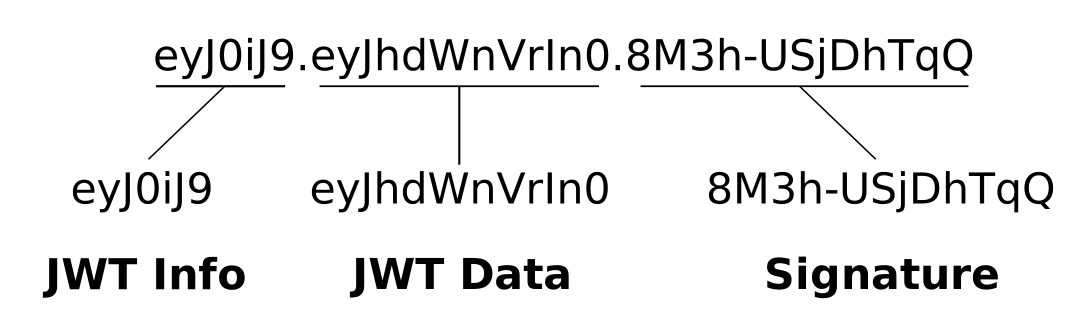
The first segment is the JWT header, declaring the signing algorithm. For web push it must be:
{
  "typ": "JWT",
  "alg": "ES256"
}
The second segment is the JWT payload, which carries claims about the sender, the intended recipient, and the token's validity window. For web push it looks like:
{
  "aud": "https://some-push-service.org",
  "exp": "1469618703",
  "sub": "mailto:[email protected]"
}
The aud claim is set to the push service's origin. The exp claim is a Unix timestamp that must not exceed 24 hours, preventing token replay if intercepted. Node.js typically sets it 12 hours out to avoid clock skew:
Math.floor(Date.now() / 1000) + 12 * 60 * 60;
The sub claim is a URL or mailto address so the push service can contact the sender if needed. (This is why the web-push library asks for an email address.)
The third segment is the signature. To produce it, join the first two segments with a dot — the "unsigned token" — and sign it using ES256, which per the JWT spec means ECDSA with the P-256 curve and SHA-256. Using Web Crypto:
// Utility function for UTF-8 encoding a string to an ArrayBuffer.
const utf8Encoder = new TextEncoder('utf-8');

// The unsigned token is the concatenation of the URL-safe base64 encoded
// header and body.
const unsignedToken = .....;

// Sign the |unsignedToken| using ES256 (SHA-256 over ECDSA).
const key = {
  kty: 'EC',
  crv: 'P-256',
  x: window.uint8ArrayToBase64Url(
    applicationServerKeys.publicKey.subarray(1, 33)),
  y: window.uint8ArrayToBase64Url(
    applicationServerKeys.publicKey.subarray(33, 65)),
  d: window.uint8ArrayToBase64Url(applicationServerKeys.privateKey),
};

// Sign the |unsignedToken| with the server's private key to generate
// the signature.
return crypto.subtle.importKey('jwk', key, {
  name: 'ECDSA', namedCurve: 'P-256',
}, true, ['sign'])
.then((key) => {
  return crypto.subtle.sign({
    name: 'ECDSA',
    hash: {
      name: 'SHA-256',
    },
  }, key, utf8Encoder.encode(unsignedToken));
})
.then((signature) => {
  console.log('Signature: ', signature);
});
The push service uses the public application server key to decrypt the signature and confirm the result equals the unsigned token.
The complete JWT goes in the Authorization header, prefixed with WebPush:
Authorization: 'WebPush [JWT Info].[JWT Data].[Signature]';
The public application server key must also be sent in the Crypto-Key header, base64url-encoded with a p256ecdsa= prefix:
Crypto-Key: p256ecdsa=[URL Safe Base64 Public Application Server Key]
Encrypting Payloads
Web push requires payload encryption — unlike native push, where plaintext data is permitted. The reason stems from the protocol's open design: all push services share the same API, so a malicious or careless service could technically intercept payloads. Encrypting the payload ensures only the browser — which holds the private key for the subscription's p256dh key — can read the data.
Encryption is defined in the Message Encryption spec, which relies on two cryptographic primitives.
ECDH and HKDF in brief
ECDH (Elliptic Curve Diffie-Hellman) lets two parties each generate a shared secret using their own private key and the other's public key. Alice's private key plus Bob's public key produces secret X; Bob's private key plus Alice's public key produces the same X. Only public keys are exchanged.
In Node.js, key generation is straightforward:
const keyCurve = crypto.createECDH('prime256v1');
keyCurve.generateKeys();

const publicKey = keyCurve.getPublicKey();
const privateKey = keyCurve.getPrivateKey();
HKDF (HMAC-based Key Derivation Function) transforms weak key material into cryptographically strong material — useful, for example, for converting a Diffie–Hellman shared secret into suitable encryption keys. The web push spec requires SHA-256 and caps derived keys at 256 bits (32 bytes).
// Simplified HKDF, returning keys up to 32 bytes long
function hkdf(salt, ikm, info, length) {
  // Extract
  const keyHmac = crypto.createHmac('sha256', salt);
  keyHmac.update(ikm);
  const key = keyHmac.digest();

  // Expand
  const infoHmac = crypto.createHmac('sha256', key);
  infoHmac.update(info);

  // A one byte long buffer containing only 0x01
  const ONE_BUFFER = new Buffer(1).fill(1);
  infoHmac.update(ONE_BUFFER);

  return infoHmac.digest().slice(0, length);
}
Inputs and steps
To encrypt a push payload, you need three inputs:
- The payload.
- The
authsecret. - The
p256dhkey.
The latter two come from the PushSubscription. Treat auth as highly sensitive; p256dh is a public key generated by the browser, whose private counterpart never leaves it.
subscription.toJSON().keys.auth;
subscription.toJSON().keys.p256dh;

subscription.getKey('auth');
subscription.getKey('p256dh');
The encryption process produces three outputs: the encrypted payload, a salt, and an ephemeral public key.
Salt: 16 bytes of random data:
const salt = crypto.randomBytes(16);
Local keypair: Use the P-256 elliptic curve. These keys are solely for this encryption operation and have no connection to application server keys.
const localKeysCurve = crypto.createECDH('prime256v1');
localKeysCurve.generateKeys();

const localPublicKey = localKeysCurve.getPublicKey();
const localPrivateKey = localKeysCurve.getPrivateKey();
Deriving the shared secret and key material
Shared secret: An ECDH exchange between the subscription public key and your local private key:
const sharedSecret = localKeysCurve.computeSecret(
  subscription.keys.p256dh,
  'base64',
);
Pseudo-random key (PRK): The PRK combines the shared secret with the subscription's auth secret through HKDF. The odd Content-Encoding: auth\0 string is a label; browsers decrypting a message expect a recognizable content-encoding followed by a 0-value byte and then the ciphertext.
const authEncBuff = new Buffer('Content-Encoding: auth\0', 'utf8');
const prk = hkdf(subscription.keys.auth, sharedSecret, authEncBuff, 32);
Context: A byte buffer holding both the subscription public key and the local public key, prefixed by their lengths and a label. It feeds into the derivation of the nonce and content encryption key (CEK).
const keyLabel = new Buffer('P-256\0', 'utf8');

// Convert subscription public key into a buffer.
const subscriptionPubKey = new Buffer(subscription.keys.p256dh, 'base64');

const subscriptionPubKeyLength = new Uint8Array(2);
subscriptionPubKeyLength[0] = 0;
subscriptionPubKeyLength[1] = subscriptionPubKey.length;

const localPublicKeyLength = new Uint8Array(2);
subscriptionPubKeyLength[0] = 0;
subscriptionPubKeyLength[1] = localPublicKey.length;

const contextBuffer = Buffer.concat([
  keyLabel,
  subscriptionPubKeyLength.buffer,
  subscriptionPubKey,
  localPublicKeyLength.buffer,
  localPublicKey,
]);
Nonce and CEK: A nonce is a one-time value preventing replay attacks. The CEK is the actual key that will encrypt the payload. Both derive from running the context through HKDF:
const nonceEncBuffer = new Buffer('Content-Encoding: nonce\0', 'utf8');
const nonceInfo = Buffer.concat([nonceEncBuffer, contextBuffer]);

const cekEncBuffer = new Buffer('Content-Encoding: aesgcm\0');
const cekInfo = Buffer.concat([cekEncBuffer, contextBuffer]);
// The nonce should be 12 bytes long
const nonce = hkdf(salt, prk, nonceInfo, 12);

// The CEK should be 16 bytes long
const contentEncryptionKey = hkdf(salt, prk, cekInfo, 16);
Performing the encryption
With the CEK and nonce in hand, create an AES128 cipher — the CEK is the key and the nonce is the initialization vector:
const cipher = crypto.createCipheriv(
  'id-aes128-GCM',
  contentEncryptionKey,
  nonce,
);
Before encryption, you must prepend two bytes indicating the amount of padding, measured in bytes, that follows. Padding prevents an eavesdropper from guessing the type of message by its size. With no padding, those two bytes are zero and the payload starts immediately.
const padding = new Buffer(2 + paddingLength);
// The buffer must be only zeros, except the length
padding.fill(0);
padding.writeUInt16BE(paddingLength, 0);
Pass the padding block and payload through the cipher:
const result = cipher.update(Buffer.concat(padding, payload));
cipher.final();

// Append the auth tag to the result -
// https://nodejs.org/api/crypto.html#crypto_cipher_getauthtag
const encryptedPayload = Buffer.concat([result, cipher.getAuthTag()]);
Headers and body for the request
The POST request carrying the encrypted payload needs several headers.
Encryption header — carries the base64url-encoded salt:
Encryption: salt=[URL Safe Base64 Encoded Salt]
Crypto-Key header — already used for the application server key; it also carries the ephemeral local public key used for this encryption. Both keys belong in the same header value:
Crypto-Key: dh=[URL Safe Base64 Encoded Local Public Key String]; p256ecdsa=[URL Safe Base64 Encoded Public Application Server Key]
Content-type and encoding headers — fixed values. The payload is a stream of bytes.
Content-Length: [Number of Bytes in Encrypted Payload]
Content-Type: 'application/octet-stream'
Content-Encoding: 'aesgcm'
Options among the libraries in the web-push-libs project demonstrate the complete flow. Once the encrypted body and headers are assembled, issue the POST to the subscription's endpoint:
const pushRequest = https.request(httpsOptions, function(pushResponse) {
pushRequest.write(encryptedPayload);
pushRequest.end();
Delivery Control Headers
Beyond authentication and encryption, push services honor a few behavioral headers.
TTL (required) — an integer representing how many seconds the message should be retained if the device cannot be reached. When it expires, the message is dropped. A TTL of zero forces an immediate delivery attempt, but the message is discarded the moment the device is unreachable. Push services may lower the requested TTL on their own; check the response's TTL header to see what happened.
TTL: [Time to live in seconds]
Topic (optional) — a string that causes a new message to replace a pending one sharing the same topic. This is useful when a device is offline and only the newest update matters.
Urgency (optional) — signals how important delivery is; push services may use this to conserve a device's battery by deferring unimportant traffic. The default is normal, and valid values also include very-low and high.
Urgency: [very-low | low | normal | high]
The message topic and urgency values sent to your own push service vary; the web-push protocol itself defines no single authority for those semantics.
Inspect the response status of the POST request to judge whether it was handled successfully.
| Status Code | Description |
|---|---|
| 201 | Created. The request to send a push message was received and accepted. |
| 429 | Too many requests. Meaning your application server has reached a rate limit with a push service. The push service should include a 'Retry-After' header to indicate how long before another request can be made. |
| 400 | Invalid request. This generally means one of your headers is invalid or improperly formatted. |
| 404 | Not Found. This is an indication that the subscription is expired and can't be used. In this case you should delete the `PushSubscription` and wait for the client to resubscribe the user. |
| 410 | Gone. The subscription is no longer valid and should be removed from application server. This can be reproduced by calling `unsubscribe()` on a `PushSubscription`. |
| 413 | Payload size too large. The minimum size payload a push service must support is 4096 bytes (or 4kb). |
See also the Web Push standard (RFC8030) for a full listing of HTTP status code semantics.
Further Reading on Web Push
This article is part of a broader series on web push notifications. For adjacent topics, Tech Report recommends the following resources:
- Web Push Notification Overview
- How Push Works
- Subscribing a User
- Permission UX
- Sending Messages with Web Push Libraries
- Handling Push Events
- Displaying a Notification
- Notification Behavior
- Common Notification Patterns
- Push Notifications FAQ
- Common Issues and Reporting Bugs
For hands-on practice, two code labs walk through building a client and a server from scratch:


