Passkey registration: what happens behind the scenes
Passkeys replace passwords with device-based authentication that relies on the user's screen lock — biometrics, PIN, or pattern. Because the private key never leaves the user's device and is tied to a specific domain, passkeys are resistant to phishing and credential theft. Passkey providers like Google Password Manager and iCloud Keychain handle syncing across devices.
Creating a passkey generates a key pair: the private key is stored securely with the passkey provider, while the public key is sent to your server. During sign-in, the private key produces a signature after user verification on the valid domain, and the server verifies that signature using the stored public key. No sensitive credentials are stored server-side.
When to prompt for passkey creation
You can offer passkey creation at any of several points in the user journey:
- During or right after account sign-up
- Immediately following a successful sign-in
- After sign-in with a passkey from another device (when
authenticatorAttachmentiscross-platform) - On a dedicated passkey management page
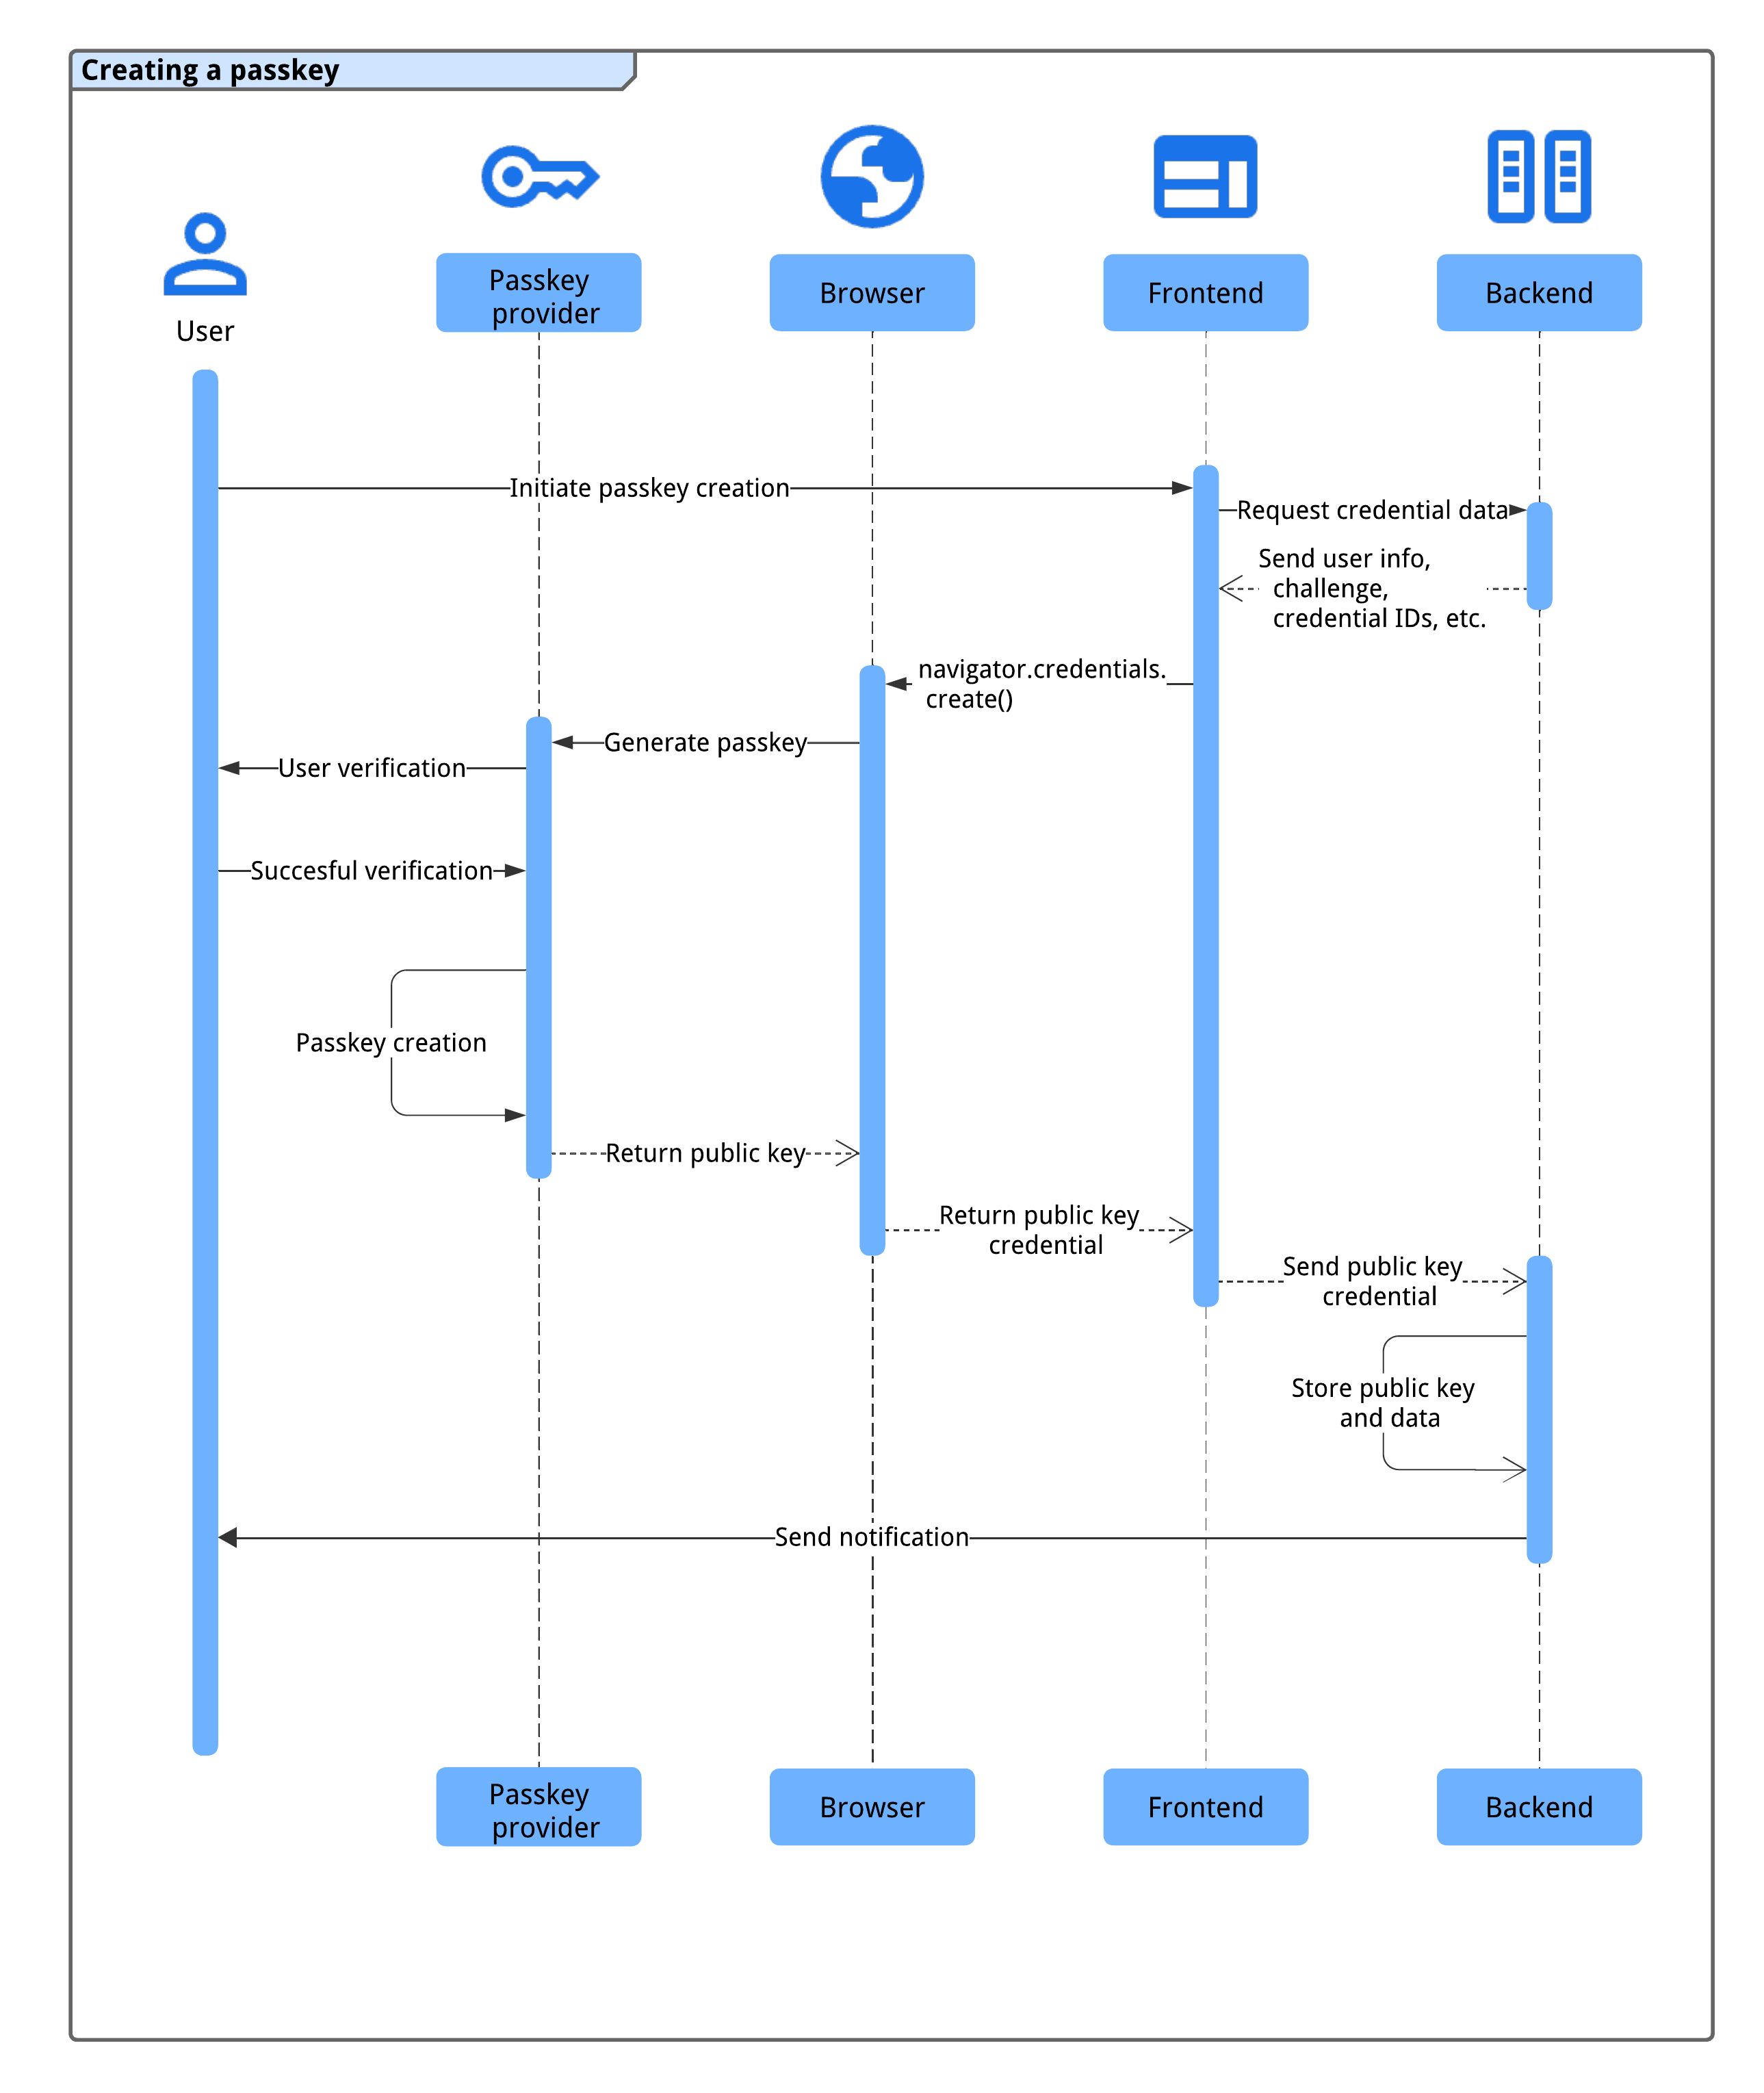
The registration flow relies on the WebAuthn API and involves four components:
- Backend — holds user account data including public keys
- Frontend — talks to the browser and fetches required data from the backend
- Browser — executes your JavaScript and surfaces the WebAuthn API
- Passkey provider — typically a password manager or security key that creates and stores the passkey
Prerequisites
Before triggering passkey creation, confirm these conditions are met:
- The user account has been verified through a secure method — email, phone verification, or identity federation — within a meaningfully short window
- The frontend and backend can exchange credential data over a secure channel
- The browser supports WebAuthn and passkey creation
The registration flow
When the user initiates passkey creation — for example by clicking a "Create a Passkey" button or finishing registration — the process proceeds as follows:
- The frontend requests credential data from the backend, including user information, a challenge, and existing credential IDs to prevent duplicates.
- The frontend calls
navigator.credentials.create()with that data. This returns a promise. - The user's device prompts for biometric, PIN, or pattern verification to authorize creation.
- The passkey provider generates the key pair and returns a public key credential, resolving the promise.
- The frontend sends the public key credential to the backend.
- The backend stores the public key and related metadata for future authentication.
- The backend sends a confirmation notice, typical by email, to detect potentially unauthorized registration.
Browser and platform support
WebAuthn is widely supported across modern browsers, though there are some minor gaps between platforms. Check passkeys.dev for current browser and OS compatibility details.
Creating a passkey on the frontend
Creating a passkey involves a sequence of steps coordinated between the browser and your backend. The frontend flow starts with a compatibility check and ends with sending the newly created public key credential to the server for storage.
Check browser and device support
Before showing any passkey-related UI, such as a "Create a new passkey" button, verify that the environment can actually handle passkey creation. The core checks are:
- The browser supports WebAuthn through the
PublicKeyCredentialinterface. - The browser can run capability detection via
PublicKeyCredential.getClientCapabilities(). - The browser supports WebAuthn conditional UI with
conditionalGet. - The device has a platform authenticator available, which is reported by the
passkeyPlatformAuthenticatorcapability.
Optionally, you can also check for signalUnknownCredential if you plan to use the Signal API for credential management.
With these checks in place, only render the passkey creation option when everything the flow depends on is present:
if (window.PublicKeyCredential && PublicKeyCredential.getClientCapabilities) {
  const capabilities = await PublicKeyCredential.getClientCapabilities();
  if (capabilities.conditionalGet === true &&
      capabilities.passkeyPlatformAuthenticator === true) {
    // The browser supports passkeys and the conditional UI.
  }
}
Fetch creation options from your server
When the user opts to create a passkey, your frontend needs a set of parameters to pass to navigator.credentials.create(). Your backend should generate the core parts of this payload. A typical response object contains:
challenge: A single-use, server-generated ArrayBuffer challenge for this registration.rp.id: The Relying Party ID, which is either your site's domain or a registrable domain suffix. Using a broader ID likeexample.comlets users authenticate on any of its subdomains.rp.name: Your organization's name. This field is deprecated in WebAuthn L3 but is kept for backward compatibility.user.id: A permanent, unique user identifier stored as an ArrayBuffer. It should never contain personally identifiable information (PII).user.name: A recognizable account identifier, typically the email address or username, shown in the account selector.user.displayName: An optional, friendlier account name; pass an empty string if you have nothing suitable.pubKeyCredParams: The list of supported public-key algorithms. Use[{alg: -7, type: "public-key"},{alg: -257, type: "public-key"}]for ECDSA P-256 and RSA coverage.excludeCredentials: An array of credential IDs already registered for this user to prevent duplicate device registration. Include thetransportsvalue returned bygetTransports()from the original registration where available.authenticatorSelection.authenticatorAttachment: Set to"platform"withhint: ['client-device']when creating a passkey as a password upgrade. This skips prompts for external security keys.authenticatorSelection.requireResidentKey: Set totrueto create a discoverable credential that stores user information.authenticatorSelection.userVerification: Leave as"preferred"or omit the property to allow the authenticator latitude in requiring a screen lock.
Build this object on the server, base64url-encode any ArrayBuffer members, and hand the JSON to the client. The client can then decode it with PublicKeyCredential.parseCreationOptionsFromJSON() before invoking the WebAuthn API:
// Fetch an encoded `PubicKeyCredentialCreationOptions` from the server.
const _options = await fetch('/webauthn/registerRequest');

// Deserialize and decode the `PublicKeyCredentialCreationOptions`.
const decoded_options = JSON.parse(_options);
const options = PublicKeyCredential.parseCreationOptionsFromJSON(decoded_options);
...
Call the WebAuthn API
With the decoded options, call navigator.credentials.create(). The returned promise resolves only after the user interacts with the browser's modal dialog and completes local verification:
// Invoke WebAuthn to create a passkey.
const credential = await navigator.credentials.create({
  publicKey: options
});
Handle the credential response
If the user successfully verifies with their device's screen lock, the promise resolves with a PublicKeyCredential object. If it rejects, inspect the error's name property to decide how to proceed:
InvalidStateError: A passkey for this site already exists on the device. No dialog was shown; treat this as a non-error since the user is already registered.NotAllowedError: The user canceled the operation.AbortError: The request was aborted programmatically.- Other exceptions: An unexpected failure, and the browser typically shows an error dialog.
The resolved credential object contains the data your server needs:
id: A base64url-encoded ID for the new passkey, used by the browser during later authentication checks.rawId: The binary ArrayBuffer form of the credential ID.response.clientDataJSON: ArrayBuffer-encoded client data.response.attestationObject: An ArrayBuffer containing the attestation, including the RP ID hash, flags, and the public key.authenticatorAttachment: Returns"platform"when created on a passkey-capable device.type: Always"public-key".
Serialize the credential with its .toJSON() method, wrap that in JSON.stringify(), and send it to your backend:
...

// Encode and serialize the `PublicKeyCredential`.
const _result = credential.toJSON();
const result = JSON.stringify(_result);

// Encode and send the credential to the server for verification.
const response = await fetch('/webauthn/registerResponse', {
  method: 'post',
  credentials: 'same-origin',
  body: result
});
...
Persist the credential server-side
On the backend, avoid hand-rolling attestation verification. A server-side WebAuthn library exists to handle the parsing and validation reliably. Once verified, store these fields alongside the user account for future authentication:
- Credential ID: The credential ID returned in the response.
- Credential name: Derive a display name from the passkey provider, which you can identify by parsing the AAGUID.
- User ID: The
user.idfrom the initial creation flow. - Public key: The public key included in the credential, required to verify future assertions.
- Creation timestamp: When the passkey was created, for management purposes.
- Last-used timestamp: When the passkey last succeeded for sign-in, updated on each authentication.
- AAGUID: The passkey provider's unique identifier.
- Backup Eligibility flag: Whether the device is eligible to sync the passkey; distinguishes syncable credentials from device-bound ones.
Report and remediate registration failures
A failure after the passkey is created on the device but before the public key lands in your database leaves the user stranded: a passkey will appear in their provider but will signal failed authentications later with no obvious fix. Alert the user if the server-side storage step fails.
You can also use the Signal API to inform the passkey provider that the credential never made it into your system, which may trigger cleanup on supported providers:
// Detect authentication failure due to lack of the credential
if (response.status === 404) {
  // Feature detection
  if (PublicKeyCredential.signalUnknownCredential) {
    await PublicKeyCredential.signalUnknownCredential({
      rpId: "example.com",
      credentialId: "vI0qOggiE3OT01ZRWBYz5l4MEgU0c7PmAA" // base64url encoded credential ID
    });
  } else {
    // Encourage the user to delete the passkey from the password manager nevertheless.
    ...
  }
}
User notification and close-out checks
After a passkey is successfully registered, notify the account holder — for example, by email. This gives the user a chance to spot unauthorized account access. If an attacker registers a passkey without the user knowing, that credential stays valid for future logins even if the user later changes their password. An alert at registration time is the most effective way to catch this.
Registration checklist
- Verify the user before allowing passkey creation. Prefer email confirmation or another secure verification method.
- Avoid duplicate credentials for the same passkey provider by passing
excludeCredentialsin the registration request. - Store the AAGUID when saving the credential, so you can identify the passkey provider and show the user a recognizable name for the key.
- Handle failed registration attempts by calling
PublicKeyCredential.signalUnknownCredential()when appropriate. - Send a post-registration notification to the account holder.
Reference material
- Server-side passkey registration
- Apple document: Authenticating a User Through a Web Service
- Google document: Passwordless login with passkeys
Once registration is complete, the next stage is enabling sign-in with the newly created passkey — see the guide on signing in through form autofill.


