Start with a detailed first prompt
The single biggest lever on output quality is the initial prompt. The more design context you supply up front, the fewer corrective follow-ups you'll need. Designer Advocate Ana Boyer puts it plainly: fixing a bad first generation with many small prompts takes far more time than getting close on attempt one.
Because Figma Make runs on Anthropic's Claude Sonnet 4, Anthropic's general prompting guidance applies here as well. A useful first prompt should cover the task, the surrounding context, key design elements, expected interaction behaviors, and constraints like device or layout. Notably, phrasing matters: instead of vertically align two elements, try something more concrete like move this element down 20 pixels or add 16px of space between these buttons.
If the output still misses, don't grind through endless tweaks. Start a new Figma Make file and fold what you learned into a more complete opening prompt.
In practice
Designer Advocate Manager Greg Huntoon landed on a working v1 for a mouse-effect visualization kit after iterating on his prompt structure. His winning prompt included a project overview, platform specification, purpose, core feature list, design style guidance, and technical specs. He also made the first step explicit: First step: Build the base grid overlay component with adjustable dimensions and placeholder hover states.
Prepare your design files before handoff
Figma Make works from scratch, but it's also strong at converting an existing static design into an interactive prototype. That path depends on the state of your source file. Clean up whatever frame you plan to copy-paste into the prompt box, with correct frame constraints and Auto Layout settings mattering most. Naming layers by content or purpose also helps.
You can lean on Figma Design's existing AI features, including Suggest Auto Layout and Rename layers with AI, or plugins like Clean Document, to tidy frames ahead of time.
Even with good layer hygiene, Figma Make can copy a design too literally into its own constraints. If content spills past the preview edge, follow up with Scale this to the size of my screen and make it responsive. For bounded work, try Keep this mobile-sized.
In practice
Product Manager Holly Li built a working music player micro-interaction in a single prompt, crediting a robust Auto Layout structure in the original Figma Design file. Her entire prompt was: Please make this CD player interactive, CD should spin when I play a track. Thanks!
Break complex work into separate steps
A rich first prompt establishes the foundation, but ambitious projects need incremental follow-ups rather than a single fix-everything request. "The smaller the scope, the more detailed the LLM can be," says Product Designer Tammy Taabassum. Performance tracks with the size of your request and the precision of your language.
Work in small changes after the initial generation. This lets you build multi-page flows frame by frame and preserve control over the overall direction. You can also request separate code folders per element, which improves organization, isolates errors, and keeps results maintainable across many prompts.
In practice
Alpha tester Antonella Rodriguez spent more than 150 prompts building out a financial dashboard with an onboarding flow. She began broadly with core features, layout, and a visual reference, then cleaned the v1 output and populated each page. Representative follow-ups included Add post-its on the journal page to add notes., Add a table with category, type of spending, amount in USD, amount in pesos, notes, date on the Finances page., and Add a checkbox to explain which type of currency you are using, USD or ARS.
For a 3D London explorer used in the Config London keynote, Taabassum prompted Figma Make to isolate each landmark into separate coded files after the initial generation. Splitting Big Ben, the London Eye, and Tower Bridge made individual refinement faster without touching the whole environment. Her prompt: Can you move Big Ben code into a new file?
Reuse your own components for consistent styling
Copy-pasting a component, or a frame full of them, into Figma Make is a strong move. Library components that already carry Auto Layout and consistent layer names translate well, and pasting them into the prompt box doubles as a visual reference. Figma Make picks up on the style and spacing so it can match your design system without a written explanation.
The point and edit tool also handles component swaps: select an element on the preview, paste your own component into the prompt box, and run Replace this component by this design.
In practice
The designer advocate team built a productivity app using components from the Material 3 Design Kit. They pasted a navigation component and a calendar component into Figma Make with a prompt to build a task, calendar, and notes app, adapting the attached components' content and matching the other pages' style to them. They then used point and edit to swap in additional Material 3 variants.
Use point and edit for visual refinements
Basic visual changes are fastest through the point and edit tool. Click an element, then adjust properties with the toolbar or extra prompts. Color, corner radius, spacing, and typography all respond to direct manipulation.
Note that the editing options depend on the selected element type. Text elements expose font, color, and formatting controls; containers focus on background and spacing; images come with their own set including upload replacement.
Edit values directly in the code tab
Some non-visual changes are easier to make in the code itself. The go to source button jumps to the code behind any element, and Figma Make labels its code plainly enough for non-developers to find what controls which behavior. Updated values appear in the preview instantly, with no refresh, which makes rapid testing of different product behaviors straightforward.
If go to source doesn't expose a page-level setting, search the semantic layers inside a code folder with cmd+F (Mac) or Ctrl+F (PC).
In practice
This approach suits iteration on motion properties. For example, to test how the vinyl in Holly Li's music player spins, you can go to that element's source code, locate its speed parameter, and adjust the value by hand until the feel is right in the preview.
Prototype smarter with realistic mock data
One of Figma Make's most powerful capabilities is its ability to populate designs with life-like data — from stock tickers to weather forecasts — without any backend setup. Rather than wiring up calls to third-party services, you can use prompting alone to simulate dynamic content.
A word of caution: be careful about asking Figma Make to tap a third-party API directly if you plan to actually deploy the outcome. Doing so may expose API keys and other secrets, creating security and financial risks. For prototyping purposes, however, simulating that data gives you a useful approximation that could help you flesh out how a system works.
Two prompting strategies will get you there:
- Describe the kind of data you expect the interface to display.
- If you want to swap datasets yourself later, explicitly ask Figma Make to build a data import entry point into the screen.
There is another bonus: Figma Make can leverage any hardware your browser has access to. That means prototypes that involve keyboard, sound, or camera inputs are feasible, as demonstrated by Product Designer Daniela Muntyan’s mini photobooth app.
How it plays out
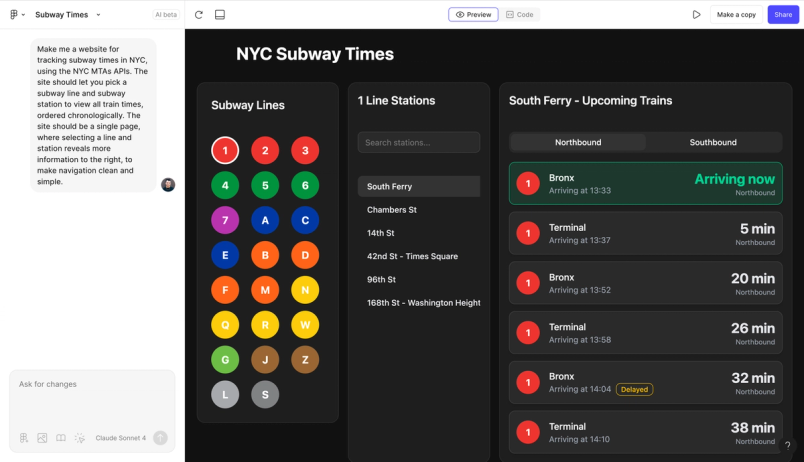
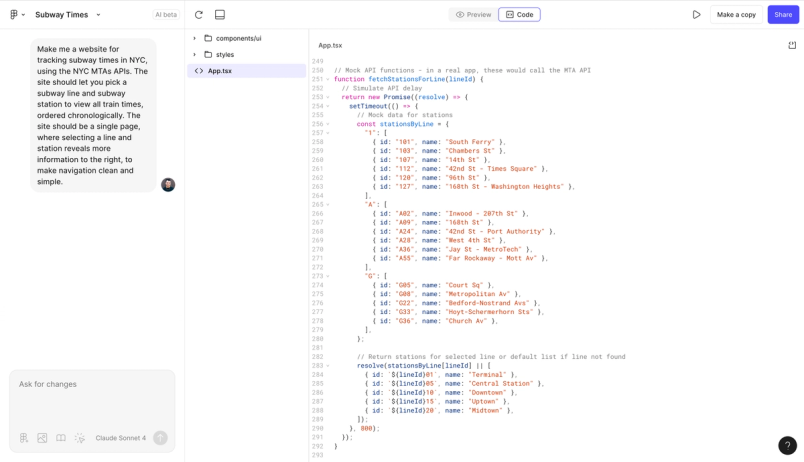
When Product Designer Ryan Reid prototyped a New York City Subway time tracker using the MTA API, Figma Make pulled in actual subway lines and stations, then synthesized mock data that looked like real-time train arrivals — with zero API connection. Ryan’s prompt was simple and functional:
Make me a website for tracking subway times in NYC, using the NYC MTA's APIs. The site should let you pick a subway line and subway station to view all train times, ordered chronologically. The site should be a single page, where selecting a line and station reveals more information to the right, to make navigation clean and simple.
Separately, the Figma advocacy team took a similar path with a marathon trainer: they asked the internal GPT for a fake set of running sessions, exported it as a .csv file, and asked Figma Make to add an upload mechanism to the dashboard. The final page reads any correctly formatted .csv file and renders an adaptive analytics view — no manual data entry needed.
The prompt started off like this:
I want to build an analytics dashboard that shows the progression of my marathon training over time.
The dashboard should have a summary of my latest training, including key numbers and a line graph of my progression over time. X axis: training date, Y axis: distance running on each training date.
Before any of the analytics appears, the page should be empty with a placeholder that invites me to upload a .csv file. You will then take that CSV file, which will be formatted with the following information, to turn them into the dashboard detailed above: date, distance_km, time_minutes, avg_pace, heart_rate, calories_burned, elevation_gain.
Turn Figma Make into a handoff partner
Instead of waiting until the end of the design process to involve developers, you can use Make to build interfaces that produce ready-to-share code. Asking Figma Make to output design decisions as code snippets effectively gives you your own handoff tool, useful for rapid experimentation before a formal build phase starts.
Extra tip: if the code Figma Make produces doesn't match your stack, you can ask it for a higher-level translation instead. Prompt it like this:
Keep the code exactly as it is, but describe to me how this piece is implemented in pseudo-code. If possible, detail specific platform considerations for (insert platform name)
In practice
Designer Advocate Luis Ouriach did exactly this when building his OKLCH Palette Builder. The application takes a single primary brand color and generates an entire color ramp spanning common categories — greys, green, blue, red, yellow, and orange — with a user-defined number of shades per ramp. The handoff output includes both CSS Variables and Tailwind CSS configuration, so developers can drop it straight into a project.
Luis’s prompt:
Create an OKLCH color palette builder where you add your primary brand color and it generates a fully formed ramp over common colors: green, blue, red, yellow, orange, and greys. You can decide how many colors within each ramp you want - for example, 3 of each in different shades.
Developer Advocate Jake Albaugh used the same pattern for a completely different purpose. He wanted fine-grained control over the animation behavior of a luxury bank card, so he prompted the tool for visible effect controls and for JSON output detailing every animation parameter. The result was a repeatable set of values re-useable across his other builds — tied to every UI input change.
One of Jake’s prompts:
Make it so there is a json code output describing all the parameters (including min max tilt on each axis) that changes when the input changes.
Take your time finding what works
Prompting an AI design tool is rarely a one-shot affair. Expect trial and error as you explore the boundaries of what Make can do for your workflows. The beta version of Figma Make is now open to all Figma users with a Full seat — and its capabilities are only beginning to surface.
Ready to dig deeper into using the tool responsibly? Those seven tips on managing your credits—detailed in our follow-up article—are a good place to start.