
Most applications need authentication and access control, and building them from scratch pulls effort away from core features. This article walks through a straightforward way to add both to a React application, using a hosted service rather than a static library that has to be kept up to date or re-researched for every new project.
The two jobs of React authentication
Signing a user on always comes down to two steps:
- Obtain an access token from an authentication server.
- Send that access token to your backend server with every subsequent request.
The same two steps apply whether the user signs in with email and password, magic links, or a single sign on (SSO) provider such as Google, Azure, or Facebook. The goal is for the React app to send an initial request to the authentication server and receive back a token it can use.
Why JWTs work as access tokens
JSON Web Tokens (JWTs) are one good option for the access token itself. They are compact, URL-safe, and usable for both authentication and access control. Each JWT carries a JSON object as its payload and is signed so that your backend server can verify the payload's authenticity.
eyJhbGciOiJIUzI1NiIsInR5cCI6IkpXVCJ9.eyJ1c2VySWQiOjEsImF1dGhvcml6YXRpb24iOiJhZG1pbiJ9.f7iKN-xi24qrQ5NQtOe0jiriotT-rve3ru6sskbQXnA
The payload is the middle segment, between the periods:
eyJ1c2VySWQiOjEsImF1dGhvcml6YXRpb24iOiJhZG1pbiJ9Decoding that segment from base64 yields the JSON object:
JSON.parse(atob("eyJ1c2VySWQiOjEsImF1dGhvcml6YXRpb24iOiJhZG1pbiJ9"));

// =>
{
  “userId”: 1,
  “authorization”: “admin”
}
Readability is important to understand here: anyone holding the JWT — your React application or an unrelated third party — can read the payload. Signing protects authenticity, not secrecy. Only the authentication server can generate valid JWTs; your React app, your backend, or a malicious third party can read and verify them but cannot mint them.
When a request arrives with a JWT, the backend should check it against the public key for that token. This lets the application server reject any token that was not issued by the authentication server, as well as tokens that have expired.
The token flow
- The React app requests a JWT from the authentication server whenever the user wants to sign on.
- The authentication server generates the JWT with a private key and returns it to the React app.
- The React app stores the JWT and attaches it to requests sent to the backend.
- The backend verifies the JWT with the public key, then reads the payload to determine which user is making the request.
Every step is simple to describe, but each has its own implementation pitfalls. Security overhead compounds over time as new threat vectors appear and new platforms need to be patched or supported.
What Userfront provides
Userfront abstracts away that complexity and keeps the auth protocols updated automatically. Its stated philosophy is that world-class auth should not take effort: setup should be easy and security updates should happen for you. It covers authentication, SSO, access control, and multi-tenancy, with a production-ready free tier for up to 10,000 monthly active users.
Project setup
The example below uses Create React App for project scaffolding and React Router for client-side routing. The final code is available in the linked example repository.
npx create-react-app my-app
cd my-app
npm install react-router-dom --save
npm start
The app then runs at http://localhost:3000.

Following the React Router quickstart, replace the contents of src/App.js with the following:
// src/App.js

import React from "react";
import { BrowserRouter as Router, Switch, Route, Link } from "react-router-dom";

export default function App() {
  return (
    <Router>
      <div>
        <nav>
          <ul>
            <li>
              <Link to="/">Home</Link>
            </li>
            <li>
              <Link to="/login">Login</Link>
            </li>
            <li>
              <Link to="/reset">Reset</Link>
            </li>
            <li>
              <Link to="/dashboard">Dashboard</Link>
            </li>
          </ul>
        </nav>

        <Switch>
          <Route path="/login">
            <Login />
          </Route>
          <Route path="/reset">
            <PasswordReset />
          </Route>
          <Route path="/dashboard">
            <Dashboard />
          </Route>
          <Route path="/">
            <Home />
          </Route>
        </Switch>
      </div>
    </Router>
  );
}

function Home() {
  return <h2>Home</h2>;
}

function Login() {
  return <h2>Login</h2>;
}

function PasswordReset() {
  return <h2>Password Reset</h2>;
}

function Dashboard() {
  return <h2>Dashboard</h2>;
}
That produces a minimal routed application — the structure needed before adding auth:
| Route | Description |
|---|---|
/ | Home page |
/login | Login page |
/reset | Password reset page |
/dashboard | User dashboard, for logged in users only |

Signup, login, and password reset
A Userfront account supplies a signup form, a login form, and a password reset form. The Toolkit section of the dashboard contains the installation instructions, which begin with the React package:
npm install @userfront/react --save
npm start
On the home page, import and initialize Userfront, then update the Home() function to render the signup form:
// src/App.js

import React from "react";
import { BrowserRouter as Router, Switch, Route, Link } from "react-router-dom";
import Userfront from "@userfront/react";

Userfront.init("demo1234");

const SignupForm = Userfront.build({
  toolId: "nkmbbm",
});

export default function App() {
  return (
    <Router>
      <div>
        <nav>
          <ul>
            <li>
              <Link to="/">Home</Link>
            </li>
            <li>
              <Link to="/login">Login</Link>
            </li>
            <li>
              <Link to="/reset">Reset</Link>
            </li>
            <li>
              <Link to="/dashboard">Dashboard</Link>
            </li>
          </ul>
        </nav>

        <Switch>
          <Route path="/login">
            <Login />
          </Route>
          <Route path="/reset">
            <PasswordReset />
          </Route>
          <Route path="/dashboard">
            <Dashboard />
          </Route>
          <Route path="/">
            <Home />
          </Route>
        </Switch>
      </div>
    </Router>
  );
}

function Home() {
  return (
    <div>
      <h2>Home</h2>
      <SignupForm />
    </div>
  );
}

function Login() {
  return <h2>Login</h2>;
}

function PasswordReset() {
  return <h2>Password Reset</h2>;
}

function Dashboard() {
  return <h2>Dashboard</h2>;
}
The signup form is live on the home page:

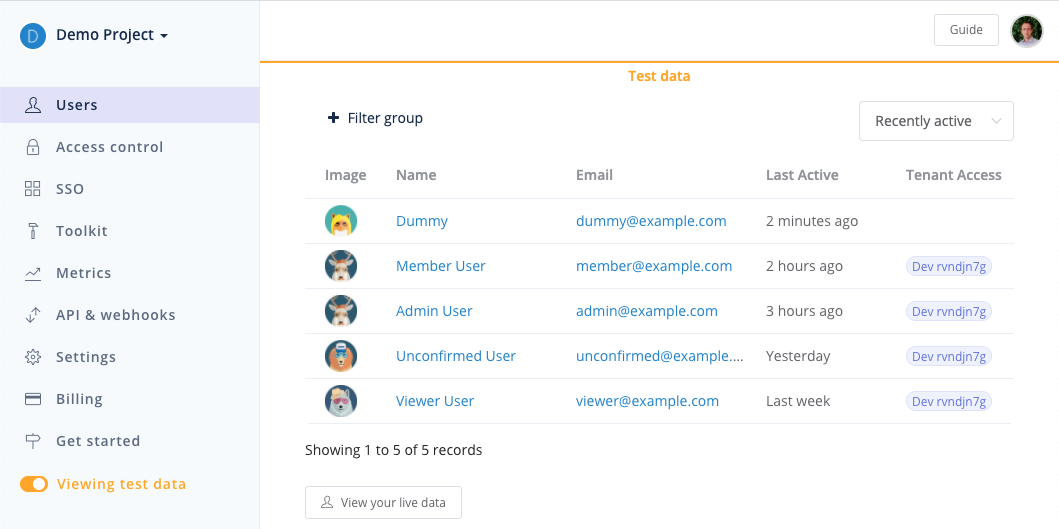
By default the form is in "Test mode," which records users in a test environment viewable in the Userfront dashboard:
Login and password reset are added exactly the same way as signup:
// src/App.js

import React from "react";
import { BrowserRouter as Router, Switch, Route, Link } from "react-router-dom";
import Userfront from "@userfront/react";

Userfront.init("demo1234");

const SignupForm = Userfront.build({
  toolId: "nkmbbm",
});
const LoginForm = Userfront.build({
  toolId: "alnkkd",
});
const PasswordResetForm = Userfront.build({
  toolId: "dkbmmo",
});

export default function App() {
  return (
    <Router>
      <div>
        <nav>
          <ul>
            <li>
              <Link to="/">Home</Link>
            </li>
            <li>
              <Link to="/login">Login</Link>
            </li>
            <li>
              <Link to="/reset">Reset</Link>
            </li>
            <li>
              <Link to="/dashboard">Dashboard</Link>
            </li>
          </ul>
        </nav>

        <Switch>
          <Route path="/login">
            <Login />
          </Route>
          <Route path="/reset">
            <PasswordReset />
          </Route>
          <Route path="/dashboard">
            <Dashboard />
          </Route>
          <Route path="/">
            <Home />
          </Route>
        </Switch>
      </div>
    </Router>
  );
}

function Home() {
  return (
    <div>
      <h2>Home</h2>
      <SignupForm />
    </div>
  );
}

function Login() {
  return (
    <div>
      <h2>Login</h2>
      <LoginForm />
    </div>
  );
}

function PasswordReset() {
  return (
    <div>
      <h2>Password Reset</h2>
      <PasswordResetForm />
    </div>
  );
}

function Dashboard() {
  return <h2>Dashboard</h2>;
}
At that point signup, login, and password reset are all functional for users:


Protecting routes in React
Dashboards usually should not be viewable unless the user is logged in. The pattern is a protected route: if an unauthenticated user tries to visit /dashboard, redirect them to the login screen.
After login with Userfront, the access token is available as Userfront.accessToken(). Checking for that token tells you whether the user is logged in. Add the Redirect component to the React Router import, then update the Dashboard component to redirect when no access token is present:
// src/App.js

import React from "react";
import {
  BrowserRouter as Router,
  Switch,
  Route,
  Link,
  Redirect, // Be sure to add this import
} from "react-router-dom";

// ...

function Dashboard() {
  function renderFn({ location }) {
    // If the user is not logged in, redirect to login
    if (!Userfront.accessToken()) {
      return (
        <Redirect
          to={{
            pathname: "/login",
            state: { from: location },
          }}
        />
      );
    }

    // If the user is logged in, show the dashboard
    const userData = JSON.stringify(Userfront.user, null, 2);
    return (
      <div>
        <h2>Dashboard</h2>
        <pre>{userData}</pre>
        <button onClick={Userfront.logout}>Logout</button>
      </div>
    );
  }

  return <Route render={renderFn} />;
}
The same component includes a logout button that calls Userfront.logout() directly:
<button onClick={Userfront.logout}>Logout</button>Logged-in users now see the dashboard; anyone else is sent to the login page.

Calling a protected API
User-specific data from your backend means endpoints that verify incoming JWTs. Libraries exist for reading and verifying JWTs in many languages; some popular choices:
Sending the token from React
While the user is logged in, the access token is available as Userfront.accessToken(). Send it as a Bearer token in the Authorization header:
// Example of calling an endpoint with a JWT

import Userfront from "@userfront/react";
Userfront.init("demo1234");

async function getInfo() {
  const res = await window.fetch("/your-endpoint", {
    method: "GET",
    headers: {
      "Content-Type": "application/json",
      Authorization: `Bearer ${Userfront.accessToken()}`,
    },
  });

  console.log(res);
}

getInfo();
Verifying on the backend
The backend must read the JWT from the Authorization header and verify it with the public key found in the Userfront dashboard. A Node.js middleware example:
// Node.js example (Express.js)

const jwt = require("jsonwebtoken");

function authenticateToken(req, res, next) {
  // Read the JWT access token from the request header
  const authHeader = req.headers["authorization"];
  const token = authHeader && authHeader.split(" ")[1];
  if (token == null) return res.sendStatus(401); // Return 401 if no token

  // Verify the token using the Userfront public key
  jwt.verify(token, process.env.USERFRONT_PUBLIC_KEY, (err, auth) => {
    if (err) return res.sendStatus(403); // Return 403 if there is an error verifying
    req.auth = auth;
    next();
  });
}
Invalid or missing tokens are rejected by the server. Route handlers can then reference the token contents through the req.auth object:
console.log(req.auth);

// =>
{
  mode: 'test',
  tenantId: 'demo1234',
  userId: 5,
  userUuid: 'ab53dbdc-bb1a-4d4d-9edf-683a6ca3f609',
  isConfirmed: false,
  authorization: {
    demo1234: {
      tenantId: 'demo1234',
      name: 'Demo project',
      roles: ["admin"],
      permissions: []
    },
  },
  sessionId: '35d0bf4a-912c-4429-9886-cd65a4844a4f',
  iat: 1614114057,
  exp: 1616706057
}
From there you can perform further checks or use userId or userUuid to look up user records. Role checks work the same way: to restrict a route to admins, inspect the authorization object of the verified access token and reject tokens without an admin role.
// Node.js example (Express.js)

app.get("/users", (req, res) => {
  const authorization = req.auth.authorization["demo1234"] || {};

  if (authorization.roles.includes("admin")) {
    // Allow access
  } else {
    // Deny access
  }
});
Adding single sign on
With Toolkit forms in place, you can enable social identity providers such as Google, Facebook, and LinkedIn, or business providers such as Azure AD and Office365. Create an application with the identity provider, then add that application's credentials to the Userfront dashboard. The sign-on experience changes; the flow through JWTs does not.
No additional code is needed for this approach. Providers can be added or removed without touching your forms or the way you handle JWTs.

Closing considerations
React authentication and access control can be complex to build yourself, or simple with a service that handles both initial setup and ongoing maintenance. JWTs cleanly separate the token generation layer from the rest of the application, which makes the auth model easier to reason about and more modular for future needs — and leaves effort for the core application, where the value is.
Further material, from auth form setup through API documentation and example repositories across languages and frameworks, is available in the Userfront guide.