What Are Passkeys?
Passkeys replace passwords with a cryptographically generated key pair bound to a specific website domain. A third-party provider, such as Google or Apple, generates and stores the keys on your behalf. When you log into a site, you authenticate with that provider, and the provider validates your identity using the stored key pair.
The technology relies on asymmetric — or public key — cryptography, which uses two mathematically related keys. The private key stays with the user and creates signatures; the public key is shared with the service and validates those signatures.
A simple demo using the SubtleCrypto API shows the underlying principle: construct a message, generate a key pair, sign the message with the private key, and let a third party verify it with the public key. The signature proves the message came from the holder of the matching private key, and this verification is what grants account access.
// Simplified example: generating keys and signing a message
const keyPair = await crypto.subtle.generateKey(
  { name: "ECDSA", namedCurve: "P-256" },
  true,
  ["sign", "verify"]
);
const signature = await crypto.subtle.sign(
  { name: "ECDSA", hash: "SHA-256" },
  keyPair.privateKey,
  message
);
const isValid = await crypto.subtle.verify(
  { name: "ECDSA", hash: "SHA-256" },
  keyPair.publicKey,
  signature,
  message
);
The flow has three parts: a message to authenticate, a public/private key pair where one key signs and the other verifies, and the signature itself. A third party checks the signature against the public key to confirm the keys match.
Why They Replace Passwords
Passwords place the burden of memorization on the user and the burden of secure storage on the service. Passkeys shift both to a provider the user already controls. Logging in becomes as simple as approving a prompt on your device, similar to single sign-on but with cryptographic keys instead of shared credentials.
Because a passkey is tied to the domain it was created for, the credentials are only accessible to the user during login. You can have multiple passkeys for the same domain and choose between them when signing in. This removes the need to remember which email and password combination was used for each site.
Security Benefits
Passkeys address two of the most common attack vectors: database leaks and phishing.
Database Leaks
Compromised databases often expose email and password combinations, which attackers then reuse across multiple services. Passkeys change this dynamic because the service stores only the public key — information that is meant to be shared. Without the corresponding private key, the public key is useless. Attempting to crack a private key from a public key would take an impractical amount of computational time, rendering leaked databases harmless.
Passing around a password in email or text also introduces risk. With passkeys, there is no secret credential to copy or forward. The private key stays on your device or with your provider and is never transmitted.
Phishing Resistance
Traditional password logins can be captured by a convincing fake site. Once you submit your credentials to a phishing page, the attacker owns your account. Passkeys prevent this because they are bound to the domain. A phishing site with a different domain will not trigger the passkey prompt — the cryptographic keys simply will not authenticate against the wrong domain.
Even a compromised DNS server that redirects you to a fake site would not help an attacker, since the passkey provider checks the domain rather than relying on visual cues. While theoretical attacks exist, they require compromising infrastructure at a level that suggests broader security problems than a phishing defense would solve.
How Implementation Works
Implementing passkeys requires a few components. For a typical sign-up and login flow, you need a temporary cache to store authentication challenges, plus a permanent store for user accounts and public keys. Redis or memcache are fine for ephemeral challenges; a conventional database handles account records.
To understand the actual mechanics, consider the pieces involved in generating the attestation (registration) and assertion (login) phases.
Key Generation
An authenticator — hardware or software — creates the key pair. This could be a hardware security key, a device’s secure enclave, or the operating system’s Trusted Platform Module (TPM). Communication with the authenticator runs over the Client to Authenticator Protocol (CTAP), which supports NFC, Bluetooth, or USB connections. This matters when you need to log in on one device while your passkey lives on another.
Passkeys are built on the WebAuthn API but add cloud syncing of keys. WebAuthn itself does not include that behavior, and passkeys carry Relying Party (RP) information so the user does not need to enter an identifier before authenticating.
What Gets Stored
A typical database structure has a users table with associated public_keys. Each public key record stores the key material itself plus metadata about the key. Challenges generated for authentication attempts are cached separately, along with session data related to those challenges.
-- Simplified schema
CREATE TABLE users (
  id UUID PRIMARY KEY,
  username TEXT UNIQUE NOT NULL
);

CREATE TABLE public_keys (
  id UUID PRIMARY KEY,
  user_id UUID REFERENCES users(id),
  public_key TEXT NOT NULL,
  credential_id TEXT UNIQUE NOT NULL
);
The verification flow involves three actors: the user’s authenticator generating keys, the client triggering the process via the browser, and the Relying Party storing the public key for future checks. The client is the user’s device or browser; the Relying Party is the website server.
The Two Authentication Phases
The attestation phase occurs during registration. Instead of submitting a username and password, the client calls the browser’s credentials API, the authenticator creates a key pair, and the public key is sent to the Relying Party for storage.
const credential = await navigator.credentials.create({
  publicKey: {
    challenge: new Uint8Array([/* random bytes from server */]),
    rp: { name: "Example Site", id: "example.com" },
    user: { id: new Uint8Array([/* user id */]), name: "[email protected]" },
    pubKeyCredParams: [{ type: "public-key", alg: -7 }]
  }
});
The assertion phase is the login equivalent. The Relying Party sends a challenge, the authenticator signs it with the private key, and the client returns the signature for verification.
const assertion = await navigator.credentials.get({
  publicKey: {
    challenge: new Uint8Array([/* random bytes from server */]),
    allowCredentials: [{ type: "public-key", id: credentialId }]
  }
});
Both phases start with a random challenge generated by the Relying Party. The authenticator signs that challenge, and the client sends the signature back. The Relying Party verifies the signature against the stored public key, confirming that the user possesses the matching private key. That proof of possession is what grants access — no password has ever been entered, sent, or stored.
The Attestation Journey
When a user registers a passkey, the browser returns an AuthenticatorAttestationResponse from the navigator.credentials.create call. This object carries two key pieces: clientDataJSON (a JSON blob that needs decoding) and attestationObject (CBOR-encoded binary data). Modern browsers also expose getPublicKey() and getPublicKeyAlgorithm(), saving you the trouble of manually extracting the key material from the encoded object.
const { challenge } = await (await fetch("/attestation/generate")).json(); // Server call mock to get a random challenge

const options = {
 // Our challenge should be a base64-url encoded string
 challenge: new TextEncoder().encode(challenge),
 rp: {
  id: window.location.host,
  name: document.title,
 },
 user: {
  id: new TextEncoder().encode("my-user-id"),
  name: 'John',
  displayName: 'John Smith',
 },
 pubKeyCredParams: [ // See COSE algorithms for more:
  {
   type: 'public-key',
   alg: -7, // ES256
  },
  {
   type: 'public-key',
   alg: -256, // RS256
  },
  {
   type: 'public-key',
   alg: -37, // PS256
  },
 ],
 authenticatorSelection: {
  userVerification: 'preferred', // Do you want to use biometrics or a pin?
  residentKey: 'required', // Create a resident key e.g. passkey
 },
 attestation: 'indirect', // indirect, direct, or none
 timeout: 60_000,
};

// Create the credential through the Authenticator
const credential = await navigator.credentials.create({
 publicKey: options
});

// Our main attestation response. See:
const attestation = credential.response as AuthenticatorAttestationResponse;

// Now send this information off to the Relying Party
// An unencoded example payload with most of the useful information
const payload = {
 kid: credential.id,
 clientDataJSON: attestation.clientDataJSON,
 attestationObject: attestation.attestationObject,
 pubkey: attestation.getPublicKey(),
 coseAlg: attestation.getPublicKeyAlgorithm(),
};
The clientDataJSON needs to be decoded and parsed. It contains fields that the server must verify: the challenge string sent during registration, the origin of the requesting site, and the type value, which should be webauthn.create.
type DecodedClientDataJSON = {
 challenge: string,
 origin: string,
 type: string
};

const decoded: DecodedClientDataJSON = JSON.parse(new TextDecoder().decode(attestation.clientDataJSON));
const {
 challenge,
 origin,
 type
} = decoded;
The attestationObject is CBOR-encoded. You'll need a decoder such as cbor-x to inspect it. For passkeys, the fmt field will typically be "none". Other values like "packed" appear with hardware authenticators and require signature verification steps that are beyond the basic passkey flow.
import { decode } from 'cbor-x/decode';

enum DecodedAttestationObjectFormat {
  none = 'none',
  packed = 'packed',
}
type DecodedAttestationObjectAttStmt = {
  x5c?: Uint8Array[];
  sig?: Uint8Array;
};

type DecodedAttestationObject = {
  fmt: DecodedAttestationObjectFormat;
  authData: Uint8Array;
  attStmt: DecodedAttestationObjectAttStmt;
};

const decodedAttestationObject: DecodedAttestationObject = decode(
 new Uint8Array(attestation.attestationObject)
);

const {
 fmt,
 authData,
 attStmt,
} = decodedAttestationObject;
Within the decoded object, the authData buffer follows a specific structure:
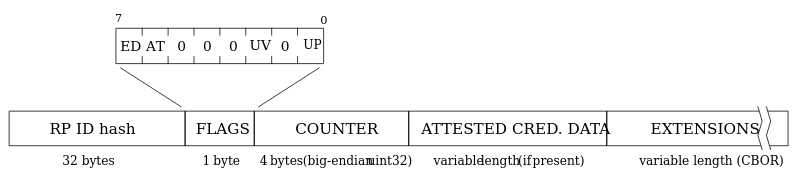
The rpIdHash (SHA-256 of the relying party ID), the flags byte (indicating user presence and verified credentials), and the signCount (a counter that increments with each use) are all located in this buffer. For the public key itself, calling getPublicKey() returns an SPKI-encoded key, which is not the same as the COSE key format stored inside attestedCredentialData. The SPKI format integrates cleanly with the Web Crypto importKey function, making the subsequent signature verification step much simpler.
// Example of importing attestation public key directly into Web Crypto
const pubkey = await crypto.subtle.importKey(
  'spki',
  attestation.getPublicKey(),
  { name: "ECDSA", namedCurve: "P-256" },
  true,
  ['verify']
);
The cryptographic algorithm for the key is identified by its COSE algorithm number. You can retrieve this via getPublicKeyAlgorithm(). For example, a return value of -7 corresponds to the ES256 algorithm (ECDSA with P-256). ECDSA-based algorithms are generally preferred for passkeys because their key sizes are much smaller than RSA keys, and web browsers support the common variants natively in Web Crypto.
| Name | Value | Description |
|---|---|---|
| ES512 | -36 | ECDSA w/ SHA-512 |
| ES384 | -35 | ECDSA w/ SHA-384 |
| ES256 | -7 | ECDSA w/ SHA-256 |
| RS512 | -259 | RSASSA-PKCS1-v1_5 using SHA-512 |
| RS384 | -258 | RSASSA-PKCS1-v1_5 using SHA-384 |
| RS256 | -257 | RSASSA-PKCS1-v1_5 using SHA-256 |
| PS512 | -39 | RSASSA-PSS w/ SHA-512 |
| PS384 | -38 | RSASSA-PSS w/ SHA-384 |
| PS256 | -37 | RSASSA-PSS w/ SHA-256 |
After registration, the client sends a response to the server containing the essential data. The credential ID (kid) deserves careful capture because it will serve as the primary key in your public_keys table.
type AttestationCredentialPayload = {
  kid: string;
  clientDataJSON: string;
  attestationObject: string;
  pubkey: string;
  coseAlg: number;
};

const payload: AttestationCredentialPayload = {
  kid: credential.id,
  clientDataJSON: safeByteEncode(attestation.clientDataJSON),
  attestationObject: safeByteEncode(attestation.attestationObject),
  pubkey: safeByteEncode(attestation.getPublicKey() as ArrayBuffer),
  coseAlg: attestation.getPublicKeyAlgorithm(),
};
The server-side verification for registration checks several points:
- The
clientDataJSONcontains the samechallengethat was issued. - The
originmatches the relying party, and thetypeiswebauthn.create. - The
attestationObjecthas anfmtofnone, the correctrpIdHashinauthData, plus expectedflagsand asignCount.
At the very least, store the public key, the COSE algorithm, and the credential ID. Keeping the full attestationObject is also valuable if you later need more verification data. For passkeys, the signCount typically remains at 0000; a nonzero value appears in scenarios with other WebAuthn authenticator types.
The Assertion Phase
During login, the browser returns an AuthenticatorAssertionResponse from navigator.credentials.get. This object contains the clientDataJSON, the authenticatorData, and a cryptographic signature.
const { challenge } = await (await fetch("/assertion/generate")).json(); // Server call mock to get a random challenge

const options = {
  challenge: new TextEncoder().encode(challenge),
  rpId: window.location.host,
  timeout: 60_000,
};

// Sign the challenge with our private key via the Authenticator
const credential = await navigator.credentials.get({
  publicKey: options,
  mediation: 'optional',
});

// Our main assertion response. See: <https://developer.mozilla.org/en-US/docs/Web/API/AuthenticatorAssertionResponse>
const assertion = credential.response as AuthenticatorAssertionResponse;

// Now send this information off to the Relying Party
// An example payload with most of the useful information
const payload = {
  kid: credential.id,
  clientDataJSON: safeByteEncode(assertion.clientDataJSON),
  authenticatorData: safeByteEncode(assertion.authenticatorData),
  signature: safeByteEncode(assertion.signature),
};
The assertion clientDataJSON is structured identically to the attestation version. You decode and parse it to check the same challenge and origin, but now the type should be webauthn.get.
type DecodedClientDataJSON = {
  challenge: string,
  origin: string,
  type: string
};

const decoded: DecodedClientDataJSON = JSON.parse(new TextDecoder().decode(assertion.clientDataJSON));
const {
  challenge,
  origin,
  type
} = decoded;
The authenticatorData here closely mirrors the authData from the attestation phase, except it no longer contains the attestedCredentialData block or extensions. You still need to check the rpIdHash, the flags, and the signCount.
| Name | Length (bytes) | Description |
|---|---|---|
rpIdHash | 32 | This is a SHA-256 hash of the origin, e.g., my.passkeys.com. |
flags | 1 | Flags that determine multiple pieces of information (specification). |
signCount | 4 | This should always be 0000 for passkeys, just as it should be for authData. |
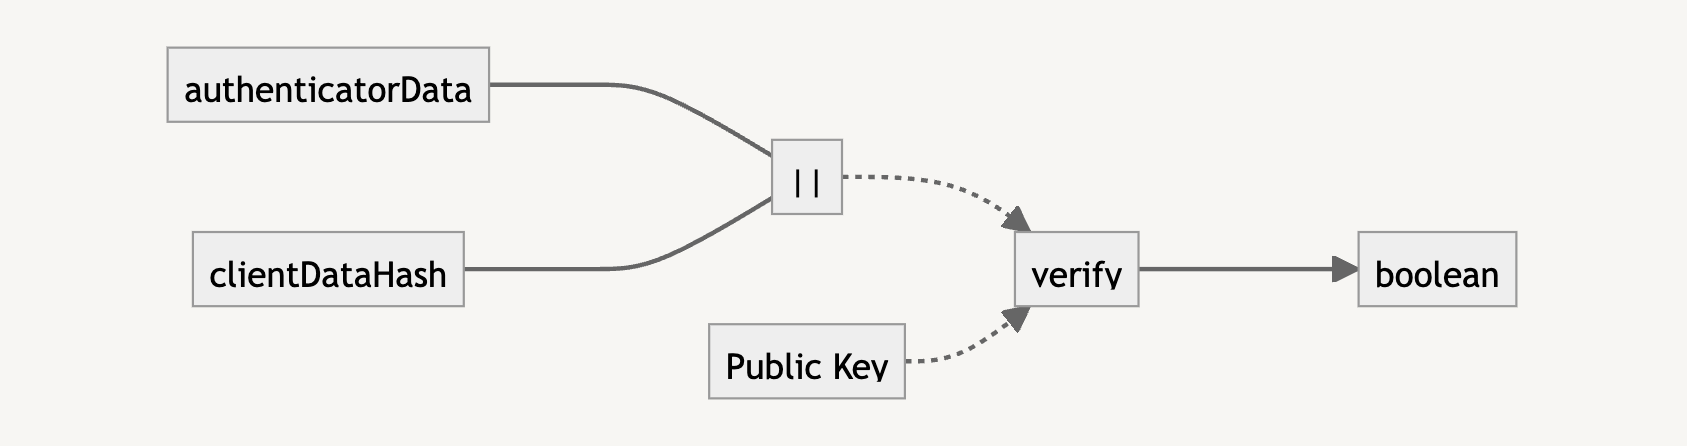
The signature proves that the user possesses the private key. It's generated over the concatenation of two items: the authenticatorData and the clientDataHash (the SHA-256 digest of clientDataJSON).
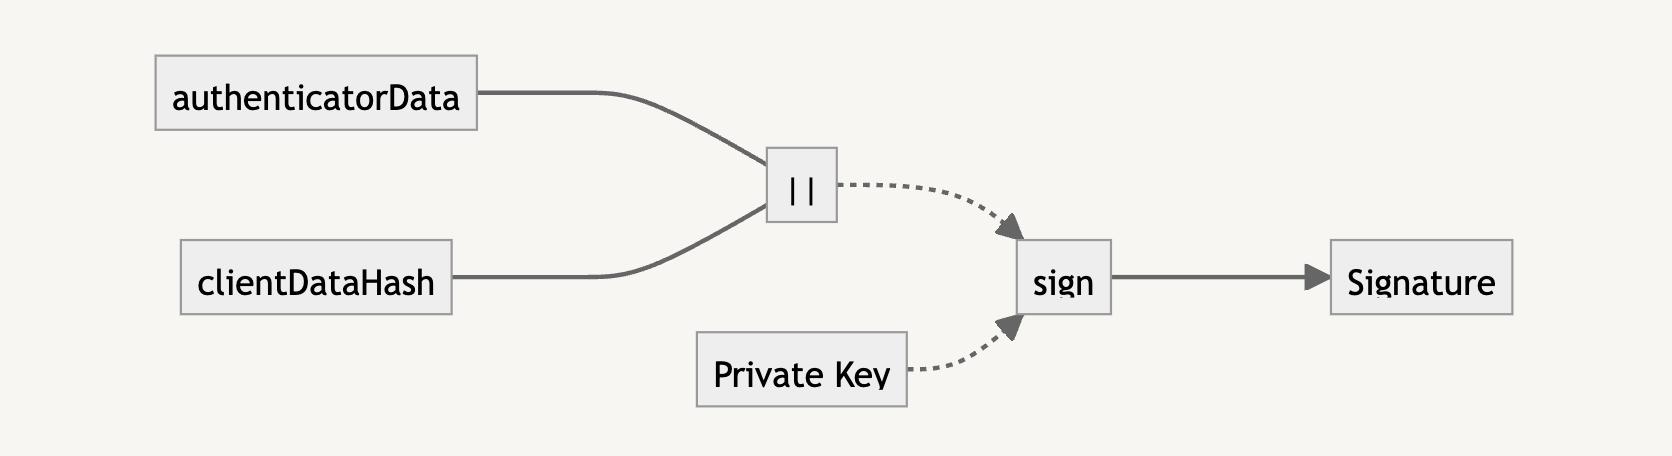
To verify, you recreate that same concatenation on the server side and then use that material together with the stored public key to validate the signature. If the verification returns true, authentication succeeds.
const clientDataHash = await crypto.subtle.digest(
  'SHA-256',
  assertion.clientDataJSON
);
// For concatBuffer see: <https://github.com/nealfennimore/passkeys/blob/main/src/utils.ts#L31>
const data = concatBuffer(
  assertion.authenticatorData,
  clientDataHash
);

// NOTE: the signature from the assertion is in ASN.1 DER encoding. To get it working with Web Crypto
//We need to transform it into r|s encoding, which is specific for ECDSA algorithms)
//
// For fromAsn1DERtoRSSignature see: <https://github.com/nealfennimore/passkeys/blob/main/src/crypto.ts#L60>'
const isVerified = await crypto.subtle.verify(
  { name: 'ECDSA', hash: 'SHA-256' },
  pubkey,
  fromAsn1DERtoRSSignature(signature, 256),
  data
);
The client then sends the assertion payload to the server:
type AssertionCredentialPayload = {
  kid: string;
  clientDataJSON: string;
  authenticatorData: string;
  signature: string;
};

const payload: AssertionCredentialPayload = {
  kid: credential.id,
  clientDataJSON: safeByteEncode(assertion.clientDataJSON),
  authenticatorData: safeByteEncode(assertion.authenticatorData),
  signature: safeByteEncode(assertion.signature),
};
The server-side verification process is straightforward:
- Look up the
kidto retrieve the stored public key and its algorithm. - Check the
clientDataJSONfor the correctchallenge, a matchingorigin, and thetypeofwebauthn.get. - Inspect
authenticatorDatafor a validrpIdHash,flags, andsignCount. - Recreate the verification data and check the
signatureagainst the stored public key.
If every step passes, the user is authenticated and gets access to the account.
What Pulls Passwords Forward
Passkeys won't kill passwords overnight. Expect passwords to linger for quite some time. That said, passkey adoption is already visible across many widely used applications. Cryptography-based authentication has existed in other forms, such as the SQRL scheme, but passkeys have become the industry-standard approach, and you can expect their footprint to keep growing.
Given the phishing resistance and solid security gains that come with passkeys, understanding how they work underneath is worthwhile.