

Why Passwords Aren't Enough
Password-based authentication has a fundamental weakness: it relies entirely on something the user knows. Users forget passwords and write them down, reuse the same credentials across services, or choose weak passwords for convenience. Any of these habits can compromise an account regardless of how secure the application itself is.
One-time passwords (OTPs) address these gaps. An OTP is valid for a single login session or transaction and expires after a short period. Since each code can only be used once, a stolen OTP is useless to an attacker. OTPs can either replace traditional passwords or reinforce them through two-factor authentication (2FA), where the user must provide both something they know (a password) and something they own (a phone or email account).
What We're Building
In this tutorial, you'll build a full-stack Express.js application that combines password-based login with OTP verification via Twilio Verify. The application follows the Model-View-Controller (MVC) architecture, uses MongoDB for data storage, and renders views with EJS templating.
You'll learn how to:
- Build an Express.js server from scratch
- Connect MongoDB to your application
- Implement authentication using Passport.js
- Protect routes with Twilio Verify OTPs
Understanding Authentication vs. Authorization
Before writing code, it's important to distinguish between two concepts that are often confused. Authentication is the process of identifying who a user is — verifying they have an account in your system. Authorization determines what that user is permitted to do once authenticated.
Authentication: Who are you?
Authorization: What can you do?
Authorization depends entirely on authentication. There's no authorization without first confirming the user's identity. The most common authentication method is a username and password combination, which is exactly where our application starts.
Project Setup
Create a project directory to get started:
mkdir authWithTwilioVerify
Inside the authWithTwilioVerify directory, initialize a package.json file to track project dependencies and configuration:
cd authWithTwilioVerify
npm init -y
Following the MVC pattern, create folders for each architectural layer:
mkdir public controllers views routes config models
The MVC structure separates concerns and keeps code organized:
Controllers— houses the request handlersModels— holds database schemas and modelsPublic— contains static assets like CSS and imagesViews— templates rendered in the browserRoutes— defines the application's endpointsConfig— stores application-specific settings
This separation makes the codebase easier to navigate and maintain, and since MVC is a widely adopted pattern, other developers can quickly understand your project structure.
Installing Dependencies
Several packages are needed to build the application:
express— provides a clean interface for handling routes and requestsexpress-session— manages user sessionsconnect-flash— displays status messages to usersnodemon— automatically restarts the server on file changes
Install them with:
npm install nodemon -D
Add a start script to package.json so the server runs with nodemon:
"scripts": {
    "dev": "nodemon index"
    },
Now create your entry point:
npm install express express-session connect-flash --save
In the index.js file, require the installed packages and configure them for your application:
const path = require('path')
const express = require('express');
const session = require('express-session')
const flash = require('connect-flash')

const port = process.env.PORT || 3000
const app = express();

app.use('/static', express.static(path.join(__dirname, 'public')))
app.use(session({
    secret: "please log me in",
    resave: true,
    saveUninitialized: true
    }
));

app.use(express.json())
app.use(express.urlencoded({ extended: true }))

// Connect flash
app.use(flash());

// Global variables
app.use(function(req, res, next) {
    res.locals.success_msg = req.flash('success_msg');
    res.locals.error_msg = req.flash('error_msg');
    res.locals.error = req.flash('error');
    res.locals.user = req.user
    next();
});

//define error handler
app.use(function(err, req, res, next) {
    res.render('error', {
        error : err
    })
})

//listen on port
app.listen(port, () => {
    console.log(`app is running on port ${port}`)
});
How the Server Configuration Works
The code above uses the app.use() function to register middleware. Middleware functions receive the request object, response object, and a next() callback. They can inspect or modify the request and response cycle before passing control to the next middleware in the pipeline.
Most packages that have access to the application's request and response objects and can alter those states are used as middleware. In essence, middleware adds functionality to the Express application.
Think of it as handing the application state to a middleware function, letting it do its work, then calling next() to move to the subsequent handler.
Finally, the server is configured to listen on port 3000. Run the application with:
npm run dev
If you see app is running on port 3000 in the terminal, the server is up and running. Next, we'll connect MongoDB and build out the models, views, and authentication flow.
Modeling Users With Mongoose
MongoDB stores data as JSON documents, which makes it easy for a Node.js application to work with the data as JavaScript objects. After installing MongoDB, we can integrate it into our Express app with Mongoose, an object data mapper (ODM) that wraps the native MongoDB driver with a more convenient API.
npm install mongoose --save
After requiring Mongoose in index.js, the mongoose.connect() function establishes a connection using a URI in the format mongodb://localhost:27017/{database_name}. That host and port are the MongoDB defaults; the database name is up to us. Mongoose connects to the named database if it exists, and creates it if it does not. Because connect() returns a promise, we log the outcome in then() and catch() handlers to confirm the connection succeeded.
const mongoose = require('mongoose')

const app = express()

//connect to mongodb
mongoose.connect('mongodb://localhost:27017/authWithTwilio',
{
    useNewUrlParser: true,
    useUnifiedTopology: true
})
.then(() => {
    console.log(`connected to mongodb`)
})
.catch(e => console.log(e))
A Mongoose schema defines the shape of our documents. In our user model we declare name, username, password, phonenumber, and email — all required. If any of these fields are missing, Mongoose rejects the save operation.
cd models
touch user.js
const mongoose = require('mongoose');

const userSchema = new mongoose.Schema({
    name : {
        type: String,
        required: true
    },
    username : {
        type: String,
        required: true
    },
    password : {
        type: String,
        required: true
    },
    phonenumber : {
        type: String,
        required: true
    },
    email : {
        type: String,
        required: true
    },
    verified: Boolean
})

module.exports = mongoose.model('user', userSchema)
Hashing Passwords With bcryptjs
Warning: never store users’ passwords as plain text. Always encrypt the passwords before pushing them to the database.
If an attacker gains access to the database, hashed passwords at least resist casual inspection. We use bcryptjs for this purpose.
npm install bcryptjs
In models/user.js, the userSchema.pre('save', callback) Mongoose hook runs before a document is persisted. Inside that callback we generate a salt with bcrypt.genSalt() and hash the password with bcrypt.hash(). On success we assign the result to this.password; on failure we reject the promise.
Mongoose also lets us attach methods to a schema via schema.methods.method_name. Our validPassword method takes a plain-text password and uses bcrypt.compare() to check it against the stored hash. This is convenient because validation becomes a simple property call like User.validPassword(password), returning true or false.
//after requiring mongoose
const bcrypt = require('bcryptjs')

//before module.exports
//hash password on save
userSchema.pre('save', async function() {
    return new Promise( async (resolve, reject) => {
        await bcrypt.genSalt(10, async (err, salt) => {
            await bcrypt.hash(this.password, salt, async (err, hash) => {
                if(err) {
                    reject (err)
                } else {
                    resolve (this.password = hash)
                }
            });
        });
    })
})
userSchema.methods.validPassword = async function(password) {
    return new Promise((resolve, reject) => {
        bcrypt.compare(password, this.password, (err, res) => {
            if(err) {
                reject (err)
            }
            resolve (res)
        });
    })
}
This workflow shows the benefit of Mongoose over raw MongoDB: a schema keeps documents consistent, while built-in and custom methods give us a tidy interface for common operations.
Express is to Node, as Mongoose is to MongoDB.
Views With EJS and Semantic UI
For our front end, we use the EJS templating engine directly with Express, which means we can render HTML pages without a separate SPA framework. To display a page, a controller calls res.render(). Passing data works by adding a second argument — for example, res.render('dashboard', { user }). Inside a template, <%= user.username %> prints that value, while the control syntax <% %> runs conditionals and loops. In short, EJS embeds JavaScript logic in HTML.
In index.js we bring in express-ejs-layouts.
npm install ejs express-ejs-layouts --save
//after requiring connect-flash
const expressLayouts = require('express-ejs-layouts')

//after the mongoose.connect logic
app.use(expressLayouts);
app.set('view engine', 'ejs');
cd views
touch layout.ejs
The views/layout.ejs file acts like an index.html shell: it holds the shared stylesheets and scripts, and the body placeholder renders every page-specific view. We style everything with Semantic UI.
<!DOCTYPE html>
<html lang="en">
    <head>
    <meta charset="UTF-8" />
    <meta name="viewport" content="width=device-width, initial-scale=1.0" />
    <meta http-equiv="X-UA-Compatible" content="ie=edge" />
        <link rel="stylesheet" href="https://use.fontawesome.com/releases/v5.6.3/css/all.css" integrity="sha384-UHRtZLI+pbxtHCWp1t77Bi1L4ZtiqrqD80Kn4Z8NTSRyMA2Fd33n5dQ8lWUE00s/" crossorigin="anonymous">
        <link rel="stylesheet" href="https://cdn.jsdelivr.net/npm/[email protected]/dist/semantic.min.css">
        <link rel="stylesheet" href="https://www.smashingmagazine.com/static/css/app.css">
        <link rel="stylesheet" href="https://www.smashingmagazine.com/static/css/intlTelInput.css">
    <title>Node js authentication</title>
    </head>
    <body>

    <div class="ui container">
        <%- body %>
    </div>
    <script
        src="https://code.jquery.com/jquery-3.3.1.slim.min.js"
        integrity="sha384-q8i/X+965DzO0rT7abK41JStQIAqVgRVzpbzo5smXKp4YfRvH+8abtTE1Pi6jizo"
        crossorigin="anonymous"
    ></script>
    <script src="https://cdn.jsdelivr.net/npm/[email protected]/dist/semantic.min.js"></script>
    </body>
</html>
Partials hold reusable markup so we write it once. They are analogous to components in a front-end framework: they keep the code DRY and easy to reuse. Our main example is a menu partial and a message partial file, both stored under /views/partials.
cd views
mkdir partials
cd partials
touch menu.ejs message.ejs
<div class="ui secondary  menu">
    <a class="active item" href="/">
        Home
    </a>
    <% if(locals.user) { %>
        <a class="ui item" href="https://www.smashingmagazine.com/users/dashboard">
        dashboard
        </a>
        <div class="right menu">
        <a class='ui item'>
            <%= user.username %>
        </a>
        <a class="ui item" href="https://www.smashingmagazine.com/users/logout">
            Logout
        </a>
        </div>
    <% } else {%>
        <div class="right menu">
        <a class="ui item" href="https://www.smashingmagazine.com/users/signup">
            Sign Up
        </a>
        <a class="ui item" href="https://www.smashingmagazine.com/users/login">
            Login
        </a>
        </div>
    <% } %>
    </div>
<% if(typeof errors != 'undefined'){ %> <% errors.forEach(function(error) { %>
    <div class="ui warning message">
        <i class="close icon"></i>
        <div class="header">
            User registration unsuccessful
        </div>
        <%= error.msg %>
    </div>
<% }); %> <% } %> <% if(success_msg != ''){ %>
<div class="ui success message">
    <i class="close icon"></i>
    <div class="header">
        Your user registration was successful.
    </div>
    <%= success_msg %>
</div>
<% } %> <% if(error_msg != ''){ %>
<div class="ui warning message">
    <i class="close icon"></i>
    <div class="header">

    </div>
    <%= error_msg %>
</div>
<% } %> <% if(error != ''){ %>
<div class="ui warning message">
    <i class="close icon"></i>
    <div class="header">

    </div>
    <%= error %>
</div>
<% } %>
Page Views
Our application needs views for the dashboard, an error state, the landing page, authentication forms, and the OTP verification step. Each page starts by including the menu partial to get consistent navigation.
<%- include('./partials/menu') %>
<h1>
    DashBoard
</h1>
<h1>Error Page</h1>
<p><%= error %></p>
<%- include('./partials/menu') %>
<h1>
    Welcome to the Home Page
</h1>
<div class="ui very padded text container segment">
    <%- include ('./partials/message') %>
    <h3>
        Login Form
    </h3>

    <form class="ui form" action="/users/login" method="POST">
    <div class="field">
        <label>Email</label>
        <input type="email" name="email" placeholder="Email address">
    </div>
    <div class="field">
        <label>Password</label>
        <input type="password" name="password" placeholder="Password">
    </div>
    <button class="ui button" type="submit">Login</button>
    </form>
</div>
The verify page collects the one-time code that the user receives.
<%- include ('./partials/message') %>
<h1>Verify page</h1>
<p>please verify your account</p>
<form class="ui form" action="/users/verify" method="POST">
    <div class="field">
        <label>verification code</label>
        <input type="text" type="number" name="verifyCode" placeholder="code">
    </div>
    <button class="ui button" type="submit">Verify</button>
</form>
<br>
<a class="ui button" href="https://www.smashingmagazine.com/users/resend">Resend Code</a>
Sign-up needs to capture mobile numbers with their country codes, so we rely on intl-tel-input for country selection and number validation. That means a few asset files must be moved from node_modules into our public folders:
Create
css,js, andimgdirectories insidepublic.Copy
intlTelInput.cssfromnode_modules\intl-tel-input\build\css\intopublic/css.Copy
intlTelInput.jsandutils.jsfromnode_modules\intl-tel-input\build\js\intopublic/js.Copy
flags.pngand[email protected]fromnode_modules\intl-tel-input\build\img\intopublic/img.
cd public
mkdir css js img
cd public
touch app.css
Then app.css gets the custom styles for the forms and layout.
.iti__flag {background-image: url("/static/img/flags.png");}

@media (-webkit-min-device-pixel-ratio: 2), (min-resolution: 192dpi) {
    .iti__flag {background-image: url("/static/img/[email protected]");}
}
.hide {
    display: none
}
.error {
    color: red;
    outline: 1px solid red;
}
.success{
    color: green;
}
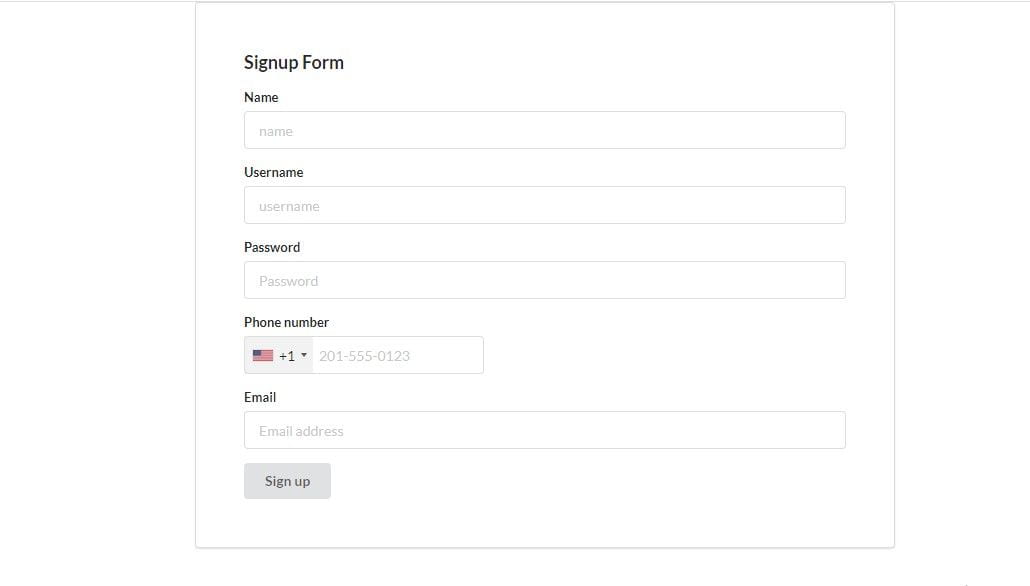
Finally, the signup.ejs template puts the full form together.
<div class="ui very padded text container segment">
    <%- include ('./partials/message') %>
    <h3>
        Signup Form
    </h3>

    <form class="ui form" action="/users/signup" method="POST">
    <div class="field">
        <label>Name</label>
        <input type="text" name="name" placeholder="name">
    </div>
    <div class="field">
        <label>Username</label>
        <input type="text" name="username" placeholder="username">
    </div>
    <div class="field">
        <label>Password</label>
        <input type="password" name="password" placeholder="Password">
    </div>
    <div class="field">
        <label>Phone number</label>
        <input type="tel" id='phone'>
        <span id="valid-msg" class="hide success">✓ Valid</span>
        <span id="error-msg" class="hide error"></span>
    </div>
    <div class="field">
        <label>Email</label>
        <input type="email" name="email" placeholder="Email address">
    </div>

    <button class="ui button" type="submit">Sign up</button>
    </form>
</div>
<script src="https://www.smashingmagazine.com/static/js/intlTelInput.js"></script>
<script>
    const input = document.querySelector("#phone")
    const errorMsg = document.querySelector("#error-msg")
    const validMsg = document.querySelector("#valid-msg")

    const errorMap = ["Invalid number", "Invalid country code", "Too short", "Too long", "Invalid number"];
    const iti = window.intlTelInput(input, {
        separateDialCode: true,
        autoPlaceholder: "aggressive",
        hiddenInput: "phonenumber",
        utilsScript: "/static/js/utils.js?1590403638580" // just for formatting/placeholders etc
    });
    var reset = function() {
        input.classList.remove("error");
        errorMsg.innerHTML = "";
        errorMsg.classList.add("hide");
        validMsg.classList.add("hide");
    };
    // on blur: validate
    input.addEventListener('blur', function() {
        reset();
        if (input.value.trim()) {
        if (iti.isValidNumber()) {
            validMsg.classList.remove("hide");
        } else {
            input.classList.add("error");

            var errorCode = iti.getValidationError();
            errorMsg.innerHTML = errorMap[errorCode];
            errorMsg.classList.remove("hide");
        }
        }
    });
    // on keyup / change flag: reset
    input.addEventListener('change', reset);
    input.addEventListener('keyup', reset);

    document.querySelector('.ui.form').addEventListener('submit', (e) => {
        if(!iti.isValidNumber()){
        e.preventDefault()
        }
    })
</script>
Adding Passport For Local Authentication
Instead of hand-rolling authentication logic, we use the passport package with its local-strategy for username/password checks. Passport is a good fit here because its strategy-based design makes it straightforward to swap in other methods (like JWT) later without rewriting the core auth flow.
npm install passport passport-local
In index.js, register the application-level middleware that Passport needs:
//after requiring express
const passport = require('passport')

//after requiring mongoose
const { localAuth } = require('./config/passportLogic')

//after const app = express()
localAuth(passport)

//after app.use(express.urlencoded({ extended: true }))
app.use(passport.initialize());
app.use(passport.session());
passport.initialize() sets Passport up, and passport.session() tells it to use session-based authentication. The localAuth() call wires in the configuration we define next.
Create the config folder with the necessary files:
mkdir config
touch  passportLogic.js middleware.js
In config/passportLogic.js, we define the local strategy:
//file contains passport logic for local login
const LocalStrategy = require('passport-local').Strategy;
const mongoose = require('mongoose')
const User = require('../models/user')
const localAuth = (passport) => {
    passport.use(
        new LocalStrategy(
        { usernameField: 'email' }, async(email, password, done) => {
            try {
                const user = await User.findOne({ email: email })

                if (!user) {
                    return done(null, false, { message: 'Incorrect email' });
                }
                //validate password
                const valid = await user.validPassword(password)
                if (!valid) {
                    return done(null, false, { message: 'Incorrect password.' });
                }
                return done(null, user);
            } catch (error) {
                return done(error)
            }
        }
    ));
    passport.serializeUser(function(user, done) {
        done(null, user.id);
    });

    passport.deserializeUser(function(id, done) {
        User.findById(id, function(err, user) {
            done(err, user);
        });
    });
}
module.exports = {
    localAuth
}
The localAuth() function calls passport.use() with a LocalStrategy() instance. We set usernameField to email, then look up a user by that email. If no user is found, we return an error via the done() callback. If a user exists, we validate the password with the validPassword method on the User object and return the user on success with done(null, user).
The accompanying passport.serializeUser() and passport.deserializeUser() calls handle moving user instances to and from the session.
In config/middleware.js, define the route-level guards:
//check if a user is verified
const isLoggedIn = async(req, res, next) => {
    if(req.user){
        return next()
    } else {
        req.flash(
            'error_msg',
            'You must be logged in to do that'
        )
        res.redirect('/users/login')
    }
}
const notLoggedIn = async(req, res, next) => {
    if(!req.user) {
        return next()
    } else{
        res.redirect('back')
    }
}

module.exports = {
    isLoggedIn,
    notLoggedIn
}
isLoggedIn and notLoggedIn restrict access to specific routes. Route-level middleware works per-route for protection and authorization, whereas application-level middleware (like passport.session()) applies to the whole app.
Sign-Up And Login Controllers
cd controllers
mkdir signUpController.js loginController.js
The sign-up controller in signUpController.js follows this flow:
- Validate the submitted credentials.
- Check the database for an existing user with that email or phone number.
- Return an error if a match exists.
- Otherwise, create the new user and redirect to the login page.
const mongoose = require('mongoose')
const User = require('../models/user')

//sign up Logic
const getSignup = async(req, res, next) => {
    res.render('signup')
}
const createUser = async (req, res, next) => {
    try {
        const { name, username, password, phonenumber, email} = await req.body
        const errors = []
        const reRenderSignup = (req, res, next) => {
            console.log(errors)
            res.render('signup', {
                errors,
                username,
                name,
                phonenumber,
                email
            })
        }
        if( !name || !username || !password || !phonenumber || !email ) {
            errors.push({ msg: 'please fill out all fields appropriately' })
            reRenderSignup(req, res, next)
        } else {
            const existingUser = await User.findOne().or([{ email: email}, { phonenumber : phonenumber }])
            if(existingUser) {
            errors.push({ msg: 'User already exists, try changing your email or phone number' })
            reRenderSignup(req, res, next)
            } else {
                const user = await User.create(
                    req.body
                )
                req.flash(
                    'success_msg',
                    'You are now registered and can log in'
                );
                res.redirect('/users/login')
            }

        }
    } catch (error) {
        next(error)
    }
}
module.exports = {
    createUser,
    getSignup
}
In loginController.js, the logic is:
- Use
passport.authenticate()with the local scope (email/password) to check credentials. - On failure, return an error message and redirect back to the login route.
- On success, log the user in via
req.logIn, triggersendVerification(), and redirect to the verify route.
const mongoose = require('mongoose')
const passport = require('passport')
const User = require('../models/user')
const { sendVerification } = require('../config/twilioLogic')
const getLogin = async(req, res) => {
    res.render('login')
}
const authUser = async(req, res, next) => {
    try {
        passport.authenticate('local', function(err, user, info) {
            if (err) {
                return next(err)
            }
            if (!user) {
                req.flash(
                    'error_msg',
                    info.message
                )
                return res.redirect('/users/login')
            }
            req.logIn(user, function(err) {
                if (err) {
                    return next(err)
                }
                sendVerification(req, res, req.user.phonenumber)
                res.redirect('/users/verify');
            });
        })(req, res, next);
    } catch (error) {
        next(error)
    }

}
module.exports = {
    getLogin,
    authUser
}
The sendVerification() function doesn't work yet — we need Twilio to implement it.
Enforcing Verification With Twilio Verify
To get started with Twilio Verify, create an account, open the dashboard, start a new project, and follow the setup steps.
Install the Twilio SDK for Node.js:
npm install twilio
We also install dotenv to manage environment variables:
npm install dotenv
Create a .env file at the project root for credentials. Add a .gitignore file so those secrets and node_modules stay out of version control:
node_modules
.env
From the Twilio console, copy your ACCOUNT SID, AUTH TOKEN, and trial phone number, then set them in .env:
TWILIO_ACCOUNT_SID = <YOUR_ACCOUNT_SID>
TWILIO_AUTH_TOKEN = <YOUR_AUTH_TOKEN>
TWILIO_PHONE_NUMBER = <TOUR_TWILIO_NUMBER>
Next, create config/twilioLogic.js:
cd cofig
touch twilioLogic.js
require('dotenv').config()
const twilio = require('twilio')
const client = twilio(process.env.TWILIO_ACCOUNT_SID, process.env.TWILIO_AUTH_TOKEN)
//create verification service
const createService = async(req, res) => {
    client.verify.services.create({ friendlyName: 'phoneVerification' })
        .then(service => console.log(service.sid))
}

createService();
Running the file logs your TWILIO_VERIFICATION_SID; copy it and add it to .env.
Since the Verify service is created only once, remove the createService() line from twilioLogic.js and add these functions:
//after createService function creation

//send verification code token
const sendVerification = async(req, res, number) => {

        client.verify.services(process.env.TWILIO_VERIFICATION_SID)
            .verifications
            .create({to: `${number}`, channel: 'sms'})
            .then( verification =>
                console.log(verification.status)
            );
}

//check verification token
const checkVerification = async(req, res, number, code) => {
    return new Promise((resolve, reject) => {
        client.verify.services(process.env.TWILIO_VERIFICATION_SID)
            .verificationChecks
            .create({to: `${number}`, code: `${code}`})
            .then(verification_check => {
                resolve(verification_check.status)
            });
    })
}
module.exports = {
    sendVerification,
    checkVerification
}
sendVerification is an async function that sends an OTP via SMS to the provided number. checkVerification is likewise async — it checks whether the submitted OTP matches what was sent.
Back in config/middleware.js, add two more route-level middlewares:
//after notLoggedIn function declaration

//prevents an unverified user from accessing '/dashboard'
const isVerified = async(req, res, next) => {
    if(req.session.verified){
        return next()
    } else {
        req.flash(
            'error_msg',
            'You must be verified to do that'
        )
        res.redirect('/users/login')
    }
}

//prevent verified User from accessing '/verify'
const notVerified = async(req, res, next) => {
    if(!req.session.verified){
        return next()
    } else {
        res.redirect('back')
    }
}

module.exports = {
    //after notLoggedIn
    isVerified,
    notVerified
}
isVerified and notVerified check the user verification state, restricting routes to verified users only.
cd controllers
touch verifyController.js
In verifyController.js, resendCode() re-sends the verification code. verifyUser calls checkVerification: when the status is approved, it sets verified on req.session to true. The req.session object is added to the request by express-session.
Defining The Routes
The application exposes these routes:
/user/login— user login/user/signup— registration/user/logout— logout/user/resend— resend verification code/user/verify— input verification code/user/dashboard— Twilio Verify-protected route
cd routes
touch user.js
const express = require('express')
const router = express.Router()
const { createUser, getSignup } = require('../controllers/signUpController')
const { authUser, getLogin } = require('../controllers/loginController')
const { loadVerify, verifyUser, resendCode } = require('../controllers/verifyController')
const { isLoggedIn, isVerified, notVerified, notLoggedIn } = require('../config/middleware')

//login route
router.route('/login')
    .all(notLoggedIn)
    .get(getLogin)
    .post(authUser)

//signup route
router.route('/signup')
    .all(notLoggedIn)
    .get(getSignup)
    .post(createUser)
//logout
router.route('/logout')
    .get(async (req, res) => {
        req.logout();
        res.redirect('/');
    })
router.route('/resend')
    .all(isLoggedIn, notVerified)
    .get(resendCode)
//verify route
router.route('/verify')
    .all(isLoggedIn, notVerified)
    .get(loadVerify)
    .post(verifyUser)
//dashboard
router.route('/dashboard')
    .all(isLoggedIn, isVerified)
    .get(async (req, res) => {
        res.render('dashboard')
    })

//export router
module.exports = router
router.route() defines the path, and .all([middleware]) applies the given middleware to every HTTP method for that route. The chain router.route('/login').all([middleware]).get(getController).post(postController) is equivalent to separate router.get() and router.post() calls with the same path and middleware — but keeps the route's logic together in one place.
Start the application with:
npm run dev
What’s Next
This tutorial covered building an Express app, wiring Passport for session-based authentication, and protecting routes with Twilio Verify.
Suggested next steps:
- Explore Passport with a JWT strategy.
- Apply this pattern to another application.
- Look into other Twilio products beyond Verify.