

Why Authentication Middleware Makes Sense
Rolling your own authentication for a React app starts simple but quickly becomes a burden. You need secure password storage, session management, social login integration, and role assignment — all while keeping pace with security best practices. Identity platforms like Okta handle that infrastructure so your team can focus on the application itself.
Okta is an enterprise-grade identity-as-a-service platform. It stores user data and authentication information in the cloud, manages access through an admin dashboard, and supports both cloud and on-premises applications. Core capabilities include the Okta Identity Engine for customizing authorization flows, single sign-on across devices, automated user provisioning through lifecycle hooks, and mobile device management from a central console.
For React developers, Okta works as an OAuth 2.0 authorization server. It issues tokens for authentication and authorization, and you can retrieve user data using the getUser method on OktaAuthService. When comparing identity providers, Okta's differentiation lies in enterprise features like its integration network, centralized administration, and advanced lifecycle management.
Setting Up an Okta Application
To get started, create an account on Okta and log in to the admin dashboard. From the "Applications" tab, click "Create App Integration." Choose "OpenID Connect" as the sign-in method, which provisions Okta's built-in sign-in widget (custom login flows are also possible). Select "Single-Page Application" as the application type and continue.
You'll then specify redirect URIs. For local development, set both sign-in and sign-out redirect URIs to localhost:3000. Once that's configured, you can control user authentication options from the Okta dashboard.
Bootstrapping the React Project
Create a new React application with Create React App using either npm or Yarn, then navigate into the project directory and start the development server.
Next, install the required Okta packages:
@okta/okta-react@okta/okta-signin-widget@okta/okta-auth-js
You'll also want dotenv for environment variables and styled-components for styling. Create a .env file in the project root with Okta credentials: a BASE_URL pointing to your Okta-hosted login domain and a CLIENT_ID available from the Okta dashboard under client credentials.
Configuring Okta in React
Create a config.js file in the project root: export an oktaAuthConfig object containing the issuer (your BASE_URL), the clientID from Okta, and the redirectUri matching the callback you set up in your dashboard.
Your React components interact with Okta through the useOktaAuth hook, which exposes the Okta state and an oktaAuth object. With it, you can call sign-in and sign-out methods on user action.
Building the Application Components
For the demo — a rent management system — we'll build components that render estate information. Only authenticated users should see occupant details.
The Navbar component lives at src/components/Navbar/Navbar.js. Use useOktaAuth to check authentication state: if the user isn't authenticated, show a login button that calls the Okta sign-in method; if they are, show a logout option. Style the navigation with the estate name and a link to the user profile.
Next, create a RoomCard component under components/RoomCard. This purely presentational component accepts props — the occupant name, room number, rent due date, and an image URL — and renders them inside a styled wrapper.
Define the estate data in a root-level data.js file as an array of occupant objects. To fetch user details from Okta, create a custom hook in a hooks/getUser.js file.
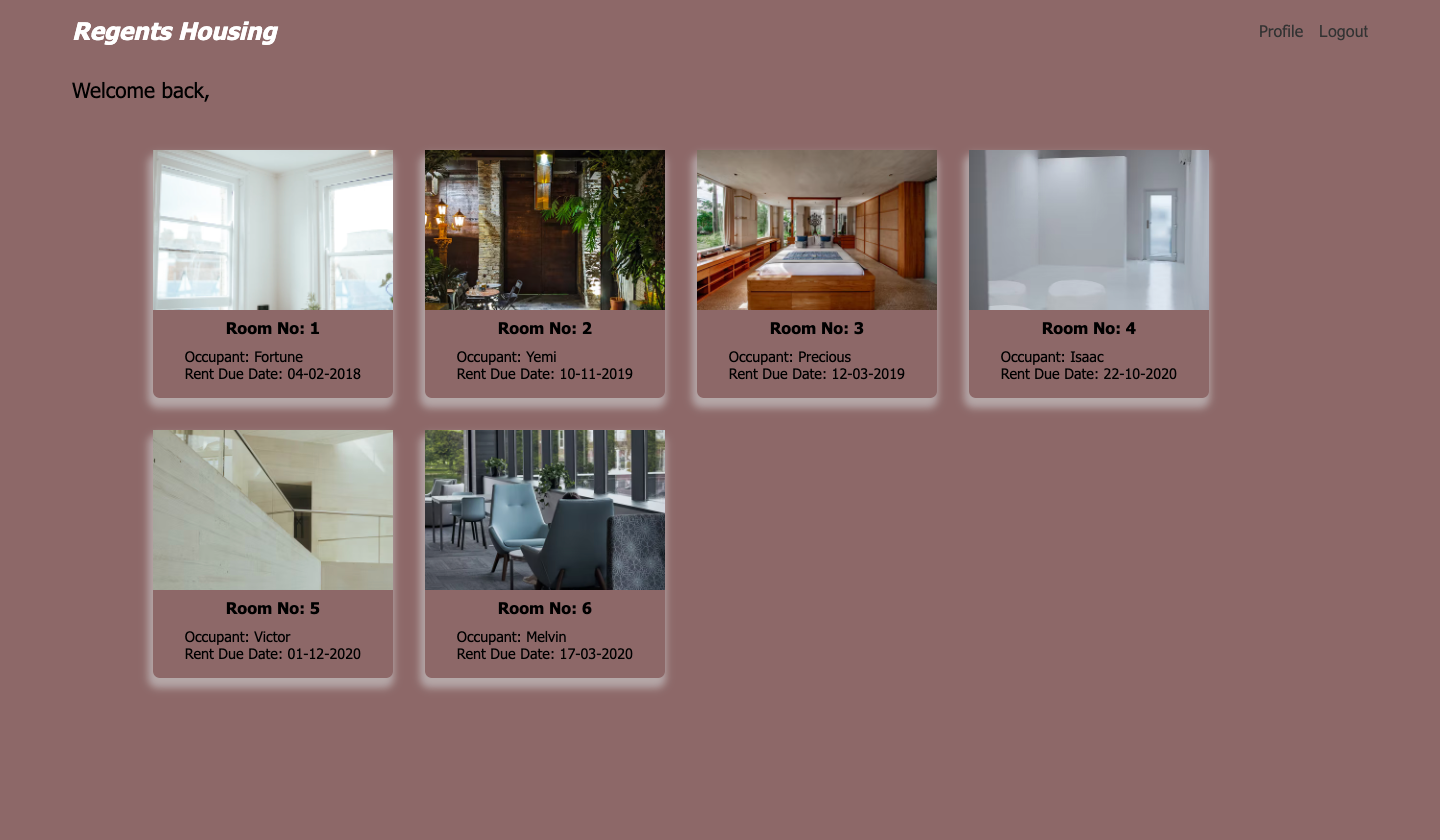
Finally, assemble the pages. Create a pages/home/index.js file. The home page uses useOktaAuth to check authentication; when logged in, it retrieves user details via the hook, shows a welcome message with the user's name, and renders the list of RoomCard components with occupant data. Once styled, the layout shows each occupant's card with room number, name, and rent due date.
Profile Routing and Access Control
With the core authentication flow in place, the next step is building a profile page that displays the logged-in user's details from Okta, including username, email address, name, and email verification status.
Create a Profile folder inside the pages directory with an index.js file:
import useAuthUser from "../hook/getUser";
import styled from "styled-components";

const Profile = () => {
        const userInfo = useAuthUser();

    return (
        <Container>
            <h2>My Profile Details</h2>
            <section>
                <ul>
                    <li>Username: {userInfo?.preferred_username}</li>
                    <li>Email: {userInfo?.email}</li>
                    <li>Full Name: {userInfo?.name}</li>
                    <li>Email Verified: {userInfo?.email_verified ? "Yes" : "No"} </li>
                    <li>Zone: {userInfo?.zoneinfo}</li>
                </ul>
            </section>
        </Container>
    );
};
This component fetches the user's data from Okta after login and presents it through a Wrapper component.
Add the corresponding styles for the page:
const Container = styled.section`
        max-width: 90%;
        margin: 2rem auto;
        & h2 {
            font-size: 1.3rem;
            font-weight: 500;
            margin-bottom: 1rem;
        }
        & ul {
            width: 50%;
            list-style: none;
            display: flex;
            flex-direction: column;
            background: #f2f3f5;
            padding: 1rem 2rem;
            & li {
                margin: 0.7rem 0;
                font-size: 1rem;
            }
        }
    `;

export default Profile;
Defining Application Routes
To control which users can access specific parts of the application, routes need to be explicitly defined. In this case, all access is granted to the primary user identified by the email address used during Okta app registration.
Create a Routes file in the root directory:
import { Route, Switch, useHistory } from "react-router-dom";
import { Security, SecureRoute, LoginCallback } from "@okta/okta-react";
import { OktaAuth, toRelativeUrl } from "@okta/okta-auth-js";
import Home from "./pages/home";
import Profile from "./pages/profile";
import { oktaAuthConfig } from "./config";
import Nav from "./components/Navbar/Nav";

const oktaAuth = new OktaAuth(oktaAuthConfig);
const Routes = () => {
    const history = useHistory();

    const restoreOriginalUri = async (_oktaAuth, originalUri) => {
        history.replace(toRelativeUrl(originalUri || "/", window.location.origin));
    };
    return (
        <Security oktaAuth={oktaAuth} restoreOriginalUri={restoreOriginalUri}>
            <Navbar />
            <Switch>
                <Route path="/" exact={true} component={Home} />
                <SecureRoute path="/profile" component={Profile} />
                <Route path="/login/callback" component={LoginCallback} />
            </Switch>
        </Security>
    );
};

export default Routes;
The Routes function redirects users to the application after successful login via the Okta sign-in widget. The Okta app is initialized with the provided config. The storage URL points to the Okta login endpoint, and Okta's security package manages authentication within the app.
The login route handles user authentication, followed by routes for Home, Profile, and Callback pages.
Wire these routes into App.js:
import { BrowserRouter } from "react-router-dom";
import Routes from "./Routes";

const App = () => {
        return (
                <BrowserRouter>
                   <Routes />
                </BrowserRouter>
        );
};

export default App;
With the Routes file imported, the application structure now includes all necessary permissions and navigation paths.
Summary
Authentication and authorization remain critical components of modern web applications. This walkthrough covered implementing Okta, an identity-as-a-service platform, for seamless user management within a React-based estate manager application. The complete project source is available on GitHub.
Further Reading
- Okta Documentation
- Add User Authentication to Your React App — Okta Developer
- Configuring Okta Authentication for React App — DataHub