

Bringing OCR to the Browser With Tesseract.js
Extracting text from images has long been a manual bottleneck. When users submit gift cards, scanned documents, or screenshots containing critical information, that data often has to be transcribed by hand because there's no practical way to process it programmatically. Optical Character Recognition (OCR) changes that, and with Tesseract.js, OCR can run entirely in the browser without a dedicated backend service.
OCR has a number of practical applications: moderating text embedded in user-submitted images, indexing images for search, making image content available to screen readers, and automating workflows such as gift card PIN verification. It also supports digitizing printed documents like cheques and certificates.
What Is Tesseract.js?
Tesseract.js is a JavaScript library that ports the original Tesseract OCR engine from C to JavaScript and WebAssembly, making OCR available directly in the browser. The engine was originally written in ASM.js and later ported to WebAssembly, with ASM.js still available as a fallback where WebAssembly isn't supported. It supports over 100 languages, automatic text orientation and script detection, and provides a simple interface for reading paragraphs, words, and character bounding boxes.
Tesseract itself has deep roots: Hewlett-Packard developed it as proprietary software in the 1980s, it was released as open source in 2005, and Google has sponsored its development since 2006. Version 4, released in October 2018, introduced a new OCR engine based on a neural network using Long Short-Term Memory (LSTM), which improved recognition accuracy.
Understanding the Tesseract API
Tesseract.js offers two usage patterns. The simplest approach uses the recognize method directly, which takes an image as its first argument, a language string as its second, and an optional logger function as its third:
Tesseract.recognize(
  image,language,
  {
    logger: m => console.log(m)
  }
)
.catch (err => {
  console.error(err);
})
.then(result => {
 console.log(result);
})
}
The image formats Tesseract supports are jpg, png, bmp, and pbm, which can be supplied as elements (img, video, or canvas), file objects from an <input>, blob objects, paths or URLs, or base64-encoded images.
Languages are specified as strings, such as eng, and multiple languages can be combined with a plus sign, as in eng+chi_tra. The language parameter determines which trained language data gets loaded for processing.
The logger function is called multiple times during processing and receives an object with workerId, jobId, status, and progress properties:
{ workerId: ‘worker-200030’, jobId: ‘job-734747’, status: ‘recognizing text’, progress: ‘0.9’ }
The progress property is a number between 0 and 1, representing the percentage of the recognition process completed. This makes it useful for implementing a progress bar or updating the UI during conversion.
The result object returned from recognize contains several properties, revealed by breaking down its structure:
{
  text: "I am codingnninja from Nigeria..."
  hocr: "<div class='ocr_page' id= ..."
  tsv: "1 1 0 0 0 0 0 0 1486 ..."
  box: null
  unlv: null
  osd: null
  confidence: 90
  blocks: [{...}]
  psm: "SINGLE_BLOCK"
  oem: "DEFAULT"
  version: "4.0.0-825-g887c"
  paragraphs: [{...}]
  lines: (5) [{...}, ...]
  words: (47) [{...}, {...}, ...]
  symbols: (240) [{...}, {...}, ...]
}
Each of these properties—text, lines, words, paragraphs, and symbols—has a bbox property with x/y coordinates of its bounding box. A confidence score is also included for each result component.
The second approach is more imperative, using a worker directly:
import { createWorker } from 'tesseract.js';

  const worker = createWorker({
  logger: m => console.log(m)
  });

  (async () => {
  await worker.load();
  await worker.loadLanguage('eng');
  await worker.initialize('eng');
  const { data: { text } } = await     worker.recognize('https://tesseract.projectnaptha.com/img/eng_bw.png');
 console.log(text);
 await worker.terminate();
})();
With this pattern, createWorker(options) sets up a web worker (or node child process) that runs the Tesseract engine. The worker's load() method loads the Tesseract core scripts, loadLanguage() loads the requested language data, and initialize() prepares everything for execution. After that, the recognize method processes the supplied image, and terminate() stops the worker and cleans up resources.
Building a Gift Card PIN Extractor
To demonstrate Tesseract.js in a real scenario, let's build an application that extracts a PIN from a scanned gift card. This addresses the manual processing bottleneck directly.
For testing, we'll use a gift card image that has realistic properties—textures or backgrounds that could interfere with OCR:
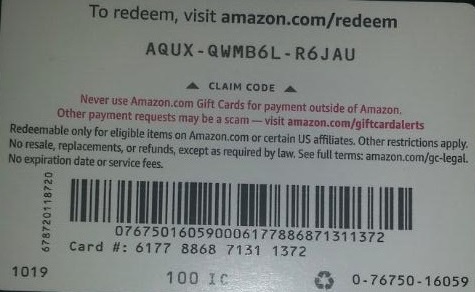
The target text to extract is AQUX-QWMB6L-R6JAU.
Project Setup
Tesseract.js works with vanilla JavaScript or any framework—React, Vue, Angular—so the choice is a matter of preference. For this project, we're using React with create-react-app:
npx create-react-app image-to-text
cd image-to-text
yarn add Tesseract.js
or, alternatively:
npm install tesseract.js
For installing Tesseract.js itself, yarn proved more reliable in this case. Either package manager will do, though the experience with npm was not as smooth. After installation, start the dev server:
yarn start
or:
npm start
If the browse doesn't open automatically, navigate to localhost:3000 manually.
Setting Up the Upload Form
Next, we modify the home page in App.js to include the upload form:
import { useState, useRef } from 'react';
import Tesseract from 'tesseract.js';
import './App.css';

function App() {
  const [imagePath, setImagePath] = useState("");
  const [text, setText] = useState("");

  const handleChange = (event) => {
    setImage(URL.createObjectURL(event.target.files[0]));
  }

  return (
    <div className="App">
      <main className="App-main">
        <h3>Actual image uploaded</h3>
        <img
           src={imagePath} className="App-logo" alt="logo"/>

          <h3>Extracted text</h3>
        <div className="text-box">
          <p> {text} </p>
        </div>
        <input type="file" onChange={handleChange} />
      </main>
    </div>
  );
}

export default App
The key function here is handleChange:
const handleChange = (event) => {
    setImage(URL.createObjectURL(event.target.files[0]));
  }
Within this function, URL.createObjectURL takes the selected file from event.target.files[0] and creates a URL reference usable by HTML elements like img, audio, and video. The setImagePath function stores that URL in the component state:
<img src={imagePath} className="App-logo" alt="image"/>
The image's src attribute is set to {imagePath}, which lets the user preview the selected image in the browser before processing begins.
From Image To Extracted Text
With the image path already captured, the next step is passing it to Tesseract.js. The handleClick function in App.js calls the Tesseract API with the image path, a language code, and a settings object.
import { useState} from 'react';
import Tesseract from 'tesseract.js';
import './App.css';

function App() {
  const [imagePath, setImagePath] = useState("");
  const [text, setText] = useState("");

  const handleChange = (event) => {
    setImagePath(URL.createObjectURL(event.target.files[0]));
  }

  const handleClick = () => {

    Tesseract.recognize(
      imagePath,'eng',
      {
        logger: m => console.log(m)
      }
    )
    .catch (err => {
      console.error(err);
    })
    .then(result => {
      // Get Confidence score
      let confidence = result.confidence

      let text = result.text
      setText(text);

    })
  }

  return (
    <div className="App">
      <main className="App-main">
        <h3>Actual imagePath uploaded</h3>
        <img
           src={imagePath} className="App-image" alt="logo"/>

          <h3>Extracted text</h3>
        <div className="text-box">
          <p> {text} </p>
        </div>
        <input type="file" onChange={handleChange} />
        <button onClick={handleClick} style={{height:50}}> convert to text</button>
      </main>
    </div>
  );
}

export default App
A button on the form invokes handleClick to trigger the conversion whenever a user clicks it.
<button onClick={handleClick} style={{height:50}}> convert to text</button>
On a successful conversion, the result exposes both confidence and text. The extracted text is stored in state via setText(text) and rendered inside a <p> {text} </p> element.
The confidence value indicates how accurate the conversion is, on a scale from 1 to 100, where 1 is the least accurate and 100 is the most. This score can help decide whether to trust an extracted result.
Three main factors influence confidence and overall accuracy: the quality and nature of the source document, the quality of the scan, and the processing capabilities of the Tesseract engine itself.
Adding a bit of styling to App.css makes the interface presentable.
.App {
  text-align: center;
}

.App-image {
  width: 60vmin;
  pointer-events: none;
}

.App-main {
  background-color: #282c34;
  min-height: 100vh;
  display: flex;
  flex-direction: column;
  align-items: center;
  justify-content: center;
  font-size: calc(7px + 2vmin);
  color: white;
}

.text-box {
  background: #fff;
  color: #333;
  border-radius: 5px;
  text-align: center;
}
First Test And Browser Differences
Running the first test on a dark gift card image produced a result with a confidence level of 64.
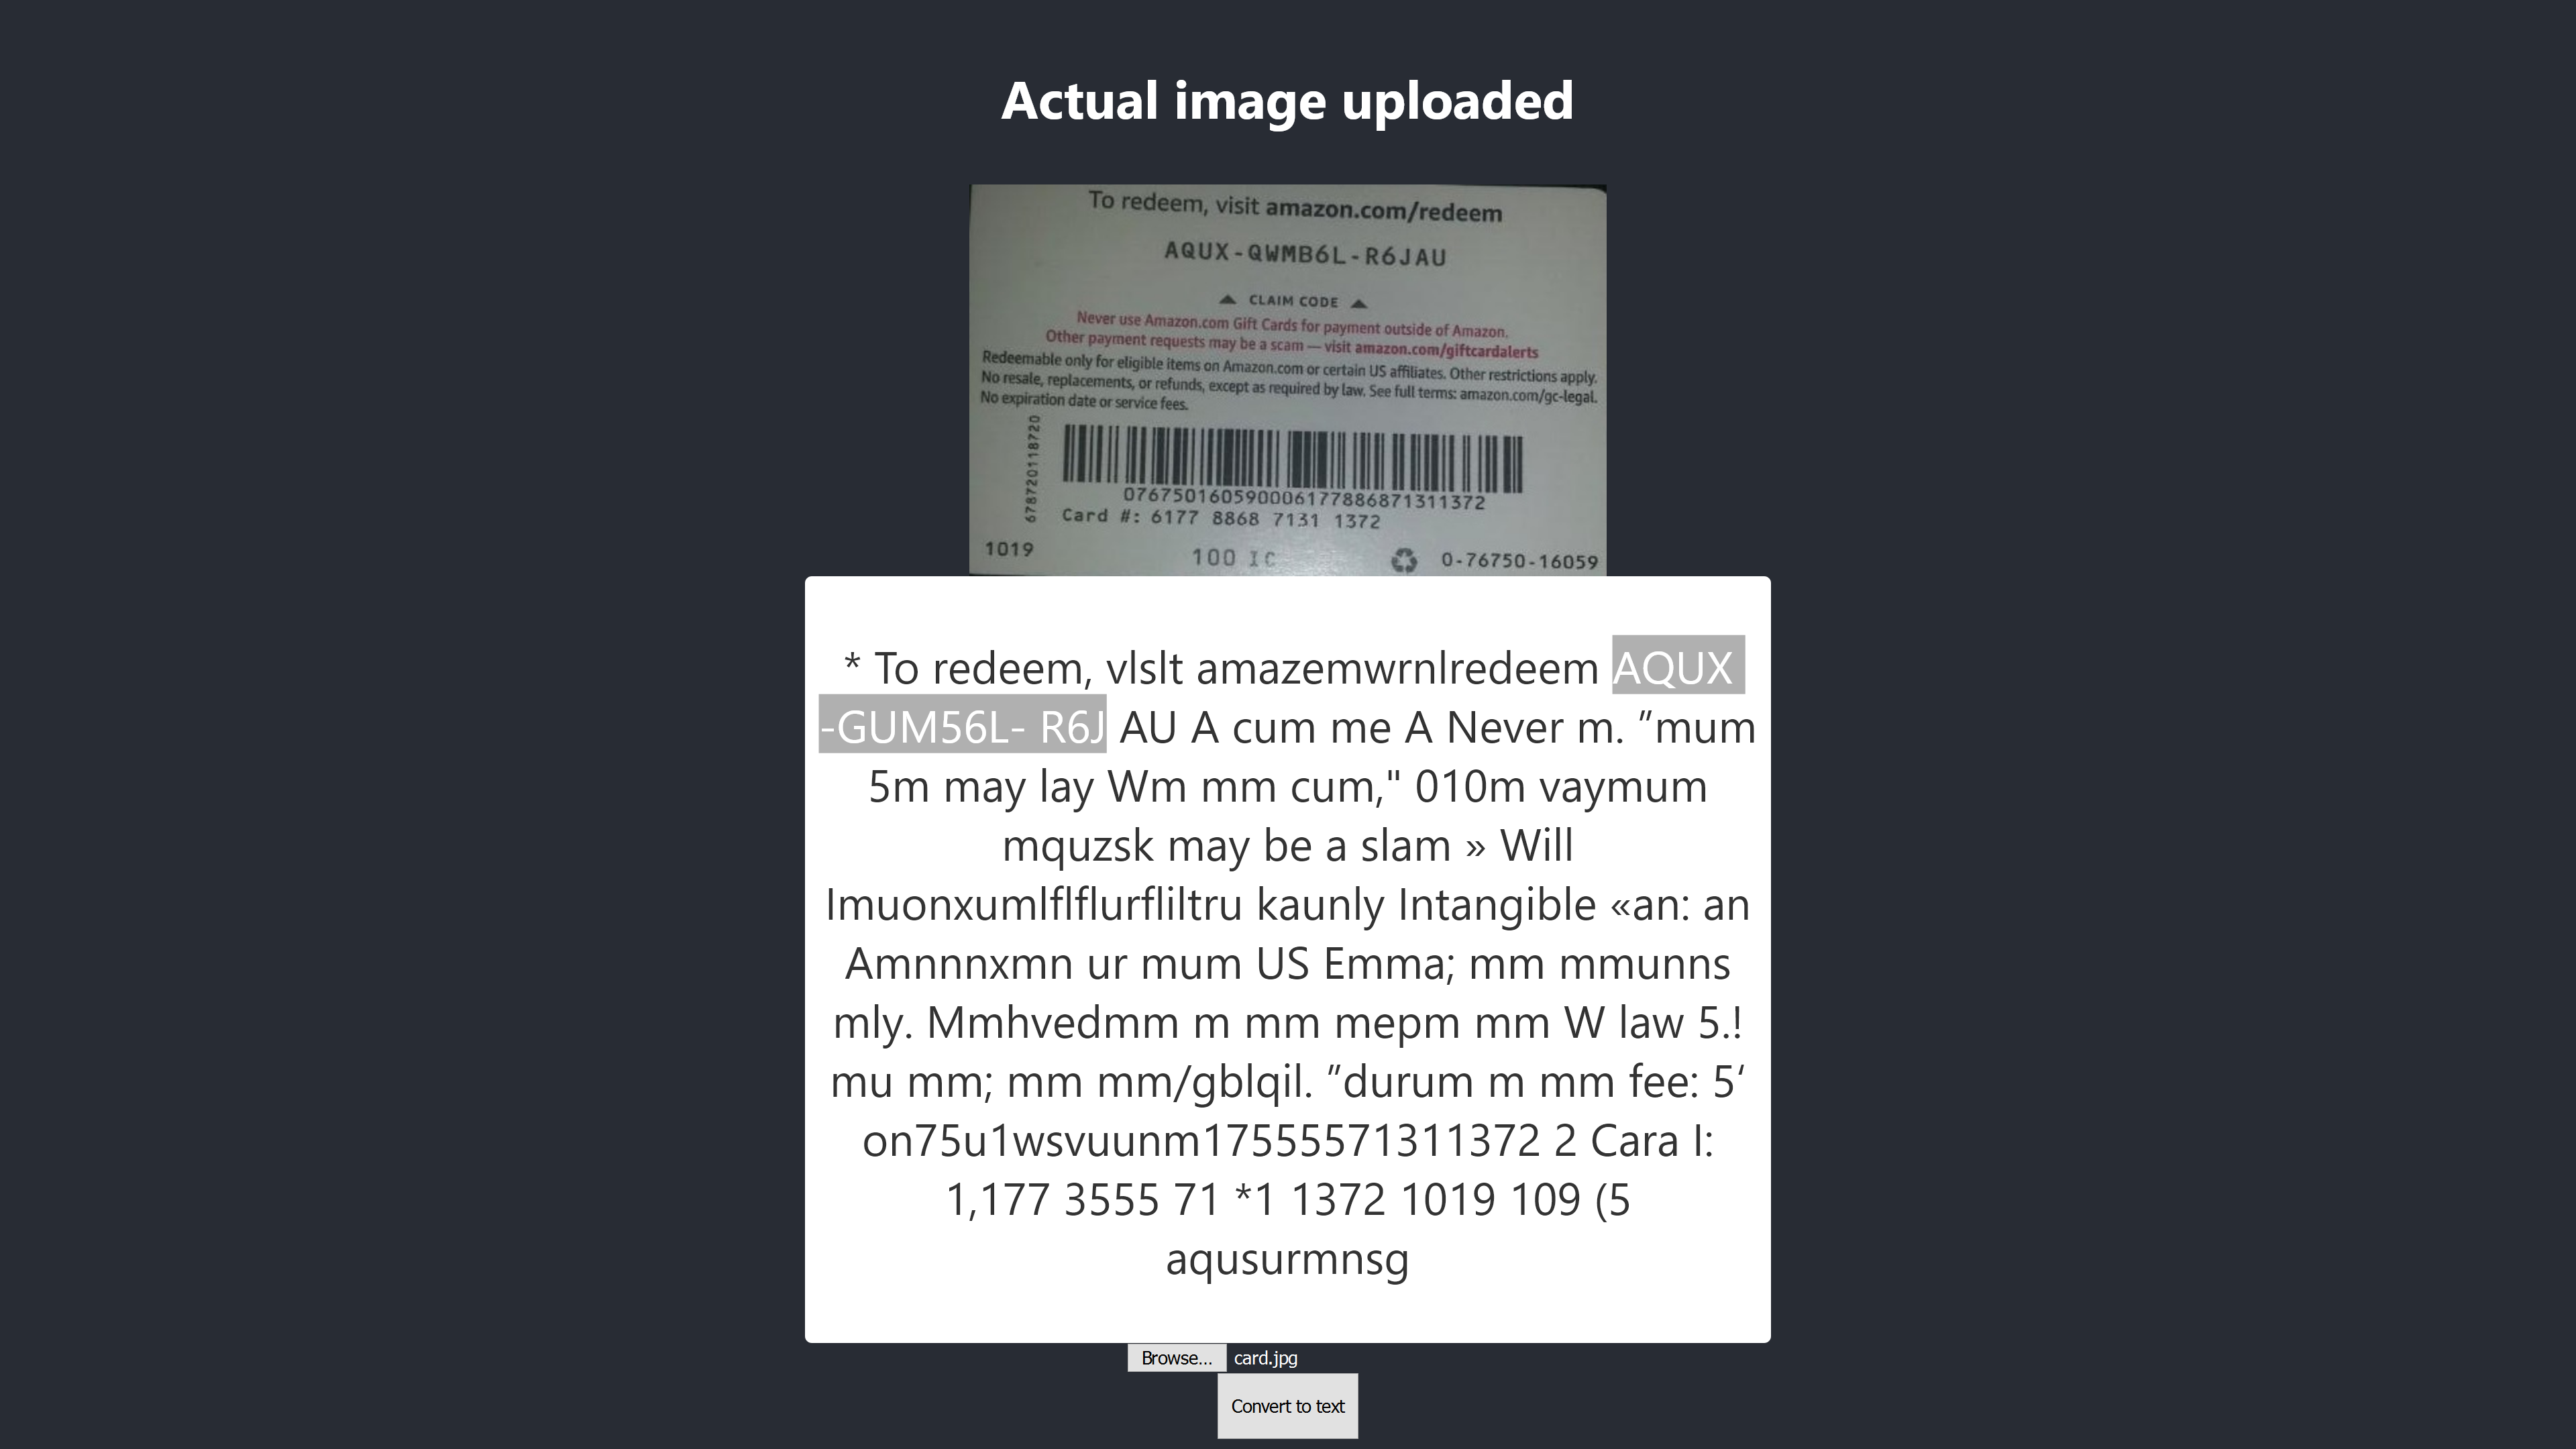
The dark background plays a role in lowering accuracy. The extracted PIN is close, but not exact, because the card image isn't perfectly clear.
Running the same test in Chrome produced an even worse result. The reason is that browsers render images and color profiles differently. Because Tesseract receives pre-rendered image.data, the input differs across browsers, yielding different outputs. The same image can be processed to look different in each browser, which is why preprocessing is important for consistent results.
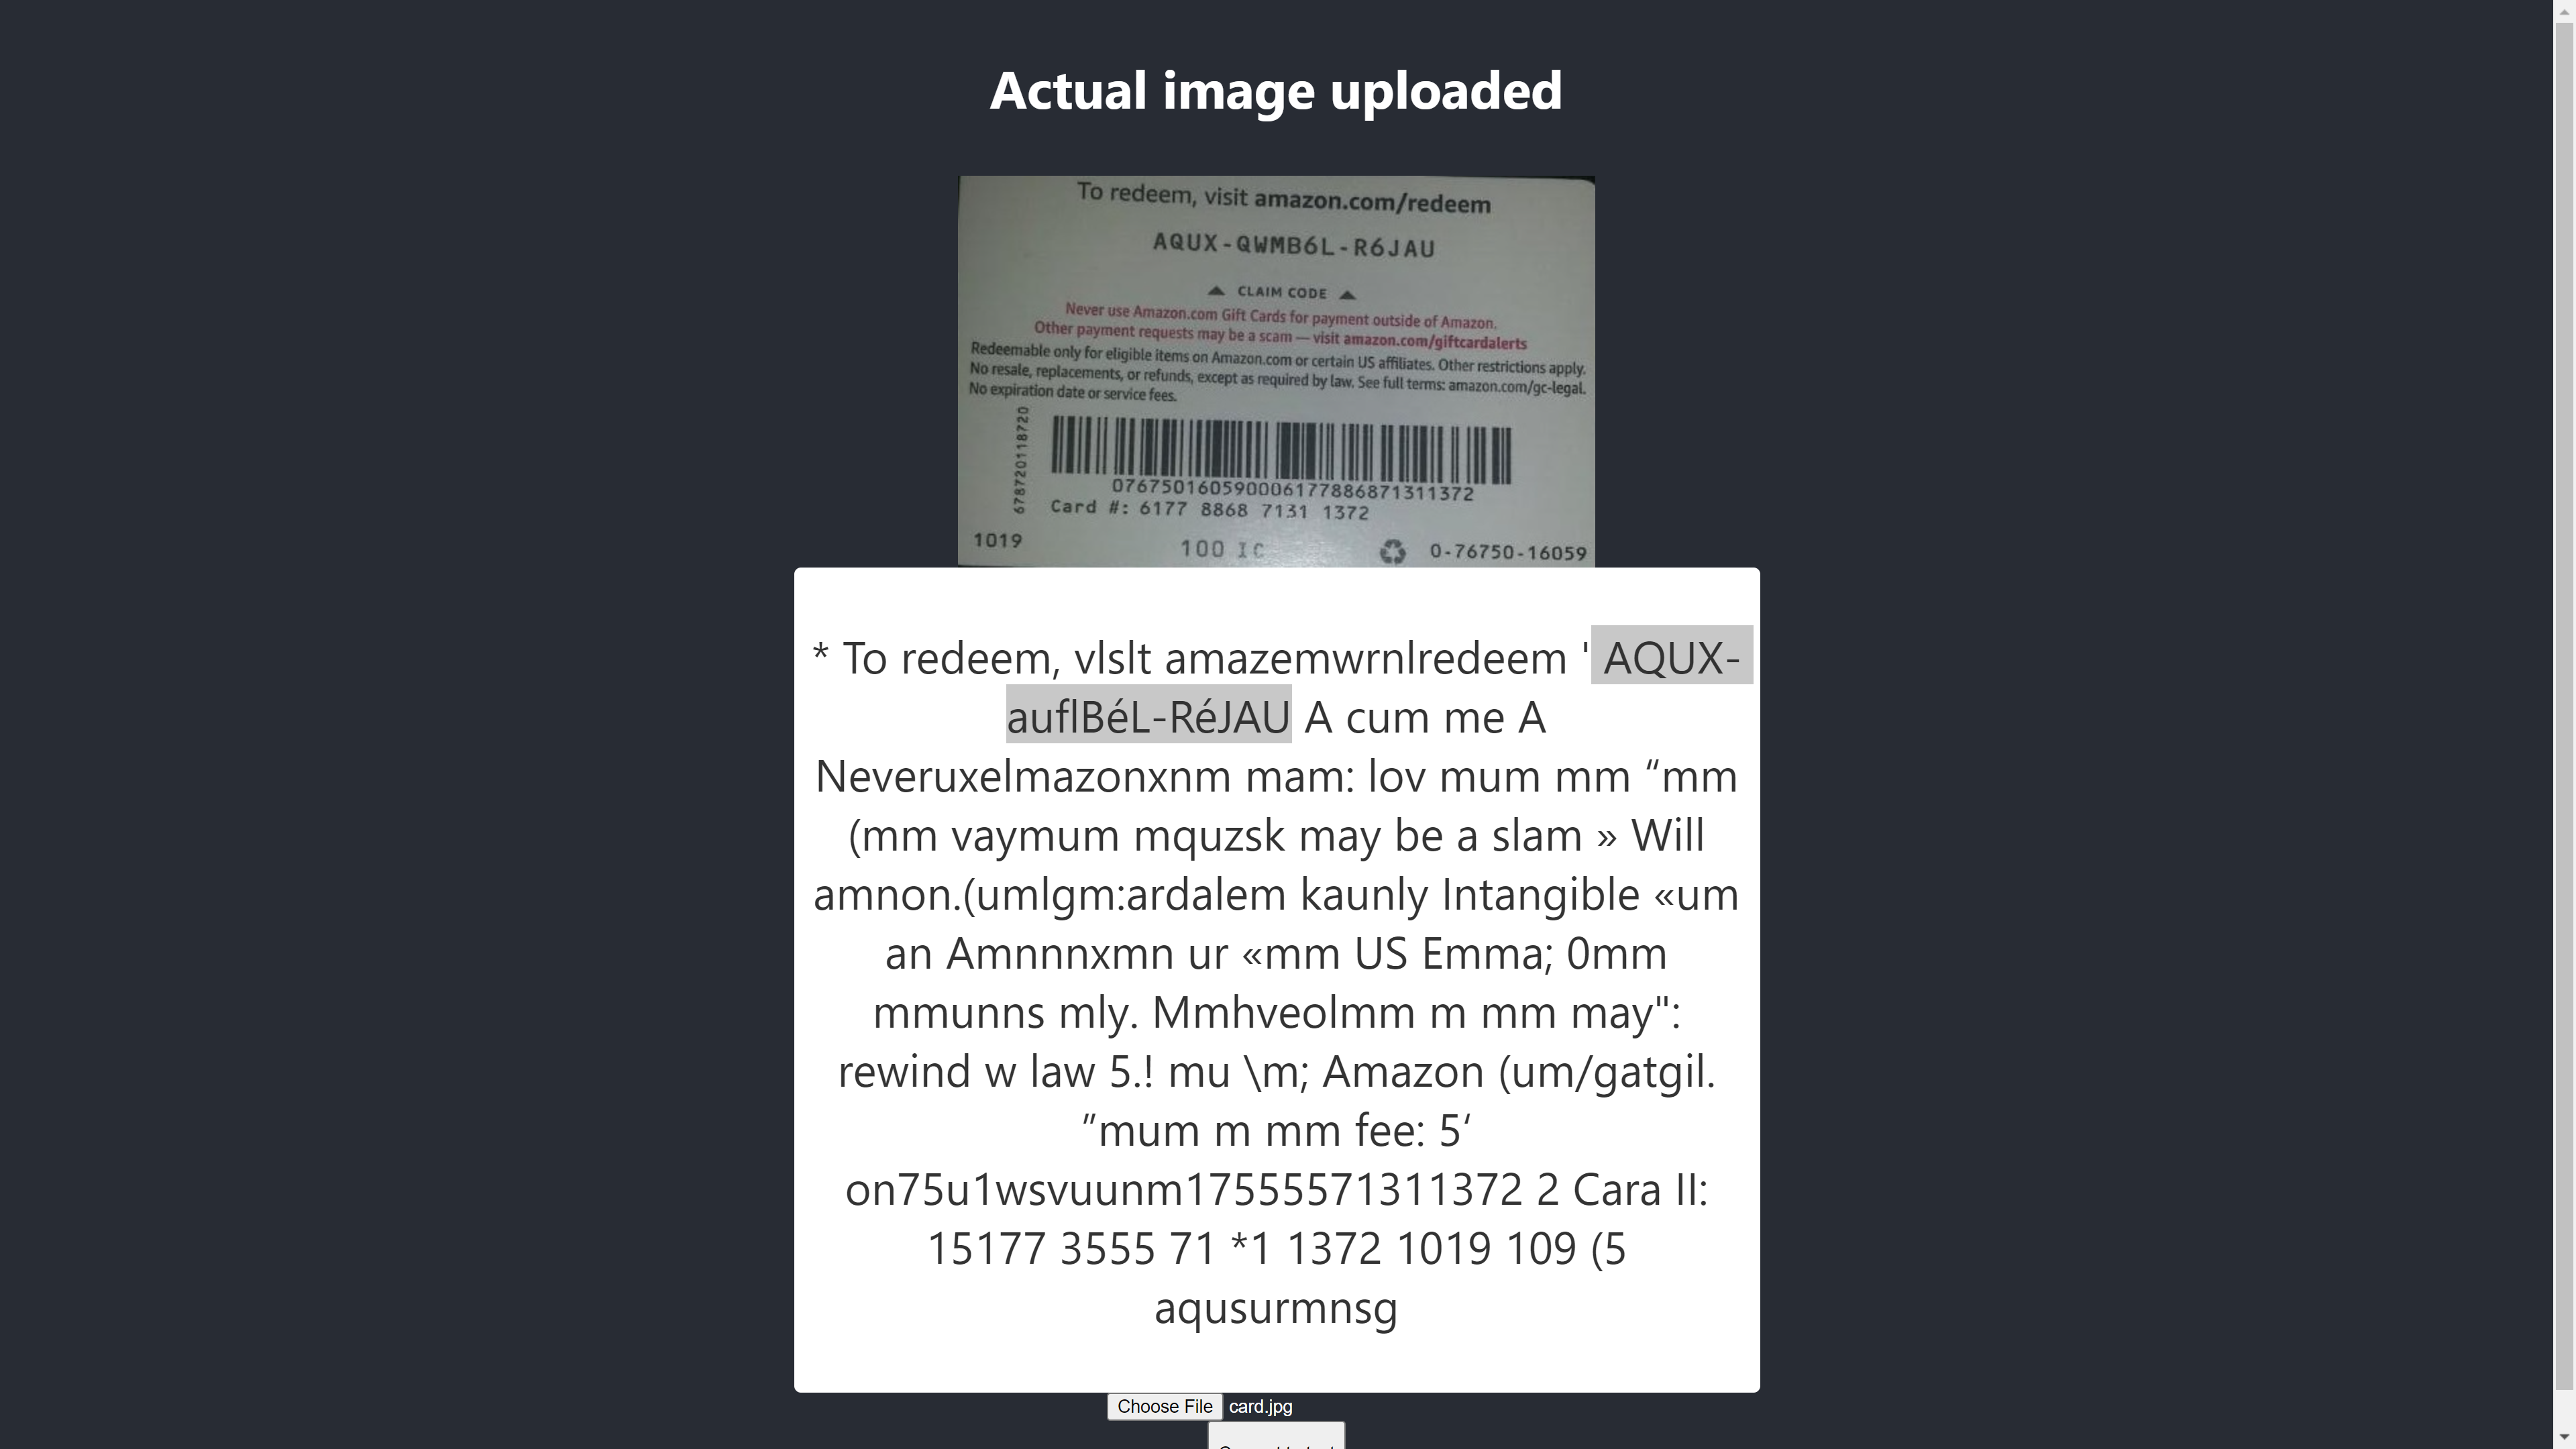
To get reliable results, we need to look beyond the raw conversion and explore image preprocessing techniques.
Improving Accuracy Through Preprocessing
Tesseract.js performs some internal preprocessing before OCR, but it doesn't always deliver accurate results. To improve outcomes, images can be preprocessed externally using techniques such as binarization, inversion, dilation, deskewing, or rescaling.
Image preprocessing is a broad field on its own. Rather than pulling in an entire library like P5.js for a few utilities, the necessary functions have been consolidated into a preprocess.js file.
Binarization:
Binarization converts every pixel in an image to either black or white. Applying this to the gift card tests whether a simpler two-tone image improves accuracy.
function preprocessImage(canvas) {
    const ctx = canvas.getContext('2d');
    const image = ctx.getImageData(0,0,canvas.width, canvas.height);
    thresholdFilter(image.data, 0.5);
    return image;
 }

 Export default preprocessImage
The preprocessImage function in preprocess.js sets up a canvas and retrieves its pixel data. The thresholdFilter function then binarizes the image by forcing each pixel to black or white.
To use it in the React component, we import preprocessImage, add a canvas element to the form, and access both the canvas and image via refs.
import { useState, useRef } from 'react';
import preprocessImage from './preprocess';
import Tesseract from 'tesseract.js';
import './App.css';

function App() {
  const [image, setImage] = useState("");
  const [text, setText] = useState("");
  const canvasRef = useRef(null);
  const imageRef = useRef(null);

  const handleChange = (event) => {
    setImage(URL.createObjectURL(event.target.files[0]))
  }

  const handleClick = () => {

    const canvas = canvasRef.current;
    const ctx = canvas.getContext('2d');

    ctx.drawImage(imageRef.current, 0, 0);
    ctx.putImageData(preprocessImage(canvas),0,0);
    const dataUrl = canvas.toDataURL("image/jpeg");

    Tesseract.recognize(
      dataUrl,'eng',
      {
        logger: m => console.log(m)
      }
    )
    .catch (err => {
      console.error(err);
    })
    .then(result => {
      // Get Confidence score
      let confidence = result.confidence
      console.log(confidence)
      // Get full output
      let text = result.text

      setText(text);
    })
  }

  return (
    <div className="App">
      <main className="App-main">
        <h3>Actual image uploaded</h3>
        <img
           src={image} className="App-logo" alt="logo"
           ref={imageRef}
           />
        <h3>Canvas</h3>
        <canvas ref={canvasRef} width={700} height={250}></canvas>
          <h3>Extracted text</h3>
        <div className="pin-box">
          <p> {text} </p>
        </div>
        <input type="file" onChange={handleChange} />
        <button onClick={handleClick} style={{height:50}}>Convert to text</button>
      </main>
    </div>
  );
}

export default App
const canvasRef = useRef(null);
const imageRef = useRef(null);
The image is merged onto the canvas first, since canvas manipulation is required in JavaScript. The canvas is then converted to a JPEG data URL and passed to Tesseract for processing.
const canvas = canvasRef.current;
const ctx = canvas.getContext('2d');

ctx.drawImage(imageRef.current, 0, 0);
ctx.putImageData(preprocessImage(canvas),0,0);
const dataUrl = canvas.toDataURL("image/jpeg");
Test #2: Binarization Results
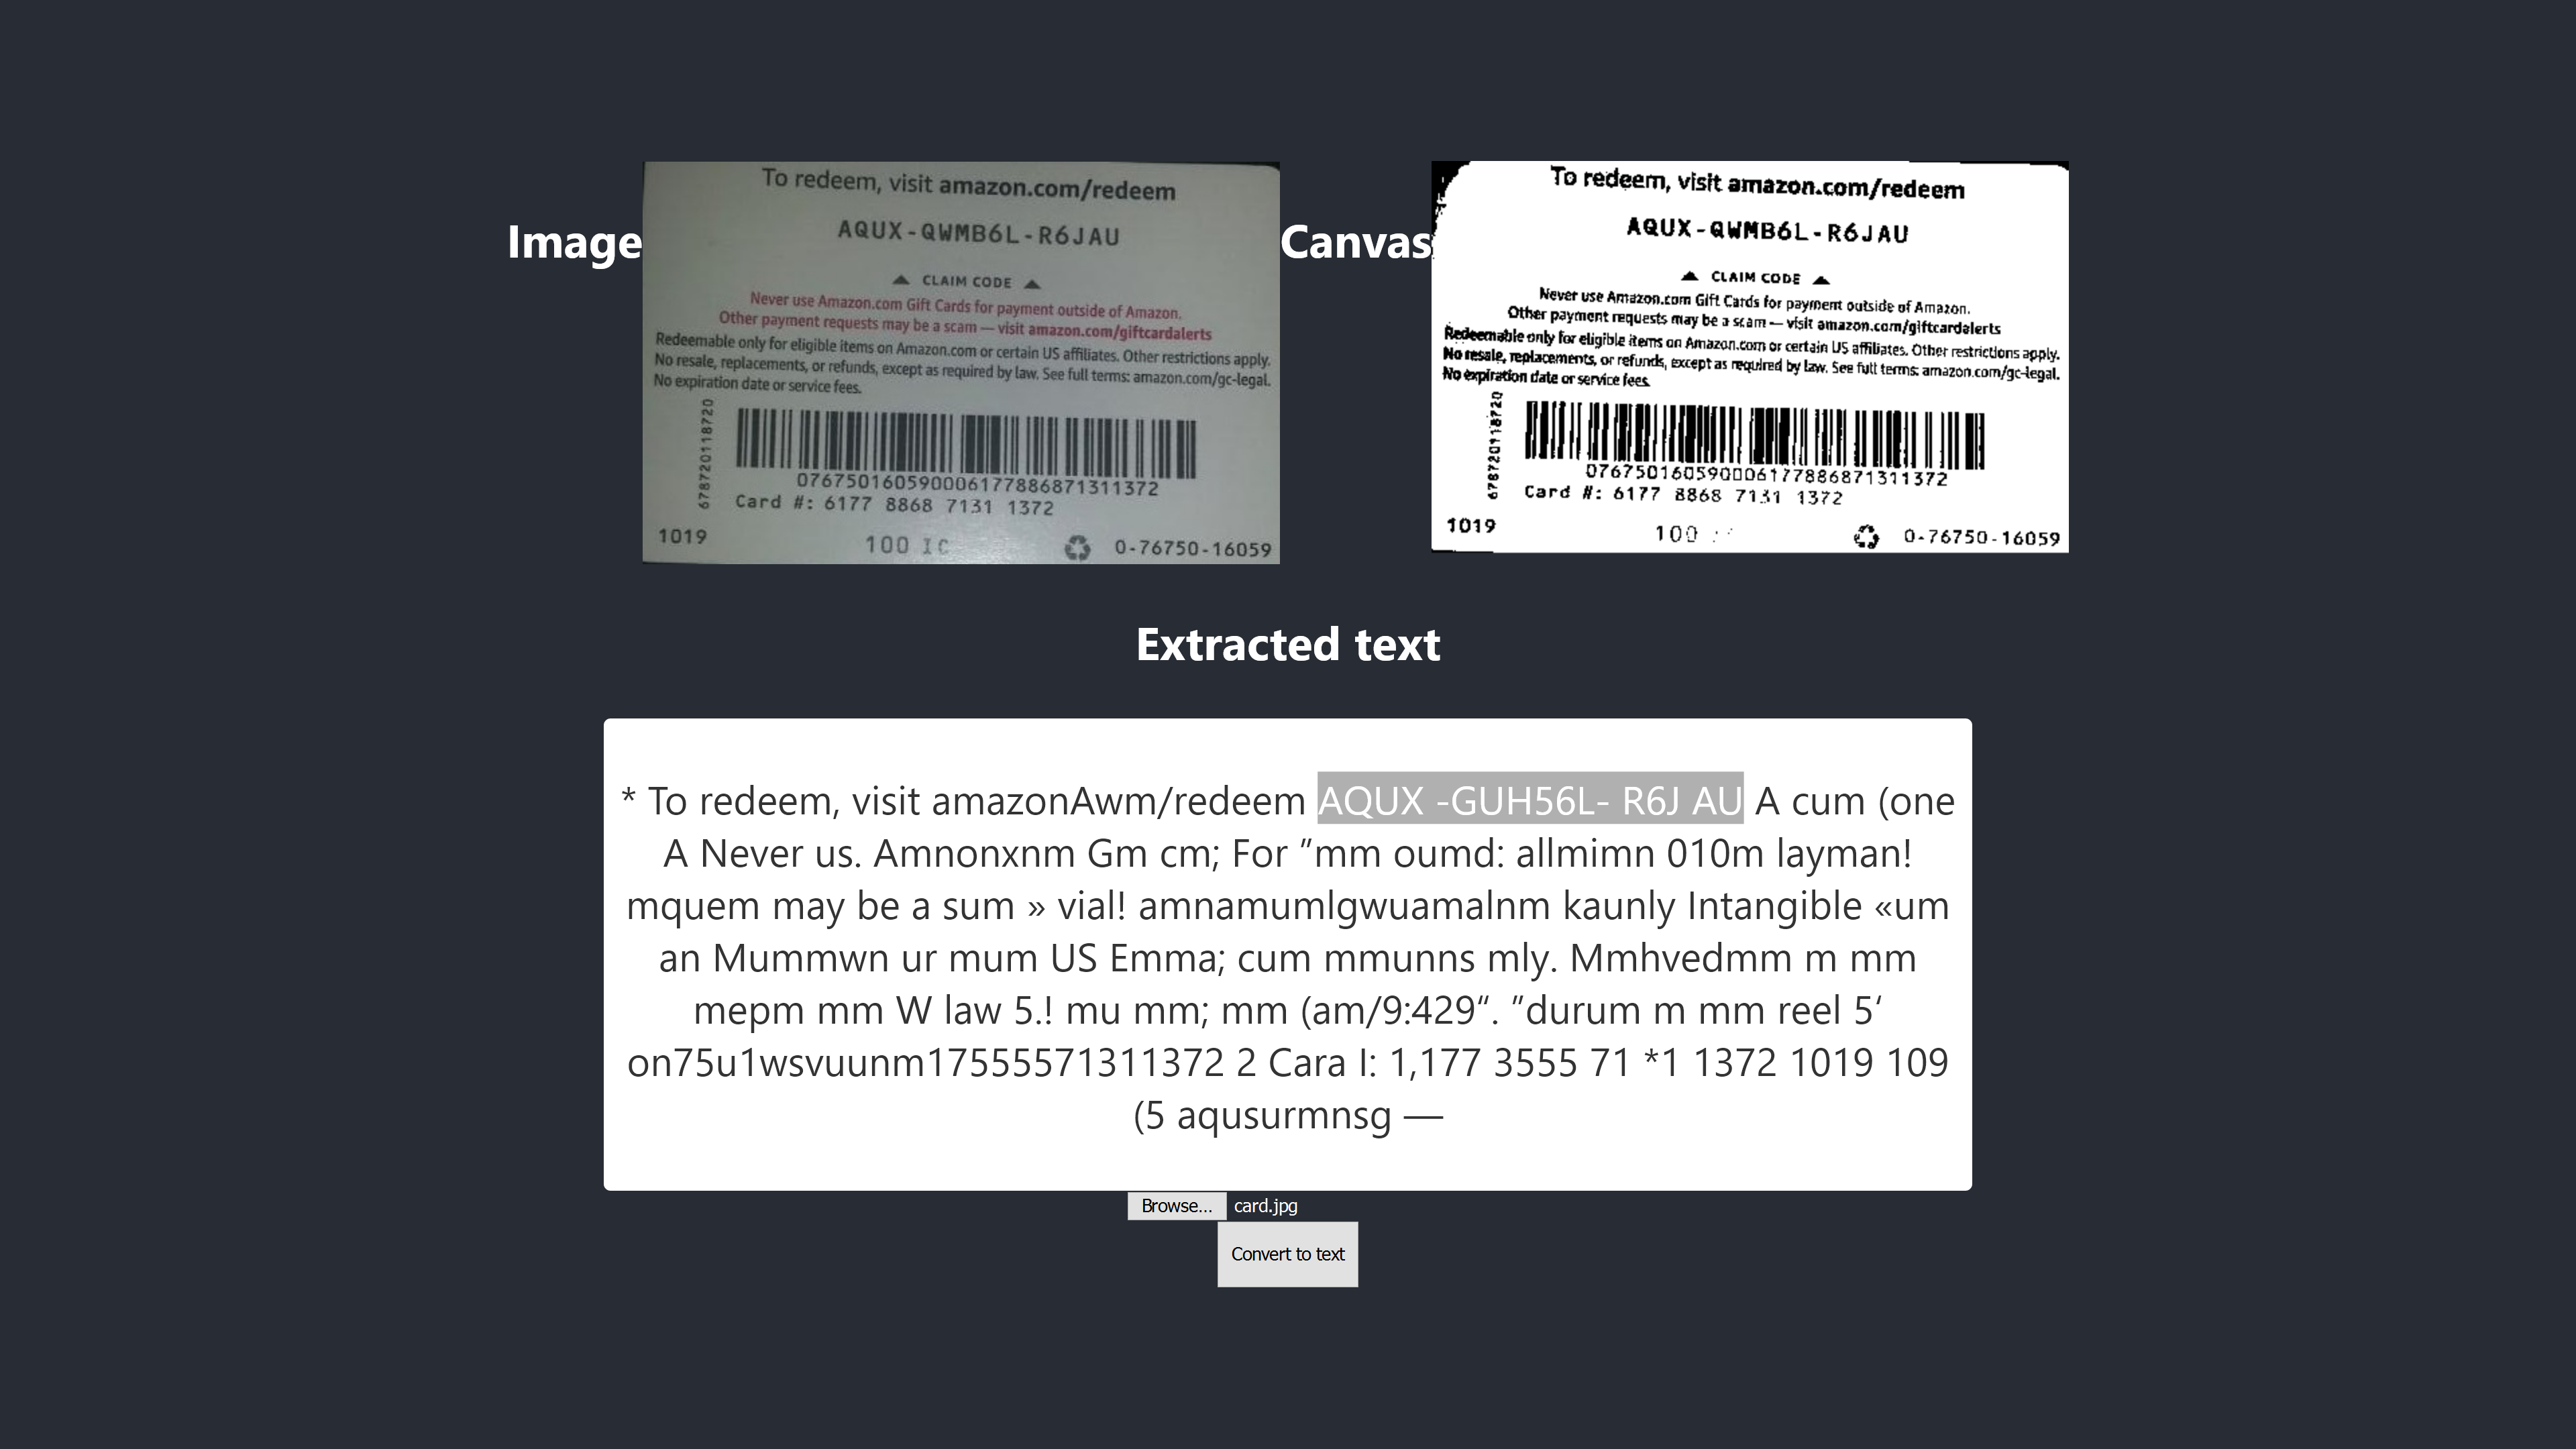
After binarization, the dark areas of the gift card turn white, but the accuracy does not improve — it gets worse. The result now has four incorrect characters, versus two before any preprocessing. Adjusting the threshold level doesn't help. Binarization isn't inherently bad; it simply doesn't address the gift card's characteristics in a way the Tesseract engine benefits from. Running the same test in Chrome produced the same outcome.
Given that binarization alone makes things worse, we can try a combination of other techniques: dilation, inversion, and blurring. Each of these has a specific purpose and is already included in preprocess.js.
Dilation, Blur, And Inversion
Dilation enlarges objects in an image by adding pixels to their boundaries, which increases the brightness of those objects. Blurring smooths an image by reducing sharpness, which helps remove small dots and patches. Inversion swaps light and dark areas, such as turning a black background with white text into a white background with black text.
The initial preprocessImage function is updated to apply a sequence of these techniques:
function preprocessImage(canvas) {
  const level = 0.4;
  const radius = 1;
  const ctx = canvas.getContext('2d');
  const image = ctx.getImageData(0,0,canvas.width, canvas.height);
  blurARGB(image.data, canvas, radius);
  dilate(image.data, canvas);
  invertColors(image.data);
  thresholdFilter(image.data, level);
  return image;
 }
The order of operations applies blurARGB() to reduce noise, dilate() to brighten objects, invertColors() to swap foreground and background, and finally thresholdFilter() to force a black-and-white output. The thresholdFilter function accepts image.data plus a level parameter to determine how light or dark the result should be. The specific level and blur radius were determined through trial and error.
Test #3: Combined Techniques
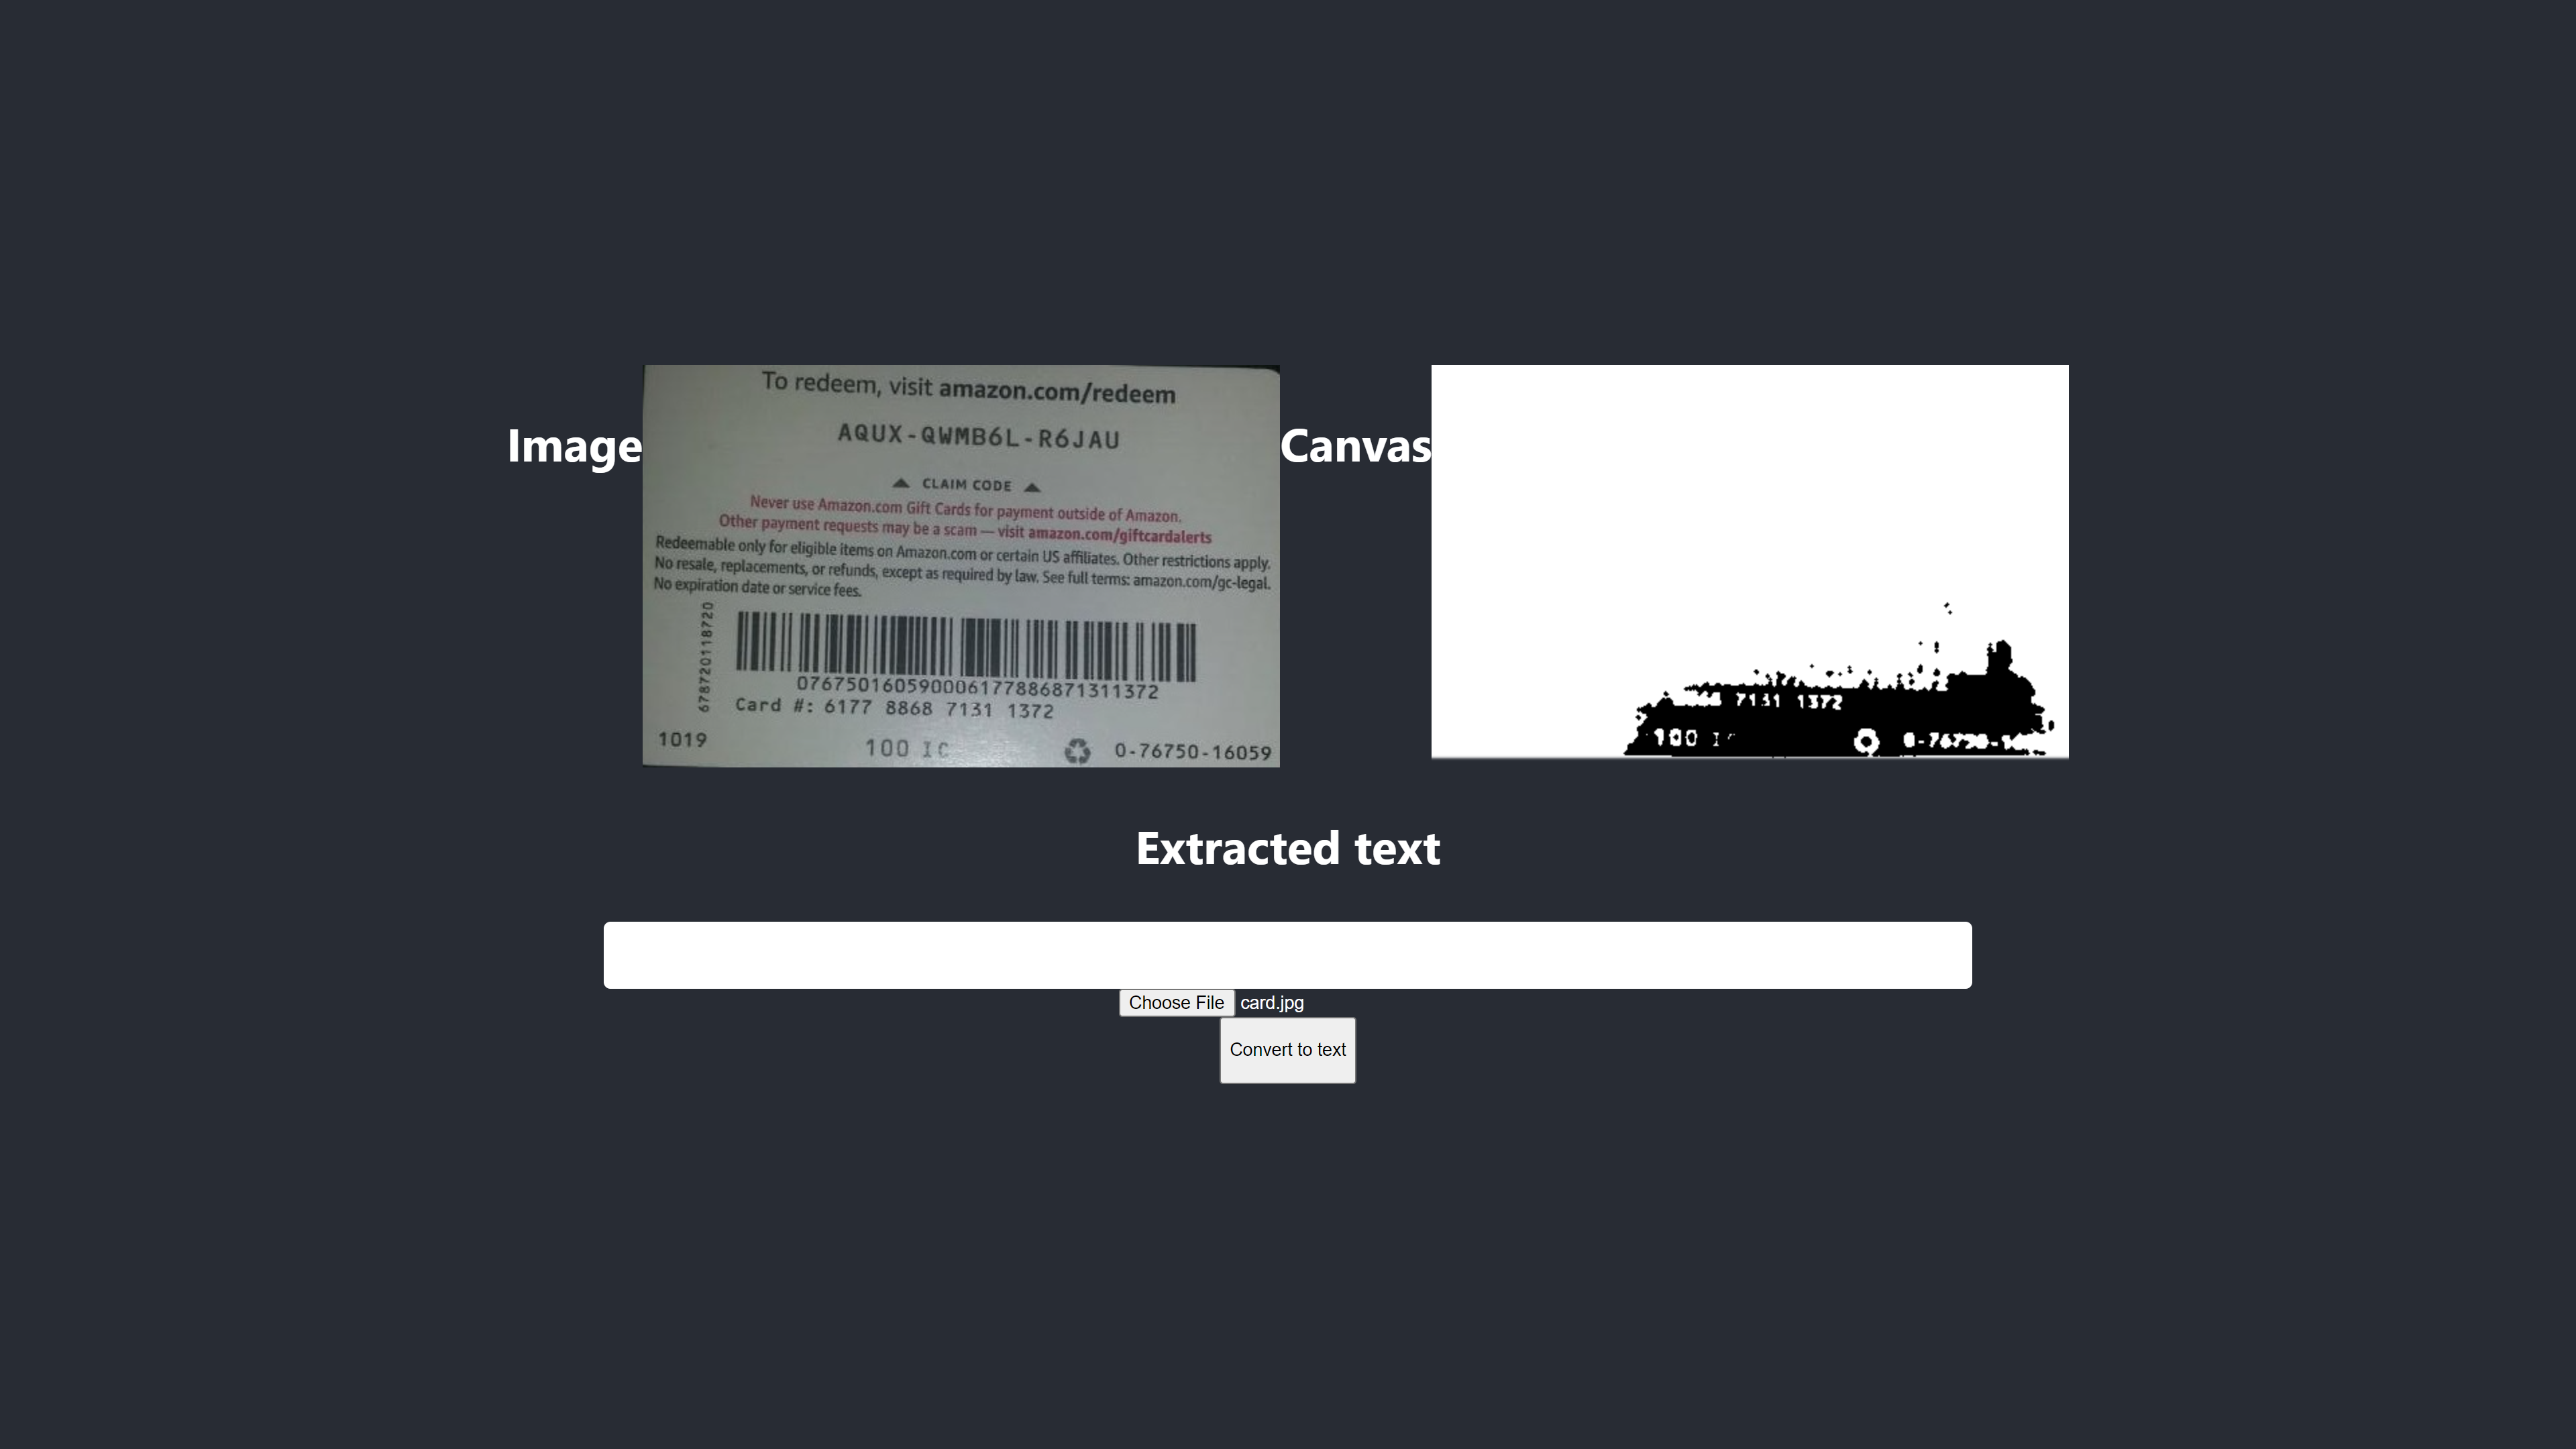
Applying all four techniques at once produced a terrible result in both Chrome and Firefox. The same techniques don't always work well together.
Using two at a time can be more effective. Knowing which techniques to combine depends on the image's characteristics — a digital image might need binarization, while an image with noise needs blurring first. The key is understanding what each technique is designed to fix.
To test a combination of only invertColors and thresholdFilter, the other two techniques are commented out:
function preprocessImage(canvas) {
    const ctx = canvas.getContext('2d');
    const image = ctx.getImageData(0,0,canvas.width, canvas.height);
    // blurARGB(image.data, canvas, 1);
    // dilate(image.data, canvas);
    invertColors(image.data);
    thresholdFilter(image.data, 0.5);
    return image;
}
Test #4: Inversion And Binarization
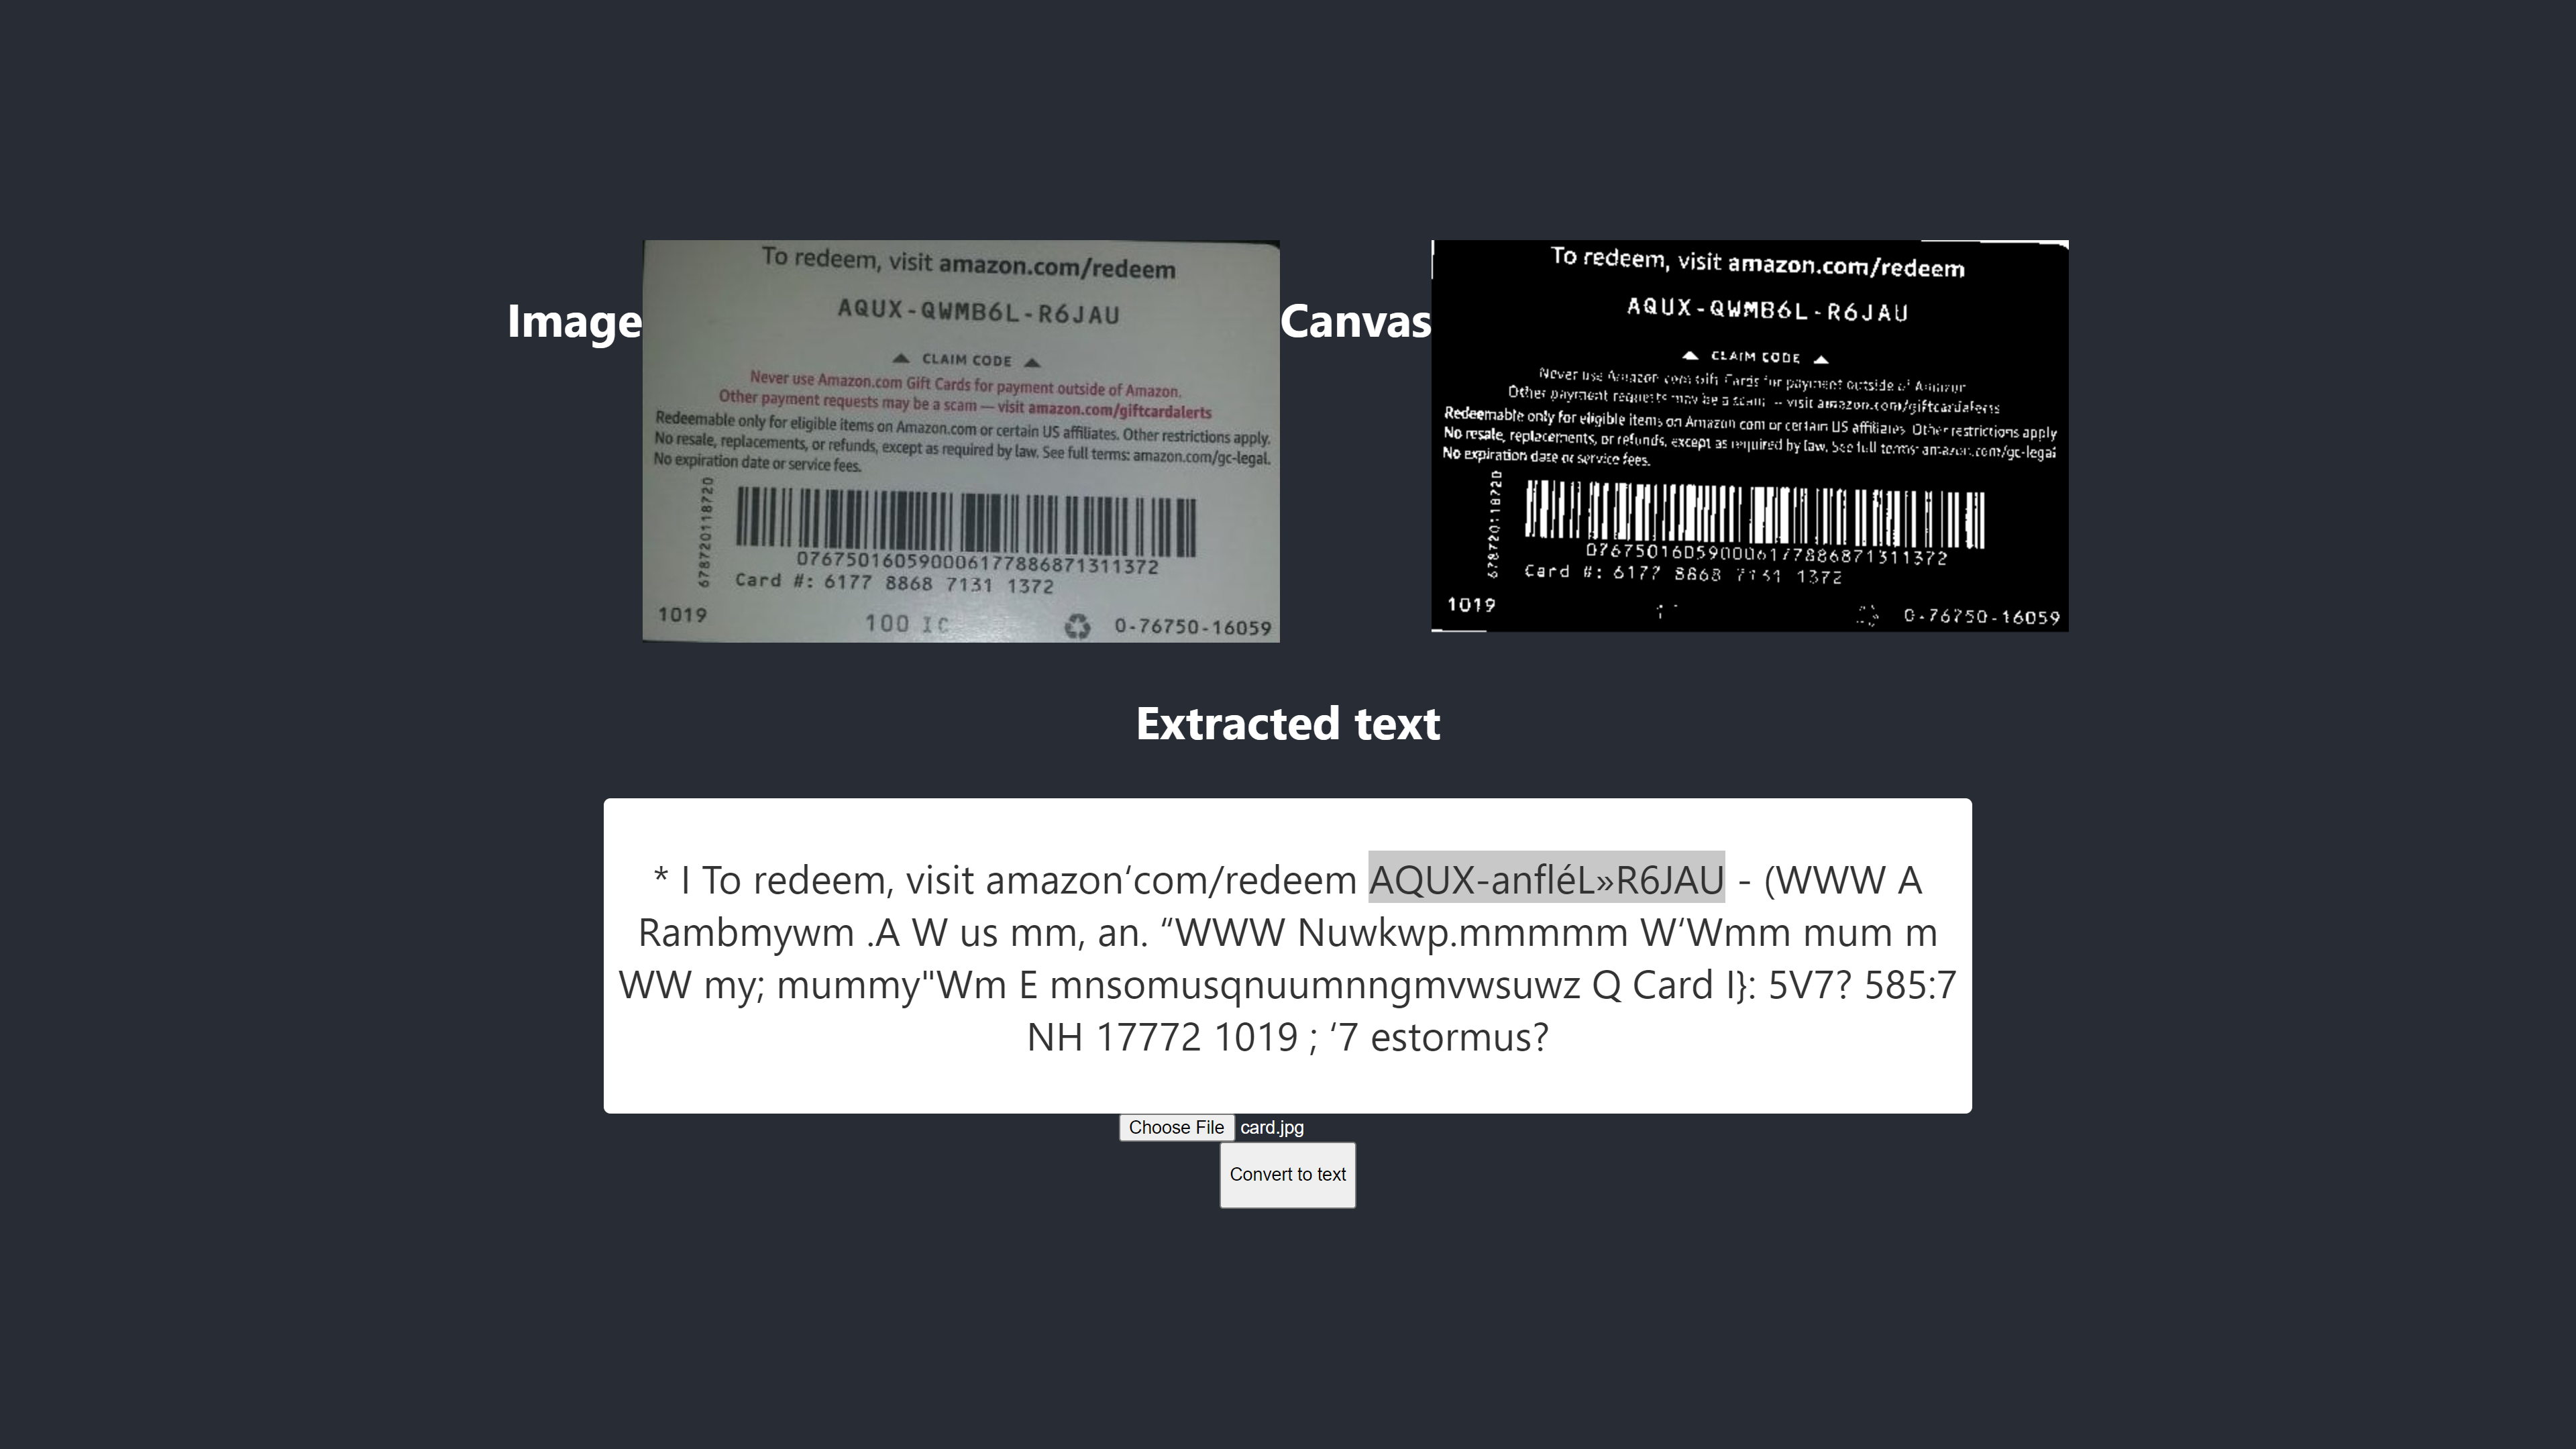
This pairing still produced worse results than the original attempt without any preprocessing. After experimenting with various techniques and combinations, the conclusion is clear: different types of images require different preprocessing approaches. For the gift card example, no preprocessing at all actually produced the best accuracy.
The Final Outcome
The initial goal was to extract the PIN from any Amazon gift card, but that goal couldn't be met in a reliable way. Matching an unpredictable output from an unpredictable input isn't practical — processing that works for one image won't necessarily work for another with different characteristics.
The best result from the experiments came from an image that matched the extracted text perfectly, achieving 100 percent confidence. However, that result could only be reproduced with images of a similar nature.
What the Tests Revealed
Running the same images through different browsers produced an important observation: unprocessed images can yield different results depending on the browser. Firefox and Chrome did not always agree in the first test. However, once preprocessing was applied, the outcomes became consistent across browsers.
Several patterns emerged from the experiments:
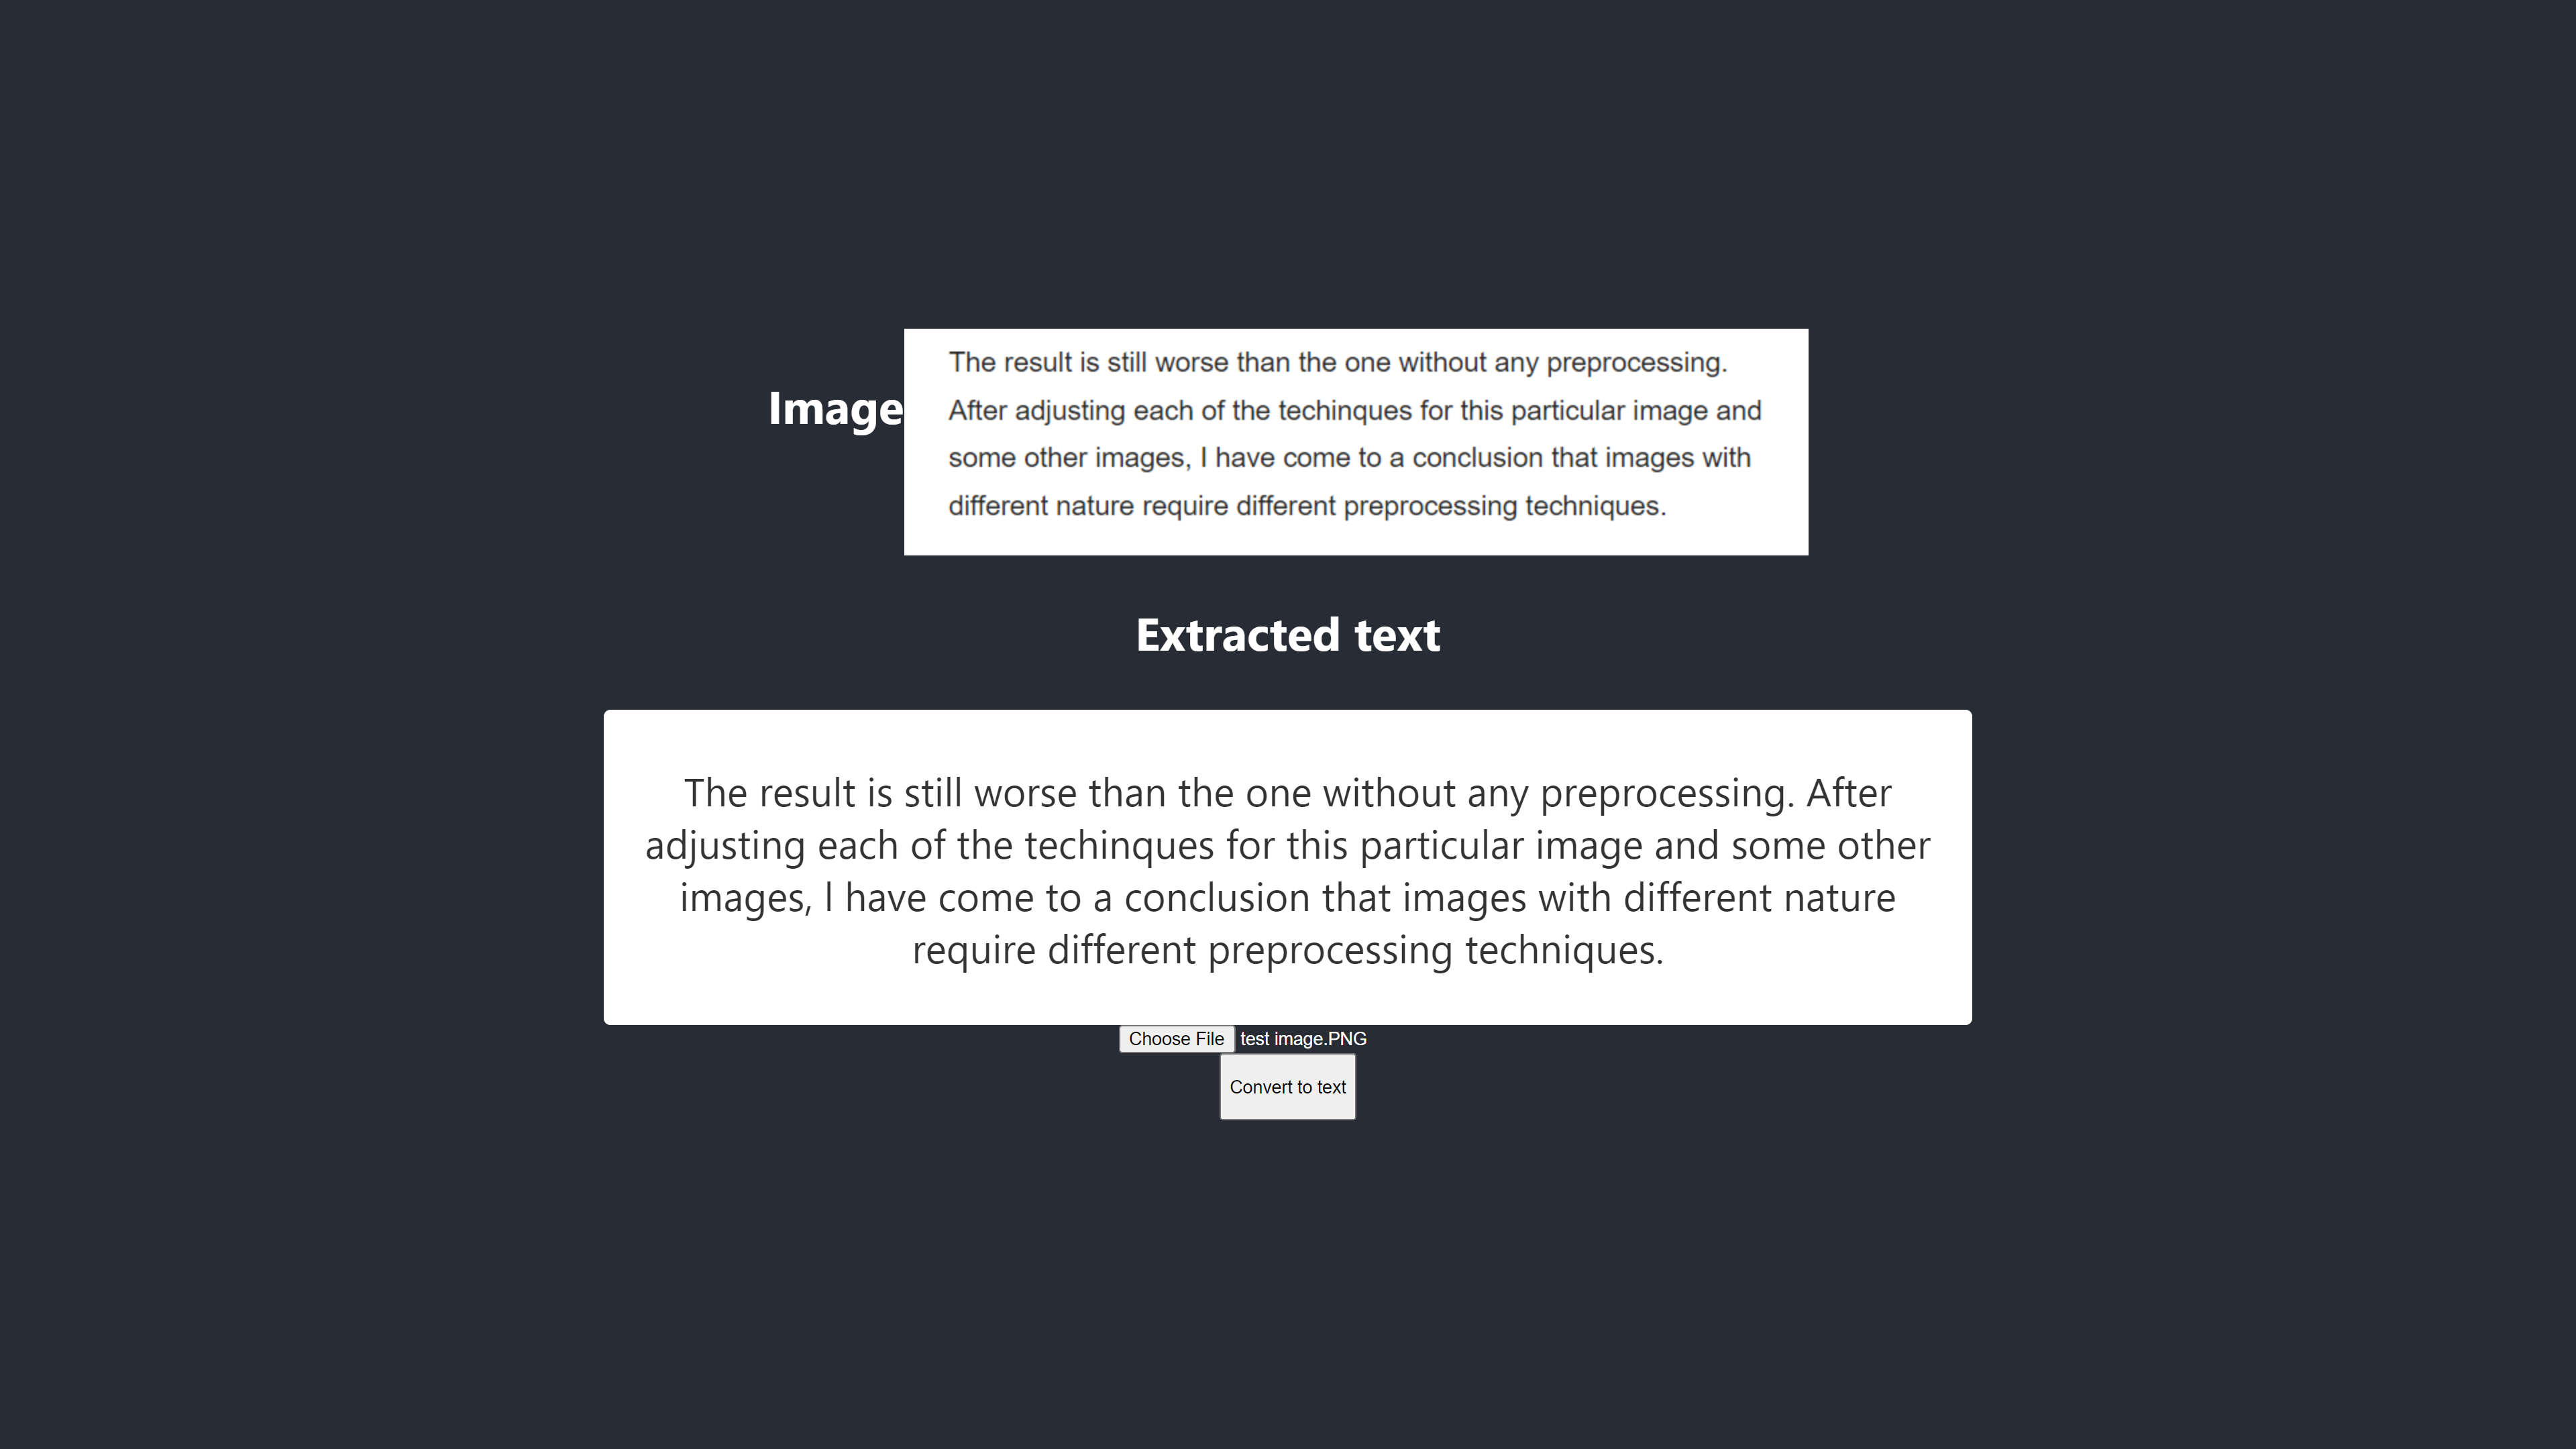
- Black text on a white background is the most reliable input. The image below returned an accurate result without any preprocessing. Adding preprocessing to this particular case required extensive tuning and produced no measurable benefit.
The conversion was 100% accurate.
- Larger font sizes consistently improve accuracy.
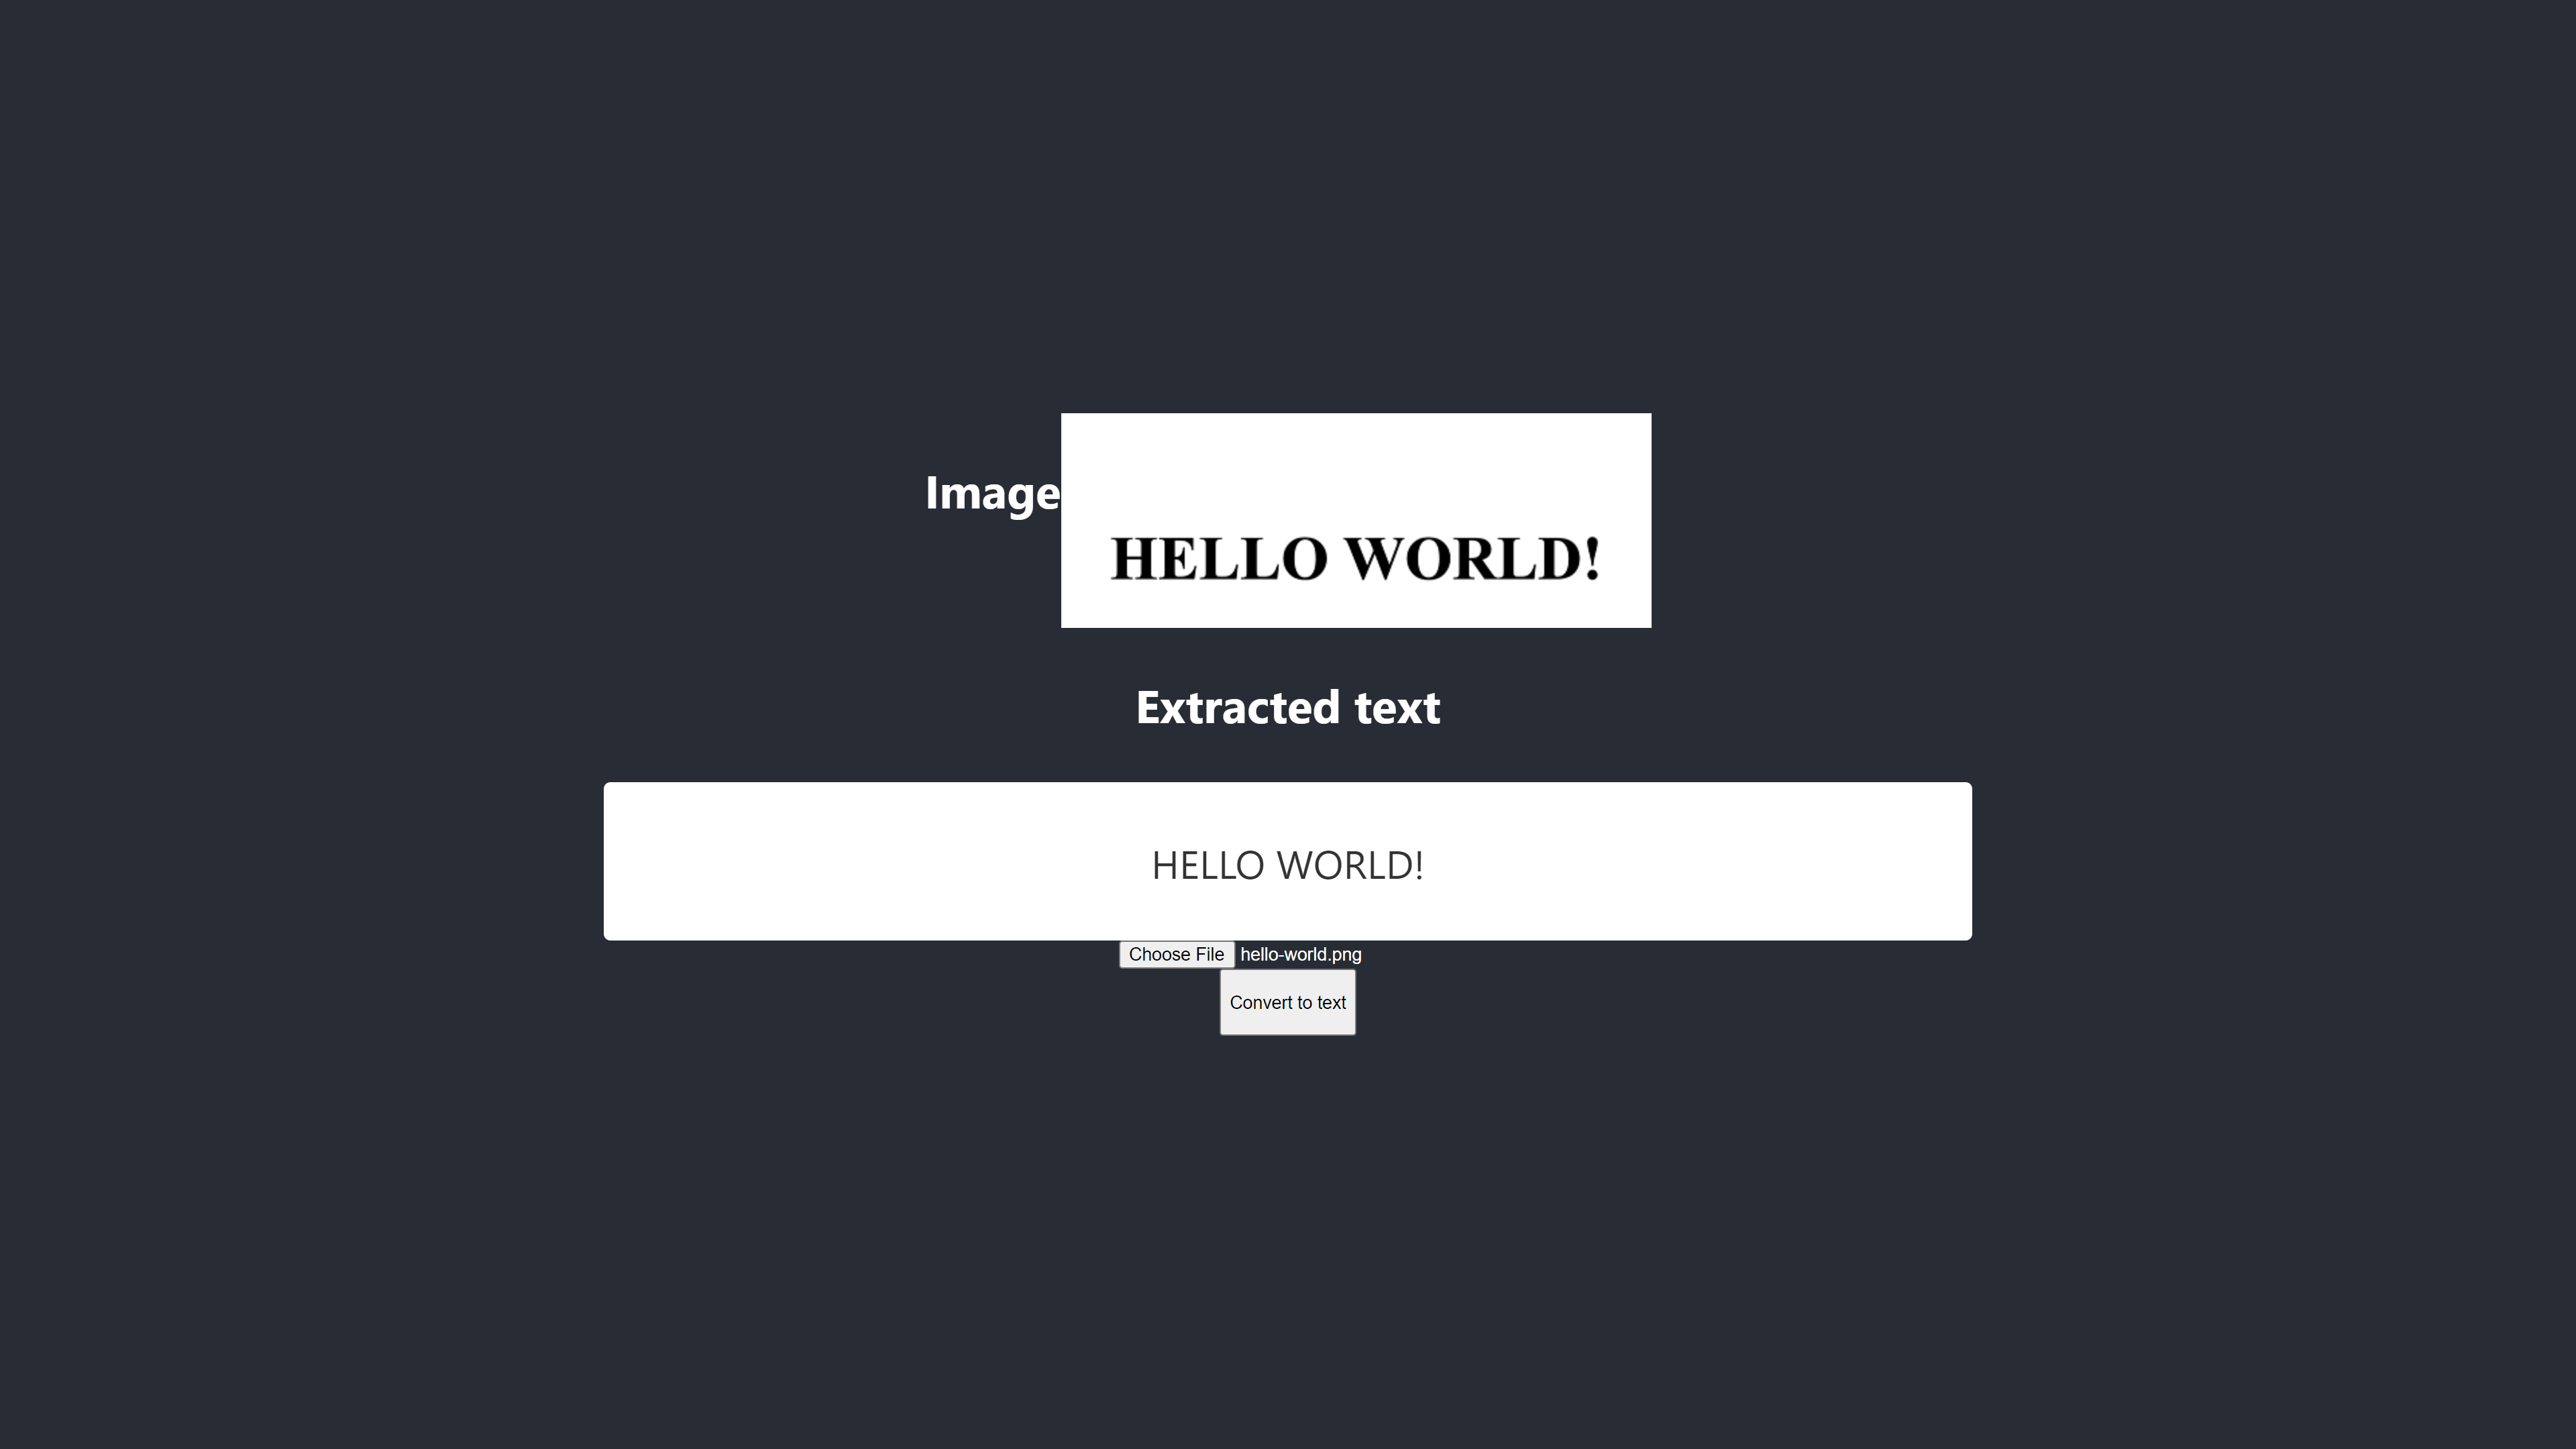
- Fonts with curved edges confuse Tesseract. The best results in testing came from Arial.
- OCR is not yet dependable enough for fully automated image-to-text pipelines when accuracy above 80% matters. It is, however, useful as a first pass for manual correction, reducing the effort of transcribing text by hand.
- OCR is also not reliable enough to feed screen readers for accessibility purposes. Inaccurate text can mislead or distract users more than no text at all.
- The technology remains promising because neural networks allow it to learn and improve; deep learning should make OCR far more capable in the near future.
- Confidence scores allow applications to make decisions. Based on testing, any score below 90 is of limited utility. When extracting specific fragments such as PINs from a gift card, a score between 75 and 100 is expected, and anything below 75 should be rejected.
The appropriate confidence threshold depends on the use case. Digitizing cheques or historic drafts requires an exact copy, so a score of 90 or above is necessary. Extracting a PIN from a gift card is a different scenario: a score between 75 and 90 is acceptable because an exact replica of the text is not the goal. In short, confidence scores enable informed decisions about whether to accept OCR output in a given application.
Final Thoughts
Optical Character Recognition is a practical answer to the data-processing limitations created by text embedded in images. While OCR has clear drawbacks today, its reliance on neural networks positions it for significant improvement.
As deep learning advances, most of these limitations will fade. Meanwhile, the preprocessing approaches covered in this article can reduce the manual effort and losses associated with text extraction, particularly in business contexts.
Additional Reading
- P5.js
- Pre-Processing in OCR
- Improving the quality of the output
- Using JavaScript to Preprocess Images for OCR
- OCR in the browser with Tesseract.js
- A Quick History of Optical Character Recognition
- The Future of OCR is Deep Learning
- Timeline of Optical Character Recognition



