Building a Client-Serverless Jamstack App: Netlify, Gatsby and Fauna
The Jamstack is an architecture built on client-side JavaScript, reusable APIs and prebuilt markup. Its defining traits: the whole app is served from a CDN (or ADN, an Application Delivery Network), everything lives in Git, automated builds fire when developers push code, and the prebuilt markup deploys automatically. Reusable APIs (Stripe for payments, Mailgun for email, or custom endpoints) allow integrations without owning backend infrastructure. In practice the stack is serverless: no servers to maintain, only existing services (email, media, database, search) or serverless functions.
This guide assembles an app from four pieces:
- Fauna as a global data store with GraphQL support.
- Netlify serverless functions as the API layer that reads and writes to Fauna.
- Gatsby, a static site generator, for the client side.
- Netlify CDN for deployment.
The sample app, "shopnote", manages shopping notes: add one or more items to a note, mark items done or urgent.

Configuring the Fauna Data Store
Fauna is a data API for client-serverless applications and a relational NoSQL system — it keeps the capabilities of a legacy RDBMS while staying flexible about scalability and performance. Data access is available through GraphQL or the Fauna Query Language (FQL), whose language-specific drivers cover JavaScript, Java, Go and others. This build uses GraphQL.
Sign up on the free plan (a generous daily usage quota), then create a database; the example names it shopnotes.

Schema comes next. In GraphQL, the schema defines the data types, the relationships between them, and which queries are allowed. In a shopnote project folder, create shopnotes.gql:
type ShopNote {
  name: String!
  description: String
  updatedAt: Time
  items: [Item!] @relation
}

type Item {
  name: String!
  urgent: Boolean
  checked: Boolean
  note: ShopNote!
}

type Query {
  allShopNotes: [ShopNote!]!
}
The schema defines a ShopNote with name, description, update time and a list of items, and an Item with name, urgent, checked and its parent note. The @relation directive marks a bi-directional relationship: ShopNote and Item form a one-to-many relation, so one note holds many items and each item belongs to at most one note.
Upload the file from the Fauna dashboard using the IMPORT SCHEMA button.

Importing a GraphQL schema makes Fauna create, maintain and update the following:
- Collections for each non-native GraphQL type — here
ShopNoteandItem. - Basic CRUD queries and mutations per collection, such as
createShopNoteandallShopNotes, each powered by FQL. - Indexes or FQL backing specific directives:
@relationfor relationships,@uniquefor uniqueness, and others.
Fauna uses a schema-free object relational data model. A database holds collections, a collection holds documents, and data records sit inside documents, forming a hierarchy:

Records can be arrays, objects or other supported types. Fauna lets you create indexes and enforce constraints; indexes can combine data across multiple collections and perform computations. As records are inserted, documents appear in the collections. Eventually the dashboard shows a data model like this:

Each document carries a unique ref attribute, a ts field holding the timestamp of the latest modification, and the record itself under data. This matters when you touch collections and documents through FQL built-ins; here, all access goes through GraphQL queries issued from Netlify Functions.
Testing Queries in the Playground
So far there is no document. Create one by running this mutation in the left panel of the GraphQL playground:
mutation {
  createShopNote(data: {
    name: "My Shopping List"
    description: "This is my today's list to buy from Tom's shop"
    items: {
      create: [
        { name: "Butther - 1 pk", urgent: true }
        { name: "Milk - 2 ltrs", urgent: false }
        { name: "Meat - 1lb", urgent: false }
      ]
    }
  }) {
    _id
    name
    description
    items {
      data {
        name,
        urgent
      }
    }
  }
}
No mutation needed to be written from scratch — Fauna generated the mutation classes in the background, so createShopNote is callable directly. The response appears on the right side of the editor:
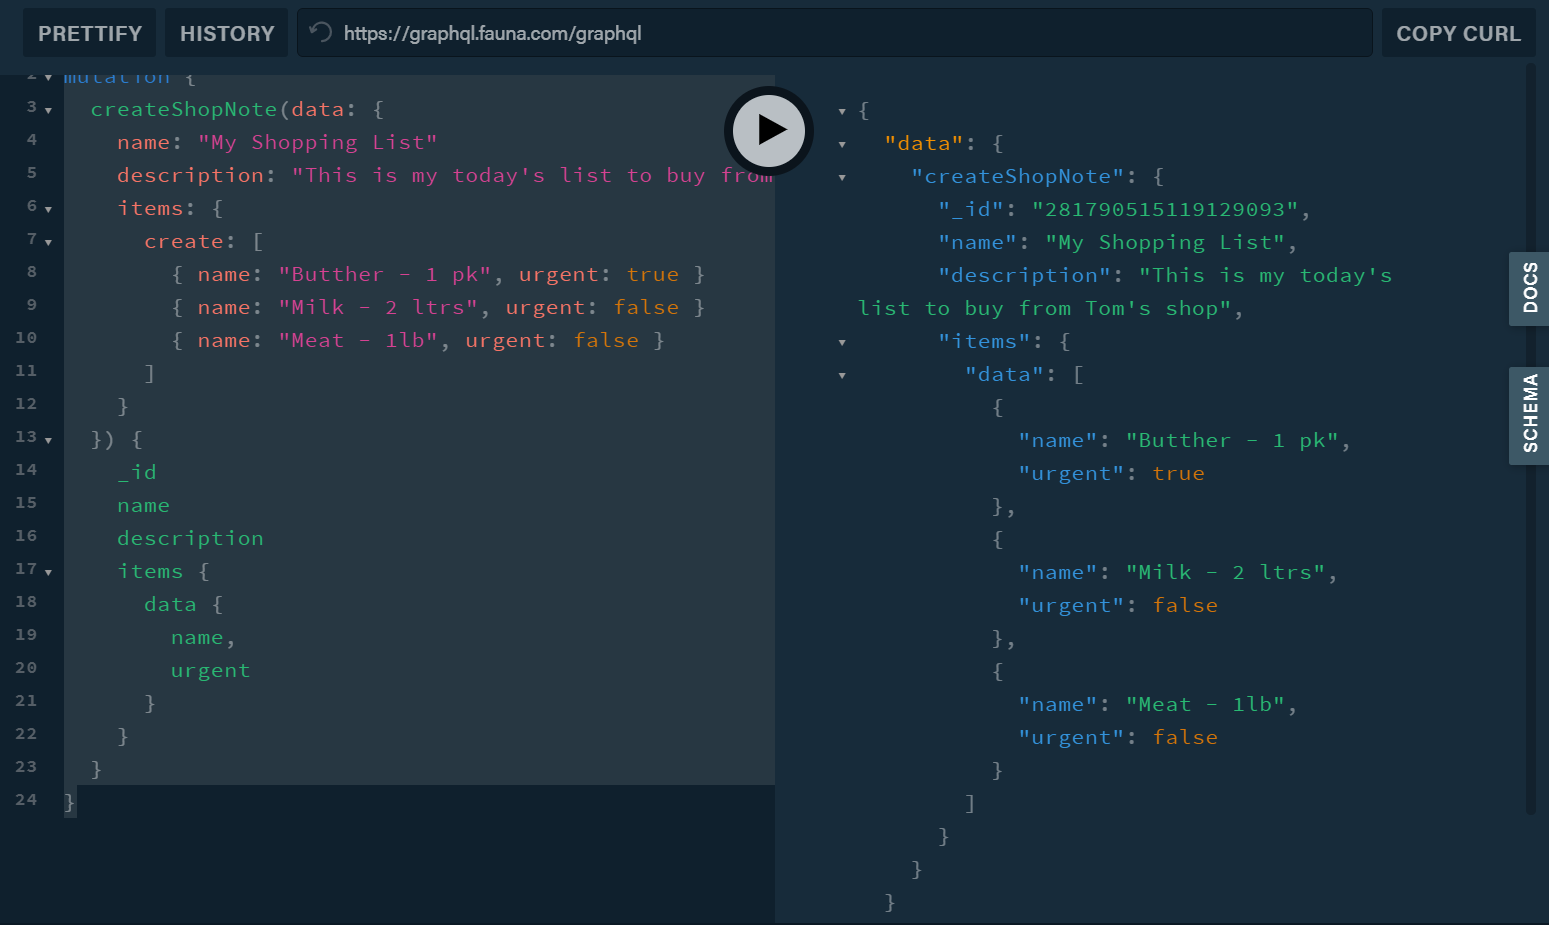
Because of the one-to-many relation, item data is nested inside the shop note response — here one note with three items. Once the schema and relation exist, documents are created automatically with that relation in mind.
Fetching every note:
query {
    allShopNotes {
    data {
      _id
      name
      description
      updatedAt
      items {
        data {
          name,
          checked,
          urgent
        }
      }
    }
  }
}
Run it in the playground the same way:

The database now supports creating and fetching. Queries for adding, updating and removing items, and for updating and deleting notes, can be written the same way and used later inside the serverless functions.
Securing the Store and Moving to Serverless
Database access must be authenticated and authorized, so create a secured server key from the SECURITY option in the FaunaDB interface.

On creation, the key's secret is displayed once — copy and save it.

The key must never be known to others or committed to the repository. Create an empty .env at the project root and paste the generated key in place of <YOUR_FAUNA_KEY_SECRET>:
FAUNA_SERVER_SECRET=<YOUR_FAUNA_KEY_SECRET>A .gitignore keeps the .env file (and node_modules, as a best practice) out of the repo:
.envThe directory at this stage:

Netlify Functions as the API Layer
Netlify functions run on AWS Lambda; provisioning Lambdas yourself is fairly complex, but Netlify reduces the job to designating a folder and dropping functions into it. Simple functions become APIs automatically, and they can interact with databases, the file system and in-memory objects. Create a free Netlify account, then initialize the project — with nodejs installed, run this at the project root:
npm init -yInstall the CLI so functions can run locally:
npm install netlify-cli -gTwo libraries follow: axios for HTTP calls, and dotenv to load FAUNA_SERVER_SECRET from .env into process.env.
yarn add axios dotenvOr with yarn:
npm i axios dotenvWriting Functions That Query Fauna
Create a functions folder at the project root and a utils subfolder inside it. The file utils/query.js holds code shared by all functions: it imports axios, loads the .env file, and exports an async function accepting a query and variables. That function calls Fauna with the secret key via axios and returns the response.
// query.js

const axios = require("axios");
require("dotenv").config();

module.exports = async (query, variables) => {
  const result = await axios({
      url: "https://graphql.fauna.com/graphql",
      method: "POST",
      headers: {
          Authorization: `Bearer ${process.env.FAUNA_SERVER_SECRET}`
      },
      data: {
        query,
        variables
      }
 });

 return result.data;
};
The file functions/get-shopnotes.js fetches all shop notes:
// get-shopnotes.js

const query = require("./utils/query");

const GET_SHOPNOTES = `
   query {
       allShopNotes {
       data {
         _id
         name
         description
         updatedAt
         items {
           data {
             _id,
             name,
             checked,
             urgent
         }
       }
     }
   }
 }
`;

exports.handler = async () => {
  const { data, errors } = await query(GET_SHOPNOTES);

  if (errors) {
    return {
      statusCode: 500,
      body: JSON.stringify(errors)
    };
  }

  return {
    statusCode: 200,
    body: JSON.stringify({ shopnotes: data.allShopNotes.data })
  };
};
Testing needs a one-time setup, run at the project root:
netlify loginA browser tab opens for login and authorization of your Netlify account; click Authorize.
Then create netlify.toml at the project root so Netlify knows where the functions live at build time:
[build]
    functions = "functions"

[[redirects]]
   from = "/api/*"
   to = "/.netlify/functions/:splat"
   status = 200
Netlify exposes each function at /.netlify/functions/get-shopnotes, which is not very user-friendly. A redirect in the config makes it /api/get-shopnotes. Start the dev server:
netlify devBy default the app runs on localhost:8888.

Visit http://localhost:8888/api/get-shopnotes — the first serverless function is live.

For creating a note, add functions/create-shopnote.js. The function desctructures the payload, then calls the query helper with a mutation. Note the ShopNotesItemRelation parameter: the relation defined in the schema must be maintained in the mutation too.
//create-shopnote.js

const query = require("./utils/query");

const CREATE_SHOPNOTE = `
  mutation($name: String!, $description: String!, $updatedAt: Time!, $items: ShopNoteItemsRelation!) {
    createShopNote(data: {name: $name, description: $description, updatedAt: $updatedAt, items: $items}) {
      _id
      name
      description
      updatedAt
      items {
        data {
          name,
          checked,
          urgent
        }
      }
    }
  }
`;

exports.handler = async event => {

  const { name, items } = JSON.parse(event.body);
  const { data, errors } = await query(
    CREATE_SHOPNOTE, { name, items });

  if (errors) {
    return {
      statusCode: 500,
      body: JSON.stringify(errors)
    };
  }

  return {
    statusCode: 200,
    body: JSON.stringify({ shopnote: data.createShopNote })
  };
};
Test it as an API with Postman or similar:

Adding an item to an existing note needs a function of its own. Because the two types are related, creating an item requires specifying which ShopNote it belongs to; the payload carries name, urgent and checked values plus the note. The request passes the note's id:
//add-item.js

const query = require("./utils/query");

const ADD_ITEM = `
  mutation($name: String!, $urgent: Boolean!, $checked: Boolean!, $note: ItemNoteRelation!) {
    createItem(data: {name: $name, urgent: $urgent, checked: $checked, note: $note}) {
      _id
      name
      urgent
      checked
      note {
        name
      }
    }
  }
`;

exports.handler = async event => {

  const { name, urgent, checked, note} = JSON.parse(event.body);
  const { data, errors } = await query(
    ADD_ITEM, { name, urgent, checked, note });

  if (errors) {
    return {
      statusCode: 500,
      body: JSON.stringify(errors)
    };
  }

  return {
    statusCode: 200,
    body: JSON.stringify({ item: data.createItem })
  };
};
The remaining capabilities — updating and deleting notes and items — follow the same pattern. After implementing them, the directory looks like:

The store, its API backed by serverless functions, and the routes have all been built and tested. What remains is the interface, for which Gatsby — a React-based static site generator — is used.
Building the Gatsby Front End
Rather than a starter project, this build initializes Gatsby manually to show the pieces. Install gatsby-cli globally:
npm install -g gatsby-cliThen install gatsby, react and react-dom:
yarn add gatsby react react-domAdd a develop script to the scripts section of package.json:
"scripts": {
  "develop": "gatsby develop"
 }
Gatsby requires a gatsby-config.js at the project root:
module.exports = {
  // keep it empty
}
Create src, then src/pages, then src/pages/index.js:
import React, { useEffect, useState } from 'react';

export default () => {
  const [loading, setLoading ] = useState(false);
  const [shopnotes, setShopnotes] = useState(null);

  return (
    <>
      <h1>Shopnotes to load here...</h1>
    </>
  )
}
Locally, gatsby develop normally runs the app, but since the client must run alongside Netlify Functions, continue with netlify dev:
netlify devThe page is available at http://localhost:8888:

Builds produce output folders that should not go to the repository, so add .cache, node_modules and public to .gitignore:
.cache
public
node_modules
*.env
The project directory should now match:

The UI Components
The shopnote interface decomposes into small logical components:
- Header: the logo, heading, and the create button for a shop note.
- Shopnotes: the list of notes.
- Note: an individual note containing one or more items.
- Item: an individual item with its name and the actions to add, remove or edit it.
These are the sections shown below:

Install the additional dependencies the interface needs to function and look right:
yarn add bootstrap lodash moment react-bootstrap react-feather shortidFetching all notes uses React's useEffect hook to call the API and update the state:
useEffect(() => {
  axios("/api/get-shopnotes").then(result => {
    if (result.status !== 200) {
      console.error("Error loading shopnotes");
      console.error(result);
      return;
    }
    setShopnotes(result.data.shopnotes);
    setLoading(true);
  });
}, [loading]);
The return section renders the data once loaded, passing it to the Shopnotes component:
return (
  <div className="main">
    <Header />
    {
      loading ? <Shopnotes data = { shopnotes } /> : <h1>Loading...</h1>
    }
  </div>
);
The complete index.js creates the initial route (/) and composes Shopnotes, Note and Item; the component files live in src/components. A final index.css under the pages folder handles styling:
import 'bootstrap/dist/css/bootstrap.min.css';
import './index.css'
At this stage the directory structure looks like this:

Deploying to Netlify CDN
Running locally is productive but not publicly reachable. Commit all changes to the Git repository (shopnote), log in to Netlify and click New site from Git:

Select the Git service holding the code (GitHub here):

Browse to and select the project:

Provide the build command and publish directory, then open the advanced configuration and add the FAUNA_SERVER_SECRET key/value pair from .env, pasting each into its field. Click deploy.

The build succeeds in a couple of minutes and the site goes live right after.
Takeaways
- The Jamstack rests on client-side JavaScript, reusable APIs and prebuilt markup; roughly 70%–80% of features that once required a custom back end can now be handled on the front end or by services.
- Fauna provides the data API, reachable through GraphQL or FQL.
- Netlify serverless functions integrate with Fauna through GraphQL mutations and queries — useful where custom authentication is needed alongside a flexible solution such as Auth0.
- Gatsby and other static site generators contribute to the Jamstack's fast end-user experience.