

Running a store online is no longer optional for most retailers. Selling through Etsy, Shopify or Amazon removes the development burden, but it also removes control over the customer experience and adds platform costs. A headless e-commerce API takes the opposite approach: the backend handles customers, orders, shipments and payments, while the frontend is entirely yours to design.
This walkthrough builds that frontend with Angular 11 against Commerce Layer as the headless API, using Paypal for payment processing.
Before You Start
Three accounts and one tool are needed. Install the Angular CLI via npm to initialize and scaffold the project:
npm install -g @angular/cliNext, create a Commerce Layer developer account, then a test organization seeded with test data — this lets you develop against realistic records instead of inventing them. Organization creation is available at core.commercelayer.io/admin/account/organizations/new.

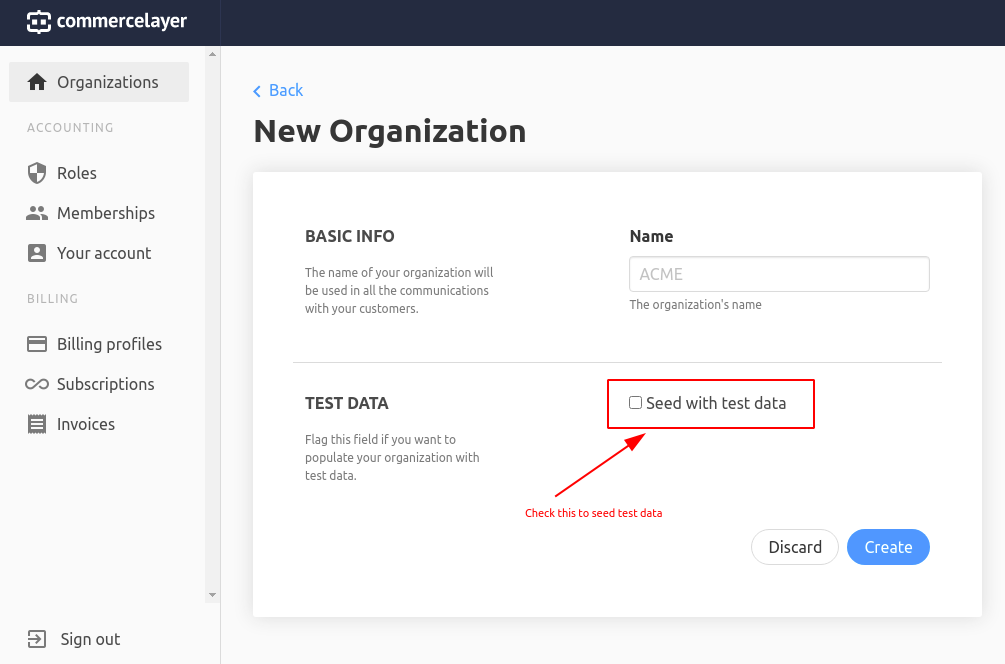
Finally, open a Paypal Sandbox account, which ships with a test business and a test personal account. Sandbox transactions exercise the full flow without moving real money.
Wiring Paypal Into Commerce Layer
Paypal payments only work on Commerce Layer once API keys are in place. In the Paypal developer dashboard's accounts overview, pick a business account and look under the API credentials tab; the Default Application lives under REST Apps.
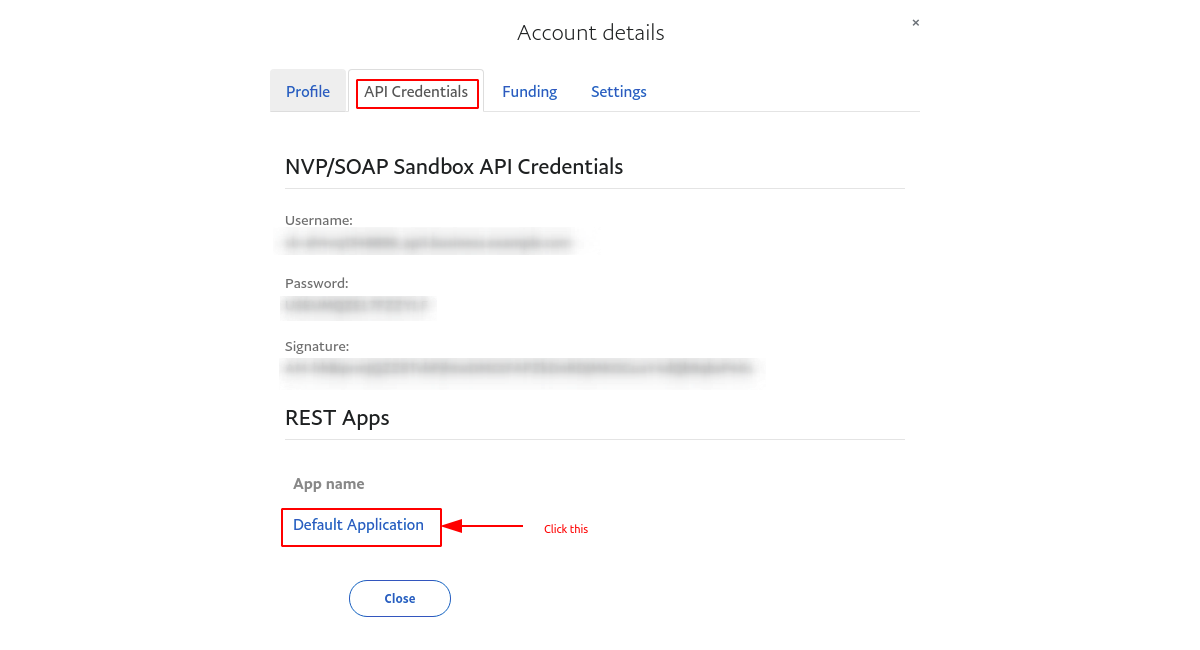
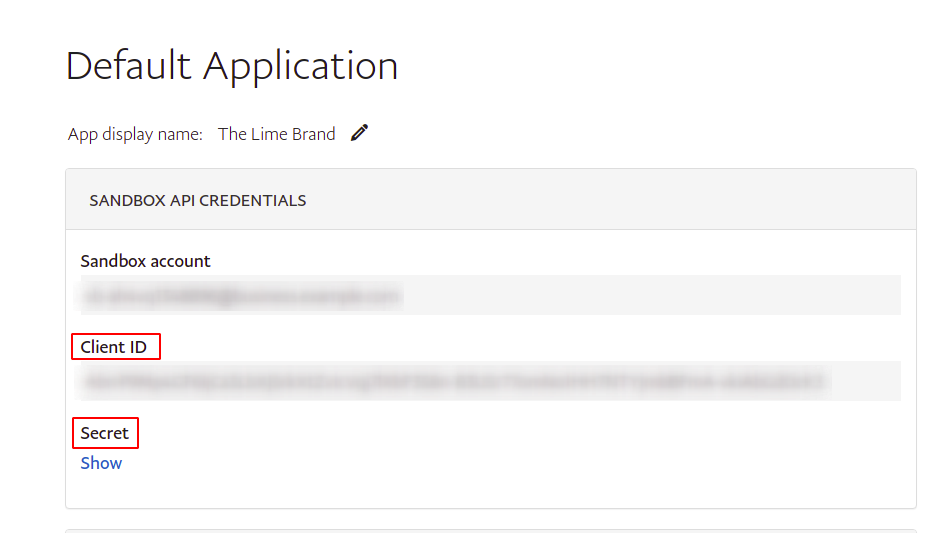
Back in the Commerce Layer organization dashboard, register a Paypal payment gateway under Settings > Payments > Payment Gateways > Paypal, supplying the client Id and secret from Paypal.
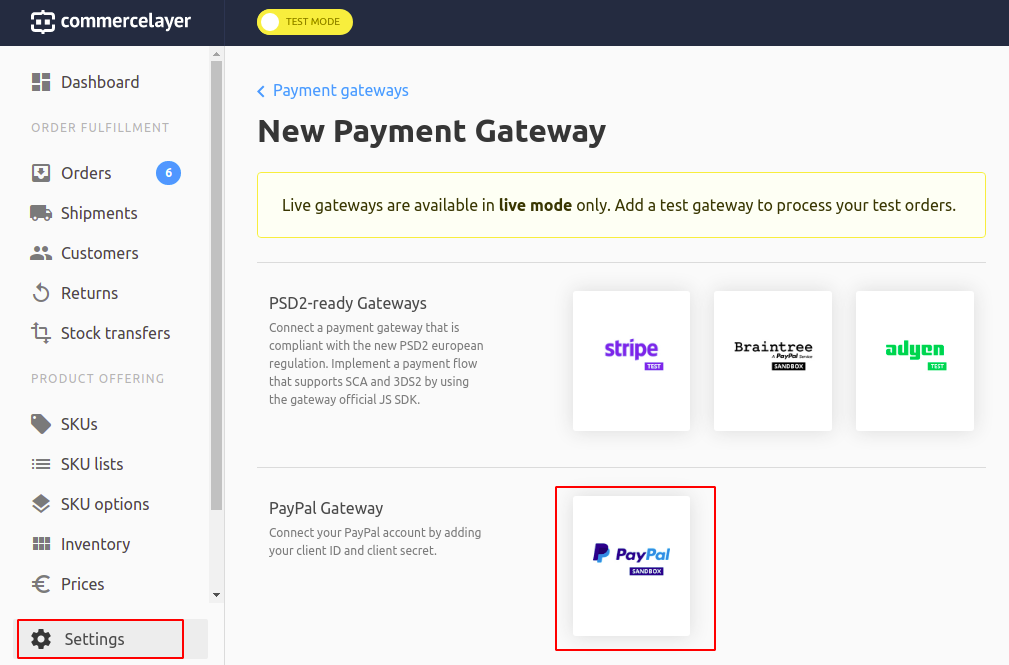
The gateway alone does not make Paypal selectable — each market you target needs its own Paypal payment method. Add those via Settings > Payments > Payment Methods > New Payment Method.

Request Routing: What This Article Changes
Commerce Layer splits its routing in two: /oauth/token trades credentials for a token, and every other endpoint follows /api/:resource and requires that token.
Only the frontend is in scope here. Tokens are held server-side, sessions track ownership, and the client gets an http-only cookie carrying a session id. That server layer is not described in this article, but the routes it exposes mirror the Commerce Layer API one-for-one, with a few extra session-management routes that have no API equivalent; those are flagged where they appear, with guidance on reproducing the behavior.
Request bodies are the other deliberate deviation. Because requests are relayed to a server that injects the token, the bodies are shaped for convenient sending rather than for the API directly. Any mismatch is called out in the relevant service. You will need to pick your own secure token storage strategy and adjust bodies to satisfy Commerce Layer exactly; when a body differs, the API reference and guides are linked for the correct shape.
Organizing the Codebase
Four foundational modules plus four feature modules make up the app. The core, data and shared modules carry cross-cutting concerns; the feature modules bundle pages and components around a single area of the store.
- core module,
- data module,
- shared module,
- feature modules.
The feature modules are:
- auth,
- product,
- cart,
- checkout.
Each module is explained alongside its contents as it comes up. The tree below shows the src/app folder and where each module lives.
src
├── app
│   ├── core
│   ├── data
│   ├── features
│   │   ├── auth
│   │   ├── cart
│   │   ├── checkout
│   │   └── products
└── shared
Scaffolding and Dependencies
The sample organization is called The LIme Brand, pre-seeded with Commerce Layer test data.
ng new lime-appTwo packages get installed: Angular Material for components and styling, and Until Destroy to unsubscribe from observables automatically when components are torn down.
npm install @ngneat/until-destroy
ng add @angular/material
Assets, Styles, Environment
Commerce Layer addresses require alpha-2 country codes, so drop a JSON file of them at assets/json/country-codes.json.
Global rules shared by the components go into styles.css.
Configuration has two fields. apiUrl points at the Commerce Layer API and is consumed by the data services. clientUrl is the app's own domain, needed when building Paypal redirect URLs.
The Shared Module
Anything used by more than one module — services, pipes, components — lands in the shared module.
ng g m sharedConcretely: three components, one pipe, two services, laid out as follows.
src/app/shared
├── components
│   ├── item-quantity
│   │   ├── item-quantity.component.css
│   │   ├── item-quantity.component.html
│   │   └── item-quantity.component.ts
│   ├── simple-page
│   │   ├── simple-page.component.css
│   │   ├── simple-page.component.html
│   │   └── simple-page.component.ts
│   └── title
│       ├── title.component.css
│       ├── title.component.html
│       └── title.component.ts
├── pipes
│   └── word-wrap.pipe.ts
├── services
│   ├── http-error-handler.service.ts
│   └── local-storage.service.ts
└── shared.module.ts
The module also re-exports a set of frequently used Angular Material components, so the other modules can pull them in without repeating individual imports.
@NgModule({
  declarations: [SimplePageComponent, TitleComponent, WordWrapPipe, ItemQuantityComponent],
  imports: [CommonModule, MatIconModule, MatButtonModule, MatTooltipModule, MatMenuModule, RouterModule],
  exports: [
    CommonModule,
    ItemQuantityComponent,
    MatButtonModule,
    MatIconModule,
    MatSnackBarModule,
    MatTooltipModule,
    SimplePageComponent,
    TitleComponent,
    WordWrapPipe
  ]
})
export class SharedModule { }
Components
Item quantity
This control handles how many units of an item go into the cart and is shared by the cart and product modules. Material's select was an obvious candidate but clashed visually with the Material inputs used everywhere else in the forms; a Material menu matched those inputs far better, so a custom selector was built from one.
ng g c shared/components/item-quantityIts API is three inputs and one output. quantity is the starting number of units, maxValue caps how many can be chosen at once, and disabled toggles the control. setQuantityEvent fires after a selection. Initialization fills the menu's values, and a setQuantity method emits setQuantityEvent.
@Component({
  selector: 'app-item-quantity',
  templateUrl: './item-quantity.component.html',
  styleUrls: ['./item-quantity.component.css']
})
export class ItemQuantityComponent implements OnInit {
  @Input() quantity: number = 0;
  @Input() maxValue?: number = 0;
  @Input() disabled?: boolean = false;
  @Output() setQuantityEvent = new EventEmitter<number>();

  values: number[] = [];

  constructor() { }

  ngOnInit() {
    if (this.maxValue) {
      for (let i = 1; i <= this.maxValue; i++) {
        this.values.push(i);
      }
    }
  }

  setQuantity(value: number) {
    this.setQuantityEvent.emit(value);
  }
}
Template:
<button mat-stroked-button [matMenuTriggerFor]="menu" [disabled]="disabled">
    {{quantity}}
    <mat-icon *ngIf="!disabled">expand_more</mat-icon>
</button>
<mat-menu #menu="matMenu">
    <button *ngFor="let no of values" (click)="setQuantity(no)" mat-menu-item>{{no}}</button>
</mat-menu>
Styles:
button {
    margin: 3px;
}
Title
Serving double duty as a checkout stepper indicator and as a plain heading on simpler screens. Material's own stepper was passed over: it fit poorly with a checkout flow that long, degraded on small screens, and cost more implementation time. A lightweight title can be reused both as a step indicator and as an ordinary heading.
ng g c shared/components/titleIt accepts title, subtitle, a numeric no, and a centerText flag controlling text alignment.
@Component({
  selector: 'app-title',
  templateUrl: './title.component.html',
  styleUrls: ['./title.component.css']
})
export class TitleComponent {
  @Input() title: string = '';
  @Input() subtitle: string = '';
  @Input() no?: string;
  @Input() centerText?: boolean = false;
}
Template:
<div id="header">
    <h1 *ngIf="no" class="mat-display-1" id="no">{{no}}</h1>
    <div [ngClass]="{ 'centered-section': centerText}">
        <h1 class="mat-display-2">{{title}}</h1>
        <p id="subheading">{{subtitle}}</p>
    </div>
</div>
Simple page
A handful of screens need nothing beyond an icon, a heading and a button — the payment and order-placement pages, the empty cart, the error page, the 404. This component covers all of them. A click either navigates to a route or triggers a buttonEvent for the caller to handle.
Create it with:
ng g c shared/components/simple-pageComponent file:
@Component({
  selector: 'app-simple-page',
  templateUrl: './simple-page.component.html',
  styleUrls: ['./simple-page.component.css']
})
export class SimplePageComponent {
  @Input() title: string = '';
  @Input() subtitle?: string;
  @Input() number?: string;
  @Input() icon?: string;
  @Input() buttonText: string = '';
  @Input() centerText?: boolean = false;
  @Input() buttonDisabled?: boolean = false;
  @Input() route?: string | undefined;
  @Output() buttonEvent = new EventEmitter();

  constructor(private router: Router) { }

  buttonClicked() {
    if (this.route) {
      this.router.navigateByUrl(this.route);
    } else {
      this.buttonEvent.emit();
    }
  }
}
Template contents:
<div id="container">
    <app-title no="{{number}}" title="{{title}}" subtitle="{{subtitle}}" [centerText]="centerText"></app-title>
    <div *ngIf="icon" id="icon-container">
        <mat-icon color="primary" class="icon">{{icon}}</mat-icon>
    </div>
    <button mat-flat-button color="primary" (click)="buttonClicked()" [disabled]="buttonDisabled">
        {{buttonText}}
    </button>
</div>
Pipe
Word wrap
Product names and similar strings are frequently long, and getting them to wrap inside Material components can be awkward. This pipe truncates to a given length and appends ellipses.
Generate it with:
ng g pipe shared/pipes/word-wrapContents:
import { Pipe, PipeTransform } from '@angular/core';

@Pipe({
  name: 'wordWrap'
})
export class WordWrapPipe implements PipeTransform {
  transform(value: string, length: number): string {
    return `${value.substring(0, length)}...`;
  }
}
Services
HTTP error handler
The project has many HTTP services, and writing error handling per method is pure repetition. One shared handler avoids that and leaves room to forward formatted errors to external logging platforms.
Generate it with:
ng g s shared/services/http-error-handlerIt holds a single method, which formats the message according to whether the failure was client-side or server-side. Further refinements are possible.
@Injectable({
  providedIn: 'root'
})
export class HttpErrorHandler {

  constructor() { }

  handleError(err: HttpErrorResponse): Observable {
    let displayMessage = '';

    if (err.error instanceof ErrorEvent) {
      displayMessage = `Client-side error: ${err.error.message}`;
    } else {
      displayMessage = `Server-side error: ${err.message}`;
    }

    return throwError(displayMessage);
  }
}
Local storage
Two things get persisted client-side: the count of items in the cart, and the order Id. In Commerce Layer, an order is what a cart corresponds to.
Generate it with:
ng g s shared/services/local-storageFour methods cover add, delete and get, plus one that empties local storage.
import { Injectable } from '@angular/core';

@Injectable({
  providedIn: 'root'
})
export class LocalStorageService {

  constructor() { }

  addItem(key: string, value: string) {
    localStorage.setItem(key, value);
  }

  deleteItem(key: string) {
    localStorage.removeItem(key);
  }

  getItem(key: string): string | null {
    return localStorage.getItem(key);
  }

  clear() {
    localStorage.clear();
  }
}
Building the Data Layer
A dedicated data module handles retrieval and management of everything the app consumes. Generate it with:
ng g m dataIts structure is as follows:
src/app/data
├── data.module.ts
├── models
└── services
Interface Declarations
Sixteen interfaces describe the shape of API data. Create them with:
for model in \
address cart country customer-address \
customer delivery-lead-time line-item order \
payment-method payment-source paypal-payment \
price shipment shipping-method sku stock-location; \
do ng g interface "data/models/${model}"; done
The table below links each interface file to its description.
| Interface | Description |
|---|---|
| Address | Represents a general address. |
| Cart | Client side version of an order tracking the number of products a customer intends to purchase. |
| Country | Alpha-2 country code. |
| Customer Address | An address associated with a customer. |
| Customer | A registered user. |
| Delivery Lead Time | Represents the amount of time it will take to delivery a shipment. |
| Line Item | An itemized product added to the cart. |
| Order | A shopping cart or collection of line items. |
| Payment Method | A payment type made available to an order. |
| Payment Source | A payment associated with an order. |
| Paypal Payment | A payment made through Paypal |
| Price | Price associated with an SKU. |
| Shipment | Collection of items shipped together. |
| Shipping Method | Method through which a package is shipped. |
| SKU | A unique stock-keeping unit. |
| Stock Location | Location that contains SKU inventory. |
Services
Eleven services live in this folder, covering creation, retrieval and manipulation of app data.
for service in \
address cart country customer-address \
customer delivery-lead-time line-item \
order paypal-payment shipment sku; \
do ng g s "data/services/${service}"; done
Addresses
Creating and attaching billing and shipping addresses to orders is handled here, via one method to create an address and one to fetch it. Calls go to /api/addresses; direct Commerce Layer requests must follow the data structure in the API's address creation example.
@Injectable({
  providedIn: 'root'
})
export class AddressService {
  private url: string = `${environment.apiUrl}/api/addresses`;

  constructor(private http: HttpClient, private eh: HttpErrorHandler) { }

  createAddress(address: Address): Observable<Address> {
    return this.http.post<Address>(this.url, address)
      .pipe(catchError(this.eh.handleError));
  }

  getAddress(id: string): Observable<Address> {
    return this.http.get<Address>(`${this.url}/${id}`)
      .pipe(catchError(this.eh.handleError));
  }
}
Cart
The cart tracks item quantity and the order Id. Rather than call the API for an item count each time a line item appears, the count is kept client-side in local storage, avoiding unnecessary order fetches. The service also holds the order Id: adding a first item creates an order on Commerce Layer, and that Id must survive until checkout. A BehaviorSubject exposes the current cart value as an observable so the header (which holds the cart button) can react to changes without polling. When an order completes, the stored values are cleared so later orders start clean. All of this runs through the local storage service.
@Injectable({
  providedIn: 'root'
})
export class CartService {
  private cart = new BehaviorSubject({
    orderId: this.orderId,
    itemCount: this.itemCount
  });

  cartValue$ = this.cart.asObservable();

  constructor(private storage: LocalStorageService) { }

  get orderId(): string {
    const id = this.storage.getItem('order-id');
    return id ? id : '';
  }

  set orderId(id: string) {
    this.storage.addItem('order-id', id);
    this.cart.next({ orderId: id, itemCount: this.itemCount });
  }

  get itemCount(): number {
    const itemCount = this.storage.getItem('item-count');

    return itemCount ? parseInt(itemCount) : 0;
  }

  set itemCount(amount: number) {
    this.storage.addItem('item-count', amount.toString());
    this.cart.next({ orderId: this.orderId, itemCount: amount });
  }

  incrementItemCount(amount: number) {
    this.itemCount = this.itemCount + amount;
  }

  decrementItemCount(amount: number) {
    this.itemCount = this.itemCount - amount;
  }

  clearCart() {
    this.storage.deleteItem('item-count');
    this.cart.next({ orderId: '', itemCount: 0 });
  }
}
Countries
Commerce Layer requires an alpha 2 code for country fields on addresses. getCountries reads a json file holding the codes for every country and returns it.
@Injectable({
  providedIn: 'root'
})
export class CountryService {

  constructor(private http: HttpClient) { }

  getCountries(): Observable {
    return this.http.get('./../../../assets/json/country-codes.json');
  }
}
Customer Addresses
This service links addresses to customers and reads back either one address or the full set. It backs the step where a customer attaches shipping and billing addresses to an order. createCustomer creates a customer; getCustomerAddresses returns all of a customer's addresses; getCustomerAddress returns a single one. Post bodies for address creation must match the API's documented example.
@Injectable({
  providedIn: 'root'
})
export class CustomerAddressService {
  private url: string = `${environment.apiUrl}/api/customer_addresses`;

  constructor(private http: HttpClient, private eh: HttpErrorHandler) { }

  createCustomerAddress(addressId: string, customerId: string): Observable<CustomerAddress> {
    return this.http.post<CustomerAddress>(this.url, {
      addressId: addressId, customerId: customerId
    })
      .pipe(catchError(this.eh.handleError));
  }

  getCustomerAddresses(): Observable<CustomerAddress[]> {
    return this.http.get<CustomerAddress[]>(`${this.url}`)
      .pipe(catchError(this.eh.handleError));
  }

  getCustomerAddress(id: string): Observable<CustomerAddress> {
    return this.http.get<CustomerAddress>(`${this.url}/${id}`)
      .pipe(catchError(this.eh.handleError));
  }
}
Customers
Sign-up creates a customer through createCustomerMethod, while getCustomer fetches by Id and getCurrentCustomer returns whoever is logged in. Data should be structured as in the customers create reference, with first and last names placed in metadata attributes. Note that the route /api/customers/current does not exist on Commerce Layer — resolving the logged-in customer is left to your own implementation.
@Injectable({
  providedIn: 'root'
})
export class CustomerService {
  private url: string = `${environment.apiUrl}/api/customers`;

  constructor(private http: HttpClient, private eh: HttpErrorHandler) { }

  createCustomer(email: string, password: string, firstName: string, lastName: string): Observable<Customer> {
    return this.http.post<Customer>(this.url, {
      email: email,
      password: password,
      firstName: firstName,
      lastName: lastName
    })
      .pipe(catchError(this.eh.handleError));
  }

  getCurrentCustomer(): Observable<Customer> {
    return this.http.get<Customer>(`${this.url}/current`)
      .pipe(catchError(this.eh.handleError));
  }

  getCustomer(id: string): Observable<Customer> {
    return this.http.get<Customer>(`${this.url}/${id}`)
      .pipe(catchError(this.eh.handleError));
  }
}
Delivery Lead Times
Returns shipping timeline information for the various stock locations.
@Injectable({
  providedIn: 'root'
})
export class DeliveryLeadTimeService {
  private url: string = `${environment.apiUrl}/api/delivery_lead_times`;

  constructor(private http: HttpClient, private eh: HttpErrorHandler) { }

  getDeliveryLeadTimes(): Observable<DeliveryLeadTime[]> {
    return this.http.get<DeliveryLeadTime[]>(this.url)
      .pipe(catchError(this.eh.handleError));
  }
}
Line Items
Manages the items in a cart: creating an item as soon as it is added, fetching its details, updating it when the quantity changes, and deleting it on removal. Request bodies for create and update operations must match the documentation example.
@Injectable({
  providedIn: 'root'
})
export class LineItemService {
  private url: string = `${environment.apiUrl}/api/line_items`;

  constructor(private http: HttpClient, private eh: HttpErrorHandler) { }

  createLineItem(lineItem: LineItem): Observable<LineItem> {
    return this.http.post<LineItem>(this.url, lineItem)
      .pipe(catchError(this.eh.handleError));
  }

  getLineItem(id: string): Observable<LineItem> {
    return this.http.get<LineItem>(`${this.url}/${id}`)
      .pipe(catchError(this.eh.handleError));
  }

  updateLineItem(id: string, quantity: number): Observable<LineItem> {
    return this.http.patch<LineItem>(`${this.url}/${id}`, { quantity: quantity })
      .pipe(catchError(this.eh.handleError));
  }

  deleteLineItem(id: string): Observable<LineItem> {
    return this.http.delete<LineItem>(`${this.url}/${id}`)
      .pipe(catchError(this.eh.handleError));
  }
}
Orders
Orders can be created, updated, deleted or fetched, with shipments retrievable separately through getOrderShipments. The checkout flow leans on this service heavily. Fetching an entire order with all relations is costly, so GetOrderParams selects the fields to return — the Commerce Layer equivalent being the include query parameter, which lists the order relationships to include. Required fields per stage are documented for the cart summary and the checkout stages.
Updates use UpdateOrderParams for the same reason: the token-populating server performs extra work depending on which field changes. Direct API callers can skip this, since Commerce Layer does not demand it, though the body should still resemble the API's update example.
@Injectable({
  providedIn: 'root'
})
export class OrderService {
  private url: string = `${environment.apiUrl}/api/orders`;

  constructor(
    private http: HttpClient,
    private eh: HttpErrorHandler) { }

  createOrder(): Observable<Order> {
    return this.http.post<Order>(this.url, {})
      .pipe(catchError(this.eh.handleError));
  }

  getOrder(id: string, orderParam: GetOrderParams): Observable<Order> {
    let params = {};
    if (orderParam != GetOrderParams.none) {
      params = { [orderParam]: 'true' };
    }

    return this.http.get<Order>(`${this.url}/${id}`, { params: params })
      .pipe(catchError(this.eh.handleError));
  }

  updateOrder(order: Order, params: UpdateOrderParams[]): Observable<Order> {
    let updateParams = [];
    for (const param of params) {
      updateParams.push(param.toString());
    }

    return this.http.patch<Order>(
      `${this.url}/${order.id}`,
      order,
      { params: { 'field': updateParams } }
    )
      .pipe(catchError(this.eh.handleError));
  }

  getOrderShipments(id: string): Observable<Shipment[]> {
    return this.http.get<Shipment[]>(`${this.url}/${id}/shipments`)
      .pipe(catchError(this.eh.handleError));
  }
}
Paypal Payments
Creates and updates Paypal payments against orders, and fetches one by id. Creation bodies should follow the Paypal payment create example.
@Injectable({
  providedIn: 'root'
})
export class PaypalPaymentService {
  private url: string = `${environment.apiUrl}/api/paypal_payments`;

  constructor(private http: HttpClient, private eh: HttpErrorHandler) { }

  createPaypalPayment(payment: PaypalPayment): Observable<PaypalPayment> {
    return this.http.post<PaypalPayment>(this.url, payment)
      .pipe(catchError(this.eh.handleError));
  }

  getPaypalPayment(id: string): Observable<PaypalPayment> {
    return this.http.get<PaypalPayment>(`${this.url}/${id}`)
      .pipe(catchError(this.eh.handleError));
  }

  updatePaypalPayment(id: string, paypalPayerId: string): Observable<PaypalPayment> {
    return this.http.patch<PaypalPayment>(
      `${this.url}/${id}`,
      { paypalPayerId: paypalPayerId }
    )
      .pipe(catchError(this.eh.handleError));
  }
}
Shipments
Fetches or updates a shipment by id. Update bodies should resemble the shipment update example.
@Injectable({
  providedIn: 'root'
})
export class ShipmentService {
  private url: string = `${environment.apiUrl}/api/shipments`;

  constructor(private http: HttpClient, private eh: HttpErrorHandler) { }

  getShipment(id: string): Observable<Shipment> {
    return this.http.get<Shipment>(`${this.url}/${id}`)
      .pipe(catchError(this.eh.handleError));
  }

  updateShipment(id: string, shippingMethodId: string): Observable<Shipment> {
    return this.http.patch<Shipment>(
      `${this.url}/${id}`,
      { shippingMethodId: shippingMethodId }
    )
      .pipe(catchError(this.eh.handleError));
  }
}
SKUs
Reads products from the store. Multi-product retrieval supports pagination with a configurable page size; page and page size belong in query params, as in the pagination example for direct API requests. A single product can be fetched by id.
@Injectable({
  providedIn: 'root'
})
export class SkuService {
  private url: string = `${environment.apiUrl}/api/skus`;

  constructor(private http: HttpClient, private eh: HttpErrorHandler) { }

  getSku(id: string): Observable<Sku> {
    return this.http.get<Sku>(`${this.url}/${id}`)
      .pipe(catchError(this.eh.handleError));
  }

  getSkus(page: number, pageSize: number): Observable<Sku[]> {
    return this.http.get<Sku[]>(
      this.url,
      {
        params: {
          'page': page.toString(),
          'pageSize': pageSize.toString()
        }
      })
      .pipe(catchError(this.eh.handleError));
  }
}
Core Module
Application-wide essentials sit here: shared components such as the header, pages such as the 404, plus authentication and session services, interceptors and guards.
src/app/core
├── components
│   ├── error
│   │   ├── error.component.css
│   │   ├── error.component.html
│   │   └── error.component.ts
│   ├── header
│   │   ├── header.component.css
│   │   ├── header.component.html
│   │   └── header.component.ts
│   └── not-found
│       ├── not-found.component.css
│       ├── not-found.component.html
│       └── not-found.component.ts
├── core.module.ts
├── guards
│   └── empty-cart.guard.ts
├── interceptors
│   └── options.interceptor.ts
└── services
    ├── authentication.service.ts
    ├── header.service.ts
    └── session.service.ts
Generate the module and its contents with:
ng g m core
ng g g core/guards/empty-cart
ng g s core/header/header
ng g interceptor core/interceptors/options
for comp in header error not-found; do ng g c "core/${comp}"; done
for serv in authentication session; do ng g s "core/authentication/${serv}"; done
The module file registers routes for NotFoundComponent and ErrorComponent:
@NgModule({
  declarations: [HeaderComponent, NotFoundComponent, ErrorComponent],
  imports: [
    RouterModule.forChild([
      { path: '404', component: NotFoundComponent },
      { path: 'error', component: ErrorComponent },
      { path: '**', redirectTo: '/404' }
    ]),
    MatBadgeModule,
    SharedModule
  ],
  exports: [HeaderComponent]
})
export class CoreModule { }
Core Services
The services folder holds the authentication, session and header services.
Authentication Service
AuthenticationService acquires client tokens and customer tokens, both of which gate the rest of the API's routes. A customer token comes from exchanging an email and password and carries broader permissions; a client token needs no credentials and carries narrower ones. getClientSession obtains a client token and login a customer token, and both methods create a session as well. Request bodies should follow the client-credentials and password examples in the authentication docs.
@Injectable({
  providedIn: 'root'
})
export class AuthenticationService {
  private url: string = `${environment.apiUrl}/oauth/token`;

  constructor(private http: HttpClient, private eh: HttpErrorHandler) { }

  getClientSession(): Observable<object> {
    return this.http.post<object>(
      this.url,
      { grantType: 'client_credentials' })
      .pipe(catchError(this.eh.handleError));
  }

  login(email: string, password: string): Observable<object> {
    return this.http.post<object>(
      this.url,
      { username: email, password: password, grantType: 'password' })
      .pipe(catchError(this.eh.handleError));
  }
}
Session Service
SessionService manages sessions. A BehaviorSubject observable named loggedInStatus broadcasts login state; setLoggedInStatus assigns it (true logged in, false not), isCustomerLoggedIn queries the server for an existing session, and logout tears the server session down. The last two hit server-only routes that populate the request with a token — they are not part of Commerce Layer and must be implemented separately.
@Injectable({
  providedIn: 'root'
})
export class SessionService {
  private url: string = `${environment.apiUrl}/session`;
  private isLoggedIn = new BehaviorSubject(false);

  loggedInStatus = this.isLoggedIn.asObservable();

  constructor(private http: HttpClient, private eh: HttpErrorHandler) { }

  setLoggedInStatus(status: boolean) {
    this.isLoggedIn.next(status);
  }

  isCustomerLoggedIn(): Observable<{ message: string }> {
    return this.http.get<{ message: string }>(`${this.url}/customer/status`)
      .pipe(catchError(this.eh.handleError));
  }

  logout(): Observable<{ message: string }> {
    return this.http.get<{ message: string }>(`${this.url}/destroy`)
      .pipe(catchError(this.eh.handleError));
  }
}
Header Service
Controls whether the header shows its cart, login and logout buttons. They are hidden on the login and signup pages and visible elsewhere to avoid confusion. A BehaviourSubject observable, showHeaderButtons, carries the state, and setHeaderButtonsVisibility sets it.
@Injectable({
  providedIn: 'root'
})
export class HeaderService {
  private headerButtonsVisibility = new BehaviorSubject(true);

  showHeaderButtons = this.headerButtonsVisibility.asObservable();

  constructor() { }

  setHeaderButtonsVisibility(visible: boolean) {
    this.headerButtonsVisibility.next(visible);
  }
}
Core Components
Error and Not Found Pages
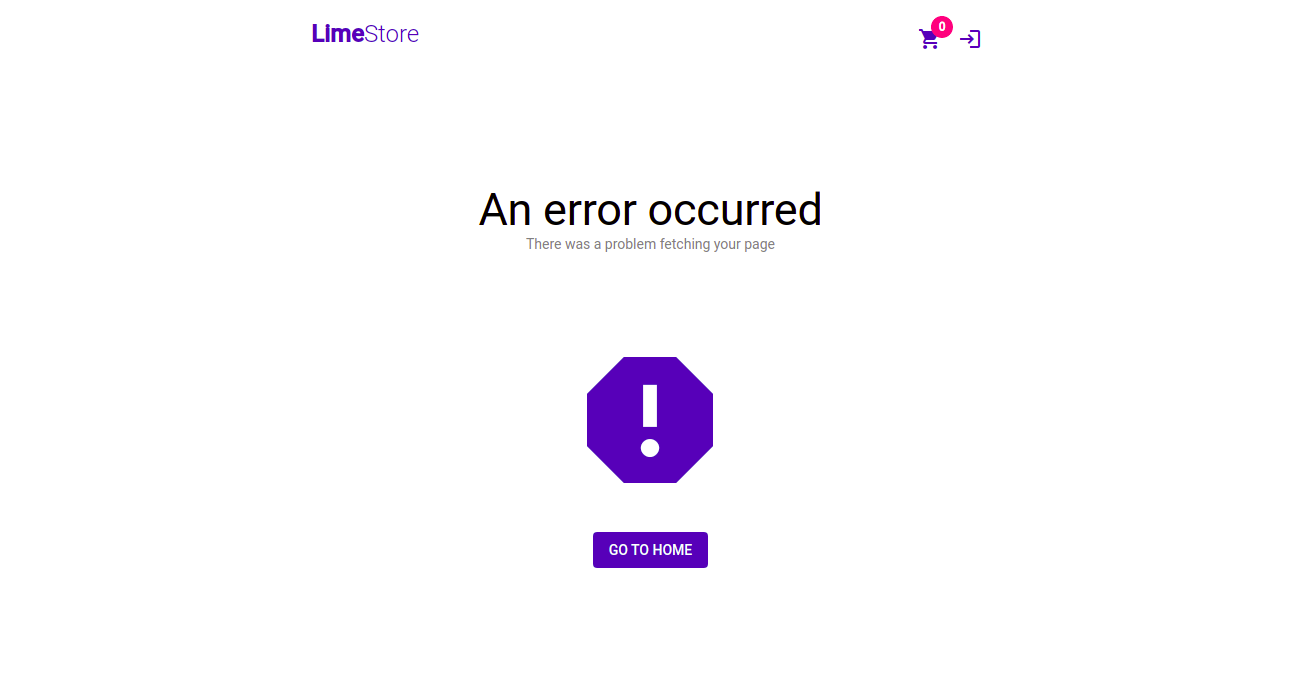
The error component stands in as a page whenever failed server requests leave a page with no data, telling the user something went wrong instead of rendering blank. Its template:
<app-simple-page title="An error occurred" subtitle="There was a problem fetching your page" buttonText="GO TO HOME" icon="report" [centerText]="true" route="/">
</app-simple-page>
Rendered:
The not-found component is the 404 reached when the router has no match for a requested route. Only its template is modified.
<app-simple-page title="404: Page not found" buttonText="GO TO HOME" icon="search" subtitle="The requested page could not be found" [centerText]="true" route="/"></app-simple-page>
Header Component
HeaderComponent is the top-of-page header holding the app title and the cart, login and logout buttons. On init it checks for a current session by subscribing to this.session.isCustomerLoggedIn(), and it subscribes to this.session.loggedInStatus to catch logouts during the app's lifetime. The this.header.showHeaderButtons subscription decides button visibility per page, while this.cart.cartValue$ supplies the cart item count.
A logout method destroys the session and assigns a client token — necessary because a token is still needed for every API request once the customer-token session is gone. A material snackbar reports success or failure of the logout. Subscriptions are torn down automatically on component destruction thanks to the @UntilDestroy({ checkProperties: true }) decorator.
@UntilDestroy({ checkProperties: true })
@Component({
  selector: 'app-header',
  templateUrl: './header.component.html',
  styleUrls: ['./header.component.css']
})
export class HeaderComponent implements OnInit {
  cartAmount: number = 0;
  isLoggedIn: boolean = false;
  showButtons: boolean = true;

  constructor(
    private session: SessionService,
    private snackBar: MatSnackBar,
    private cart: CartService,
    private header: HeaderService,
    private auth: AuthenticationService
  ) { }

  ngOnInit() {
    this.session.isCustomerLoggedIn()
      .subscribe(
        () => {
          this.isLoggedIn = true;
          this.session.setLoggedInStatus(true);
        }
      );

    this.session.loggedInStatus.subscribe(status => this.isLoggedIn = status);

    this.header.showHeaderButtons.subscribe(visible => this.showButtons = visible);

    this.cart.cartValue$.subscribe(cart => this.cartAmount = cart.itemCount);
  }

  logout() {
    concat(
      this.session.logout(),
      this.auth.getClientSession()
    ).subscribe(
      () => {
        this.snackBar.open('You have been logged out.', 'Close', { duration: 4000 });
        this.session.setLoggedInStatus(false);
      },
      err => this.snackBar.open('There was a problem logging you out.', 'Close', { duration: 4000 })
    );
  }
}
The template follows; its styling is linked here.
<div id="header-container">
    <div id="left-half" routerLink="/">
        <h1><span id="lime-text">Lime</span><span id="store-text">Store</span></h1>
    </div>
    <div id="right-half">
        <div id="button-container" *ngIf="showButtons">
            <button mat-icon-button color="primary" aria-label="shopping cart">
                <mat-icon [matBadge]="cartAmount" matBadgeColor="accent" aria-label="shopping cart" routerLink="/cart">shopping_cart</mat-icon>
            </button>
            <button mat-icon-button color="primary" aria-label="login" *ngIf="!isLoggedIn">
                <mat-icon aria-label="login" matTooltip="login" routerLink="/login">login</mat-icon>
            </button>
            <button mat-icon-button color="primary" aria-label="logout" *ngIf="isLoggedIn" (click)="logout()">
                <mat-icon aria-label="logout" matTooltip="logout">logout</mat-icon>
            </button>
        </div>
    </div>
</div>
Guard: Empty Cart
Checkout and billing routes are blocked when the cart is empty, since those flows require a valid order — an order being a cart with items. With items present the user proceeds; otherwise they are redirected to an empty-cart page.
@Injectable({
  providedIn: 'root'
})
export class EmptyCartGuard implements CanActivate {
  constructor(private cart: CartService, private router: Router) { }

  canActivate(
    route: ActivatedRouteSnapshot,
    state: RouterStateSnapshot): Observable<boolean | UrlTree> | Promise<boolean | UrlTree> | boolean | UrlTree {
    if (this.cart.orderId) {
      if (this.cart.itemCount > 0) {
        return true;
      }
    }

    return this.router.parseUrl('/empty');
  }
}
Interceptor: Options
Every outgoing HTTP request passes through this interceptor, which appends a Content-Type header and a withCredentials property. The latter decides whether a request carries outgoing credentials such as the http-only cookies in use, while Content-Type declares that json resources are being sent to the server.
@Injectable()
export class OptionsInterceptor implements HttpInterceptor {

  constructor() { }

  intercept(request: HttpRequest<any>, next: HttpHandler): Observable<HttpEvent<any>> {
    request = request.clone({
      headers: request.headers.set('Content-Type', 'application/json'),
      withCredentials: true
    });

    return next.handle(request);
  }
}
The Four Feature Modules
Beyond the core layer, the app's functionality lives in four lazily-reachable feature areas: auth, product, cart, and checkout. Each bundles its own pages, its own module file, and the services it depends on.
Products: Browsing the Catalog
The products module carries two pages — a paginated list and a detail view.
Grid of SKUs, Advanced on Scroll
The ProductListComponent is what the user lands on first. Its Material grid list adapts its column count to the viewport width; the BreakpointObserver service decides how many columns to assign at initialization. Product data comes from SkuService.getProducts, with failures routed to the error page. Extra pages are pulled in through a getNextPage method.
Details and Adding to the Cart
Selecting an item opens ProductComponent, which shows the full name, price, and description plus an add-to-cart button. The product id arrives via route parameters on initialization and is used to look the product up through SkuService.
The addItemToCart method handles the cart logic: if no order exists yet, OrderService creates one, and a line item for the product is then added to it. If the order is already there, only the line item is created. A snackbar reports the outcome either way.
Authentication: Signup and Login
Available to unauthenticated visitors, and lazy-loaded accordingly, the auth module provides the signup and login pages.
Signup
Registration requires a first name, last name, email, password, and confirmation. The FormBuilder service builds the group; every field is required, the password must be at least eight characters, and a custom matchPasswords validator checks the two password entries against each other. On initialization the component tells HeaderService to hide the cart, login, and logout buttons in the header.
Once the form is valid, the signup method hands the input to CustomerService.createCustomer. Success means a snackbar confirming account creation and a redirect to the home page.
Login
Login takes an email and password, both required. The same HeaderService call hides the header's cart, login, and logout buttons on initialization. Credentials go to AuthenticationService; when they check out, SessionService records the login status and the user is returned to the page they came from. On failure, an error snackbar appears and the password field is cleared.
Cart: Reviewing the Order
Three pages sit in the cart module: the order summary, the coupon and gift card code entry screen, and an empty-cart page.
Applying Codes
The codes page gives the shopper two fields, one for coupons and one for gift cards, so discounts can be applied before checkout. Both addCoupon and addGiftCard work by calling OrderService.updateOrder, after which the fields are cleared and a snackbar reports success or failure.
Summary
The summary lists every item with its name, quantity, and image, and breaks down taxes, shipping, and discounts so the customer can judge the total before moving on.
OrderService supplies the order and its line items at initialization. Items can be edited or removed — deleteLineItem passes the line item id to LineItemService.deleteLineItem, and on success the cart's item count is refreshed via CartService. The checkout method then routes the user to the customer page to start checkout.
Empty Cart Fallback
Checkout with an empty cart shouldn't be reachable at all. A guard in the CoreModule catches those requests and redirects them to EmptyCartComponent, which simply uses SimplePageComponent to show explanatory text and a button back to the homepage.
Checkout: From Address to Placed Order
The largest module by far, checkout covers billing and shipping addresses, customer email, shipping and payment selection, and finally order placement and confirmation. It contains three components and seven pages.
Shared Components
Country selection. Because a Material select looks out of place next to the address form's input fields, this component uses a Material menu instead. On initialization, country codes are fetched through CountryService and stored on the countries property for the template to render. A single output, setCountryEvent, emits the selected country's alpha-2 code.
Address form. A valid Commerce Layer address needs first and last name, address line, city, zip code, state code, country code, and phone number. Built with FormBuilder and reused by both the billing and shipping pages, the component exposes input properties for button text, displayed title, and checkbox text, and outputs an event with the complete address when the button triggers addAddress, plus an isCheckboxChecked event when the checkbox changes.
Address list. Logged-in customers with saved addresses can skip retyping. On initialization, CustomerAddressService fetches their addresses when SessionService reports them as logged in. Selecting one fires the setAddressEvent output, which emits the address id to the parent.
Checkout Pages
Customer email. An order must be tied to an email address. If the customer is logged in, CustomerService supplies their current email and it becomes the default; otherwise, or if they change it, OrderService updates the order with the new address before routing to the billing page.
Billing address. Here the customer either supplies a new billing address or picks a saved one — logged-in users get both options, guests only the first. The showAddress property controls whether existing addresses appear, selectedCustomerAddressId holds a picked address, and sameShippingAddressAsBilling tracks whether the shipping address should match.
Initialization checks login status via SessionService and shows existing addresses if there are any. For a logged-in customer, updateBillingAddress clones the chosen address and sets it on the order through OrderService.updateOrder with the address id. Guests go through createAddress, where AddressService creates the address and the order is then updated with its id. Snackbars cover success and error cases. If the billing address doubles as the shipping address, the user continues to shipping methods; otherwise they land on the shipping address page.
Shipping address. Largely the same behaviour as billing, but with different template copy and different order fields: shippingAddressCloneId for a selected address, shippingAddress for a newly created one. Choosing to make billing match shipping writes to billingAddressSameAsShipping. Once the address is set and the order updated, the user moves to shipping methods.
Shipping methods. The page shows how many shipments the order needs, which methods are available, and what each costs. The shipments property holds the shipments, and shipmentsForm wraps the method selection. Initialization fetches the order — line items and shipments included — via OrderService and the delivery lead times via DeliveryLeadTimeService; the two datasets are combined into the shipments array, each entry carrying its items, available methods, and costs. setShipmentMethods writes the choice for each shipment before routing to payments.
Payments. Clicking the payment button sends the user to Paypal using the approvalUrl link. Initialization loads the order with its payment source through OrderService. If a payment source exists, its id retrieves the matching Paypal payment from PaypalPaymentService, which carries the approval url. If not, the order is first updated to prefer Paypal, a new Paypal payment is created with PaypalPaymentService, and the approval url is taken from the result. Clicking the button then redirects to Paypal for approval.
Payment cancellation. Paypal expects a cancel page, and this component exists solely to provide it.
Placing the order. Paypal redirects here after approval, appending the payer's id as a query parameter. On initialization the component reads payerId from the url, retrieves the order with its payment source via OrderService, and updates the Paypal payment with the payer id through the PaypalPayment service. Any failure sends the user to the error page, and the disableButton property keeps the place-order action unavailable until the payer id is set.
Clicking to place the order updates it to a placed status, after which the cart is emptied, a success snackbar is shown, and the customer is returned to the homepage.
Wiring Authentication And Interceptors Into The App Module
Every call the app makes to Commerce Layer, apart from the authentication request itself, must carry a token. That means the token has to be in place before the rest of the application starts talking to the API. The APP_INITIALIZER token solves this: it takes an initialization function that fetches the token from the server's /oauth/token route and starts a session. The application also needs the OptionsInterceptor from earlier registered, which is done through the HTTP_INTERCEPTORS token. With all modules in place, the app module resembles the following.
@NgModule({
  declarations: [
    AppComponent
  ],
  imports: [
    BrowserModule,
    AppRoutingModule,
    HttpClientModule,
    BrowserAnimationsModule,
    AuthModule,
    ProductsModule,
    CartModule,
    CheckoutModule,
    CoreModule
  ],
  providers: [
    {
      provide: HTTP_INTERCEPTORS,
      useClass: OptionsInterceptor,
      multi: true
    },
    {
      provide: APP_INITIALIZER,
      useFactory: (http: HttpClient) => () => http.post<object>(
        `${environment.apiUrl}/oauth/token`,
        { 'grantType': 'client_credentials' },
        { withCredentials: true }),
      multi: true,
      deps: [HttpClient]
    }
  ],
  bootstrap: [AppComponent]
})
export class AppModule { }
App component template and styles
The app component's template is then adjusted, along with its styling.
<div id="page">
    <app-header></app-header>
    <div id="content">
        <router-outlet></router-outlet>
    </div>
</div>
What Is Still Missing
The result is an Angular 11 storefront that talks to Commerce Layer and Paypal and can carry a customer through a full order, which also serves to illustrate how such an app is structured and how it interfaces with an e-commerce API. It is a starting point rather than a finished product. Plenty of improvements are left open: letting customers change item quantities from the cart, linking each cart item back to its product page, refining the address components, and adding further guards on checkout routes such as the place-order page.
For a deeper look at what happens between the first step and the last of an order, Commerce Layer's guides and API documentation are the places to go.
Further reading
- Uniting Web And Native Apps With 4 Unknown JavaScript APIs
- Things I Wish I Had Known About Angular When I Started
- How To Work With GraphQL In WordPress In 2024
- When Friction Is A Good Thing: Designing Sustainable E-Commerce Experiences
 (vf, yk, il, mrn)
Explore more on


