

Why JavaScript Still Needs Bundlers
Native browser support for JavaScript modules has improved considerably, but module bundlers remain indispensable. Tools such as webpack, Parcel, Rollup and Google's Closure Compiler translate modular source code into optimized bundles that browsers can actually load and execute. That gap between authoring modules and shipping them efficiently is exactly what webpack was built to bridge.
Modularity itself wasn't always a first-class concept in the browser. Early on, JavaScript ran primarily in server-side environments like Node.js, which adopted the CommonJS module blueprint. For large web applications, modular patterns promised cleaner codebases by preventing namespace collisions and making structure more maintainable. Yet browsers had no native module system, leaving the frontend stranded when it came to importing and exporting code cleanly.
Webpack, originally written by Tobias Koppers, has grown into a core piece of the JavaScript toolchain, used across projects of every size. To follow along with the examples, you'll want a working understanding of JavaScript modules and a local Node installation so you can run webpack commands.
Core Concepts: Chunks, Modules, Assets
Webpack is a static module bundler, heavily configurable and extensible via a plugin ecosystem that lets you add external loaders and plugins as needed. It approaches your application from a root entry point and traces a dependency graph through everything that file relies on, either directly or transitively. The output is one or more optimized bundles of the combined modules.
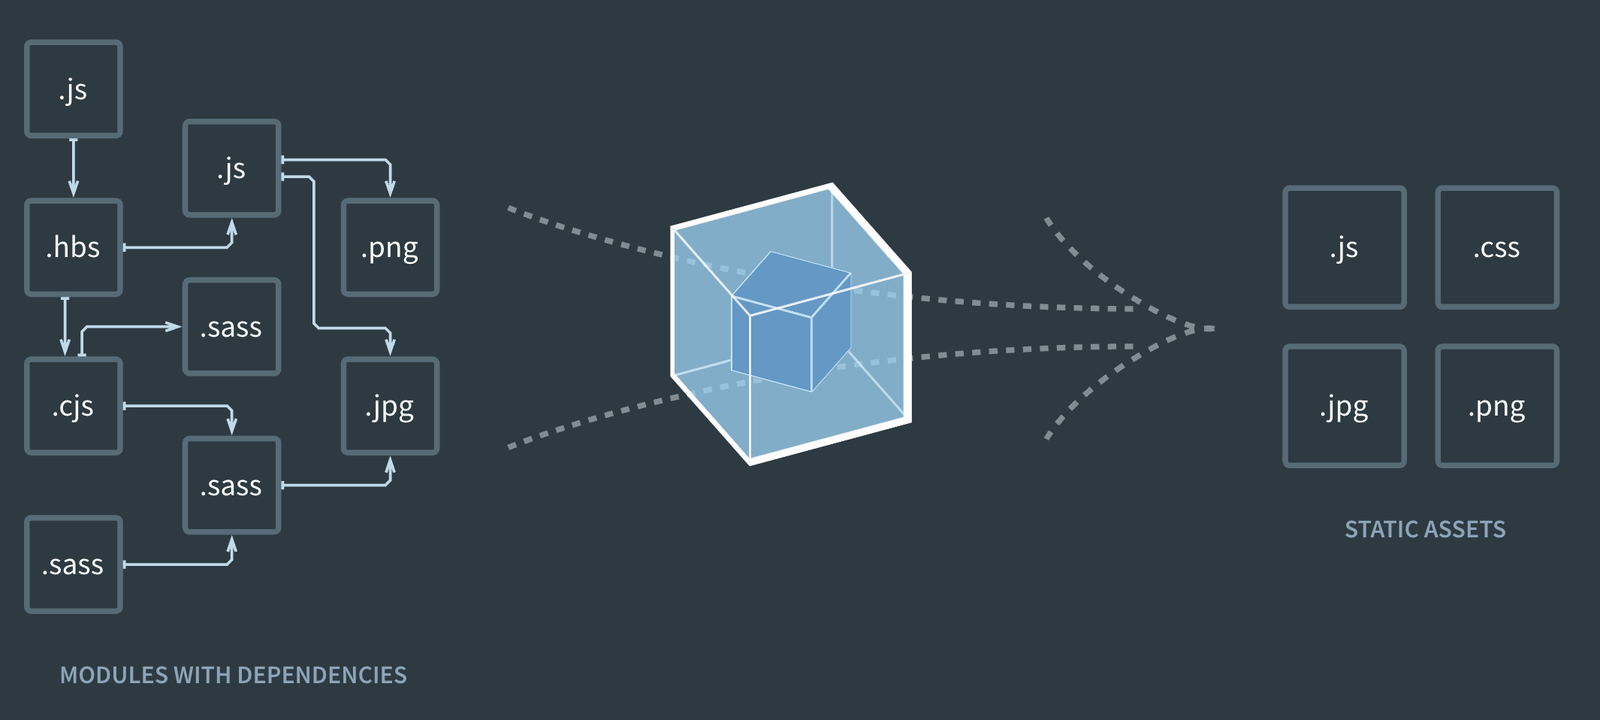
The terminology webpack uses appears across its documentation, so it's worth being precise from the start:
- Chunk
A chunk is code extracted from modules and stored in a chunk file. Chunks are most commonly referenced when implementing code-splitting strategies. - Modules
Modules are the broken-down pieces of your application, imported to carry out a specific function. Webpack understands modules written in ES6, CommonJS, and AMD syntax. - Assets
Assets refers to the static files included during the build — anything from images and fonts to video files. Loaders are the mechanism webpack provides to work with different asset types.
Zero-Configuration Bundling
Recent versions of webpack work without a dedicated configuration file. The webpack-cli package is required — if it's missing, the terminal prompts you to install it — and you just set the webpack command as one of the scripts in your package.json. With no flags, webpack assumes your entry point is located in the src directory and emits the bundled output to dist.
{
  "name" : "Smashing Magazine",
  "main": "index.js",
  "scripts": {
      "build" : "webpack"
  },
  "dependencies" : {
    "webpack": "^5.24.1"
  }
}
Running that build command makes webpack bundle the file in src/index.js and write the result as main.js inside a dist directory. This zero-config mode demonstrates the tool's pragmatic defaults, yet real projects generally need tighter control over behavior.
The Configuration File
When you need to customize how webpack behaves, you edit a configuration file and reference it with the --config flag. This is a subtle shift from the default setup above:
"build" : "webpack --config webpack.config.js"The flag points to a webpack.config.js file, which doesn't exist yet. You create it in your application directory with the contents the configuration file below shows:
# webpack.config.js

const path = require("path")

module.exports = {
  entry : "./src/entry",
  output : {
    path: path.resolve(__dirname, "dist"),
    filename: "output.js"
  }
}
This configuration still bundles JavaScript, but now entry and output paths are explicitly defined rather than assumed. A few things are worth keeping in mind when working with webpack configuration files:
- Configuration files are JavaScript files authored as CommonJS modules.
- The file exports an object whose properties act as options directing the bundling process. The
modeoption is one such property:modesets theNODE_ENVvalue during bundling. Valid values areproductionanddevelopment, and it defaults tononeif left unset. Webpack also bundles assets differently per mode — development mode enables caching to speed up rebuild times, for example. The mode reference in webpack's documentation lists all the options applied automatically in each mode.
- The file exports an object whose properties act as options directing the bundling process. The
Core Webpack Concepts
Whether you configure webpack through the CLI or a configuration file, four main concepts appear as options. These concepts shape how webpack builds and outputs your application bundles.
Entry
The entry field points to the file where webpack starts constructing its dependency graph. From this starting point, webpack follows imports to other modules that depend, directly or indirectly, on the entry file.
An entry point can be a single file:
# webpack.configuration.js

module.exports = {
  mode:  "development",
  entry : "./src/entry"
}
Or a multi-main entry type, using an array of file paths:
# webpack.configuration.js

const webpack = require("webpack")

module.exports = {
  mode: "development",
  entry: [ './src/entry', './src/entry2' ],
}
Output
The output field determines where the compiled bundle is placed. When you have multiple modules, this field lets you specify a custom filename instead of relying on webpack's default naming.
# webpack.configuration.js

const webpack = require("webpack");
const path = require("path");

module.exports = {
  mode: "development",
  entry: './src/entry',
  output: {
    filename: "webpack-output.js",
    path: path.resolve(__dirname, "dist"),
  }
}
Loaders
Webpack natively understands only JavaScript. Every other file type imported as a module—images, CSS, JSON, CSV, and others—needs a loader to be processed and added to the dependency graph. Loaders are versatile: they can transpile ES code, handle styles, or run ESLint on your source.
There are three ways to apply loaders. The inline method imports the loader directly in your file, as when using image-loader to compress an image:
// main.js

import ImageLoader from 'image-loader'
A more common approach is configuring loaders in the webpack configuration file. This allows you to define which file types each loader applies to. You create a rules array where each loader object contains a test field with a regex pattern:
# webpack.config.js

const webpack = require("webpack")
const path = require("path")
const merge = require("webpack-merge")

module.exports = {
  mode: "development",
  entry: './src/entry',
  output: {
    filename: "webpack-output.js",
    path: path.resolve(__dirname, "dist"),
  },
  module: {
    rules: [
    {
      test: /\.(jpe?g|png|gif|svg)$/i,
      use: [
        'img-loader'
        ]
    }
   ]
  }
}
In the example above, the test regex matches all image files with jp(e)g, png, gif, or svg extensions. The third way to apply loaders is through the CLI using the --module-bind flag.
The awesome-webpack readme maintains an extensive, categorized list of loaders. A few commonly useful ones include:
- Responsive-loader — Generates multiple image sizes from a single source and returns a
srcsetfor responsive display. - Babel-loader — Transpiles modern ECMAScript syntax down to ES5.
- GraphQL-loader — Loads
.graphqlfiles containing schemas, queries, and mutations, with optional validation.
Plugins
While loaders operate on individual files during bundling, plugins let the webpack compiler perform tasks on the chunks produced from bundled modules. This enables custom actions that loaders cannot perform at bundle time.
One example is webpack's built-in ProgressPlugin, which customizes the compilation progress output in the console:
# webpack.config.js

const webpack = require("webpack")
const path = require("path")
const merge = require("webpack-merge")

const config = {
  mode: "development",
  entry: './src/entry',
  output: {
    filename: "webpack-output.js",
    path: path.resolve(__dirname, "dist"),
  },
  module: {
    rules: [
    {
      test: /\.(jpe?g|png|gif|svg)$/i,
      use: [
        'img-loader'
        ]
    }
   ]
  },
  plugins: [
        new webpack.ProgressPlugin({
          handler: (percentage, message ) => {
            console.info(percentage, message);
          },
        })
    ]
}

module.exports = config
With this configuration, a handler function prints the compilation percentage and status message during the build process:
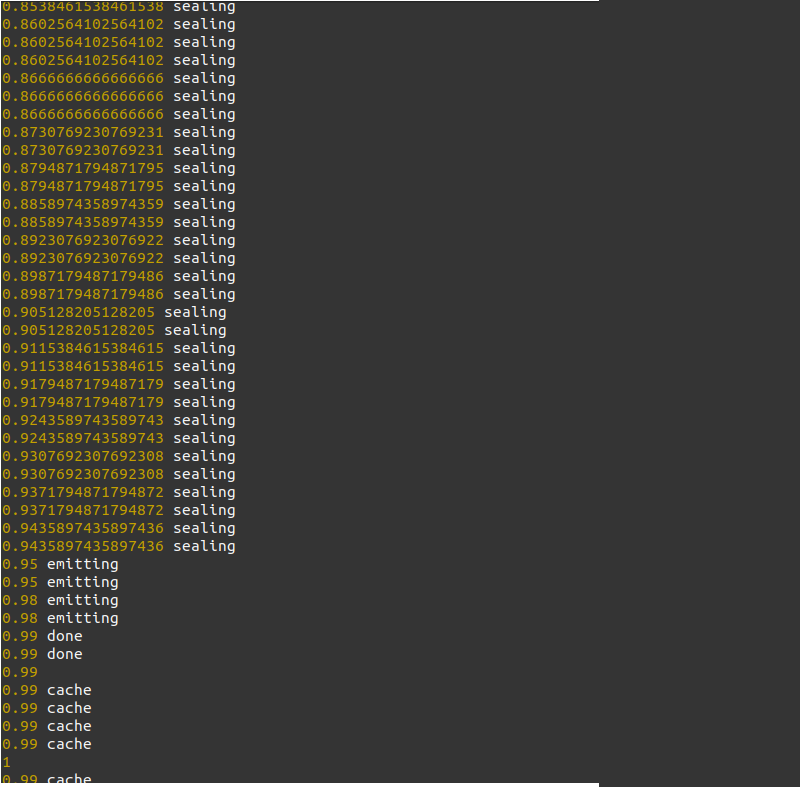
Other useful plugins from the awesome-webpack list include:
- Offline-plugin — Provides offline support via service workers first, falling back to AppCache where service workers are unavailable.
- Purgecss-webpack-plugin — Removes unused CSS during compilation to optimize your project.
Managing Multiple Environments
You may need different webpack configurations for development versus production. For instance, you likely don't want minor warning logs in your production deployment pipeline.
One approach recommended by webpack is to export a function from your configuration file instead of an object. Webpack passes the current environment as the first parameter and options as the second:
// webpack.config.js

module.exports = function (env, args) {
  return {
   mode : env.production ? 'production' : 'development',
  entry: './src/entry',
  output: {
    filename: "webpack-output.js",
    path: path.resolve(__dirname, "dist"),
  },
  plugins: [
       env.development && (
          new webpack.ProgressPlugin({
            handler: (percentage, message ) => {
                console.info(percentage, message);
            },
        })
      )
    ]
  }
}
In this exported function, the env parameter is used with a ternary operator to set the webpack mode and to enable ProgressPlugin only during development. This function-based approach works well for small differences, but complex configurations can become cluttered with conditional statements.
A cleaner alternative for larger projects is maintaining separate configuration files for each environment and referencing them in different package.json scripts:
{
  "name" : "smashing-magazine",
  "main" : "index.js"
  "scripts" : {
    "bundle:dev" : "webpack --config webpack.dev.config.js",
    "bundle:prod" : "webpack --config webpack.prod.config.js"
  },
  "dependencies" : {
    "webpack": "^5.24.1"
  }
}
These two script commands, bundle:dev and bundle:prod, each point to a configuration file written for a specific environment. This approach avoids conditional logic but requires maintaining multiple configuration files.
Splitting the Configuration File
At this point, the configuration includes a single loader and plugin, and the file remains around 38 lines. For larger applications, config files grow considerably with multiple loaders and plugins, each with custom options. To keep things clean, you can split the configuration into smaller objects across separate files, then merge them using the webpack-merge package.
For example, you could divide the configuration into three files: one for plugins, one for loaders, and a base file that combines them.
First, create webpack.plugin.config.js to hold the extracted plugin:
// webpack.plugin.config.js
const webpack = require('webpack')

const plugin = [
  new webpack.ProgressPlugin({
          handler: (percentage, message ) => {
            console.info(percentage, message);
          },
  })
]

module.exports = plugin
Next, create webpack.loader.config.js containing the webpack loaders, such as the moved img-loader:
// webpack.loader.config.js

const loader = {
 module: {
    rules: [
    {
      test: /\.(jpe?g|png|gif|svg)$/i,
      use: [
        'img-loader'
        ]
    }
  ]
  }
}
Finally, the webpack.base.config.js file keeps the entry and output configuration while pulling in the two other files:
// webpack.base.config.js
const path = require("path")
const merge = require("webpack-merge")

const plugins = require('./webpack.plugin.config')
const loaders = require('./webpack.loader.config')

const config = merge(loaders, plugins, {
  mode: "development",
  entry: './src/entry',
  output: {
    filename: "webpack-output.js",
    path: path.resolve(__dirname, "dist"),
  }
});

module.exports = config
The resulting base configuration is notably more compact than the original webpack.config.js. Each part of the configuration now lives in its own file and can be maintained or reused independently.
Shrinking What Webpack Emits
As an application grows, so does the bundle that webpack produces. New features mean new files, refactors, and additional packages, all of which push the output size upward. Webpack does apply some automatic optimizations when the configuration mode is set to production. One notable default behavior, available since webpack 4, is tree-shaking: the bundler analyzes import and export statements to detect modules that are never used and drops them from the final output.
You can also take manual control through an optimization object in your configuration. The webpack documentation lists about 20 fields that can be set there. One of the most direct is minimize, a boolean that instructs webpack to shrink the bundle, which it does by default with TerserPlugin. Minification removes unnecessary data from the code, reducing the size of what is produced after the process.
If you prefer another minifier, add a minimizer array inside the optimization object. For instance, Uglifyjs-webpack-plugin can be configured with caching enabled so that only changed files are re-minified, and with a test pattern that limits which file types are processed:
// webpack.config.js
const Uglify = require("uglifyjs-webpack-plugin")

module.exports = {
    optimization {
      minimize : true,
      minimizer : [
        new Uglify({
          cache : true,
          test: /\.js(\?.*)?$/i,
       })
    ]
  }
 }
The Uglifyjs-webpack-plugin documentation offers a full list of options if you need more control.
Measuring Optimization in Practice
To see the effect of these settings, consider a demo desktop application built with Electron and React, bundled with webpack. That combination is heavy enough to produce a sizable output. The project is a single-page app styled with styled-components, showing images fetched from a CDN when launched.
Start by cloning the repository and installing dependencies:
# clone repository
git clone https://github.com/vickywane/webpack-react-demo.git

# change directory
cd demo-electron-react-webpack

# install dependencies
npm install
The running app displays a list of images in a styled interface:

First, produce a development bundle without any manual optimization. Running yarn build:dev prints the compilation statistics to the terminal:
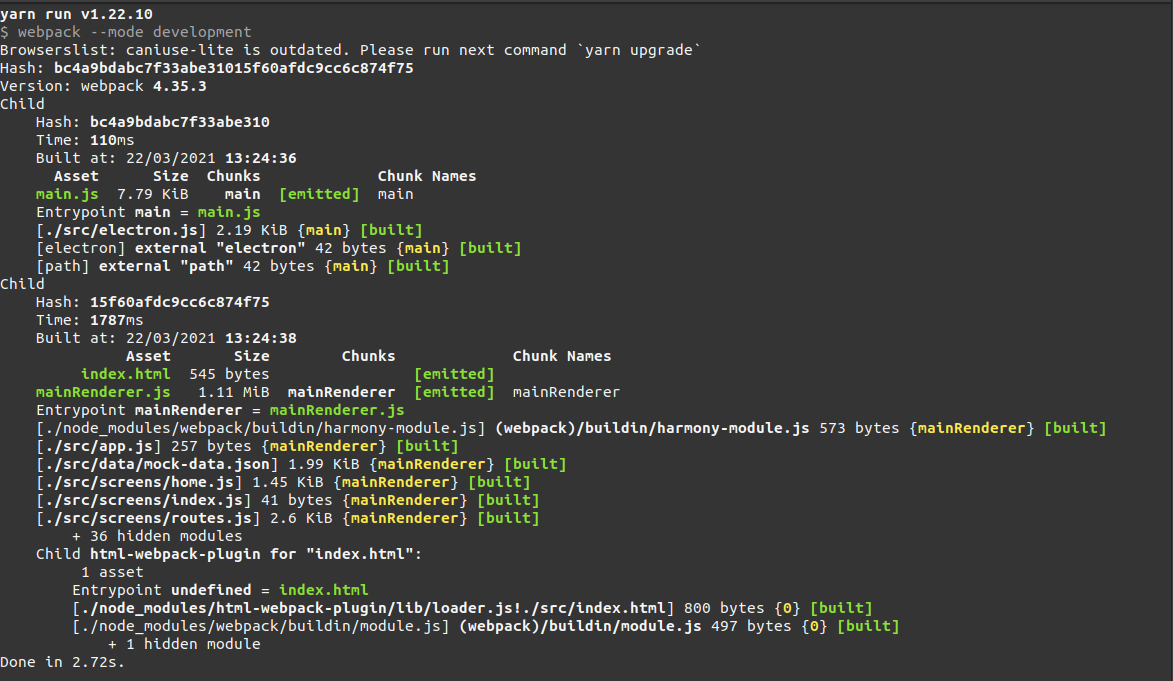
In that output, note that the mainRenderer.js chunk — the Electron entry point — is 1.11 Mebibyte (approximately 1.16 MB).
Next, add Uglifyjs-webpack-plugin to webpack.base.config.js for minification:
// webpack.base.config.js
const Uglifyjs = require("uglifyjs-webpack-plugin")

module.exports = {
  plugins : [
    new Uglifyjs({
      cache : true
    })
  ]
}
Now build the application in production mode with yarn build:prod:
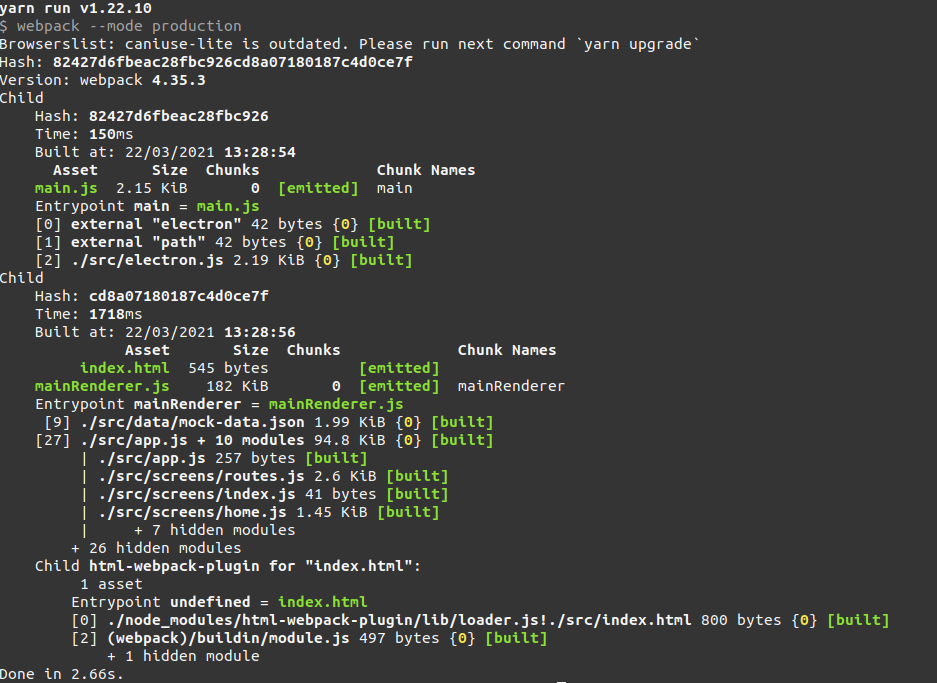
The mainRenderer chunk now drops to 182 Kibibytes (about 186 KB), a reduction of more than 80% from the development bundle.
To understand what is taking up space in the optimized output, the webpack-bundle-analyzer plugin provides a visual breakdown. Install it with yarn add webpack-bundle-analyzer and update the base configuration:
// webpack.base.config.js
const Uglifyjs = require("uglifyjs-webpack-plugin");
const BundleAnalyzerPlugin = require("webpack-bundle-analyzer");
  .BundleAnalyzerPlugin;

const config = {
  plugins: [
    new Uglifyjs({
      cache : true
    }),
    new BundleAnalyzerPlugin(),
  ]
};

module.exports = config;
Re-run yarn build:prod, and the analyzer starts an HTTP server that opens a visual overview of the bundles in the browser:
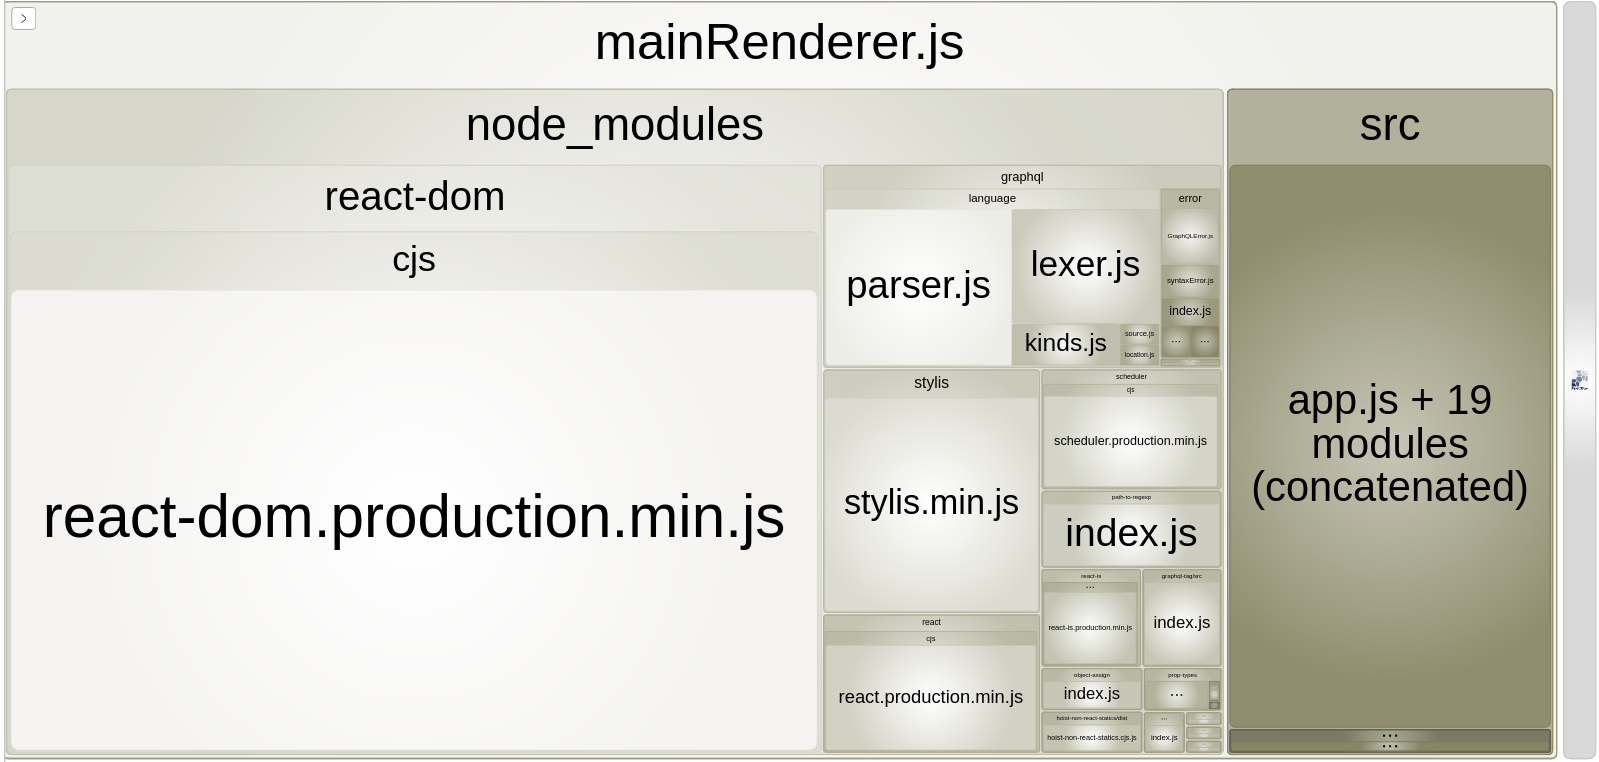
The visualization shows that within the node_modules folder, react-dom.production.min.js is the largest file, followed by stylis.min.js. With that view, you can quickly identify which installed packages contribute the most to the bundle and then decide whether to optimize them or replace them with lighter alternatives. The plugin’s documentation covers other output formats for the analysis as well.
Learning From the Webpack Community
Webpack’s longevity is partly due to the large ecosystem of developers around it. For newcomers, the official documentation is backed by guides such as the Build Performance guide, which offers tips on speeding up builds. Slack has also published a case study on how it kept webpack fast at scale, even if that piece is older now.
Community articles often go beyond the docs with sample projects. For example, an article on Webpack 5 Module Federation shows how the new Module Federation concept works in a React application. These kinds of resources make it easier to apply webpack’s features to real-world setups.
Where Webpack Fits Today
Webpack has been a core part of the JavaScript toolchain for years, and its flexible, extensible design is a big reason why. Understanding what problem a module bundler solves and how to set up your own configuration gives you a better foundation the next time you need to choose one for a project.


