

SVG Filter Patterns: From Noise to Natural-Looking Textures
Generating natural-looking patterns with CSS alone has always been awkward. A wood texture or a camouflage print typically means reaching for an external image file — an extra network dependency that complicates things. SVG filters solve much of this with a few declarative elements, and the key primitive is <feTurbulence>.
Unlike most filter primitives, <feTurbulence> takes no input image. It generates its own: a Perlin noise gradient, widely used in computer graphics to produce organic textures. Its attributes control the noise type and character, letting you create everything from fine grain to stretched, wood-like bands. But noise alone is only the starting point — chaining other filter primitives reveals the hidden patterns inside it.
Building a Custom Filter
A reusable SVG filter is declared with the <filter> element and a chain of <fe{PrimitiveName}> children. You apply it to any renderable element by referencing the filter's id:
<svg xmlns="http://www.w3.org/2000/svg">
  <filter id="coolEffect">
    <!-- Filter primitives will be written here -->
  </filter>
  <rect width="100%" height="100%" filter="url(#coolEffect)"/>
</svg>
The easiest primitive to start with is <feFlood>, which fills its target region with a color. On a full-size <rect>, it colors the entire shape:
<svg xmlns="http://www.w3.org/2000/svg">
  <filter id="coolEffect">
    <feFlood flood-color="red" flood-opacity="0.5"/>
  </filter>
  <rect width="100%" height="100%" filter="url(#coolEffect)"/>
</svg>
To layer multiple effects, use <feBlend>. It merges two inputs — often the SourceGraphic (the original element) and the output of a previous primitive. Name an intermediate result with the result attribute and reference it via in or in2:
<svg xmlns="http://www.w3.org/2000/svg">
  <filter id="coolEffect">
    <feFlood flood-color="red" flood-opacity="0.5" result="flood"/>
    <feBlend in="flood" in2="SourceGraphic"/>
  </filter>
  <rect width="100%" height="100%" filter="url(#coolEffect)"/>
</svg>
Filter primitives chain conveniently by default: a subsequent primitive automatically uses the previous one's result as its input, so you can often omit result and in entirely.
Controlling the Noise
<feTurbulence> exposes several attributes that shape its output:
baseFrequency
The most important attribute; without it there is no pattern. It accepts one or two numbers for frequency along the axes. A single value applies the same frequency to both. Lower values (toward 0.001) yield larger features; higher values (up to 1) yield finer detail. An uneven x/y pair stretches the noise in one dimension:
<svg xmlns="http://www.w3.org/2000/svg">
  <filter id="coolEffect">
    <feTurbulence baseFrequency="0.001 1"/>
  </filter>
  <rect width="100%" height="100%" filter="url(#coolEffect)"/>
</svg>
type
Two options exist: turbulence (default) and fractalNoise. The former produces different noise in the Alpha channel compared to RGB; the latter keeps all four channels consistent. The visual difference is obvious side-by-side:
<svg xmlns="http://www.w3.org/2000/svg">
  <filter id="coolEffect">
    <feTurbulence baseFrequency="0.1" type="fractalNoise"/>
  </filter>
  <rect width="100%" height="100%" filter="url(#coolEffect)"/>
</svg>
numOctaves
Think of music: each octave doubles the frequency. Here, each additional octave doubles the frequency and halves the amplitude, adding detail. The default is 1. Values above 5 have diminishing returns, and more octaves cost more computation.
<svg xmlns="http://www.w3.org/2000/svg">
  <filter id="coolEffect">
    <feTurbulence baseFrequency="0.1" type="fractalNoise" numOctaves="2"/>
  </filter>
  <rect width="100%" height="100%" filter="url(#coolEffect)"/>
</svg>
seed
An integer that selects a different instance of noise with identical qualities. Default is 0 (1 is equivalent); floats are truncated. Useful for varying the pattern per user, within a practical range of 0 to 9999999.
<svg xmlns="http://www.w3.org/2000/svg">
  <filter id="coolEffect">
    <feTurbulence baseFrequency="0.1" type="fractalNoise" numOctaves="2" seed="7329663"/>
  </filter>
  <rect width="100%" height="100%" filter="url(#coolEffect)"/>
</svg>
stitchTiles
Set to stitch, it repeats the pattern seamlessly on both axes; noStitch is the default. Note that <feTurbulence> also generates noise in the Alpha channel, so outputs are semi-transparent rather than opaque.

noStitch (top) to stitch (bottom)Patterns Gallery

Starry Sky
Two chained effects: <feTurbulence> to generate noise, and <feColorMatrix> to transform each pixel. The latter computes each output channel from a constant and weighted sums of all input channels. These four formulas can be written as a 4×5 matrix — the source of the primitive's name. Input and output RGBA components are floats from 0 to 1; results are clamped to that range.
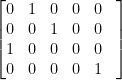
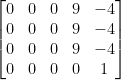
Using the same formula for R, G and B produces a grayscale image: it multiplies the Alpha value by nine and subtracts four. Since Alpha varies in the noise, most results clamp to black or white — the sky and the brightest stars — with a few intermediate values for dimmer stars. The fourth row sets Alpha to a constant 1, making the image opaque.
Pine Wood
A wooden texture needs features elongated in one direction. Set baseFrequency="0.1 0.01" with type="fractalNoise" to stretch the noise. Then <feColorMatrix> recolors it, again using Alpha for variance. This time, the constant offsets exceed the Alpha weights, keeping pixels within a chosen color range — the values need experimentation.
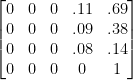
One catch: the color matrix operates in linearized RGB space by default. Normal hex colors like #800080 must be converted first. Tools exist for the conversion; it's a necessary step to achieve the right pine-wood tones.
Dalmatian Spots
This pattern adds <feComponentTransfer>, which defines per-channel transfer functions. Here, only Alpha gets one: a discrete step function via tableValues. The values control both step count and height. For instance, tableValues="1" maps everything to 1; "0 1" sends values below 0.5 to 0 and rest to 1.

After experimenting, tableValues="0 1 0" yields mid-range spots. A subsequent <feColorMatrix> recolors transparent pixels (Alpha 0) black and opaque ones (Alpha 1) white. Finally, numOctaves="2" makes spots jagged, and baseFrequency="0.06" sets the zoom.
ERDL Camouflage
ERDL is a classic four-color military pattern: dark green backdrop, brown shapes, yellowish-green patches, and black blobs. Again, <feComponentTransfer> processes the noise — this time with discrete functions on the RGB channels. Treat the RGBA channels as four layers; single-step functions at different cut points (Red: 66.67%, Green: 60%, Blue: 50%) create blobs of varying density.
<feFuncR type="discrete" tableValues="0 0 0 0 1 1"/>
<feFuncG type="discrete" tableValues="0 0 0 1 1"/>
<feFuncB type="discrete" tableValues="0 1"/>
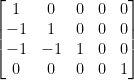
Overlapping blobs produce unwanted colors. A second <feComponentTransfer> removes them via channel arithmetic: Red keeps its identity, Green subtracts Red, and Blue subtracts both Green and Red. The result is pure Red, Green, Blue or Black pixels. A final <feColorMatrix> recolors each: black becomes dark green, red becomes black, green becomes yellow-green, and blue becomes brown.
Island Group
A simple heightmap. <feColorMatrix> copies the Red channel into Green and Blue, producing grayscale noise:

<feComponentTransfer> then recolors level-by-level, this time using the table function type. Unlike discrete, table ramps smoothly between values. Finding the optimal level count requires balancing two factors: the uneven distribution of intensity in the image and the number of color levels desired — pure experimentation, especially in linear RGB space.

<feComponentTransfer>
<feComponentTransfer>The result maps deep blues and aqua for water, yellows for sand, and greens for forest.
Using the Patterns in Production
These patterns are most useful when deployed responsibly — three standard approaches exist.
Inline Data URI in CSS or HTML
Encoding the SVG markup into a data URI is ideal for small files (a few kilobytes or less): the image is always present, with no download delay. Tools like Yoksel's URL-encoder handle the encoding manually; mini-svg-data-uri (npm) can automate it in a build. A randomized seed can be injected server-side:
.your-selector {
  background-image: url("data:image/svg+xml,%3Csvg xmlns='http://www.w3.org/2000/svg'%3E%3Cfilter id='filter'%3E%3CfeTurbulence baseFrequency='0.2'/%3E%3CfeColorMatrix values='0 0 0 9 -4 0 0 0 9 -4 0 0 0 9 -4 0 0 0 0 1'/%3E%3C/filter%3E%3Crect width='100%25' height='100%25' filter='url(%23filter)'/%3E%3C/svg%3E%0A");
}
<img src="data:image/svg+xml,%3Csvg xmlns='http://www.w3.org/2000/svg'%3E%3Cfilter id='filter'%3E%3CfeTurbulence baseFrequency='0.2'/%3E%3CfeColorMatrix values='0 0 0 9 -4 0 0 0 9 -4 0 0 0 9 -4 0 0 0 0 1'/%3E%3C/filter%3E%3Crect width='100%25' height='100%25' filter='url(%23filter)'/%3E%3C/svg%3E%0A"/>SVG Markup in HTML
Dropping the SVG code directly into HTML is simple but risks ID collision. If multiple patterns use #filter, the first instance overrides the rest. This suits small, hand-crafted pages where you control all IDs; a build-time unique-ID generator is a more involved fix for larger sites.
<div>
  <svg xmlns="http://www.w3.org/2000/svg">
    <filter id="filter">
      <feTurbulence baseFrequency="0.2"/>
      <feColorMatrix values="0 0 0 9 -4
                             0 0 0 9 -4
                             0 0 0 9 -4
                             0 0 0 0 1"/>
    </filter>
    <rect width="100%" height="100%" filter="url(#filter)"/>
  </svg>
</div>
Standalone SVG File
The classic approach: serve the SVG file like any other image, then reference it from an <img> tag or CSS background. With HTTP/2 and SVG's small size relative to raster formats, this remains a sound option, caches well at multiple layers, and works on a CDN.
<img src="https://example.com/starry-sky.svg"/>Caveats
The biggest practical limitation is computational cost. Long filter chains are like running multiple photo-editing operations in the browser on every paint. For heavy chains, pre-rendering to a JPEG or PNG may save users significant CPU. Browser inconsistencies also appear: Safari currently fails to honor spreadMethod="repeat" on radial gradients (rendering pad instead), and Firefox doesn't render SVG content in full-screen mode's extended viewport, unlike Chrome and Safari.
The same filter can render differently across browsers, a reality of SVG's rendering complexity. Despite these caveats, mastering <feTurbulence> and its companion primitives opens the door to crafting unique, organic patterns — no external assets required. Adding a random seed between 1 and 10 million to any example gives you a fresh variation instantly.


