

Face Detection in the Browser with React and Clarifai
Facial recognition systems identify people by mapping facial features, recording their unique mathematical ratios, and storing that data as a face print. A simpler subset of this technology — facial detection — finds human faces within an image and draws a bounding box around them. That's the behavior we'll build as a React web app, driven by the Clarifai Face Detection model.
Clarifai's Face Detection model returns probability scores indicating whether an image contains human faces, along with coordinate locations where faces appear. Its Predict API analyzes your input images and returns a list of concepts with corresponding likelihood scores.
Setting Up the Project
Node.js is required for this project. With that in place, create a new React project using create-react-app, which gives you a single-page starter project with webpack, Babel, and other useful features preconfigured.
/* install react app globally */
npm install -g create-react-app

/* create the app in your new directory */
create-react-app face-detect

/* move into your new react directory */
cd face-detect

/* start development sever */
npm start
This installs the create-react-app package globally with npm, generates the face-detect project, moves you into it, and starts the development server. Open the folder in your editor of choice; Visual Studio Code is a solid free option.
Once the starter project loads, delete src/logo.svg and replace the contents of src/App.js with an empty component.
import React, { Component } from "react";
import "./App.css";
class App extends Component {
  render() {
    return (

    );
  }
}
export default App;
Next, add minimal global styling for the page background, and install Tachyons, a utility-first CSS toolkit that lets us style components without writing much custom CSS.
# install tachyons into your project
npm install tachyons
Import Tachyons into src/index.js alongside the existing React imports.
import React from "react";
import ReactDOM from "react-dom";
import "./index.css";
import App from "./App";
import * as serviceWorker from "./serviceWorker";
// add tachyons below into your project, note that its only the line of code you adding here
import "tachyons";

ReactDOM.render(<App />, document.getElementById("root"));
// If you want your app to work offline and load faster, you can change
// unregister() to register() below. Note this comes with some pitfalls.
// Learn more about service workers: https://bit.ly/CRA-PWA
serviceWorker.register();
Then apply a background color and pointer cursor to the page body via src/index.css.
body {
  margin: 0;
  font-family: "Courier New", Courier, monospace;
  -webkit-font-smoothing: antialiased;
  -Moz-osx-font-smoothing: grayscale;
  background: #485563; /* fallback for old browsers */
  background: linear-gradient(
    to right,
    #29323c,
    #485563
  ); /* W3C, IE 10+/ Edge, Firefox 16+, Chrome 26+, Opera 12+, Safari 7+ */
}
button {
  cursor: pointer;
}
code {
  font-family: source-code-pro, Menlo, Monaco, Consolas, "Courier New",
    monospace;
}
Building the Components
Our application will have two components: ImageSearchForm, which takes a URL input for fetching images, and FaceDetect, which renders the image with a detection box overlay. Create the following folder structure under the src directory:
src/Components TEMPLATE

├── src
  ├── Components
    ├── FaceDetect
      ├── FaceDetect.css
      ├── FaceDetect.js
    ├── ImageSearchForm
      ├── ImageSearchForm.css
      ├── ImageSearchForm.js
In ImageSearchForm, we build an input field and a Detect button. The component relies heavily on Tachyons utility classes for its styling.
import React from "react";
import "./ImageSearchForm.css";

// imagesearch form component

const ImageSearchForm = () => {
  return (
    <div className="ma5 to">
      <div className="center">
        <div className="form center pa4 br3 shadow-5">
          <input className="f4 pa2 w-70 center" type="text" />
          <button className="w-30 grow f4 link ph3 pv2 dib white bg-blue">
            Detect
          </button>
        </div>
      </div>
    </div>
  );
};
export default ImageSearchForm;
The ImageSearchForm.css file contains a CSS pattern for the form background; you can swap in any pattern you prefer from resources like CSS3 Patterns.
.form {
  width: 700px;
  background: radial-gradient(
      circle,
      transparent 20%,
      slategray 20%,
      slategray 80%,
      transparent 80%,
      transparent
    ),
    radial-gradient(
        circle,
        transparent 20%,
        slategray 20%,
        slategray 80%,
        transparent 80%,
        transparent
      )
      50px 50px,
    linear-gradient(#a8b1bb 8px, transparent 8px) 0 -4px,
    linear-gradient(90deg, #a8b1bb 8px, transparent 8px) -4px 0;
  background-color: slategray;
  background-size: 100px 100px, 100px 100px, 50px 50px, 50px 50px;
}
Back in App.js, import both new components and render them. The FaceDetect component is commented out for the moment so we can build out the form interface first without errors.
import React, { Component } from "react";
import "./App.css";
import ImageSearchForm from "./components/ImageSearchForm/ImageSearchForm";
// import FaceDetect from "./components/FaceDetect/FaceDetect";

class App extends Component {
  render() {
    return (
      <div className="App">
        <ImageSearchForm />
        {/* <FaceDetect /> */}
      </div>
    );
  }
}
export default App;
After wiring up ImageSearchForm in App.js, the application is running and showing your first component. In the next phase, we'll connect the form to the Clarifai API, parse the returned face coordinates, and render the rectangar detection box over the image in the FaceDetect component.
Connecting The Clarifai Face Detection API
To power the face detection, we'll use Clarifai's machine learning API. After signing up for a free account (which includes 5,000 operations per month), you'll land on your dashboard where you can create an application and retrieve your unique API key. Be sure to use your own key—the one from the tutorial won't work for you.
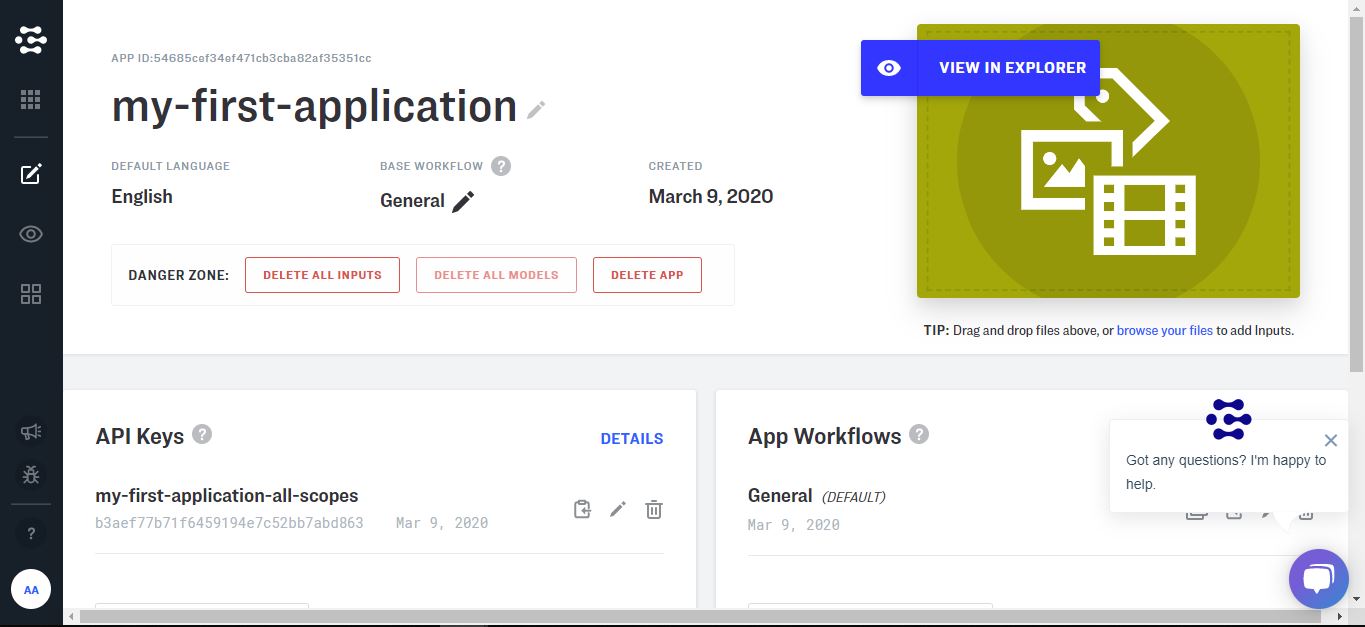
Clarifai trains computer vision models by exposing them to many labeled images. For this project, we'll use their pre-trained Face Detection model, which exposes a RESTful predict API. To use it from our React app, we need to install the official clarifai npm package:
/* Install the client from npm */
npm install clarifai
Once installed, we can import the package into src/App.js. We also need to manage two pieces of state: the current value of the input field and the URL of the image we're analyzing. When the user submits a URL, we set imageUrl and then call the Clarifai model's predict endpoint with that URL, logging the response to the console for now.
import React, { Component } from "react";
// Import Clarifai into our App
import Clarifai from "clarifai";
import ImageSearchForm from "./components/ImageSearchForm/ImageSearchForm";
// Uncomment FaceDetect Component
import FaceDetect from "./components/FaceDetect/FaceDetect";
import "./App.css";

// You need to add your own API key here from Clarifai.
const app = new Clarifai.App({
  apiKey: "ADD YOUR API KEY HERE",
});

class App extends Component {
  // Create the State for input and the fectch image
  constructor() {
    super();
    this.state = {
      input: "",
      imageUrl: "",
    };
  }

// setState for our input with onInputChange function
  onInputChange = (event) => {
    this.setState({ input: event.target.value });
  };

// Perform a function when submitting with onSubmit
  onSubmit = () => {
        // set imageUrl state
    this.setState({ imageUrl: this.state.input });
    app.models.predict(Clarifai.FACE_DETECT_MODEL, this.state.input).then(
      function (response) {
        // response data fetch from FACE_DETECT_MODEL
        console.log(response);
        /* data needed from the response data from clarifai API,
           note we are just comparing the two for better understanding
           would to delete the above console*/
        console.log(
          response.outputs[0].data.regions[0].region_info.bounding_box
        );
      },
      function (err) {
        // there was an error
      }
    );
  };
  render() {
    return (
      <div className="App">
        // update your component with their state
        <ImageSearchForm
          onInputChange={this.onInputChange}
          onSubmit={this.onSubmit}
        />
        // uncomment your face detect app and update with imageUrl state
        <FaceDetect imageUrl={this.state.imageUrl} />
      </div>
    );
  }
}
export default App;
The above code imports the Clarifai client, initializes it with your API_KEY, and defines the onSubmit handler that fires when the Detect button is clicked. Inside it, we store the input as the current imageUrl and pass that same value to clarifaiApp.models.predict() using the FACE_DETECT_MODEL constant. The promise resolves with facial recognition data, which we log for inspection.
Wiring Up The Form And Image Components
Since we added new props, the existing ImageSearchForm component needs to be updated to accept and invoke them. We'll bind onInputChange to the input's onChange event and onSubmit to the button's onClick event.
import React from "react";
import "./ImageSearchForm.css";
// update the component with their parameter
const ImageSearchForm = ({ onInputChange, onSubmit }) => {
  return (
    <div className="ma5 mto">
      <div className="center">
        <div className="form center pa4 br3 shadow-5">
          <input
            className="f4 pa2 w-70 center"
            type="text"
            onChange={onInputChange}    // add an onChange to monitor input state
          />
          <button
            className="w-30 grow f4 link ph3 pv2 dib white bg-blue"
            onClick={onSubmit}  // add onClick function to perform task
          >
            Detect
          </button>
        </div>
      </div>
    </div>
  );
};
export default ImageSearchForm;
Now we create the FaceDetect component referenced in App.js. This component simply receives the imageUrl prop and renders it inside an img tag. However, to later draw a box around detected faces, we need to keep a reference to this rendered image element.
import React from "react";
// Pass imageUrl to FaceDetect component
const FaceDetect = ({ imageUrl }) => {
  return (
  # This div is the container that is holding our fetch image and the face detect box
    <div className="center ma">
      <div className="absolute mt2">
                        # we set our image SRC to the url of the fetch image
        <img alt="" src={imageUrl} width="500px" heigh="auto" />
      </div>
    </div>
  );
};
export default FaceDetect;
At this stage, you should see the image displayed in the browser, and the Clarifai API response logged in your developer console. Open the console and inspect the data. We are interested specifically in the nested path data.region.region_info.bounding_box, which holds the normalized coordinates of the detected face.
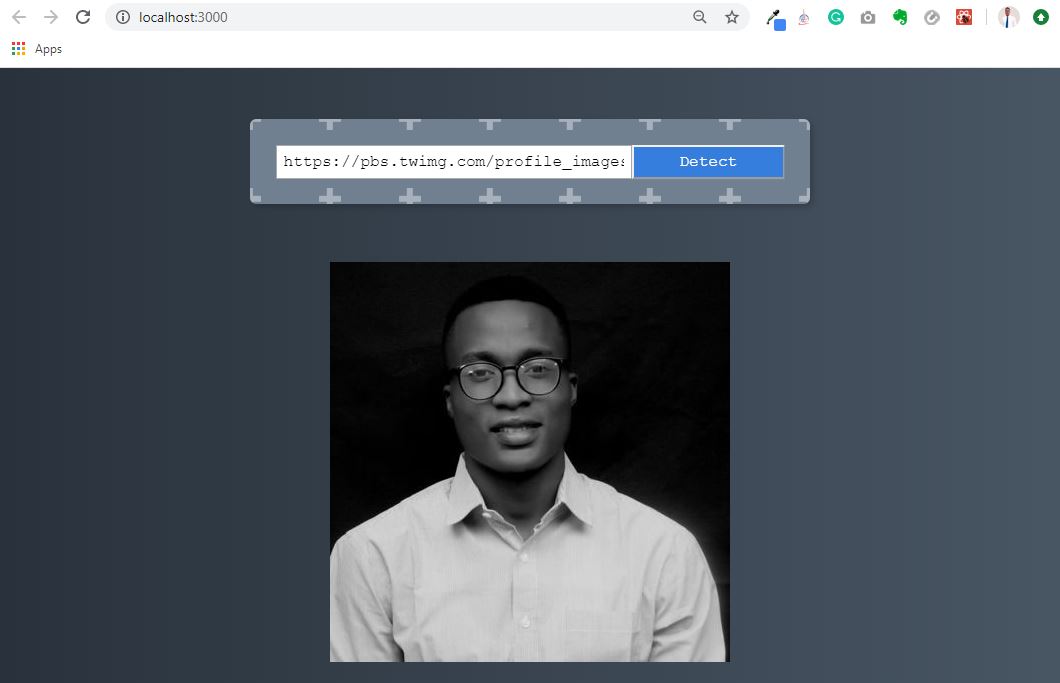
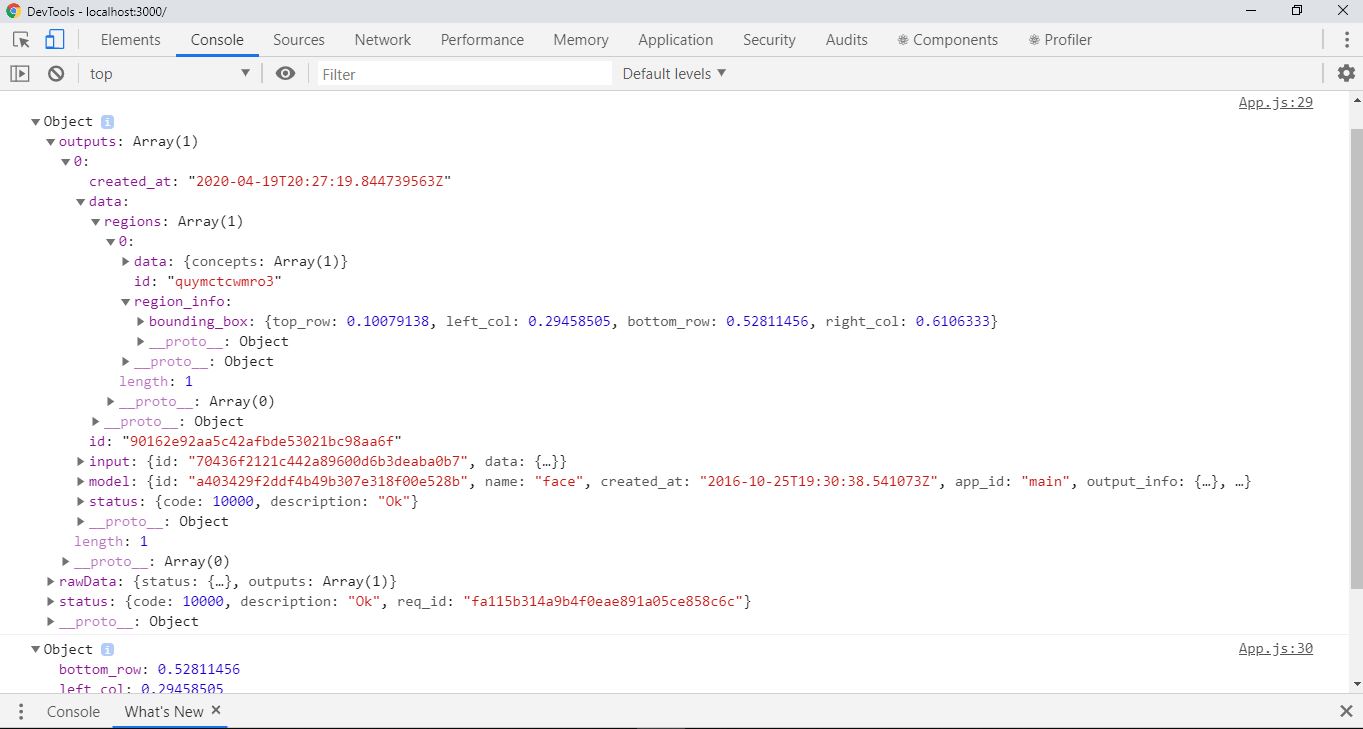
The bounding_box object provides four values:
bottom_row: 0.52811456
left_col: 0.29458505
right_col: 0.6106333
top_row: 0.10079138
These numbers are normalized (between 0 and 1) relative to the image's width and height. For example, left_col and top_row give the position of the top-left corner, while right_col and bottom_row give the bottom-right corner. To visually display a box, we need to convert these relative measurements into absolute pixel values on the actual displayed image.
bottom_row: 0.52811456 | This indicates our face detection box start at 52% of the image height from the bottom. |
left_col: 0.29458505 | This indicates our face detection box start at 29% of the image width from the left. |
right_col: 0.6106333 | This indicates our face detection box start at 61% of the image width from the right. |
top_row: 0.10079138 | This indicates our face detection box start at 10% of the image height from the top. |
Calculating And Drawing The Face Box
Now we can turn the raw bounding box data into a styled overlay. In App.js, we'll add a new state object box and a function to compute its pixel coordinates based on the image's rendered dimensions.
import React, { Component } from "react";
import Clarifai from "clarifai";
import ImageSearchForm from "./components/ImageSearchForm/ImageSearchForm";
import FaceDetect from "./components/FaceDetect/FaceDetect";
import "./App.css";

// You need to add your own API key here from Clarifai.
const app = new Clarifai.App({
  apiKey: "ADD YOUR API KEY HERE",
});

class App extends Component {
  constructor() {
    super();
    this.state = {
      input: "",
      imageUrl: "",
      box: {},  # a new object state that hold the bounding_box value
    };
  }

  // this function calculate the facedetect location in the image
  calculateFaceLocation = (data) => {
    const clarifaiFace =
      data.outputs[0].data.regions[0].region_info.bounding_box;
    const image = document.getElementById("inputimage");
    const width = Number(image.width);
    const height = Number(image.height);
    return {
      leftCol: clarifaiFace.left_col * width,
      topRow: clarifaiFace.top_row * height,
      rightCol: width - clarifaiFace.right_col * width,
      bottomRow: height - clarifaiFace.bottom_row * height,
    };
  };

  /* this function display the face-detect box base on the state values */
  displayFaceBox = (box) => {
    this.setState({ box: box });
  };

  onInputChange = (event) => {
    this.setState({ input: event.target.value });
  };

  onSubmit = () => {
    this.setState({ imageUrl: this.state.input });
    app.models
      .predict(Clarifai.FACE_DETECT_MODEL, this.state.input)
      .then((response) =>
        # calculateFaceLocation function pass to displaybox as is parameter
        this.displayFaceBox(this.calculateFaceLocation(response))
      )
      // if error exist console.log error
      .catch((err) => console.log(err));
  };

  render() {
    return (
      <div className="App">
        <ImageSearchForm
          onInputChange={this.onInputChange}
          onSubmit={this.onSubmit}
        />
        // box state pass to facedetect component
        <FaceDetect box={this.state.box} imageUrl={this.state.imageUrl} />
      </div>
    );
  }
}
export default App;
The calculateFaceLocation function grabs the rendered image element by its id (inputimage), then multiplies the normalized bounding box values by the image's width and height properties. The result is an object containing pixel values for the left, top, right, and bottom edges of the box. We also create a displayFaceBox helper that simply updates the box state with the calculated coordinates.
We call this function inside our existing onSubmit handler, passing the response from the Clarifai prediction.
leftCol | clarifaiFace.left_col is the % of the width multiply with the width of the image then we would get the actual width of the image and where the left_col should be. |
topRow | clarifaiFace.top_row is the % of the height multiply with the height of the image then we would get the actual height of the image and where the top_row should be. |
rightCol | This subtracts the width from (clarifaiFace.right_col width) to know where the right_Col should be. |
bottomRow | This subtract the height from (clarifaiFace.right_col height) to know where the bottom_Row should be. |
Next, update the FaceDetect component to receive the box object as a prop and apply it as a style on a wrapping div that overlays the image. We'll also give the image the id="inputimage" attribute so that calculateFaceLocation can find it.
import React from "react";
// add css to style the facebox
import "./FaceDetect.css";
// pass the box state to the component

const FaceDetect = ({ imageUrl, box }) => {
  return (
    <div className="center ma">
      <div className="absolute mt2">
            /* insert an id to be able to manipulate the image in the DOM */
        <img id="inputimage" alt="" src={imageUrl} width="500px" heigh="auto" />
       //this is the div displaying the faceDetect box base on the bounding box value
      <div
          className="bounding-box"
          // styling that makes the box visible base on the return value
          style={{
            top: box.topRow,
            right: box.rightCol,
            bottom: box.bottomRow,
            left: box.leftCol,
          }}
        ></div>
      </div>
    </div>
  );
};
export default FaceDetect;
To style the box, we need to create the referenced FaceDetect.css file. The CSS positions the box absolutely over the image and gives it a white, semi-transparent border so it remains visible on different image backgrounds.
.bounding-box {
  position: absolute;
  box-shadow: 0 0 0 3px #fff inset;
  display: flex;
  flex-wrap: wrap;
  justify-content: center;
  cursor: pointer;
}
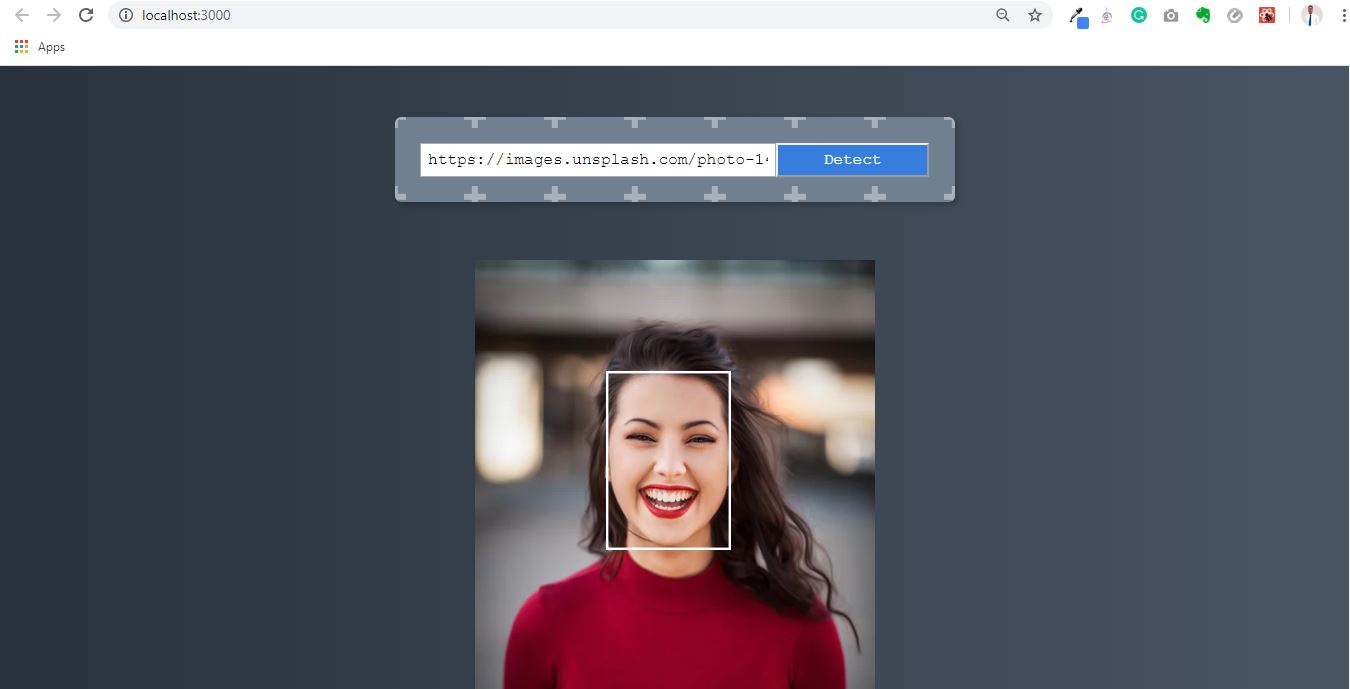
With these changes in place, submitting an image URL with a visible face will render a white detection box precisely around that face.
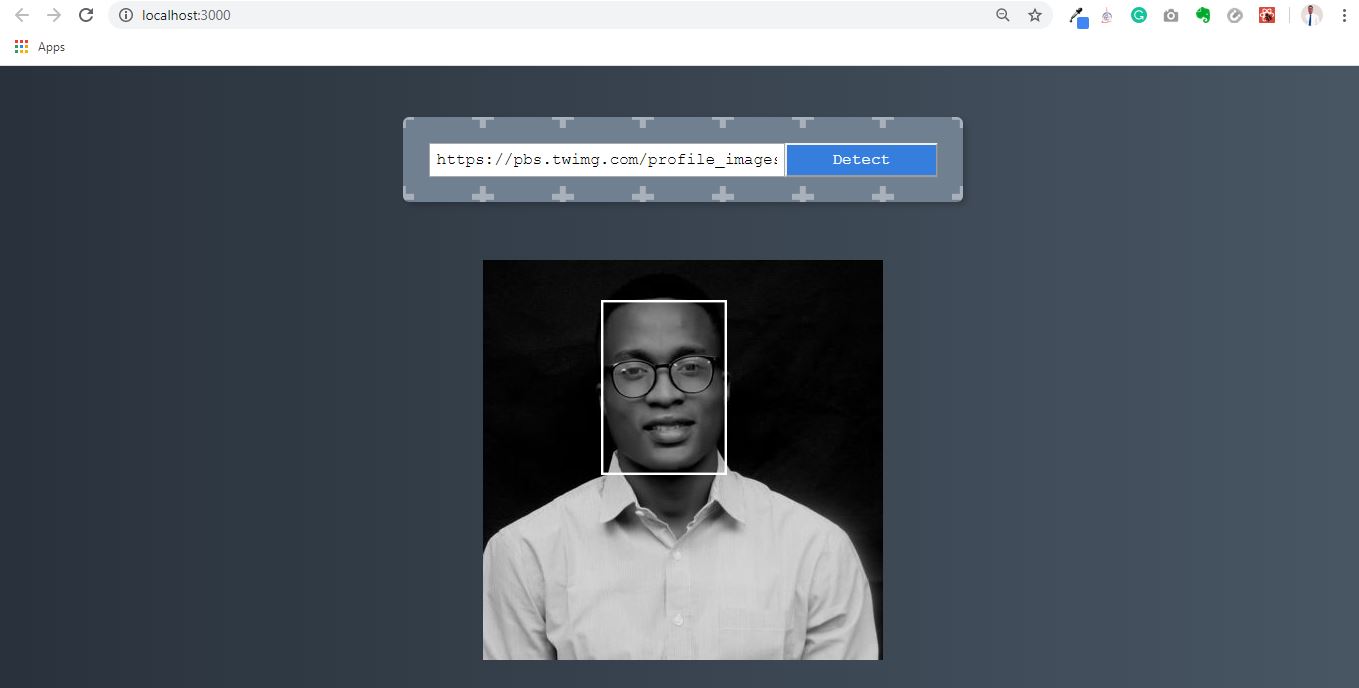
The app can handle any image URL containing a clear human face.
Wrap Up
This walkthrough demonstrated how to integrate a third-party machine learning API into a React application. We built a URL-based image search form, connected it to Clarifai's pre-trained Face Detection model, and translated the normalized bounding box response into a visual overlay using standard CSS and React state. The complete code is available in the GitHub repository. Here are the official resources for further exploration:


