

Why Netlify Forms Need A Workaround For Angular
Netlify Forms is a zero-configuration form backend: during deployment, Netlify’s build bots parse the HTML files in your site, detect forms carrying the netlify attribute, and automatically enable submission handling for them. No API routes or server scripts are required.
That parsing step is exactly where client-rendered Angular forms break down. By the time your Angular app runs in the browser, the compiled JavaScript generates the form markup dynamically — the build bots never see it. The practical fix is to include a static, hidden HTML form in index.html that the bots can discover, then have your Angular reactive form POST submissions to that hidden form.
Project Setup And Dependencies
You’ll need a Netlify account and the Angular CLI. Install the CLI globally if you don’t already have it:
npm install -g @angular/cli
Create the application with routing enabled, then generate the components you’ll need: a feedback form component, a success page, and a 404 page. The success page will be displayed after Netlify accepts a submission.
ng new feedback
ng g c feedback
ng g c success
ng g c page-not-found
Register the routes for those components in app-routing.module.ts.
const routes: Routes = [
  { path:'', component: FeedbackComponent },
  { path: 'success', component: SuccessComponent },
  { path: '**', component: PageNotFoundComponent }
];
Because this form uses the FormBuilder service, register ReactiveFormsModule in app.module.ts. The POST request to the hidden form also requires HttpClientModule to be registered.
import { ReactiveFormsModule } from '@angular/forms';
import { HttpClientModule } from '@angular/common/http';

@NgModule({
  imports: [
    // other imports
    ReactiveFormsModule,
    HttpClientModule
  ]
})
export class AppModule { }
Replace the contents of app.component.html with only the router outlet, then add shared page styling to styles.css.
<router-outlet></router-outlet>
html, body {
    height: 100%;
    width: 100%;
    display: flex;
    align-items: flex-start;
    justify-content: center;
}

h1 {
    margin: 0;
    text-align: center;
}

h1, p, label {
    font-family: Arial, Helvetica, sans-serif;
}

p {
    max-width: 25rem;
}

#container {
    border: none;
    padding: .4rem;
    border-radius: 0;
    flex-direction: column;
    display: flex;
}

hr {
    width: 80%;
}

button {
    color: white;
    background-color: black;
    font-size: large;
    padding: .5rem;
    border-radius: .5rem;
    margin-top: 1rem;
}

@media screen and (min-height: 700px) {
    html, body {
        align-items: center;
        justify-content: center;
    }
}

@media screen and (min-width: 480px) {
    #container {
        border: .1rem solid lightgray;
        padding: 2rem;
        border-radius: .5rem;
    }

    html, body {
        align-items: center;
        justify-content: center;
    }
}
Building The Reactive Form
In the FeedbackComponent class, import FormBuilder and Validators, then inject FormBuilder through the constructor.
import { FormBuilder, Validators } from '@angular/forms';
constructor(private fb: FormBuilder) { }
Define the form model with the injected service’s group method. Include an errorMsg property that holds submission errors, plus a closeError method to dismiss the error alert shown on the form. Each control uses validators from the Validators class; the email control, for instance, can combine multiple validators. If any control fails validation, submission should be disabled.
export class FeedbackComponent {
  feedbackForm = this.fb.group({
    firstName: ['', Validators.required],
    lastName: ['', Validators.required],
    email: ['', [Validators.email, Validators.required]],
    type: ['', Validators.required],
    description: ['', Validators.required],
    rating: [0, Validators.min(1)]
  });

  errorMsg = '';

  closeError() {
    this.errorMsg = '';
  }

  // ...
}
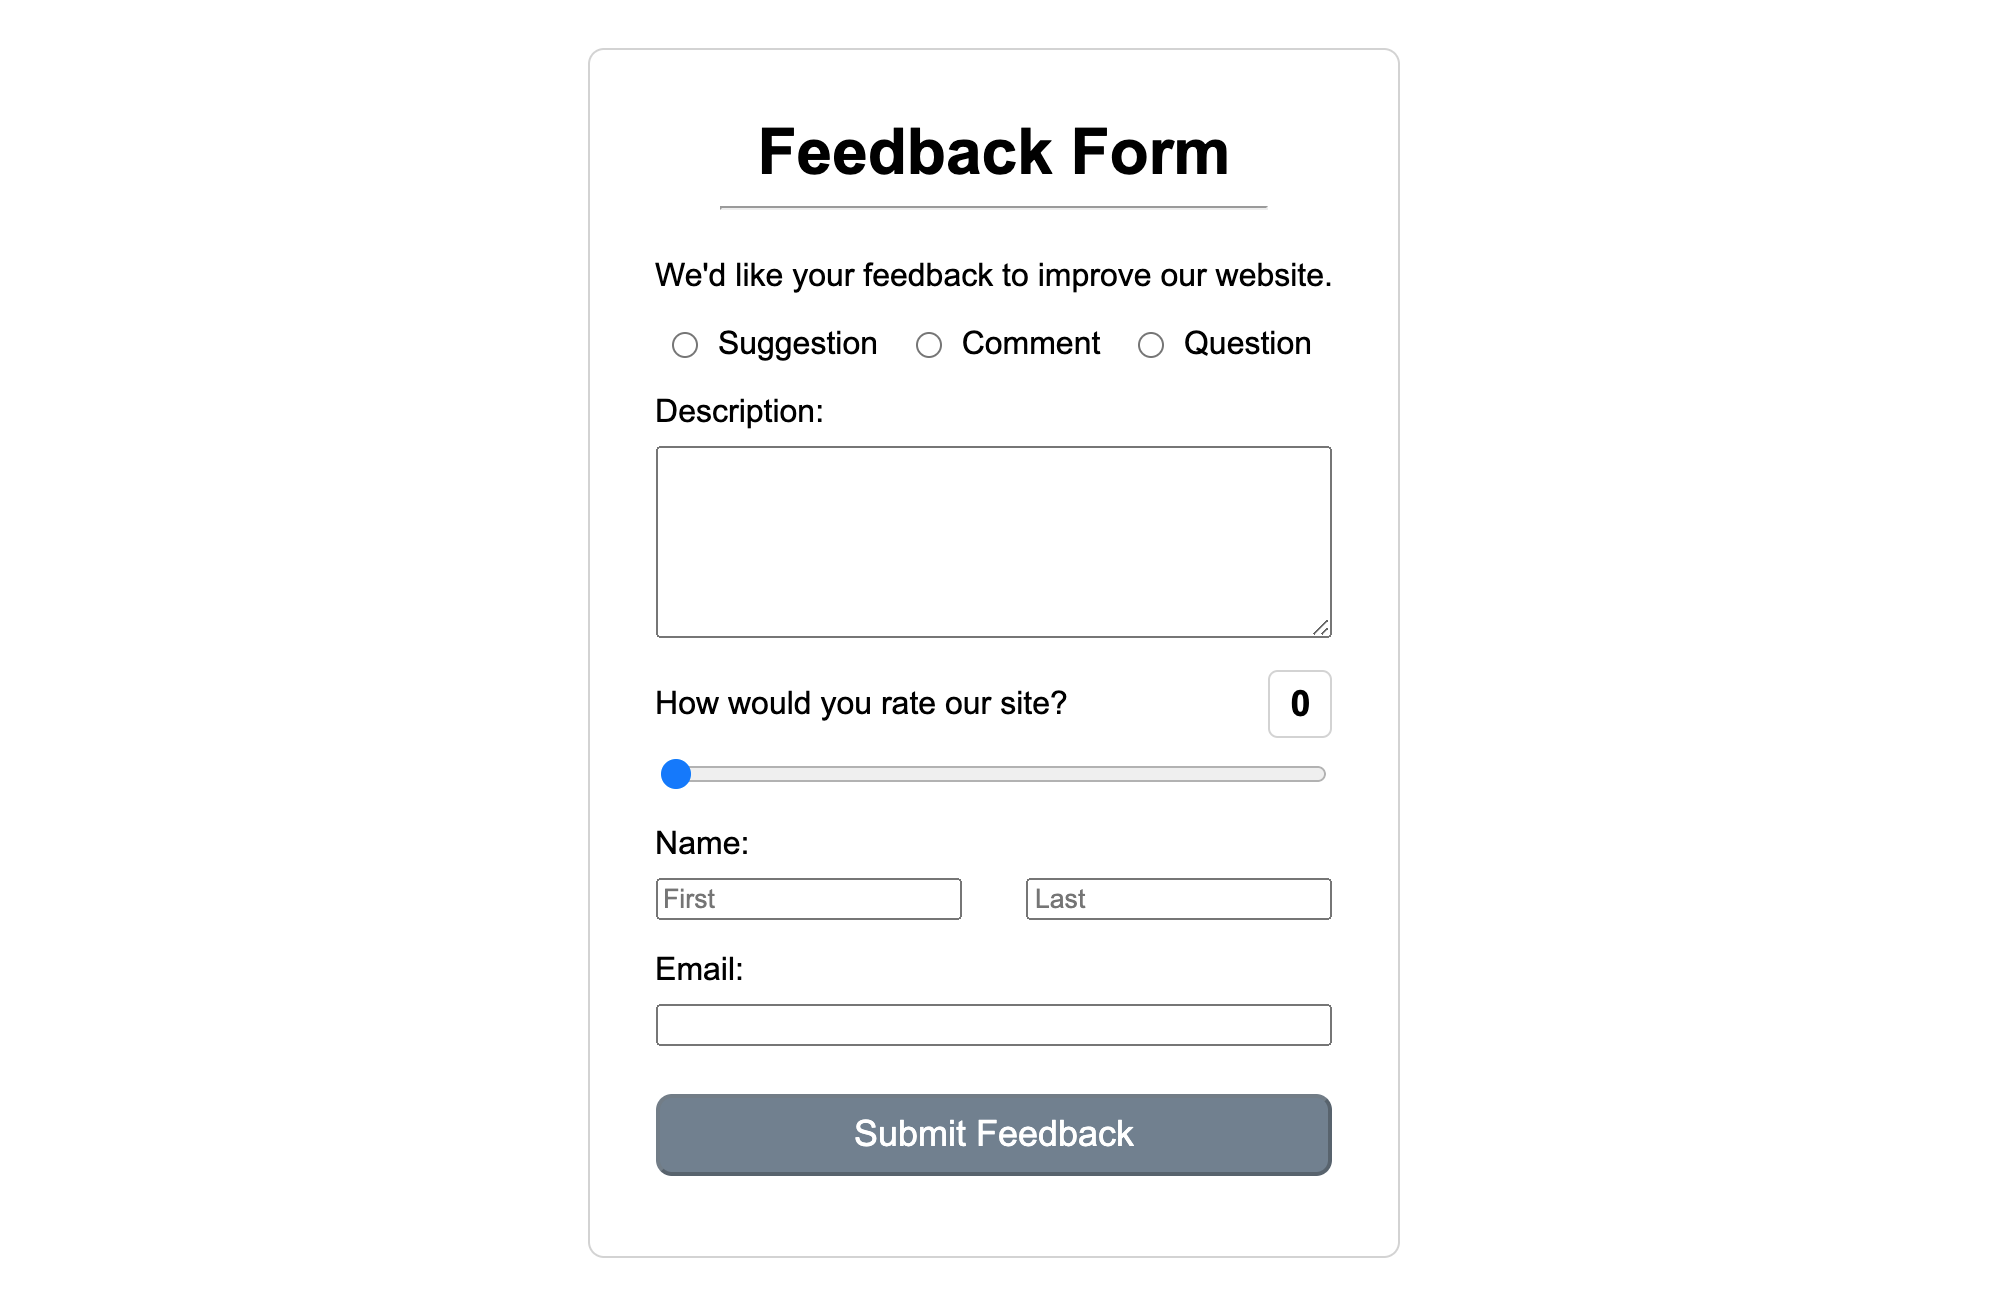
In feedback.component.html, bind the form element with [formGroup]="feedbackForm" and give every input a formControlName attribute that matches the corresponding control in the model.
<div id="container">
  <div class="error" [class.hidden]="errorMsg.length == 0">
    <p>{{errorMsg}}</p>
    <span (click)="closeError()" class="close">✖︎</span>
  </div>
  <h1>Feedback Form</h1>
  <hr>
  <p>We’d like your feedback to improve our website.</p>
  <form [formGroup]="feedbackForm" name="feedbackForm" (ngSubmit)="onSubmit()">
    <div id="options">
      <p class="radioOption">
        <input formControlName="type" type="radio" id="suggestion" name="type" value="suggestion">
        <label for="suggestion">Suggestion</label><br>
      </p>
      <p class="radioOption">
        <input formControlName="type" type="radio" id="comment" name="type" value="comment">
        <label for="comment">Comment</label><br>
      </p>
      <p class="radioOption">
        <input formControlName="type" type="radio" id="question" name="type" value="question">
        <label for="question">Question</label><br>
      </p>
    </div>
    <div class="inputContainer">
      <label>Description:</label>
      <textarea rows="6" formControlName="description"></textarea>
    </div>
    <div class="inputContainer">
      <div id="ratingLabel">
        <label>How would you rate our site?</label>
        <label id="ratingValue">{{feedbackForm.value?.rating}}</label>
      </div>
      <input formControlName="rating" type="range" name="rating" max="5">
    </div>
    <div class="inputContainer">
      <label>Name:</label>
      <div class="nameInput">
        <input formControlName="firstName" type="text" name="firstName" placeholder="First">
        <input formControlName="lastName" type="text" name="lastName" placeholder="Last">
      </div>
    </div>
    <div class="inputContainer">
      <label>Email:</label>
      <input formControlName="email" type="email" name="email">
    </div>
    <div class="inputContainer">
      <button type="submit" [disabled]="feedbackForm.invalid">Submit Feedback</button>
    </div>
  </form>
</div>
Style the form with rules placed in feedback.component.css.
#options {
    display: flex;
    flex-direction: column;
}

#options label {
    margin: 0 0 0 .2rem;
}

.radioOption {
    margin: 0 0 .2rem 0;
}

.inputContainer {
    display: flex;
    flex-direction: column;
    margin: .5rem 0 .5rem 0;
}

label {
    margin: .5rem 0 .5rem 0;
}

.nameInput {
    display: flex;
    flex-direction: column;
}

button:disabled {
    cursor: not-allowed;
    pointer-events: all;
    background-color: slategrey;
}

#ratingLabel {
    display: flex;
    justify-content: space-between;
    margin: .5rem 0 .5rem 0;
}

#ratingValue {
    font-weight: bolder;
    font-size: large;
    border: .1rem solid lightgray;
    padding: .4rem .6rem .1rem .6rem;
    margin: 0;
    vertical-align: middle;
    border-radius: .3rem;
}

.error {
    color: darkred;
    background-color: lightsalmon;
    border: .1rem solid crimson;
    border-radius: .3rem;
    padding: .5rem;
    text-align: center;
    margin: 0 0 1rem 0;
    display: flex;
    width: inherit;
}

.error p {
    margin: 0;
    flex-grow: 1;
}

textarea, input {
    margin: .1rem;
    font-family: Arial, Helvetica, sans-serif;
    padding: 5px;
    font-size: medium;
    font-weight: lighter;
}

.close {
    cursor: default;
}

.hidden {
    display: none;
}

@media screen and (min-width: 480px) {
    #options {
        flex-direction: row;
        justify-content: space-around;
    }

    .nameInput {
        flex-direction: row;
        justify-content: space-between;
    }
}
The Hidden HTML Form
Because the build bots can’t parse dynamically rendered Angular forms, add a plain HTML form directly to index.html. Give it the same name as your reactive form, plus three specific attributes: netlify (which the bots look for), netlify-honeypot (for spam protection that avoids a captcha), and hidden.
<!doctype html>
<html lang="en">
<!-- Head -->
 <body>
  <form name="feedbackForm" netlify netlify-honeypot="bot-field" hidden>
    <input type="text" name="firstName"/>
    <input type="text" name="lastName"/>
    <input type="text" name="email"/>
    <input type="text" name="feedbackType"/>
    <input type="text" name="description"/>
    <input type="text" name="rating"/>
  </form>
  <app-root></app-root>
 </body>
</html>
One limitation to note: because you cannot programmatically set the value of a file input element, file uploads are not possible with this approach.
Sending Submissions To The Hidden Form
Before wiring up the submit handler, create a Feedback interface that models the submission payload.
touch src/app/feedback/feedback.ts
export interface Feedback {
   firstName: string;
   lastName: string;
   email: string;
   type: string;
   description: string;
   rating: number;
}
Generate a NetlifyFormsService that exposes a public method to submit feedback entries. Internally it will keep a private generic submission method and an error handler.
ng g s netlify-forms/netlify-forms
The public submitEntry method returns an Observable<string> — Netlify responds to a successful POST with an HTML page containing a success alert. The service sends the submission as HttpParams, includes a ContentType header set to application/x-www-form-urlencoded, and specifies responseType as text. Omitting the responseType option triggers an error because the response is an HTML page, not JSON.
import { Injectable } from '@angular/core';
import { HttpClient, HttpErrorResponse, HttpParams } from '@angular/common/http';
import { Feedback } from '../feedback/feedback';
import { Observable, throwError } from 'rxjs';
import { catchError } from 'rxjs/operators';

@Injectable({
  providedIn: 'root'
})
export class NetlifyFormsService {

  constructor(private http: HttpClient) { }

  submitFeedback(fbEntry: Feedback): Observable {
    const entry = new HttpParams({ fromObject: {
      'form-name': 'feedbackForm',
      ...fbEntry,
      'rating': fbEntry.rating.toString(),
    }});

    return this.submitEntry(entry);
  }

  private submitEntry(entry: HttpParams): Observable {
    return this.http.post(
      '/',
      entry.toString(),
      {
        headers: { 'Content-Type': 'application/x-www-form-urlencoded' },
        responseType: 'text'
      }
    ).pipe(catchError(this.handleError));
  }

  private handleError(err: HttpErrorResponse) {
    let errMsg = '';

    if (err.error instanceof ErrorEvent) {
      errMsg = `A client-side error occurred: ${err.error.message}`;
    } else {
      errMsg = `A server-side error occurred. Code: ${err.status}. Message: ${err.message}`;
    }

    return throwError(errMsg);
  }
}

Back in the FeedbackComponent, import and inject the NetlifyFormsService and Angular’s Router.
import { Router } from '@angular/router';
import { NetlifyFormsService } from '../netlify-forms/netlify-forms.service';
constructor(
   private fb: FormBuilder,
   private router: Router,
   private netlifyForms: NetlifyFormsService
) {}
In the component’s onSubmit method, call NetlifyFormsService.submitEntry. On success, reset the form and navigate to the success page with Router.navigateByUrl('/success'). On failure, assign the error message to the errorMsg property so it displays on the form.
onSubmit() {
this.netlifyForms.submitFeedbackEntry(this.feedbackForm.value).subscribe(
   () => {
     this.feedbackForm.reset();
     this.router.navigateByUrl('/success');
   },
   err => {
     this.errorMsg = err;
   }
 );
}
Success And 404 Pages
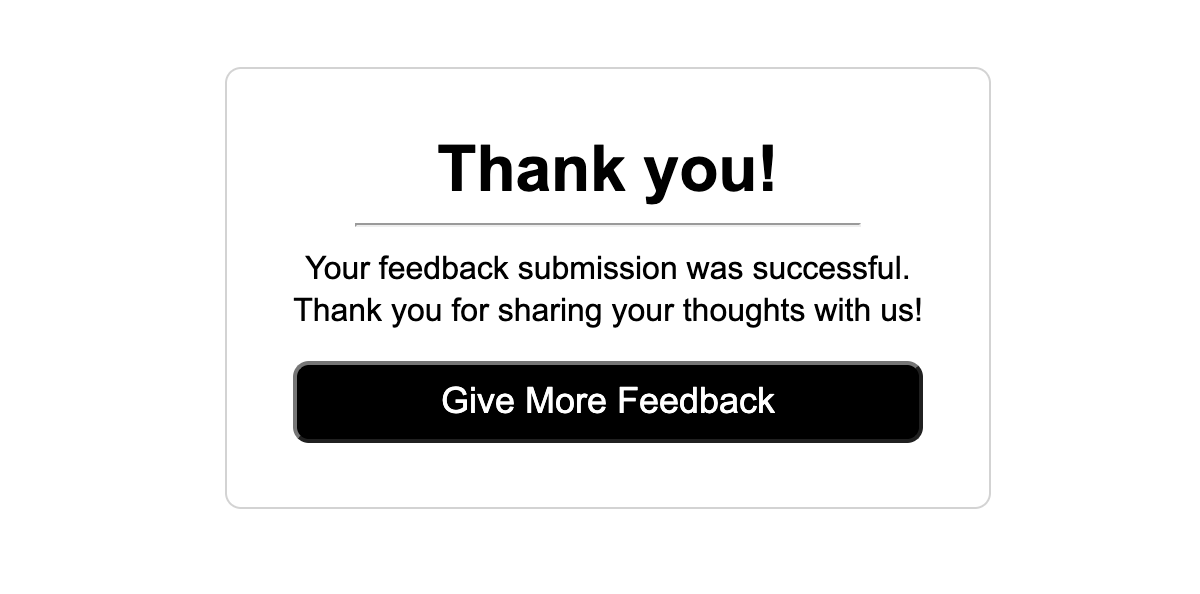
Netlify’s action attribute can point a normal form to a custom success page, but that redirect doesn’t work reliably with the hidden-form workaround. A successful POST to the hidden form returns Netlify’s generic success HTML regardless of an action attribute. So the earlier client-side navigation via the Router handles the redirect instead.
Add markup and styling to the SuccessComponent and the PageNotFoundComponent.
<div id="container">
    <h1>Thank you!</h1>
    <hr>
    <p>Your feedback submission was successful.</p>
    <p>Thank you for sharing your thoughts with us!</p>
    <button routerLink="/">Give More Feedback</button>
</div>
p {
    margin: .2rem 0 0 0;
    text-align: center;
}
<div id="container">
    <h1>Page Not Found!</h1>
    <hr>
    <p>Sorry! The page does not exist.</p>
    <button routerLink="/">Go to Home</button>
</div>
p {
    text-align: center;
}

Deploying On Netlify Edge
Because Netlify Forms is only active on sites hosted by Netlify, the final step is a deployment to Netlify Edge. Netlify Edge is the global delivery network where sites are published after deployment. Every deployment is atomic: a site goes live only once all files are uploaded and ready. Production deployments receive a subdomain on netlify.app; preview and branch deployments (for staging or development environments) are also supported.
Deploy by connecting your Git repository to Netlify or using the CLI. The build command for an Angular project is ng build, with the publish directory set to dist/feedback. Each deployment triggers Netlify’s build bots to re-parse index.html, which is what keeps the hidden form’s submission handling active.
Handling Client-Side Routing on Netlify
Because the app relies on the Angular Router, all routing happens on the client. Direct links to in-app pages or a page refresh send a request to the server, which knows nothing about those frontend-only routes. Without extra configuration, those requests would return a 404 error.
The fix is a _redirects file that tells Netlify to send every request to index.html, letting the Angular router take over from there. This file lives in the publish directory (dist/<app_name>) after a build. To keep it there, create it in the src folder and register it as an asset in angular.json.
touch src/_redirects
The rule below does the job. It rewrites all incoming requests to index.html. The 200 status option ensures responses are treated as successful page loads, not as permanent redirects (the default would be 301).
/* /index.html 200
Register the file in the assets array under projects > {your_project_name} > architect > options:
{
  "glob": "_redirects",
  "input": "src",
  "output": "/"
}
Local Preview Before Deployment
Testing the compiled output locally catches build-related problems such as broken asset paths before you push it live. The preview requires building the app and serving the output with a lightweight server like lite-server.
Note: Expect the form submission to fail with a 404 during local preview. Netlify Forms only responds on deployed Netlify sites, so the error is normal until the app is live.
- Install
lite-server:
npm install lite-server --save-dev
- Build the app from the workspace root. Adding the
--watchflag triggers rebuilds as files change. The compiled output goes intodist/<app_name>. Avoid checking this generated directory into version control.
ng build --watch
- Serve the build artifact:
lite-server --baseDir="dist/<app name>"
The preview is then available at localhost:3000.
Deployment Options
Three methods cover most workflows: the netlify-builder Angular extension, the Netlify web UI with a Git repository, and the Netlify CLI.
Option 1: netlify-builder
The netlify-builder package adds deployment commands to the Angular CLI. This approach requires an app scaffolded with Angular CLI v8.3.0 or later. The setup also needs the Netlify site's API ID (under Site Settings > General © Site Details > Site Information) and a personal access token (from User Settings > Applications).
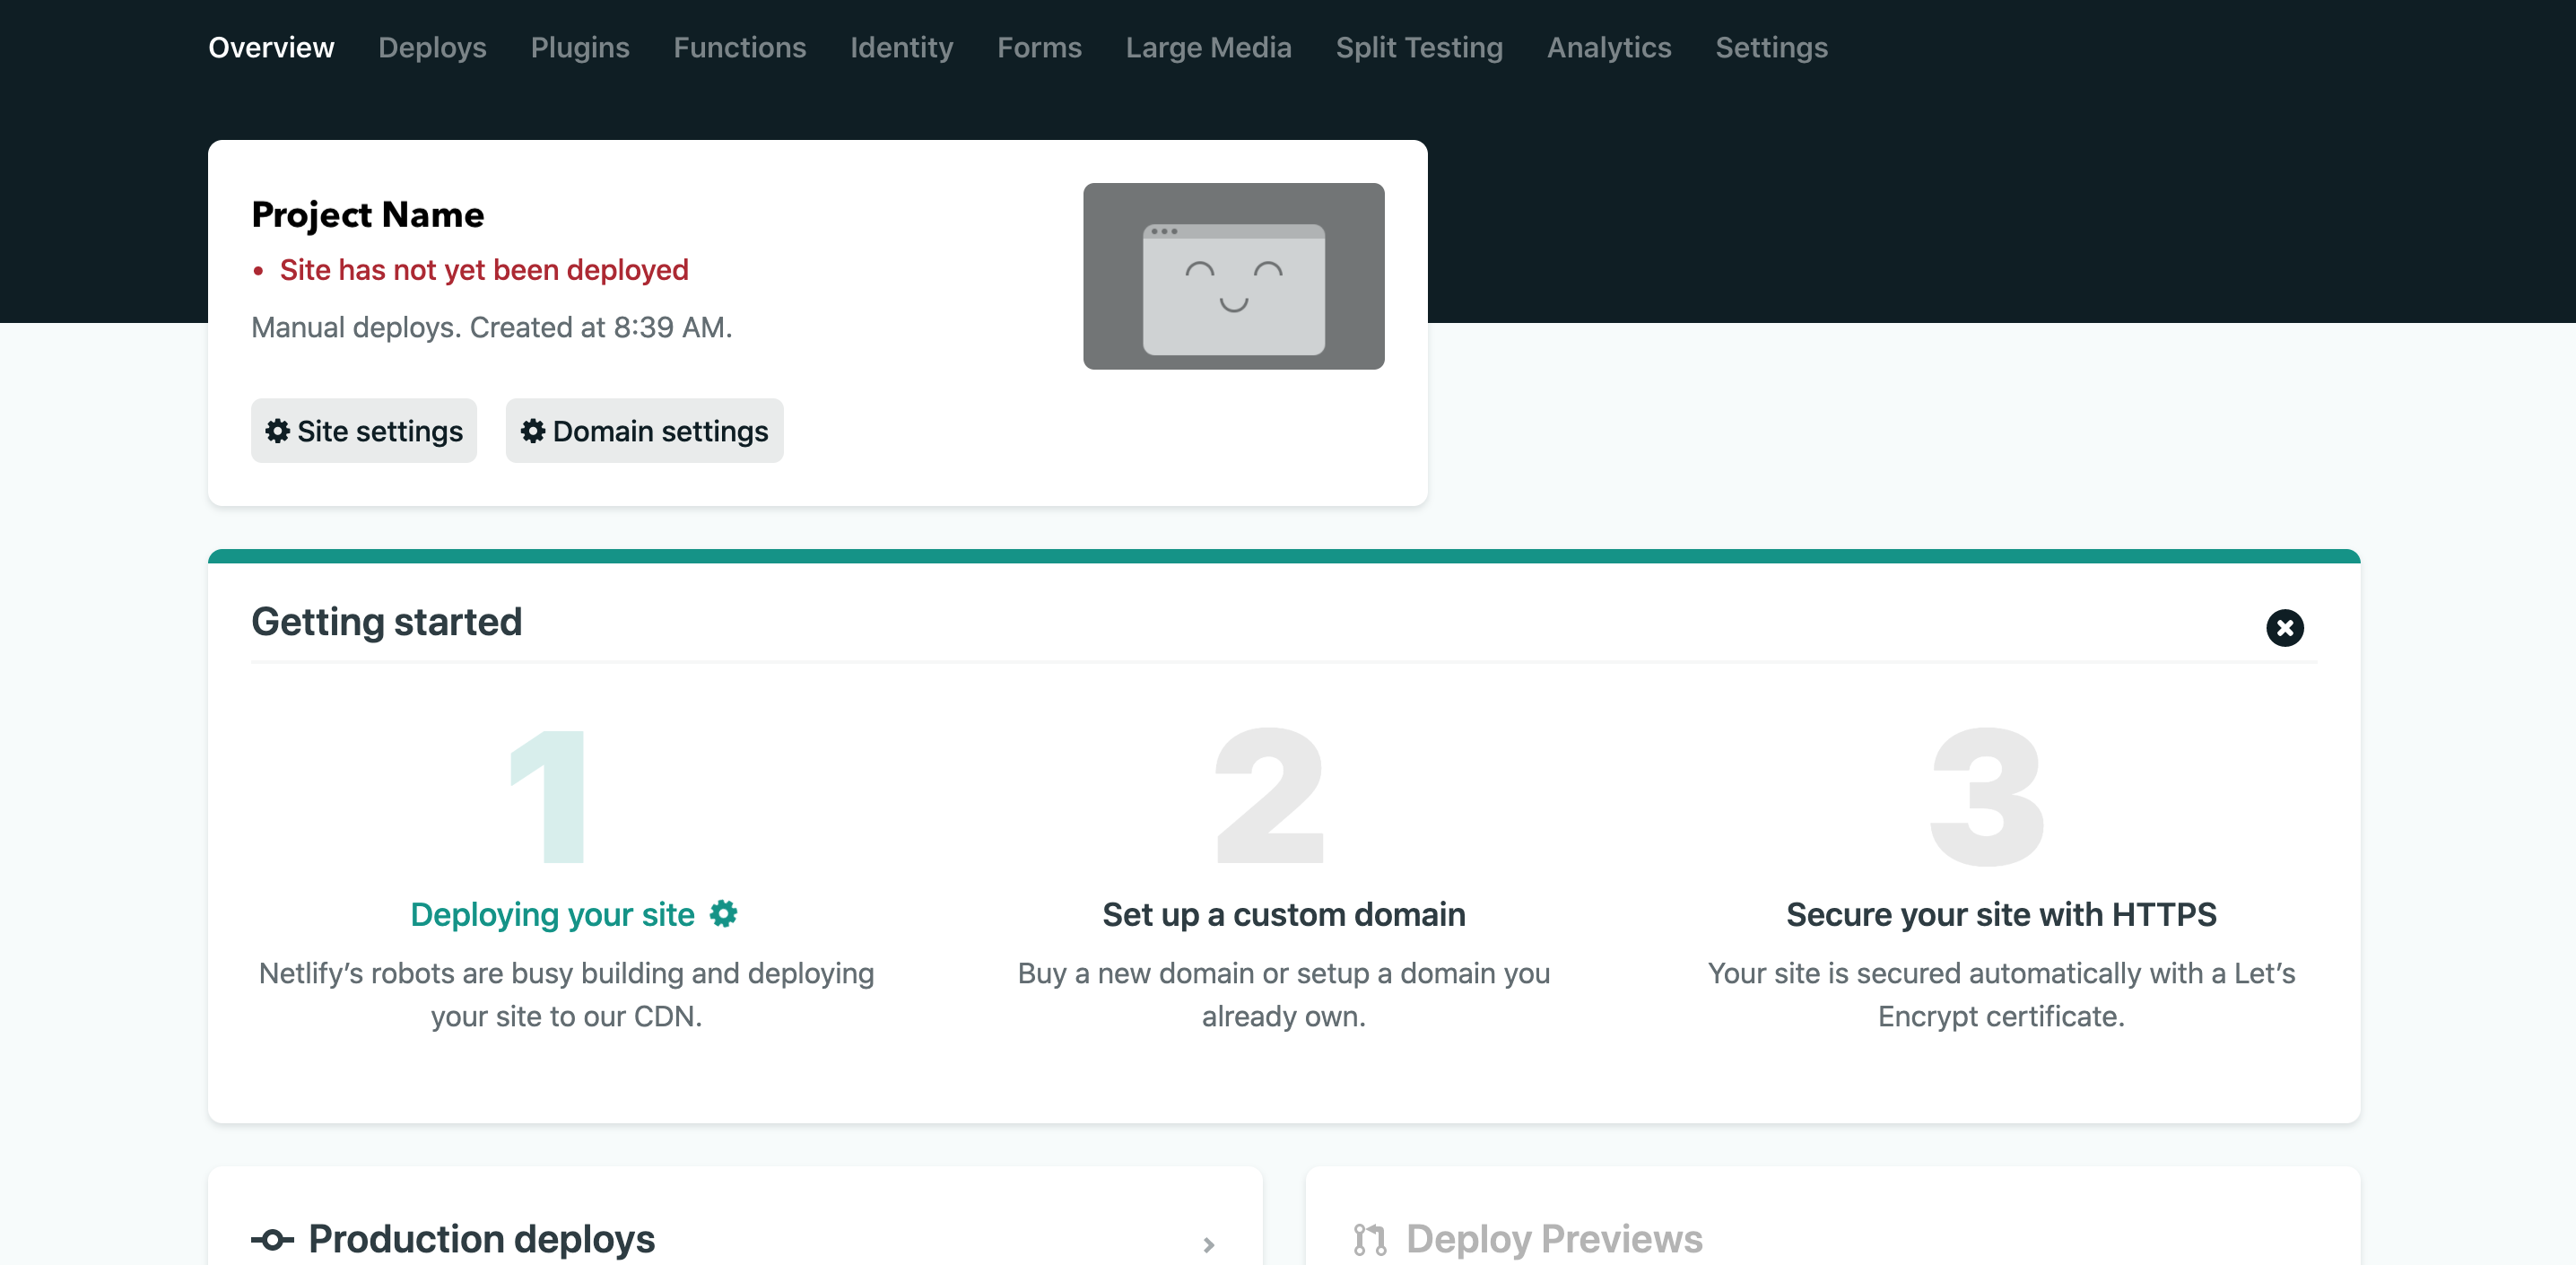
- On the Netlify dashboard, create an empty project by dragging any local folder into the "Drag and drop your site folder here" area. The project receives a random name that you can change in its domain settings.
- Store the API ID and access token safely. A local
.envfile works, but keep it out of version control. After that, add the builder to the project:
ng add @netlify-builder/deploy
The generator prompts for the API ID and token. While you can insert them into angular.json, be cautious because that file is often committed to source control. Skipping the prompt is acceptable; you will supply the values later. If you do respond, the architect section records them.
"deploy": {
    "builder": "@netlify-builder/deploy:deploy",
    "options": {
    "outputPath": "dist/<app name>",
    "netlifyToken": "",
    "siteId": ""
    }
}
- Deploy the app:
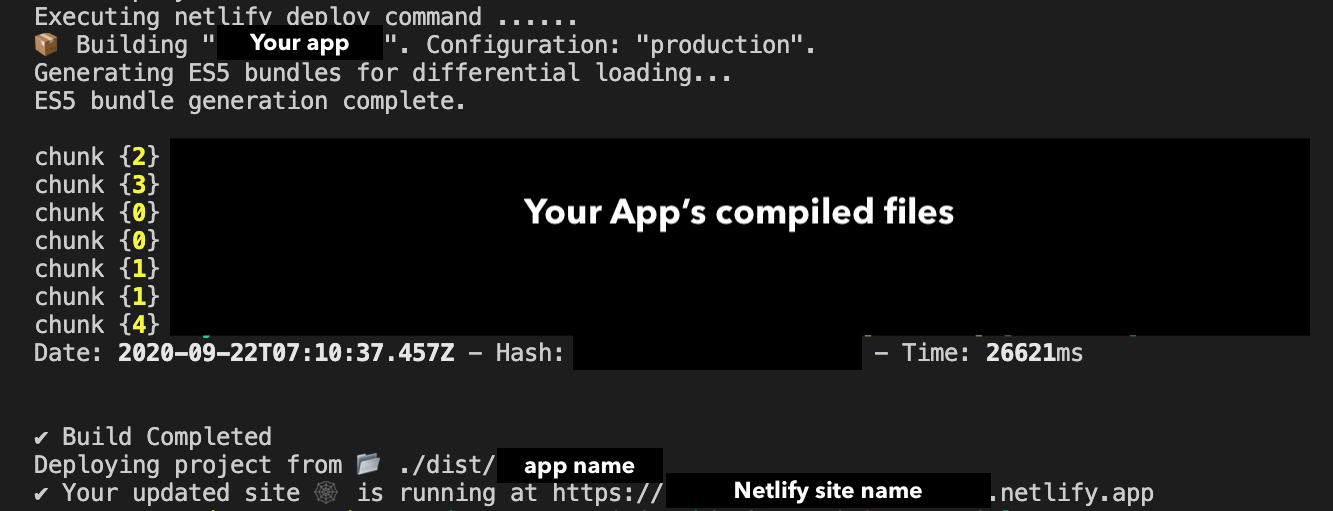
NETLIFY_TOKEN=<access token> NETLIFY_API_ID=<api id> ng deploy
For repeat use, put the command in an npm script.
Option 2: Git Repository and Netlify UI
When the app's source is on GitHub, Bitbucket, or GitLab, the Netlify dashboard can handle the full deploy pipeline.
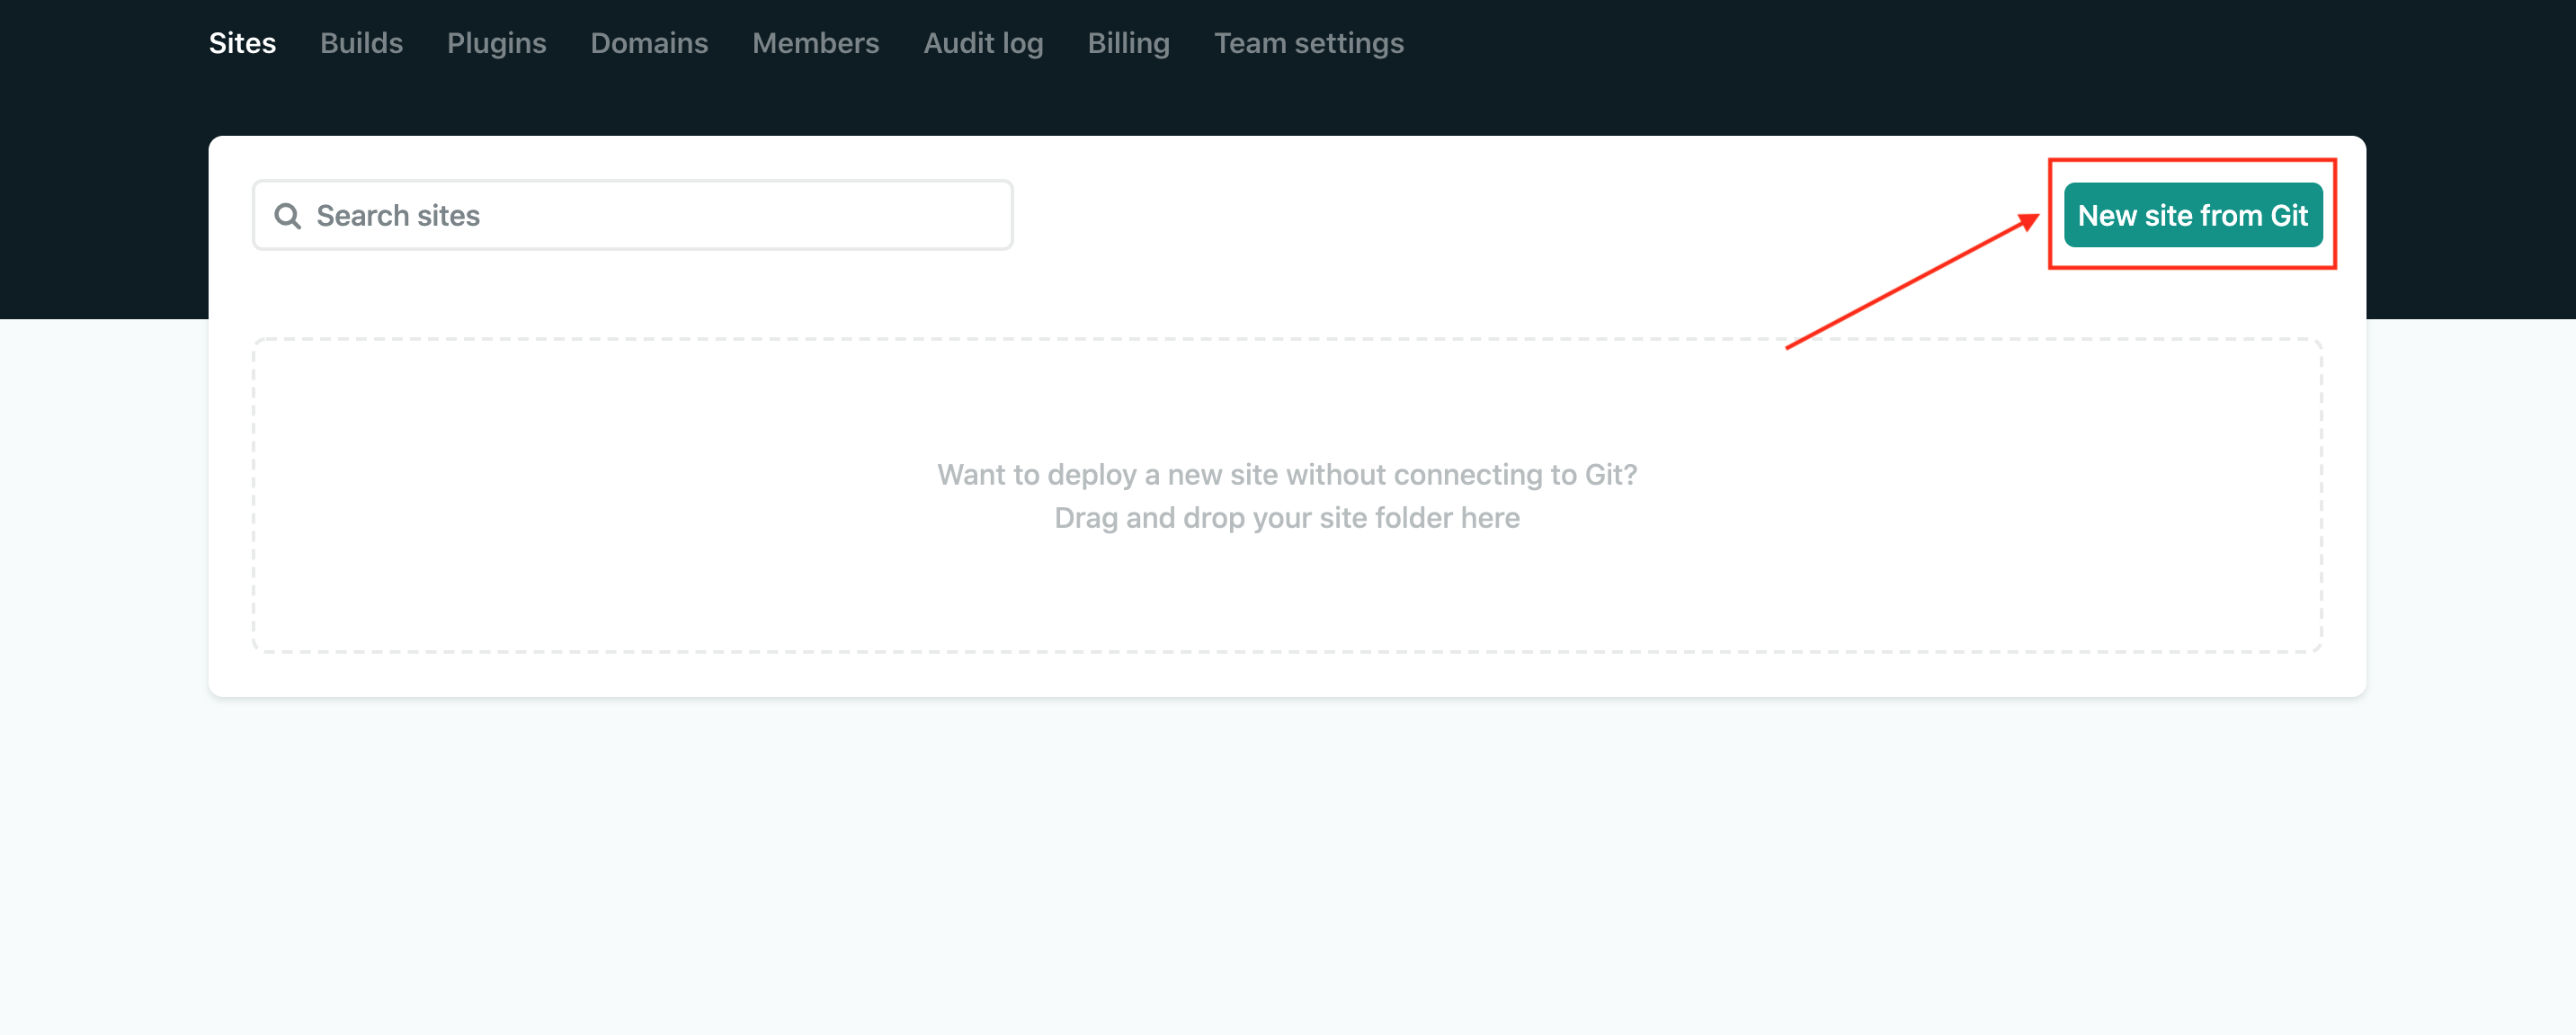
- Select New site from Git on the Sites tab.
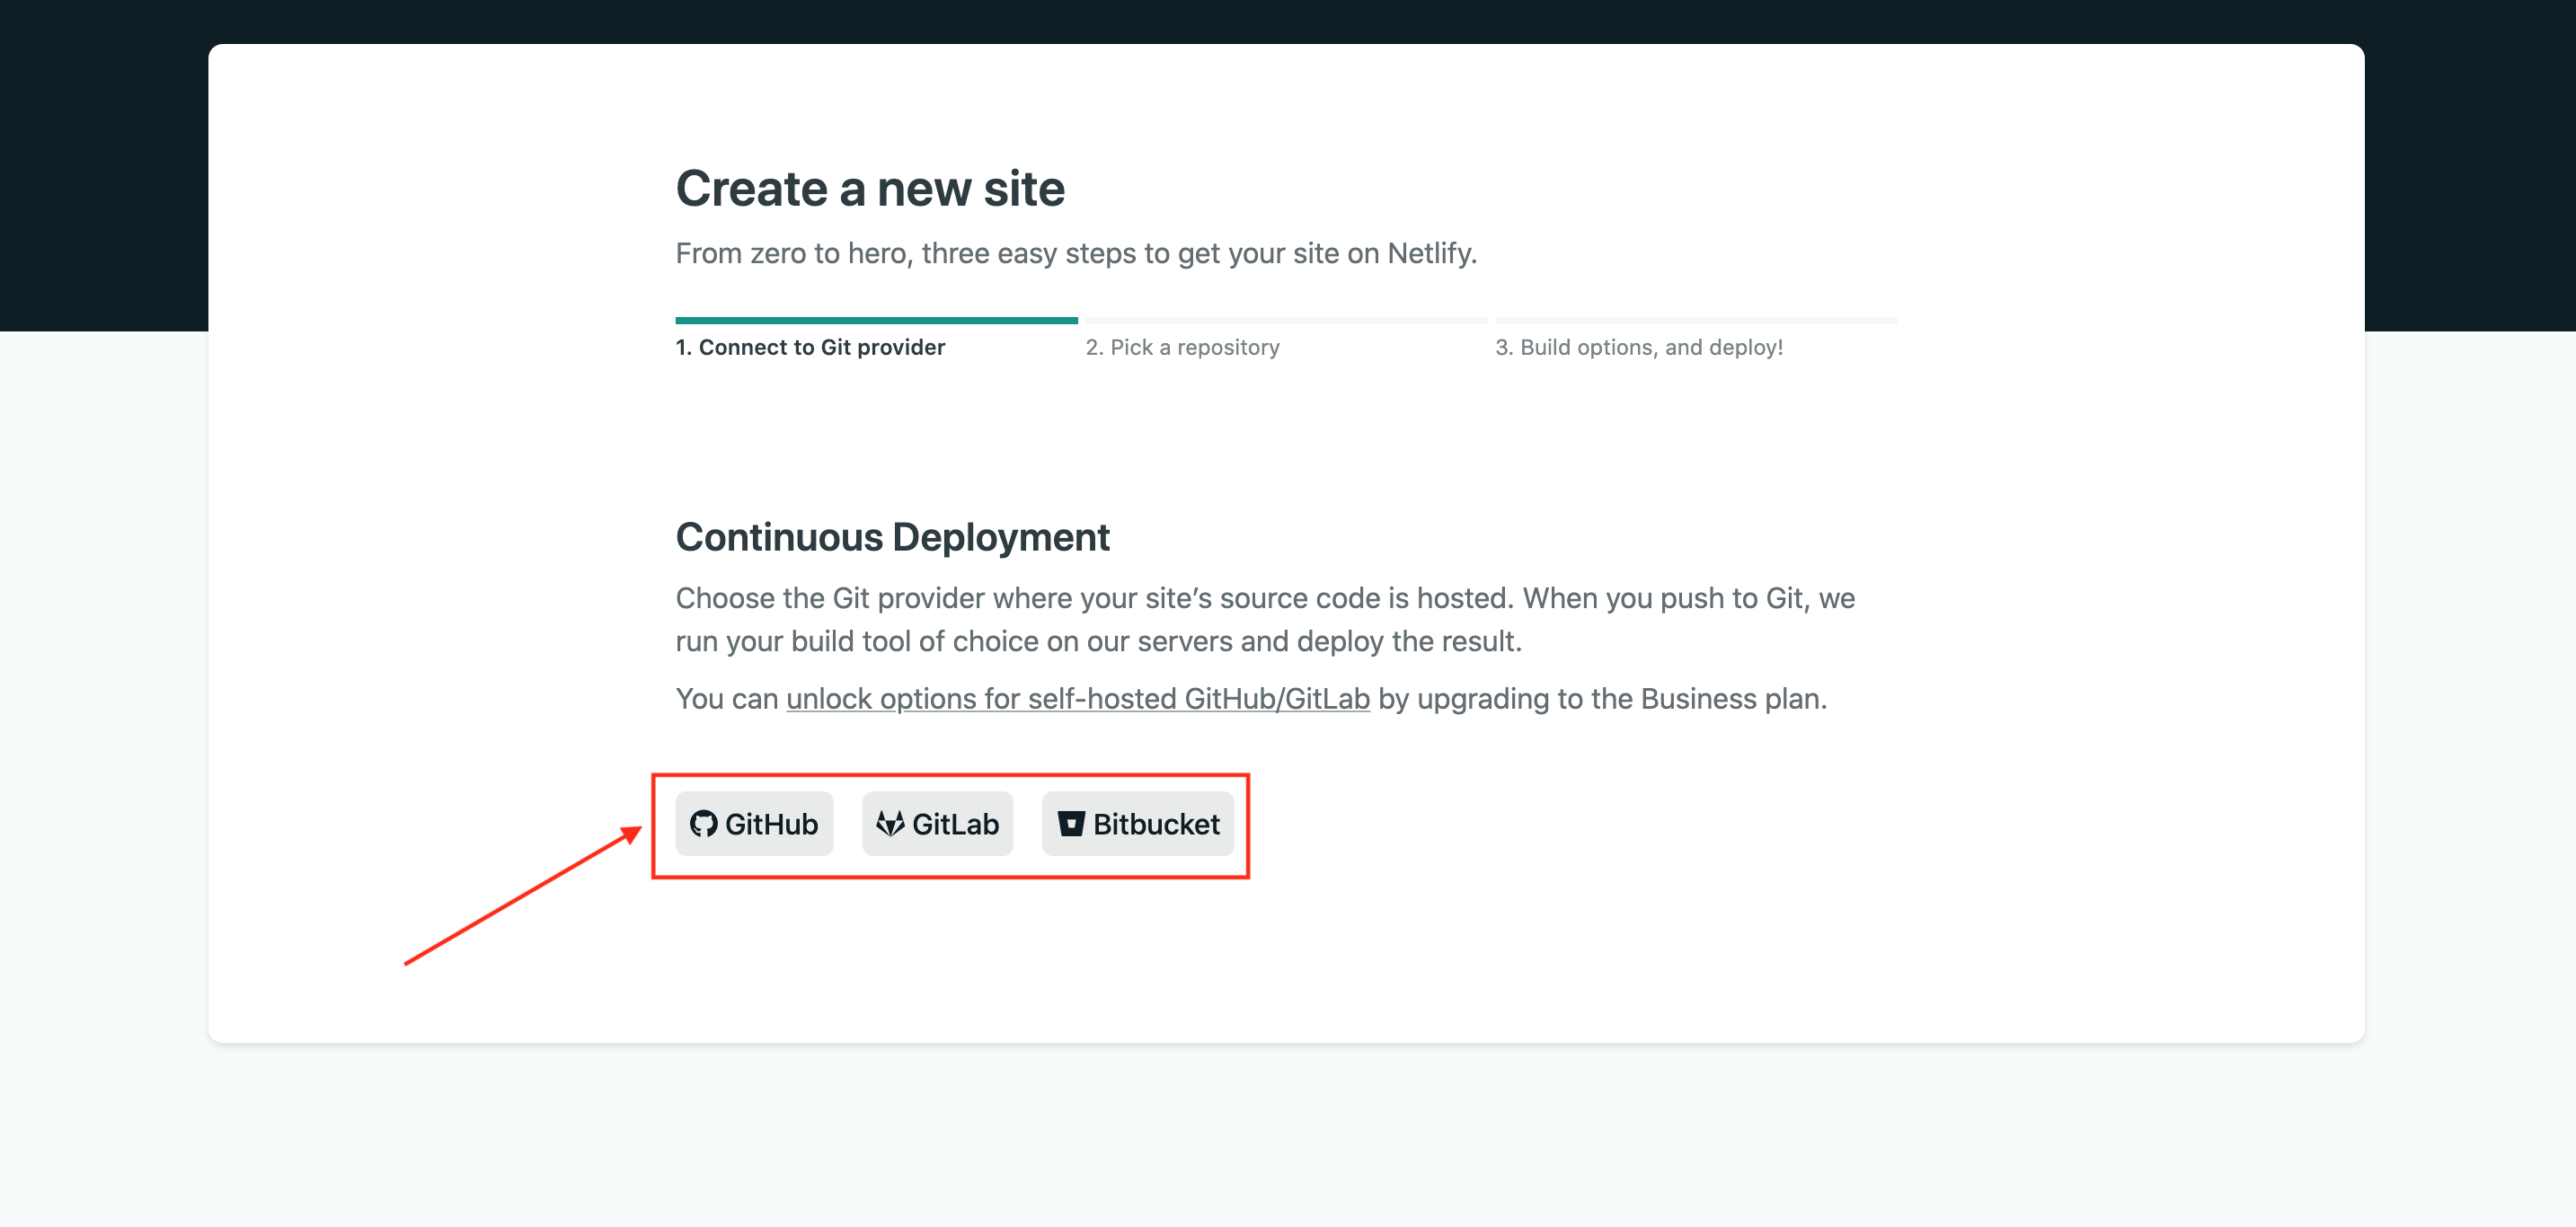
- Connect Netlify to your code host and authorize access to your repositories.
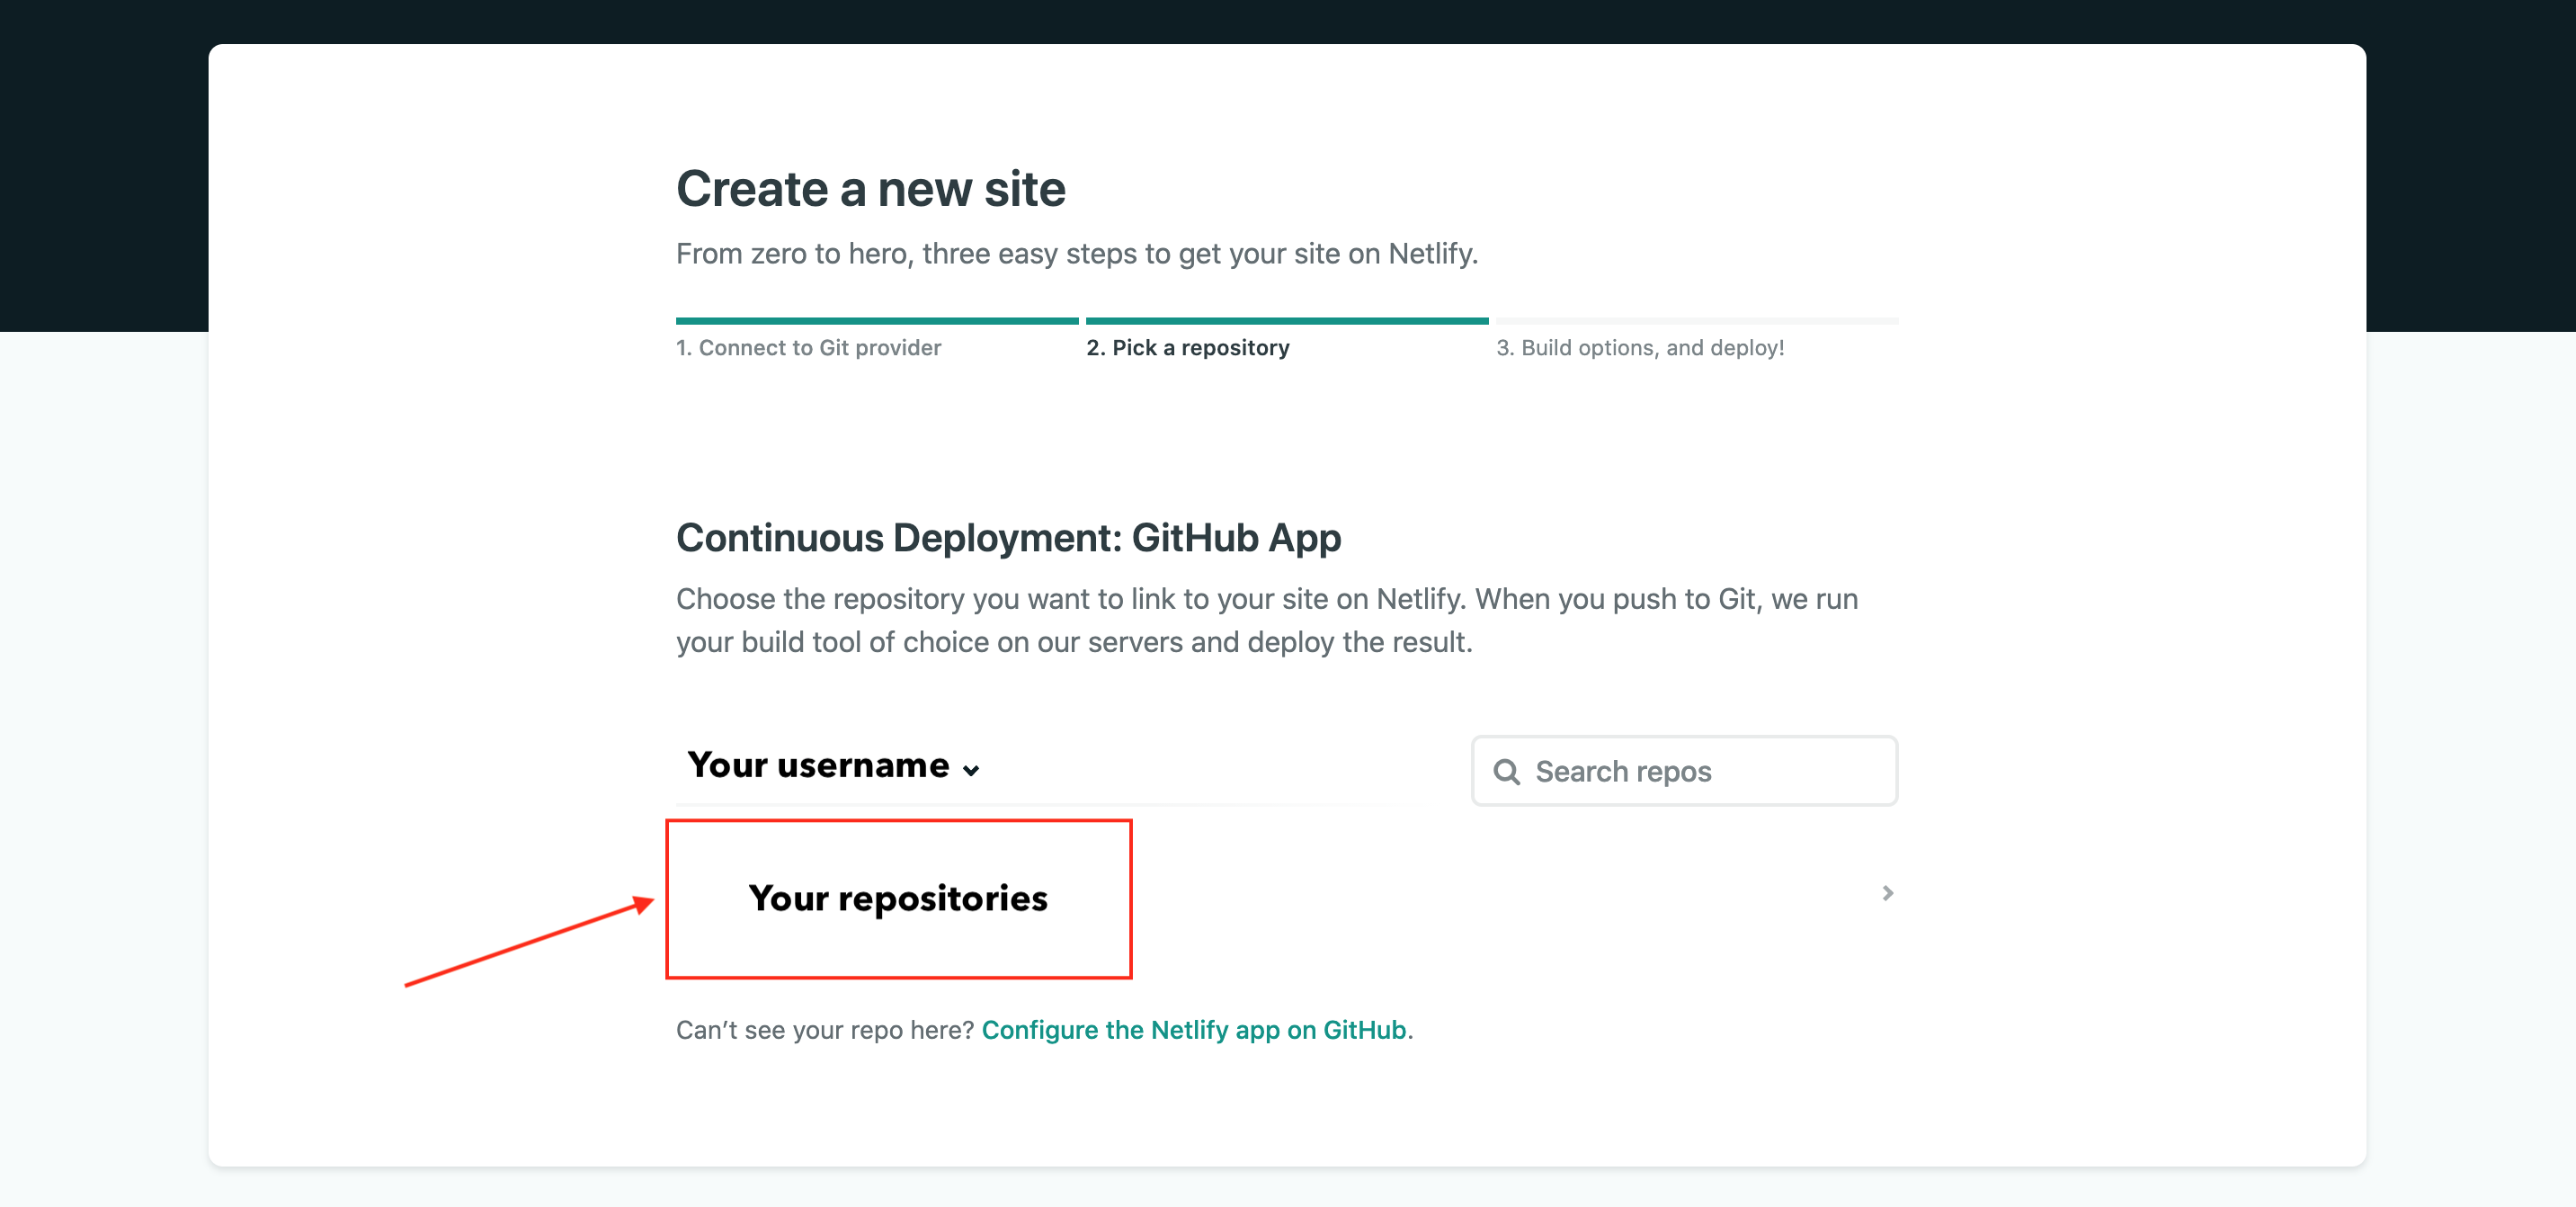
- Choose the repository that holds the Angular app.
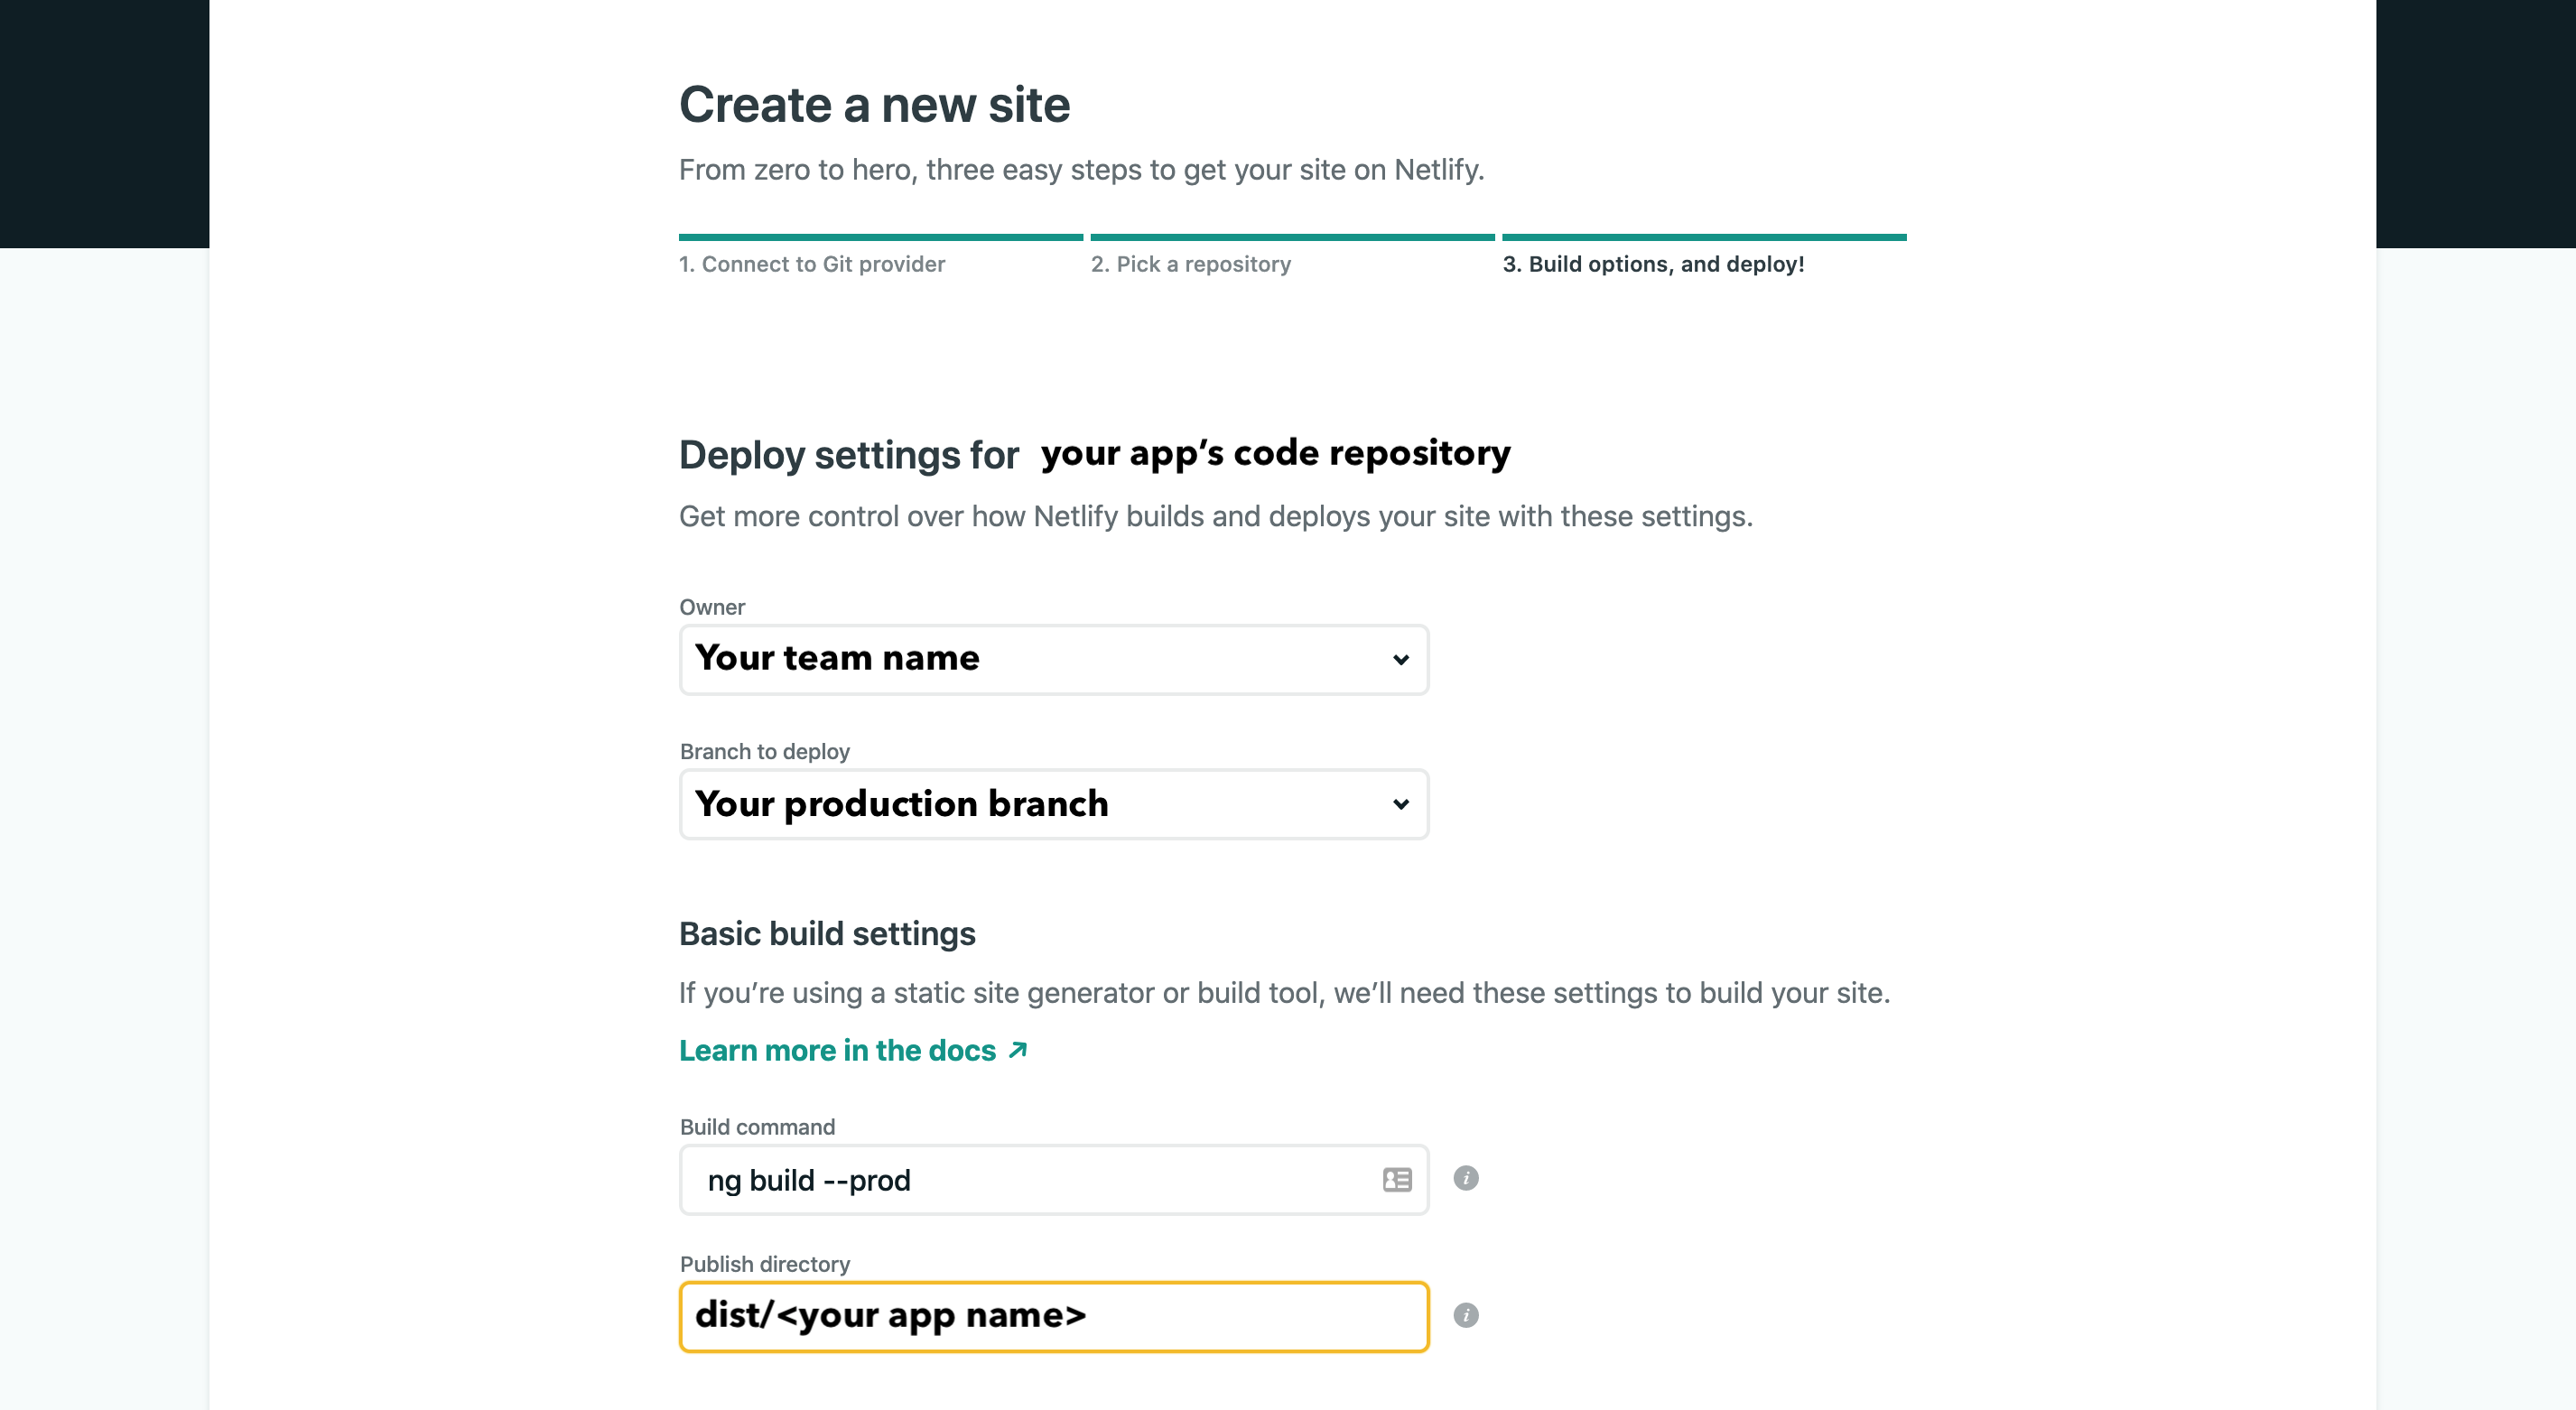
- Set the deployment settings: pick the branch, define the build command as
ng deploy --prod, and point the publish directory atdist/<your_app>.
- Click Deploy Site to start the process.
Option 3: Netlify CLI
- Install the CLI tool:
npm install netlify-cli -g
- Authenticate with the Netlify account:
netlify login
The command opens a browser tab for authorization. Approve the request to link the CLI with your account.
- Create a project:
netlify init
Choose Create & configure a new site when prompted, then select the team and a site name. The CLI displays the new project's details. Next, it links a Git hosting provider for webhooks and deploy keys—this step is mandatory. Select your platform and authorize the connection.
- Configure the deployment. Set the build command as:
ng build --prod
Then specify the directory to publish: dist/<app_name>. The CLI reports the project configuration after the final setup.
- Trigger a production deploy:
netlify deploy --prod
The --prod flag publishes to the live site. Omitting it creates a draft URL on Netlify for testing and preview. Once the upload succeeds, the CLI prints a confirmation.

Reading Form Submissions
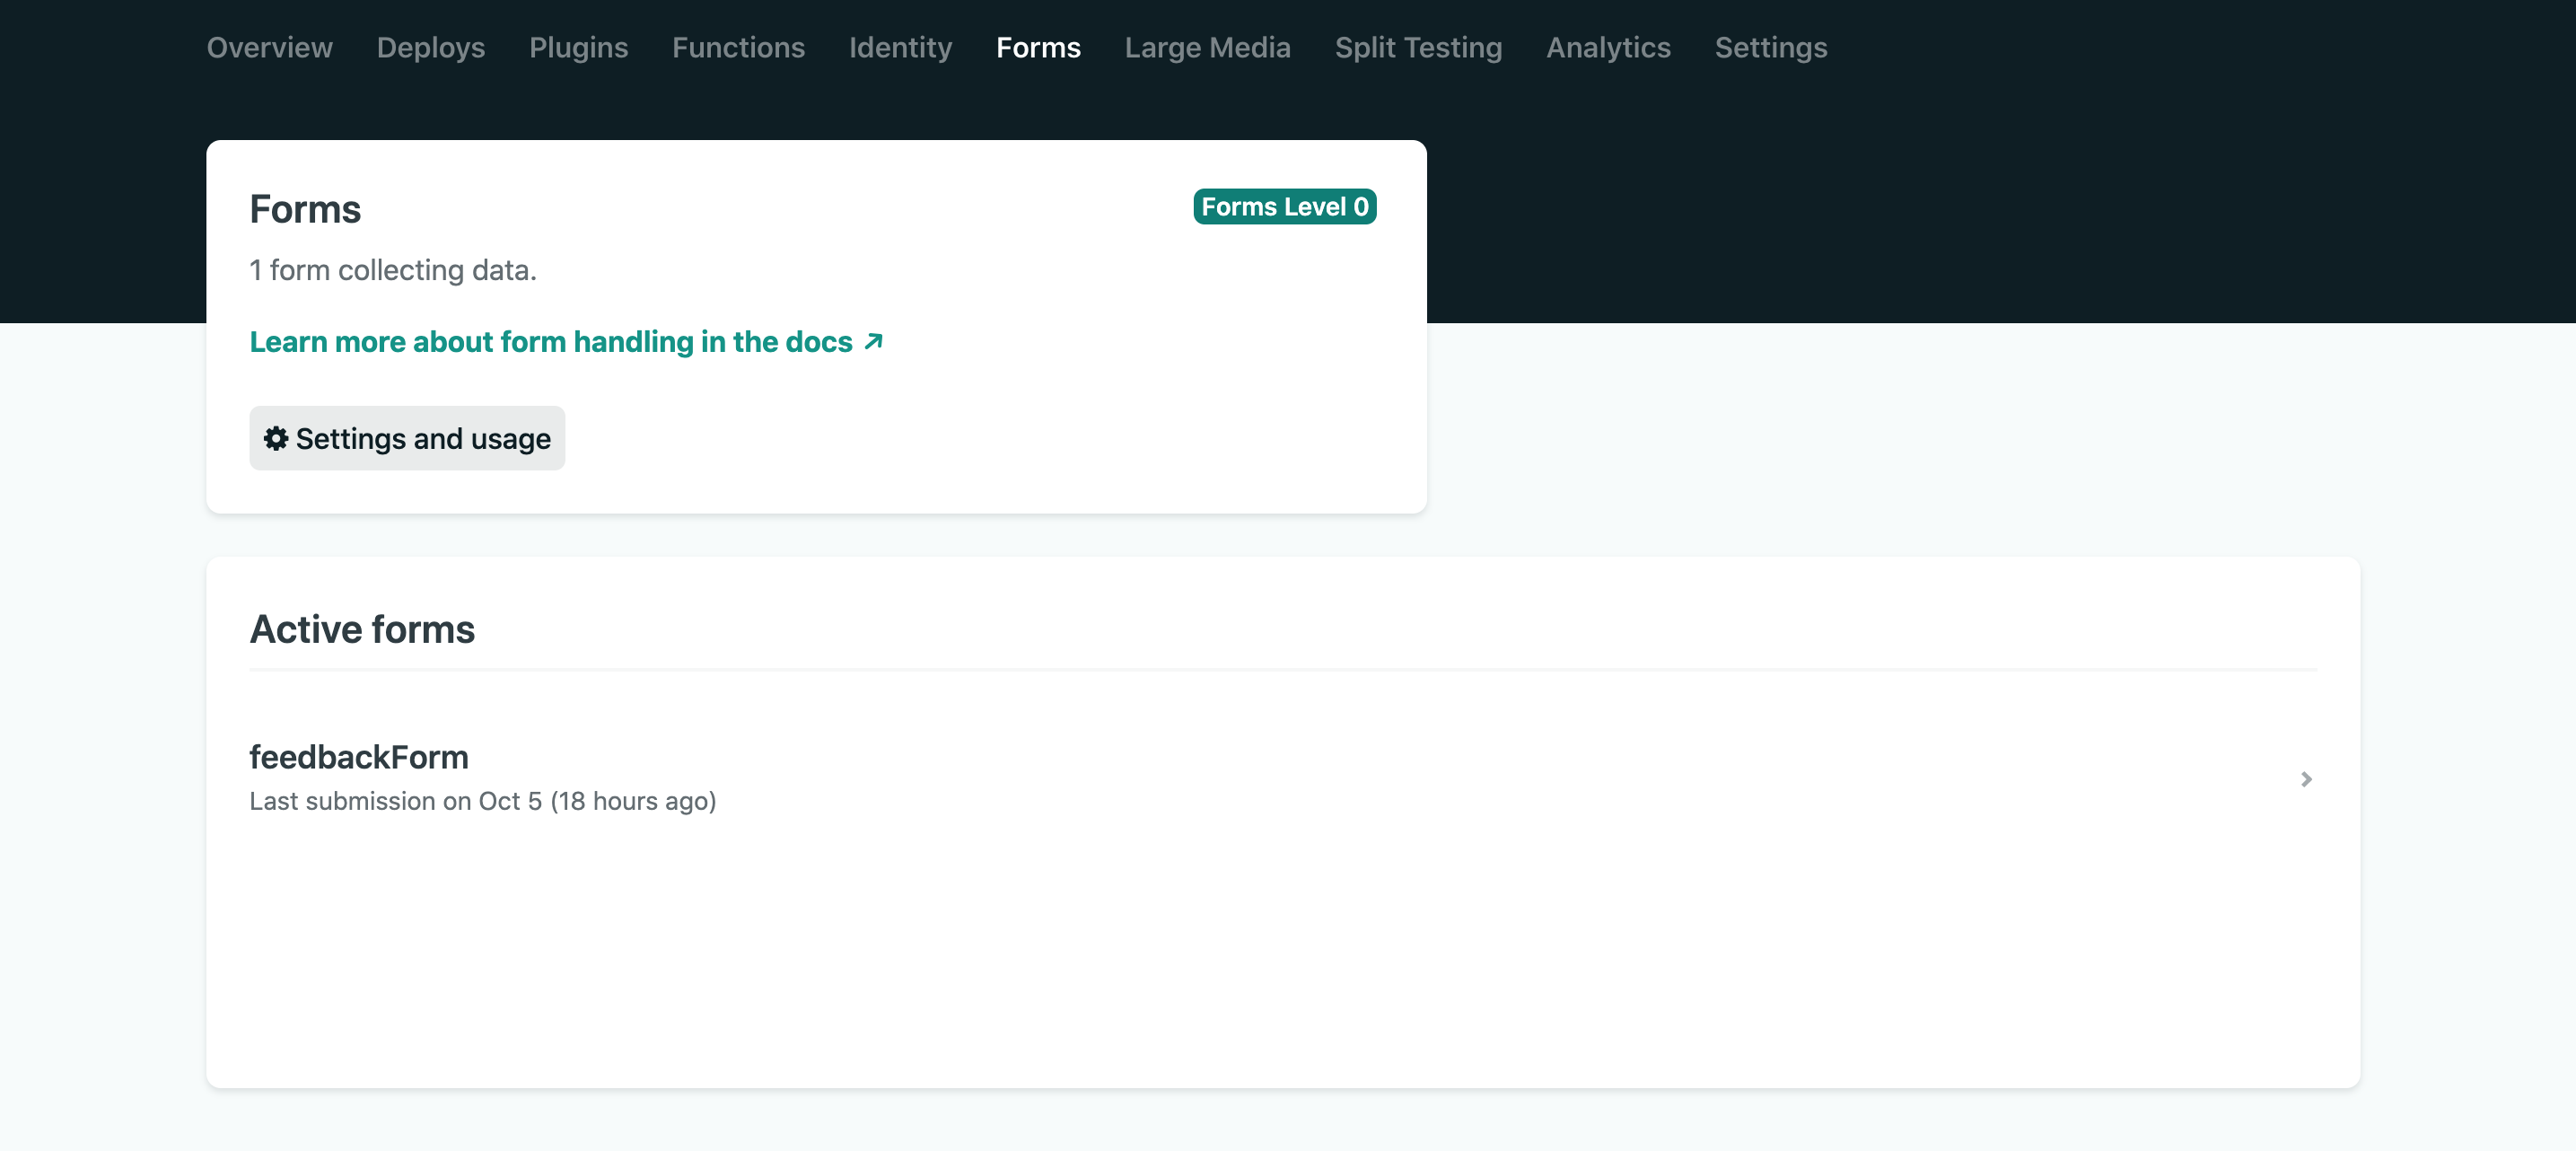
The Forms tab on the site dashboard displays all submissions at app.netlify.com/sites/<your_site_name>/forms. The name attribute in the hidden form element doubles as the form name in the dashboard. Individual forms list their submissions, which you can export as a CSV, mark as spam, or delete.
Why This Setup Works
Netlify Forms removes the need for a custom backend when the goal is modest data collection—contact forms, feedback widgets, or sign-up sheets. Combined with Angular reactive forms, you get a predictable data model that stays in sync with the UI. The reactive approach does not depend on template rendering to maintain its state.
The constraint is that Netlify Forms only activate once the site is on Netlify's edge network, which in turn brings automated builds, deployment workflows, and features like A/B testing to the hosted app.


