
From Boilerplate to Persisted Data: React, GraphQL, and FaunaDB
Setting up a backend alongside a React frontend has traditionally meant wrestling with server configuration, deployment pipelines, and database administration. FaunaDB, a NoSQL database-as-a-service, removes much of that friction by letting you generate a fully functional GraphQL API directly from a schema file. Combined with Heroku's zero-configuration React deployment, you can go from a blank directory to a live, data-persisting application in a matter of minutes.
This walkthrough builds a simple to-do list with the ability to add, complete, and remove items. The full source code is available in the example repository.
Building and Deploying a React Baseline
Start by scaffolding a new React project with create-react-app:
create-react-app fauna-todo
cd fauna-todo
yarn start
With the boilerplate running locally at http://localhost:3000, you can immediately deploy it to Heroku. Assuming the Heroku CLI is installed, creating and publishing the app requires only a few commands:
git init
heroku create -b https://github.com/mars/create-react-app-buildpack.git
git push heroku master
The app is now live. To open it in a browser:
heroku openProvisioning FaunaDB and Generating an API
With the frontend in place, persistence comes next. Create a free account at fauna.com and click "New Database" from the dashboard, providing a database name of your choice:

FaunaDB can derive a complete GraphQL API from a schema definition. Create a file named schema.graphql at the project's root. For the to-do app, start with an Item type that has a single name string field, along with an explicit allItems query:
type Item {
 name: String
}
type Query {
 allItems: [Item!]
}
In the FaunaDB dashboard, click the "GraphQL" tab and upload this schema file:
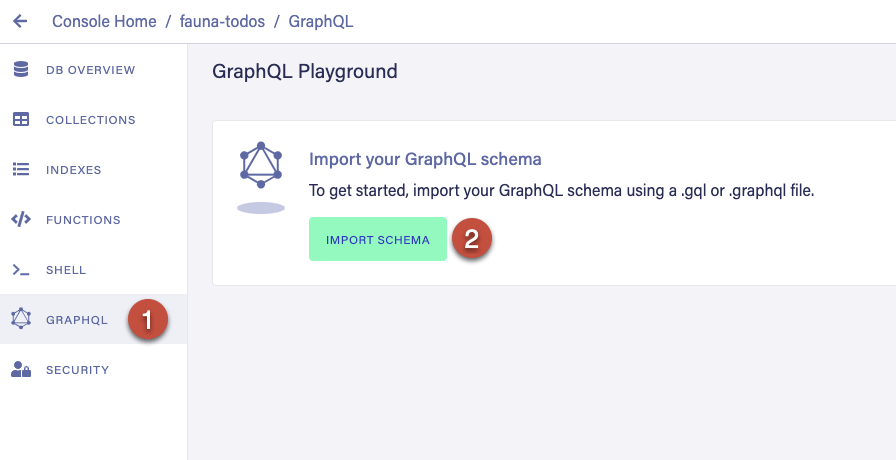
With the schema imported, the dashboard turns into a GraphQL Playground, and the "Docs" tab reveals the API surface that FaunaDB generated automatically beyond the explicit allItems query:
findItemByIDcreateItemupdateItemdeleteItem
These standard CRUD operations are derived directly from declaring the Item type. You can test them in the Playground. First, empty results are returned for allItems:
query MyItemQuery {
 allItems {
   data {
    name
   }
 }
}
Seed an item with the generated createItem mutation:
mutation MyItemCreation {
 createItem(data: { name: "My first todo item" }) {
   name
 }
}
Re-running the original query now confirms the record was created, and the item also appears under the "Collections" tab in the dashboard.
Scoped Keys for Safe Access
To access the database from the React app, you need a key. While FaunaDB includes built-in admin and server roles, using those for application-level access is dangerous, as they allow database-level operations like deleting collections. Instead, define a scoped custom role.
In the "Security" tab, open "Manage Roles" and create a "New Custom Role" named ItemEditor. Grant it read, write, create, and delete permissions on items, along with read access to the allItems index:

Save the role, then create a new key under the "Security" tab, selecting the ItemEditor role:

Copy the secret value that FaunaDB presents. To make the key available locally, Create React App needs it in an environment file with a REACT_APP_ prefix. Create .env.local in the project directory:
REACT_APP_FAUNA_SECRET=fnADzT7kXcACAFHdiKG-lIUWq-hfWIVxqFi4OtTvEnsure .env.local is listed in .gitignore so the secret never enters version control. Restart the development server with yarn start for the environment variable to be picked up.
Wiring Apollo to FaunaDB
Apollo Client provides the interface between React and the GraphQL API. Install the required packages:
yarn add @apollo/client graphql @apollo/react-hooksCreate src/client.js with the Apollo configuration:
import { ApolloClient, InMemoryCache } from "@apollo/client";
export const client = new ApolloClient({
 uri: "https://graphql.fauna.com/graphql",
 headers: {
   authorization: `Bearer ${process.env.REACT_APP_FAUNA_SECRET}`,
 },
 cache: new InMemoryCache(),
});
This points Apollo at FaunaDB's GraphQL endpoint and includes the generated key as an authorization header. Two considerations from this setup:
- The header uses the
ItemEditorrole key for every user. A multi-user app would require per-user login tokens passed here instead. - Apollo introduces client-side caching, which can return stale data. Since FaunaDB is strongly consistent, use refetch queries and specify response fields on mutations to keep the cache fresh.
Replace the contents of App.js to establish the basic component structure, using inline styles for simplicity in this demo:
import React from "react";
import { ApolloProvider } from "@apollo/client";
import { client } from "./client";
function App() {
 return (
   <ApolloProvider client={client}>
     <div style={{ padding: "5px" }}>
       <h3>My Todo Items</h3>
       <div>items to get loaded here</div>
     </div>
   </ApolloProvider>
 );
}
A hard-coded item appears at http://localhost:3000. To display the record created in FaunaDB, create an ItemList component that runs the allItems query:
import React from "react";
import gql from "graphql-tag";
import { useQuery } from "@apollo/react-hooks";
const ITEMS_QUERY = gql`
 {
   allItems {
     data {
       _id
       name
     }
   }
 }
`;
export function ItemList() {
 const { data, loading } = useQuery(ITEMS_QUERY);
if (loading) {
   return "Loading...";
 }
return (
   <ul>
     {data.allItems.data.map((item) => {
       return <li key={item._id}>{item.name}</li>;
     })}
   </ul>
 );
}
Updating App.js to render ItemList will load the persisted to-do item from the database.
Deploying with Heroku Environment Variables
Committing and pushing the changes to Heroku reveals a blank page when visiting the live URL. Network inspection shows FaunaDB rejecting the request because the database secret is missing. Heroku needs the same environment variable that works locally.
In the Heroku dashboard, open the app's "Settings" tab and add the REACT_APP_FAUNA_SECRET key-value pair:

Alternatively, set it from the CLI:
heroku config:set REACT_APP_FAUNA_SECRET=fnADzT7kXcACAFHdiKG-lIUWq-hfWIVxqFi4OtTvHeroku buildpacks require an explicit redeploy for new environment variables to take effect:
git commit — allow-empty -m 'Add REACT_APP_FAUNA_SECRET env var'
git push heroku master
heroku open
Adding and Deleting Items
With the full request pipeline working, mutating data is straightforward. An AddItem component uses a basic HTML form to invoke the createItem mutation:
import React from "react";
import gql from "graphql-tag";
import { useMutation } from "@apollo/react-hooks";
const CREATE_ITEM = gql`
 mutation CreateItem($data: ItemInput!) {
   createItem(data: $data) {
     _id
   }
 }
`;
const ITEMS_QUERY = gql`
 {
   allItems {
     data {
       _id
       name
     }
   }
 }
`;
export function AddItem() {
 const [showForm, setShowForm] = React.useState(false);
 const [newItemName, setNewItemName] = React.useState("");
const [createItem, { loading }] = useMutation(CREATE_ITEM, {
   refetchQueries: [{ query: ITEMS_QUERY }],
   onCompleted: () => {
     setNewItemName("");
     setShowForm(false);
   },
 });
if (showForm) {
   return (
     <form
       onSubmit={(e) => {
         e.preventDefault();
         createItem({ variables: { data: { name: newItemName } } });
       }}
     >
       <label>
         <input
           disabled={loading}
           type="text"
           value={newItemName}
           onChange={(e) => setNewItemName(e.target.value)}
           style={{ marginRight: "5px" }}
         />
       </label>
       <input disabled={loading} type="submit" value="Add" />
     </form>
   );
 }
return <button onClick={() => setShowForm(true)}>Add Item</button>;
}
Including this component in App.js enables creating new to-dos from the installed form.
Deleting items follows the same pattern, but uses deleteItem. This updated ItemList also fires a refetch of allItems once deletion succeeds:
import React from "react";
import gql from "graphql-tag";
import { useMutation, useQuery } from "@apollo/react-hooks";
const ITEMS_QUERY = gql`
 {
   allItems {
     data {
       _id
       name
     }
   }
 }
`;
const DELETE_ITEM = gql`
 mutation DeleteItem($id: ID!) {
   deleteItem(id: $id) {
     _id
   }
 }
`;
export function ItemList() {
 const { data, loading } = useQuery(ITEMS_QUERY);
const [deleteItem, { loading: deleteLoading }] = useMutation(DELETE_ITEM, {
   refetchQueries: [{ query: ITEMS_QUERY }],
 });
if (loading) {
   return <div>Loading...</div>;
 }
return (
   <ul>
     {data.allItems.data.map((item) => {
       return (
         <li key={item._id}>
           {item.name}{" "}
           <button
             disabled={deleteLoading}
             onClick={(e) => {
               e.preventDefault();
               deleteItem({ variables: { id: item._id } });
             }}
           >
             Remove
           </button>
         </li>
       );
     })}
   </ul>
 );
}
The list updates correctly when clicking "Remove." Note that the ITEMS_QUERY includes the auto-generated _id field, which is the unique identifier needed for the delete mutation.
Updating Items with Schema Evolution
A usable to-do list also needs to track completed state. This requires extending the schema. Update schema.graphql to add a boolean field:
type Item {
 name: String
 isComplete: Boolean
}
type Query {
 allItems: [Item!]
}
Return to the GraphQL tab in FaunaDB and select "Update Schema" to upload the modified file. For changes like this that are purely additive, updating is safe and preserves existing data. The "Override Schema" option would rebuild from scratch and erase records, which is fine for scratch data but not for anything you want to keep.
The Playground documentation confirms that updateItem accepts an ItemInput object containing the new field. Adding the UPDATE_ITEM mutation to ItemList.js—as demonstrated in the example repository—completes the feature.
This mutation does not need a refetchQueries parameter. Apollo automatically updates the item in its cache based on the _id identifier field returned by the mutation, causing the component to re-render with the fresh state.
Going Further with FaunaDB
With a final push to Heroku, you have a deployed application that stores data in a managed GraphQL database. The most useful takeaway for future projects is the speed of this provisioning loop: defining a schema and importing it into FaunaDB instantly yields a production-grade API with queries, mutations, and scoped security roles. That removes the database administration overhead from the project, freeing you to concentrate on application logic rather than infrastructure glue.


