Push Messaging at a Glance
Web push notifications involve three distinct pieces that need to work together: client-side code that subscribes a user, a server-side API call that triggers the message, and a service worker that receives and handles the push event. Before diving into specific APIs, it helps to understand how these pieces fit together.
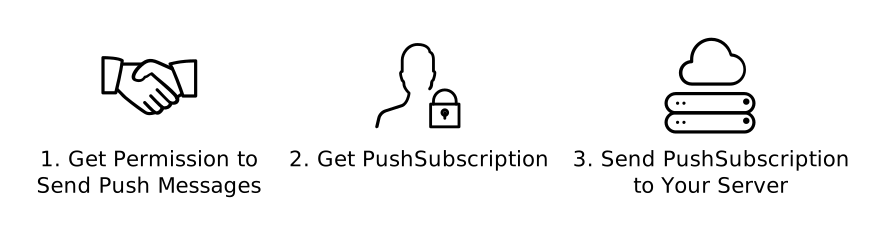
Step 1: Subscribing the User
The client-side work begins with subscribing a user to push messaging. This requires two things: user permission and a PushSubscription object from the browser. The PushSubscription can be thought of as an ID for that user's device — it contains all the information needed to send push messages to that specific user. This is handled through the Push API in JavaScript.
Before subscribing a user, you need to generate a set of "application server keys," also known as VAPID keys. These keys are unique to your server and allow a push service to verify which application server carried out the subscription — ensuring the same server is the one triggering messages to that user.
Once the user is subscribed and you have a PushSubscription, the subscription details need to be sent to your backend and saved in a database so you can use them later to send push messages.
Step 2: Sending the Push Message
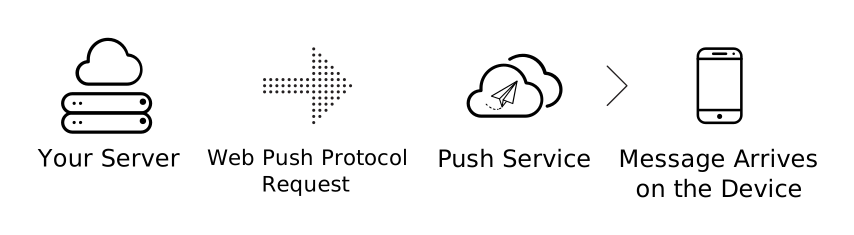
When you want to send a push message, your server makes an API call to a push service. This call specifies what data to send, who the recipient is, and how the message should be delivered. Several questions usually come up here; let's address each one.
What is the Push Service?
A push service receives the network request, validates it, and delivers the message to the appropriate browser. If the browser is offline, the push service queues the message until the browser reconnects.
Browsers each choose their own push service — that's entirely out of your control. It's not a problem, though, because every push service expects the same API call format. You don't need to know which service a given browser uses; you just need to make a valid API call.
To find the right URL for triggering a push message, look at the endpoint value in the PushSubscription:
{
  "endpoint": "https://random-push-service.com/some-kind-of-unique-id-1234/v2/",
  "keys": {
    "p256dh": "BNcRdreALRFXTkOOUHK1EtK2wtaz5Ry4YfYCA_0QTpQtUbVlUls0VJXg7A8u-Ts1XbjhazAkj7I99e8QcYP7DkM=",
    "auth": "tBHItJI5svbpez7KI4CCXg=="
  }
}
In the example above, https://random-push-service.com/some-kind-of-unique-id-1234/v2/ is the endpoint. The push service is identified by the hostname (random-push-service.com), and the path contains a unique ID for the individual user. The keys object in the subscription will be discussed in a later section.
What Does the API Look Like?
All web push services conform to the Web Push Protocol, an IETF standard defining how to make API calls to a push service. The API requires specific headers and expects message data as a stream of bytes. You can either use a library that handles this for you or implement it yourself following the protocol.
What Can the API Do?
The API's core job is to deliver a message to a user, with or without data, along with instructions on how the message should be handled during delivery. Message data must be encrypted so that push services — which could be operated by anyone — cannot read the content. This is especially important because the browser decides which push service to use, and you can't assume that service is trustworthy.
When a push message is triggered, the push service receives the API call and queues it. The message stays queued until the user's device comes online or the message expires. You can control queuing behavior with these delivery instructions:
- Time-to-live (TTL): How long a message should remain queued before it is dropped and never delivered.
- Urgency: Message priority level. This is useful when a push service is conserving a user's battery and only delivering high-priority messages.
- Topic name: Assign a topic to a message so that pending messages on the same topic are replaced by the newest one.
Step 3: Handling the Push Event
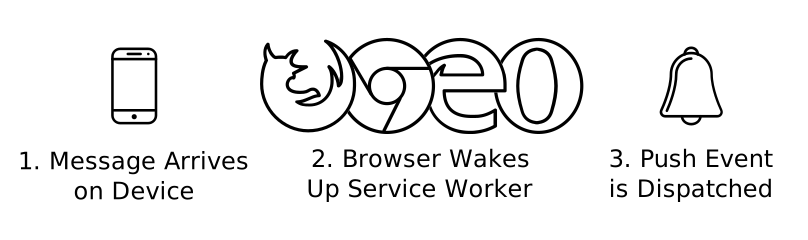
After sending a push message, it sits on the push service's server until one of two things happens: the device comes online and the message gets delivered, or the message expires and is removed. If a message expires, it is never delivered.
When delivery happens, the browser receives the message, decrypts any data, and dispatches a push event in your service worker.
A service worker is a special JavaScript file that the browser can run without your page being open — even when the browser is closed. Service workers also have access to APIs like push that aren't available in regular page scripts. Inside the service worker's push event handler, you can perform background work such as firing analytics calls, caching pages for offline use, or displaying notifications.
That's the complete push messaging flow. From the client-side subscription, to the server-side API call, to the service worker event handler — each step depends on the one before it to deliver a notification from your server to the user's device.


