Password resets are a baseline expectation for any application with user accounts, and also one of the easiest places to introduce serious security flaws. A typical implementation built on NodeJS and MySQL has to coordinate an entry link, an email submission form, an address lookup, an expiring reset token sent by email, a new-password form, and finally the credential update that lets the user sign in again. The walkthrough below covers each of those stages; the security notes apply to any language, framework, or database, even where the code samples are NodeJS-specific.
Beyond Node, Express and MySQL, the example relies on two libraries: Sequelize, a NodeJS database ORM that simplifies migrations and lets you build queries safely, and Nodemailer for sending the reset messages.
Why not JWTs, and how to install the stack
Some designs use JSON Web Tokens for the reset link, since they eliminate database storage and are simpler to ship. This example avoids that approach: JWT secrets are typically kept right in the code, which creates a single secret guarding everything — the same mistake as salting every password with an identical value. Moving that information into the database avoids it.
Start by installing Sequelize, Nodemailer and the supporting packages:
$ npm install --save sequelize sequelize-cli mysql crypto nodemailerRequire the modules in the route file that will host the reset workflow:
const nodemailer = require('nodemailer');Then configure the mail transport with your SMTP credentials:
const transport = nodemailer.createTransport({
    host: process.env.EMAIL_HOST,
    port: process.env.EMAIL_PORT,
    secure: true,
    auth: {
       user: process.env.EMAIL_USER,
       pass: process.env.EMAIL_PASS
    }
});
The example uses AWS Simple Email Service, though Mailgun or any comparable provider works. SES requires Domain Keys and authorization setup on first use; pairing it with Route 53 makes this nearly automatic, and AWS publishes a tutorial on using SES with Route 53.
Credentials should not live in code. dotenv lets you keep a local .env file, so production can use separate keys that never appear in the repository and whose permissions you can restrict to specific team members.
Storing reset tokens
Reset tokens have to be persisted, which means a table. The assumption here is that a working users table already exists; if Sequelize is not yet in the project, initialize it from the application root:
$ sequelize initThis creates the migrations and models folders along with a config file. Update the development block in that config with your local MySQL credentials, then generate the table through the Sequelize CLI:
$ sequelize model:create --name ResetToken --attributes email:string,token:string,expiration:date,used:integer
$ sequelize db:migrate
The resulting table holds four things: the user's email address, the generated token, the token's expiration, and a flag recording whether the token has been used. Under the hood, sequelize-cli executes:
CREATE TABLE `ResetTokens` (
  `id` int(11) NOT NULL AUTO_INCREMENT,
  `email` varchar(255) DEFAULT NULL,
  `token` varchar(255) DEFAULT NULL,
  `expiration` datetime DEFAULT NULL,
  `createdAt` datetime NOT NULL,
  `updatedAt` datetime NOT NULL,
  `used` int(11) NOT NULL DEFAULT '0',
  PRIMARY KEY (`id`)
) ENGINE=InnoDB AUTO_INCREMENT=21 DEFAULT CHARSET=utf8mb4 COLLATE=utf8mb4_0900_ai_ci;
Confirm the table landed correctly with your SQL client or the command line:
mysql> describe ResetTokens;
+------------+--------------+------+-----+---------+----------------+
| Field      | Type         | Null | Key | Default | Extra          |
+------------+--------------+------+-----+---------+----------------+
| id         | int(11)      | NO   | PRI | NULL    | auto_increment |
| email      | varchar(255) | YES  |     | NULL    |                |
| token      | varchar(255) | YES  |     | NULL    |                |
| expiration | datetime     | YES  |     | NULL    |                |
| createdAt  | datetime     | NO   |     | NULL    |                |
| updatedAt  | datetime     | NO   |     | NULL    |                |
| used       | int(11)      | NO   |     | 0       |                |
+------------+--------------+------+-----+---------+----------------+
7 rows in set (0.00 sec)
An ORM is worth adopting even outside this flow. It writes and escapes SQL queries for you, which produces more readable code and blocks injection attacks by default.
The request and issue routes
Create the GET route in user.js:
router.get('/forgot-password', function(req, res, next) {
  res.render('user/forgot-password', { });
});
The POST route is what the reset form hits, and it carries several deliberate security decisions:
- Return
'ok'as the status even when no matching email exists, so bots cannot probe which addresses are registered. - Token randomness matters: more random bytes make the token harder to guess. The generator here draws 64 random bytes, and never fewer than 8.
- Expire the token after one hour, capping how long a reset link stays usable.
router.post('/forgot-password', async function(req, res, next) {
  //ensure that you have a user with this email
  var email = await User.findOne({where: { email: req.body.email }});
  if (email == null) {
  /**
   * we don't want to tell attackers that an
   * email doesn't exist, because that will let
   * them use this form to find ones that do
   * exist.
   **/
    return res.json({status: 'ok'});
  }
  /**
   * Expire any tokens that were previously
   * set for this user. That prevents old tokens
   * from being used.
   **/
  await ResetToken.update({
      used: 1
    },
    {
      where: {
        email: req.body.email
      }
  });

  //Create a random reset token
  var fpSalt = crypto.randomBytes(64).toString('base64');

  //token expires after one hour
  var expireDate = new Date(new Date().getTime() + (60 * 60 * 1000))

  //insert token data into DB
  await ResetToken.create({
    email: req.body.email,
    expiration: expireDate,
    token: fpSalt,
    used: 0
  });

  //create email
  const message = {
      from: process.env.SENDER_ADDRESS,
      to: req.body.email,
      replyTo: process.env.REPLYTO_ADDRESS,
      subject: process.env.FORGOT_PASS_SUBJECT_LINE,
      text: 'To reset your password, please click the link below.\n\nhttps://'+process.env.DOMAIN+'/user/reset-password?token='+encodeURIComponent(token)+'&email='+req.body.email
  };

  //send email
  transport.sendMail(message, function (err, info) {
     if(err) { console.log(err)}
     else { console.log(info); }
  });

  return res.json({status: 'ok'});
});
The User variable above presupposes a User model connected to the database. The snippet follows Sequelize conventions; direct database queries can be substituted, though Sequelize is the better route.
The view uses Bootstrap CSS, jQuery and pug, the templating engine built into Node Express:
extends ../layout

block content
  div.container
    div.row
      div.col
        h1 Forgot password
        p Enter your email address below. If we have it on file, we will send you a reset email.
        div.forgot-message.alert.alert-success(style="display:none;") Email address received. If you have an email on file we will send you a reset email. Please wait a few minutes and check your spam folder if you don't see it.
        form#forgotPasswordForm.form-inline(onsubmit="return false;")
          div.form-group
            label.sr-only(for="email") Email address:
            input.form-control.mr-2#emailFp(type='email', name='email', placeholder="Email address")
          div.form-group.mt-1.text-center
            button#fpButton.btn.btn-success.mb-2(type='submit') Send email

  script.
    $('#fpButton').on('click', function() {
      $.post('/user/forgot-password', {
        email: $('#emailFp').val(),
      }, function(resp) {
        $('.forgot-message').show();
        $('#forgotPasswordForm').remove();
      });
    });
The page renders the form as follows:
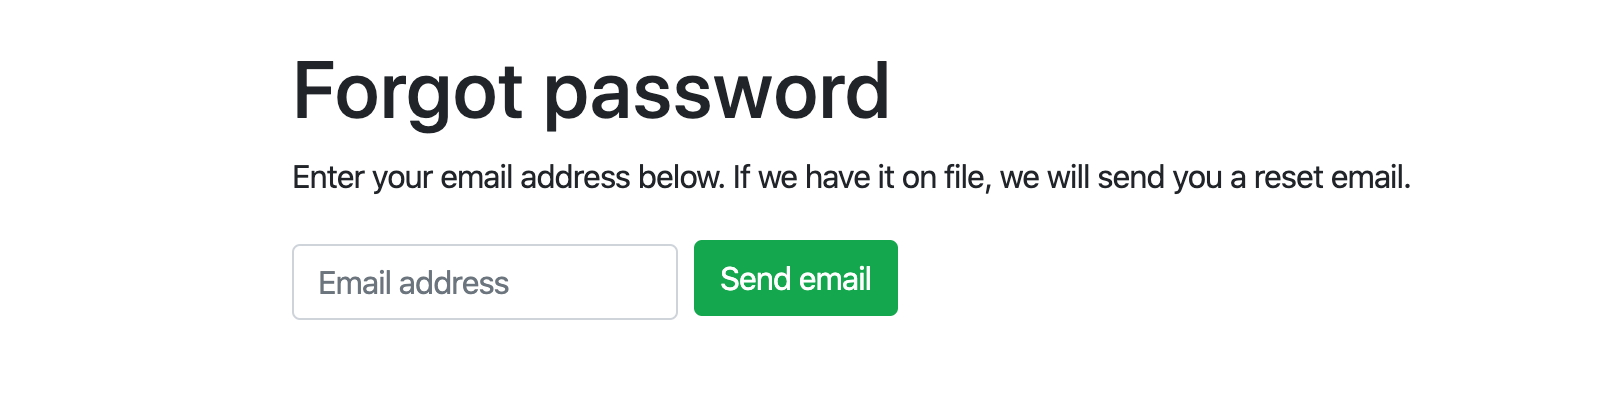
At this point a submission with a known email address should send a reset message to that address. The link inside it does nothing yet.
Consuming the token and writing the new password
Add the Sequelize.Op module to the route file:
const Sequelize = require('sequelize');
const Op = Sequelize.Op;
The GET route that handles the clicked link must validate the token carefully — a lookup should only match tokens that are neither expired nor already used.
router.get('/reset-password', async function(req, res, next) {
  /**
   * This code clears all expired tokens. You
   * should move this to a cronjob if you have a
   * big site. We just include this in here as a
   * demonstration.
   **/
  await ResetToken.destroy({
    where: {
      expiration: { [Op.lt]: Sequelize.fn('CURDATE')},
    }
  });

  //find the token
  var record = await ResetToken.findOne({
    where: {
      email: req.query.email,
      expiration: { [Op.gt]: Sequelize.fn('CURDATE')},
      token: req.query.token,
      used: 0
    }
  });

  if (record == null) {
    return res.render('user/reset-password', {
      message: 'Token has expired. Please try password reset again.',
      showForm: false
    });
  }

  res.render('user/reset-password', {
    showForm: true,
    record: record
  });
});
To keep the table small, this example deletes expired tokens on load; a large site should move that cleanup into a cron job.
The POST route handles the new password once the form is submitted, with four checks in place:
- Confirm the two password fields match and satisfy your minimum requirements.
- Re-validate the token, because it arrives from the user through the form. It must still be unused and unexpired.
- Mark the token used before resetting the password. This prevents an unforeseen event such as a server crash from leaving a live token attached to a password that has already been changed.
- Apply a cryptographically secure random salt — 64 random bytes in this implementation.
router.post('/reset-password', async function(req, res, next) {
  //compare passwords
  if (req.body.password1 !== req.body.password2) {
    return res.json({status: 'error', message: 'Passwords do not match. Please try again.'});
  }

  /**
  * Ensure password is valid (isValidPassword
  * function checks if password is >= 8 chars, alphanumeric,
  * has special chars, etc)
  **/
  if (!isValidPassword(req.body.password1)) {
    return res.json({status: 'error', message: 'Password does not meet minimum requirements. Please try again.'});
  }

  var record = await ResetToken.findOne({
    where: {
      email: req.body.email,
      expiration: { [Op.gt]: Sequelize.fn('CURDATE')},
      token: req.body.token,
      used: 0
    }
  });

  if (record == null) {
    return res.json({status: 'error', message: 'Token not found. Please try the reset password process again.'});
  }

  var upd = await ResetToken.update({
      used: 1
    },
    {
      where: {
        email: req.body.email
      }
  });

  var newSalt = crypto.randomBytes(64).toString('hex');
  var newPassword = crypto.pbkdf2Sync(req.body.password1, newSalt, 10000, 64, 'sha512').toString('base64');

  await User.update({
    password: newPassword,
    salt: newSalt
  },
  {
    where: {
      email: req.body.email
    }
  });

  return res.json({status: 'ok', message: 'Password reset. Please login with your new password.'});
});

And again, the view:

extends ../layout

block content
  div.container
    div.row
      div.col
        h1 Reset password
        p Enter your new password below.
        if message
          div.reset-message.alert.alert-warning #{message}
        else
          div.reset-message.alert(style='display:none;')
        if showForm
          form#resetPasswordForm(onsubmit="return false;")
            div.form-group
              label(for="password1") New password:
              input.form-control#password1(type='password', name='password1')
              small.form-text.text-muted Password must be 8 characters or more.
            div.form-group
              label(for="password2") Confirm new password
              input.form-control#password2(type='password', name='password2')
              small.form-text.text-muted Both passwords must match.
            input#emailRp(type='hidden', name='email', value=record.email)
            input#tokenRp(type='hidden', name='token', value=record.token)
            div.form-group
              button#rpButton.btn.btn-success(type='submit') Reset password

  script.
    $('#rpButton').on('click', function() {
      $.post('/user/reset-password', {
        password1: $('#password1').val(),
        password2: $('#password2').val(),
        email: $('#emailRp').val(),
        token: $('#tokenRp').val()
      }, function(resp) {
        if (resp.status == 'ok') {
          $('.reset-message').removeClass('alert-danger').addClass('alert-success').show().text(resp.message);
          $('#resetPasswordForm').remove();
        } else {
          $('.reset-message').removeClass('alert-success').addClass('alert-danger').show().text(resp.message);
        }
      });
    });
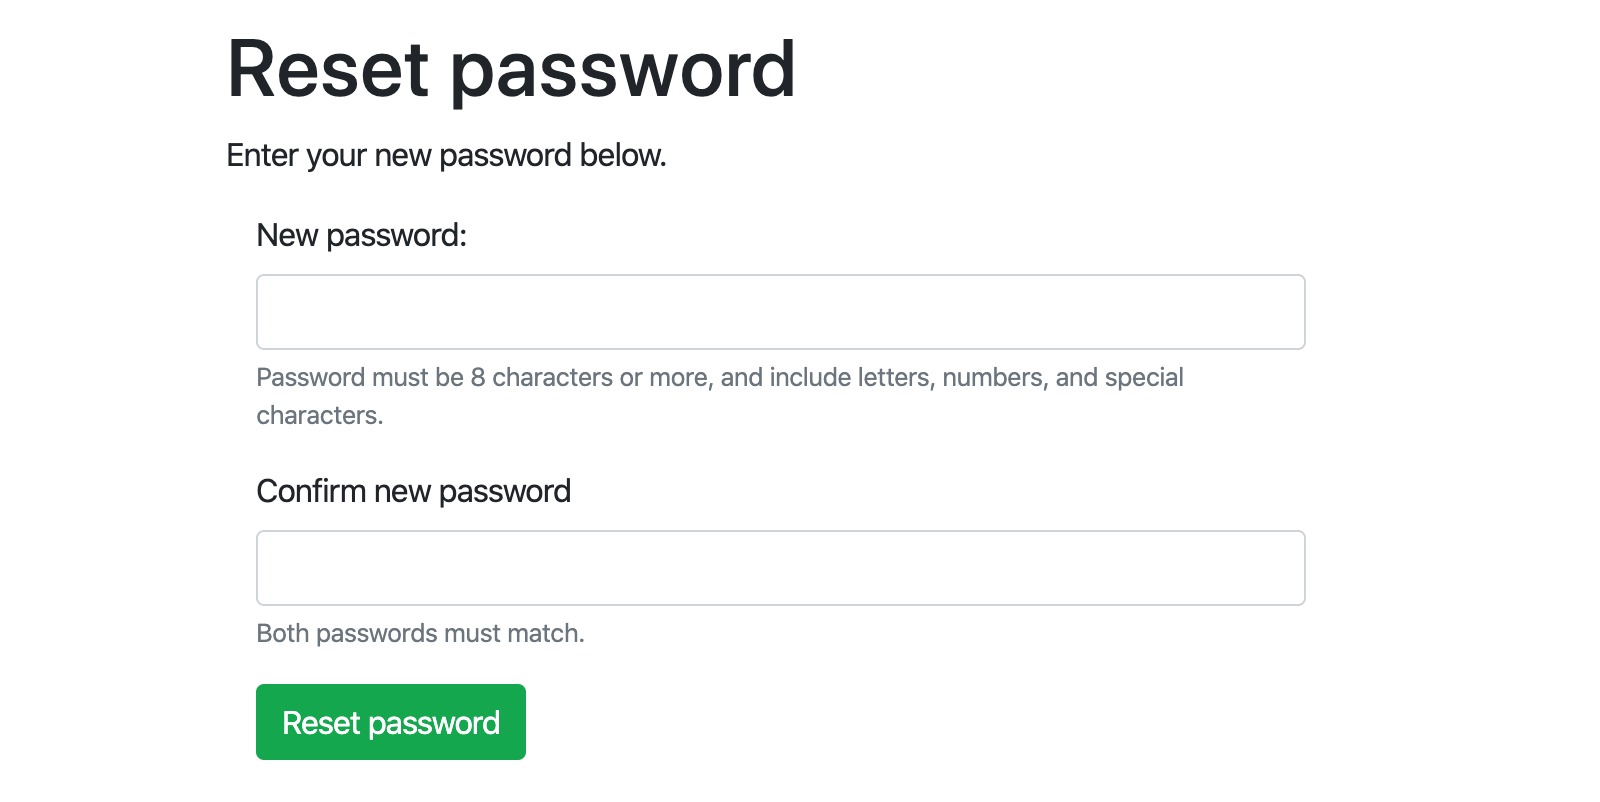
The finished screen:
Wiring it up and testing
Add a link to this flow from the login page to complete it. From there, test each stage of the process: verify that tokens expire quickly and that their status is updated correctly as the workflow moves from issued to consumed.
Further directions include Wikipedia's summary of cryptographic security for the underlying theory, 2FA for hardening authentication more broadly, and PassportJS, a NodeJS middleware offering third-party login strategies such as Google and Facebook if you would rather not own the reset flow at all.